


C4+
Table of contents
 Loading...
kÉï=~ë=çÑW=
NMKOMMR
bеЦдблЬ
IMPORTANT:
• In case of faults which you are unable to eliminate with the help
of this manual, please contact our Customer Service Center.
• It is essential that you take this Service Manual along with you
on every customer call.
Furthermore, you must always have the spare parts list and wiring dia-
grams with you as well.
You can order additional copies of this Service Manual under the
• order number 58 77 977 from our department DZL 1 in Bensheim.
See reverse side of manual for address.
`O
H
I=`P
H
I=`Q
H
I=`R
H
I=jN
H
pЙкобЕЙ=j~ем~д===== =


kÉï=~ë=çÑW=
NMKOMMR
bеЦдблЬ
`O
H
I=`P
H
I=`Q
H
I=`R
H
I=jN
H
pЙкобЕЙ=j~ем~д===== =
`Q
H
`P
H
`O
H
`R
H
jN
H


58 77 977 D 3370
D 3370.076.01.06.02 10.2005
I
Contents
bеЦдблЬ
1 Important information..................................................................................................... 1 – 1
1.1 Technical data ...................................................................................................... 1 – 2
1.2 Warning and safety information............................................................................ 1 – 2
1.3 Symbols................................................................................................................ 1 – 2
1.4 Abbreviations........................................................................................................ 1 – 3
1.5 Minimum configuration ......................................................................................... 1 – 4
1.6 Where to save user-specific data in the C2
+
, C3
+
, C4
+
, C5
+
, M1
+
...................... 1 – 4
2 Overview of modules and PCBs.................................................................................... 2 – 1
3 Points to observe during assembly................................................................................ 3 – 1
3.1 Patient chair ......................................................................................................... 3 – 2
3.2 Protective ground / electronic ground................................................................... 3 – 2
3.3 MV1 / AD3 ............................................................................................................ 3 – 2
3.4 Connecting the water Unit/assistant element: ...................................................... 3 – 2
3.5 Assistant element: ................................................................................................ 3 – 3
4 What happens after switch-on? ..................................................................................... 4 – 1
4.1 Sequence of events.............................................................................................. 4 – 2
4.2 Checking the CAN BUS ....................................................................................... 4 – 5
4.3 CAN BUS wiring diagram ..................................................................................... 4 – 8
5 Description of the functions of ... ................................................................................... 5 – 1
5.1 Control panel / PCB AP........................................................................................ 5 – 2
5.2 Chair control/PCB CJ ........................................................................................... 5 – 3
6 How it works ... .............................................................................................................. 6 – 1
6.1 ... Water supply .................................................................................................... 6 – 2
6.2 ... Tumbler filling ................................................................................................... 6 – 2
6.3 ... Cuspidor flushing.............................................................................................. 6 – 2
6.4 ... Motor SL / EL1 ................................................................................................ 6 – 4
6.5 ... highspeed handpiece ....................................................................................... 6 – 6
6.6 ... ultrasound......................................................................................................... 6 – 8
6.7 ... Sprayvit ............................................................................................................ 6 – 9
6.8 ... Polylight in the assistant element ..................................................................... 6 – 9
6.9 ... Polylight Mini LED in the assistant/dentist element.......................................... 6 – 9
6.10 ... X-ray image viewer........................................................................................... 6 – 10
7 Points to observe when changing the ........................................................................... 7 – 1
7.1 …ADX/CJ board Serial No.
≥ 70,000 .................................................................. 7 – 3
7.2 ... ADX PCB in the dentist element ...................................................................... 7 – 3
7.3 ... Water heating voltage for Sprayvit ................................................................... 7 – 3
7.4 ... PCB HP in the assistant element ..................................................................... 7 – 3

58 77 977 D 3370
II D 3370.076.01.06.02 10.2005
Contents
8 Service LEDs................................................................................................................. 8 – 1
9 Option list....................................................................................................................... 9 – 1
10 Reading out service codes ... ........................................................................................ 10 – 1
10.1 on the display of the dentist element.................................................................... 10 – 2
10.2 ... using a notebook link to the C2
+
, C3
+
, C4
+
, C5
+
, M1
+
..................................... 10 – 3
11 Service code listings...................................................................................................... 11 – 1
11.1 Service messages of the connection box (AK) ................................................... 11 – 2
11.1.1 Software version: 1.6 - 5.8, revision date 08.2004
11.2 Service messages of the dentist element (AE) ................................................... 11 – 6
11.2.1 Software version: 1.5 - 2.37/3.37, revision date 01.2005
11.3 Service messages of the dentist panel (AP) ....................................................... 11 – 14
11.3.1 C2
+
– C5
+
: Software version: 1.7 - 5.8, revision date 08.2004
M1
+
: Software version 10.3 , revision date 08.2004
11.4 Service messages of the assistant element (HE) ................................................ 11 – 15
11.4.1 Software version: 1.4 - 2.3, revision date 10.2004
11.5 Service messages of the water unit (WE) ............................................................ 11 – 19
11.5.1 Software version: 1. - 3.2, revision date 08.2005

C2
+
, C3
+
, C4
+
, C5
+
, M1
+
1 Important information

58 77 977 D 3370
1 – 2 D 3370.076.01.06.02 10.2005
1 Important information
1.1 Technical data
Model designation C2
+
, C3
+
, C4
+
, C5
+
, M1
+
, M1
+
Power supply 230V AC 50Hz,
115V AC 50/60Hz
Nominal current 4.5A at 230V
9.5A at 115V
Main unit fuse for 230V AC: T 6.3A H , 250V AC, Order No. 10 77 452
for 100/115 V AC: T 10A H, 250V AC, Order No. 10 77 460
1.2 Warning and safety information
Caution! Prior to opening the unit, connecting a measuring instrument or replacing
parts: Switch the unit OFF.
Protective ground connection The building water supply is at protective ground potential and must not touch
the fuse box of the chair.
Warning! If there is a protective ground contact, the patient or user may be exposed to
tension in the event of a fault - risk of electric shock!
Operational reliability To ensure operational reliability, the use of mobile telephones in the practice
or hospital area must be prohibited.
Troubleshooting: If you encounter difficulties, search in the error catalog first and proceed
according to the instructions given there.
1.3 Symbols
C2
+
dentist element
C3
+
dentist element
C4
+
dentist element
C5
+
dentist element
M1
+
dentist element
C2
C2
+
+
C3
C3
+
+
C4
C4
+
+
C5
+
M1
+
bеЦдблЬ
58 77 977 D 3370
D 3370.076.01.06.02 10.2005
1 – 3
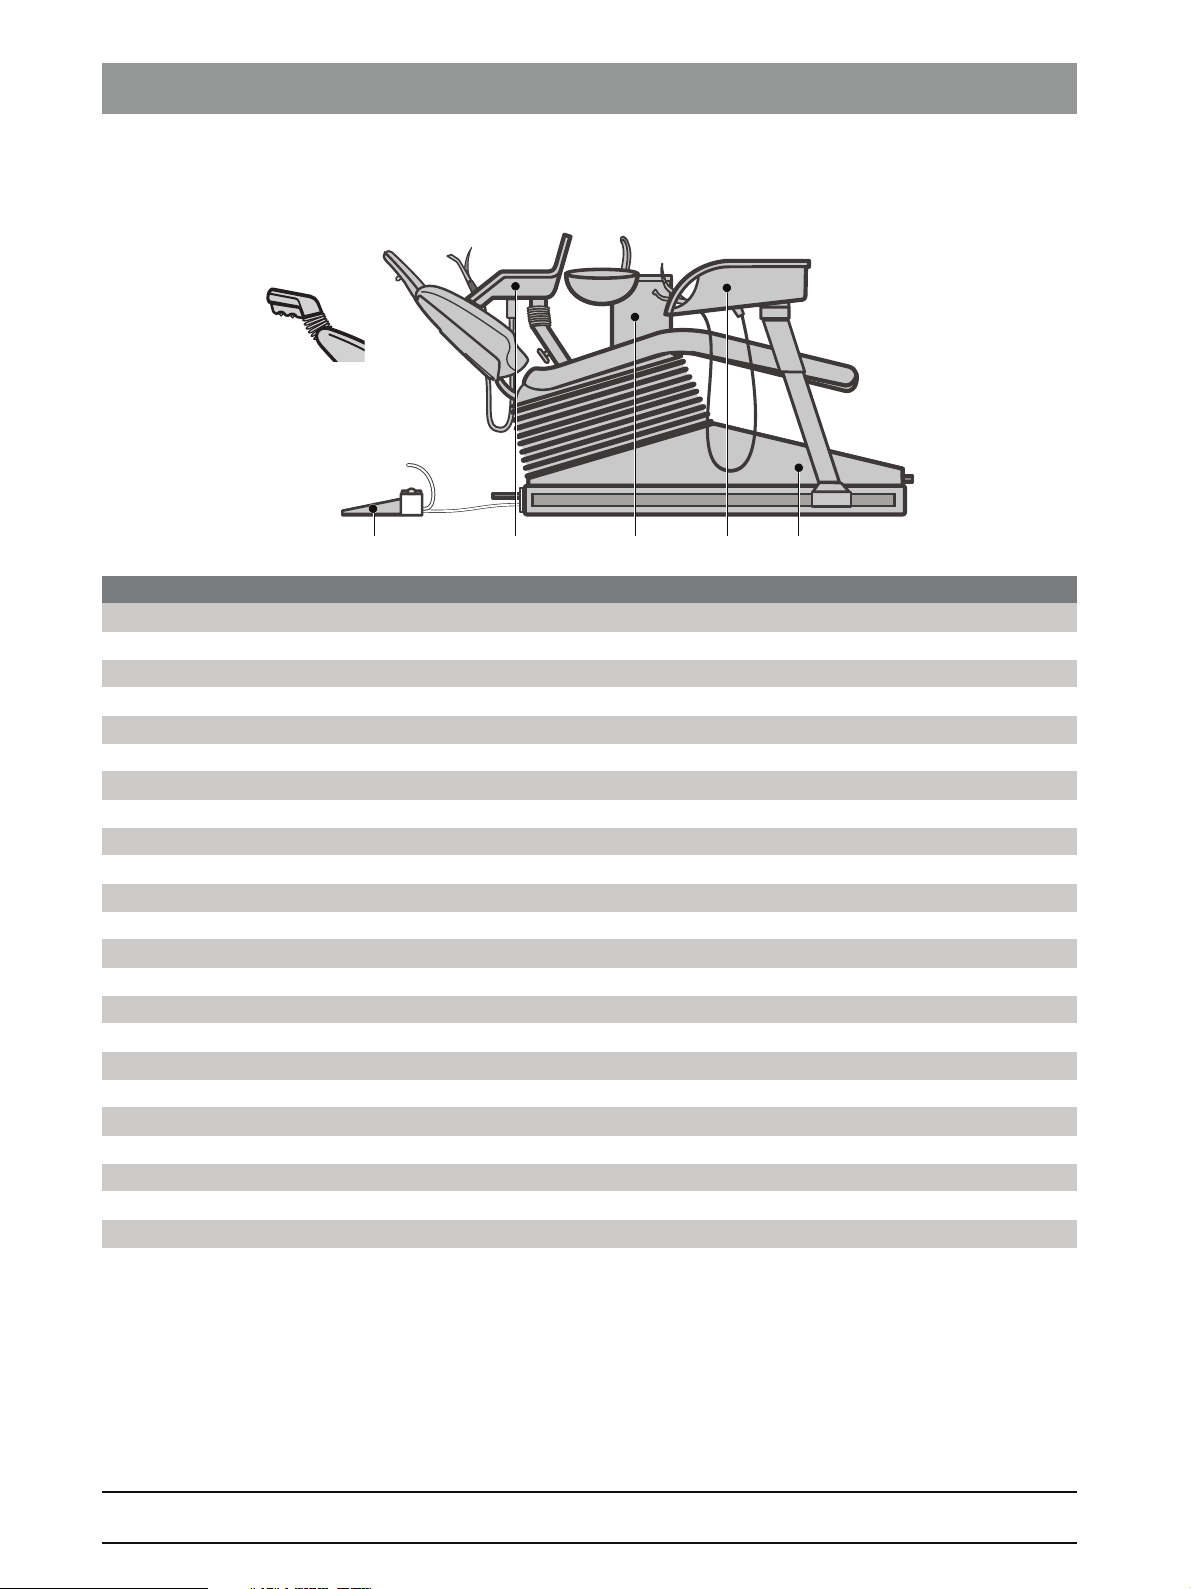
1 Important information
Assistant element
Patient chair
Water unit
1.4 Abbreviations
Dent. el. Dentist element
AK Connection box
COM Serial interface
EMC Electromagnetic compatibility
PCB Printed circuit board
FS Foot switch
FT Foot button
GND Ground
Ass. el. Assistant element
HW Hardware
KL Holder
L Cable
LCD Liquid Crystal Display
LED Light Emitting Diode
PC Personal Computer
S Switch
SDI Sirona Dental Interface (electrical, pneumatic, hydraulic plug connection)
ST Patient chair
SW Software
T Transformer
TR Support arm
VAC AC voltage
VDC DC voltage
WE Water unit
X Connector
+V
iso
Galvanically isolated voltage

58 77 977 D 3370
1 – 4 D 3370.076.01.06.02 10.2005
1 Important information
1.5 Minimum configuration
1.6 Where to save user-specific data in the
C2
+
, C3
+
, C4
+
, C5
+
, M1
+
Component PCB Hardware
version
Software version
C2
+
Software version
C3
+
/C4
+
Software version
C5
+
Software version
M1
+
Dentist element ADX - 2.19 2.23 2.29 2.30
Dentist element AL - 4.0 4.0 4.0 4.0
Assistant element HC - 2.1 2.2 2.2 2.2
Water unit WE - 3.0 3.1 3.1 3.1
For PC networking PCB Hardware
version
Software version
C2
+
Software version
C3
+
/C4
+
Software version
C5
+
Software version
M1
+
Connection box CJ - 5.3 5.5 5.7 5.7
Dentist element AP - 5.2 5.4 5.7 10.2
Board
(Part no., designation)
Stored settings Default value
Dentist element
(42 00 221, ADX)
Mode dialog:
Language (Engl., D, I, F, E)
Pressure indication (bar/PSI)
Cursor control (On/Off)
Foot switch mode (On/Off - adjustable)
Purge time (60 sec. to 120 sec.)
Service mode / Start - Stop)
Max. light voltage per instrument
Cooling air for electric motor
Saline pump (holders 2, 3, 4, 5, 6, Off) C2
+
/M1
+
Saline pump (holders 2, 3, 4, 5, Off) C3
+
/C4
+
/C5
+
SIVISION (On/Off)
-
English
PSI
ON
adjustable
120 sec.
STOP
3.6V
100% of input pressure
OFF
OFF
OFF
Instrument parameters:
Instrument light (On/Off)
Spray (On/Off)
Direction of rotation (CW/CCW)
(storable, but is set to the default value the next time the
treatment center is turned on for safety reasons)
US intensity
Highspeed handpiece intensity
Intensity of electric motor 1
Intensity of electric motor 2
HF intensity
OFF
High-speed handpiece: ON
Electric motor: OFF
US: ON
(not programmable)
CW
20
3.5 ±0.1 bar
40,000 rpm
20,000 rpm
20
Miscellaneous:
Sprayvit ventilation (Yes/No) NO

bеЦдблЬ
58 77 977 D 3370
D 3370.076.01.06.02 10.2005
1 – 5
1 Important information
Assistant element
(42 00 650, ass. el.)
Mode dialog:
--------------------
miscellaneous:
SPRAYVIT ventilation (Yes/No) NO
Water unit
(
42 00 627,
WE Air Water Sep.)
(42 00 619, WE)
Mode dialog:
Tumbler filling with
S program (On/Off)
Cuspidor flushing with
S program (On/Off)
SIROLUX U-POS
(Sirolux switched on if dentist element is in place)
OFF
ON
OFF
Miscellaneous:
Tumbler filling time
(2, 4, 6, 8, 10 sec.)
Flushing time
(20, 40, 60, 90, 150, 300, 360, 420 sec.)
SIROLUX intensity
(20, 40, 80, 90, 100%)
Suction intensity (4 levels)
SIROLUX status with chair programs:
Program S (On/Off)
Program 0 (On/Off)
Program 1 (On/Off)
Program 2 (On/Off)
6 sec.
60 sec.
80%
100%
OFF
OFF
ON
ON
Chair
connection box
(58 63 480, CJ)
Mode dialog:
# key (switch/button)
Miscellaneous:
Chair programs 0, S, 1, 2, for users A and B;
(Position of: lift, backrest, travel track, tilting part)
User (A/B)
Switch
Factory program
A
Dentist panel
(33 17 091, AP)
The dentist panel is not used for saving any data!
Board
(Part no., designation)
Stored settings Default value


C2
+
, C3
+
, C4
+
, C5
+
, M1
+
2 Overview of modules
and PCBs

58 77 977 D 3370
2 – 2 D 3370.076.01.06.02 10.2005
2 Overview of modules and PCBs
STAEHEFS WE
`O
H
Component PCB / module
Dentist element (AE) AP = Control panel
ADX = Control PCB
AL = SIRONA motor SL module
AU = SIROSON module
HF = HF module
PL = Polylux
MI = Mini LED
CC = IR PCB
Assistant element (HE) HEP = Control panel
HC = Control PCB
HP = Power supply PCB
HI = Flexible PCB
PL = POLYLUX
MI = Mini LED
Water unit (WE) WE = Control PCB
Patient chair (ST) DI = SIROLUX
CJ = Control ST
CF = Fuse PCB
SR = Relay PCB
CK = Hand switch PCB
SL = Wiring PCB
KS = 4-way foot control
Foot switch (FS) CFS = Foot switch PCB

bеЦдблЬ
58 77 977 D 3370
D 3370.076.01.06.02 10.2005
2 – 3
2 Overview of modules and PCBs
STAEAss. FS WE
`P
H
Component PCB / module
Dentist element (AE) AP = Control panel
ADX = Control PCB
AL = SIRONA motor SL module
AU = SIROSON module
CC = IR PCB
Assistant element (HE)
HEP = Control panel
HC = Control PCB
HP = Power supply PCB
RK = IR PCB
PL = Polylux
MI = Mini LED
Water unit (WE) WE = Control PCB
Patient chair (ST) DI = SIROLUX
CJ = Control ST
CF = Fuse PCB
SR = Relay PCB
SL = Wiring PCB
CK = Hand switch PCB
KS = 4-way foot control
Foot switch (FS) CFS = Foot switch PCB
58 77 977 D 3370
2 – 4 D 3370.076.01.06.02 10.2005
2 Overview of modules and PCBs
STAEAss. FS WE
`Q
H
Component PCB / module
Dentist element (AE) AP = Control panel
ADX = Control PCB
AL = SIRONA motor SL module
AU = SIROSON module
CC = IR PCB
Assistant element (HE) HEP = Control panel
HC = Control PCB
HP = Power supply PCB
RK = IR PCB
PL = POLYLUX
MI = Mini LED
Water unit (WE) WE = Control PCB
Patient chair (ST) DI = SIROLUX
CJ = Control ST
CF = Fuse PCB
SR = Relay PCB
SL = Wiring PCB
CK = Hand switch PCB
KS = 4-way foot control
Foot switch (FS) CFS = Foot switch PCB

bеЦдблЬ
58 77 977 D 3370
D 3370.076.01.06.02 10.2005
2 – 5
2 Overview of modules and PCBs
STAEAss.
FS
WE
`R
H
Component PCB / module
Dentist element (AE) AP = Control panel
ADX = Control PCB
AL = SIRONA motor SL module
AU = SIROSON module
CC = IR PCB
Assistant element (HE) HEP = Control panel
HC = Control PCB
HP = Power supply PCB
RK = IR PCB
PL = POLYLUX
MI = Mini LED
Water unit (WE) WE = Control PCB
WV = WE and video interface
DI = SIROLUX
Patient chair (ST) CJ = Control ST
CF = Fuse PCB
SR = Relay PCB
SL = Wiring PCB
CK = Hand switch PCB
KS = 4-way foot control
Foot switch (FS) CFS = Foot switch PCB

58 77 977 D 3370
2 – 6 D 3370.076.01.06.02 10.2005
2 Overview of modules and PCBs
jN
H
ST
AE
FS
WEAss.
Component PCB / module
Dentist element (AE) AP = Control panel
ADX = Control PCB
AL = SIRONA motor SL module
AU = SIROSON module
HF = HF module
PL = Polylux
MI = Mini LED
CC = IR PCB
Assistant element (HE) HEP = Control panel
HC = Control PCB
HP = Power supply PCB
HI = Flexible PCB
PL = POLYLUX
MI = Mini LED
Water unit (WE) WE = Control PCB
Patient chair (ST) DI = SIROLUX
CJ = Control ST
CF = Fuse PCB
SR = Relay PCB
CK = Hand switch PCB
SL = Wiring PCB
KS = 4-way foot control
Foot switch (FS) CFS = Foot switch PCB

C2
+
, C3
+
, C4
+
, C5
+
, M1
+
3 Points to observe during assembly
58 77 977D 3370
3 – 2 D 3370.076.01.06.02 10.2005
3 Points to observe during assembly
3.1 Patient chair
The patient chair can be moved without dentist element only if the
4-way foot control is installed.
3.2 Protective ground / electronic
ground
An equipotential bonding conductor must not be connected. If
present, isolate it!!
Measure the protective ground against electronic ground.
Measure continuity from A to B:
The continuity tester must not beep.
A meter must show a reading of ∞ Ω.
3.3 MV1 / AD3
During assembly, decide whether the MV1 (version with disinfec-
tion system) or pressure reducer AD3 (version without disinfec-
tion system) is to be installed (see installation instructions).
3.4 Connecting the water Unit/assis-
tant element:
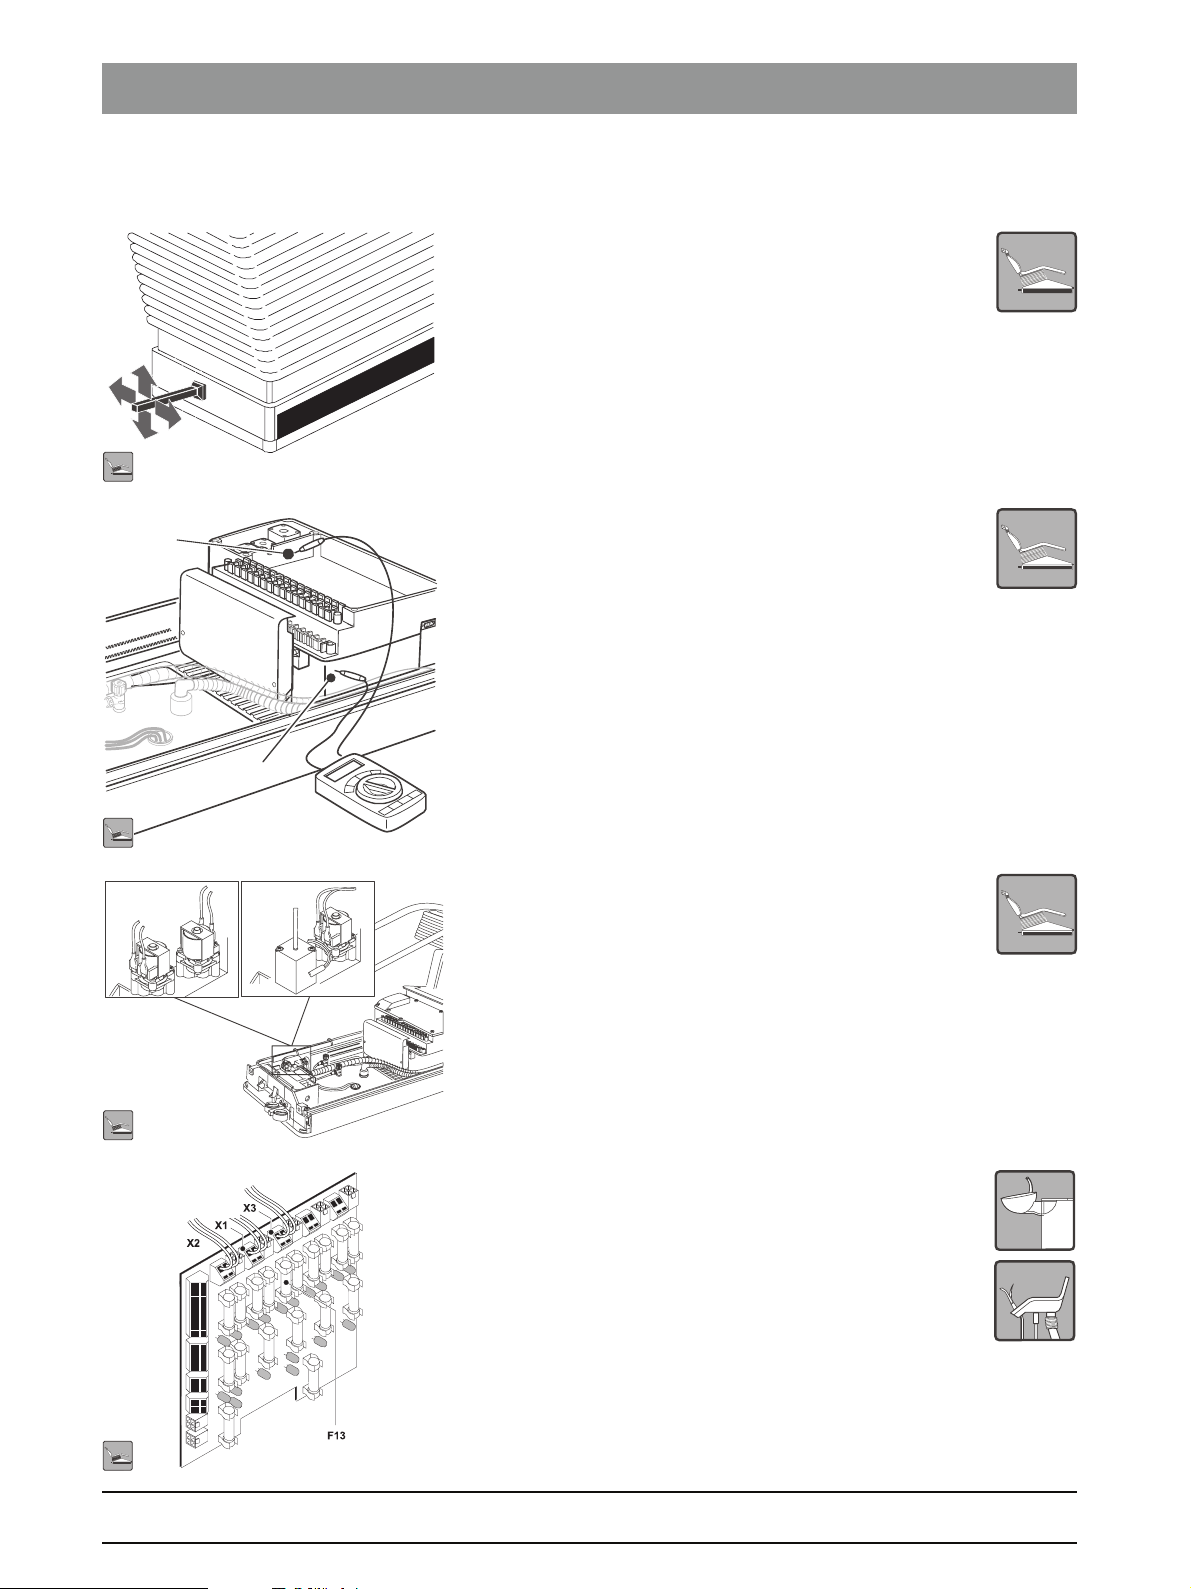
The 16V supply cables must be connected according to the color
coding to terminals X1, X2 and X3 on PCB CF in the connection
box.
A
B
AD3
MV1
Water unit
X1.1 = gray
X1.2 = pink
Dentist element
X2.1 = gray
X2.2 = pink
Assistant element
X3.1 = gray
X3.2 = pink

3
58 77 977D 3370
D 3370.076.01.06.02 10.2005
3 – 3
3 Points to observe during assembly
bеЦдблЬ
3.5 Assistant element:
The 16VAC and 24VAC cables are interconnected at the neu-
tral conductors. If the conductors are switched, there will be
a short-circuit and fuse F 13 on PCB CF will blow. If no
medium time-lag fuse is fitted, PCB HP in the assistant ele-
ment may be destroyed.
General Ensure proper installation of hoses and cables, do not allow them to be
crushed.
If hoses are interchanged, water will penetrate into the air supply system. This
may result in a failure of solenoid valves.
Crushed hoses and cables may cause failures on the entire treatment center.
Check the position of cables and media hoses before tightening any nuts.
EMC installation work EMC work that has not been performed correctly may result in faults which
are difficult to detect later on.
When all the installation work has been completed, measure the contact
resistance between protective ground and electronic ground (see 3.2 or
installation instructions).


C2
+
, C3
+
, C4
+
, C5
+
, M1
+
4 What happens after switch-on?

58 77 977 D 3370
4 – 2 D 3370.076.01.06.02 10.2005
4 What happens after switch-on?
4.1 Sequence of events
The unit transformer T1 is supplied with power via the unit main
switch S1.
The transformer supplies a voltage of 25VAC which is then rectified.
This results in a DC voltage (approx. + 35VDC).
Components AE, HE, WE and the chair (AK) are now supplied with + 35VDC
via fuse PCB CF, i.e., the required voltages (e.g., + 5V for logic, + 24V for
solenoid valves) are generated on the PCBs in the different components.
The 16VAC and 24VAC voltages in the unit are used primarily to power the
SPRAYVIT, water heater, camera supply and the halogen Polylight.
When the supply voltages are applied to the different components, the soft-
ware on the PCBs powers up (boot procedure).
A self-test is performed on the treatment center in this phase, and is audible
(for example, solenoid valves respond and relays trip).
Current is measured to detect whether any of the components (solenoid
valve, relay, or motor) has 1. a short-circuit, 2. an open circuit.
These evaluations are written into the service info memory of the individual
components AE, HE, WE and chair (AK).
CAUTION
A message relating to an open circuit does not necessarily indicate a fault. If
an open circuit is detected and the component is nevertheless functioning
completely, the current measurement is only out of tolerance.
When the self-test has been completed, the LCD indicates READY.
The clock is also displayed
NOTE
i
The clock chip is located on PCB CJ in the connection box (chair).
If the clock is functioning properly, CAN communication between the compo-
nents is generally in order.
The software recognizes ...: :
1. ... whether the treatment center is in a sanitation mode.
This signal comes from the water unit, PCB WE, via CAN communication.
If this is the case, it must be terminated or properly interrupted.
Interrupt sanitizing by simultaneously pressing the SPRAY ON/OFF and
CHIP BLOWER keys, AP SW version 5.4 and higher press intensity
key for 3 sec. (assistant element:press the SAN key for 3 sec.).
S1
T1
1
SAN
BA
R
BAR
BA
R
BAR
5
0
50
5
0
50
P
S
I
PSI
P
S
I
PSI
BA
R
BAR
BA
R
BAR
5
0
50
5
0
50
P
S
I
PSI
P
S
I
PSI
BA
R
BAR
BA
R
BAR
5
0
50
5
0
50
P
S
I
PSI
P
S
I
PSI
BA
R
BAR
BA
R
BAR
5
0
50
5
0
50
P
S
I
PSI
P
S
I
PSI
"READY" indicates that the treatment center is ready to
operate. This does not mean, however, that the treatment
center self-tests have been completed without errors.
READY
CJ
Intensity key 1
SW version 5.4 and higher
in the AP

4
58 77 977 D 3370
D 3370.076.01.06.02 10.2005
4 – 3
4 What happens after switch-on?
bеЦдблЬ
. 2. ... whether the instrument configuration at the instrument
flanges has changed since the last power ON.
This is detected by the different instrument hoses and their
coding.
If it is determined during power-up that the instrument config-
uration differs from the stored configuration (on the ADX PCB),
the instrument values will be set as follows:
– Highspeed handpiece to full power
– 1. Motor to 40,000 rpm
– 2. Motor to 20,000 rpm
– Ultrasound to 20
CAUTION
The heater and the light in the SPRAYVIT remain turned off during
initial start-up.
The water pump must execute at least 20 strokes before the heat-
ing and light are enabled. This applies to the SPRAYVIT both in
the dentist element and in the assistant element.
If the ADX PCBs in the dentist element and HC are replaced, the
pump must execute an additional 20 strokes.
When the self-test has been completed, the individual components can com-
municate with each other via a data bus system.
This system is called: "CAN BUS"
CAN BUS, data communication between PCBs C2
+
,C3
+
, C4
+
,
M1
+
,
R297
X30
P21
ADX
HC
HP
PCB
CJ
PCB
WE
PCB
CJ
PCB
CJ
PCB
CJ
PCB
CJ
PCB
HC
PCB
HF
PCB
ADX
PCB
ADX
PCB
AP
PCB
HF
Option
C2
+
M1
+
Option
C2
+
l
M1
+
Jumper
plugs
must
be
present
Jumper
plugs
must
be
present

58 77 977 D 3370
4 – 4 D 3370.076.01.06.02 10.2005
4 What happens after switch-on?
CAN BUS, data communication between PCBs C5
+
The four components chair, dentist element, assistant element and water
unit are interconnected via a CAN serial interface.
The individual CAN drivers (transmitters and receivers for data communica-
tion) are arranged in the following order:
The individual signals - for example, cuspidor flushing, tumbler filling, instru-
ment motor ON and clock time - are transferred and relayed from component
to component via this system.
Chair = board CJ
Water unit = board WE
Assistant element = board HF
Dentist element = board ADX
Dentist element = board AP
Assistant element = board HC

4
58 77 977 D 3370
D 3370.076.01.06.02 10.2005
4 – 5
4 What happens after switch-on?
bеЦдблЬ
4.2 Checking the CAN BUS
Is the clock running ?
If not, check whether the CAN connections are crushed, and
check for short-circuits and loose pins on the connectors.
NOTE
i
Tip: The clock chip is situated on PCB CJ in the chair (connection
box).
Turn on SIROLUX FANTASTIC from the dentist side and from the
assistant side.
NOTE
i
Tip: In this way you check the CAN cabling and the functioning of
many PCBs.
The "Turn on SIROLUX" key information is passed from the den-
tist element panel (AP) to the connection box (CJ) and from there
on to the water unit (WE).
Here PCB WE drives the SIROLUX dimmer PCB.
It then turns the SIROLUX light on.
In addition, the relevant LEDs on the panels are activated by a
CAN message from the water unit.
Check the CAN BUS using the foot switch.
Move the chair with the cursor.
In this way you can test the section between foot switch, chair (connection
box) and panel.
NOTE
i
Information: You can move the chair with the 4-way foot control.
Tip:The 4-way foot control is not connected to the CAN; the chair also moves
when communication is no longer possible.
L
BAR
BAR
BAR
BAR
5050
P
S
I
PSI
P
S
I
PSI
BARBAR
50
50
50
50
P
S
I
PSI
P
S
I
PSI
CJ
Loading...