

IAN 273091
HANDHELD STEAM CLEANER SDR 1100 A2
HANDHELD STEAM CLEANER
Operating instructions
ÅNGTVÄTT
Bruksanvisning
KÄSIKÄYTTÖINEN HÖYRYPESURI
Käyttöohje
HANDDAMPFREINIGER
Bedienungsanleitung
RĘCZNE, PAROWE URZĄDZENIE
CZYSZCZĄCE
Instrukcja obsługi
RANKINIS GARŲ VALYTUVAS
Naudojimo instrukcija
GB / IE Operating instructions Page 1
FI Käyttöohje Sivu 17
SE Bruksanvisning Sidan 33
PL Instrukcja obsługi Strona 49
LT Naudojimo instrukcija Seite 65
DE / AT / CH Bedienungsanleitung Seite 81
Before reading, unfold the page containing the illustrations and familiarise yourself with all functions of
the device.
Käännä ennen lukemista kuvallinen sivu esiin ja tutustu seuraavaksi laitteen kaikkiin toimintoihin.
Vik ut bildsidan och ha den till hands när du läser igenom anvisningarna och gör dig bekant med
apparatens / maskinens funktioner.
Przed przeczytaniem proszę rozłożyć stronę z ilustracjami, a następnie proszę zapoznać się z wszystkimi
funkcjami urządzenia.
Prieš skaitydami atsiverskite lapą su paveikslėliais ir susipažinkite su visomis prietaiso funkcijomis.
Klappen Sie vor dem Lesen die Seite mit den Abbildungen aus und machen Sie sich anschließend mit allen
Funktionen des Gerätes vertraut.
A
B

1
SDR 1100 A2
GB
IE
Contents
Introduction ...................................................2
Copyright ............................................................... 2
Intended use ............................................................ 2
Warning notes ........................................................... 3
Safety guidelines ..............................................4
Package contents ..............................................6
Description of appliance/accessories ..............................7
Technical data .................................................7
Operating the appliance ........................................8
Filling/refilling with water .................................................. 8
Operating the appliance ..................................................10
Areas of application ..................................................... 11
Fitting/removing attachments ...............................................11
Child safety lock ........................................................ 13
Cleaning .....................................................13
Storage .....................................................14
Troubleshooting ..............................................14
Disposal of the appliance .......................................15
Disposal of packaging materials ............................................ 15
Notes on the Declaration of Conformity ...........................15
Warranty ....................................................16
Service ......................................................16
Importer .....................................................16
2
SDR 1100 A2
GB
IE
Introduction
Congratulations on the purchase of your new appliance.
You have selected a high quality product. The operating instructions are part of
this product. They contain important information on safety, usage and disposal.
Before using the product, familiarise yourself with all handling and safety instructions. Use the product only as described and for the range of applications specified.
Keep these operating instructions in a safe place. Please also pass these operating
instructions on to any future owner(s).
Copyright
This documentation is protected by copyright.
Any copying or reproduction, including in the form of extracts, or any reproduction
of images (even in a modified state), is permitted only with the written authorisation of the manufacturer.
Intended use
This appliance is a steam cleaner designed for the removal of dirt and stains in
domestic households, for example ...
– smooth surfaces: work surfaces, tiles, glazed tiles, windows, mirrors
– hard-to-reach areas: corners, joints, blinds, WC, bathroom fittings, etc.
– textiles: curtains, cushions, clothing, car seats.
This appliance is not intended:
– for outdoor use,
– for use with liquids other than water,
– for use in commercial or industrial applications.
WARNING
Danger if not used for the intended purpose!
The appliance may pose a hazard if it is not used for its intended purpose
and/or if it is used for any other purpose.
► Use the appliance only for its intended purpose.
► Observe the procedures described in these operating instructions.
3
SDR 1100 A2
GB
IE
NOTE
► Incorrect use of the appliance and/or using it for an alternative purpose
can be dangerous. Use the appliance only for its intended purpose.
Observe the procedures described in these operating instructions.
Claims of any kind for damage resulting from misuse, incompetent repairs,
unauthorised modification or the use of unauthorised spare parts will not
be accepted. The risk shall be borne solely by the user.
Warning notes
The following warnings are used in these operating instructions:
WARNING
A warning at this hazard level indicates a potentially
hazardous situation.
Failure to avoid this hazardous situation could result in physical injury.
► Follow the instructions in this warning to prevent physical injury.
CAUTION
A warning at this hazard level indicates potential property
damage.
Failure to avoid this situation could result in property damage.
► Follow the instructions in this warning to prevent property damage.
NOTE
► A note provides additional information that will assist you in using the
appliance.

4
SDR 1100 A2
GB
IE
Safety guidelines
RISK OF ELECTRIC SHOCK
► Connect the appliance only to mains power sockets supplying a mains
power voltage of 220–240 V ~ / 50 Hz.
► In the event of operating malfunctions, and before cleaning the appliance,
disconnect the plug from the mains power socket.
► To disconnect the power cable, always pull the plug from the socket, do not
pull the power cable itself.
► Do not kink or crush the power cable, and route the cable so that it cannot
be stepped on or tripped over.
► To avoid risks, arrange for defective plugs and/or power cables to be
replaced at once by qualified technicians or our Customer Service
Department.
► Ensure that the power cable does not become wet or moist during use.
Route the cable in such a way that it cannot be crushed or damaged.
► Should the appliance, the power cable or the plug become damaged,
arrange for them to be repaired by Customer Services to avoid hazardous
situations.
► Disconnect the appliance from the mains power socket before filling it
with water, changing accessories or cleaning it.
► Use the appliance only in dry indoor areas, not outdoors.
► Never submerse the appliance in water or other liquids!
► Never aim the steam jet directly at electrical appliances or equipment
which contains electrical components, such as the interior of ovens.
► Never leave a heat-generating device unattended! After use or during work
pauses, always remove the plug from the mains power socket. The appliance
heats up and generates steam pressure continuously when the plug is con-
nected to a mains power socket!
► Use the appliance only with dry hands and never without shoes (i.e. not
barefoot). This will help reduce the effect of an electric shock in the event
of a malfunction.
► Never aim the appliance at moisture-sensitive objects.
► This appliance may be used by persons with limited physical, sensory or
mental capabilities or lack of experience and knowledge, provided that
they are under supervision or have been told how to use the appliance
safely and are aware of the potential risks. The appliance must not be
used as a plaything by children.
5
SDR 1100 A2
GB
IE
WARNING! RISK OF INJURY!
► Never remove the safety valve
8
if steam is still exiting the steam nozzle!
► Do not operate the appliance with an empty water tank. When the water
reserve is used up, remove the power cable to prevent the appliance from
overheating.
► The accessories will get hot during use! There is a risk of scalding!
► Allow the accessories used to cool down before dismantling them.
► Use only the original accessory parts for this appliance. Other accessories
may not meet the safety requirements.
► The appliance may not be used if it has been dropped, if there are any
obvious signs of physical damage or if it is leaking.
► The appliance must be kept out of the reach of children if it is switched on
or is cooling down.
► Wear gloves, protective glasses and breathing protection equipment when
attempting to remove substances that could be hazardous to health.
► Never direct the steam toward people or animals. Hot steam can cause
serious injuries!
WARNING! RISK OF SCALDING!
This symbol warns you about escaping steam.
Please follow the safety instructions!
CAUTION – PROPERTY DAMAGE!
► Start by carrying out a test on an unobtrusive area to be certain that the
material is suitable for cleaning with a steam cleaner, for instance:
– Painted/varnished wood or leather can be bleached by steam.
– Unprotected wood can swell up.
– Protective wax coatings can be dissolved by steam.
– Plastics can become tarnished from the effects of steam.
– Soft plastics can deform when exposed to steam.
– Cold glass or mirror surfaces can crack when sprayed with hot steam.
► If you wish to clean windows, you must first preheat them, for instance by
applying the steam over large areas from a greater distance, then moving
in progressively closer.
► Acrylics, velvet and silk react sensitively to hot steam, as do plastic fibres.
6
SDR 1100 A2
GB
IE
Package contents
The appliance is supplied with the following components as standard:
▯ Steam cleaner
▯ Extension hose
▯ Extension nozzle
▯ Angle nozzle
▯ Upholstery nozzle
▯ Round brush
▯ Safety valve
▯ Pulling attachment
▯ Cotton cover
▯ Funnel
▯ Measuring cup
▯ Operating instructions
Remove all parts of the appliance from the packaging and remove all
packaging materials.
WARNING
Risk of suffocation!
► Packaging material must not be used as a plaything. Risk of suffocation.
NOTE
► Check the package for completeness and for signs of visible damage.
► If the consignment is incomplete or damaged due to defective packaging
or carriage, contact the Service hotline (see the section Service).

7
SDR 1100 A2
GB
IE
Description of appliance/accessories
Steam lever
2
“Child safety lock” button
3
Water tank
4
Red control lamp
5
Green control lamp
6
Steam nozzle
7
Water tank filler opening
8
Safety valve
9
Extension hose
10
Extension nozzle
11
Round brush
12
Angle nozzle
13
Squeegee attachment
14
Upholstery nozzle
15
Cotton cover
16
Measuring cup
17
Funnel
Technical data
Mains voltage 220–240 V ~, 50Hz
Rated power 950–1100 W
Appliance protection rating IPX4
Water tank capacity
350 ml
With a water filling of 250 ml (MAX), steam
can be generated for about 5 minutes.
8
SDR 1100 A2
GB
IE
Operating the appliance
WARNING! RISK OF INJURY!
To ensure fault-free operation and a long service life for the
appliance, pay heed to the following instructions:
► Do not press the steam lever
until the green control lamp 5 lights up.
If you press too early, it may cause an accumulation of hot water in the
steam nozzle
6
which will drip or spray from the nozzle. There is a risk
of scalding.
► Before switching off, allow all of the steam to escape from the appliance.
Press the steam lever
until no more steam comes out of the steam
nozzle
6
.
Filling/refilling with water
RISK OF ELECTRIC SHOCK
► Always disconnect the plug from the mains power socket before you add
water to the water tank
3
!
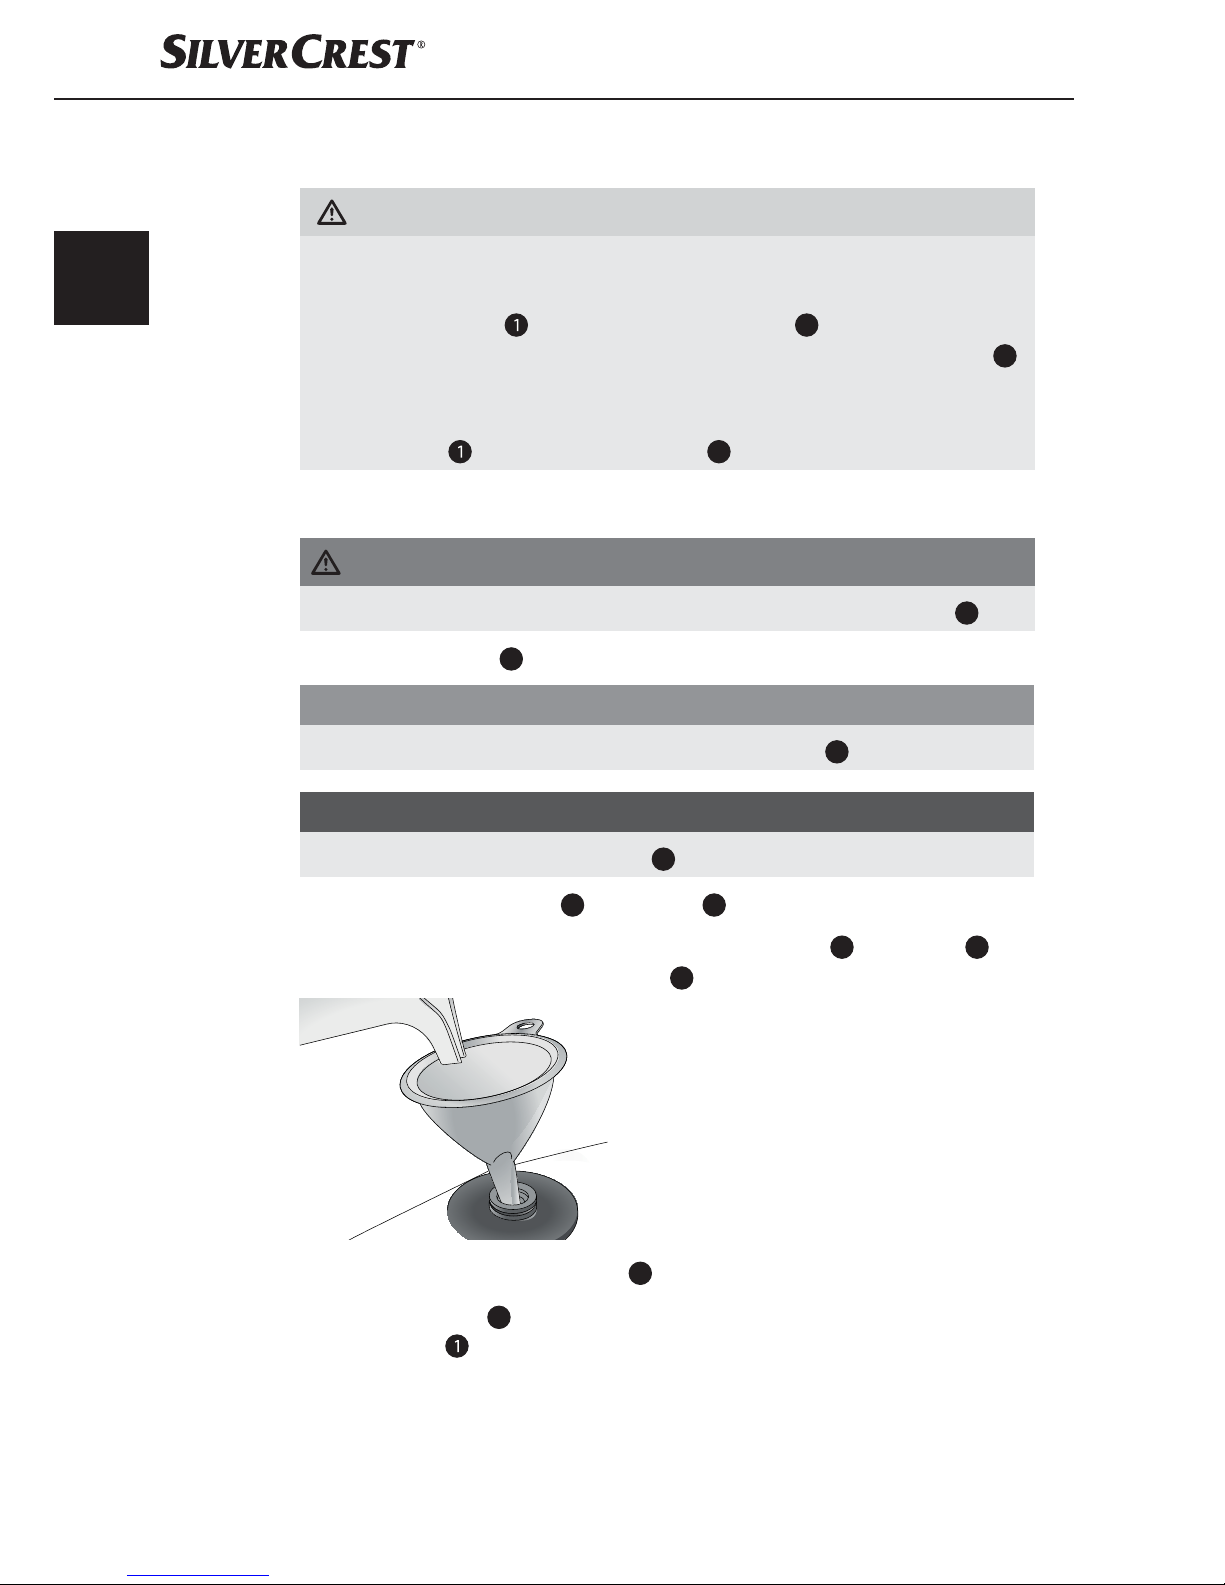
Open the safety valve
8
.
CAUTION – PROPERTY DAMAGE!
► Do not put any additives or cleaning agents in the water tank
3
!
NOTE
► Ensure that you fill the appliance’s water tank
3
with around 250 ml of water.
Fill the water tank
3
with water through the filler opening 7.
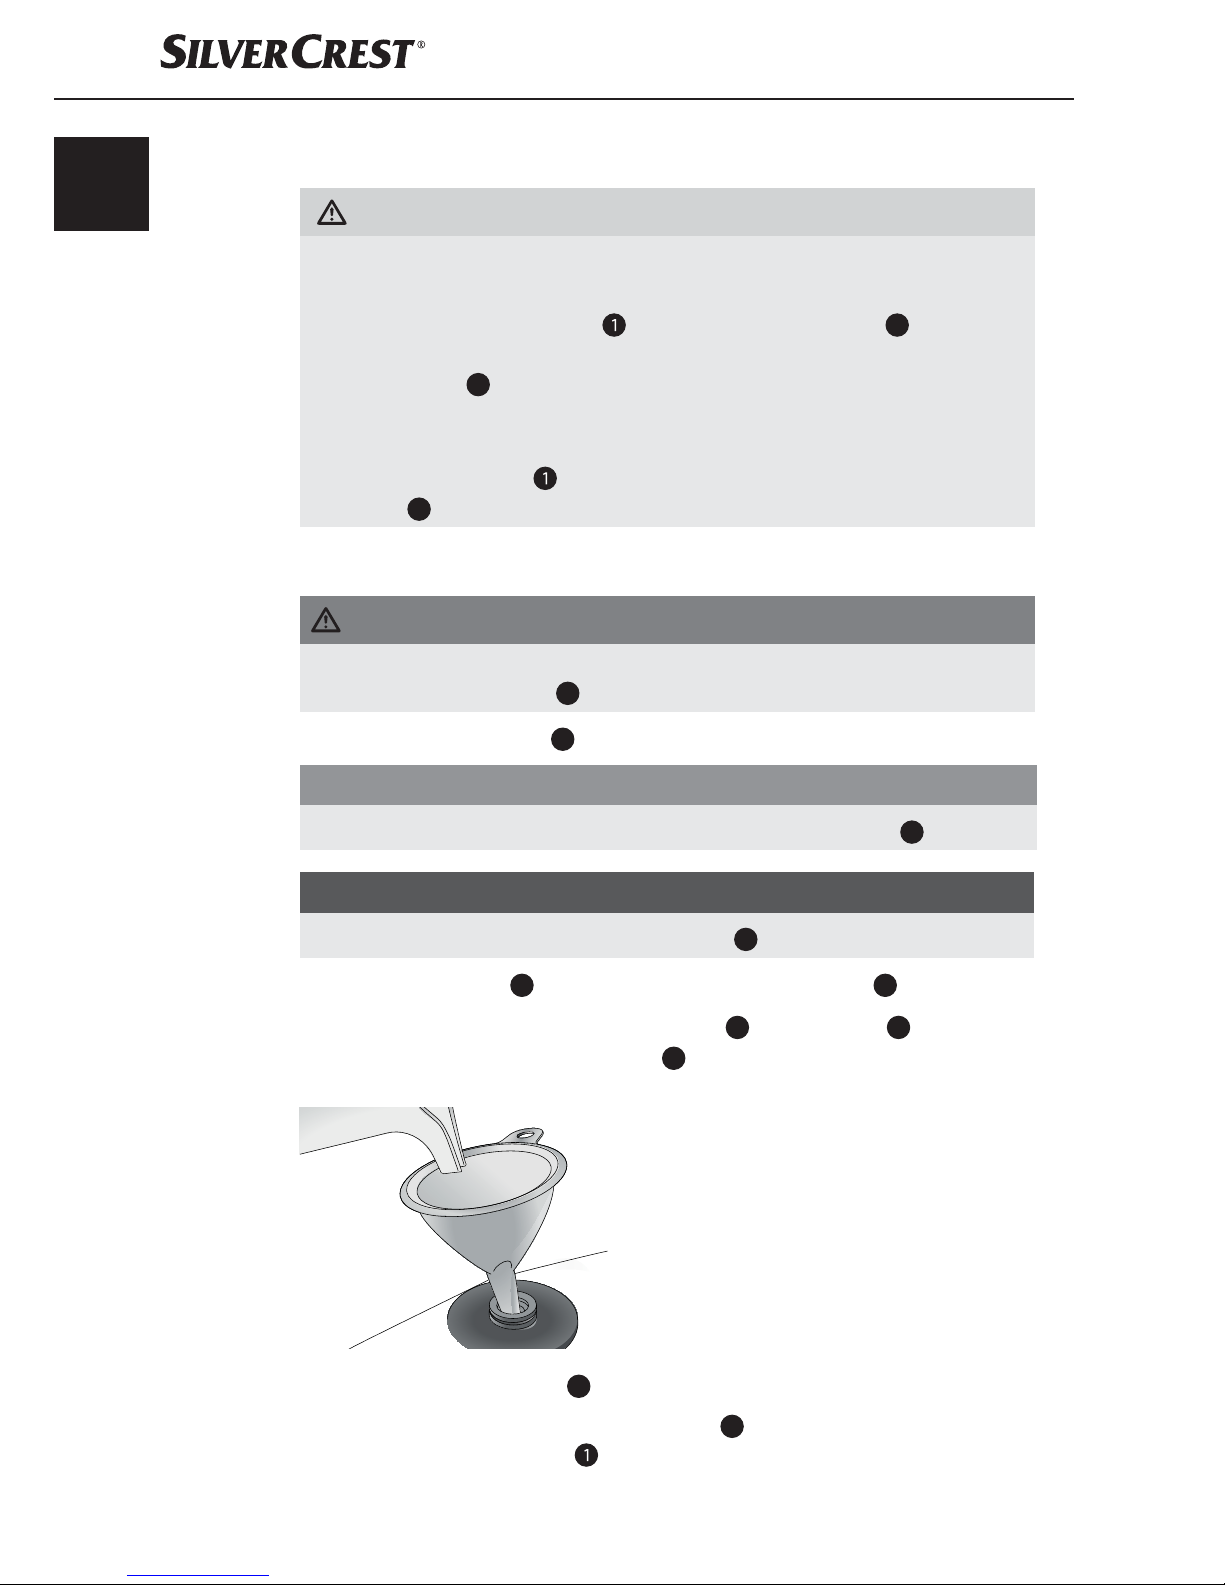
To do this, use the supplied measuring cup
16
and the funnel 17 for assistance
(see figure). Fill the measuring cup
16
with water up to the marking line
(approx. 250 ml).
Reclose the safety valve 8.
■ If there is no more water in the water tank
3
, no steam will come out when
the steam lever is pressed . The water tank must be filled as follows:
9
SDR 1100 A2
GB
IE
Remove the plug from the mains power socket.
Wait about 10 seconds.
Slowly open the safety valve
8
. Before fully opening up the valve, wait
a few seconds until the hissing of the water vapour stops.
Fill the water tank
3
with water.
Reclose the safety valve
8
.
If the mains water at your locality is rated as hard, it is recommended that you
mix the mains water with distilled water. Otherwise, the appliance could calcify
prematurely and clog the steam nozzle
6
.
To extend the optimal functioning of the appliance, mix the mains water with
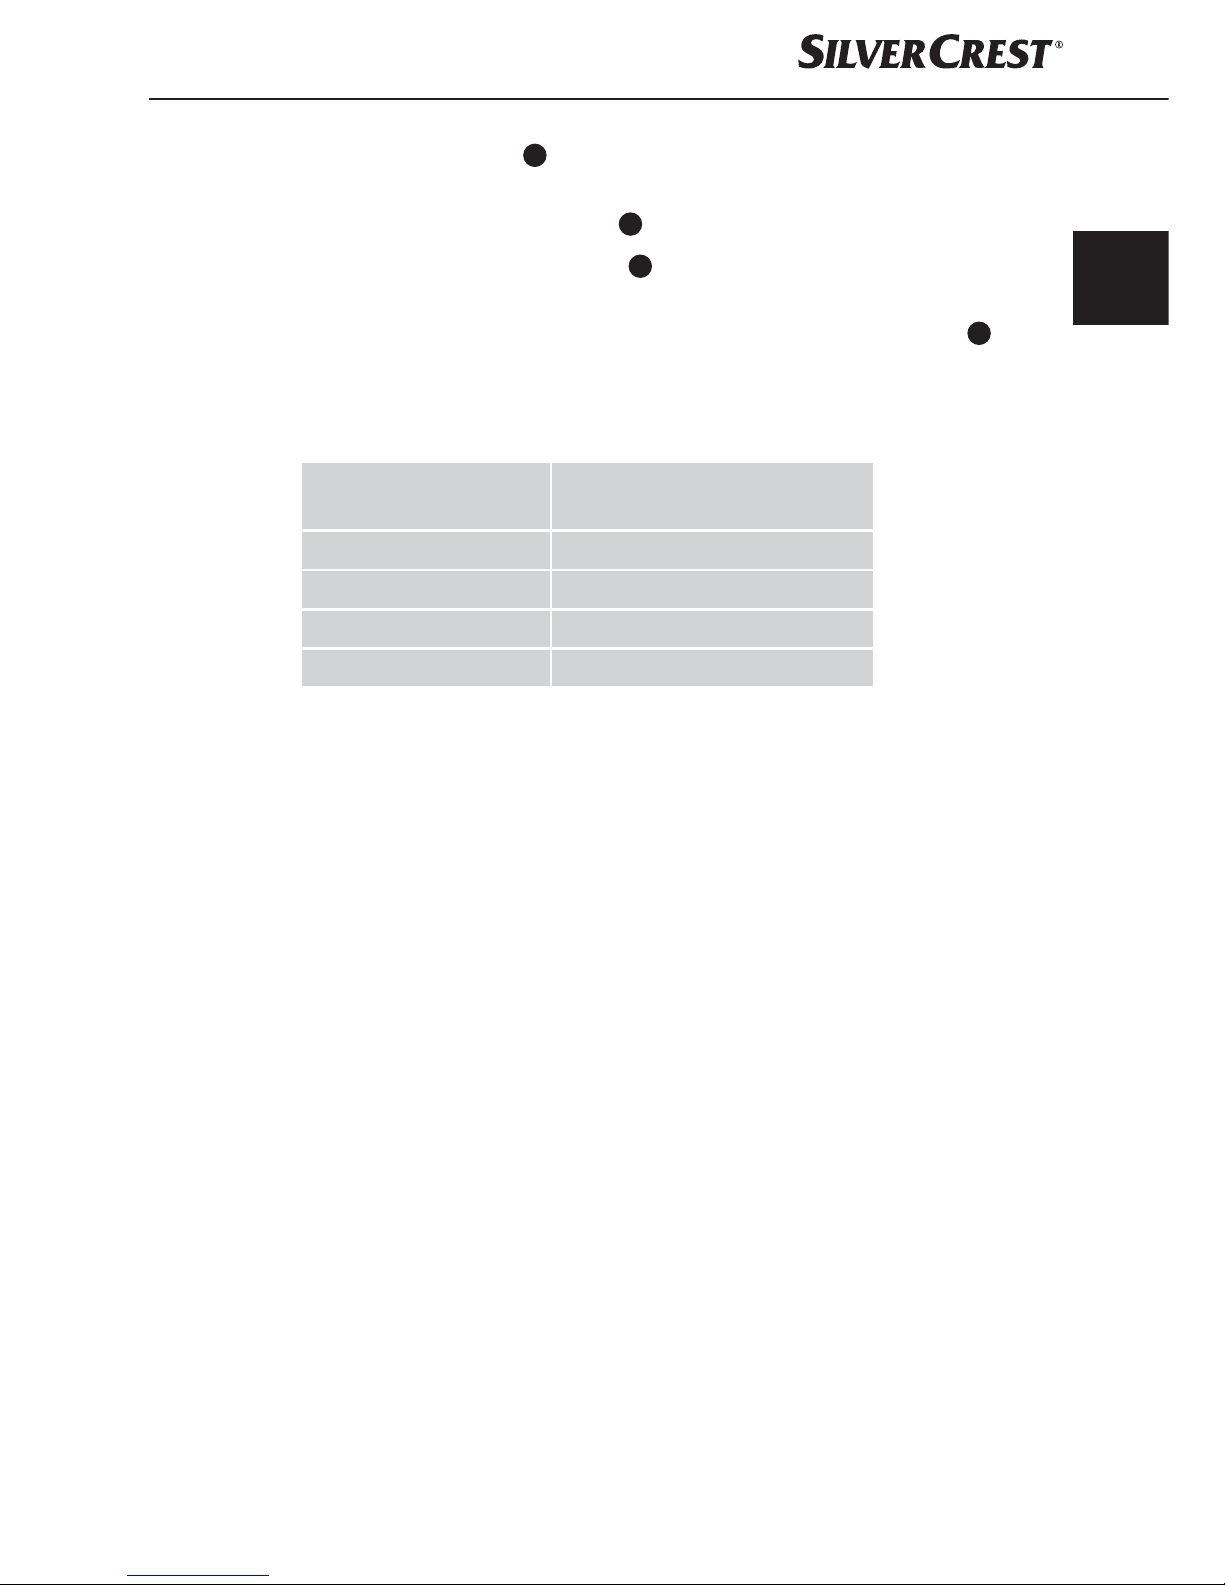
distilled water as per the following table.
Water hardness
Ratio of distilled water
to mains water
very soft/soft 0
medium 1:1
hard 2:1
very hard 3:1
The water hardness level of your tap water can be queried at your local water
works.
10
SDR 1100 A2
GB
IE
Operating the appliance
1) Insert the plug into a mains power socket.
The red control lamp
4
lights up to indicate that there is a connection to the
mains electricity.
2) As soon as the appliance is ready to use, the green control lamp
5
lights
up. The red control lamp
4
stays lit.
NOTE
► While heating up, steam may occasionally escape from the steam nozzle
6
.
3) Press the steam lever
downwards. Steam comes out of the steam nozzle 6.
If the steam pressure drops, the green control lamp
5
will go out.
Release the steam lever
until the green control lamp 5 comes back on.
NOTE
► If water drips out of the steam nozzle
6
during operation or the steam
pressure falls, release the steam lever . The appliance needs to heat up
again. Wait until the green control lamp
5
lights up again.
► The steam cleaner has a thermal cut-out. It switches itself off automatically
in case of overheating (e.g. due to an empty water tank). If this happens,
pull out the mains plug and refill the water tank 3.
WARNING! RISK OF INJURY!
► If you stop working for an extended period of time and leave the appliance
switched on, steam may occasionally escape even though the steam lever
is not pressed.
11
SDR 1100 A2
GB
IE
Areas of application
You can clean either by using steam directly from the steam nozzle 6 or you
can fit an accessory.
■ Do not use an accessory if you want to clean items such as toilets and sinks,
taps and drains, windows, furniture, fabrics, shutters or mirrors.
You can easily remove water and dissolved dirt from smooth surfaces after
cleaning using the squeegee attachment
13
.
NOTE
► The closer you hold the steam nozzle
6
to the surface to be cleaned, the
better the effect. The steam pressure and temperature are at their highest
directly after leaving to the steam nozzle
6
.
► Stubborn stains and dirt must be soaked with water beforehand.
■ Use the angle nozzle
12
for tight corners or joints, or hard-to-reach places.
■ Use the round brush
11
for stubborn soiling, for example, on wheel rims.
Fitting/removing attachments
WARNING! RISK OF INJURY!
► Always remove the plug from the mains power socket before you fit/remove
an attachment.
► Wait until the appliance has cooled down before you fit/remove an attach-
ment.
► Wait until all of the steam has dissipated before you fit/remove an attach-
ment.
Extension hose
Push the extension hose 9 on to the steam nozzle 6 as far as the stop.
The marking line on the extension hose
9
and the marking
line on the appliance must be aligned with each other
(see fold-out page Figure A).
Turn anticlockwise until both marking lines on the extension hose
9
are
aligned with both marking lines on the appliance. The extension hose
9
remains locked in this position (see fold-out page Figure B).
NOTE
► The fixture on the appliance has a joint so that the attachment can be
aligned to the best usage position. This is, however, not possible with the
extension hose
9
.
■ The extension hose
9
is removed in the reverse order.

12
SDR 1100 A2
GB
IE
Extension nozzle
Push the extension nozzle 10 on to the steam nozzle 6 as far as the stop .
The marking line on the extension nozzle
10
and the marking line on the
appliance must be aligned with each other (see fold-out page Figure A).
Turn anticlockwise until both marking lines on the extension nozzle
10
are
aligned with both marking lines on the appliance. The extension nozzle
10
remains locked in this position (see fold-out page Figure B).
NOTE
► The fixture on the appliance has a joint so that the attachment can be
aligned to the best usage position. This is, however, not possible with the
extension nozzle
10
.
■ The extension nozzle
10
is removed in the reverse order.
Assembling the squeegee
Remove the upholstery nozzle 14 and place this together with the two
brackets onto the squeegee attachment
13
.
Then press the upholstery nozzle
14
under the mount of the squeegee
attachment
13
(see fold-out page).
Upholstery nozzle
Push the upholstery nozzle 14 on to the steam nozzle 6 as far as the stop.
The marking line on the upholstery nozzle
14
and the marking line on the
appliance must be aligned with each other (see fold-out page Figure A).
Turn anticlockwise until both marking lines on the upholstery nozzle
14
are
aligned with both marking lines on the appliance. The upholstery nozzle
14
remains locked in this position (see fold-out page Figure B).
■ A cotton cover
15
is supplied for use with the upholstery nozzle 14. This can
be used for the cleaning of sensitive surfaces, such as sofas and armchairs.
NOTE
► The fixture on the appliance has a joint so that the attachment can be
aligned to the best usage position. This is, however, not possible with the
upholstery nozzle
14
.
■ The upholstery nozzle
14
is removed in the reverse order.
13
SDR 1100 A2
GB
IE
Angle nozzle and round brush
■ Both of these attachments can be used either on the extension hose 10 or on
the extension nozzle
9
or directly onto the steam nozzle 6.
Push the respective attachment on the hexagonal mount.
NOTE
► The fixture on the appliance has a joint so that the attachment can be
aligned to the best usage position.
► The respective attachment can now be turned to the desired position.
Child safety lock
This appliance is equipped with a child safety lock 2.
■ To activate the child safety lock
2
, press the "Child safety lock" button 2
with the
icon. The steam lever can now no longer be pressed down.
■ To deactivate the child safety lock
2
, press the "Child safety lock" button 2
with the
icon. The steam lever can now be activated again.
Cleaning
RISK OF ELECTRIC SHOCK
► Always remove the plug from the mains power socket before cleaning the
appliance.
►
You must never immerse the appliance in water when cleaning it or
hold it under running water.
WARNING – RISK OF INJURY!
► Allow the appliance to cool sufficiently before cleaning it.
CAUTION – PROPERTY DAMAGE!
► Do not use aggressive, chemical or abrasive cleaning agents!
They could irreparably damage the surface!
Remove the power plug from the socket.
Allow the appliance to cool down.
Empty the water tank
3
.
Clean the appliance and the accessories with a moist cloth. For stubborn
dirt, wipe, adding mild detergent to the cloth.
14
SDR 1100 A2
GB
IE
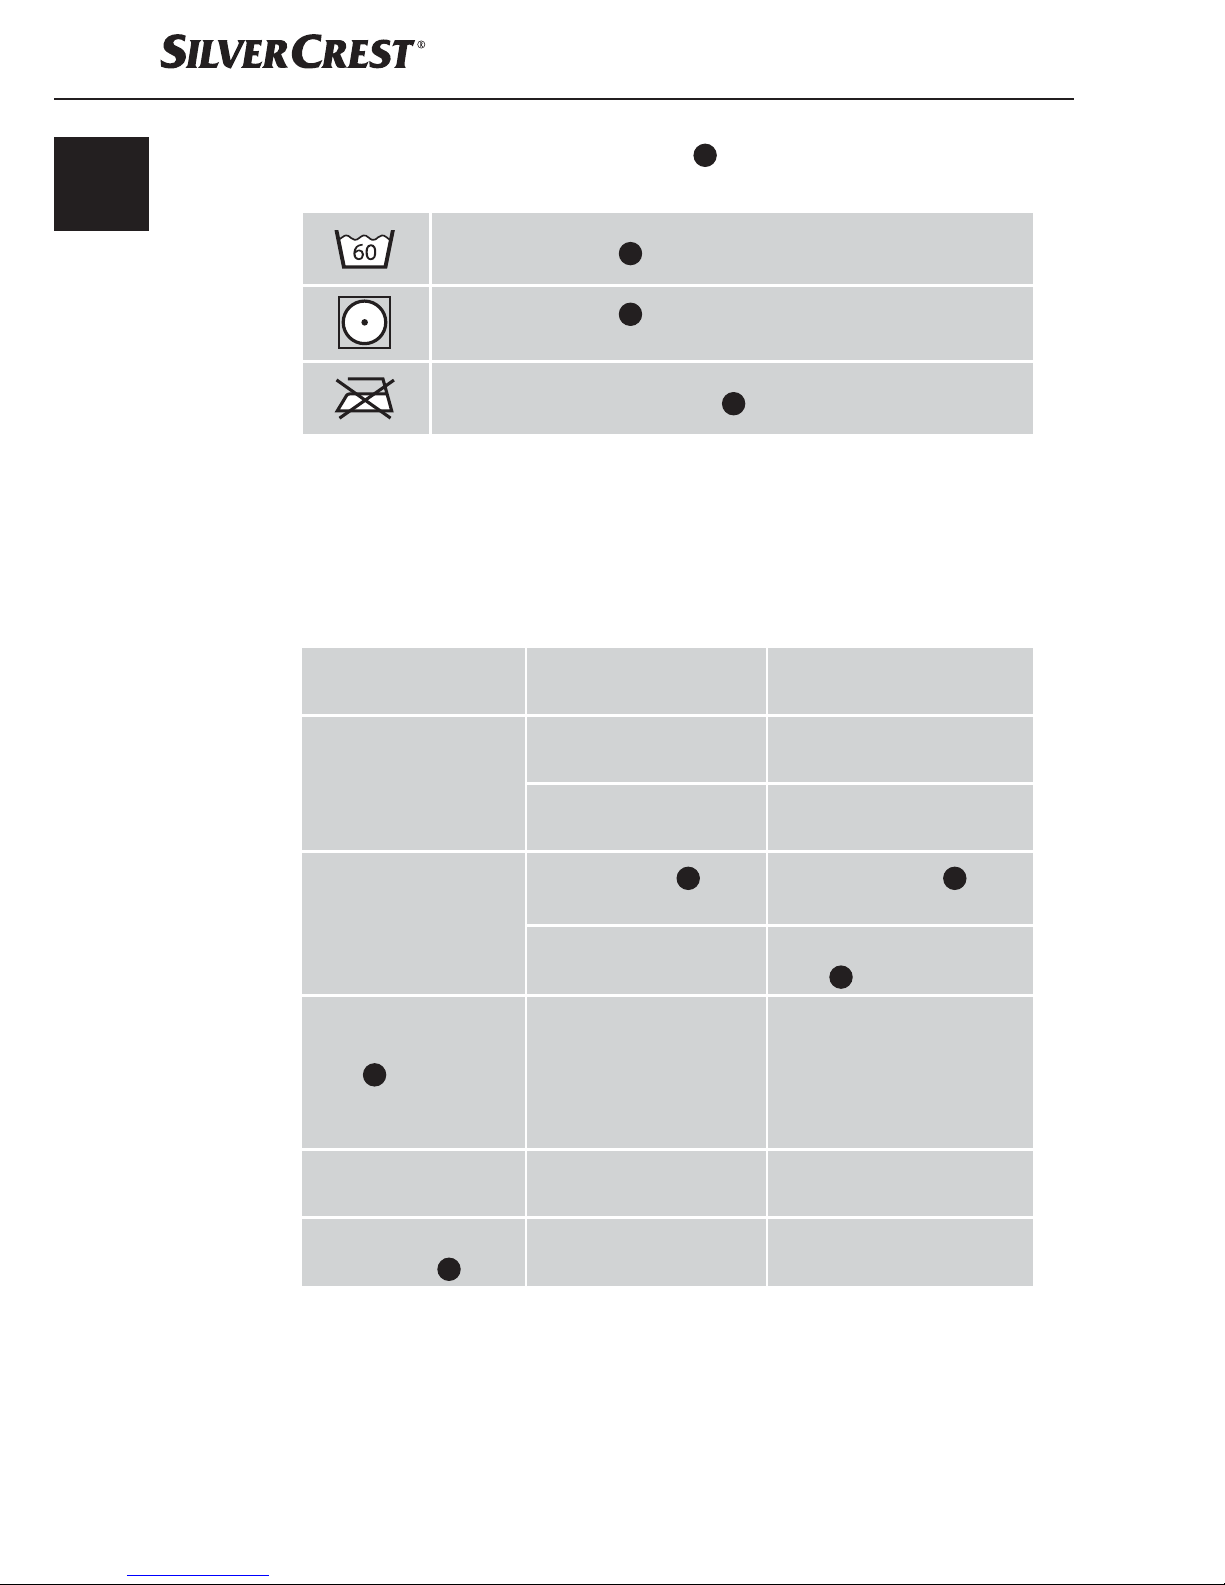
■ If it is dirty, the removable cotton cover 15 can be cleaned in accordance
with the symbols on the label:
The cotton cover 15 is machine washable at 60°C.
The cotton cover 15 can be dried at a low temperature in
a tumble drier.
Do not iron the cotton cover 15.
Storage
Store the cleaned and dried appliance in a clean and dust-free location.
Troubleshooting
PROBLEM
POSSIBLE
CAUSE
POSSIBLE
SOLUTIONS
The appliance is
not working.
The plug is not connected.
Connect the appliance to
a mains power socket.
The appliance is
damaged.
Contact the Customer
Service department.
No steam is
produced.
The water tank
3
is
empty.
Fill the water tank 3 with
water.
The appliance is not yet
heated up.
Wait until the green control
lamp
5
lights up.
The green control
lamp
5
lights up and
then goes out again.
This is not a fault: the
temperature dropped
for a short time and the
appliance started heating up again.
-
The steam volume is
low.
The temperature is too
low.
Wait until the appliance
has heated up again.
Water drips from the
steam nozzle
6
.
The temperature is too
low.
Wait until the appliance
has heated up again.
15
SDR 1100 A2
GB
IE
Disposal of the appliance
Under no circumstances should you dispose of the appliance
with the normal household waste. This product is subject to
the provisions of European Directive 2012/19/EU.
Dispose of the appliance via an approved waste disposal company or your
municipal waste disposal facility. Please observe applicable regulations.
Please contact your waste disposal facility if you are in any doubt.
Disposal of packaging materials
The packaging protects the appliance from damage during carriage.
The packaging materials have been selected for their environmental friendliness
and ease of disposal, and are therefore recyclable.
Returning the packaging to the materials cycle conserves raw materials and
reduces the amount of waste that is generated. Dispose of packaging materials
that are no longer needed in accordance with applicable local regulations.
NOTE
► If possible, keep the original packaging of the appliance during the
warranty period so that the device can be packed properly for
returning in the event of a warranty claim.
Notes on the Declaration of Conformity
This appliance complies with the essential requirements and
other relevant provisions of the European Electromagnetic
Compatibility Directive 2004/108/EC, the Low Voltage
Directive 2006/95/EC and the RoHS Directive 2011/65/EU.
The complete Declaration of Conformity, in its original form, is
available from the importer.
16
SDR 1100 A2
GB
IE
Warranty
You are provided a 3-year warranty on this appliance, valid from the date
of purchase. This appliance has been manufactured with care and inspected
meticulously prior to delivery.
Please retain your receipt as proof of purchase. In the event of a warranty claim,
please contact your Customer Service unit by telephone. This is the only way to
guarantee free return of your merchandise.
NOTE
► The warranty is valid only for material or manufacturing faults, not for
transport damage, parts subject to wear or damage to fragile parts, e.g.
switches.
This appliance is intended solely for private use and not for commercial purposes.
The warranty shall be deemed void in the case of misuse or improper handling,
use of force or interventions which were not carried out by one of our authorised
Service centres.
Your statutory rights are not restricted by this warranty.
The warranty period is not prolonged by repairs made under the warranty.
This also applies to replaced and repaired components.
Any damage or defects present at the time of purchase must be reported immediately after unpacking, but no later than two days after the date of purchase.
Repairs carried out after expiry of the warranty period shall be subject to charge.
Service
Service Great Britain
Tel.: 0871 5000 720 (£ 0.10/Min.)
E-Mail: kompernass@lidl.co.uk
IAN 273091
Service Ireland
Tel.: 1890 930 034
(0,08 EUR/Min., (peak))
(0,06 EUR/Min., (off peak))
E-Mail: kompernass@lidl.ie
IAN 273091
Hotline availability: Monday to Friday 08:00 - 20:00 (CET)
Importer
KOMPERNASS HANDELS GMBH
BURGSTRASSE 21
44867 BOCHUM
GERMANY
www.kompernass.com

17
SDR 1100 A2
FI
Sisällysluettelo
Johdanto ....................................................18
Tekijänoikeus ........................................................... 18
Määräystenmukainen käyttö ............................................... 18
Varoitukset .............................................................19
Turvallisuusohjeet .............................................20
Toimitussisältö ................................................22
Laitteen kuvaus / Lisävarusteet ..................................23
Tekniset tiedot ................................................23
Laitteen käyttäminen ..........................................24
Veden täyttäminen ....................................................... 24
Laitteen ottaminen käyttöön ................................................26
Käyttöalueet ............................................................ 27
Lisäosien kiinnittäminen / irrottaminen ........................................27
Lapsilukko ............................................................. 29
Puhdistaminen ...............................................29
Säilytys .....................................................30
Vian korjaus .................................................30
Laitteen hävittäminen ..........................................31
Pakkauksen hävittäminen ..................................................31
Vaatimustenmukaisuusvakuutusta koskevia ohjeita ................31
Takuu .......................................................32
Huolto ......................................................32
Maahantuoja .................................................32

18
SDR 1100 A2
FI
Johdanto
Onnittelut uuden laitteen hankinnasta.
Olet valinnut laadukkaan tuotteen. Käyttöohje on osa tätä tuotetta. Se sisältää
turvallisuutta, käyttöä ja hävittämistä koskevia tärkeitä ohjeita. Tutustu ennen tuotteen käyttöä kaikkiin käyttö- ja turvallisuusohjeisiin. Käytä tuotetta vain kuvatulla
tavalla ja vain mainittuihin käyttötarkoituksiin. Säilytä tämä käyttöohje hyvässä
tallessa. Kun luovutat tuotteen eteenpäin, liitä mukaan kaikki tuotetta koskevat
asiakirjat.
Tekijänoikeus
Tämä asiakirja on tekijänoikeudellisesti suojattu.
Kaikenlainen monistaminen tai jälkipainatus, myös osittainen, sekä kuvien esittä-
minen, myös muutetussa tilassa, on sallittua ainoastaan valmistajan kirjallisella
suostumuksella.
Määräystenmukainen käyttö
Tämä laite on tarkoitettu lian irrottamiseen vesihöyryn avulla yksityisissä kotitalouksissa, esimerkiksi...
– sileät pinnat: työtasot, laatat, kaakelit, ikkunat, peilit
– vaikeapääsyiset alueet: kulmat, saumat, kaihtimet, WC, hanat jne.
– tekstiilit: verhot, verhoilut, vaatteet, autonistuimet.
Tätä laitetta ei ole tarkoitettu käytettäväksi:
– ulkotiloissa,
– muiden nesteiden kuin veden kanssa,
– ammattikäytössä tai teollisuudessa.
VAROITUS
Määräystenvastaisesta käytöstä aiheutuva vaara!
Laite voi olla vaarallinen, jos sitä käytetään määräysten vastaisesti ja/tai
muihin kuin sille suunniteltuihin käyttötarkoituksiin.
► Käytä laitetta ainoastaan sille suunniteltuun käyttötarkoitukseen.
► Noudata tässä käyttöohjeessa kuvattuja toimintatapoja.
19
SDR 1100 A2
FI
OHJE
► Laite voi olla vaarallinen, jos sitä käytetään määräysten vastaisesti ja/tai
muihin kuin sille suunniteltuihin käyttötarkoituksiin. Käytä laitetta ainoastaan
sille suunniteltuihin käyttötarkoituksiin. Noudata tässä käyttöohjeessa kuvattuja toimintatapoja. Emme vastaa mistään vahingoista, jotka ovat aiheutuneet määräystenvastaisesta käytöstä, virheellisesti suoritetuista korjauksista,
luvattomista muutoksista tai muiden kuin hyväksyttyjen varaosien käytöstä.
Vastuu on yksinomaan käyttäjällä.
Varoitukset
Tässä käyttöohjeessa käytetään seuraavia varoituksia:
VAROITUS
Tämän vaara-asteen varoitus on merkkinä mahdollisesti
vaarallisesta tilanteesta.
Jos vaarallista tilannetta ei vältetä, se voi johtaa loukkaantumisiin.
► Noudata tämän varoituksen ohjeita henkilövahinkojen välttämiseksi.
HUOMIO
Tämän vaara-asteen varoitus on merkkinä mahdollisista
aineellisista vahingoista.
Jos tilannetta ei vältetä, se voi johtaa aineellisiin vahinkoihin.
► Noudata tämän varoituksen ohjeita aineellisten vahinkojen välttämiseksi.
OHJE
► Ohje on merkkinä lisätiedoista, jotka helpottavat laitteen käsittelyä.

20
SDR 1100 A2
FI
Turvallisuusohjeet
SÄHKÖISKUN VAARA
► Liitä laite ainoastaan määräysten mukaan asennettuun pistorasiaan,
jonka verkkojännite on 220–240 V ~ / 50 Hz.
► Irrota pistoke pistorasiasta, jos laitteen toiminnassa ilmenee häiriöitä ja
ennen kun puhdistat laitetta.
► Kun irrotat virtajohdon pistorasiasta, vedä aina pistokkeesta, älä koskaan
johdosta.
► Älä taita tai purista virtajohtoa ja vedä se niin, ettei kukaan voi astua sen
päälle tai kompastua siihen.
► Anna vaarojen välttämiseksi vialliset pistokkeet ja virtajohdot heti valtuute-
tun ammattihenkilöstön tai huoltopalvelun vaihdettavaksi.
► Varmista, ettei virtajohto kastu tai altistu kosteudelle käytössä. Vedä johto
niin, ettei se jää puristuksiin tai pääse vaurioitumaan.
► Vältä vaaratilanteet vaihdattamalla vioittunut laite, virtajohto tai pistoke
huollossa uuteen.
► Irrota ensin pistoke pistorasiasta, ennen kuin täytät laitteeseen vettä, puhdis-
tat laitetta tai vaihdat lisäosia.
► Käytä laitetta vain kuivissa tiloissa, älä ulkona.
► Älä koskaan upota laitetta veteen tai muihin nesteisiin!
► Älä koskaan kohdista höyryä suoraan sähkölaitteita tai sähköosia sisältäviä
laitteita kohti, esimerkiksi uunien sisätiloihin.
► Älä koskaan jätä kuumuutta tuottavaa laitetta valvomatta! Irrota pistoke
pistorasiasta aina käytön jälkeen ja keskeyttäessäsi käytön. Laite lämmittää
ja tuottaa höyryä niin kauan, kun pistoke on pistorasiassa!
► Käytä laitetta vain kuivin käsin ja kengät jalassa (ei paljasjaloin). Näin
vähennät toimintahäiriön sattuessa vaarallisia sähköiskuvirtoja kehossa.
► Älä koskaan suuntaa laitetta kosteudelle herkkiä esineitä kohti.
► Tätä laitetta saavat käyttää henkilöt, joiden fyysiset, sensoriset tai henkiset
kyvyt ovat rajalliset, tai joilla ei ole riittävää kokemusta tai tietoa laitteen
käytöstä, kun heitä valvotaan tai heitä on opastettu laitteen turvalliseen
käyttöön, ja he ovat ymmärtäneet laitteen käyttöön liittyvät vaarat. Lapset
eivät saa leikkiä laitteella.
21
SDR 1100 A2
FI
VAROITUS! LOUKKAANTUMISVAARA!
► Älä koskaan irrota suojakantta
8
, niin kauan kun höyrysuuttimesta tulee
höyryä!
► Älä käytä laitetta, jos vesisäiliö on tyhjä. Kun vesisäiliö on tyhjä, irrota
pistoke pistorasiasta, jotta laite ei ylikuumene.
► Lisäosat kuumenevat käytössä! On olemassa palovammavaara!
► Anna lisäosien jäähtyä, ennen kuin irrotat niitä.
► Käytä vain tähän laitteeseen tarkoitettuja alkuperäisiä lisäosia. Muiden
kuin alkuperäisten lisävarusteiden käyttöön voi liittyä turvallisuusriski.
► Älä käytä laitetta, jos se on pudonnut, jos siinä on näkyviä vaurioita tai se
vuotaa.
► Pidä laite poissa lasten ulottuvilta laitteen ollessa päällä tai jäähtymässä.
► Käytä käsineitä, suojalaseja ja hengityssuojaa, jos yrität irrottaa terveydelle
vaarallisia aineita.
► Älä koskaan suuntaa höyrysuihkua ihmisiä tai eläimiä kohti. Kuuma höyry
voi aiheuttaa huomattavia vammoja!
VAROITUS! PALOVAMMAVAARA!
Tämä symboli varoittaa sinua ulostulevasta höyrystä.
Noudata turvallisuusohjeita!
HUOMIO - AINEELLISET VAHINGOT!
► Kokeile ensin huomaamattomaan kohtaan, soveltuuko höyrypesuri puhdis-
tettavan materiaalin puhdistamiseen, esimerkiksi:
– Maalattu puu tai nahka saattaa menettää väriään höyryn vaikutuksesta.
– Käsittelemätön puu saattaa turvota.
– Höyry saattaa irrottaa vahasuojapintaa.
– Muovit saattavat värjääntyä höyryn vaikutuksesta.
– Pehmeät muovit saattavat vääntyä höyryn vaikutuksesta.
– Kylmät lasi- ja peilipinnat saattavat haljeta kuuman höyryn vaikutuksesta.
► Jos haluat puhdistaa ikkunoita, lämmitä niitä ensin kohdistamalla niihin
höyryä suurialaisesti aluksi kauempaa ja lähestymällä vähitellen.
► Akryyli, sametti ja silkki reagoivat herkästi kuumaan höyryyn, samoin
keinokuidut.
22
SDR 1100 A2
FI
Toimitussisältö
Toimitus sisältää seuraavat osat:
▯ Höyrypesuri
▯ Jatkoletku
▯ Jatkosuutin
▯ Kulmasuutin
▯ Huonekalusuutin
▯ Pyöröharja
▯ Suojakansi
▯ Lasta
▯ Puuvillainen suojus
▯ Suppilo
▯ Mitta-astia
▯ Käyttöohje
Ota kaikki laitteen osat pakkauksesta ja poista kaikki pakkausmateriaalit.
VAROITUS
Tukehtumisvaara!
► Pakkausmateriaaleilla ei saa leikkiä. On olemassa tukehtumisvaara.
OHJE
► Tarkista, ettei toimituksesta puutu osia eikä tuotteessa ole näkyviä vaurioita.
► Jos havaitset toimituksessa puutteita tai vaurioita, jotka johtuvat puutteel-
lisesta pakkauksesta tai jotka ovat syntyneet kuljetuksen aikana, soita
huollon palvelunumeroon (ks. luku Huolto).

23
SDR 1100 A2
FI
Laitteen kuvaus / Lisävarusteet
Höyryvipu
2
"Lapsilukko"-kytkin
3
Vesisäiliö
4
Punainen merkkivalo
5
Vihreä merkkivalo
6
Höyrysuutin
7
Vesisäiliön täyttöaukko
8
Suojakansi
9
Jatkoletku
10
Jatkosuutin
11
Pyöröharja
12
Kulmasuutin
13
Lasta
14
Huonekalusuutin
15
Puuvillainen suojus
16
Mitta-astia
17
Suppilo
Tekniset tiedot
Verkkojännite 220 - 240 V ~, 50 Hz
Nimellisteho 950 - 1100 W
Laitteen suojaluokka IPX4
Vesisäiliön tilavuus
350 ml
250 ml:n vesitäytöllä (MAX)
laite tuottaa höyryä n. 5 minuuttia.
24
SDR 1100 A2
FI
Laitteen käyttäminen
VAROITUS! LOUKKAANTUMISVAARA!
Noudata seuraavia ohjeita, jotta laite toimisi moitteettomasti
ja sen käyttöikä olisi mahdollisimman pitkä.
► Paina höyryvipua
vasta, kun vihreä merkkivalo 5 palaa. Muuten laittee-
seen voi kerääntyä kuumaa vettä, joka tippuu tai roiskuu höyrysuuttimesta
6
.
On olemassa palovammavaara.
► Päästä kaikki höyry ulos laitteesta, ennen kuin sammutat laitteen. Paina
höyryvipua
, kunnes höyrysuuttimesta 6 ei enää tule höyryä.
Veden täyttäminen
SÄHKÖISKUN VAARA
► Irrota aina pistoke pistorasiasta, ennen kuin täytät vettä vesisäiliöön
3
!
Avaa suojakansi
8
.
HUOMIO - AINEELLISET VAHINGOT!
► Älä lisää vesisäiliöön mitään lisä- tai puhdistusaineita
3
!
OHJE
► Varmista, että laitteen vesisäiliöön
3
täytetään n. 250 ml vettä.
Täytä vettä vesisäiliöön
3
täyttöaukon 7 kautta.
Täytä vettä toimituksessa mukana tulevan mitta-astian
16
ja suppilon 17
avulla (ks. kuva). Täytä mitta-astiaan
16
vettä merkkiviivaan asti (n. 250 ml).
Sulje tämän jälkeen suojakansi 8 uudelleen.
■ Jos vesisäiliössä
3
ei ole enää vettä, laitteesta ei tule höyryä, vaikka
höyryvipua painetaan. Täytä laitteeseen vettä seuraavasti:
Irrota verkkopistoke pistorasiasta.
Odota n. 10 sekuntia.
25
SDR 1100 A2
FI
Pyöritä suojakantta 8 hitaasti auki ja odota ennen täydellistä avaamista
muutama sekunti, kunnes vesihöyryn ulostulo on loppunut.
Täytä sen jälkeen vesisäiliöön
3
lisää vettä.
Sulje tämän jälkeen suojakansi
8
uudelleen.
Jos asuinpaikkakuntasi vesi on erittäin kovaa, on suositeltavaa sekoittaa vesijohtoveteen tislattua vettä. Muuten laite saattaa kalkkeutua ja höyrysuutin
6
tukkeutua.
Jotta laite toimisi moitteettomasti mahdollisimman pitkään, sekoita vesijohtovettä
ja tislattua vettä seuraavan taulukon mukaisessa suhteessa.
Veden kovuus
Tislatun veden ja
vesijohtoveden suhde
erittäin pehmeä/pehmeä 0
keskinkertainen 1:1
kova 2:1
erittäin kova 3:1
Voit tiedustella paikkakuntasi veden kovuutta paikkakunnan vesilaitokselta.
26
SDR 1100 A2
FI
Laitteen ottaminen käyttöön
1) Työnnä verkkopistoke verkkopistorasiaan.
Punainen merkkivalo
4
palaa merkkinä siitä, että laite on liitetty sähköverk-
koon.
2) Kun laite on käyttövalmis, vihreä merkkivalo
5
syttyy. Punainen merkkivalo 4
palaa edelleen.
OHJE
► Lämmitysvaiheen aikana höyrysuuttimesta
6
voi välillä tulla höyryä.
3) Paina höyryvipu
alas. Höyrysuuttimesta 6 tulee höyryä. Kun höyrysuihku
heikkenee, vihreä merkkivalo
5
sammuu.
Vapauta höyryvipu
, kunnes vihreä merkkivalo 5 on jälleen syttynyt.
OHJE
► Jos höyrysuuttimesta
6
tippuu vettä käytön aikana tai ulostuleva höyrysuihku
heikkenee, vapauta höyryvipu . Laitteen on lämmettävä uudelleen.
Odota, kunnes vihreä merkkivalo
5
syttyy uudelleen palamaan.
► Höyrypesurissa on ylikuumenemissuoja. Se sammuu ylikuumetessaan (esim.
vesisäiliön ollessa tyhjä) automaattisesti. Irrota tällöin pistoke pistorasiasta
ja täytä vesisäiliö
3
.
VAROITUS! LOUKKAANTUMISVAARA!
► Jos laite on asetettu pidemmäksi aikaa sivuun sen ollessa päällä, laitteesta
saattaa haihtua vesihöyryä, vaikkei höyryvipua
painettaisi.
27
SDR 1100 A2
FI
Käyttöalueet
Voit puhdistaa laitteella käyttämällä suoraan höyrysuuttimesta 6 tulevaa höyryä
tai käyttää jotakin lisäosista.
■ Älä käytä lisäosia puhdistaessasi WC:tä ja pesuallasta, hanoja ja viemäri-
aukkoja, ikkunoita, kalustekankaita, ikkunaluukkuja tai peilejä.
Jos puhdistat sileitä pintoja, voit puhdistamisen jälkeen poistaa veden ja
irronneen lian helposti laitteeseen liitettävällä lastalla
13
.
OHJE
► Mitä lähempänä puhdistettavaa pintaa höyrysuutin
6
on, sitä parempi
on sen puhdistusteho. Höyryn paine ja lämpötila ovat suurimmat aivan
höyrysuuttimen
6
suulla.
► Piintynyttä likaa on pehmitettävä etukäteen vedellä.
■ Käytä kulmasuutinta
12
ahtaiden kulmien, saumojen ja vaikeapääsyisten
paikkojen puhdistamiseen.
■ Käytä pyöröharjaa
11
piintyneen lian puhdistamiseen, esimerkiksi vanteista.
Lisäosien kiinnittäminen / irrottaminen
VAROITUS! LOUKKAANTUMISVAARA!
► Irrota pistoke pistorasiasta aina, ennen kuin kiinnität tai irrotat lisäosia.
► Odota, kunnes laite on jäähtynyt, ennen kuin kiinnität tai irrotat lisäosia.
► Odota, kunnes kaikki höyry on tullut ulos laitteesta, ennen kuin kiinnität tai
irrotat lisäosia.
Jatkoletku
Työnnä jatkoletku 9 höyrysuuttimeen 6 vasteeseen asti. Tällöin jatkolet-
kussa
9
olevan merkkiviivan ja laitteessa olevien merkkiviivojen on oltava
kohdakkain (ks. kääntösivun kuva A).
Pyöritä jatkoletkua myötäpäivään, kunnes molemmat jatkoletkussa
9
olevat
merkkiviivat ovat laitteen merkkiviivojen kohdalla. Jatkoletku
9
kiinnittyy
tähän asemaan (ks. kääntösivun kuva B).
OHJE
► Laitteen kiinnityskohdissa on nivel, jonka avulla lisäosa voidaan asemoida
käyttöä varten parhaalla mahdollisella tavalla. Tämä ei ole mahdollista, jos
käytetään jatkoletkua
9
.
■ Jatkoletkun
9
irrottaminen tapahtuu päinvastaisessa järjestyksessä.
 Loading...