


This device complies with Part 15 of the FCC Rules.
Operationissubjecttothefollowingtwoconditions:(1)Thisdevice may not cause harmful interference, and (2) this device must accept any interference received, including interference that may cause undesired operation.
WARNING - FCC Regulations state that any unauthorized changes or modifications to this equipment not expressly approved by the manufacturer could void the user’s authority to operate this equipment.
Note: This equipment has been tested and found to comply with the limits for a Class B digital device, pursuant to Part 15 of the FCC Rules.
These limits are designed to provide reasonable protection against harmful interference in a residential installation. This equipment generates, uses, and can radiate radio frequency energy and, if not installed and used in accordance with the instructions, may cause harmful interference to radio communications.
However, there is no guarantee that interference will not occur in a particular installation. If this equipment does cause harmful interference to radio or television reception, which can be determined by turning the equipment off and on, the user is encouraged to try to correct the interference by one or more of the following measures:
-Reorient or relocate the receiving antenna.
-Increase the separation between the equipment and receiver.
-Connect the equipment into an outlet on a circuit different from that to which the receiver is connected.
-Consultthedealeroranexperiencedradio/TVtechnicianforhelp.
Note: A shielded interface cable is required to ensure compliance withFCCregulationsforClassBcertification.
FOR YOUR RECORDS....
For your assistance in reporting this Electronic Organizer in case of loss or theft, please record the model number and serial number (located on the bottom of the case) below.
Pleaseretainthisinformation
Model Number
Serial Number
Date of Purchase
Place of Purchase

Introduction
Congratulations on purchasing the OZ-570 Electronic Organizer.
Please read this operation manual thoroughly to familiarize yourself with all the features of the unit and to ensure years of reliable operation. You may also find it useful to keep this operation manual on hand for reference.
Some of the accessories described in this manual may not be available at the time you purchase this product.
Check with your local SHARP dealer concerning availability.
All company and/or product names are trademarks and/or registered trademarks of their respective manufacturers.
Note:
*Some of the accessories described in the manual may be unavailable in some countries.
NOTICE
*SHARP strongly recommends that you keep separate permanent written records of all important data. Data may belostoralteredinvirtuallyanyelectronicmemoryproduct under certain circumstances. Therefore, SHARP assumes no responsibility for data lost or otherwise rendered unusable whether as a result of improper use, repairs, defects, battery replacement, use after the specified battery life has expired, or any other cause.
*SHARP assumes no responsibility, directly or indirectly, for financial losses or claims from third persons resulting from the use of this product and any of its functions, such as stolen credit card numbers, the loss or alteration of storeddata,etc.
*The information provided in this manual is subject to change without notice.
The functions such as Calendar and Schedule in this product can handle dates from January 1, 1901 to December 31, 2099.
1

Contents
Introduction ............................. |
1 |
Contents ............................... |
2-3 |
Caring for the Organizer .................... |
4 |
Chapter 1 Getting Started .................. |
5-18 |
Part Names and Functions |
|
Getting the Organizer Up and Running |
|
SettinguptheOrganizerafterInitialization |
|
Getting to Know Your Organizer |
|
Chapter 2 General Operation ................ |
19-32 |
Opening an Application
Selecting the Display Modes
Creating a New Entry
Editing an Existing Entry
Editing Techniques
Finding Specific Entries in Your Organizer
Deleting Entries
Checking the Time and Date
Checking the Memory
The TOOLS Menu - the Organizer’s Basic Utilities
Chapter 3 Time Management ................ |
33-44 |
The Calendar Application |
|
The Schedule Application |
|
The To Do Application |
|
The ANN (Anniversary) Application |
|
Chapter 4 Creating Your Own Database ........ |
45-50 |
The Tel Application |
|
The User File Application |
|
Customizing the User File Application |
|
Chapter 5 Memo ......................... |
51-54 |
The Memo Application |
|
Chapter 6 Desk Accessories ................ |
55-66 |
The Calc (Calculator) Application |
|
The Clock Application |
|
Chapter 7 Expense Function ................ |
67-72 |
Entering Expense Record |
|
Expense Report |
|
Chapter 8 Features and Utilities for Added Power |
73-76 |
Copying or Moving Blocks of Text |
|
Copying or Moving Entries |
|
Special Characters |
|
Chapter 9 Using the Optional Peripherals ...... |
77-82 |
The Peripherals Menu Transferring Data
Exchanging Information with a Personal Computer Points to Remember when Using Peripherals
2
Chapter 10 Personalizing Your Organizer ....... |
83-88 |
Setting the Owner Information |
|
Locking the Organizer |
|
Changing the Calendar Display Format |
|
Selecting the Large Font View |
|
Appendices ............................. |
89-93 |
A. Resetting the Organizer |
|
Allresetoperation |
|
B. Battery Replacement |
|
General guidelines |
|
Replacing the operating batteries |
|
C.Specifications |
|
Index .................................. |
94-98 |
Product Support.......................... |
99 |
3

Caring for the Organizer
The Organizer contains sophisticated circuitry and a glass display panel which can be damaged if not handled with care. A few precautions should be taken regarding the Organizer’s care to ensure it gives you many years of reliable and troublefreeuse.
*Keep the Organizer away from extreme heat. Do not leave it on the dashboard of a car or near any sourceofheat.Donotleaveitinany place that is extremely damp or dusty.
Wrong |
* Do not drop the Organizer or subject |
Wrong |
|
ittosevere impact orextreme force. |
||
|
||
Bending the Organizer unduly can |
|
|
damage it. |
|
|
* Do not use extreme force when |
|
|
pressing the keys. Do not use any |
|
|
sharp, pointed object or even your |
|
|
fingernails to press them. |
|
|
|
Wrong |
* Sharp or hard object can scratch |
Wrong |
|
and damage the Organizer. Make |
||
|
||
sure it is adequately protected when |
|
|
carried with other objects. Do not |
|
|
carry it loose in a bag or briefcase: |
|
|
find a pocket or secure compartment |
|
|
within your bag. |
|
|
* CleantheOrganizer onlywith asoft, |
Wrong |
|
dry cloth. Do not use solvents. |
||
|
* Do not carry the Organizer around |
Wrong |
|
in your back pocket, as it may break |
||
|
||
when you sit down. The display is |
|
|
made of glass and is very delicate. |
|
*Since this product is not waterproof, do not use it or store it where fluids, for example water, can splash onto it. Raindrops,waterspray,juice,coffee,steam,perspiration, etc.willalsocausemalfunction.
*Replace the batteries as soon as they become weak (see p.90). Failing to replace weak batteries may result in leakage or lost data.
4

CHAPTER 1 |
|
Getting Started |
1 |
This chapter explains everything you need to know to set up and begin working with your Organizer, from installing the batteries to initialization. The chapter also includes a labeled illustration of the parts of the Organizer, and basic explanation of its key features, from the keyboard to the display and its symbols.
5

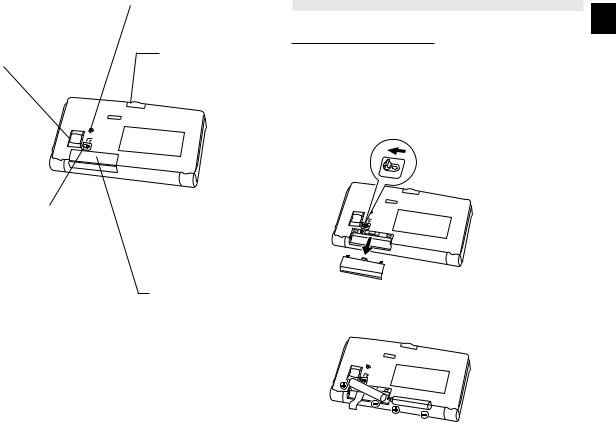
Part Names and Functions
CALC/CONV A B A
B A B
B
•
•
AM |
PM |
|
( |
$ /
Display
Shows information, and is used for navigating thevariousfunctions.
Numeric keypad
Used for operating the calculator and entering numbers in other applications.
) |
SOLVE |
? |
CANCEL CALENDAR |
DAILY |
SCHEDULE |
ANN |
TO DO |
|
|
SYNC |
|
|
|
|
|
SEARCH |
A |
A |
MENU |
PREV |
TEL |
USERFILE |
MEMO |
EXPENSE |
CLOCK |
|
|
|
|
|
|
|
|
NEW |
EDIT |
NEXT |
|
|
|
|
|
||
PORT |
ALARM |
|
|
HELP |
|
|
|
|
|
|
|
|
|
OPTION |
CAPS |
CUT |
COPY |
PASTE |
|
|
Application keys
Startsappropriateapplications.
Arrow (cursor) keys
Keyboard
For entry of characters and commands.
4-pin cable jack
Connects 4 pin Communication Cable for otherinterfaces,etc.
6
|
|
Reset button |
|
|
|
|
|
Initializesandresets |
Connects the docking |
|
the Organizer. |
station for PC |
|
Lock button |
communication. |
|
|
|
Opens the Organzier. |
|
|
|
RESET |
|
BATTERIES |
REPLACE |
OPERATION |
NORMAL |
Getting the Organizer Up and Running
1
Installing the batteries
1.Set the battery replacement switch on the bottom of the Organizer to REPLACE BATTERIES (the red dot becomes visible).
2.Slideofftheoperatingbatteriescover.
Battery replacement switch
Locks the battery compartment to prevent access to the batteries
RESET |
|
BATTERIES |
REPLACE |
OPERATION |
NORMAL |
Operating battery compartment
Holds operating battery
3.Insert two batteries on top of the ribbon tab, making sure they are positioned correctly according to plus (+) and minus (-) polarity, as shown below.
RESET |
|
BATTERIES |
REPLACE |
OPERATION |
NORMAL |
7

4.Replace the cover.
5.Set the battery replacement switch back to NORMAL OPERATION (the red dot disappears).
*The Organizer will not function unless the battery replacement switch is in the NORMAL OPERATION position.
Initializing
The Organizer must be initialized when it is used for the first time.
1.Press and hold the [ON] key.
2.While holding down the [ON] key, push the RESET button on the bottom of the Organizer using a pen or some other pointed object. The following message will appear.
3.Press[Y]toinitializetheOrganizer.
The message “Working...Please Wait.” appears while the Organizer proceeds with the initialization procedure.
The LCD Contrast screen then appears.
4.If the display is not clear, press [  ] and [
  ] or [PREV] and[NEXT]untilthedisplayissatisfactory.
5.Press [ENTER] when ready.
The Replacing Batteries Alert message will be shown. Press [ENTER] and the Organizer will automatically start the SETUP utility, so that the owner information, the time and date and various other settings are defined before use.
8
Setting up the Organizer after Initialization
The Organizer takes you through the various steps needed to set up the Organizer before use. These steps are described below. We strongly recommend that you complete the entire SET UP procedure before starting to actually use your Organizer.
*Welcome messages
*Name Field Setting
*User Setup Introduction
*Setting the Owner Information
*Setting the Clock
*Advanced Setup
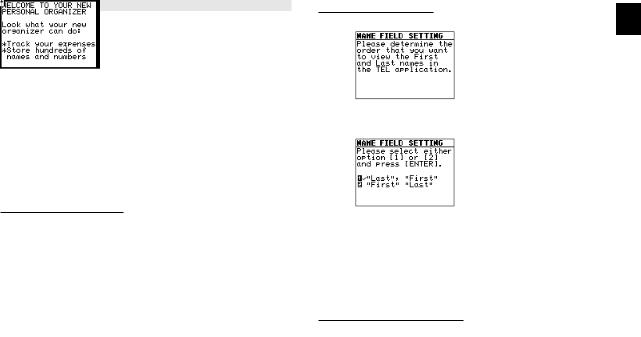
Welcome messages
After completing the LCD Contrast setting, the Organizer displays the following welcome message, briefly outlining its functions.
When  and
and  are displayed, hidden entries can be displayed by pressing [NEXT] ([
  ]) or [PREV] ([
  ]).
]).
Press [ENTER] once or twice to proceed with the Name Field Setting.
Name Field Setting
1
1.Press [NEXT] to turn to next page.
2.Press [1] or [2] to select the desired name order. Press [ENTER] when you have finished.
The User Setup introduction appears to explain the operations you are about to carry out.
User Setup Introduction
Press [ENTER] to continue.
The User Setup Basic Instructions appear to instruct you how to move around the screen during User Setup and normal use.
You can use [  ] [
] [  ] [
] [  ] [
] [  ] to move around the screen.
9
You can also use [PREV] and [NEXT] to move cursor to previous or next page.
Press [ENTER] to proceed with setting the Owner Information (or [CANCEL] to exit the SETUP procedure).
Setting the Owner Information
The Owner Information comprises your name, address and telephone number.
*If you make a mistake while entering the Owner Information, don’t worry! You can amend the Owner Information easily during normal use, so just proceed with the rest of the User Setup. (see PREFERENCES, p.83)
1.After pressing [ENTER] after the previous Basic Instructions screen, the Set Owner Information screen appears.
2.Enter your name, then press [  ].
].
The cursor moves to the NUMBER field.
3.Enter your number an example, tel number, mobile phone number, etc. Then press [  ]. The cursor moves to the ADDRESS field.
4.Enter your full address.
*Press [  ] to move the start of the next line in ADDRESS.
5.Press [ENTER] when done.
Press [ENTER] to proceed with setting up the Clock as described below (or [CANCEL] to quit the User Setup procedure).
Setting the Clock
In order for the Calendar, Schedule, To Do, and other timebased applications to work correctly, the built-in clock must be set to the correct time, date and city. The Clock application displays the time in two different cities: the Local city, where the user normally lives or works, and the World city, which is any other city of the user’s choice. When the Organizer is first initialized,theLocalcityisautomaticallysettoNewYork,and the World city is London. Before setting the Clock’s correct time, you should first select the Local City for which you want tosetthetime.
After entering the Owner Information above, the following list ofcitiesappears:
1 0

1.If the desired city does not appear, press [PREV] or [NEXT] todisplaymorecities.
*You can jump to a particular country by pressing the first letterofthatcountry’s name.
2.Select the desired city by moving the cursor to it and then press [ENTER] to confirm. Or select numbers [1] - [4] directly.
The Daylight Saving Time screen appears.
3.IfyourcityiscurrentlyonDaylightSavingTime,press[Y], otherwise press [N].
The ADJUST TIME/DATE window then appears.
4.Select the time system you want the Clock to use by pressing [ ] or [
 ], then press [
  ].
].
5.In the DATE field, press [  ] to display the pop-up calendar. Use [PREV] and [NEXT] to select the current month, then use the arrow keys to select today’s date.
6.Press [ENTER] once the date has been selected.
The pop-up calendar disappears and the date now appears in the DATE field.
7.Press [  ] to move to TIME field. Enter the local time, preceding single-digit hours and minutes with “0”.
8.Press [PM] to select PM or [AM] for AM, then press [ENTER].
A new screen then appears to inform you that the basic setup procedure is now completed, and the Organizer is ready for 1 use. However, there are other areas in which you can customize your Organizer further by setting various options. You can select START ORGANIZING to start using the Organizer. Or you can choose ADVANCED SETUP to further customize your Organizer.
To start working with the Organizer
After initialization and the User Setup has been set, the Organizer is ready to be used for normal work, such as the entryofinformation.
1.Select START ORGANIZING from the User Setup screen.
The Calendar application opens in the 2-Month view.
2.Select any application you wish to use by pressing the corresponding key.
Advanced Setup
1.Select ADVANCED SETUP from the User Setup screen.
The User Setup display then appears. There are two choices available.
1CHANGE WORLD CITY
2LOCK ORGANIZER
If you do not wish to set the Advanced Setup at this time, press
1 1

[ENTER] to exit set up. The Calendar application display then appears, and you can begin to use your Organizer.
To set one of the Advanced Setup, select the appropriate option.
Setting the World City
As wellas settingtheLocalCitypreviously,youcanalso select the world city, used to display the time in another city of your choice alongside the Local time. When the Organizer is initialized,theWorldcityissettoLondon.
To select the World city:
1.Select CHANGE WORLD CITY from the Advanced Setup screen.
The CHANGE WORLD CITY screen appears. A list of six capital citiesisgiven,withfourcitiesdisplayedatonetime.
2.If the city you wish to select does not appear in the list, typethefirstletterofthedesiredcountry.
3.Select the desired city by moving the cursor to it and then press [ENTER]. Or select numbers [1] - [4] directly.
Setting the Password and Locking the Organizer
The Organizer allows you to keep selected entries in your Organizer secure by locking it with a password. Once the
Organizer is locked, the Secret entries cannot be accessed until the Organizer is Unlocked, for which the password must be given.
Select this option if you want to define a password and lock the Organizer.
1.From the Advanced Setup screen, select LOCK ORGANIZER.
The Lock Organizer screen appears.
2.Enter the password you wish to use then press [ENTER].
3.Re-type the password to confirm and then press [ENTER].
A message appears reminding you to remember your password or keep it in a safe place.
4.Press [ENTER].
The Advanced Setup screen reappears.
Press [ENTER] to exit setup.
Turning the Organizer on and off
Press [ON] to turn the power on and [OFF] to turn the power off. The Organizer will not operate if the battery replacement switch is in the REPLACE BATTERIES position.
1 2

Auto power off
Toconservebatterypower,theOrganizerwillturnitselfoffifit has not been used for about 7 consecutive minutes. However, in order to avoid accidentally interrupting data transfers, the auto power-off function is disabled while communicating with other devices.
If the Organizer’s power goes off automatically before an entry you have been working with is stored in an application, the data will not be lost. When you press [ON], the Organizer will return to the same operating state as before the power turned offautomatically.
Setting the LCD contrast to suit various lighting
conditions
From time to time, the contrast of the LCD display may have to be adjusted for ideal readability. You may find, for example, thatacontrastsettingthatwasfineforthehomeorofficeisnot adequate when outdoors or when traveling on public transport. Follow the procedure below to adjust the LCD contrast.
1.Press [MENU] three times to open the TOOLS menu.
2.Select LCD CONTRAST.
3.Adjust the contrast by pressing [  ] and [
  ] or [PREV] and [NEXT].
4.Press [ENTER] when you are satisfied with the contrast.
Turning the key beep on and off
1
The Organizer can be set to make a sound (a beep) each time a key is pressed. This may help you to know whether a key has been pressed properly. The default setting is on, indicated by a musical symbol  on the bottom of the display. You can use the TOOLS menu to change the setting.
1.Press [MENU] three times to open the TOOLS menu.
2.Select KEY SOUND ON (  indicates that the option is currentlyset.)
The key beep is now turned off and the musical symbol  disappears from the bottom line of the display.
Backlight
The Organizer provides a built-in Backlight, which allows you to view the display and use the Organizer even in low-light conditions, eg. in a theater, restaurant, or business presentation. When already on, press [BACKLIGHT] again to turn it off.
If you press [BACKLIGHT], the Backlight will remain on for as long as you continue to use the Organizer, until you have not typed any key for a set time duration. This is useful if you want to enter or access some information that will take longer than a set time duration.
You can set how many seconds the Backlight to be turned off afterfinishingoperation.
1 3

1.Press [MENU] twice to open the PREFERENCES menu.
2.Select BACKLIGHT SETUP.
A submenu appears,
Getting to Know Your Organizer
OZ-570 Organizer is a compact yet sophisticated information management device that you can use anytime, anywhere. Their applications and utilities allow you to enter and organize information, and it has powerful communications facilities that enable you to put that information to optimum use when you return to your home or office. You can quickly update your computerized mailing lists, for example, or even transfer your notes, letters and memos onto a PC for further processing.
3.Select an option by pressing [  ] and [
  ].
].
4.Press [ENTER] when you have finished.
The Backlight may remain on for less than a set time duration ifthebatterylevelisverylow.
Note: Do not use the Backlight unnecessarily.
*Since the Backlight drains power from the operating batteries,excessiveuseoftheBacklightwillsignificantly reduceyourbatterylife.
*Continuous use of the Backlight will, over time, lead to gradual loss of brightness.
Applications
Operations on the Organizer are performed using applications. The Organizer’s Calendar and Schedule, for example, are applications that record and display time related information. To start an application, press the corresponding key on the top of the keyboard.
When working in one application, you can switch to another application simply by pressing that application key. Data being processedinthefirstapplicationwillbekept,eveniftheentry is not complete.
Menu operations
Another powerful aspect of using the Organizer is its menu system, which can be used to quickly issue commands and perform operations. Two universal menus, PREFERENCES and TOOLS, are available from all applications. In addition, all applications have a menu for functions and commands that are specificto each application.
1 4

Press [MENU] once displays the application menu, which contains the operations and commands specific to the particular application. Pressing [MENU] successively displays the PREFERENCES, TOOLS and PERIPHERALS menus.
Pop-up menus
The Organizer’s pop-up menus offer a convenient and efficient method of selecting options from pre-defined lists, similar to many of the latest personal computer application software packages. Most applications and functions contain some popup fields. When the user moves to one of these fields, the popup symbol appears on the right of the field. Pressing [  ] causes the pop-up menu to appear, containing a list of options orvaluescurrentlyavailableforthatfield.Youcanthenselect the desired item from the list without having to type any text.
Inaddition,alldatefieldsfunctionaspop-upfields.Whethera date can be entered, the user can press [  ] to display the special pop-up one-month calendar. You can use [PREV] and [NEXT] to select the desired month, then the arrow keys to select the desired date. You may find this more convenient than typing in the date directly, since the pop-up calendar also shows the days of the week.
1
The keyboard
The Organizer’s keyboard has a standard layout, just like a typewriter or computer. [  ] works just like the Shift key on a typewriter or computer, and [2nd] [
  ] is like the Caps Lock key.
Above the keyboard are the special keys used to start the Organizer’s various applications, work with the various menus and control the cursor on the screen.
Symbols in white above a key such as ’ or : can be accessed by holding down [  ] and then pressing the appropriate key.
Functions in blue above a key, such as HELP, can be accessed by pressing the particular key after pressing [2nd]. There is no need to hold down [2nd] while you press the desired key.
*Special symbols and characters, such as “&”, “?” and “/”, can also be entered by using [SMBL]. For a full explanation, see P.75.
1 5

Display symbols
The following symbols appear at the bottom of the screen to indicate various operating conditions.
|
This symbol appears at the bottom of the display |
|
to indicate that the current entry (in View or Edit |
|
mode) has been marked as Secret. |
|
These symbols indicate that all information in an |
|
entry cannot be shown simultaneously on the |
|
display. The additional entries or fields which |
|
cannot fit onto the display can be viewed by |
|
pressing the displayed arrow keys. |
2nd |
The [2nd] key has been pressed. |
|
The operating batteries are weak and need to be |
|
replaced (see p.90) |
CAPS |
[2nd] [ ] has been pressed. In caps lock mode, |
|
all typed letters will be in upper case. Press [2nd] |
|
[ ]againtoturnoff caps lock. |
|
The Organizer is locked. Entries marked as secret |
|
cannot be accessed without first entering the |
|
password and unlocking the Organizer (see p.85). |
EDIT |
The entry on the display can be edited. |
All alarms are enabled. When this symbol is not shown, the alarm sound for any alarms that have been set is disabled (see p.65).
The key sound is on (see p.13).
This symbol appears at the bottom of the display whilethebacklight ison.
Built-in help and other messages
The Organizer has a built-in help feature which acts as a convenient, on-line reference manual. You can call up the Help feature at any time simply by pressing [2nd] [HELP]. On-line help is quite extensive, so you may have to call up more than one screen to find the information you require.
When built-in help is not available
On-line help is only available when called from an application screen, ie. not while performing a menu command, opening message box or some other operation. Pressing [2nd] [HELP] when there is no application display on the screen will have no effect.
How to use built-in Help
If you press [2nd] [HELP] from any application screen, the HELP INDEX appears:
1 6

To get Help, press the number corresponding to the menu option describing the kind of Help you want. Pressing [CANCEL] takes you back to the display you were in previously. After selecting a number, the first page of help for corresponding topic is displayed.
If you make a selection from the above menu, the display that appears will resemble the following example:
In this type of display, pressing [NEXT] takes you to the next page of the display, pressing [PREV] takes you to the previous page, and pressing [CANCEL] takes you back to the HELP INDEX menu.
From time to time during normal operation, the Organizer will display messages to guide you through necessary tasks. Many of these messages will give you a choice of commands or ask you to confirm important operations, while others will simply
display information for you to read. In most cases, you must make a selection or simply acknowledge the message before 1 continuing.
Other messages may display information briefly before disappearing.
1 7
1 8

Chapter 2
General Operation
This chapter introduces most of the Organizer’s basic operations. The Tel application will be used for the examples. However, most of the techniques described here can be applied to all of the Organizer’s applications.
Opening an Application
To start an application, simply press the corresponding key, located on the top of the keyboard. Each time you press [CALENDAR], [SCHEDULE], [TO DO], [ANN], [CLOCK], [TEL], 2 [USER FILE], [MEMO], [EXPENSE], [DAILY] or [CALC/CONV],
the selected application will appear. Any application already being displayed will be hidden whenever a new application is selected. You can always return to another application at the exact point where you left off simply by pressing its key again. However, only one application at a time can ever be displayed.
1 9
Selecting the Display Modes
Once an application is open, you can switch between three basic display modes: Index, View and Edit. Each display mode has its own unique appearance and particular purpose. Index mode is normally the default view when an application is opened, and provides a summary of the individual entries that have been created. Pressing [ENTER] after selecting a particular entry causes the entry to be displayed in View mode, which shows the full details of the entry.
Pressing [EDIT], either when an entry is displayed in View mode or is selected in Index Mode, causes the entry to be displayed in Edit mode.The entry’sdetailscanthen be alteredas desired. Edit mode is also used when an entry is being created (by pressing [NEW]).
*The Calc (except Conversion function) and Clock applications do not have Index, View or Edit modes.
Index mode
The Index mode of Tel and User File shows you a two lines view of each entry within the application while the Index mode of the rest of the applications shows you a one line view of each entry. This allows you to easily find a particular entry, which you can then display in full (View mode) by pressing [ENTER].
Other operations:
[NEW] |
Creates a new entry for the current application |
|
|
|
(in Edit mode). |
[EDIT] |
Displays the currently selected entry and edits |
|
|
|
it(Editmode). |
[DEL] |
Deletes the currently selected entry. |
|
[PREV] |
Displays any previous/subsequent entries not |
|
[NEXT] |
shown. |
|
[ |
][ ] |
Selects an entry. |
[ |
] |
Displays category menu and user can select a |
|
|
category. |
*Under the Index mode of Tel application,  and
and  will be shown to indicate office phone number and home phone number respectively.
2 0

View mode
View mode allows you to see the full details of an entry, without
being able to edit or change it.
Other operations:
[NEW] |
Creates a new entry for the current application |
|
|
|
(in Edit mode). |
[EDIT] |
Edits the currently displayed entry. |
|
[DEL] |
Deletes the currently selected entry. |
|
[PREV] |
Displays any previous/subsequent entries not |
|
[NEXT] |
shown. |
|
[ |
][ ] |
Displays any information not shown within an |
|
|
entry. |
[ |
] |
Displays field names. |
*Under the View mode of Tel application,  ,
,  ,
,  ,
,  and
and  will be shown to indicate office phone number, fax number, home phone number, mobile phone number
and pager number respectively.
Edit mode
Edit mode is used to create a new entry or edit an existing entry.
Cursor 2
Other operations:
[CANCEL] |
When user cancel to edit the data in edit mode, |
||
|
|
|
“Do you really want to throw away all of these |
|
|
|
changes? Yes/No” will be shown for |
|
|
|
confirmation. |
[ENTER] |
|
Stores an entry in the Organizer’s memory or |
|
|
|
|
initiatesanoperation. |
[ |
] |
|
Activates the pop-up menu for a field |
|
|
|
displaying the “pop-up” symbol. |
[ |
][ |
] |
Moves the cursor. |
[ |
][ |
] |
|
[PREV] |
|
Move cursor to previous or next page. |
|
[NEXT] |
|
|
|
2 1

Creating a New Entry
In Index or View mode, pressing [NEW] opens a blank form for creating a new entry.
Make the following new Tel entry:
CATEGORY |
BUSINESS |
LAST NAME |
Jones |
FIRST NAME |
Pat |
COMPANY |
SHARP CORPORATION |
TITLE |
SUPERVISOR |
OFFICE# |
201-654-6546 |
FAX# |
201-654-6547 |
1.Press [TEL] to open the application.
The application opens in Index mode. The alert message “Press [NEW] to make a new entry” is shown when there is no data registered.
2. Press [NEW] on the keyboard.
A blank form opens in Edit mode.
3.Press [  ] to move to the CATEGORY field. Press [
  ] to
] to
open the pop-up menu. Select BUSINESS.
4.Press [  ] to move to the LAST NAME field. Type in the last name Jones.
5.Press [  ] to move to the FIRST NAME field.
6.Type in Pat.
7.Press [  ] to move to the COMPANY field.
8.Type in SHARP CORPORATION.
9.Press [  ] to move to the TITLE field.
10.Type in SUPERVISOR.
11.Press [  ] to move to the OFFICE# field.
12.Type in 201-654-6546.
13.Press [  ] move to the FAX# field.
14.Type in 201-654-6547.
15.Press [ENTER] to store the entry.
The message “Stored!” appears briefly. The entry is now stored in the Organizer’s memory and displayed in View mode.
*For other useful methods available in Edit mode, see below.
*Press [2nd] [ENTER] to store an edited entry as new, leaving the original unchanged.
2 2

Editing an Existing Entry
To edit an entry already stored in memory, you must first access the entry in Edit mode (in which it was originally created).
1.Press [TEL] to open the application.
2.Select the desired entry in Index mode.
3.Press [EDIT] to open the entry in Edit mode.
4.Make any necessary changes.
5.Press [ENTER] to store the changes when you are finished.
Thenew,editedentryisnowstored,replacingtheoriginalentry.
Editing Techniques
This section explains all the general editing techniques used in Edit mode when making a new entry or editing an existing
entry in all of the applications. (The Memo application has many 2 additional features for working with text; see p.51 for more information.)
Fields
Most applications divide the display into field boxes. The number of fields in each application varies, as do the types of fields.Thedifferenttypesoffieldincludetextfields,adatefield, timefieldsandpop-upfields.Therearealsoa fewspecialtypes of textfields.In theUserFilesapplication,youcandefinethe names of fields according to your preferences (see p.48).
You can type any character into a text field. The size of a text fieldislimitedonlybythesizeoftheentry.Textfieldsadjust their size automatically to accommodate the number of lines entered.
Only a date can be entered in a date field, usually in the format MM/DD/YYYY. For example, you would type 01011999 to enter JANUARY 1, 1999.
Onlya timeof day can be enteredin the timefield,in the format of HH:MM followed by [AM] or [PM] (for AM and PM). For example, to enter 9:00 AM, you would type 0900 then press [AM].
2 3

When the pop-up symbol  appears by a field while editing an entry, this indicates that a pop-up menu is available for the field. The pop-up menu contains a list of values available for thefield,andisusedbypressing[
 ]andselectingthedesired value from the pop-up list. Note that the pop-up symbol only appears next to a field in Edit mode, when the field is selected. When you move out of a pop-up field, the pop-up symbol disappears.
The cursor
The cursor is used to work with text, indicating the position where text will be entered or deleted. It is also used to select items from menus or lists.
In text fields, where there is no restriction on the type of text (letters or numbers) that can be entered, the cursor appears as  in insertion mode, or
  as in overwrite mode (see p.25).
In the date and time fields, the cursor appears as  , indicating that numbers only should be entered in a specified format (see above).
*In text fields or boxes when there is no character at the cursor position, the cursor appears as _.
Typing in text
Typing in text is simple and straightforward. The Organizer’s keyboard layout is just like the keyboard on a typewriter or computer.
Letters (lower-case and upper-case)
Any of the standard letters (A to Z) can be entered by pressing the corresponding key. All letters will normally appear in lower case. Hold down either of the [  ] keys while pressing letter key(s) to enter upper-case letters. [2nd] [
  ] functions like a “Caps lock” key on a typewriter or computer. Once pressed, the symbol CAPS will appear in the display. Any letters typed while the Organizer is in CAPS mode will appear in upper case. To switch back to lower-case mode, simply press [2nd] [
  ] again. To enter lower-case letters while in CAPS mode, hold down [
  ] while pressing a letter key.
Numbers
Numbers are entered using the numeric keypad located to the right of the display. The numbers are entered regardless of whether CAPS mode is on or off.
Symbols
The symbols that appear in white above certain keys can be entered directly from the keyboard. Holding down [  ] while pressing the appropriate key will allow you to enter these symbols. Colons can be entered by holding down [
  ] and pressing the [ • ] key. In addition, a large number of special
2 4

symbols are available by pressing [SMBL] (see p.75)
Moving around the display
You can move the cursor around the display with the arrow keys[ ],[
],[ ],[
],[ ],[
],[ ],[PREV]and[NEXT].Inaddition, you can hold any arrow key down for continuous rapid movement.
The following convenient keyboard shortcuts are also available in Edit mode:
[2nd] [ |
] |
Moves the cursor to the end of the line. |
[2nd] [ |
] |
Moves the cursor to the beginning of the line. |
[2nd] [ |
] |
Movesthecursortothefirstlineofafield. |
[2nd] [ |
] |
Movesthecursortothelastlineofafield. |
[2nd] [PREV] |
Movesthecursortothefirstfield. |
|
[2nd] [NEXT] |
Moves the cursor to the last field. |
|
Inserting and overwriting text
To insert text into some existing text, move the cursor past the character after which you wish to insert text and begin typing. Insertion mode is the Organizer’s default setting, indicated by the triangle cursor  . To switch to the overwriting mode, press [INS].Anytextyouenterwillreplacetheexistingtext.Thecursor
appears as  in the overwrite mode. To switch back to the previous mode, press [INS] again.
Deletingtext
2
If you make a mistake while entering text, use the following keys to erasetheincorrecttext,thenenter the correcttext:
[BS] |
Deletes the character before the cursor |
[DEL] |
Deletes the character at the cursor’s current |
|
location. |
Working with blocks of text
Working with a block of text is sometimes easier and more convenient than working with characters one by one. The first stepistoselectthetexttoworkwith.
1.Hold down the [  ] key while using the arrow keys to move over the entire text that you want to work with. This will“highlight”thetext(displayitinreversewhiteonblack).
2.You can now perform a number of operations on the selectedtext:
2 5

[BS] or [DEL] |
Deletes the selected text. |
[2nd] [COPY] |
Copies the selected text to the clipboard so |
|
that it can later be pasted to another location. |
[2nd] [CUT] |
Deletes the selected text from its current |
|
location and moves it to the clipboard. |
[2nd] [PASTE] Replaces the selected text with whatever is currentlyintheclipboard.
Once text is selected, any new text that is typed in will replace the selected text. This can be useful if you are replacing one block of text with another, as selecting the old text and then typingthenewtextsavesyouthetroubleof actuallydeletingit first.
For a full explanation of the Cut/Copy/Paste functions, see
p.73.
Scrolling the display
If there is more information than can be displayed at one time, an arrow will appear at the bottom of the display. The arrows indicatethedirectionyouneedtoscrollin.Press[ ]or[
]or[ ] toscrolltheinformationonelineatatime.
Finding Specific Entries in Your Organizer
There are a number of ways that you can locate entries and information in your Organizer. One is to scroll between entries using the [NEXT] and [PREV] keys. Others are as follows.
Using Index mode
Index mode gives you a listing of all the entries in a particular application.Itisusefulforprovidingasummarylistoftheentries contained for that application, from which a desired entry may be selected.
Many applications open in whichever mode was active when they were last used, ie. View, Edit or Index mode.
1.Press the desired application key.
2.If it is not already displayed, switch to Index mode by pressing [ENTER] or [CANCEL].
Alistoftheexistingentriesappears.
3.Ifthedesiredentryisnotdisplayed,youcanscrollthelist of entries by pressing [  ] and [
  ].
].
2 6

4.When the desired entry is displayed, select it and press [ENTER] to see the entry in full.
5.You can also press any letters/symbols/numbers, then the most relevant entry will be highlighted. Press [ENTER] to see the details of the entry. (Only Tel, User File and MEMO applicationsprovidethisfunction.)
Using keywords
If you know a particular entry is in your Organizer, but you don’t remember where, you can use the Search command to findit.
1.Press [SEARCH].
The Search window will open.
2.Enter the name you are looking for. For example, type
SUMMER.
3.Press [  ] to open the pop-up menu. Press [1] - [8] to
select the appropriate application.
2
4.Press [ENTER] when ready.
*To search only secret entries (see p.85), press [2nd] [ - ] to check the SECRET ONLY item.
The Organizer will now display the first entry that contains the “keyword” that you entered.
If there is more than one entry that contains the keyword, press [NEXT] until you find the entry you are looking for. Then press [ENTER] when you have finished searching.
2 7

By date
You can use the various Calendar views to quickly and easily find information related to a time and/or date.
1.Press [CALENDAR].
The calendar appears in the preset view.
2.Select a day using the arrow keys, then press [ENTER] to see the Weekly Calendar.
3.Press [ENTER] again to see the Weekly Graph.
4.Press [ENTER] again to return to 2-Month Calendar.
For more information about using the Calendar application,seep.33.
*You can open the Calendar menu by pressing [MENU] to select the desired Calendar view.
2 8
Deleting Entries
Entries in the Organizer can be deleted using either the [DEL] key or the application menu.
Deleting single entries
1.Open the desired application.
2.Select the entry in Index mode.
3.Press [DEL] on the keyboard.
A confirmation message appears asking if you are sure you want to delete the selected entry.
4.Press [Y] (or [N] to cancel the deletion).
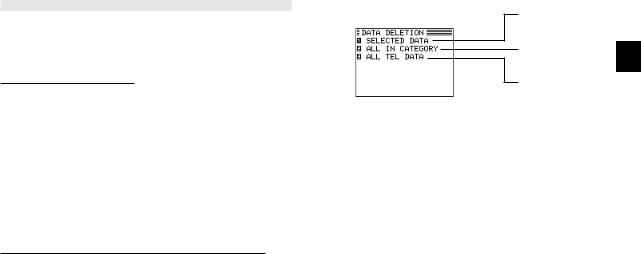
Deleting entries using the application menu
You can also make deletions using the application menu. The DATA DELETION submenu allows you to do this flexibly and easily.
1.Open the desired application.
2.Select the entry in Index mode or display it in View mode.
3.Press [MENU] to open the application menu.
4.Select DATA DELETION.
Deletes a selected entry.
Deletesallentriesin
theselectedcategory. 2
Deletesallentriesin
TEL application.
5.Select SELECTED DATA.
A warning message appears asking if you are sure you want todeletetheentry.
6.Press [Y] (or [N] to cancel the deletion).
2 9
 Loading...