


OZ-5600

®
MODEL
OZ-5600
ELECTRONIC ORGANIZER
OPERATION MANUAL
Quick Start ............................................. 8
Getting Started .................................... 41
General Operation ............................... 55
Time Management............................... 69
Creating Your Own Database ............. 95
Memo and Outlining .......................... 103
Desk Accessories .............................. 117
Money & Account Management ........ 133
Features and Utilities for
Added Power ..................................... 161
Using the Optional Peripherals ......... 169
Personalizing Your Organizer ........... 183
Appendices ........................................ 191

®
SHARP ELECTRONICS CORPORATION
Sharp Plaza, Mahwah, New Jersey 07430-2135.
SHARP CORPORATION
95G16T(TINSE1240PCZZ)
PRINTED IN JAPAN
➀
2

Introduction
Congratulations on purchasing the OZ-5600 Organizer.
Please read this operation manual thoroughly to familiarize
yourself with all the features of the unit and to ensure years
of reliable operation. You may also find it useful to keep this
operation manual on hand for reference.
Some of the accessories described in this manual may not
be available at the time you purchase this product.
Check with your local SHARP dealer concerning
availability.
All company and/or product names are trademarks and/or
registered trademarks of their respective manufacturers.
NOTICE
• SHARP strongly recommends that you keep separate
permanent written records of all important data. Data
may be lost or altered in virtually any electronic memory
product under certain circumstances. Therefore,
SHARP assumes no responsibility for data lost or
otherwise rendered unusable whether as a result of
improper use, repairs, defects, battery replacement, use
after the specified battery life has expired, or any other
cause.
• SHARP assumes no responsibility, directly or indirectly,
for financial losses or claims from third parties resulting
from the use of this product and any of its functions,
such as stolen credit card numbers, the loss or
alteration of stored data, etc.
• The information provided in this manual is subject to
change without notice.
1

Contents
Introduction ...................................................... 1
Contents ........................................................... 2
Quick Start........................................................ 8
Answers to Commonly Asked Questions.... 32
What Your Organizer Can Do........................ 36
About this Manual.......................................... 37
Conventions Used in this Manual ................ 39
Caring for the Organizer................................ 40
Chapter 1 Getting Started ............................ 41
Part Names and Functions.......................... 42
Getting the Organizer Up and Running....... 43
Installing the batteries....................................43
Initializing .......................................................44
Setting up the Organizer after Initialization . 45
Welcome messages and instructions............ 45
Setting the Owner’s Information .................... 45
Setting the Clock ........................................... 46
Setting the User’s Preferences......................47
Tel/User File Templates ................................47
2
Setting the Start-up Display...........................48
Setting the Password and Locking the
Organizer ....................................................... 49
Setting the World City.................................... 49
To start working with the Organizer...............49
Turning the Organizer on and off .................. 50
Backlight ........................................................50
Setting the LCD contrast to suit various
lighting conditions .......................................... 50
Turning off the initial display.......................... 51
Turning the key beep on and off....................51
Getting to Know Your Organizer.................. 52
Applications ...................................................52
Menu operations............................................52
Pop-up menus ...............................................52
The keyboard................................................. 53
Display symbols............................................. 53
Built-in help and other messages .................. 54
Chapter 2 General Operation....................... 55
Opening an Application ...............................55
Selecting the Display Modes....................... 56
Index mode .................................................... 56
View mode ..................................................... 57
Edit mode.......................................................57
Creating a New Entry ..................................58

Editing an Existing Entry ............................. 59
Editing Techniques ......................................59
Fields .............................................................59
The cursor......................................................60
Typing in text .................................................60
Moving around the display ............................61
Inserting and overwriting text ........................ 61
Deleting text................................................... 61
Working with blocks of text ............................61
Scrolling the display................................ 62
Finding Specific Entries in Your Organizer.. 63
Using Index mode.......................................... 63
Using keywords .............................................63
By date...........................................................64
Deleting Entries ........................................... 65
Deleting single entries ...................................65
Deleting entries using the application menu . 65
Checking the Time and Date....................... 66
Checking the Memory ................................. 67
The TOOLS Menu - the Organizer’s Basic
Utilities......................................................... 68
Chapter 3 Time Management ....................... 69
The Calendar Application............................ 69
Selecting a Calendar view .............................69
The Monthly view...........................................70
The Monthly view: Monthly Goals display ..... 70
The Weekly view ........................................... 71
The Daily view ...............................................71
Finding entries using the Calendar views ..... 72
Selecting a date.............................................72
Making new Schedule, To Do and
Ann entries.....................................................72
The Calendar application menu .................... 73
The Schedule Application............................74
Making new entries........................................74
Finding Schedule entries...............................75
Moving appointments and editing entries......75
Deleting entries..............................................76
Selecting a specific date................................77
Making entries for recurring and extended
events ............................................................77
Setting a Schedule alarm ..............................79
The Schedule application menu .................... 80
The To Do Application ................................. 80
Making new entries........................................80
Finding entries using Index mode .................82
Controlling how the Calendar displays
To Do information .......................................... 83
Using keywords .............................................83
3

Editing entries................................................84
Checking off completed entries ..................... 84
Using categories............................................85
Deleting To Do entries................................... 88
The To Do application menu .........................89
The Ann (Anniversary) Application.............. 90
Making new entries........................................90
Finding entries ............................................... 91
Editing Ann entries ........................................ 92
Deleting Ann entries ......................................92
The Ann application menu............................. 93
Chapter 4 Creating Your Own Database..... 95
The Tel and User File Applications.............. 95
Selecting a file ...............................................96
Creating new entries......................................96
Finding entries ............................................... 96
Editing entries................................................97
Deleting file entries ........................................ 98
The Tel application menu .............................. 98
The User File application menu.....................98
Customizing the Tel and User File
Applications ................................................. 99
Changing file names...................................... 99
Configuring fields.........................................100
Customizing the Index display.....................101
Modifying the Index sort order..................... 101
Modifying the templates...............................102
Chapter 5 Memo and Outlining.................. 103
The Memo Application...............................103
Creating documents .................................... 103
Finding entries ............................................. 104
Editing Memo entries................................... 105
Deleting Memo entries.................................105
Changing the way text is displayed .............106
Turning word wrap on and off......................107
The Memo application menu ....................... 107
The Outline Application ............................. 107
Creating an outline ...................................... 107
Locating outlines..........................................109
Displaying full topics ....................................109
Revising outlines ......................................... 110
Deleting Outline topics.................................112
Using subtopics (children) ........................... 113
The Outline application menu......................116
Chapter 6 Desk Accessories...................... 117
The Calc (Calculator) Application.............. 117
Using the arithmetic calculator ....................117
The paperless printer...................................118
4

Calculating dates ......................................... 120
Using the Calculator with other
applications.................................................. 121
When E appears ..........................................122
Cost/Selling price/Markup and Cost/
Selling price/Margin calculations .................122
Setting the number of decimal places ......... 123
Calculation examples .................................. 124
The Calc application menu ..........................125
The Clock Application................................126
Changing the Local city ...............................126
Setting the time and date ............................ 127
Checking the time in a city .......................... 128
Adding a User-defined city ..........................129
Daylight Saving Time (DST) ........................130
Setting daily alarms .....................................130
The Clock application menu ........................ 132
Chapter 7 Money & Account
Management .................................................133
Money Tracking application....................... 133
What it can do.............................................. 133
Introducing Money Tracking concepts.........133
Things to Know about Money Tracking.......134
Setting up Money Tracking accounts ..........135
Viewing account information ....................... 137
Editing or viewing account details ............... 137
Entering Money Tracking transactions........137
Viewing account transactions...................... 140
Displaying transactions in detail:
View mode ...................................................141
Editing/updating existing transactions:
Edit mode.....................................................141
Listing all transactions ................................. 142
A closer look at Money Tracking
transactions .................................................142
Using the Filter to display selected
transactions .................................................143
Canceling an active Filter ............................ 145
About Categories....................................... 145
Using the pre-defined Categories................145
Adding your own Categories .......................146
Editing Category names ..............................146
Using Categories ......................................... 147
The SPLIT function...................................... 147
Automatic transfers......................................149
Making a transfer for a SPLIT transaction...151
Account balancing & reconciliation ........... 152
Performing account balancing..................... 152
Marking transactions as CLEARED ............152
5

Postponing the ACCOUNT BALANCING
procedure.....................................................153
Balancing the account and reconciling the
transactions .................................................154
Handling unbalanced accounts ...................155
Removing transactions after account
balancing .....................................................156
When the Organizer is Locked .................... 156
Deleting Money Tracking entries................. 157
Money Tracking application menu...............160
Chapter 8 Features and Utilities for
Added Power ................................................ 161
Copying or Moving Blocks of Text............. 161
Copying or Moving Entries ........................ 162
The Time Stamp and Date Stamp
Functions................................................... 163
The Word Key ........................................... 164
Defining your words or phrases...................164
Inserting a word or phrase...........................164
Editing a word or phrase..............................165
Deleting a word or phrase ...........................165
The Filter Function .................................... 165
Turning the Filter on ....................................165
Turning the Filter off ....................................166
Deleting filtered entries................................ 166
Special Characters .................................... 167
Chapter 9 Using the Optional
Peripherals ................................................... 169
The Peripherals Menu............................... 169
Printing from the Organizer ....................... 170
Setting printer emulation ............................. 170
Printing the current display..........................171
Printing a single entry ..................................171
Printing a specified group of To Do
entries .......................................................... 171
Printing Schedule entries for specific
periods ......................................................... 172
Printing all entries ........................................172
Transferring Data....................................... 173
Transferring between OZ-5600
Organizers ...................................................174
Exchanging data with other Organizers ......176
The IN BOX and IN BOX VIEWER ...........178
Removing entries from the IN BOX .............178
Assigning entries to IN BOX from
applications.................................................. 179
Exchanging Information with a Personal
Computer................................................... 180
6

Points to remember when using
peripherals................................................. 181
Chapter 10 Personalizing Your
Organizer ...................................................... 183
The Start-Up Display................................. 183
Selecting the start-up display ......................183
Responses to the start-up display ...............184
Setting the Owner’s Information .................. 185
Locking the Organizer ...............................186
Turning on the Lock..................................... 186
Marking/unmarking entries as Secret.......... 187
Accessing Secret entries .............................187
Automatic Relocking....................................188
Changing or deleting the password............. 188
If you forget your password... ...................... 188
Changing the Calendar Display Format .... 189
Setting the monthly format .......................... 189
Setting up the default Calendar view .......... 189
Setting up the date format ........................... 190
Selecting the Bold display font .................. 190
All reset operation........................................197
C. Troubleshooting.................................... 198
D. Battery Replacement ............................198
General guidelines.......................................198
Replacing the operating batteries................199
Replacing the memory backup battery........200
E. Specifications........................................ 202
Index.............................................................. 205
Appendices................................................... 191
A. List of Key Notations............................. 191
B. Resetting the Organizer........................ 196
7

Quick Start
Important things to do
1.
Complete and return the Blue registration
card. This allows Sharp to notify you of new
products and accessories for your Organizer
as they become available.
2.
Please read through this Quick Start section.
Even if you hate reading manuals, this
section will get you up and running with your
Organizer in just a few minutes. The
Organizer has been carefully designed to be
extremely easy to use, but it will help you
greatly to go through this quick introduction to
setting up and using your Organizer.
3.
Read through the section for answers to
commonly asked questions. There is a good
chance that many general questions you may
have about your Organizer will be answered
in this section.
HELP
4.
2nd
Press
using a particular application on the
Organizer. The on-screen help facility
provides you with a quick reference guide
explaining various options and their functions.
H any time you need help
8
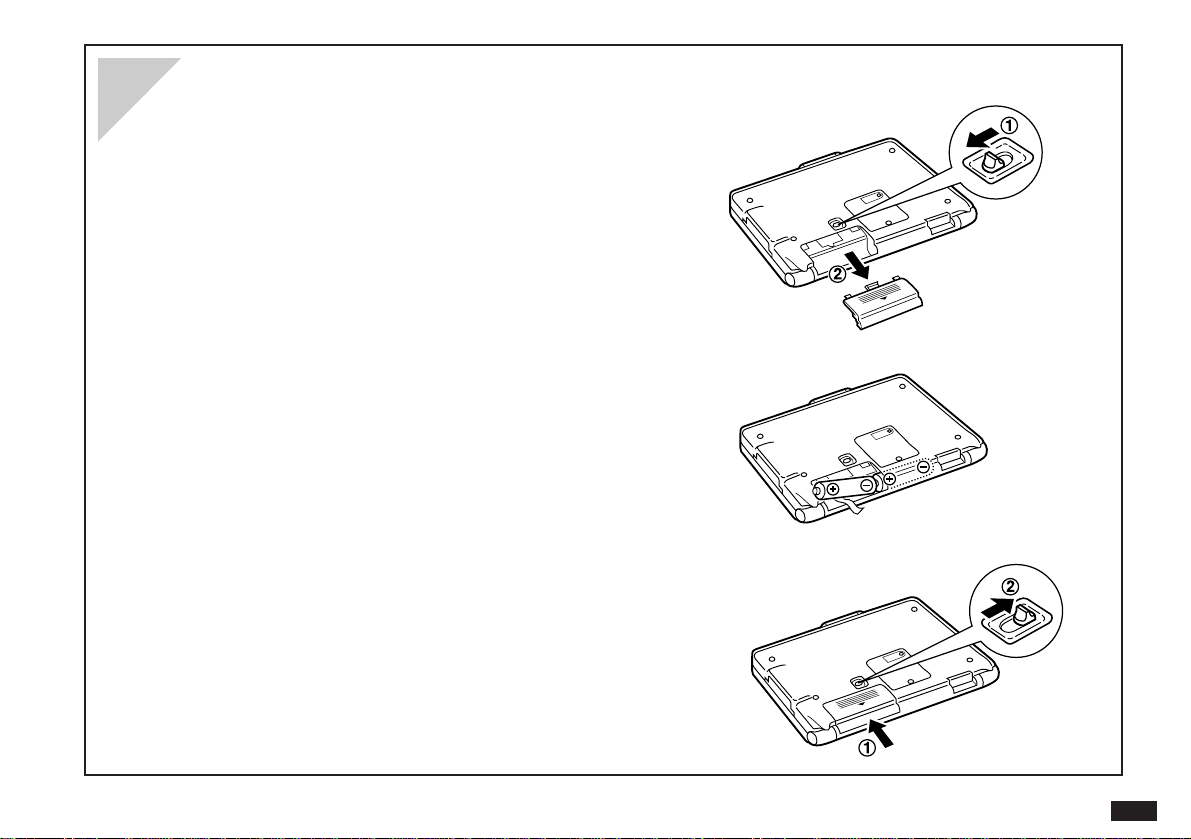
Installing or replacing the batteries
1.
Set the battery replacement switch on the bottom of the
Organizer to “REPLACE BATTERIES” (so the red dot
appears). (Fig. 1)
2.
Remove the operation battery cover and remove old
batteries. (Fig. 1)
3.
Insert the two batteries on top of the ribbon tab,
as shown in the diagram (Fig. 2)
4.
Replace the operation battery cover. (Fig. 3)
5.
Set the battery replacement switch to “NORMAL
OPERATION”. (Fig. 3)
Fig. 1
Fig. 2
Fig. 3
9
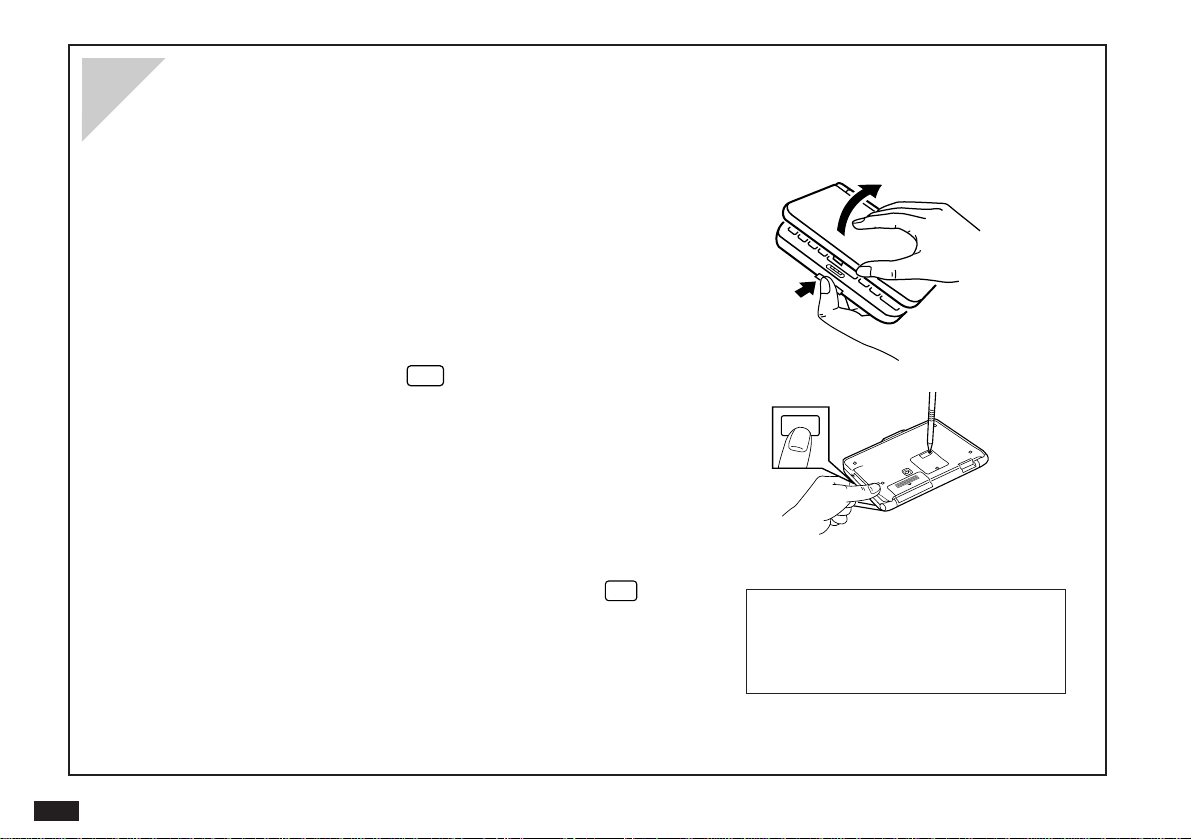
Initializing the Organizer
ON
After you install the batteries for the first time, you must initialize the Organizer before using it.
1.
Press the LOCK button and open the Organizer.
CANCEL
2.
While holding down the
push the RESET button on the back of the
Organizer with a pen or a similar object.
key on the keyboard,
ON
10
3.
When the confirmation message appears, press
to initialize the Organizer.
The Organizer then takes you through the set up
procedure, starting with adjusting the LCD contrast.
Y
#Q-3-3
4.
Press or to adjust the LCD contrast to your
liking.
#Q-3-4
5.
ENTER
Press
You may have to wait for about 10 seconds before the
next screen appears.
Note that the Start-up continues with “Setting up the
Organizer” on p.12.
.
11

Setting up the Organizer
After initializing the Organizer and adjusting the LCD contrast, or after restarting with the SET UP option selected for
START-UP mode, the following steps occur.
1.
The welcome screen appears, introducing you to the
Organizer’s features. Press
2.
After the User Setup introduction appears, press
ENTER
3.
After you have read the User Setup Basic Instructions,
press
4.
Enter the Owner Information, pressing to move
to the next field. (Don’t worry if you make a mistake, you
can change the Owner Information anytime; see Chap.10.)
to continue.
ENTER
to continue.
ENTER
to continue.
#Q-4-1
#Q-4-2
#Q-4-3
12
5.
6.
ENTER
Press
After the Owner Information confirmation screen appears,
ENTER
press
to store the information you entered.
to proceed with setting the Clock.
7.
You must select your local city before setting the
time. If your city is not shown, press
SPACE
select USER CITY2, then set up your city later (see
“Adding a User-defined city” in the Clock
application, Chap.6).
and
#Q-4-4
8.
9.
10.
ENTER
Press
when your city is selected.
If your country is currently using Daylight Saving
(Summer) Time, press
Y
, otherwise press N.
Next, enter the current time in your city, then press
.
Single-digit hours or minutes should be preceded by “0”,
eg. 0533. Press
11.
Select the time system you want to use, ie. 12- or
24-hour clock. Press
12.
Press ˜ and select today’s date from the pop-up
calendar, then press
Use and to select the month and the cursor
keys to select the day.
13.
14.
ENTER
Press
The User Setup screen is displayed. After reading, press
PM
AM
or ª for AM or PM respectively.
+
/–
.
ENTER
.
to save.
with User's Preferences.
ENTER
#Q-5-6
#Q-5-6 (showing pop-up calendar
& callout text)
to continue customizing your unit
13
User’s Preferences
#Q-6-2
1.
TEMPLATES
Built-in templates have been created for the Tel and User File applications. There are three telephone files
and three user files that can be customized to meet your specific needs.
14
To customize your Tel files highlight TEL TEMPLATE and press
you would like to customize. Press
ENTER
To customize your User File files, highlight USER FILE TEMPLATE and press
above.
2.
START-UP DISPLAY
Highlight START-UP DISPLAY and press
turn on the Organizer. Highlight your choice and press
to save.
START-UP ON: displays Owner Information on start-up and requires password if ASK
PASSWORD is set to ON.
OFF: Background appears only.
SETUP: displays User Setup screens on start-up.
˜
to bring up a list of template options. Highlight your choice and press
ENTER
. This allows you to choose what you want to see when you
ENTER
ENTER
to save.
. Use the cursor to highlight the file
ENTER
. Follow the steps
BACKGROUND – User can select the background to be displayed on start-up.
ASK PASSWORD – ON: A password is required on start-up if START-UP is also set to ON.
3.
MORE CLOCK SETTINGS
OFF: No password is required.
Allows you to choose the World city to be used in the clock display. Use
the cities. Highlight your choice and press
4.
LOCK ORGANIZER
Allows you to assign a password which will be needed in order to access entries marked as Secret.
5.
START ORGANIZING
At any time you can start to actually use the Organizer by highlighting START ORGANIZING and pressing
ENTER
The Calendar application opens with today’s date selected.
.
ENTER
to save.
and to scroll through
15
Making your first entry (in the Tel application)
1.
Press .
2.
3.
NEW
Press
.
Type in the name, telephone number and address of the
person or company you want to store.
#Q-8-1
Use to move between fields. Use BS or
correct mistakes. Use to move to a new line in
the name and address fields.
4.
Press
ENTER
when finished to store the new entry.
DEL
The dark outline around a field indicates that it is
selected for entering information.
Indicates that the entry is in Edit mode, so it is
being added or can be modified.
to
16
Recording an appointment
1.
Press , then press
2.
Today’s date has been given automatically. If you want to
NEW
.
use a different date, move up to the DATE field and press
˜
.
Press or to select the desired month, then use the arrow
keys to select the day of the appointment. Press
done.
3.
Move to the TIME field and type in the start and end times for
your appointment, then press
4.
Type in a description for the appointment (eg. “Meeting with
.
ENTER
John”).
Press
ENTER
to store the entry.
5.
#Q-9-1
when
#Q-9-2
17
Changing an appointment
Appointment times can frequently change. Instead of re-typing a new appointment and deleting the old one, you can
change an existing appointment easily.
1.
Find the Schedule entry you want to move.
18
2.
3.
4.
5.
EDIT
Press
If the appointment time has changed, enter the new
start and/or end times.
If the date has changed, move to the DATE field, press
and select the new date from the pop-up calendar, then
press
Press
ENTER
ENTER
.
.
to store the revised appointment.
#Q-10-1
˜
#Q-10-2 (showing pop-up
calendar and new date selected)
#Q-10-3 (with new date)
Entering a To Do item
1.
Press then press
2.
Enter a description of the task to be done, then press .
3.
Enter the DUE DATE, which is the date by which the task must
NEW
.
be completed.
#Q-11-1
4.
If desired, enter any other information.
Press
Press
ENTER
.
to store the entry.
5.
6.
The To Do index appears, showing you the list of all To Do
items.
You can assign a priority number which can be used
to sort the entries in Index mode.
Press to mark any entry as completed.
Up to five category fields can be used to selectively
access groups of entries using the Filter function.
#Q-11-2
19
Using the Calendar views
The Calendar provides three different views: Monthly, Weekly and Daily. Each of these views allows you to see
information stored using the Schedule, To Do and Ann applications.
1.
Press . If the Monthly view does not open, select it
by pressing , selecting VIEWS and then MONTHLY.
20
White-on-black display indicates an
Ann entry recording an anniversary or
some other annual event.
A lower dot indicates a Schedule
entry during the afternoon or
evening.
An upper dot indicates a Schedule
entry during the morning.
2.
Use the cursor to highlight a date, then press
to switch to the Weekly view.
#Q-12-2
ENTER
#Q-12-1
An exclamation mark indicates
a To Do item on this day.
If you de-select HIDE
MONTHLY GOALS from
the menu, the nextmonth view will be
replaced by the
MONTHLY GOALS.
Press to display additional
information for this day.

3.
Use the cursor to move to a selected day of the week, then
ENTER
press
to switch to the Daily view for that day.
#Q-12-3
Press to mark the selected
entry as completed.
4.
Use and to select an entry, then press
display its full details in the application used to create it.
You can also switch views by pressing .
You can press
allows you to make a new entry for the Schedule, To Do and Ann
applications.
NEW
to open CALENDAR ACTIVITIES, which
ENTER
Shaded areas on the time bar indicate
appointments. Black areas indicate
appointment conflicts.
to
21
Editing an entry
1.
Find an entry that you wish to change (a change of address in
the Tel application is shown here as an example).
2.
3.
4.
EDIT
Press
to go to Edit mode.
Move to the field you want to change.
Make any desired changes.
NOTE: You can clear any field by pressing
highlight any text using and the cursor keys, and then delete the
text (by pressing
it elsewhere.
If you make a mistake and want to restore the original entry, simply
press .
DEL
) or cut the text (by pressing
NEW
. You can
2nd
#Q-14-1 (TEL entry with
description highlighted)
to paste
22
Deleting an entry
1.
In any application, select an entry that you want to delete in Index mode, or display it in View mode.
2.
Press
A confirmation message appears.
3.
Press Y to confirm the deletion.
DEL
.
#Q-15-1
23
Deleting multiple entries
1.
Switch to the application in which you want to delete multiple entries.
2.
Press and select DATA DELETION then press
3.
Select the group of entries you want to delete and press
(The menu choices will vary depending on the application.)
4.
A confirmation message will appear. Press Y to delete the
selected items.
ENTER
ENTER
.
.
#Q-15-2
24

Searching for information anywhere in the Organizer
1.
2.
3.
4.
5.
2nd
Press
Type in any text stored in the entries you want to find.
Press ˜ and select the application to want to search in
using
The application you were using last will always appear as the default.
Press
Press to see additional entries that contain the searched
text, then press
.
and , then press
ENTER
to begin the search.
ENTER
ENTER
when you find the desired entry.
.
#Q-16-1
#Q-16-2
25
Finding an entry using Index mode
The Index modes for Schedule, Tel, User File, Ann, Memo, Outline, and Money Tracking are very similar.
1.
Select an application and press to go to
Index mode if it is not already displayed.
#Q-17-1
2.
Use and to scroll through the list until you find
the entry you want.
Type the first letter of the entry to jump to the closest position
in the Index list.
26
3.
Press
You can also press
ENTER
to view the desired entry once it is selected.
EDIT
to edit the entry, or
DEL
to delete it.
#Q-17-2
Copying and pasting text between applications
You may want to copy text from one place to another in the Organizer.
1.
Display in Edit mode the entry containing the text you want
to copy.
2.
Move to the start of the text you want to copy.
3.
While holding down , use the cursor keys to select the
text you want to copy.
Selected text is displayed in reverse (white-on-black).
#Q-18-1
4.
5.
6.
2nd
Press
Display in Edit mode the entry to which you want to add
the copied text.
Move the cursor to the position you want the copied text to
begin, and press
to copy the selected text.
2nd
.
#Q-18-2
#Q-18-3
27
Using the Calculator
In addition to working like a standard calculator, the Organizer’s Calculator can work with figures created in another
application.
1.
In Edit mode, find an entry containing some figures you
want to calculate.
2.
Use and the cursor keys to select the figures.
#Q-19-1
28
3.
4.
5.
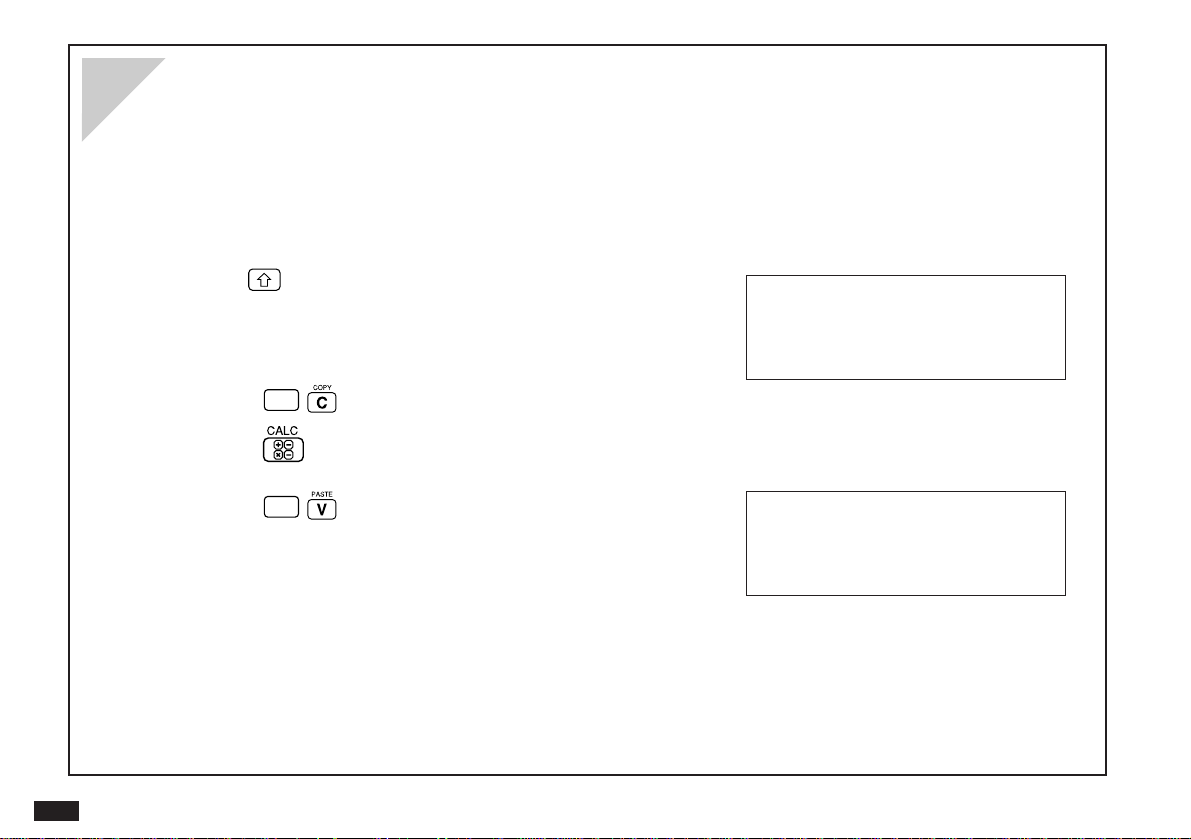
2nd
Press
Press
Press
You can use the result to perform any other calculations you wish.
to copy the figures.
repeatedly until the Calculator screen appears.
•
•
2nd
to bring in the copied figures to the Calculator.
#Q-19-2
 Loading...