


Sharp AE-A12KR, AE-A18KR, AE-A24KR, AE-A9KR, AY-AP18KR User Manual
...AY-AP9KR
AY-AP12KR
AY-AP18KR
AY-AP24KR
|
|
|
|
|
|
|
|
|
|
INDOOR UNIT |
|
OUTDOOR UNIT |
||
UNITÀ INTERNA |
|
UNITÀ ESTERNA |
||
ΕΣΩΤΕΡΙΚΗ ΣΥΣΚΕΥΗ |
|
ΕΞΩΤΕΡΙΚΗ ΣΥΣΚΕΥΗ |
||
UNIDADE INTERIOR |
|
UNIDADE EXTERIOR |
||
Ç ÜNİTE |
|
DİŞ ÜNİTE |
||
JEDNOSTKA WEWNĘTRZNA |
|
JEDNOSTKA ZEWNĘTRZNA |
||
|
|
|
|
|
AY-AP9KR |
AE-A9KR |
AY-AP12KR |
AE-A12KR |
AY-AP18KR |
AE-A18KR |
AY-AP24KR |
AE-A24KR |
SPLIT TYPE
ROOM AIR CONDITIONER OPERATION MANUAL
CONDIZIONATORE D'ARIA DA CAMERA TIPO SPLIT
MANUALE DI ISTRUZIONI
ΑΙΡΚΟΝΤΙΣΙΟΝ ΔΩΜΑΤΙΟΥ ΤΥΠΟΥ SPLIT
ΕΓΧΕΙΡΙΔΙΟ ΛΕΙΤΟΥΡΓΙΑΣ
AR CONDICIONADO DE SALA DE DUAS UNIDADES
MANUAL DE OPERAÇÃO
SPLİT KLİMA
KULLANMA KILAVUZU
POKOJOWY KLIMATYZATOR TYPU SPLIT
INSTRUKCJA OBSŁUGI
POLSKI TÜRKÇE PORTUGUÊS ΛΛΗΝΙΚΑE ITALIANO ENGLISH
*Plasmacluster is a trademark of SHARP Corporation.
Attention: Your product is marked with this symbol. It means that used electrical and electronic products should not be mixed with general household waste. There is a separate collection system for these products.
Pb
A. Information on Disposal for Users (private households)
1. In the European Union
Attention: If you want to dispose of this equipment, please do not use the ordinary dust bin!
Used electrical and electronic equipment must be treated separately and in accordance with legislation that requires proper treatment, recovery and recycling of used electrical and electronic equipment.
Following the implementation by member states, private households within the EU states may return their used electrical and electronic equipment to designated collection facilities free of charge*. In some countries* your local retailer may also take back your old product free of charge if you purchase a similar new one.
*) Please contact your local authority for further details.
If your used electrical or electronic equipment has batteries or accumulators, please dispose of these separately beforehand according to local requirements.
By disposing of this product correctly you will help ensure that the waste undergoes the necessary treatment, recovery and recycling and thus prevent potential negative effects on the environment and human health which could otherwise arise due to inappropriate waste handling.
2. In other Countries outside the EU
If you wish to discard this product, please contact your local authorities and ask for the correct method of disposal.
For Switzerland: Used electrical or electronic equipment can be returned free of charge to the dealer, even if you don’t purchase a new product. Further collection facilities are listed on the homepage of www.swico.ch or www.sens.ch.
B. Information on Disposal for Business Users.
1. In the European Union
If the product is used for business purposes and you want to discard it:
Please contact your SHARP dealer who will inform you about the take-back of the product. You might be charged for the costs arising from take-back and recycling. Small products (and small amounts) might be taken back by your local collection facilities.
For Spain: Please contact the established collection system or your local authority for take-back of your used products.
2. In other Countries outside the EU
If you wish to discard of this product, please contact your local authorities and ask for the correct method of disposal.
The battery supplied with this product contains traces of Lead.
For EU: The crossed-out wheeled bin implies that used batteries should not be put to the general household waste!
There is a separate collection system for used batteries, to allow proper treatment and recycling in accordance with legislation. Please contact your local authority for details on the collection and recycling schemes.
For Switzerland: The used battery is to be returned to the selling point.
For other non-EU countries: Please contact your local authority for correct method of disposal of the used battery.
GB

ENGLISH
This manual explains the proper use of your new air conditioner. Please read this manusl carefully before using the product. This manual should be kept in a safe place for handy reference.
CONTENTS
• IMPORTANT SAFETY INSTRUCTIONS...... |
GB-1 |
• PART NAMES............................................... |
GB-2 |
• USING THE REMOTE CONTROL ............... |
GB-4 |
• AUXILIARY MODE ....................................... |
GB-4 |
• BASIC OPERATION..................................... |
GB-5 |
• ADJUSTING THE AIR FLOW DIRECTION .. |
GB-6 |
• COANDA AIRFLOW ..................................... |
GB-7 |
• TURBO OPERATION ................................... |
GB-7 |
• PLASMACLUSTER OPERATION ................ |
GB-8 |
• ONE-HOUR OFF TIMER.............................. |
GB-8 |
• TIMER OPERATION .................................... |
GB-9 |
• MAINTENANCE ........................................... |
GB-10 |
• TIPS ON SAVING ENERGY......................... |
GB-10 |
• ADDITIONAL NOTES ON OPERATION ...... |
GB-11 |
• BEFORE CALLING FOR SERVICE ............. |
GB-11 |
IMPORTANT SAFETY
INSTRUCTIONS
WARNINGS FOR USE
1 Do not pull or deform the power supply cord. Pulling and misuse of the power supply cord can result in damage to the unit and cause electrical shock.
2 Be careful not to expose your body directly to the outlet air for a long time. It may affect your physical conditions.
3 When using the air conditioner for infants, children, elderly, bedridden, or disabled people make sure the room temperature is suitable for those in the room.
4 Never insert objects into the unit. Inserting objects can result in injury due to the high speed rotation of internal fans.
5 Ground the air conditioner without fail. Do not connect the grounding wire to gas pipe, water pipe, lightning rod or telephone grounding wire. Incomplete grounding may cause electric shock.
6 If anything is abnormal with the air conditioner (ex. a burning smell), stop the operation immediately and turn the circuit breaker OFF.
7 The appliance shall be installed in accordance with national wiring regulations. Improper cable connection can cause the power supply cord, plug and the electrical outlet to overheat and cause fire.
8 If the supply cord is damaged, it must be replaced by the manufacturer or its service agent or a similarly qualified person in order to avoid a hazard. Use only the manufacturespecified power cord for replacement.
IMPORTANT SAFETY
INSTRUCTIONS
WARNINGS FOR INSTALLATION/ REMOVAL/REPAIR
•Do not attempt to install/remove/repair the unit by yourself. Incorrect work will cause electric shock, water leak, fire etc. Consult your dealer or other qualified service personnel for the installation/ removal/repair of the unit.
CAUTIONS FOR USE
1 Open a window or door periodically to ventilate the room, especially when using gas appliances. Insufficient ventilation may cause oxygen shortage.
2 Do not operate the buttons with wet hand. It may cause electric shock.
3 For safety, turn the circuit breaker off when not using the unit for an extended period of time.
4 Check the outdoor unit mounting rack periodically for wear and to make sure it is firmly in place.
5 Do not put anything on the outdoor unit nor step on it. The object or the person may fall down or drop, causing injury.
6 This unit is designed for residential use. Do not use for other applications such as in a kennel or greenhouse to raise animals or grow plants.
7 Do not place a vessel with water on the unit. If water penetrates into the unit, electrical insulations may deteriorate and cause electric shock.
8 Do not block the air inlets nor outlets of the unit. It may cause insufficient performance or troubles.
9 Be sure to stop the operation and turn the circuit breaker off before performing any maintenance or cleaning. A fan is rotating inside the unit and you may get injured.
10Do not splash or pour water directly on the unit. Water can cause electrical shock or equipment damage.
11This appliance is not intended for use by young children or infirm persons without supervision.
Young children should be supervised to ensure that they do not play with the appliance.
12This appliance is unfit for use Nordic region.
CAUTIONS FOR LOCATION/
INSTALLATION
•Make sure to connect the air conditioner to power supply of the rated voltage and frequency.
Use of a power supply with improper voltage and frequency can result in equipment damage and possible fire.
•Do not install the unit in a place where inflammable gas may leak. It may cause fire.
Install the unit in a place with minimal dust, fumes and moisture in the air.
•Arrange the drain hose to ensure smooth drainage. Insufficient drainage may cause wetting of the room, furniture etc.
•Make sure a leak breaker or a circuit breaker is installed, depending on the installation location, to avoid electrical shock.
ENGLISH
GB-1

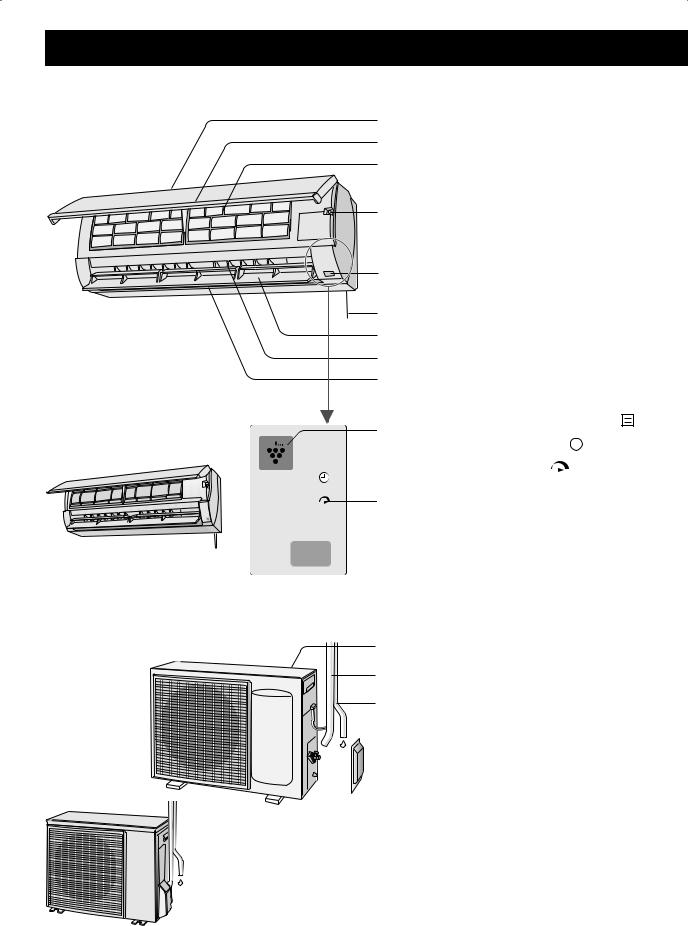
PART NAMES
INDOOR UNIT
AY-AP18KR
AY-AP24KR
AY-AP9KR
AY-AP12KR
1 |
1 Inlet (Air) |
|
|||||||||||
2 |
2 Open Panel |
|
|||||||||||
3 |
3 Air Filter |
|
|||||||||||
|
|
|
|
|
|
|
|
|
4 AUX Button |
|
|||
4 |
5 Receiver Window |
|
|||||||||||
|
|
|
|
|
|
|
|
|
6 Power Supply Cord |
|
|||
5 |
7 Vertical Adjustment Louvre |
||||||||||||
8 Horizontal Adjustment Louvre |
|||||||||||||
|
|
|
|
|
|
|
|
|
|||||
|
|
|
|
|
|
|
6 |
9 Outlet (Air) |
|
||||
|
|
|
|
|
|||||||||
7 |
|
|
|
|
|||||||||
8 |
|
|
|
|
|||||||||
9 |
|
|
|
|
|||||||||
|
|
|
|
|
|
|
|
|
0 PLASMACLUSTER Lamp(blue) |
||||
0 |
q OPERATION Lamp (red |
) |
|||||||||||
w TIMER Lamp (orange |
|
|
) |
||||||||||
|
|
|
|
|
|
|
|
q |
|
|
|||
|
|
|
|
|
|
|
|
|
|||||
|
|
|
|
|
|
|
|
w |
e TURBO Lamp (green |
) |
|||
|
|
|
|
|
|
|
|
||||||
|
|
|
|
|
|
|
|
|
|
|
|
||
|
|
|
|
|
|
|
|
|
|
|
|
||
e
OUTDOOR UNIT
AE-A18KR |
|
|
AE-A24KR |
r |
r Inlet (Air) |
|
t |
t Refrigerant Tube and Interconnecting |
|
Cord |
|
|
|
|
|
y |
y Drainage Hose |
|
|
u Outlet (Air) |
AE-A9KR |
u |
|
|
|
|
AE-A12KR |
|
|
NOTE:
Actual units might vary slightly from those shown above.
GB-2
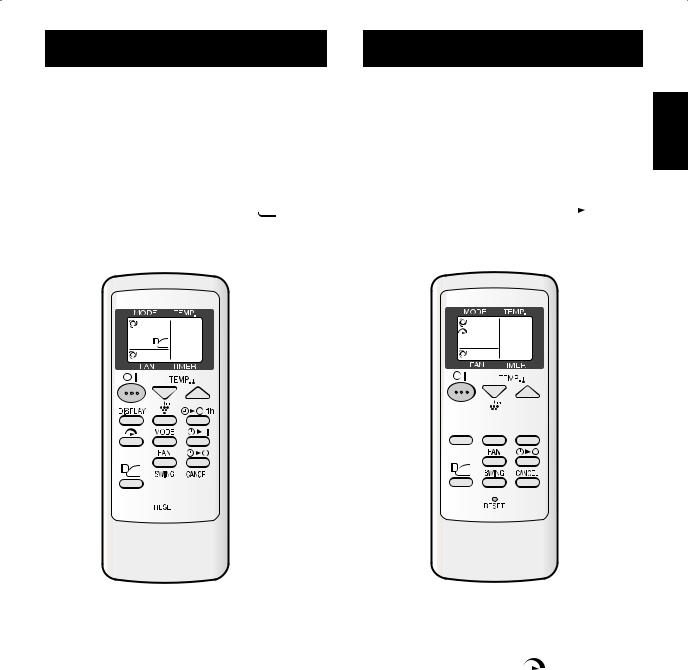
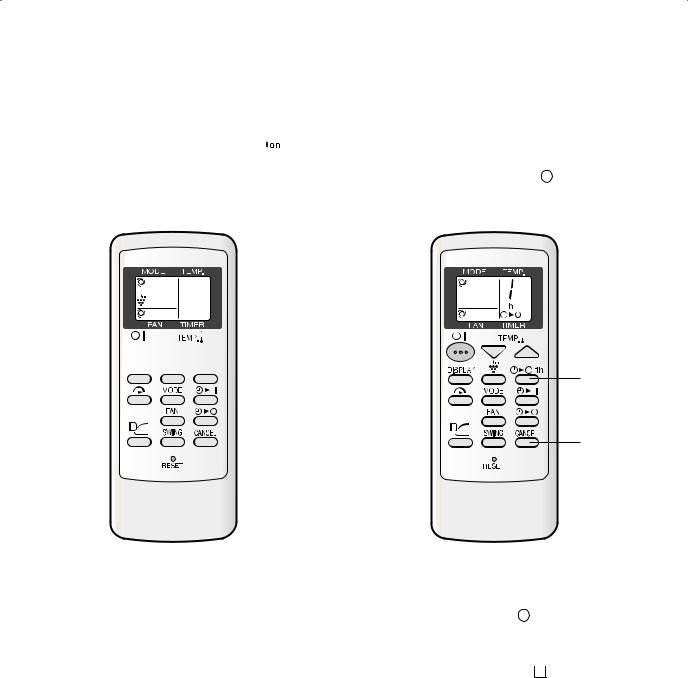
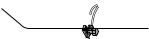
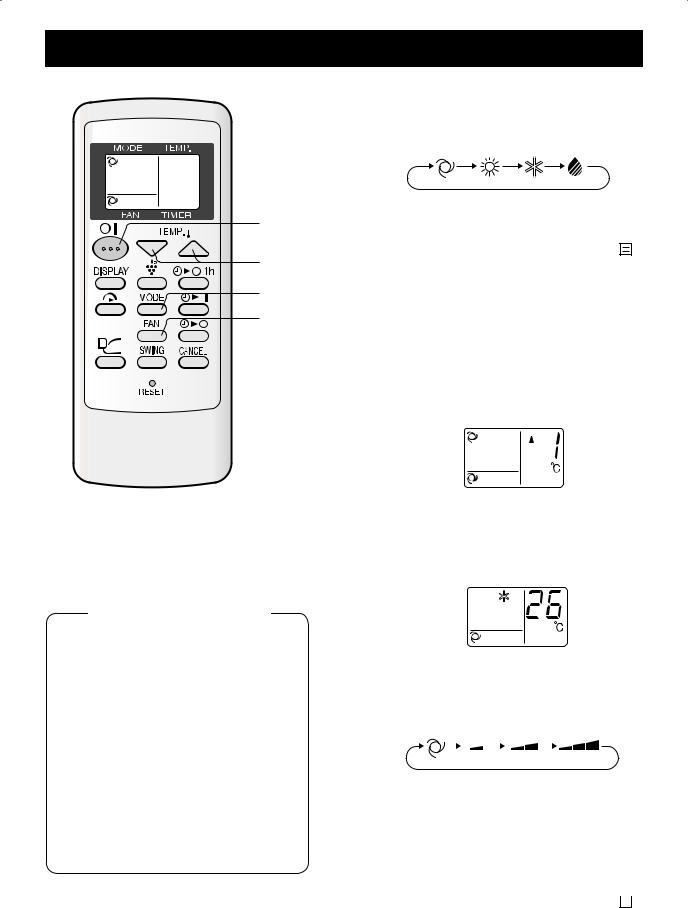
REMOTE CONTROL
1
2
3
4
5
6
7
8
9
0 q w e r t y
REMOTE CONTROL DISPLAY
|
% |
! |
^ |
@ |
|
# |
|
$

 &
&
*
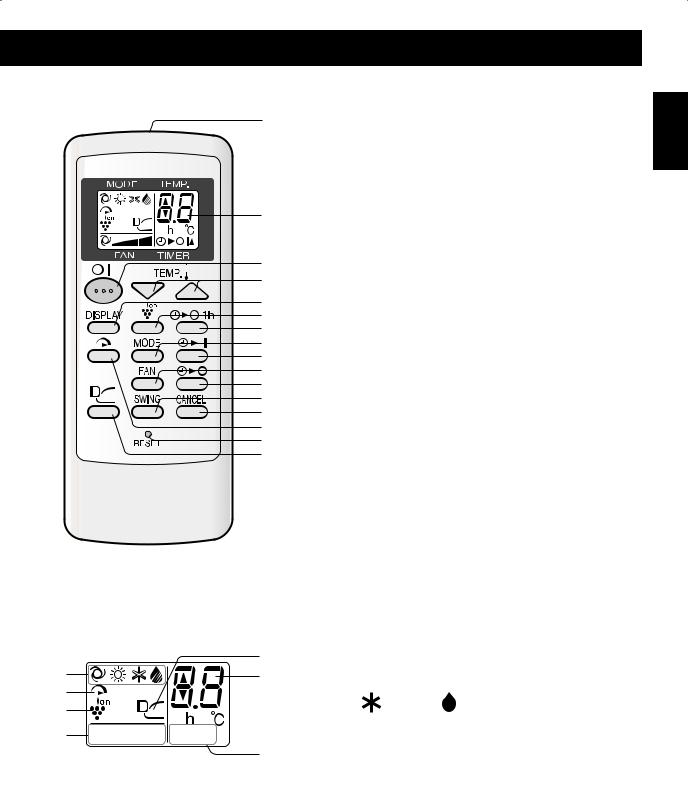
1 TRANSMITTER
2 DISPLAY
3 ON/OFF Button
4 THERMOSTAT Button
5 DISPLAY Button
6 PLASMACLUSTER Button
7 ONE-HOUR OFF TIMER Button
8 MODE Button
9 TIMER ON Button
0 FAN Button
q TIMER OFF Button
w SWING Button
e TIMER CANCEL Button
r TURBO Button
t RESET Button
y COANDA AIRFLOW Button
! MODE Symbols
 : AUTO
  : HEAT
 : COOL
  : DRY
: DRY
@ TURBO Symbol
# PLASMACLUSTER Symbol
$ FAN SPEED Symbols
 : AUTO
  : Manual setting
% COANDA AIRFLOW Symbol
^TEMPERATURE AND TIMER COUNT DOWN Indicator
& TRANSMITTING Symbol
* TIMER ON / TIMER OFF Indicator
ENGLISH
GB-3

USING THE REMOTE CONTROL
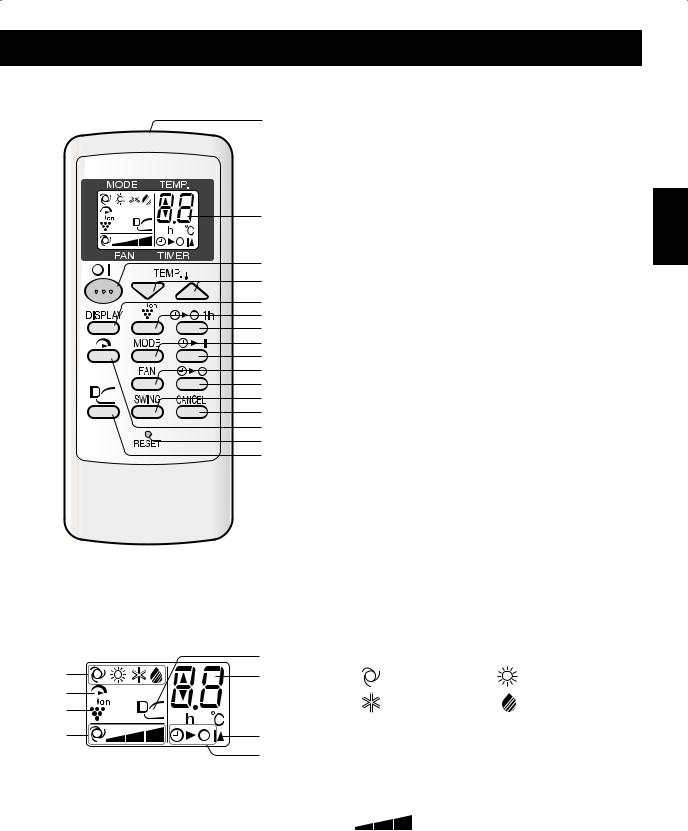
LOADING BATTERIES
Use two size-AAA (R03) batteries.
1 Remove the battery cover at the back of the remote control.
2 Insert batteries in the compartment, making sure the ± and — polarities are correctly aligned.
3 Reinstall the battery cover.
4 Press the RESET button using a thin stick.
Battery cover
NOTE:
•The battery life is approximately one year in normal use.
•When you replace the batteries, always change both batteries, and make sure they are the same type.
•If the remote control does not operate properly after replacing the batteries, press the RESET button using a thin stick.
•If you will not be using the unit for a long time, remove the batteries from the remote control.
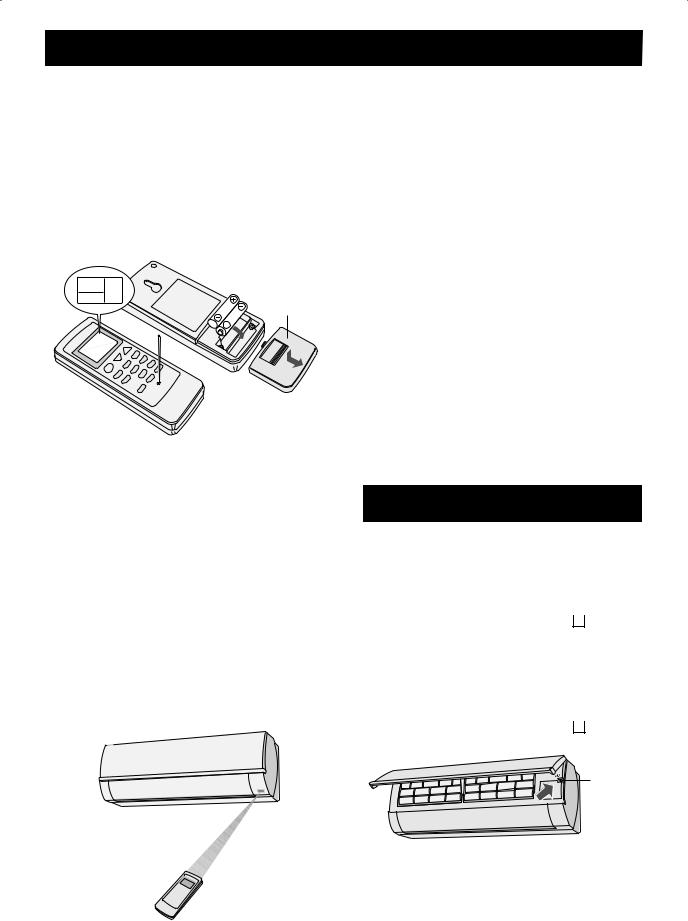
HOW TO USE THE REMOTE CONTROL
Point the remote control towards the unit’s signal receiver window and press the desired button. The unit generates a beep when it receives the signal.
•Make sure there is no curtain or other object between the remote control and the unit.
•The remote control can send signals from up to 7 metres away.
CAUTION:
•Do not allow the signal receiver window to receive strong direct sunlight, since it can adversely affect its operation. If the signal receiver window is exposed to direct sunlight, close a curtain to block the light.
•Using a fluorescent lamp with a quick starter in the same room may interfere with transmission of the signal.
•The unit can be affected by signals transmitted from the remote control of a television, VCR or other equipment used in the same room.
•Do not leave the remote control in direct sunlight or near a heater. Also, protect the unit and remote control from moisture and shock which can discolour or damage them.
AUXILIARY MODE
Use this mode when the remote control is not available.
TO TURN ON
Lift the open panel of the indoor unit and press the AUX button.
•The red OPERATION lamp (  ) on the unit will light and the unit will start operating in the AUTO mode.
•The fan speed and temperature setting are set to AUTO.
TO TURN OFF
Press the AUX button again.
•The red OPERATION lamp (  ) on the unit will turn off.
AUX
NOTE:
•If the AUX button is pressed during normal operation, the unit will turn off.
GB-4
BASIC OPERATION
2
5
3
1
4
TIPS ABOUT AUTO MODE
In the AUTO mode, the temperature setting and mode are automatically selected according to the room temperature when the unit is turned on.
Modes and Temperature Settings
Room temp. |
Automatic Operation |
||
at operation |
|
|
|
Mode |
Temperature Setting |
||
start-up |
|||
Below 21˚C |
HEAT |
23˚C |
|
21˚C-24˚C |
DRY |
Room Temp. -2˚C |
|
24˚C-26˚C |
COOL |
24˚C |
|
26˚C-28˚C |
COOL |
25˚C |
|
Above 28˚C |
COOL |
26˚C |
|
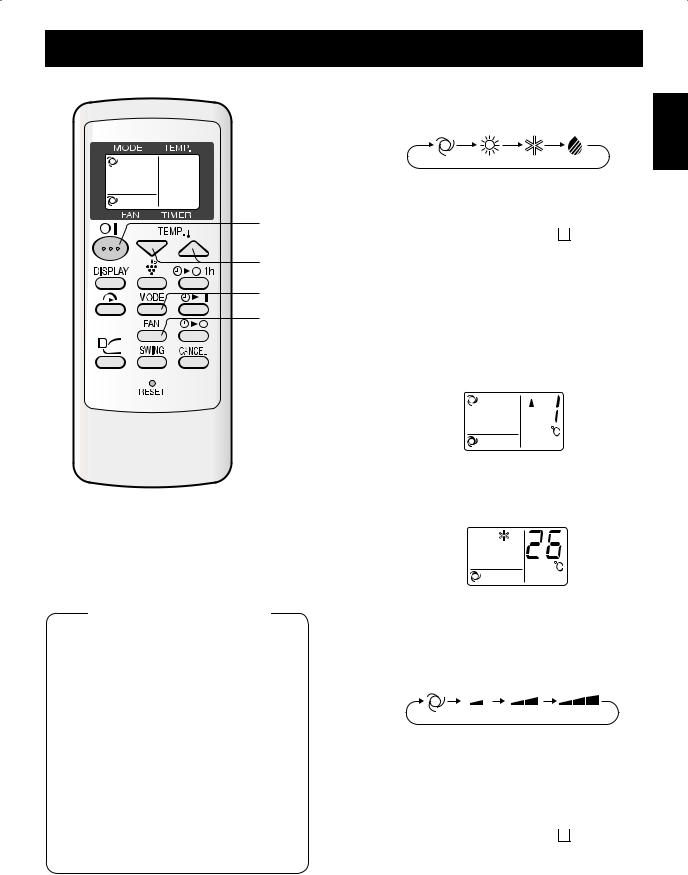
1 Press the MODE button to select the operation mode.
AUTO HEAT COOL DRY
2 Press the ON/OFF button to start operation.
•The red OPERATION lamp (  ) on the unit will light.
3 Press the THERMOSTAT button to set the desired temperature.
AUTO/DRY MODE
•The temperature can be changed up to 2°C above or below the temperature automatically determined by the air conditioner.
COOL/HEAT MODE
•The temperature can be set within the range of 18 to 32°C.
4 Press the FAN button to set the desired fan speed.
AUTO SOFT LOW HIGH
•In the DRY mode, the fan speed is preset to AUTO and cannot be changed.
5 To turn off the unit, press the ON/OFF button again.
•The red OPERATION lamp (  ) on the unit will turn off.
ENGLISH
GB-5
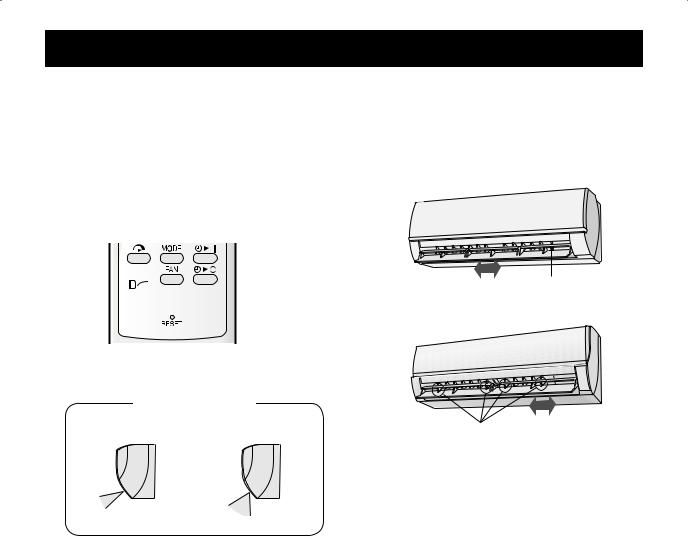
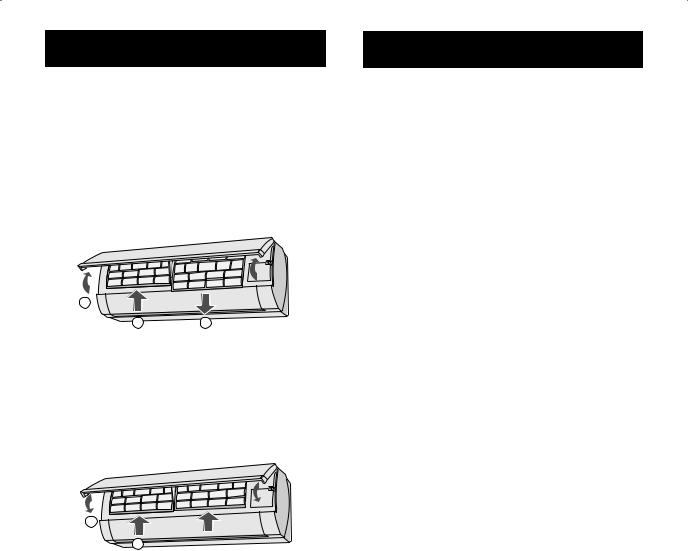
ADJUSTING THE AIR FLOW DIRECTION
VERTICAL AIR FLOW DIRECTION
1 Press the SWING button.
•The vertical adjustment louvre will swing continuously.
2 Press the SWING button again when the vertical adjustment louvre comes at the desired position.
1

 2
2
Adjustment range
COOL and DRY modes |
HEAT mode |
HORIZONTAL AIR FLOW DIRECTION
Adjust the horizontal air flow direction with the louver lever.
AY-AP18KR
AY-AP24KR
Louvre lever
AY-AP9KR
AY-AP12KR
Louvre levers
CAUTION:
Never attempt to adjust the vertical adjustment louvre manually.
•Manual adjustment of the vertical adjustment louvre can cause the unit to malfunction.
•When the vertical adjustment louvre is positioned at the lowest position in the COOL or DRY mode for an extended period of time, condensation may result.
Do not adjust the horizontal adjustment louvres to the extreme left or right in the COOL mode with the fan speed set to “SOFT (  )” for an extended period of time. Condensation may form on the louvres.
GB-6
COANDA AIRFLOW
In cooling or dry operation, vertical adjustment louver is set obliquely upward to deliver cool air to the ceiling in order to avoid direct airflow.
In heating operation, vertical adjustment louver is set downward to deliver the warm air down to the floor.
1 During operation, press the COANDA AIRFLOW button.
• The remote control will display “  ”.
”.
 1
1
TO CANCEL
Press the COANDA AIRFLOW button again.
NOTE:
If you want the COANDA AIRFLOW setting in the TURBO mode, press the COANDA AIRFLOW button during the TURBO operation.
TURBO OPERATION
In this operation, the air conditioner fan works at "extra high" speed with a setting temperature
of 15°C in COOL and DRY modes and 32°C in |
ENGLISH |
HEAT mode to rapidly cool or heat the room. |
|
1 During operation, press the TURBO button.
• The remote control will display “  ” .
” .
• The temperature display will go off.
• The green TURBO lamp (  ) on the unit will light up.


 1
1
TO CANCEL
Press the TURBO button again.
• The green TURBO lamp ( |
) on the unit will |
turn off. |
|
NOTE:
•You can not set the temperature or fan speed during the TURBO operation.
•To turn off the TURBO lamp, press the DISPLAY button.
•After the unit has run for 30 minutes in TURBO operation, the fan setting will become the "HIGH" speed, and temperature setting will become 18°C in COOL and DRY modes.
GB-7
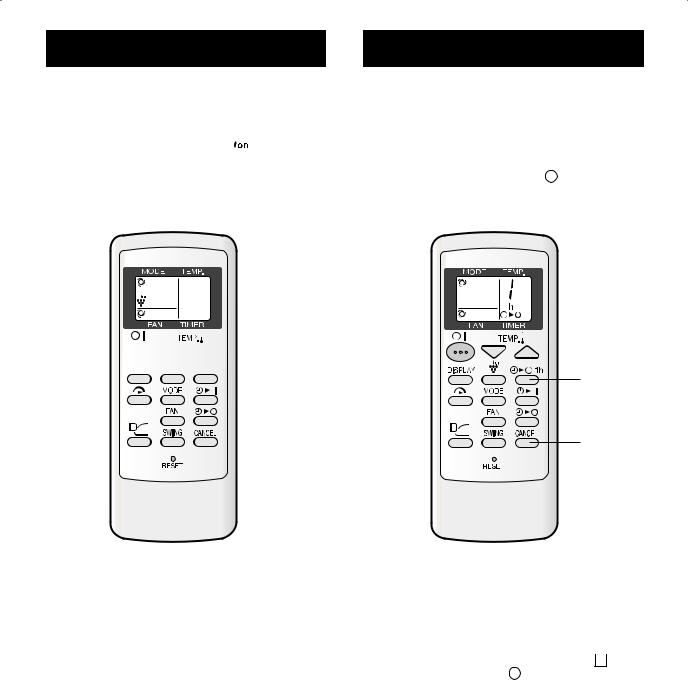
PLASMACLUSTER OPERATION |
|
ONE-HOUR OFF TIMER |
|
|
|
Plasmacluster ions released into the room will reduce some airborne mold.
1 During operation, press the PLASMACLUSTER button.
• The remote control will display “ 
 ”.
”.
•The blue PLASMACLUSTER lamp on the unit will light up.


 1
1
TO CANCEL
Press the PLASMACLUSTER button again.
•The PLASMACLUSTER lamp on the unit will turn off.
NOTE:
•Use of the PLASMACLUSTER operation will be memorized, and it will be activated the next time you turn on the air conditioner.
•To turn off the PLASMACLUSTER lamp, press the DISPLAY button.
•To perform Plasmacluster operation in FAN only mode, press the PLASMACLUSTER button when the unit is not operating. The mode symbol of the remote control will go off and the fan speed can not be set AUTO.
When the ONE-HOUR OFF TIMER is set, the unit will automatically turn off after one hour.
1 Press the ONE-HOUR OFF TIMER
button.
•The remote control will displays “ 

 ”.
”.
•The orange TIMER lamp (  ) on the unit will light up.
•The unit will stop operating after one hour.
1
CANCEL
TO CANCEL
Press the CANCEL button.
•The orange TIMER lamp (  ) on the unit will turn off.
Alternatively, turn the unit off by pressing the ON/OFF button.
•The red OPERATION lamp (  ) and the orange TIMER lamp (
  ) on the unit will turn off.
NOTE:
•The ONE-HOUR OFF TIMER operation has priority over TIMER ON and TIMER OFF operations.
•If the ONE-HOUR OFF TIMER is set while the unit is not operating, the unit starts one-hour operation at the formerly set condition.
•If you wish to operate the unit for another hour before the ONE-HOUR OFF TIMER is activated, press the ONE-HOUR OFF TIMER button again during operation.
GB-8
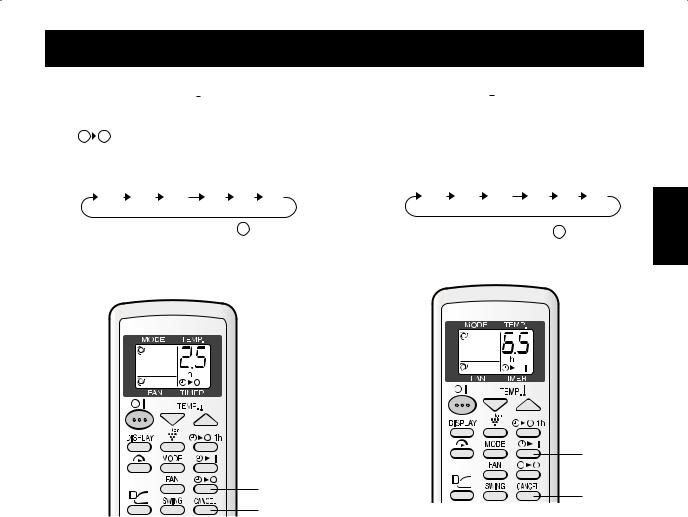
TIMER OPERATION
TIMER OFF |
|
|
|
||
Press the TIMER OFF ( |
|
|
) button |
||
|
|
||||
|
|||||
1 and set the time as desired. |
|
||||
•The time setting will change as you press the button as follows. Hold the button down to speed through the settings.
0.5h |
1.0h |
1.5h |
10h |
11h |
12h |
•The orange TIMER lamp (  ) on the unit will light.
•The time setting will count down to show the remaining time.
TIMER ON
1 Press the TIMER ON ( 
 ) button and set the time as desired.
•The time setting will change as you press the button as follows. Hold the button down to speed through the setting.
0.5h |
1.0h |
1.5h |
10h |
11h |
12h |
•The orange TIMER lamp (  ) on the unit will light.
•The time setting will count down to show the remaining time.
ENGLISH
1
CANCEL
TO CANCEL
Press the CANCEL button.
•The orange TIMER lamp (  ) on the unit will turn off.
TIPS ABOUT TIMER OFF OPERATION
When the TIMER OFF is set, the temperature setting is automatically adjusted to prevent the room from becoming excessively hot or too cold while you sleep. (Auto Sleep function)
COOL/DRY MODE:
•One hour after the time operation begins, the temperature setting rises 1°C higher than the original temperature setting.
HEAT MODE:
•One hour after the timer operation begins, the temperature setting drops 3°C lower than the original temperature setting.
1
CANCEL
Select the mode, temperature and fan speed setting as desired.
•When the temperature is set with the TIMER ON, the temperature will show in the display for 5 seconds and then return to the time display.
• The unit will turn on prior to the set time to allow the room to reach the desired temperature by the programmed time. (Awaking function)
TO CANCEL
Press the CANCEL button.
•The orange TIMER lamp (  ) on the unit will turn off.
NOTE:
•Timer duration can be set from a minimum half an hour to a maximum of 12 hours. Up to 9.5 hours, you can set in half-hour increments, and from 10 to 12 hours, in 1-hour increments.
•The latest time setting will be memorized and will appear on the remote control display the next time you set the TIMER OFF or TIMER ON.
•The TIMER OFF and TIMER ON can not be set together.
•While ONE-HOUR OFF TIMER is set, the TIMER OFF and TIMER ON setting are unavailable.
•If the ONE-HOUR OFF TIMER is set while the TIMER OFF or TIMER ON is activated, the TIMER ON or TIMER OFF setting will be cancelled.
GB-9
MAINTENANCE
Be sure to disconnect the power cord from the wall outlet or turn off the circuit breaker before performing any maintenance.
CLEANING THE FILTERS
1 Turn off the unit.
2 Remove the filters.
1 Lift the open panel.
2 Push the air filters up slightly to unlock them. 3 Pull the air filters down to remove them.
1 |
|
2 |
3 |
3 Clean the filters.
Use a vacuum cleaner to remove dust. If the filters are dirty, wash them with warm water and a mild detergent. Dry filters in the shade before reinstalling.
4 Reinstall the filters.
1 Reinstall the filters in the original positions.
2 Close the open panel.
2
1
CLEANING THE UNIT AND THE REMOTE CONTROL
•Wipe them with a soft cloth.
•Do not directly splash or pour water on them. It can cause electrical shock or equipment damage.
•Do not use hot water, thinner, abrasive powders or strong solvents.
MAINTENANCE AFTER AIR CONDITIONER SEASON
1 Operate the unit in the COOL mode, temperature setting 32˚C, for about half a day to allow the mechanism to thoroughly dry.
2 Stop the operation and unplug the unit. Turn off the circuit breaker, if you have one exclusively for the air conditioner.
3Clean the filters, then reinstall them.
MAINTENANCE BEFORE AIR CONDITIONER SEASON
1 Make sure that the air filters are not dirty.
2 Make sure that nothing obstructs the air inlet or outlet.
TIPS ON SAVING ENERGY
Below are some simple ways to save energy when you use your air conditioner.
SET THE CORRECT TEMPERATURE
•Setting the thermostat 1°C higher than the desired temperature in the COOL mode and 2°C lower in the HEAT mode will save approximately 10 percent in power consumption.
•Setting the temperature lower than necessary during cooling operation will result in increased power consumption.
BLOCK DIRECT SUNLIGHT AND PREVENT DRAFTS
•Blocking direct sunlight during cooling operation will reduce power consumption.
•Close the windows and doors during cooling and heating operations.
SET PROPER AIR FLOW DIRECTION TO OBTAIN THE BEST AIR CIRCULATION
KEEP FILTER CLEAN TO ENSURE THE MOST EFFICIENT OPERATION
MAKE MOST OF THE TIMER OFF FUNCTION
DISCONNECT THE POWER CORD WHEN THE UNIT IS NOT USED FOR AN EXTENDED PERIOD OF TIME
•The indoor unit still consumes a small amount of power when it is not operating.
GB-10

ADDITIONAL NOTES ON OPERATION
OPERATING TEMPERATURE RANGE
|
|
INDOOR TEMP. |
OUTDOOR TEMP. |
|
COOLING |
upper limit |
32˚C |
46˚C |
|
lower limit |
21˚C |
21˚C |
||
|
||||
HEATING |
upper limit |
27˚C |
24˚C |
|
lower limit |
– |
–7˚C |
||
|
•The built-in protective device may prevent the unit from operating when used out of this range.
•Condensation may form on the air outlet if the unit operates continuously in the COOL or DRY mode when humidity is over 80 percent.
WHEN POWER FAILURE OCCURS
This air conditioner has a memory function to store settings when a power failure occurs.
After power recovery, the unit will automatically restart in the same settings which were active before the power failure, except for timer settings.
If the timers were set before a power failure, they will need to be re-set after power recovery.
PREHEATING FUNCTION
In the HEAT operation, the indoor fan may not start for two to five minutes after the unit is turned on to prevent cold air from blowing out of the unit.
DE-ICING FUNCTION
•When ice forms on the heat exchanger in the outdoor unit during the HEAT operation, an automatic de-icer provides heat for about 5 to 10 minutes to remove the ice. During de-icing, the inside and outside fans stop operating.
•After de-icing is completed, the unit automatically resumes operation in the HEAT mode.
HEATING EFFICIENCY
•The unit employs a heat pump that draws heat from the outside air and releases it into the room. The outside air temperature therefore greatly affects the heating efficiency.
•If the heating efficiency is reduced due to low outside temperatures, use an additional heater.
•It takes time to warm up and heat the entire room because of the forced air circulation system.
BEFORE CALLING FOR
SERVICE
The following conditions do not denote equipment malfunctions
UNIT DOES NOT OPERATE
The unit will not operate if it is turned on immediately after it is turned off. The unit will not operate immediately after the mode is changed. This is to protect the internal mechanisms. Wait 3 minutes before operating the unit.
UNIT DOES NOT SEND OUT WARM AIR
The unit is preheating or de-icing.
ODORS
Carpet and furniture odors that entered into the unit may be sent out from the unit.
BEFORE CALLING FOR
SERVICE
CRACKING NOISE
The unit may produce a cracking noise. This sound is generated by the friction of the front panel and other components expanding or connecting due to a temperature change.
A LOW BUZZING NOISE EMITTED
This is a sound emitted when the unit is generating Plasmacluster ions.
SWISHING NOISE
The soft, swishing noise is the sound of the refrigerant flowing inside the unit.
WATER VAPOUR
•In the COOL and DRY operation, water vapour can sometimes be seen at the air outlet due to the difference between the room air temperature and the air discharged by the unit.
•In the HEAT operation, water vapour may flow out of the outdoor unit during de-icing.
ODOR EMITTED FROM THE PLASMACLUSTER AIR OUTLET
This is the smell of ozone generated from the Plasmacluster Ion generator. The ozone concentration is very small, posing no adverse effect on your health. The ozone discharged into the air rapidly decomposes, and its density in the room will not increase.
If the unit appears to be malfunctioning, check the following points before calling for service.
IF THE UNIT FAILS TO OPERATE
Check to see if the circuit breaker has tripped or the fuse has blown.
IF THE UNIT FAILS TO COOL (OR HEAT) THE ROOM EFFECTIVELY
•Check the filters. If dirty, clean them.
•Check the outdoor unit to make sure nothing is blocking the air inlet or outlet.
•Check the thermostat is proper setting.
•Make sure windows and doors are closed tightly.
•A large number of people in the room can prevent the unit from achieving the desired temperature.
•Check whether any heat-generating appliances are operating in the room.
IF THE UNIT FAILS TO RECEIVE THE REMOTE CONTROL SIGNAL
•Check whether the remote control batteries have become old and weak.
•Try to send the signal again with the remote control pointed properly towards the unit’s signal receiver window.
•Check whether the remote control batteries are installed with the polarities properly aligned.
Please call for service when OPERATION lamp, TIMER lamp and/or PLASMACLUSTER lamp on the unit blink.
ENGLISH
GB-11
Attenzione: Il dispositivo è contrassegnato da questo simbolo, che segnala di non smaltire le apparecchiature elettriche ed elettroniche insieme ai normali rifiuti domestici. Per tali prodotti è previsto un sistema di raccolta a parte.
Pb
A. Informazioni sullo smaltimento per gli utenti (privati)
1. Nell'Unione europea
Attenzione: Per smaltire il presente dispositivo, non utilizzare il normale bidone della spazzatura!
Le apparecchiature elettriche ed elettroniche usate devono essere gestite a parte e in conformità alla legislazione che richiede il trattamento, il recupero e il riciclaggio adeguato dei suddetti prodotti.
In seguito alle disposizioni attuate dagli Stati membri, i privati residenti nella UE possono conferire gratuitamente le apparecchiature elettriche ed elettroniche usate a centri di raccolta designati*.
In alcuni paesi*, anche il rivenditore locale può ritirare gratuitamente il vecchio prodotto se l'utente acquista un altro nuovo di tipologia simile.
*) Per maggiori informazioni si prega di contattare l'autorità locale competente.
Se le apparecchiature elettriche o elettroniche usate hanno batterie o accumulatori, l'utente dovrà smaltirli a parte preventivamente in conformità alle disposizioni locali.
Lo smaltimento corretto del presente prodotto contribuirà a garantire che i rifiuti siano sottoposti al trattamento, al recupero e al riciclaggio necessari prevenendone il potenziale impatto negativo sull'ambiente e sulla salute umana, che potrebbe derivare da un'inadeguata gestione dei rifiuti.
2. In paesi che non fanno parte dell'UE
Se si desidera eliminare il presente prodotto, contattare le autorità locali e informarsi sul metodo di smaltimento corretto.
Per la Svizzera: Le apparecchiature elettriche o elettroniche usate possono essere restituite gratuitamente al rivenditore, anche se non si acquista un prodotto nuovo.
Altri centri di raccolta sono elencati sulle homepage di www.swico.ch o di www.sens.ch.
B. Informazioni sullo smaltimento per gli utenti commerciali
1. Nell'Unione europea
Se il prodotto è impiegato a scopi commerciali, procedere come segue per eliminarlo.
Contattare il proprio rivenditore SHARP che fornirà informazioni circa il ritiro del prodotto. Potrebbero essere addebitate le spese di ritiro e riciclaggio. Prodotti piccoli (e quantitativi ridotti) potranno essere ritirati anche dai centri di raccolta locali.
Per la Spagna: Contattare il sistema di raccolta ufficiale o l'ente locale preposto al ritiro dei prodotti usati.
2. In paesi che non fanno parte dell'UE
Se si desidera eliminare il presente prodotto, contattare le autorità locali e informarsi sul metodo di smaltimento corretto.
La batteria fornita con questo prodotto contiene tracce di Piombo.
Per EU: Il cassonetto barrato indica che le batterie usate non devono essere gettate assieme ai rifiuti domestici !
Vi è un sistema di raccolta differenziata per le batterie usate, che consente il loro corretto trattamento e riciclo secondo quanto previsto dalle leggi vigenti. Vi prego di contattare le locali autorità per i dettagli del sistema di raccolta e riciclaggio.
Per la Svizzera: Le batterie usate devono essere restituite al punto vendita
Per altri Stati non-EU : Vi prego di contattare le autorità locali per conoscere il metodo corretto di conferimento delle batterie usate.
IT

ITALIANO
Questo manuale spiega come usare al meglio il vostro nuovo condizionatore. Leggete attentamente questo manuale prima di usare il prodotto. Questo manuale deve essere conservato in un posto sicuro per una facile consultazione.
INDICE
• IMPORTANTI ISTRUZIONI PER LA SICUREZZA.... |
IT-1 |
• NOMI DEI COMPONENTI................................ |
IT-2 |
• USO DEL TELECOMANDO ............................. |
IT-4 |
• MODALITA’ AUSILIARIA................................... |
IT-4 |
• FUNZIONI DI BASE ......................................... |
IT-5 |
• REGOLAZIONE DELLA DIREZIONE |
IT-6 |
DEL FLUSSO D’ARIA....................................... |
|
• FLUSSO D’ARIA EFFETTO COANDA............. |
IT-7 |
• FUNZIONAMENTO TURBO............................. |
IT-7 |
• FUNZIONAMENTO DEL PLASMACLUSTER.. |
IT-8 |
• TIMER DI SPEGNIMENTO DOPO UN’ORA.... |
IT-8 |
• FUNZIONAMENTO DEL TIMER ...................... |
IT-9 |
• MANUTENZIONE............................................. |
IT-10 |
• SUGGERIMENTI PER RISPARMIARE ENERGIA .. |
IT-10 |
• ULTERIORI NOTE RIGUARDANTI |
IT-11 |
IL FUNZIONAMENTO ...................................... |
|
• PRIMA DI RICHIEDERE ASSISTENZA............ |
IT-11 |
|
|
IMPORTANTI ISTRUZIONI |
|
PER LA SICUREZZA |
|
AVVERTIMENTI PER L'USO
1 Non tirate o deformate il cavo di alimentazione. Se si tira o si usa erratamente il cavo, l’unità si può danneggiare e provocare scosse elettriche.
2 Fate attenzione a non esporvi direttamente all’uscita dell’aria per un lungo periodo di tempo. Potrebbe danneggiare la vostra salute.
3 Nel caso si usi il condizionatore d’aria in presenza di neonati, bambini, persone anziane, persone costrette a stare a letto o persone con handicap fisici, assicuratevi prima che la temperatura sia confortevole per tali persone.
4 Non inserire mai oggetti nell’unità. Ciò potrebbe portare a lesioni a causa dell’alta velocità di rotazione dei ventilatori interni.
5 Collegate correttamente il condizonatore d’aria a terra. Non collegate il cavo a terra al tubo del gas, al tubo dell’ascua, al parafulmini o al cavo a terra del telefono. un collegamento a terra incompleto potrebbe causare una scossa elettrica.
6 In caso di anomalie del condizionatore d’aria (ad esempio, odore di bruciato), interrompete subito l’ uso e SPEGNETE l’interruttore di circuito.
7 L’apparecchio deve essere installato in conformità con i regolamenti di connessione elettrica nazionali. Un collegamento scorretto del cavo può provocare il surriscaldamento del cavo di alimentazione, della spina e della presa elettrica e causare un incendio.
8 Se è danneggiato il cavo di alimentazione, bisogna far sostituire lo stesso dal fabbricante, da un centro di assistenza o da una persona qualificata per evitare eventuali rischi. Sostituire il cavo di alimentazione solo con un altro specificato dal produttore.
IMPORTANTI ISTRUZIONI PER LA SICUREZZA
AVVERTIMENTI PER L'INSTALLAZIONE /RIMOZIONE/RIPARAZIONE
•Non cercate di installare/rimuovere/riparare l’unità senza assistenza. Un uso errato causerà scosse elettriche, perdite d’acqua, incendi e così via. Consultate il vostro rivenditore o dell’altro personale di servizio qualificato per l’installazione/rimozione/riparazione dell’unità.
PRECAUZIONI PER L'USO
1 Aprite una finestra o una porta periodicamente per ventilare la stanza, specialmente quando si usano apparecchi a gas. Una ventilazione insufficiente potrebbe causare mancanza di ossigeno.
2 Non toccate i tasti con mani bagnate. Ciò potrebbe provocare una scossa elettrica.
3 Per sicurezza, spegnete l’interruttore del circuito quando non usate l’unità per un lungo periodo di tempo.
4 Controllate la cremagliera di montaggio dell’unità esterna periodicamente ed assicuratevi che sia ben fissata.
5 Non urtate l’unità esterna e non collocate alcun oggetto sopra di essa, poiché potrebbe cadere causando lesioni personali.
6 Questa unità è stata progettata per l’uso in aree residenziali. Non usatela in canili o serre per allevare animali o coltivare piante.
7 Non collocate contenitori d’acqua sull’unità. Se l’acqua penetra nell’unità, l’isolamento elettrico si potrebbe rovinare causando una scossa elettrica.
8 Non bloccate gli sbocchi d’uscita ed entrata dell’aria dell’unità. Ciò potrebbe compromettere il funzionamento o provocare guasti.
9 Assicuratevi di spegnere l’apparecchio e l’interruttore di circuito prima di eseguire lavori di manutenzione o pulitura. Il ventilatore che gira all’interno dell’unità potrebbe provocarvi lesioni.
10Non spruzzate o gettate acqua direttamente sull’unità. L’acqua potrebbe causare una scossa elettrica o danni all’apparecchio.
11Questo apparecchio non deve essere usato da bambini o persone inferme senza supervisione.
Assicuratevi che i bambini non giochino con l’apparecchio.
12Questo apparecchio non è adatto all’uso nelle regioni nordiche.
PRECAUZIONI PER IL LUOGO DI MONTAGGIO/INSTALLAZIONE
•Assicuratevi di collegare il condizionatore d’aria ad una presa di corrente di voltaggio e frequenza giusta.
L’uso di una presa di corrente dal voltaggio e frequenze errate potrebbe risultare dannoso all’apparecchio e provocare un incendio.
•Non installare l’unità in un luogo dove i potrebbero essere perdite di gas infiammabile. Ciò potrebbe provocare incendi.
Non collocate l’unità in luoghi nei quali l’aria contenga polvere, fumi oppure umidità in misura eccessiva.
•Sistemate il tubo di drenaggio in modo tale da assicurare un drenaggio corretto. Un drenaggio insufficiente potrebbe far fuoriuscire acqua dalla stanza, bagnare i mobili e così via.
•Assicuratevi di installare un interruttore differenziale o magnetometrico a seconda del luogo d’installazione, per evitare scosse elettriche.
ITALIANO
IT-1
NOMI DEI COMPONENTI
UNITA' INTERNA
AY-AP18KR
AY-AP24KR
AY-AP9KR
AY-AP12KR
11 Entrata (dell’aria)
22 Pannello aperto
33 Filtri dell’aria
|
|
|
|
|
|
|
|
|
4 Tasto AUX |
|
|
|
|
4 |
5 Finestra di ricezione |
|
|
|
|||||||||
|
|
|
|
|
|
|
|
|
6 Cavo d’alimentazione |
|
|
|
|
5 |
7 Deflettori di regolazione verticale |
||||||||||||
8 Deflettori di regolazione orizzontale |
|||||||||||||
|
|
|
|
|
|
|
|
|
|||||
|
|
|
|
|
|
|
6 |
9 Uscita (dell’aria) |
|
|
|
||
|
|
|
|
|
|||||||||
7 |
|
|
|
|
|||||||||
8 |
|
|
|
|
|||||||||
9 |
|
|
|
|
|||||||||
|
|
|
|
|
|
|
|
|
0 Spia PLASMACLUSTER (blu) |
||||
0 |
q Spia di FUNZIONAMENTO (rossa ) |
||||||||||||
w Spia TIMER (arancione |
|
|
) |
||||||||||
|
|
|
|
|
|
|
|
q |
|
|
|||
|
|
|
|
|
|
|
|
|
|||||
|
|
|
|
|
|
|
|
w |
e Spia TURBO (verde |
) |
|
||
|
|
|
|
|
|
|
|
|
|||||
|
|
|
|
|
|
|
|
|
|
|
|
||
|
|
|
|
|
|
|
|
|
|
|
|
||
e
UNITA' ESTERNA
AE-A18KR
AE-A24KR
AE-A9KR
AE-A12KR
rr Entrata (dell’aria)
tt Tubo refrigerante e cavo di interconnessione
y y Tubo di drenaggio u Uscita (dell’aria)
 u
u
NOTE:
Le unità effettive potrebbero differire leggermente da quelle illustrate sopra.
IT-2
TELECOMANDO
1
2
3
4
5
6
7
8
9
0 q w e r t y
1 TRASMETTITORE
2 DISPLAY
3 Tasto d’ACCENSIONE/SPEGNIMENTO
4 Tasto TEMP.
5 Tasto DISPLAY
6 Tasto PLASMACLUSTER
7 Tasto TIMER DI SPEGNIMENTO DOPO UN’ORA
8 Tasto MODE (MODALITA’)
9 Tasto TIMER ATTIVATO (per impostare il timer)
0 Tasto FAN (VENTILATORE)
q Tasto TIMER DISATTIVATO (per impostare il timer) w Tasto SWING (ROTAZIONE)
e Tasto CANCEL (ANNULLA)
r Tasto TURBO
t Tasto RESET
y Tasto FLUSSO D’ARIA EFFETTO COANDA
ITALIANO
DISPLAY DEL TELECOMANDO
%! Simboli delle MODALITA’
! |
^ |
: AUTOMATICO |
: RISCALDAMENTO |
@ |
|
: RINFRESCAMENTO |
: DEUMIDIFICAZIONE |
# |
|
||
|
|
|
|
$ |
& |
@ Simbolo TURBO |
|
|
|
*# Simbolo PLASMACLUSTER
$ Simboli di VELOCITA’ DEL VENTILATORE
 : AUTOMATICO
: Impostazione manuale
% Simboli FLUSSO D’ARIA EFFETTO COANDA
^ Indicatore CONTEGGIO TIMER E TEMPERATURA
& Simbolo di TRASMISSIONE
* Indicatore TIMER ATTIVATO/DISATTIVATO
IT-3
USO DEL TELECOMANDO
INSERIMENTO DELLE BATTERIE
Utilizzate due batterie di dimensioni AAA (R03)
1 Rimuovere il coperchio delle batterie sul retro del telecomando.
2 Inserire le batterie nel comparto, assicurando che le polarità ± e — siano allineate correttamente.
3 Reinserite il coperchio delle batterie.
4 Premere il tasto RESET utilizzando un bastoncino sottile.
Coperchio del telecomando
NOTE:
•In condizioni di uso normali, le batterie durano circa un anno.
•Quando cambiate le batterie, utilizzate sempre due batterie dello stesso tipo.
•Se il telecomando non funziona correttamento dopo aver sostituito le batterie, premere il tasto RESET utilizzando un bastoncino sottile.
•Se non intendete usare l'unità per un lungo periodo di tempo, togliete le batterie dal telecomando.
COME USARE IL TELECOMANDO
Puntate il telecomando verso la finestra di ricezione del segnale dell'unità e premete il tasto desiderato. L'unità emette un segnale acustico "bip" quando riceve il segnale.
•Assicuratevi che non ci sia una tenda o altri oggetti tra il telecomando e l'unità.
•Il telecomando può inviare segnali fino ad una distanza di 7 metri.
PRECAUZIONI
•Evitate di esporre la finestra di ricezione alla luce solare diretta, in quanto ne può danneggiare il funzionamento. Se la finestra di ricezione del segnale è esposta alla luce solare diretta, chiudete la tenda per bloccare la luce.
•L'uso di una lampada fluorescente con una reattanza d'accensione rapida nello stesso locale può interferire con la trasmissione del segnale.
•L'unità può essere influenzata da segnali trasmessi dal telecomando di un televisore, videoregistratore o altre attrezzature usate nella stessa stanza.
•Non lasciate il telecomando esposto alla luce solare diretta o vicino ad un radiatore. Inoltre, proteggete l'unità e il telecomando da umidità e scosse che potrebbero scolorirli e danneggiarli.
MODALITA’ AUSILIARIA
Usate questa modalità quando il telecomando non è disponibile.
PER ACCENDERE
Sollevate il pannello anteriore dell'unità interne e premete il tasto AUX sul pannello operativo.
•La spia rossa di FUNZIONAMENTO (  ) sull'unità si illuminerà e l'unità comincerà il funzionamento nella modalità AUTOMATICA.
•La velocità del ventilatore e l'impostazione della temperatura sono impostate su AUTOMATICO.
PER SPEGNERE
Pemere nuovamente il tasto AUX.
•La spia rossa di FUNZIONAMENTO (  ) sull'unità si spegnerà.
AUX
NOTE:
•Se viene premuto il tasto AUX durante il normale funzionamento, l'unità si spegnerà.
IT-4
FUNZIONI DI BASE
2
5
3
1
4
SUGGERIMENTI SULLA
MODALITA’ AUTOMATICA
Nella modalità AUTOMATICA l’impostazione e il modo della temperatura vengono selezionati automaticamente in base alla temperatura della stanza nel momento in cui l’unità viene accesa.
Modalità ed impostazioni della temperatura
Temperatura della |
Funzionamento automatico |
||
stanza |
|
|
|
Modalità |
Impostazione |
||
all’avvio |
|||
dell’operazione |
|
della temperatura |
|
Sotto 21˚C |
RISCALDAMENTO |
23˚C |
|
Da 21°C a 24˚C |
DEUMIDIFICAZIONE |
Temperatura della stanza -2˚C |
|
Da 24˚C a 26˚C |
RINFRESCAMENTO |
24˚C |
|
Da 26°C a 28˚C |
RINFRESCAMENTO |
25˚C |
|
Sopra 28˚C |
RINFRESCAMENTO |
26˚C |
|
1 Premete il tasto MODE per selezionare il modo di funzionamento.
AUTOMATICO RISCALDARINFRESCADEUMIDIFICA-
MENTO MENTO ZIONE
• La spia rossa di FUNZIONAMENTO ( |
) |
ITALIANO |
Premete il tasto d'ACCENSIONE/SPE- |
|
|
2 GNIMENTO per accendere l'unità. |
|
|
sull’unità si illuminerà. |
|
|
3 Premete il tasto TEMP. per impostare la temperatura desiderata.
MODALITA’ AUTOMATICA/DEUMIDIFICAZIONE
•La temperatura può essere cambiata entro l’ intervallo di 2°C superiore e 2°C inferiore alla temperatura determinata automaticamente dal condizionatore dell’aria.
MODALITA’ RINFRESCAMENTO/RISCALDAMENTO
•La temperatura può essere impostata in un intervallo compreso tra 18° e 32°C.
4 Premete il tasto FAN per impostare la velocità del ventilatore desiderata.
AUTOMATICO MODERATO BASSO |
ALTO |
|||||
|
|
|
|
|
|
|
•Nella modalità DEUMIDIFICAZIONE, la velocità del ventilatore è preselezionata su AUTOMATICO e non può essere cambiata.
5 Per spegnere l'unità, premete nuovamente il tasto d'ACCENSIONE/SPEGNIMENTO.
• La spia rossa di FUNZIONAMENTO (  ) sull'unità si spegnerà.
IT-5

REGOLAZIONE DELLA DIREZIONE DEL FLUSSO D’ARIA
DIREZIONE VERTICALE DEL FLUSSO D'ARIA
1 Pemere il tasto SWING.
•Il deflettore di regolazione verticale cambierà l’ angolo continuamente.
2 Premete il tasto SWING nuovamente quando il deflettore di regolazione verticale si trova nella posizione desiderata.
1


 2
2
Intervallo di regolazione
Modalità RINFRESCAMENTO |
Modalità |
e DEUMIDIFICAZIONE |
RISCALDAMENTO |
DIREZIONE ORIZZONTALE DEL FLUSSO D’ARIA
Tenete il deflettore di regolazione orizzontale come mostrato nello schema e regolate la direzione del flusso d'aria.
AY-AP18KR
AY-AP24KR
Deflettore di regolazione
AY-AP9KR
AY-AP12KR
Deflettori di regolazione
PRECAUZIONI
Non tentate mai di regolare manualmente i deflettori di regolazione verticale.
•La regolazione manuale dei deflettori di regolazione verticale può causare un malfunzionamento dell’unità quando si usa il telecomando per la regolazione.
•Quando il deflettore di regolazione verticale è posizionato nella parte bassa nella modalità RINFRESCAMENTO o DEUMIDIFICAZIONE per un lungo periodo di tempo, si potrebbe formare della condensa.
Non regolate il deflettore di regolazione automatica all’estrema sinistra o all’estrema destra nella modalità RINFRESCAMENTO con la velocità della ventola impostata su “MODERATO (  )” per un periodo di tempo prolungato. Si potrebbe formare della condensa sui deflettori di ventilazione.
IT-6
FLUSSO D’ARIA EFFETTO COANDA |
|
FUNZIONAMENTO TURBO |
|
|
|
Durante le operazioni di raffreddamento o deumidificazione, il deflettore di regolazione verticale è posizionato obliquamente verso l'alto per indirizzare l'aria fredda sul soffitto in modo da evitare il flusso d'aria diretto.
Durante l'operazione di riscaldamento, il deflettore di regolazione verticale è posizionato verso il basso per indirizzare l'aria calda sul pavimento.
1 Premete il tasto FLUSSO D'ARIA EFFETTO COANDA durante il funzionamento.
• Sul telecomando apparirà “  ”.
”.


 1
1
In questa modalità di funzionamento, la ventola del condizionatore d’aria funziona ad “altissima” velocità con una temperatura impostata di 15°C nei modi RINFRESCAMENTO e DEUMIDIFICAZIONE e con una temperatura impostata di 32°C nel modo RISCALDAMENTO per raffreddare e riscaldare rapidamente la stanza.
1 Premete il tasto TURBO durante il funzionamento.
•Sul telecomando apparirà “  ”.
”.
•Dal display scomparirà l'indicazione della temperatura.
•La spia verde TURBO (  ) sull'unità si illuminerà.


 1
1
ITALIANO
PER ANNULLARE
Premere nuovamente il tasto FLUSSO D'ARIA EFFETTO COANDA.
NOTE:
Se volete l'impostazione FLUSSO D'ARIA EFFETTO COANDA nella modalità TURBO, premete il tasto FLUSSO D'ARIA EFFETTO COANDA durante l'operazione TURBO.
PER ANNULLARE
Premere nuovamente il tasto TURBO.
• La spia verde TURBO (  ) sull’unità si spegnerà.
NOTE:
•Non potete impostare la temperatura o la velocità della ventola durante il funzionamento TURBO.
•Per spegnere la spia TURBO, premete il tasto DISPLAY.
•Quando l'unità funziona per oltre 30 minuti nella modalità TURBO, l'impostazione della ventola diventerà "ALTO" e l'impostazione della temperatura passerà a 18°C nella modalità RINFRESCAMENTO e DEUMIDIFICAZIONE.
IT-7
FUNZIONAMENTO DEL
PLASMACLUSTER
Gli ioni rilasciati nella stanza ridurranno alcuni funghi causati dall’aria.
1 Premete il tasto PLASMACLUSTER durante il funzionamento.
•Sul telecomando apparirà “ 
 ” .
” .
•La spia blu PLASMACLUSTER sull'unità si illuminerà.


 1
1
PER ANNULLARE
Pemere nuovamente il tasto PLASMACLUSTER.
• La spia PLASMACLUSTER sull'unità si spegnerà.
NOTE:
•L'utilizzo della funzione PLASMACLUSTER verrà memorizzato e sarà attivato la volta successiva che si accende il condizionatore d'aria.
•Per spegnere la spia PLASMACLUSTER, premete il tasto DISPLAY.
•Per avere la funzione PLASMACLUSTER nella modalità FAN (VENTILATORE), premete il tasto PLASMACLUSTER quando l'unità non è in funzione. Il simbolo della modalità sul telecomando si spegne e la velocità del ventilatore non può essere impostata su AUTOMATICO.
TIMER DI SPEGNIMENTO DOPO UN’ORA
Quando è impostato il TIMER DI SPEGNIMENTO DOPO UN’ORA, l’unità si spegnerà dopo un’ora.
1 Premete il tasto TIMER DI SPEGNIMENTO DOPO UN'ORA
•Sul telecomando apparirà “ 

 ” .
” .
•La spia arancione TIMER (  ) sull'unità si illuminerà.
•L'unità smetterà di funzionare dopo un'ora.
1
CANCEL
PER ANNULLARE
Pemere il tasto CANCEL.
• La spia arancione TIMER (  ) sull'unità si spegnerà.
In alternativa, spegnete l'unità premendo il tasto d'ACCENSIONE/SPEGNIMENTO.
•La spia rossa di FUNZIONAMENTO (  ) e la spia arancione TIMER (
  ) sull'unità si spegneranno.
NOTE:
•L'operazione TIMER DI SPEGNIMENTO DOPO UN'ORA ha la priorità sulle impostazioni TIMER ATTIVATO e TIMER DISATTIVATO.
•Se il TIMER DI SPEGNIMENTO DOPO UN'ORA viene impostato mentre l'unità non è in funzione, l'unità funzionerà per un'ora in base alle condizioni impostate precedentemente.
•Se desiderate utilizzare l'unità per un'altra ora prima che la modalità TIMER DI SPEGNIMENTO DOPO UN'ORA si attivi, premete il tasto durante il funzionamento.
IT-8
FUNZIONAMENTO DEL TIMER
TIMER DISATTIVATO
1 |
Premere il tasto TIMER DISATTIVATO |
||
( |
|
) ed impostate l’ora desiderata. |
|
|
|||
|
|||
•L'impostazione dell'ora cambia quando premete il tasto come segue. tenete premuto il tasto per scorrere le impostazioni velocemente.
0.5h |
1.0h |
1.5h |
10h |
11h |
12h |
•La spia arancione TIMER (  ) sull’unità si illuminerà.
•L’impostazione dell’ora scorrerà per indicare il tempo rimanente.
TIMER ATTIVATO
1 Premere il tasto TIMER ATTIVATO ( 
 ) ed impostare l’ora desiderata.
•L'impostazione dell'ora cambia quando premete il tasto come segue. Tenete premuto il tasto per scorrere le impostazioni velocemente.
0.5h |
1.0h |
1.5h |
10h |
11h |
12h |
•La spia arancione TIMER (  ) sull'unità si illuminerà.
•L'impostazione dell'ora scorrerà per indicare il tempo rimanente.
ITALIANO
1
CANCEL
PER ANNULLARE
Pemere il tasto CANCEL.
• La spia arancione TIMER (  ) sull'unità si spegnerà.
SUGGERIMENTI SUL FUNZIONAMENTO DI DISATTIVAZIONE DEL TIMER
Quando viene impostato TIMER DISATTIVATO, l'impostazione della temperatura viene regolata automaticamente per evitare che la stanza diventi eccessivamente fredda quando dormite. (Funzione Auto Sleep)
MODALITA' RINFRESCAMENTO/DEUMIDIFICAZIONE:
•Un'ora dopo l'attivazione del timer, l'impostazione della temperatura aumenta di 1°C rispetto all'impostazione della temperatura inziale.
Modalità RISCALDAMENTO
•Un'ora dopo l'attivazione del timer, l'impostazione della temperatura diminuisce di 3°C rispetto all'impostazione della temperatura inziale.
1
CANCEL
Selezionate il modo, l'impostazione della temperatura e la velocità della ventola in base alle vostre esigenze.
•Quando la temperatura è impostata con il TIMER ATTIVATO, sul display verrà visualizzata la temperatura per 5 secondi prima di tornare alla visualizzazione dell'ora.
•L'unità si accenderà prima dell'ora impostata per permettere che la stanza raggiunga la temperatura desiderata all'ora del programma. (Funzione risveglio)
PER ANNULLARE
Pemere il tasto CANCEL.
• La spia arancione TIMER (  ) sull'unità si spegnerà.
NOTE:
•La durata del timer può essere impostata da un minimo di mezz’ora ad un massimo di 12 ore. Fino a 9,5 ore e mezzo si può impostare ad intervalli di mezz’ ora mentre dalle 10 alle 12 ore ad intervalli di un’ora.
•L’impostazione dell’ora più recente verrà memorizzata e visualizzata sul display del telecomando quando TIMER ATTIVATO o TIMER ATTIVATO vengono impostati la volta successiva.
•TIMER ATTIVATO e TIMER DISATTIVATO non possono essere impostati insieme
•Quando è impostato TIMER DI SPEGNIMENTO DOPO UN’ORA, le impostazioni TIMER DISATTIVATO e TIMER ATTIVATO non sono disponibili.
•Se viene impostato TIMER DI SPEGNIMENTO DOPO UN’ORA quando TIMER DISATTIVATO o TIMER ATTIVATO è attivo, l’impostazione TIMER ATTIVATO o TIMER DISATTIVATO verrà annullata.
IT-9
 Loading...