


 Loading...
Contact SAMSUNG WORLD-WIDE
If you have any questions or comments relating to Samsung products, please contact the SAMSUNG customer care centre.
Country |
Customer Care Centre |
Web Site |
|
AUSTRIA |
0810 - SAMSUNG(7267864, € 0.07/min) |
www.samsung.com/at |
|
BELGIUM |
02 201 2418 |
www.samsung.com/be |
|
CZECH REPUBLIC |
800 - SAMSUNG (800-726786) |
www.samsung.com/cz |
|
Samsung Zrt., česká organizační složka, Oasis Florenc, Sokolovská394/17, |
|||
|
180 00, Praha 8 |
|
|
DENMARK |
8 - SAMSUNG(7267864) |
www.samsung.com/dk |
|
EIRE |
0818 717 100 |
www.samsung.com/ie |
|
ESTONIA |
800-7267 |
www.samsung.ee |
|
FINLAND |
30 - 6227 515 |
www.samsung.com/fi |
|
FRANCE |
3260 'dites' SAMSUNG (€ 0,15/Min) |
www.samsung.com/fr |
|
0825 08 65 65 (€ 0.15/Min) |
|||
|
|
||
GERMANY |
01805 - SAMSUNG(7267864, € 0.14/Min) |
www.samsung.de |
|
HUNGARY |
06 - 80 - SAMSUNG(7267864) |
www.samsung.com/hu |
|
ITALIA |
800 - SAMSUNG(7267864) |
www.samsung.com/it |
|
KAZAKHSTAN |
8-10-800-500-55-500 |
www.samsung.com/kz_ru |
|
KYRGYZSTAN |
00-800-500-55-500 |
|
|
LATVIA |
8000-7267 |
www.samsung.com/lv |
|
LITHUANIA |
8-800-77777 |
www.samsung.lt |
|
LUXEMBURG |
02 261 03 710 |
www.samsung.com/lu |
|
NETHERLANDS |
0900 - SAMSUNG(7267864, € 0.10/Min) |
www.samsung.com/nl |
|
NORWAY |
3 - SAMSUNG(7267864) |
www.samsung.com/no |
|
POLAND |
0 - 801 - 1SAMSUNG(172678) |
www.samsung.com/pl |
|
022 - 607 - 93 - 33 |
|||
|
|
||
PORTUGAL |
808 20 - SAMSUNG(7267864) |
www.samsung.com/pt |
|
RUSSIA |
8-800-555-55-55 |
www.samsung.ru |
|
SLOVAKIA |
0800 - SAMSUNG(7267864) |
www.samsung.com/sk |
|
SPAIN |
902 - 1 - SAMSUNG (902 172 678) |
www.samsung.com/es |
|
SWEDEN |
075 - SAMSUNG(726 78 64) |
www.samsung.com/se |
|
Switzerland |
0848 - SAMSUNG(7267864, CHF 0.08/min) |
www.samsung.com/ch |
|
TADJIKISTAN |
8-10-800-500-55-500 |
|
|
Turkey |
444 77 11 |
www.samsung.com/tr |
|
U.K |
0845 SAMSUNG(7267864) |
www.samsung.com/uk |
|
UKRAINE |
8-800-502-0000 |
www.samsung.ua |
|
UZBEKISTAN |
8-10-800-500-55-500 |
www.samsung.com/kz_ru |
|
Plasma TV
user manual
imagine the possibilities
Thank you for purchasing this Samsung product. To receive more complete service, please register your product at
www.samsung.com/global/register
Model |
|
Serial No. |
BN68-01808A-01

User Instructions
Screen Image retention
Do not display a still image (such as on a video game or when hooking up a PC to this PDP) on the plasma monitor panel for more than 2 hours as it can cause screen image retention. This image retention is also known as “screen burn”. To avoid such image retention, reduce the degree of brightness and contrast of the screen when displaying a still image.
Height
The PDP can normally operate only under 2000m in height. It might abnormally function at a place over 2000m in height so do not install and operate there.
Heat on the top of the PDP TV
The top side of the product may be hot after long period of use as heat dissipates from the panel through the vent hole in the upper part of the product. This is normal and does not indicate any defect or operation failure of the product. However, children should be prevented from touching the upper part of the product.
The product is making a ‘cracking’ noise.
A ‘cracking’ noise may occur when the product contracts or expands due to a change of surrounding environment such as temperature or humidity. This is normal and not a defect of the unit.
Cell Defects
The PDP uses a panel consisting of 1,230,000(SD-level) to 3,150,000(HD-level) pixels which require sophisticated technology to produce. However, there may be few bright or dark pixels on the screen. These pixels will have no impact on the performance of the product.
Avoid operating the TV at temperatures below 5°C(41°F)
A still image displayed too long may cause permanent damage to the PDP Panel.
Watching the PDP TV in 4:3 format for a long period of time may leave traces of borders displayed on the left, right and centre of the screen caused by the difference of light emission on the screen. Playing a DVD or a game console may cause similar effect to the screen. Damages caused by the above effect are not covered by the Warranty.
Afterimage on the Screen.
Displaying still images from Video games and PC for longer than a certain period of time may produce partial afterimages. To prevent this effect, reduce the ‘brightness’ and ‘contrast’ when displaying still images.
Warranty
-Warranty does not cover any damage caused by image retention.
-Burn-in is not covered by the warranty.
Installation
Be sure to contact an authorized service centre, when installing your set in a location with heavy dust, high or low temperatures, high humidity, chemical substance and where it operates continually such as the airport, the train station etc. Failure to do so may cause a serious damage to your set.
Contact SAMSUNG WORLDWIDE
If you have any questions or comments relating to Samsung products, please contact the SAMSUNG customer care centre. (See back cover for more informations.)
© 2008 Samsung Electronics Co., Ltd. All rights reserved.
English -

Contents |
|
General Information |
|
User Instructions.............................................. |
2 |
Checking Parts................................................ |
4 |
Using the Stand-Base...................................... |
4 |
Control Panel .................................................. |
5 |
Connection Panel............................................ |
6 |
Viewing the Remote Control............................ |
8 |
Operation |
|
Switching Your Television On and Off.............. |
9 |
Viewing the Menus.......................................... |
9 |
Plug & Play Feature....................................... |
10 |
Using the TOOLS Button............................... |
12 |
Viewing External Signal Sources................... |
12 |
Editing Device Names................................... |
13 |
Channel Control |
|
Storing Channels Automatically..................... |
13 |
Storing Channels Manually............................ |
14 |
Adding / Locking Channels............................ |
15 |
Sorting the Stored Channels......................... |
16 |
Assigning Names to Channels...................... |
16 |
Fine Tuning Channel Reception.................... |
17 |
Picture Control |
|
Changing the Picture Standard..................... |
18 |
Customizing the Picture Settings................... |
18 |
Configuring Detailed Settings on the Picture.. |
19 |
Picture Options.............................................. |
20 |
Resetting the Picture Settings to the Factory |
|
Defaults......................................................... |
22 |
Sound Control |
|
Sound Features............................................. |
23 |
Selecting the Sound Mode |
|
(depending on the model).............................. |
24 |
Connecting Headphones (Sold separately)... |
24 |
Symbols
Press
|
English |
Function Description |
|
Time Features................................................ |
25 |
Language / Melody / Light Effect / |
|
Entertainment / Energy Saving / PIP............. |
26 |
PC Display |
|
Setting up Your PC Software |
|
(Based on Windows XP)................................ |
27 |
Input Mode (PC)............................................ |
28 |
Setting the PC............................................... |
29 |
Appendix |
|
Teletext Feature (depending on the model)... |
30 |
Wall Mount Kit Specifications (VESA)........... |
32 |
Wallmount adjustment (Sold separately)..... |
33 |
Preparing before installing WallMount on the |
|
wall................................................................ |
34 |
How to assemble the Stand-Base |
|
(depending on the model).............................. |
34 |
Securing the TV to the Wall........................... |
35 |
Troubleshooting............................................. |
36 |
Specifications................................................ |
37 |
Important Note
English -

 Checking Parts
Owner’s Instructions |
Remote Control/ |
Power Cord |
Cloth-Clean |
Holer-Ring (4ea) |
|
AAA Batteries |
|
|
(Refer to page 34) |
Warranty Card/ |
Cover-Bottom / Screws |
Ferrite Core for |
Ferrite Core for |
Safety Guide Manual |
(2ea) |
Power Cord (2ea) |
S-Video |
(Not available in all |
(Refer to page 34) |
|
|
locations) |
|
|
|
Sold Separately
Antenna Cable |
Component Cables |
Audio Cables |
PC Cable |
Scart Cable |
PCAudio Cable |
HDMI Cable |
HDMI/DVI Cable |
Ferrite Core (Power Cord, S-Video) |
|
|
|
The ferrite cores are used to shield the cables from interference. |
|
||
When connecting a cable, open the ferrite core and clip it around |
|
||
the cable near the plug. |
|
|
|
|
|
|
(PS42A410) |
Using the Stand-Base
Two or more people should carry the PDP. Never lay the PDP on the
floor because of possible damage to the screen. Always keep the
PDP upright.
The PDP can rotate 20 degrees in
right and left directions.
-20° ~ 20°
English -
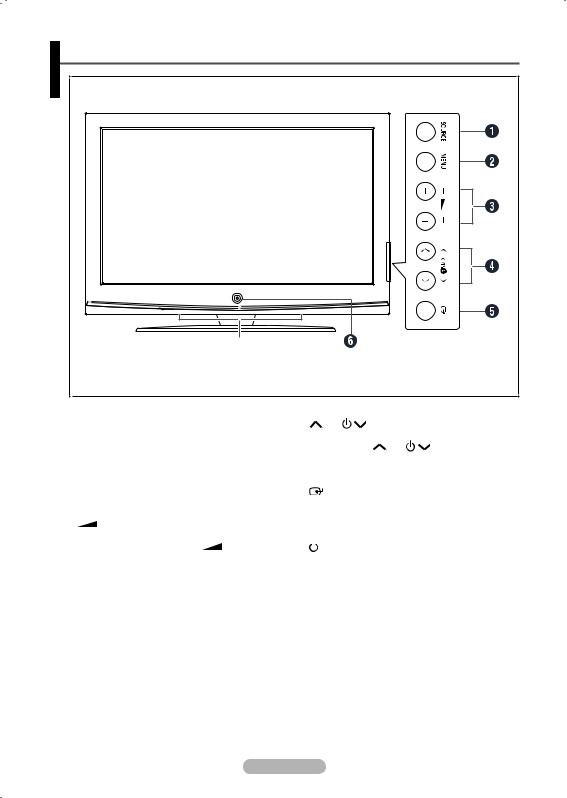
Control Panel
Front (or Side) Panel
7
The product colour and shape may vary depending on the model.
1SOURCE
Toggles between all the available input sources
(TV, Ext.1, Ext.2, AV, S-Video, Component, PC, HDMI1, HDMI2).
2MENU
Press to see an on-screen menu of your TV’s features.
3– +
Press to increase or decrease the volume. In
the on-screen menu, use the – + buttons as you would use the ◄ and ► buttons on the remote control.
4 |
C/P |
|
|
|
Press to change channels. In the on-screen |
||
|
menu, use the |
C/P |
buttons as you |
|
would use the ▲ and ▼ buttons on the remote |
||
|
control. |
|
|
5 |
ENTER |
|
|
|
In the on-screen menu, use this button as you |
||
|
would use the ENTER button on the remote |
||
|
control. |
|
|
6 POWER
POWER
Press to turn the TV on and off.
Power Indicator
Blinks and turns off when the power is on and lights up in stand-by mode.
Remote Control Sensor
Aim the remote control towards this spot on the TV.
7Speakers
English -

Connection Panel
Rear Panel |
|
1 |
|
or |
8 |
Cable Television |
|
|
Network |
|
or |
2 |
3 |
4 |
5 |
6 |
7 |
The product colour and shape may vary depending on the model.
Whenever you connect an audio or video system to your set, ensure that all elements are switched off.
When connecting an external device, match the colour of the connection terminal to the cable.
1POWER IN
Connect the supplied power cord.
2COMPONENT IN
Audio (AUDIO L/R) and video (Y/PB/PR) inputs for Component.
3PC IN(PC) / (AUDIO)
Connect to the video and audio output jack on your PC.
4EXT 1, EXT 2
Inputs or outputs for external devices, such as
VCR, DVD, video game device or video disc players.
Input/Output Specification
Connector |
|
Input |
|
Output |
Video |
Audio(L/R) |
RGB |
Video +Audio(L/R) |
|
EXT 1 |
|
|
|
Only TV output is |
|
|
|
|
available. |
EXT 2 |
|
|
|
Output you can |
|
choose. |
|||
|
|
|
|
5Connecting external Audio Devices
Connect RCA audio signals from the TV to an external source, such as Audio equipment.
6SERVICE
−Connector for service.
−Connect the serial jack between the electro-motion wall mount bracket and your TV when you want to adjust the TV viewing angle using your remote control.
Continued...
English -

7 HDMI IN 1,2
- No additional Audio connection is needed for an HDMI to HDMI connection.
- When using an HDMI/DVI cable connection, you must use the HDMI IN 2 jack.
What is HDMI?
- “High Definition Multimedia interface” allows the transmission of high definition digital video data and multiple channels of digital audio.
- The HDMI/DVI terminal supports DVI connection to an extended device with the appropriate cable (not supplied). The difference between HDMI and DVI is that the HDMI device is smaller in size, has the HDCP (High Bandwidth Digital Copy
Protection) coding feature installed, and supports multi - channel digital audio.
Side Panel
DVI IN (HDMI2) AUDIO R/L
DVI audio outputs for external devices.
8ANT IN
75Ω Coaxial connector for Aerial/Cable Network.
Supported modes for HDMI/DVI and Component
|
480i |
480p |
576i |
576p |
720p |
1080i |
HDMI/DVI 50Hz |
X |
X |
X |
O |
O |
O |
HDMI/DVI 60Hz |
X |
O |
X |
X |
O |
O |
Component |
O |
O |
O |
O |
O |
O |
or
1
 2
2
The product colour and shape may vary depending on the model.
1S-VIDEO or VIDEO / AUDIO L/R
Video (S-Video or Video) and audio inputs for external devices, such as a camcorder or VCR.
2Headphones jack
You can connect a set of headphones if you wish to watch a television programme without disturbing the other people in the room.
Prolonged use of headphones at a high volume may damage your hearing.
English -

 Viewing the Remote Control
1POWER button
(turns the TV on and off)
2Selects the TV mode directly
3Number buttons for direct channel access
4One/Two-digit channel selection
5Temporary sound switch-off
6 Volume increase
 Volume decrease
7Use to quickly select frequently used functions.
8Control the cursor in the menu
9Use to see information on the current broadcast
@Channel control button (Refer to page 15)
# Available source selection $ Previous channel
%
 Next channel
 Previous channel
^Returns to the previous menu
& Exit the on-screen menu
*Displays the main on-screen menu
( Picture size selection
) Selects the HDMI mode directly
aPicture effect selection
(Refer to page 18)
Teletext Functions
(Refer to page 30)
2Exit from the teletext display (depending on the model)
7 Teletext size
9 Teletext reveal
0 Fastext topic selection
!Teletext display/mix both teletext information and the normal broadcast
12 Teletext store
#Teletext mode selection (LIST/FLOF)
$ Teletext sub page
% P 
 :Teletext next page
P  :Teletext previous page ^ Teletext hold
& Teletext cancel * Teletext index
Continued...
English -
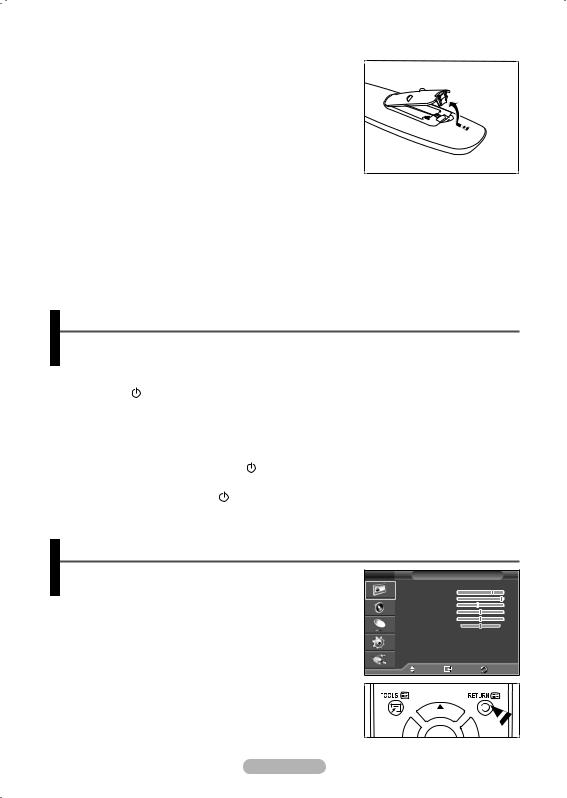
Installing Batteries in the Remote Control
1Lift the cover at the back of the remote control upward as shown in the figure.
2Install two AAA size batteries.
Make sure to match the “+” and “–” ends of the batteries with the diagram inside the compartment.
Do not mix battery types, i.e. alkaline and manganese.
3Close the cover as shown in the figure.
Remove the batteries and store them in a cool and dry
place if you won’t be using the remote control for a long time. The remote control can be used up to about 23 feet from the TV. (Assuming typical TV usage, the batteries last for about one year.)
If the remote control doesn’t work! Check the following:
1.Is the TV power on?
2.Are the plus and minus ends of the batteries reversed?
3.Are the batteries drained?
4.Is there a power cut, or is the power cord unplugged?
5.Is there a special fluorescent light or a neon sign nearby?
Switching Your Television On and Off
The main lead is attached to the rear of the television.
1Plug the main lead into an appropriate socket.
The main voltage is indicated on the rear of the television and the frequency is 50 or 60Hz.
2Press the (Power) button (On/Off) on the front of the television or press the POWER button on the remote control to switch the television on. The programme that you were watching last is re-selected automatically. If you have not yet stored any channels, no clear picture appears. Refer to “Storing Channels Automatically” on page 13 or “Storing Channels Manually” on page 14.
If the television is initially powered on, several basic customer settings proceed automatically. Refer to “Plug & Play Feature” on page 10.
3To switch the television off, press the (Power) button (On/Off) on the front of the television or press the POWER button on the remote control.
4To switch the TV on, press the (Power) button (On/Off) on the front of the TV or press the POWER button or number buttons on the remote control.
Viewing the Menus
1Press the MENU button.
The main menu is displayed on the screen.
Its left side has six icons: Picture, Sound, Channel, Setup,
Input.
2Press the ▲ or ▼ button to select one of the icons. Press the ENTER button to access the icon’s sub-menu.
3Press the ▲ or ▼ button to move to items in the menu. Press the ENTER button to enter items in the menu.
4Press the ▲/▼/◄/► button to change the selected items. Press the RETURN button to return to the previous menu.
5Press the EXIT button to exit from the menu.
T V |
Picture |
|
Mode |
: Standard |
|
Cell Light |
|
|
Contrast |
|
5 |
Brightness |
|
45 |
Sharpness |
|
50 |
Colour |
G50 |
50 |
Tint |
R50 |
|
Detailed Settings |
|
|
Picture Options |
|
|
Reset |
: OK |
|
Move |
Enter |
Exit |
English -
Plug & Play Feature
When the television is initially powered on, several basic customer settings proceed automatically and subsequently. The following settings are available.
If you accidentally select the wrong country for your TV, the characters on the screen may be wrongly displayed.
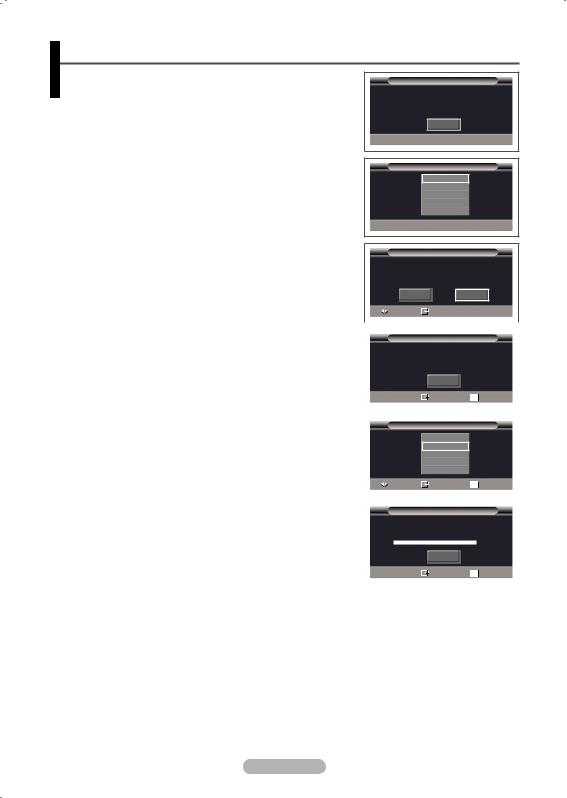
1If the television is in standby mode, press the POWER button on the remote control. The message Start Plug & Play is displayed. Press the ENTER button.
2The Language menu will automatically appear after several seconds.
3Select the appropriate language by pressing the ▲ or ▼ button.
Press the ENTER button. The message Select Home Use when installing this TV in your home. is displayed.
4Press the ◄ or ► button to select Store Demo or Home Use, then press the ENTER button. The message to check the connected status of the antenna is displayed.
The default selection is Home Use.
We recommend setting the TV to Home Use mode for the best picture in your home environment.
Store Demo mode is only intended for use in retail environments.
If the unit is accidentally set to Store Demo mode and you want to return to Home Use (Standard): Press the Volume button. When the volume OSD is displayed, press and hold the MENU button for 5 seconds.
5Make sure that the antenna is connected to the TV.
Press the ENTER button. The Country menu is displayed.
6Select your country or area by pressing the ▲ or ▼ button.
Press the ENTER button.
Plug & Play
Start Plug & Play.
OK
 Enter
Enter
Plug & Play
English
Language Deutsch
Français
Italiano
▼
 Move
Move  Enter
Enter
Plug & Play
Select 'Home Use'
when installing this TV in your home.
|
|
|
Store Demo |
|
Home Use |
|||||
Move |
|
|
Enter |
|
|
|
|
|||
|
|
|
|
|
|
|
|
|
|
|
|
|
|
|
|
|
|
|
|
||
|
|
|
|
|
Plug & Play |
|||||
|
|
|
|
Check antenna input. |
||||||
|
|
|
|
|
|
|
|
|
|
|
|
|
|
|
|
|
OK |
|
|
|
|
|
|
|
|
|
|
Enter |
|
|
|
Skip |
|
|
|
|
|
|
|
|
|
||
|
|
|
|
|
|
|||||
|
|
|
|
|
Plug & Play |
|||||
Country |
|
|
▲ |
|
|
|
|
|||
United Kingdom |
||||||||||
|
|
|
|
|
|
Austria |
|
|
|
|
|
|
|
|
Eastern Europe |
||||||
|
|
|
|
|
|
Others |
|
|
|
|
Move |
|
|
Enter |
|
|
|
Skip |
|||
|
|
|
|
|
|
|
|
|||
|
|
|
|
|
|
|
|
|
|
|
|
|
|
|
|
Plug & Play |
|||||
|
P 1 |
C -- |
|
|
|
40 MHz |
||||
|
|
|
|
|
|
|
|
|
0 % |
|
|
|
|
|
|
|
|
|
|
|
|
|
|
|
|
|
|
Start |
|
|
|
|
|
|
|
|
|
|
Enter |
|
|
|
Skip |
|
|
|
|
|
|
|
|
|
|
|
Continued...
English - 10
7Press the ENTER button to start search the channels.
The channel search will start and end automatically. After all the available channels are stored, Clock Set menu is automatically displayed. Press the ENTER button.
8Press the ◄ or ► button to select Month, Day, Year, Hour, or Minute. Set these by pressing the ▲ or ▼ button.
You can set the Month, Day, Year, Hour, or Minute directly by pressing the numeric buttons on the remote control.
9Press the ENTER button to confirm your setting. The message Enjoy your viewing is displayed. When you have finished, press the ENTER button.
Even if the ENTER button is not pressed, the message will automatically disappear after several seconds.
If you want to reset this feature …
1Press the MENU button to display the menu.
2Press the ▲ or ▼ button to select Setup, then press the ENTER button.
3Press the ENTER button again to select Plug & Play. The message Start Plug & Play is displayed.
|
|
|
|
|
Plug & Play |
|
|
|
|
|
Clock Set |
|
|
|
|
|
|||
|
Month |
Day |
Year |
Hour |
Minute |
|
|
||
|
|
|
|
|
|
|
|
|
|
|
|
01 |
|
01 |
2008 |
12 : |
00 |
|
|
|
|
|
|
|
|
|
|
|
|
|
|
Move |
Adjust |
Enter |
|
|
|||
|
|
|
|
|
|
|
|
|
|
|
|
|
|
|
|
|
|
|
|
|
|
|
|
Enjoy your viewing |
|
|
|
||
|
|
|
|
|
|
|
|
|
|
|
|
|
|
|
OK |
|
|
|
|
|
|
|
|
|
|
|
|
|
|
|
|
|
|
|
|
|
|
|
|
|
|
|
|
|
|
|
|
||
|
T V |
|
|
Setup |
|
|
|
||
|
|
|
|
|
|
|
|
|
|
|
|
|
|
Plug & Play |
|
|
|
|
|
|
|
|
|
Language |
: English |
|
|
||
|
|
|
|
Time |
|
: In Watching TV |
|
||
|
|
|
|
Light Effect |
|
||||
|
|
|
|
Wall-Mount Adjustment |
|
|
|||
|
|
|
|
Melody |
|
: Off |
|
|
|
|
|
|
|
Entertainment |
: Off |
|
|
||
|
|
|
|
Energy Saving |
: Off |
|
|
||
|
|
|
|
PIP |
|
|
|
|
|
|
|
|
|
Move |
Enter |
Return |
|||
English - 11

Using the TOOLS Button
You can use the TOOLS button to select your frequently used functions quickly and easily. The “Tools” menu changes depending on which external input mode you are viewing.
1Press the TOOLS button. The Tools menu will appear.
2Press the ▲ or ▼ button to select a menu, then press the
ENTER button.
3Press the ▲/▼/◄/►/ENTER buttons to display, change, or use the selected items.
For a more detailed description of each function, refer to the corresponding page.
•Picture Mode, see page 18
•Sound Mode, see page 23
•Sleep Timer, see page 25
•SRS TS XT, see page 23
•Energy Saving, see page 27
•Dual I-II, see page 24
•PIP, see page 26
•Auto Adjustment, see page 29
|
|
Tools |
|
|
|
|
|
|
|
|
PictureMode |
◄ |
Standard ► |
|
|
Sound Mode |
: |
Custom |
|
|
Sleep Timer |
: |
Off |
|
|
SRS TS XT |
: |
Off |
|
|
Energy Saving |
: |
Off |
|
|
Dual I-II |
: |
Mono |
|
|
Move |
Adjust |
Exit |
|
Viewing External Signal Sources
You can switch between viewing signals from connected equipment, such as a VCR, DVD, Set-Top Box, and the TV source (broadcast or cable).
1Press the MENU button to display the menu.
2Press the ▲ or ▼ button to select Input, then press the ENTER button.
3Press the ENTER button again to select Source List.
4Press the ▲ or ▼ button to select the signal source, then press the ENTER button.
Available signal sources: TV, Ext.1, Ext.2, AV, S-Video,
Component, PC, HDMI1, HDMI2.
You can choose only those external devices that are connected to the TV.
You can select these options simply by pressing the SOURCE button on the remote control.
To watch television programme again, press the TV button and select the channel number required.
You can also watch HDMI mode simply by pressing the HDMI button on the remote control.
T V |
Input |
|
Source List |
: TV |
|
Edit Name |
|
|
Move |
Enter |
Return |
T V |
Source List |
|
TV |
: −−−− |
|
Ext.1 |
|
|
Ext.2 |
: −−−− |
|
AV |
: −−−− |
|
S-Video |
: −−−− |
|
Component |
: −−−− |
|
PC |
: −−−− |
|
HDMI1 |
: −−−− |
|
HDMI2 |
: −−−− |
|
Move |
Enter |
Return |
English - 12

Editing Device Names
You can give a name to the external source.
1Press the MENU button to display the menu.
2Press the ▲ or ▼ button to select Input, then press the ENTER button.
3Press the ▲ or ▼ button to select Edit Name, then press the ENTER button.
4Press the ▲ or ▼ button to select the external source to be edited, then press the ENTER button.
5Select the required device by pressing ▲ or ▼, then press the ENTER button.
Available device names: VCR, DVD, Cable STB, Satellite STB, PVR STB, AV Receiver, Game, Camcorder, PC, TV, IPTV, Blu-Ray, HD DVD, DMA.
6Press the EXIT button to exit.
 Storing Channels Automatically
T V |
Input |
|
|
|
Source List |
: TV |
|
|
Edit Name |
|
|
Move |
Enter |
Return |
|
|
|
|
|
T V |
Edit Name |
|
|
Ext.1 |
: |
|
---- |
Ext.2 |
: |
|
VCR |
AV |
: |
|
DVD |
S-Video |
: |
Cable STB |
|
Component |
: |
Satellite STB |
|
PC |
: |
PVR STB |
|
HDMI1 |
: |
AV Receiver |
|
HDMI2 |
: |
|
Game |
|
|
|
▼ |
Move |
Enter |
Return |
|
You can scan for the frequency ranges available to you (availability depends on your country).
Automatically allocated programme numbers may not correspond to actual or desired programme numbers. However you can sort numbers manually and clear any channels you do not wish to watch.
1Press the MENU button to display the menu.
2Press the ▲ or ▼ button to select Channel, then press the ENTER button.
3Press the ENTER button again. The available countries are listed.
4Select your country by pressing the ▲ or ▼ button, then press the ENTER button.
5Press the ▲ or ▼ button to select Auto Store, then press the ENTER button.
6Press the ENTER button again to start the search.
The search will end automatically.
To stop the search before it has finished, press the MENU or the ENTER button.
T V |
|
Channel |
|
|
|
||||
|
|
|
Country |
: |
|
|
Belgium |
||
|
|
|
Auto Store |
|
|
|
|
France |
|
|
|
|
Manual Store |
|
|
|
Germany |
||
|
|
|
|
|
|
|
Italy |
||
|
|
|
Channel Manager |
|
|
|
|
||
|
|
|
|
Netherlands |
|||||
|
|
|
Sort |
|
|||||
|
|
|
|
|
|
|
Spain |
||
|
|
|
Name |
|
|
|
|
||
|
|
|
|
|
Switzerland |
||||
|
|
|
Fine Tune |
|
|
||||
|
|
|
|
United Kingdom |
|||||
|
|
|
|
|
|
||||
|
|
|
|
|
|
|
|
|
▼ |
|
|
|
Move |
Enter |
|
|
Return |
||
|
|
|
|
|
|
|
|
|
|
T V |
|
Channel |
|
|
|
||||
|
|
|
Country |
: United Kingdom |
|||||
|
|
|
Auto Store |
|
|
|
|
|
|
|
|
|
Manual Store |
|
|
|
|
|
|
|
|
|
Channel Manager |
|
|
|
|
|
|
|
|
|
Sort |
|
|
|
|
|
|
|
|
|
Name |
|
|
|
|
|
|
|
|
|
Fine Tune |
|
|
|
|
|
|
|
|
|
Move |
Enter |
|
|
Return |
||
|
|
|
|
|
|
|
|
|
|
|
|
|
|
Auto Store |
|
|
|
||
|
P |
1 C -- |
|
|
|
|
40 MHz |
||
|
|
|
|
|
|
|
|
|
0 % |
|
|
|
|
|
|
|
|
|
|
|
|
|
|
Start |
|
|
|
|
|
|
|
|
|
Enter |
|
|
|
|
Return |
|
|
|
|
|
|
|
|
|
|
English - 13

Storing Channels Manually
You can store television channels, including those received via cable networks.
When storing channels manually, you can choose:
Whether or not to store each of the channels found.
The programme number of each stored channel which you wish to identify.
1Press the MENU button to display the menu.
2Press the ▲ or ▼ button to select Channel, then press the ENTER button.
3Press the ▲ or ▼ button to select Manual Store, then press the ENTER button.
4Select the required option by pressing the ▲ or ▼ button, then press the ENTER button.
5When you are satisfied with your setting, press the ENTER button.
6Press the EXIT button to exit.
T V |
Channel |
|
|
|
|
|
Country |
: United Kingdom |
|||
|
Auto Store |
|
|
|
|
|
Manual Store |
|
|
|
|
|
Channel Manager |
|
|
|
|
|
Sort |
|
|
|
|
|
Name |
|
|
|
|
|
Fine Tune |
|
|
|
|
|
Move |
Enter |
|
Return |
|
|
|
|
|
||
T V |
Manual Store |
|
|
||
|
|
|
|
|
|
|
Programme |
: P |
1 |
|
|
|
Colour System |
: Auto |
|
|
|
|
Sound System |
: BG |
|
|
|
|
Channel |
: C |
−− |
|
|
|
Search |
: 40 |
MHz |
|
|
|
Store |
: ? |
|
|
|
|
Move |
Enter |
|
Return |
|
Programme (Programme number to be assigned to a channel)
−Press the ▲ or ▼ button until you find the correct number.
You can also select the channel number directly by pressing the numeric buttons (0~9).
Colour System: Auto/PAL/SECAM/NTSC4.43
−Press the ▲ or ▼ button to select the required colour standard.
Sound System: BG/DK/I/L
−Press the ▲ or ▼ button to select the required sound standard.
Channel (When you know the number of the channel to be stored)
−Press the ▲ or ▼ button to select C (Air channel) or S (Cable channel).
−Press the ► button, then press the ▲ or ▼ button to select the required number.
You can also select the channel number directly by pressing the numeric buttons (0~9).
If there is abnormal sound or no sound, re-select the sound standard required.
Search (When you do not know the channel numbers)
−Press the ▲ or ▼ button to start the search.
−The tuner scans the frequency range until the first channel or the channel that you selected is received on the screen.
Store (When you store the channel and associated programme number)
−Set to OK by pressing the ENTER button.
Channel mode
P (Programme mode): When completing tuning, the broadcasting stations in your area have been assigned to position numbers from P00 to P99. You can select a channel by entering the position number in this mode.
C (Air channel mode): You can select a channel by entering the assigned number to each air broadcasting station in this mode.
S (Cable channel mode): You can select a channel by entering the assigned number for each cable channel in this mode.
English - 14

Adding / Locking Channels
Using the Channel Manager, you can conveniently lock or add |
|
|
|
|
||
T V |
Channel |
|||||
channels. |
|
Country |
|
: United Kingdom |
||
1 |
Press the MENU button to display the menu. |
|
Auto Store |
|
|
|
|
Manual Store |
|
|
|||
2 |
Press the ▲ or ▼ button to select Channel, then press the |
|
Channel Manager |
|
|
|
|
Sort |
|
|
|
||
|
ENTER button. |
|
Name |
|
|
|
|
|
Fine Tune |
|
|
||
3Press the ▲ or ▼ button to select Channel Manager, then press the ENTER button.
Adding channels |
|
|
|
Move |
Enter |
Return |
|||||||||
|
|
|
|
|
|
|
|
|
|
||||||
|
Using the Channel List, you can add channels. |
|
T V |
Channel Manager |
|
|
|
||||||||
|
|
|
|
|
|
|
|
|
|
|
|||||
4 |
Select Channel List by pressing the ENTER button. |
|
Channel List |
|
|
|
|
||||||||
|
Child Lock |
|
: Off |
|
|||||||||||
5 |
Move to the ( |
|
|
|
) field by pressing the ▲/▼/◄/► buttons, |
|
|
|
|
|
|
|
|
|
|
|
select a channel |
|
to be added, and press the ENTER button to |
|
|
|
|
|
|
|
|
|
|||
|
add the channel. |
|
|
|
|
|
|
|
|
|
|
||||
|
If you press the ENTER button again, the |
) symbol |
|
|
|
|
|
|
|
|
|
||||
|
next to the channel disappears and the channel is not |
|
|
Move |
Enter |
Return |
|||||||||
|
added. |
|
|
|
|||||||||||
|
|
|
|
|
|
Channel List |
|
|
|
||||||
Locking channels |
|
|
|
|
|
|
|
|
|||||||
|
|
P 1 |
C -- |
|
|
|
|
|
|||||||
|
This feature allows you to prevent unauthorized users, such as |
|
|
|
|
|
|
1 / 10 |
|
||||||
|
children, from watching unsuitable programmes by muting out |
|
|
Prog. |
|
|
|
|
|
||||||
|
video and audio. |
|
0 |
C 01 |
|
|
|
▲ |
|||||||
|
|
|
|
|
|
|
|
|
|
|
|
|
|
||
|
|
|
|
|
|
|
|
|
1 |
C −− |
|
|
|
|
|
6 Press the ▲ or ▼ button to select Child Lock, then press the |
|
|
2 |
C −− |
|
|
|
|
|
||||||
|
|
3 |
C −− |
|
|
|
|
|
|||||||
|
ENTER button. |
|
|
|
4 |
C −− |
|
|
|
|
|
||||
7 Select On by pressing the ▲ or ▼ button, then press the |
|
|
5 |
C −− |
|
|
|
|
|
||||||
|
7 |
C −− |
|
|
|
|
|
||||||||
|
|
|
|
|
|
|
|
|
6 |
C −− |
|
|
|
|
|
|
ENTER button. |
|
|
|
|
|
|
|
|
|
|
||||
|
|
|
|
8 |
C −− |
|
|
|
|
|
|||||
8 Press the ▲ or ▼ button to select Channel List, then press |
|
|
9 |
C −− |
|
|
|
▼ |
|||||||
|
|
|
Add |
|
Lock |
|
|
|
|||||||
|
the ENTER button. |
|
|
|
|
Move |
|
Enter |
|
|
|
||||
9 |
Move to the ( ) field by pressing the ▲/▼/◄/► buttons, |
|
|
|
Page |
|
Return |
|
|
|
|||||
|
|
|
|
|
|
|
|
|
|||||||
|
select a channel to be locked, and press the ENTER button. |
|
|
|
|
|
|
|
|
|
|||||
|
If you press the ENTER button again, the |
) symbol next to the channel disappears and the |
|||||||||||||
|
channel lock is canceled. |
|
|
|
|
|
|
|
|
|
|
||||
|
A blue screen is displayed when Child Lock is activated. |
|
|
|
|
|
|
|
|
|
|||||
10 Press the EXIT button to exit.
You can select these options simply by pressing the CH LIST button on the remote control.
English - 15

Sorting the Stored Channels
This operation allows you to change the programme numbers of the stored channels.
This operation may be necessary after using the auto store.
1Press the MENU button to display the menu.
2Press the ▲ or ▼ button to select Channel, then press the ENTER button.
3Press the ▲ or ▼ button to select Sort, then press the ENTER button.
4Select the channel that you wish to move by pressing the ▲ or ▼ button, then press the ENTER button.
5Select the number of the programme to which the channel is to be moved by pressing the ▲ or ▼ button.
Press the ENTER button. The channel is moved to its new position and all other channels are shifted accordingly.
6Repeat steps 4 to 5 until you have moved all the channels to the required programme numbers.
7Press the EXIT button to exit.
T V |
|
Channel |
|
|
|
||
|
|
Country |
|
: United Kingdom |
|||
|
|
Auto Store |
|
|
|
||
|
|
Manual Store |
|
|
|
||
|
|
Channel Manager |
|
|
|||
|
|
Sort |
|
|
|
|
|
|
|
Name |
|
|
|
|
|
|
|
Fine Tune |
|
|
|
|
|
|
|
Move |
Enter |
Return |
|||
|
|
|
|
|
|
|
|
T V |
|
Sort |
|
|
|
||
|
|
Prog. |
Ch. |
Name |
|
|
|
|
|
|
▲ |
|
|
|
|
|
|
0 |
C- - |
−−−−− |
|
|
|
|
1 |
C04 |
−−−−− |
|
|
|
|
2 |
C05 |
−−−−− |
|
|
|
||
3 |
C08 |
−−−−− |
|
|
|
||
4 |
C09 |
−−−−− |
|
|
|
||
5 |
C11 |
−−−−− |
|
|
|
||
6 |
C13 |
−−−−− |
|
|
|
||
7 |
C15 |
−−−−− |
|
|
|
||
8 |
C17 |
−−−−− |
|
|
|
||
9 |
C18 |
−−−−− |
|
|
|
||
|
|
|
▼ |
|
|
|
|
|
|
Move |
Enter |
Return |
|||
Assigning Names to Channels
Channel names will be assigned automatically when channel information is broadcast. These names can be changed, allowing you to assign new names.
1Press the MENU button to display the menu.
2Press the ▲ or ▼ button to select Channel, then press the
ENTER button.
3Press the ▲ or ▼ button to select Name, then press the ENTER button.
4Press the ▲ or ▼ button to select the channel to be assigned to a new name, then press the ENTER button.
5Press the ▲ or ▼ button to select a letter, a number, or a symbol (Results in this sequence: A~Z, 0~9, +, -, *, /, blank). Move on to the previous or next letter by pressing the ◄ or ► button, then press the ENTER button.
6Repeat steps 4 to 5 for each channel to be assigned to a new name.
7Press the EXIT button to exit.
T V |
|
Channel |
|
|
|
|
|
Country |
|
: United Kingdom |
|||
|
Auto Store |
|
|
|
||
|
Manual Store |
|
|
|
||
|
Channel Manager |
|
|
|||
|
Sort |
|
|
|
|
|
|
Name |
|
|
|
|
|
|
Fine Tune |
|
|
|
|
|
|
Move |
Enter |
Return |
|||
|
|
|
|
|
|
|
T V |
|
Name |
|
|
|
|
|
Prog. |
Ch. |
Name |
|
|
|
0 |
▲ |
−−−−− |
|
|
|
|
C- - |
|
|
|
|||
|
1 |
C04 |
−−−−− |
|
|
|
|
2 |
C05 |
−−−−− |
|
|
|
3 |
C08 |
−−−−− |
|
|
|
|
4 |
C09 |
−−−−− |
|
|
|
|
5 |
C11 |
−−−−− |
|
|
|
|
6 |
C13 |
−−−−− |
|
|
|
|
7 |
C15 |
−−−−− |
|
|
|
|
8 |
C17 |
−−−−− |
|
|
|
|
9 |
C18 |
−−−−− |
|
|
|
|
|
|
▼ |
|
|
|
|
|
Move |
Enter |
Return |
|||
English - 16

Fine Tuning Channel Reception
If the reception is clear, you do not have to fine tune the channel, as this is done automatically during the search and store operation.
If the signal is weak or distorted, you may have to fine tune the channel manually.
1Press the MENU button to display the menu.
2Press the ▲ or ▼ button to select Channel, then press the ENTER button.
3Press the ▲ or ▼ button to select Fine Tune, then press the ENTER button.
4To obtain a sharp, and clear picture and good sound quality, press the ◄ or ► button until you reach the optimal setting.
Press the ENTER button.
Fine Tune Store will change the colour of the Channel OSD (On Screen Display) from White to Red and add the “*” mark.
To reset the fine tuning to 0, select Reset by pressing the ▲ or ▼ button. Press the ENTER button.
5Press the EXIT button to exit.
|
T V |
|
Channel |
|
|
|
|
|
Country |
|
: United Kingdom |
||
|
|
Auto Store |
|
|
||
|
|
Manual Store |
|
|
||
|
|
Channel Manager |
|
|||
|
|
Sort |
|
|
|
|
|
|
Name |
|
|
|
|
|
|
Fine Tune |
|
|
|
|
|
|
Move |
Enter |
Return |
||
|
|
|
|
|
|
|
|
|
|
Fine Tune |
|
|
|
|
P 1 |
|
|
0 |
|
|
|
|
|
|
|
|
|
|
|
|
|
|
||
|
|
|
Reset |
|
|
|
|
Adjust |
|
Save |
Return |
||
|
|
|
|
|
|
|
|
|
|
|
|
|
|
|
|
|
|
|
|
|
|
P 1 * |
|
|
|
|
|
|
Mono |
|
|
|
|
|
|
Picture |
: Standard |
|
|
||
|
Sound |
: Custom |
|
|
||
|
SRS TS XT |
: Off |
|
|
||
|
−− : −− |
|
|
|
|
|
|
|
|
|
|
|
|
|
|
|
|
|
|
|
English - 17

Changing the Picture Standard
You can select the type of picture which best corresponds to your viewing requirements.
1Press the MENU button to display the menu.
2Press the ENTER button to select Picture.
3Press the ENTER button again to select Mode.
4Select the required mode by pressing the ▲ or ▼ button, then press the ENTER button.
Available modes: Dynamic, Standard, Movie
Thesource.settings values may vary depending on the input
5Press the EXIT button to exit.
Choose Dynamic for viewing the TV during the day or when there is bright light in the room.
Choose Standard for general TV watching mode.
Choose Movie when viewing the movie.
Easy Setting
1Press the TOOLS button on the remote control.
2Press the ▲ or ▼ button to select Picture Mode.
3Press the ◄ or ► button to select the required option.
|
T V |
Picture |
|
|
|
|
|
|
|
|
||||
|
|
Mode |
|
: Standard |
|
|
|
|
|
|
|
|||
|
|
Cell Light |
|
|
|
|
|
|
|
|
|
|||
|
|
|
|
|
|
|
|
|
|
|||||
|
|
Contrast |
|
|
|
|
|
|
5 |
|
||||
|
|
|
|
|
|
|
|
|
||||||
|
|
Brightness |
|
|
|
|
|
|
|
45 |
|
|||
|
|
|
|
|
|
|
|
|
|
|||||
|
|
Sharpness |
|
|
|
|
|
|
|
50 |
|
|||
|
|
|
|
|
|
|
|
|
|
|||||
|
|
Colour |
|
|
|
|
|
|
|
50 |
|
|||
|
|
Tint |
G50 |
|
|
|
|
R50 |
||||||
|
|
Detailed Settings |
|
|
|
|
|
|
|
|
||||
|
|
Picture Options |
|
|
|
|
|
|
|
|
||||
|
|
Reset |
|
: OK |
|
|
|
|
|
|
||||
|
|
Move |
Enter |
Return |
||||||||||
|
|
|
|
|
|
|
|
|
|
|
|
|
|
|
|
T V |
Picture |
|
|
|
|
|
|
|
|
||||
|
|
Mode |
|
|
Dynamic |
|
|
|
|
|
|
|||
|
|
Cell Light |
|
|
Standard |
|
|
|
|
|
||||
|
|
|
|
|||||||||||
|
|
Contrast |
|
|
Movie |
|
|
5 |
|
|||||
|
|
Brightness |
|
|
|
|
|
|
|
|
45 |
|
||
|
|
Sharpness |
|
|
|
|
|
|
|
50 |
|
|||
|
|
|
|
|
|
|
||||||||
|
|
Colour |
|
|
|
|
|
|
|
50 |
|
|||
|
|
Tint |
G50 |
|
|
|
|
R50 |
||||||
|
|
Detailed Settings |
|
|
|
|
|
|
|
|
|
|
||
|
|
|
|
|
|
|
|
|
|
|||||
|
|
Picture Options |
: OK |
|
|
|
|
|
|
|
|
|||
|
|
Reset |
|
|
|
|
|
|
|
|
|
|
||
|
|
Move |
Enter |
Return |
||||||||||
|
|
|
|
|
|
|
|
|
|
|
|
|
||
|
|
Tools |
|
|
|
|
|
|
|
|
|
|
||
|
|
|
|
|
|
|
|
|
|
|||||
|
PictureMode |
◄ |
Standard |
|
|
► |
||||||||
|
Sound Mode |
: |
|
Custom |
|
|
|
|
|
|
|
|
||
|
Sleep Timer |
: |
|
Off |
|
|
|
|
|
|
|
|
||
|
SRS TS XT |
: |
|
Off |
|
|
|
|
|
|
|
|
||
|
Energy Saving |
: |
|
Off |
|
|
|
|
|
|
|
|
||
|
Dual I-II |
: |
|
Mono |
|
|
|
|
|
|
|
|
||
|
Move |
Adjust |
|
|
|
|
Exit |
|||||||
|
|
|
|
|
|
|
|
|
|
|
|
|
|
|
Customizing the Picture Settings
Your television has several setting options that allow you to control the picture quality.
1Press the MENU button to display the menu.
2Press the ENTER button to select Picture.
3Press the ENTER button again to select Mode.
4Select the required mode by pressing the ▲ or ▼ button, then press the ENTER button.
Available modes: Dynamic, Standard, Movie
T V |
Picture |
|
|
|
|
|
|
||||
|
Mode |
|
: Standard |
|
|
|
|
|
|
||
|
Cell Light |
|
|
|
|
|
|
|
|
||
|
|
|
|
|
|
|
|||||
|
Contrast |
|
|
|
|
|
|
5 |
|
||
|
|
|
|
|
|
|
|
||||
|
Brightness |
|
|
|
|
|
|
|
45 |
|
|
|
|
|
|
|
|
|
|
|
|||
|
Sharpness |
|
|
|
|
|
|
50 |
|
||
|
|
|
|
|
|
|
|
||||
|
Colour |
|
|
|
|
|
|
50 |
|
||
|
|
|
|
|
|
|
|
||||
|
Tint |
G50 |
|
|
|
|
R50 |
||||
|
Detailed Settings |
|
|
|
|
|
|
|
|||
|
Picture Options |
|
|
|
|
|
|||||
|
Reset |
|
: OK |
|
|
|
|
|
|||
|
Move |
Enter |
Return |
||||||||
5Select the required option by pressing the ▲ or ▼ button, then press the ENTER button.
6When you are satisfied with your setting, press the ENTER button.
7Press the EXIT button to exit.
Cell Light - Contrast – Brightness – Sharpness – Colour – Tint
In Analog TV, Ext., AV, S-Video modes of the PAL system, you cannot use the Tint Function.
In PC mode, you can only make changes to Cell Light, Contrast, and Brightness. Press the ◄ or ► button until you reach the optimal setting.
English - 18

Configuring Detailed Settings on the Picture
You can set detailed picture settings.
1Press the MENU button to display the menu.
2Press the ENTER button to select Picture.
3Press the ▲ or ▼ button to select Detailed Settings, then press the ENTER button.
4Select the required option by pressing the ▲ or ▼ button, then press the ENTER button.
Available options: Black Adjust, Dynamic Contrast, Gamma, Colour Space, White Balance, Edge Enhancement
5When you are satisfied with your setting, press the ENTER button.
6Press the EXIT button to exit.
Detailed Settings is available in Standard or Movie mode.
In PC mode, you can only make changes to Dynamic Contrast, Gamma and White Balance from among the Detailed Settings items.
Black Adjust: Off/Low/Medium/High
You can directly select the black level on the screen to adjust the screen depth.
T V |
|
Picture |
|
|
|
|
|
|
|
|
|
||
|
Mode |
|
: Standard |
|
|
|
|
|
|
||||
|
Cell Light |
|
|
|
|
|
|
|
|
|
|||
|
Contrast |
|
|
|
|
|
|
|
5 |
|
|||
|
|
|
|
|
|
|
|
|
|||||
|
Brightness |
|
|
|
|
|
|
|
|
|
45 |
|
|
|
|
|
|
|
|
|
|
|
|
|
|||
|
Sharpness |
|
|
|
|
|
|
|
|
50 |
|
||
|
|
|
|
|
|
|
|
|
|
||||
|
Colour |
|
|
|
|
|
|
|
|
50 |
|
||
|
Tint |
G50 |
|
|
|
|
|
R50 |
|||||
|
Detailed Settings |
|
|
|
|
|
|
|
|
|
|||
|
Picture Options |
|
|
|
|
|
|
|
|
|
|||
|
Reset |
|
: OK |
|
|
|
|
|
|
||||
|
Move |
Enter |
Return |
||||||||||
|
|
|
|
|
|
|
|
|
|
|
|
|
|
T V |
Detailed Settings |
|
|
|
|
|
|
|
|||||
|
|
|
|
|
|
|
|
|
|
|
|
|
|
|
Black Adjust |
|
: Off |
|
|
|
|
|
|
|
|||
|
Dynamic Contrast : Medium |
|
|
|
|
|
|
|
|||||
|
Gamma |
: |
|
0 |
|
|
|
|
|
|
|
||
|
Colour Space |
|
: Native |
|
|
|
|
|
|
||||
|
White Balance |
|
|
|
|
|
|
|
|
|
|
|
|
|
Flesh Tone |
: |
|
0 |
|
|
|
|
|
|
|
||
|
Edge Enhancement : On |
|
|
|
|
|
|
||||||
|
Move |
Enter |
Return |
||||||||||
Dynamic Contrast: Off/Low/Medium/High
You can adjust the screen contrast so that the optimal contrast is provided.
Gamma: -3 ~ +3
You can adjust the middle brightness of pictures.
Press the ◄ or ► button until you reach the optimal setting.
Colour Space: Auto/Native/Custom
Colour space is a colour matrix composed of red, green and blue colours. Select your favorite colour space to experience the most natural colour.
−Auto: Auto Colour Space automatically adjusts to the most natural colour tone based on program sources.
−Native: Native Colour Space offers deep and rich colour tone.
−Custom: Adjusts the colour range to suit your preference. (see “Customizing the Colour Space”)
Customizing the Colour Space
Colour: Red/Green/Blue/Yellow/Cyan/Magenta
Adjusts the Colour range to suit your preference.
Colour is available when Colour Space is set to Custom.
Press the ▲ or ▼ button to select Red, Green, Blue, Yellow, Cyan or Magenta. Press the ENTER button.
− Red/Green/Blue: In Colour, you can adjust the RGB values for the selected colour.
Press the ▲ or ▼ button to select Red, Green or Blue to change it. Press the ENTER button.
Press the ◄ or ► button to decrease or increase the value of a particular item.
Press the ENTER button.
− Reset: Resets the colour space to the default values.
White Balance: R-Offset/G-Offset/B-Offset/R-Gain/G-Gain/B-Gain/Reset
You can adjust the color temperature for more natural picture colors.
R-Offset/G-Offset/B-Offset/R-Gain/G-Gain/B-Gain: Changing the adjustment value will refresh the adjusted screen.
Select the required option by pressing the ▲ or ▼ button, then press the ENTER button.
Press the ◄ or ► button until you reach the optimal setting.
Reset: The previously adjusted white balance will be reset to the factory defaults.
Flesh Tone:-15~+15
You can emphasize the pink tone in the picture.
Press the ◄ or ► button until you reach the optimal setting.
Changing the adjustment value will refresh the adjusted screen.
Edge Enhancement: Off/On
You can emphasize object boundaries.
English - 19

Picture Options
You can set detailed picture settings. |
|
|
|
|
|
|
|
|
|
|
|
|
|
|
|
||||
T V |
Cell Light |
Picture |
|
|
|||||||||||||||
1 |
Press the MENU button to display the menu. |
|
|
|
|
: Standard |
|
||||||||||||
|
|
|
|
|
Mode |
|
|
|
|
|
|
|
|
|
|||||
2 |
Press the ENTER button to select Picture. |
|
Contrast |
|
|
|
|
|
|
|
5 |
|
|||||||
|
|
|
|
|
|
|
|
|
|||||||||||
3 |
Press the ▲ or ▼ button to select Picture Options, then press |
|
Brightness |
|
|
|
|
|
|
|
|
|
45 |
|
|||||
|
Sharpness |
|
|
|
|
|
|
|
|
50 |
|
||||||||
|
|
|
|
|
|
|
|
|
|
||||||||||
|
the ENTER button. |
|
Colour |
|
|
|
|
|
|
|
|
50 |
|
||||||
|
|
|
|
|
|
|
|
|
|
|
|||||||||
|
|
Tint |
G50 |
|
|
|
|
R50 |
|||||||||||
4 |
Select the required option by pressing the ▲ or ▼ button, then |
|
Detailed Settings |
|
|
|
|
|
|
|
|
|
|||||||
|
Picture Options |
|
|
|
|
|
|
|
|
|
|
||||||||
|
press the ENTER button. |
|
Reset |
|
|
|
: OK |
|
|
|
|
|
|
|
|||||
5 |
When you are satisfied with your setting, press the ENTER |
|
|
|
Move |
|
|
Enter |
Return |
||||||||||
|
button. |
|
|
|
|
|
|||||||||||||
|
|
|
|
|
|
|
|
|
|
|
|
|
|
|
|
|
|||
6 |
Press the EXIT button to exit. |
T V |
|
|
Picture Options |
|
|
|
|
|
|
|
|||||||
In PC mode, you can only make changes to the Color Tone, |
|
Colour Tone |
|
|
|
: Normal |
|
|
|
|
|
|
|||||||
|
Size |
|
|
|
: Auto Wide |
||||||||||||||
|
Size and Screen Burn Protection from among the items in |
|
Screen Mode |
|
|
: 16:9 |
|
|
|
|
|
|
|
||||||
|
Picture Options. |
|
Digital NR |
|
|
|
: Auto |
|
|
|
|
|
|
||||||
|
|
|
|
|
DNle |
|
|
|
: On |
|
|
|
|
|
|
||||
Colour Tone: Cool2/Cool1/Normal/Warm1/Warm2 |
|
HDMI Black Level |
|
: Normal |
|
|
|
|
|
|
|||||||||
|
Blue only mode |
|
: Off |
|
|
|
|
|
|
||||||||||
|
When the picture mode is set to Dynamic or Standard, |
|
Screen Burn Protection |
|
|
|
|
|
|
||||||||||
|
Warm1 and Warm2 cannot be selected. |
|
|
|
|
|
|
|
|
|
|
|
|
|
|
|
|
||
Size: Auto Wide/16:9/Wide Zoom/Zoom/4:3/Just Scan |
|
|
|
Move |
|
|
Enter |
Return |
|||||||||||
|
You can select the picture size which best corresponds to your |
|
|
|
|
|
|
|
|
|
|
|
|
|
|
|
|
||
|
|
|
|
|
|
|
|
|
|
|
|
|
|
|
|
|
|||
|
viewing requirements. |
T V |
|
|
|
|
Size |
|
|
|
|
|
|
|
|||||
|
|
|
|
|
|
|
|
|
|
|
|
|
|
|
|
|
|||
|
− Auto Wide: Expanding and pulling up the picture from 4:3 to |
|
Auto Wide |
|
|
|
|
|
|
|
|
|
|
|
|
||||
|
|
16:9 |
|
|
|
|
|
|
|
|
|
|
|
|
|||||
|
16:9 ratio. |
|
|
|
|
|
|
|
|
|
|
|
|
|
|||||
|
|
Wide Zoom |
|
|
|
|
|
|
|
|
|
|
|
|
|||||
|
− 16:9: Sets the picture to 16:9 wide mode. |
|
Zoom |
|
|
|
|
|
|
|
|
|
|
|
|
||||
|
− Wide Zoom: Magnify the size of the picture more than 4:3. |
|
4:3 |
|
|
|
|
|
|
|
|
|
|
|
|
||||
|
|
Just Scan |
|
|
|
|
|
|
|
|
|
|
|
|
|||||
|
Move the screen up/down using the ▲ or ▼ button after |
|
|
|
|
|
|
|
|
|
|
|
|
|
|
|
|
||
|
selecting the |
|
by pressing the ► or ENTER button. |
|
|
|
|
|
|
|
|
|
|
|
|
|
|
|
|
|
|
|
|
|
|
|
|
|
|
|
|
|
|
|
|
|
|
||
|
|
|
|
|
|
|
|
|
|
|
|
|
|
|
|
|
|
||
|
− Zoom: Magnify the size of the picture vertically on screen. |
|
|
|
Move |
|
|
Enter |
Return |
||||||||||
|
− 4:3: Sets the picture to 4:3 normal mode. |
|
|
|
|
|
|
|
|
|
|
|
|
|
|
|
|
||
|
|
|
|
|
|
|
|
|
|
|
|
|
|
|
|
|
|||
|
− Just Scan: Use the function to see the full image without any |
|
|
|
|
|
|
|
|
|
|
|
|
|
|
|
|
||
|
cutoff when HDMI (720p/1080i) or Component (1080i) signals |
|
|
|
|
|
|
|
|
|
|
|
|
|
|
|
|
||
|
are input. |
|
|
|
|
|
|
|
|
|
|
|
|
|
|
|
|
||
After selecting Just Scan in HDMI (1080i) or Component (1080i) mode:
Press the ◄ or ► button to select 

 , then press the ENTER button. Press the ▲, ▼, ◄ or ► button to move the picture up, down, left and right.
Reset: Press the ◄ or ► button to select Reset, then press the ENTER button. You can initialize the setting.
With the HDMI Just Scan picture size, depending on the AV devices, the screen may be cut off or a specific colour appears on the screen.
For an HDMI (1080p) connection of 24, 25, 30, 50, and 60 Hz, and for a Component (1080p) connection of 50 and 60Hz, only the input source is supported.
You can change the picture size simply by pressing the P.SIZE button on the remote control.
Depending on the input source, the picture size options may vary.
The items available may differ depending on the selected mode.
Auto Wide function is available only in TV, Ext.1, Ext.2, AV, and S-Video mode.
SettingsTV. can be adjusted and stored for each external device you have connected to an input of the
In PC Mode, only “16:9” and “4:3” mode can be adjusted.
Positioning and Sizing the screen using Zoom
Resizing the screen using the Zoom enables the positioning and sizing of the screen to up/down direction using the ▲ or ▼ button as well as the screen size.
Move the screen up/down using the ▲ or ▼ button after selecting the  by pressing the ◄ or ►
button. |
|
Resize the screen vertically using the ▲ or ▼ button after selecting the |
by pressing the ◄ or ► |
button. |
Continued... |
English - 20
Screen Mode: 16:9/Wide Zoom/Zoom/4:3 |
|
|
|
|
|
||||
T V |
Picture Options |
|
|
|
|||||
|
When setting the picture size to Auto Wide in a 16:9 wide TV, |
|
Colour Tone |
: Normal |
|
|
|
||
|
you can determine the picture size you want to see the 4:3 |
|
Size |
: Auto Wide |
|
|
|
||
|
|
Screen Mode |
: |
|
16:9 |
|
|
|
|
|
WSS (Wide Screen Service) image or nothing. Each individual |
|
Digital NR |
: |
Wide Zoom |
|
|
|
|
|
European country requires different picture size so this function |
|
DNle |
: |
|
Zoom |
|
|
|
|
is intended for users to select it. |
|
HDMI Black Level |
: |
|
4:3 |
|
|
|
|
|
Blue only mode |
: Off |
|
|
|
|
||
|
− 16:9: Sets the picture to 16:9 wide mode. |
|
Screen Burn Protection |
|
|
|
|
||
|
− Wide Zoom: Magnify the size of the picture more than 4:3. |
|
|
|
|
|
|
|
|
|
− Zoom: Magnify the size of the picture vertically on screen. |
|
Move |
Enter |
Return |
||||
|
− 4:3: Sets the picture to 4:3 normal mode. |
|
|
|
|
|
|
|
|
|
This function is available in Auto Wide mode. |
|
|
|
|
|
|
|
|
|
This function is not available in Component or HDMI mode. |
|
|
|
|
|
|
|
|
Digital NR: Off/Low/Medium/High/Auto |
|
|
|
|
|
|
|
|
|
|
If the signal received by the television is weak, you can activate this feature to reduce any static and |
||||||||
|
ghosting that may appear on the screen. |
|
|
|
|
|
|
|
|
When the signal is weak, select one of the other options until the best picture is displayed. |
|
|
|
|
|
||||
|
DNIe: Off/Demo/On |
|
|
|
|
|
|
|
|
|
This TV includes the DNIe function so as to provide a high visual quality. If you set DNIe to on, you |
||||||||
|
can view the screen with the DNIe feature activated. If you set the DNIe to Demo, you can view the |
||||||||
|
applied DNIe and normal pictures on the screen, for demonstration purposes. Using this function, you |
||||||||
|
can view the difference in the visual quality. |
|
|
|
|
|
|
|
|
|
DNIeTM (Digital Natural Image engine) |
|
|
|
|
|
|
|
|
|
This feature brings you more detailed image with 3D noise reduction, detail enhancement, ntrast |
|
|
|
|||||
|
enhancement and white enhancement. New image compensation Algorithm gives brighter, clearer, |
||||||||
|
more detailed image to you. DNIeTM technology will fit every signal into your eyes. |
|
|
|
|
|
|
||
|
This cofunction is not available in PC mode. |
|
|
|
|
|
|
|
|
|
DNIe is only available in Dynamic mode. |
|
|
|
|
|
|
|
|
HDMI Black Level: Normal/Low |
|
|
|
|
|
|
|
|
|
|
Using this function, you can adjust the image quality when the screen burn (appearance of black |
|
|
|
|||||
|
level, low contrast, low color, etc.) is encountered by the HDMI input for RGB limited range (16 to |
|
|
|
|||||
|
235). |
|
|
|
|
|
|
|
|
|
This function is active only when the externel input connects to HDMI(RGB signals). |
|
|
|
|
|
|||
Blue Only Mode: Off/On |
|
|
|
|
|
|
|
|
|
|
This function is for AV device measurement experts. This function displays the blue signal only by |
|
|
|
|||||
|
removing the red and green signals from the video signal so as to provide a Blue Filter effect that is |
||||||||
|
used to adjust the Colour and Tint of video equipment such as DVD players, Home Theaters, etc. |
|
|
|
|||||
|
Using this function, you can adjust the Colour and Tint to preferred values appropriate to the signal |
||||||||
|
level of each video device using the Red/Green/Blue/Cyan/Magenta/Yellow Colour Bar Patterns, |
|
|
|
|||||
|
without using an additional Blue Filter. |
|
|
|
|
|
|
|
|
|
Blue Only Mode is available when the picture mode is set to Movie or Standard. |
|
|
|
|
|
|
||
Screen Burn Protection |
|
|
|
|
|
|
|
|
|
|
To reduce the possibility of screen burn, this unit is equipped with screen burn prevention technology. |
||||||||
|
This technology enables you to set picture movement up/down |
|
|
|
|
|
|
|
|
|
(Vertical Line) and side to side (Horizontal Dot). The Time |
T V |
Picture Options |
|
|
|
|||
|
|
Colour Tone |
: Normal |
|
|||||
|
setting allows you to program the time between movement of |
|
|||||||
|
|
Size |
: Auto Wide |
|
|||||
|
the picture in minutes. |
|
Screen Mode |
: 16:9 |
|
|
|||
|
− Pixel Shift: Using this function, you can minutely move |
|
Digital NR |
: Auto |
|
|
|||
|
|
DNle |
: On |
|
|
||||
|
pixels on the PDP in horizontal or vertical direction to |
|
HDMI Black Level |
: Normal |
|
||||
|
minimize after image on the screen. |
|
Blue only mode |
: Off |
|
|
|||
|
• Set Pixel Shift to On by pressing the ▲ or ▼ button, then |
|
Screen Burn Protection |
|
|
|
|||
|
|
|
|
|
|
|
|
|
|
|
press the ENTER button. |
|
|
|
|
|
|
|
|
|
• Select the required option by pressing the ▲ or ▼ button, |
|
Move |
Enter |
Return |
||||
|
then press the ENTER button. |
|
|
|
|
|
|
|
|
|
Available options: Horizontal Dot, Vertical Line, Time |
T V |
Screen Burn Protection |
|
|
|
|||
|
|
|
|
|
|
|
|
|
|
|
|
|
Pixel Shift |
|
|
|
|
|
|
|
|
|
White |
|
|
|
|
||
|
|
|
Scrolling |
|
|
|
|
||
|
Continued... |
|
Side Gray |
: Dark |
|
|
|||
|
|
|
|
|
|
|
|
|
|
|
|
|
|
|
|
|
|
|
|
English - 21

Optimum condition for pixel shift; |
|
T V |
Pixel Shift |
|
|
||||
|
|
|
|
|
|
||||
|
|
Pixel Shift |
: On |
|
|
||||
|
|
|
|
|
|
|
|||
|
|
PC |
TV/Ext/AV/Component/HDMI |
|
|
Horizontal Dot |
: 2 |
|
|
|
|
|
|
Vertical Line |
: 2 |
|
|||
|
Horizontal Dot |
1 |
2 |
|
|
||||
|
|
|
Time |
: 2 min |
|
||||
|
Vertical Line |
1 |
2 |
|
|
|
|
|
|
|
Time (minute) |
2 |
2 min |
|
|
|
|
|
|
The Pixel Shift value may differ depending on the monitor |
|
|
Move |
Enter |
Return |
||||
size (inches) and mode. |
|
|
|
|
|
|
|
||
|
|
|
|
|
|
|
|||
This function is not available in the Just Scan mode.
−White: This function helps remove after images on the screen by changing the colour of pixels to white. Use this function when there are remaining after images or symbols on the screen especially when you displayed a still image on the screen for a long time.
−Scrolling: This function helps remove after images on the screen by moving all the pixels on the PDP according to a pattern. Use this function when there are remaining after images or symbols on the screen especially when you displayed a still image on the screen for a long time.
−Side Gray: When you watch TV with the screen ratio of 4:3, the screen is prevented from any damage by adjusting the white balance on both extreme left and right sides.
Dark: When you set the screen ratio to 4:3, it darkens the left and right sides. Light: When you set the screen ratio to 4:3, it brightens the left and right sides.
To remove after images on the screen, use either White or Scrolling function. Although both of the two functions remove after images on the screen, Scrolling is more effective.
The after image removal function has to be executed for a long time (approximately 1 hour) to effectively remove after images on the screen. If after image is not improved after the execution of the function, repeat the function again.
Press any button on the remote control to cancel this feature.
Resetting the Picture Settings to the Factory Defaults
You can set detailed picture settings. |
|
|
|
|
|
|
|
|
|
|
|
|
T V |
Picture |
|
|
|
|
|
|
|
|
|||
|
|
Mode |
|
: Standard |
||||||||
1 |
Press the MENU button to display the menu. |
Cell Light |
|
|
|
|
|
|
||||
Contrast |
|
|
|
|
|
|
|
5 |
||||
|
|
|
|
|
|
|
||||||
2 |
Press the ENTER button to select Picture. |
Brightness |
|
|
|
|
|
|
|
|
45 |
|
|
|
|
|
|
|
|
||||||
Colour |
|
|
50 |
|||||||||
3 |
Press the ▲ or ▼ button to select Reset, then press the |
Sharpness |
|
|
|
|
|
|
50 |
|||
Detailed Settings |
|
|
|
|
|
|
|
|
||||
|
ENTER button. |
Tint |
G50 |
|
|
|
|
|
|
R50 |
||
|
|
|
|
|
|
|
||||||
|
Picture Options |
|
OK |
|||||||||
4 |
Press the ▲ or ▼ button to select OK or Cancel then press |
Reset |
: |
|
|
|||||||
|
|
|
Cancel |
|||||||||
|
the ENTER button. |
Move |
Enter |
|
|
Return |
||||||
|
Each mode can be reset. |
|
|
|
|
|
|
|
|
|
|
|
English - 22

Sound Features
1 |
Press the MENU button to display the menu. |
|
|
T V |
|
Sound |
|
|
|
||
2 |
Press the ▲ or ▼ button to select Sound, then press the |
|
|
|
|
|
|
|
|
||
|
Mode |
|
|
: Custom |
|
|
|||||
|
ENTER button. |
|
|
|
Equalizer |
|
|
|
|||
|
|
|
|
SRS TS XT |
|
: Off |
|
||||
3 |
Select the required option by pressing the ▲ or ▼ button, then |
|
Auto Volume |
|
: Off |
|
|||||
|
TV Speaker |
|
: On |
|
|||||||
|
press the ENTER button. |
|
|
|
Sound Select |
|
: Main |
|
|||
|
Available options: Mode, Equalizer, SRS TS XT, Auto |
|
|
|
|
|
|
|
|
||
|
Volume, TV Speaker, Sound Select |
|
|
|
|
|
|
|
|
|
|
4 |
When you are satisfied with your setting, press the ENTER |
|
Move |
Enter |
Return |
||||||
|
button. |
|
|
|
|
|
|
|
|
|
|
5 |
Press the EXIT button to exit. |
|
|
T V |
|
Equalizer |
|
|
|
||
|
|
|
|
|
|
|
|
|
|
||
Mode: Standard/Music/Movie/Speech/Custom |
|
|
|
|
|
|
|
|
|
|
|
|
You can select the type of special sound effect to be used |
|
R |
+ |
|
|
+ |
|
|
||
|
|
|
|
|
|
|
|||||
|
when watching a given broadcast. |
|
|
|
|
0 |
|
|
0 |
|
|
|
Easy Setting |
|
|
|
L |
- |
|
|
- |
|
|
|
1 Press the TOOLS button on the remote control. |
|
|
|
Balance |
100Hz |
300Hz |
1kHz 3kHz |
10kHz |
||
|
|
|
|
|
|
|
|
|
|
|
|
|
2 Press the ▲ or ▼ button to select Sound Mode. |
|
Move |
Adjust |
Return |
||||||
|
3 Press the ◄ or ► button to select the required option. |
|
|||||||||
|
|
|
|
|
|
|
|
|
|||
Equalizer: Balance/100Hz/300Hz/1kHz/3kHz/10kHz |
|
|
|
Tools |
|
|
|
|
|||
|
The television has several settings which allow you to control |
|
Picture Mode |
|
: |
Standard |
|||||
|
the sound quality. |
|
|
|
|
|
|
|
|
||
|
|
|
SoundMode |
|
◄ |
Custom |
► |
||||
|
If you make any changes to these settings, the sound |
|
Sleep Timer |
|
: |
Off |
|
|
|
||
|
|
SRS TS XT |
|
: |
Off |
|
|
|
|||
|
mode is automatically switched to Custom. |
|
|
Energy Saving |
|
: |
Off |
|
|
|
|
SRS TS XT: Off/On |
|
|
Dual I-II |
|
: |
Mono |
|
|
|
||
|
|
|
|
|
|
|
|
|
|
||
|
TruSurround XT is a patented SRS technology that solves the |
|
|
|
|
|
|
|
|
|
|
|
problem of playing 5.1 multichannel content over two speakers. |
|
Move |
Adjust |
|
Exit |
|||||
|
TruSurround delivers a compelling, virtual surround sound |
|
|
|
|
|
|
|
|
|
|
|
|
|
|
|
|
|
|
|
|
||
|
experience through any two-speaker playback system, including internal television speakers. It is fully |
||||||||||
|
compatible with all multichannel formats. |
|
|
|
|
|
|
|
|
|
|
|
TruSurround XT, SRS and |
Symbol are trademarks of SRS Labs, Inc. |
|
|
|
||||||
 TruSurround XT technology is incorporated under license from SRS Labs, Inc.
Easy Setting
1 |
Press the TOOLS button on the remote control. |
|
|
|
|
|
|
2 |
Press the ▲ or ▼ button to select SRS TS XT. |
|
|
|
|
|
|
3 |
Press the ◄ or ► button to select Off or On. |
|
|
Tools |
|
|
|
Auto Volume: Off/On |
|
Picture Mode |
: |
Standard |
|
|
|
Each broadcasting station has its own signal conditions, and |
|
Sound Mode |
: |
Custom |
|
|
|
so it is not easy to adjust the volume every time the channel is |
|
Sleep Timer |
: |
Off |
|
|
|
|
SRSTSXT |
◄ |
Off |
► |
|
||
changed. This feature lets you automatically adjust the volume |
|
Energy Saving |
: |
Off |
|
|
|
of the desired channel by lowering the sound output when the |
|
Dual I-II |
: |
Mono |
|
|
|
|
|
|
|
|
|
||
modulation signal is high or by raising the sound output when |
|
|
|
|
|
|
|
the modulation signal is low. |
|
Move |
Adjust |
Exit |
|
|
|
TV Speaker: Off/On
If you don't want to hear the sound through TV speaker, set the TV speaker to Off.
The +, - and MUTE buttons do not operate when TV Speaker is set to Off.
Whenmenu.TV Speaker is set to Off, you can operate only Sound Select (in PIP mode) in Sound
Sound Select: Main/Sub
When the PIP feature is activated, you can listen to you can operate only Sound Select (in PIP mode) in Sound menu.
- Main: Used to listen to the sound of the main picture.
- Sub: Used to listen to the sound of the sub picture.
English - 23
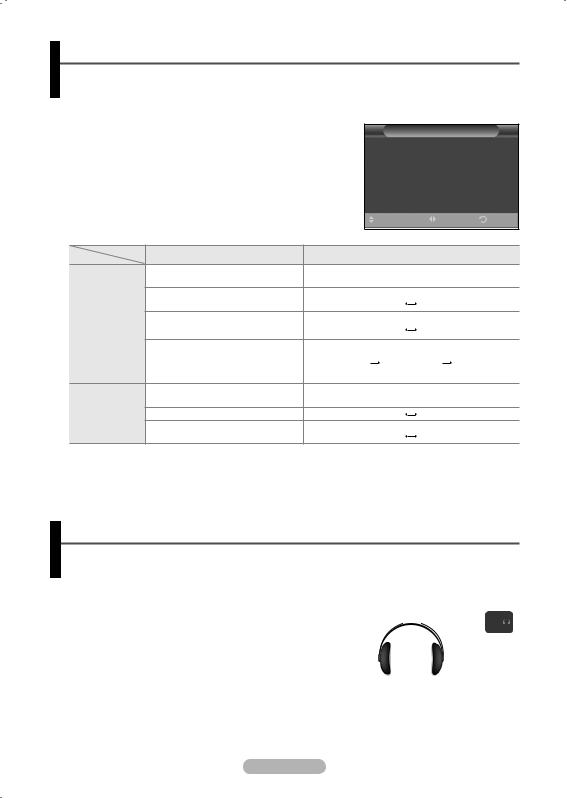
Selecting the Sound Mode (depending on the model)
The DUAL I-II button displays/controls the processing and output of the audio signal. When power is switched on, the mode is automatically preset to either “DUAL-I” or “Stereo”, depending on the current transmission.
Easy Setting
1Press the TOOLS button on the remote control.
2Press the ▲ or ▼ button to select Dual I-II.
3Press the ◄ or ► button to select the required option.
|
Tools |
|
|
Picture Mode |
: |
Standard |
|
Sound Mode |
: |
Custom |
|
Sleep Timer |
: |
Off |
|
SRS TS XT |
: |
Off |
|
Energy Saving |
: |
Off |
|
DualI-II |
◄ |
Mono |
► |
Move |
Adjust |
Exit |
|
Type of broadcast |
|
On-screen indication |
|
|
Regular broadcast |
|
Mono (Normal use) |
|
|
(Standard audio) |
|
|
|
|
|
|
|
|
|
Regular + NICAM Mono |
NICAM |
|
Mono |
|
|
(Normal) |
||
|
|
|
|
|
NICAM |
NICAM Stereo |
NICAM |
|
Mono |
Stereo |
stereo |
|
(Normal) |
|
|
|
|||
|
NICAM DUAL-I/II |
NICAM |
NICAM |
Mono |
|
dual-1 |
dual-2 |
(Normal) |
|
|
|
|||
|
Regular broadcast |
|
Mono (Normal use) |
|
A2 |
(Standard audio) |
|
|
|
|
|
|
||
Bilingual or DUAL-I/II |
Dual I |
|
Dual II |
|
Stereo |
|
|||
|
|
|
Mono |
|
|
Stereo |
Stereo |
|
|
|
|
(Forced mono) |
||
|
|
|
|
If the receiving conditions deteriorate, listening will be easier if the mode is set to Mono. If the stereo signal is weak and automatic switching occurs, switch to Mono.
Connecting Headphones (Sold separately)
You can connect a set of headphones to your set if you wish to watch a TV programme without disturbing other people in the room.
When you insert the head set jack into the corresponding port, you can operate only “Auto Volume” in Sound menu.
Prolonged use of headphones at a high volume may damage your hearing.
You will not hear sound from the speakers when you connect headphones to the TV.
Theseparately.headphone volume and TV volume are adjusted
TV Side Panel
English - 24

Time Features
1Press the MENU button to display the menu.
2Press the ▲ or ▼ button to select Setup, then press the ENTER button.
3Press the ▲ or ▼ button to select Time, then press the ENTER button.
4Select the required option by pressing the ▲ or ▼ button, then press the ENTER button.
Available options: Clock Set, Sleep Timer, Timer 1, Timer 2,
Timer 3
5When you are satisfied with your setting, press the ENTER button.
6Press the EXIT button to exit.
Clock Set
You can set the television clock so that the current time is displayed when pressing the INFO button on the remote control. You must also set the time if you wish to use the automatic on or off timers.
− Press the ◄ or ► button to select Month, Day, Year, Hour, or Minute. Set these by pressing the ▲ or ▼ button.
You can set the Month, Day, Year, Hour, or Minute directly by pressing the numeric buttons on the remote control.
In the event of a power interruption or the set being turned off at the supply, the settings for the Clock will be lost.
Sleep Timer
You can select a time period of between 30 and 180 minutes after which the television automatically switches to standby mode.
− Select the preset time interval (Off, 30, 60, 90, 120, 150, or
180) for staying on by pressing the ▲ or ▼ button.
T V |
|
|
Setup |
|
|
|
|||||
|
|
|
|
|
|
|
|
|
|
|
|
|
Plug & Play |
|
|
|
|
|
|
|
|||
|
Language |
|
|
: English |
|
|
|||||
|
Time |
|
|
: In Watching TV |
|
||||||
|
Light Effect |
|
|||||||||
|
Wall-Mount Adjustment |
|
|
||||||||
|
Melody |
|
|
: Off |
|
|
|||||
|
Entertainment |
: Off |
|
|
|||||||
|
Energy Saving |
: Off |
|
|
|||||||
|
PIP |
|
|
|
|
|
|
|
|
||
|
|
Move |
|
|
Enter |
Return |
|||||
|
|
|
|
|
|
|
|
|
|
|
|
T V |
|
|
Time |
|
|
|
|||||
|
|
|
|
|
|
|
|
|
|
|
|
|
Clock Set |
|
|
: 00 : 00 |
|
|
|
||||
|
Sleep Timer |
: Off |
|
|
|
||||||
|
Timer 1 |
|
|
: Off |
|
|
|||||
|
Timer 2 |
|
|
: Off |
|
|
|||||
|
Timer 3 |
|
|
: Off |
|
|
|||||
|
|
Move |
|
|
Enter |
Return |
|||||
|
|
|
|
|
|
|
|
|
|
|
|
T V |
|
|
Timer 1 |
|
|
|
|||||
|
|
On Time |
: |
|
|
|
|
|
|
|
|
|
|
00 |
|
00 |
|
|
|
Off |
|
|
|
|
|
Off Time |
|
|
|
|
|
|
|
|
|
|
|
00 |
|
|
00 |
|
|
|
Off |
|
|
|
|
Repeat |
|
|
|
|
|
|
|
|
|
|
|
|
Once |
|
|
|
|
||||
|
|
Volume |
|
|
|
|
|
|
|
|
|
|
|
|
|
|
|
|
|
|
|
|
|
|
|
10 |
|
|
|
|
|
|
|
|
|
|
|
Move |
|
|
Adjust |
Return |
|||||
Easy Setting |
|
|
Tools |
|
|
|
|
1 |
Press the TOOLS button on the remote control. |
|
Picture Mode |
: |
Standard |
|
|
2 |
Press the ▲ or ▼ button to select Sleep Timer. |
|
Sound Mode |
: |
Custom |
|
|
|
SleepTimer |
◄ |
Off |
► |
|
||
3 |
Press the ◄ or ► button to select the minute, then press the |
|
SRS TS XT |
: |
Off |
|
|
|
ENTER button. |
|
Energy Saving |
: |
Off |
|
|
|
|
Dual I-II |
: |
Mono |
|
|
|
Timer 1 / Timer 2 / Timer 3 |
|
|
|
|
|
|
|
You can set the On/Off timers so that the television will switch |
|
Move |
Adjust |
Exit |
|
|
|
on or off automatically at the time you select. |
|
|
|
|
|
|
|
|
|
|
|
|
|
||
You must set the clock first. |
|
|
|
|
|
|
|
− |
Press the ◄ or ► button to select the required item below. |
|
|
|
|
|
|
Press the ▲ or ▼ button to adjust to the setting satisfied.
On Time : Select hour, minute, and On/Off. (To activate timer with the setting satisfied, set to On.) Off Time : Select hour, minute, and On/Off. (To activate timer with the setting satisfied, set to On.)
Repeat : Select Once, Everyday, Mon~Fri, Mon~Sat, or Sat~Sun.
Volume : Select the required volume level.
You can set the hour, minute, directly by pressing the number buttons on the remote control.
Auto Power Off
When you set the timer “On”, the TV will eventually turn off, if no controls are operated for 3 hours after the TV was turned on by timer. This function is only available in timer “On” mode and prevents overheating, which may occur if a TV is on for too long time.
English - 25

Language / Melody / Light Effect / Entertainment / Energy Saving / PIP
1 |
Press the MENU button to display the menu. |
T V |
Setup |
|
|
|
|
2 |
Press the ▲ or ▼ button to select Setup, then press the |
|
Plug & Play |
|
|
|
|
|
Language |
: English |
|
|
|
||
|
ENTER button. |
|
Time |
: In Watching TV |
|
||
|
|
Light Effect |
|
||||
3 |
Select the required option by pressing the ▲ or ▼ button, then |
|
Wall-Mount Adjustment |
|
|
||
|
Melody |
: Off |
|
|
|||
|
press the ENTER button. |
|
Entertainment |
: Off |
|
|
|
|
|
Energy Saving |
: Off |
|
|
||
|
Available options: Language, Melody, Light Effect, |
|
PIP |
|
|
|
|
|
|
|
|
|
|
|
|
|
Entertainment, Energy Saving, PIP |
|
Move |
Enter |
Return |
||
4 |
When you are satisfied with your setting, press the ENTER |
|
|||||
|
|
|
|
|
|
||
|
button. |
|
|
|
|
|
|
5 |
Press the EXIT button to exit. |
|
|
|
|
|
|
Language
It is variable depending on the model. When you start using the television for the first time, you must select the language which will be used for displaying menus and indications.
Light Effect: Off/In Standby/In Watching TV/Always
You can turn on/off the blue LED on the front of TV according to the situation. Use it for saving power or when the LED dazzles your eyes.
−Off: The blue LED is always off.
−In Standby: The blue LED lights while in Standby mode and it turns off when your TV is turned on.
−In Watching TV: The blue LED lights when watching TV and it turns off when your TV is turned off.
−Always: The blue LED always lights.
Set the Light Effect to Off to reduce the power consumption.
Melody: Off/Low/Medium/High
The TV power on/off melody sound can be adjusted.
The Melody does not play
-When no sound is output from the TV because the MUTE button has been pressed.
-When no sound is output from the TV because the –  (Volume) button has been pressed.
-When the TV is turned off by Sleep Timer function.
Entertainment: Off/Sports/Cinema/Game
Entertainment mode enables you to select the optimal display and sound for sports, cinema and games.
− Off: Switches the Entertainment function off.
− Sports: Provides the optimal picture and sound quality for sports.
− Cinema: Provides the optimal picture and sound quality for movie watching. You can experience a richer picture and enhanced sound.
− Game: Provides the optimal picture and sound quality for games. This mode accelerates the playing speed when using an external game console connected to the TV.
If you set any of the three Entertainment modes to On, the settings will be locked and can not be adjusted. If you want to make Picture and Sound mode adjustments, the Entertainment mode must be turned off.
The Entertainment settings are saved for each input source.
Continued...
English - 26

Energy Saving: Off/Low/Medium/High
This feature adjusts the screen brightness depending on the surrounding lighting conditions.
−Off: Switches off the Energy Saving mode.
−Low: Operates in standard mode regardless of the surrounding illumination.
−Medium: Enters Medium power saving mode regardless of the surrounding illumination.
−High: Enters maximum power saving mode regardless of the surrounding illumination.
Easy Setting
1Press the TOOLS button on the remote control.
2Press the ▲ or ▼ button to select Energy Saving.
3Press the ◄ or ► button to select the required option.
PIP (Picture in Picture): PIP(On/Off)/Source/Size/Position/ Programme
You can display a sub picture within the main picture. In this way you can watch TV programme or monitor the video input from any connected devices.
− PIP: On/Off
You can activate or deactivate the PIP function.
Table of PIP Settings
Main Picture |
Sub Picture |
|
Component |
Analog TV broadcasts |
|
HDMI1, 2 |
||
only Ext1, Ext2, AV |
||
PC |
||
|
|
|
Tools |
|
|
|
|
Picture Mode |
: |
Standard |
|
|
|
Sound Mode |
: |
Custom |
|
|
|
Sleep Timer |
: |
Off |
|
|
|
SRS TS XT |
: |
Off |
|
|
|
EnergySaving |
◄ |
Off |
► |
|
|
Dual I-II |
: |
Mono |
|
|
|
Move |
Adjust |
Exit |
|
|
|
|
|
|
|
|
T V |
PIP |
|
|
|
|
|
|
|
|
|
PIP |
: On |
|
|
|
Source |
: TV |
|
|
|
Size |
: |
|
|
|
Position |
: |
|
|
|
Programme |
: P 1 |
|
|
|
Move |
Enter |
Return |
|
−Source: TV/Ext.1/Ext.2/AV
You can select a source of the sub-picture.
−Size:  /
/  /
/ 
You can select a size of the sub-picture.
If main picture is in PC and Component mode, Size is not available.
−Position:  /
/  /
/  /
/ 
You can select a position of the sub-picture.
In Double( ,
,  ) mode, Position cannot be selected.
−Programme
You can select a channel of the sub-picture only when the Source is set to TV.
Setting up Your PC Software (Based on Windows XP)
The Windows display-settings for a typical computer are shown below. But the actual screens on your PC will probably be different, depending upon your particular
version of Windows and your particular video card. But even if your actual screens look different, the same, basic set-up information will apply in almost all cases. (If not, contact your computer manufacturer or Samsung Dealer.)
1Right click the mouse on the Windows Desktop, then click on
Properties. The Display Properties will be displayed.
2Click on Settings tab, then set the Display Mode with reference to the Display Modes Table. You do not need to change the Colours settings.
3Click on Advanced. A new settings dialog box will be displayed.
4Click on the Monitor tab, then set the Screen refresh rate with reference to the Display Modes
Table. Set the Vertical Frequency and Horizontal Frequency individually if you can do so instead of setting the Screen refresh rate.
5Click on OK to close the window, then Click on OK button to the Display Properties window.
Automatic re-booting may commence at this moment.
English - 27

Input Mode (PC)
Both screen position and size will vary depending on the type of PC monitor and its resolution. The table below shows all of the display modes that are supported:
D-Sub Input
|
|
Horizontal |
Vertical |
Pixel Clock |
Sync |
PS42A410/ |
PS50A410/ |
||
Mode |
Resolution |
Frequency |
Frequency |
Frequency |
Polarity |
||||
PS42A412 |
PS50A412 |
||||||||
|
|
(kHz) |
(Hz) |
(MHz) |
(H/V) |
||||
|
|
|
|
|
|||||
|
|
|
|
|
|
|
|
|
|
IBM |
640 x 350 |
31.469 |
70.086 |
25.175 |
+ / - |
|
|
||
720 x 400 |
31.469 |
70.087 |
28.322 |
- / + |
|
|
|||
|
|||||||||
|
|
|
|
|
|
|
|
|
|
|
640 x 480 |
31.469 |
59.940 |
25.175 |
- / - |
|
|
||
|
640 x 480 |
37.861 |
72.809 |
31.500 |
- / - |
|
|
||
|
640 x 480 |
37.500 |
75.000 |
31.500 |
- / - |
|
|
||
|
800 x 600 |
37.879 |
60.317 |
40.000 |
+ / + |
|
|
||
VESA |
800 x 600 |
48.077 |
72.188 |
50.000 |
+ / + |
|
|
||
800 x 600 |
46.875 |
75.000 |
49.500 |
+ / + |
|
|
|||
|
|||||||||
|
1024 x 768 |
48.363 |
60.004 |
65.000 |
- / - |
|
|
||
|
1024 x 768 |
56.476 |
70.069 |
75.000 |
- / - |
|
|
||
|
1024 x 768 |
60.023 |
75.029 |
78.750 |
+ / + |
|
|
||
|
1360 x 768 |
47.712 |
60.015 |
85.500 |
+ / + |
|
|
||
|
|
|
|
|
|
|
|
|
|
HDMI/DVI Input |
|
|
|
|
|
|
|
||
|
|
|
|
|
|
|
|
|
|
|
|
Horizontal |
Vertical |
Pixel Clock |
Sync |
PS42A410/ |
PS50A410/ |
||
Mode |
Resolution |
Frequency |
Frequency |
Frequency |
Polarity |
||||
PS42A412 |
PS50A412 |
||||||||
|
|
(kHz) |
(Hz) |
(MHz) |
(H/V) |
||||
|
|
|
|
|
|||||
|
|
|
|
|
|
|
|
|
|
|
640 x 480 |
31.469 |
59.940 |
25.175 |
- / - |
|
|
||
VESA |
800 x 600 |
37.879 |
60.317 |
40.000 |
+ / + |
|
|
||
1024 x 768 |
48.363 |
60.004 |
65.000 |
- / - |
|
|
|||
|
|||||||||
|
1360 x 768 |
47.712 |
60.015 |
85.500 |
+ / + |
|
|
||
|
|
|
|
|
|
|
|
|
|
When using an HDMI/DVI cable connection, you must use the HDMI IN 2 jack.
The interlace mode is not supported.
The set might operate abnormally if a non-standard video format is selected.
Separate and Composite modes are supported. SOG is not supported.
For the PS42A410/PS42A412, PC text quality is optimum in VESA mode(1024 x 768@60Hz).
For the PS50A410/PS50A412, PC text quality is optimum in VESA mode (1360 x 768@60Hz).
English - 28

Setting the PC
Preset to the PC mode by pressing the SOURCE button.
1Press the MENU button to display the menu.
2Press the ▲ or ▼ button to select Picture, then press the ENTER button.
3Select the required option by pressing the ▲ or ▼ button, then press the ENTER button.
4When you are satisfied with your setting, press the ENTER button.
5Press the EXIT button to exit.
Auto Adjustment :
Auto adjustment allows the PC screen of set to self-adjust to the incoming PC video signal.
The values of fine, coarse and position are adjusted automatically.
Easy Setting
1Press the TOOLS button on the remote control.
2Press the ▲ or ▼ button to select Auto Adjustment, then press the ENTER button.
Screen Adjustment: Coarse/Fine/Position/Image Reset
Coarse/Fine
The purpose of picture quality adjustment is to remove or reduce picture noise.
If the noise is not removed by Fine-tuning alone, then adjust the frequency as best as possible (coarse) and Fine-tune again.
After the noise has been reduced, re-adjust the picture so that it is aligned on the center of screen.
1Press the ▲ or ▼ button to select Coarse or Fine, then press the ENTER button.
2Press the ◄ or ► button to adjust the screen quality, vertical stripes may appear or the picture may be blurry.
Press the ENTER button.
Position
Adjust the PC’s screen positioning if it does not fit the TV screen.
1Adjust the position by pressing the ▲/▼/◄/► button.
2Press the ENTER button.
Image Reset
You can replace all image settings with the factory default values.
|
T V |
Picture |
|
|
|
|
|
|
|
|
|||||
|
|
Mode |
|
: Standard |
|
|
|
|
|
|
|
|
|||
|
|
Cell Light |
|
|
|
|
|
|
|
|
|
|
|||
|
|
Contrast |
|
|
|
|
|
|
|
|
5 |
|
|||
|
|
|
|
|
|
|
|
|
|
||||||
|
|
Brightness |
|
|
|
|
|
|
|
|
45 |
|
|||
|
|
|
|
|
|
|
|
|
|
||||||
|
|
Sharpness |
|
|
|
|
|
|
|
|
|
|
50 |
|
|
|
|
Auto Adjustment |
|
|
|
|
|
|
|
|
|
|
|||
|
|
Screen Adjustment |
|
|
|
|
|
|
|
||||||
|
|
Detailed Settings |
|
|
|
|
|
|
|
||||||
|
|
Picture Options |
|
|
|
|
|
|
|
||||||
|
|
Reset |
|
: OK |
|
|
|
|
|
|
|
||||
|
|
Move |
Enter |
Return |
|||||||||||
|
|
|
|
|
|
|
|
|
|
|
|
|
|
|
|
|
|
|
|
|
|
|
|
|
|
|
|
|
|
|
|
|
|
Auto Adjustment in Progress |
|
|
|
|
|
|
|
|
|||||
|
|
Please wait. |
|
|
|
|
|
|
|
|
|||||
|
|
|
|
|
|
|
|
|
|
|
|
|
|
|
|
|
|
|
|
|
|
|
|
|
|
|
|
|
|
|
|
|
Tools |
|
Picture Mode |
: |
Standard |
Sound Mode |
: |
Custom |
Sleep Timer |
: |
Off |
SRS TS XT |
: |
Off |
Energy Saving |
: |
Off |
PIP
Auto Adjustment
Move |
|
Enter |
Exit |
||||||||
|
|
|
|
|
|
|
|
|
|
|
|
T V |
Screen Adjustment |
|
|
|
|
|
|||||
|
|
|
|
|
|
|
|
|
|
|
|
|
Coarse |
|
|
|
|
|
|
50 |
|
||
|
Fine |
|
|
|
|
|
|
|
11 |
|
|
|
|
|
|
|
|
|
|
|
|||
|
Position |
|
|
|
|
|
|
|
|
|
|
|
Image Reset |
|
|
|
|
|
|
|
|
|
|
|
Move |
|
Enter |
Return |
|||||||
|
|
|
|
|
|
|
|
|
|
|
|
T V |
|
Position |
|
|
|
|
|
||||
|
|
|
|
|
|
|
|
|
|
|
|
|
|
|
|
|
|
|
|
|
|
|
|
|
|
|
|
|
|
|
|
|
|
|
|
|
|
|
|
|
|
|
|
|
|
|
|
|
|
|
|
|
|
|
|
|
|
|
|
Move |
Enter |
Return |
Image Reset is completed.
English - 29
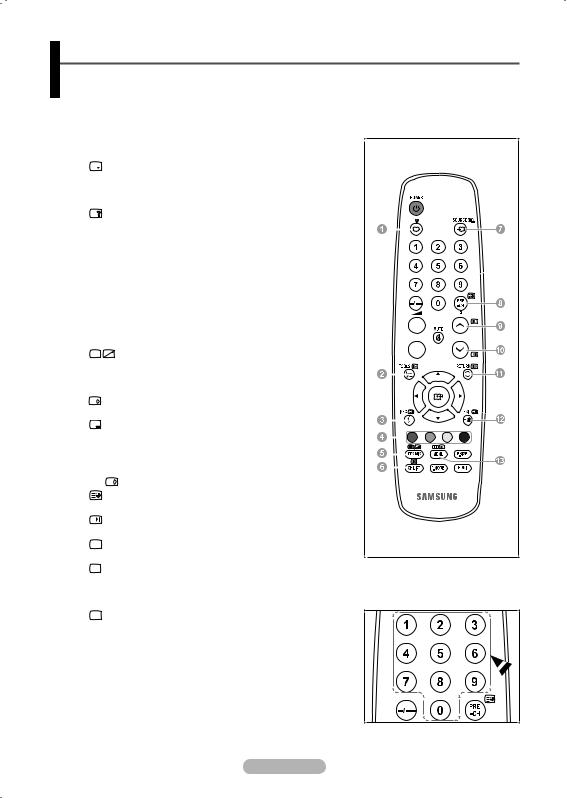
Teletext Feature (depending on the model)
Most television stations provide written information services via teletext. The index page of the teletext service gives you information on how to use the service. In addition, you can select various options to suit your requirements by using the remote control buttons.
For teletext information to be displayed correctly, channel reception must be stable. Otherwise, information may be missing or some pages may not be displayed.
1 (Exit)
Exit from the teletext display (depending on the model)
2
 (size)
Press to display the double-size letters in the upper half of the screen. For lower half of the screen, press it again.
To display normal screen, press it once again.
3 |
|
|
|
|
|
(reveal) |
|
|
|||||||||||||||
|
|
|
|
|
|
|
|||||||||||||||||
|
Used to display the hidden text (answers to quiz games, for |
|
|
||||||||||||||||||||
|
example). To display normal screen, press it again. |
|
|
|
|
|
|||||||||||||||||
4 |
Coloured buttons (red/green/yellow/blue) |
|
|
||||||||||||||||||||
|
If the FASTEXT system is used by a broadcasting company, the |
|
|
||||||||||||||||||||
|
different topics covered on a teletext page are colour-coded and |
|
|
||||||||||||||||||||
|
can be selected by pressing the coloured buttons. Press one |
|
|
||||||||||||||||||||
|
of them corresponding to the required. The page is displayed |
|
|
||||||||||||||||||||
|
with other coloured information that can be selected in the same |
|
|
||||||||||||||||||||
|
way. |
|
|
||||||||||||||||||||
|
To display the previous or next page, press the corresponding |
|
|
|
|||||||||||||||||||
|
coloured button. |
|
|
||||||||||||||||||||
5 |
|
|
|
|
|
|
|
|
|
(teletext on/mix) |
|
|
|
||||||||||
|
Press to activate teletext mode after selecting the channel |
|
|
||||||||||||||||||||
|
providing the teletext service. Press it twice to overlap the |
|
|
|
|
|
|
|
|
|
|
||||||||||||
|
|
|
|
|
|
|
|
|
|
|
|
||||||||||||
|
teletext with the current broadcasting screen. |
|
|
||||||||||||||||||||
6 |
|
|
|
|
|
(store) |
|
|
|||||||||||||||
|
|
|
|
|
|
|
|||||||||||||||||
|
Used to store the teletext pages. |
|
|
||||||||||||||||||||
7 |
|
|
|
|
|
(mode) |
|
|
|
|
|
|
|
|
|||||||||
|
|
|
|
|
|
|
|
|
|
||||||||||||||
|
|
|
|
|
|
|
|||||||||||||||||
|
Press to select the teletext mode (LIST/FLOF). |
|
|
|
|
||||||||||||||||||
|
|
|
|
||||||||||||||||||||
|
If you press it in the LIST mode, it switches into the List save |
|
|
||||||||||||||||||||
|
mode. |
|
|
|
|
|
|
|
|
|
|
||||||||||||
|
In the List save mode, you can save teletext page into list using |
|
|
|
|
|
|
||||||||||||||||
|
|
|
|
|
|||||||||||||||||||
|
the |
|
|
|
|
(store) button. |
|
|
|||||||||||||||
|
|
|
|
|
|
|
|||||||||||||||||
|
|
|
|
|
|
|
|||||||||||||||||
8 |
|
|
|
|
|
(sub-page) |
|
|
|||||||||||||||
|
Used to display the available sub-page. |
|
|
||||||||||||||||||||
9 |
|
|
|
|
|
(page up) |
|
|
|||||||||||||||
|
|
|
|
|
|
|
|||||||||||||||||
|
Used to display the next teletext page. |
|
|
||||||||||||||||||||
0
 (page down)
Used to display the previous teletext page.
! 
 (hold)
Used to hold the display on a given page if the selected page is linked with several secondary pages
which follow on automatically. To resume, press it again.
@ 
 (cancel)
Used to display the broadcast when searching for a page.
# (index)
Used to display the index (contents) page at any time while you
are viewing teletext.
You can change teletext pages by pressing the numeric buttons on the remote control.
Continued...
English - 30
Loading...