


MM-DG35
MM-DG36
PERSONAL MICRO COMPONENT
SYSTEM
user manual
imagine the possibilities
Thank you for purchasing a Samsung product.
To receive a more complete service, please register your product at
www.samsung.com/global/register


 Safety
 Warnings
CAUTION
RISK OF ELECTRIC SHOCK.
DO NOT OPEN
TO REDUCE THE RISK OF ELECTRIC SHOCK, DO NOT REMOVE REAR COVER (or BACK). NO USER SERVICEABLE PARTS INSIDE. REFER SERVICING TO QUALIFIED SERVICE PERSONNEL.
This symbol indicates “dangerous voltage” inside the product that presents a risk of electric shock or personal injury.
This symbol indicates important instructions accompanying the product.
CLASS 1 LASER PRODUCT
CLASS 1 LASER PRODUCT |
This Compact Disc player is classified as a CLASS 1 |
|
KLASSE 1 LASER PRODUKT |
LASER product. |
|
LUOKAN 1 LASER LAITE |
Use of controls, adjustments or performance of procedures |
|
KLASS 1 LASER APPARAT |
||
other than those specified herein may result in hazardous |
||
PRODUCTO LASER CLASE 1 |
||
radiation exposure. |
||
|
||
|
CAUTION : INVISIBLE LASER RADIATION WHEN OPEN AND |
|
|
INTERLOCKS DEFEATED, AVOID EXPOSURE TO BEAM. |
WARNING : To reduce the risk of fire or electric shock, do not expose this appliance to rain or moisture. CAUTION : TO PREVENT ELECTRIC SHOCK, MATCH WIDE BLADE OF PLUG TO WIDE SLOT, FULLY INSERT.
•This apparatus shall always be connected to a AC outlet with a protective grounding connection.
•To disconnect the apparatus from the mains, the plug must be pulled out from the mains socket, therefore the mains plug shall be readily operable.
CAUTION
•Apparatus shall not be exposed to dripping or splashing and no objects filled with liquids, such as vases, shall be placed on the apparatus.
•The Mains plug is used as a disconnect device and shall stay readily operable at any time.
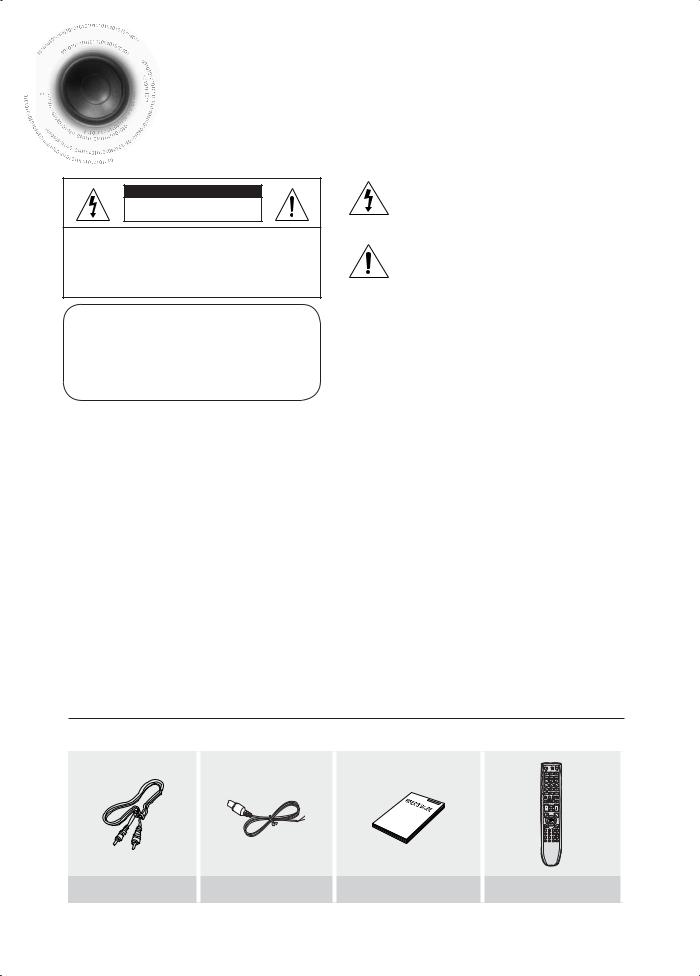
WHAT’S INCLUDED
Check for the supplied accessories below.
Video Cable |
FM Antenna |
User's Manual |
Remote Control |
1


 Precautions
ENG
PREPARATION
Ensure that the AC power supply in your house complies with the identification sticker located on the back of your player. Install your player horizontally, on a suitable base (furniture), with enough space around it for ventilation (3~4inches). Make sure the ventilation slots are not covered. Do not stack anything on top of the player. Do not place the player on amplifiers or other equipment which may become hot. Before moving the player, ensure the disc tray is empty. This player is designed for continuous use. Switching off the DVD player to the stand-by mode does not disconnect the electrical supply. In order to disconnect the player completely from the power supply, remove the main plug from the wall outlet, especially when left unused for a long period of time.
During thunderstorms, disconnect AC main plug from the wall outlet.
Voltage peaks due to lightning could damage the unit.
Protect the player from moisture(i.e. vases) , and excess heat(e. g.fireplace) or equipment creating strong magnetic or electric fields (i. e.speakers...). Disconnect the power cable from the AC supply if the player malfunctions. Your player is not intended for industrial use.
Use of this product is for personal use only.
Condensation may occur if your player or disc have been stored in cold temperatures.
If transporting the player during the winter, wait approximately 2 hours until the unit has reached room temperature before using.
Do not expose the unit to direct sunlight or other heat sources.
This could lead to overheating and malfunction of the unit.
The battery used with this product contain chemicals that are harmful to the environment.
Do not dispose of batteries in the general household trash.
2


 Features
Multi-Disc Playback & FM Tuner, USB HOST.
The MM-DG35/DG36 combines the convenience of multi-disc playback capability, including DVD, CD, MP3-CD, CD-R, CD-RW, DivX,JPEG and DVD-R/RW, with a sophisticated FM tuner, USB HOST all in a single player.
TV Screen Saver Function
The MM-DG35/DG36 automatically brightens and darkens the brightness of the TV screen after 3 minutes in the stop mode.
The MM-DG35/DG36 automatically switches itself into the power saving mode after 20 minutes in the screen saver mode.
Power Saving Function
The MM-DG35/DG36 automatically shuts itself off after 20 minutes in the stop mode.
USB Host support
You can enjoy media files such as pictures, movies and music saved on an MP3 player, digital camera or USB memory stick by connecting the storage device to the USB port of the Micro Component.
HDMI
HDMI transmits DVD video and audio signals simultaneously,and provides a clearer picture.
Anynet+ (HDMI-CEC) Function
Anynet+ is a function that can be used to operate the main unit using a Samsung TV remote control, by connecting the Micro Component System to a SAMSUNG TV using a HDMI Cable. (This is only available with SAMSUNG TV's that support Anynet+.)
3


 Contents
PREPARATION |
|
Safety Warnings ................................................................................................................................................................. |
1 |
Precautions......................................................................................................................................................................... |
2 |
Features ............................................................................................................................................................................. |
3 |
Notes on discs.................................................................................................................................................................... |
5 |
Description.......................................................................................................................................................................... |
7 |
CONNECTIONS |
|
Connecting the Speakers ................................................................................................................................................... |
11 |
Connecting the Video Out to your TV................................................................................................................................. |
12 |
HDMI Function.................................................................................................................................................................... |
13 |
Connecting External Components...................................................................................................................................... |
16 |
Connecting the FM Antennas............................................................................................................................................. |
17 |
Setting the Clock ................................................................................................................................................................ |
18 |
Checking the Remaining Time ........................................................................................................................................... |
19 |
OPERATION |
|
Disc Playback..................................................................................................................................................................... |
20 |
MP3/WMA-CD Playback .................................................................................................................................................... |
21 |
JPEG File Playback............................................................................................................................................................ |
22 |
DivX Playback .................................................................................................................................................................... |
23 |
Playing Media Files using the USB feature ........................................................................................................................ |
25 |
Displaying Disc Information................................................................................................................................................ |
27 |
Fast/Slow Playback ............................................................................................................................................................ |
28 |
Skipping Scenes/Songs...................................................................................................................................................... |
29 |
Angle Function.................................................................................................................................................................... |
30 |
Repeat Playback ................................................................................................................................................................ |
31 |
A-B Repeat Playback ........................................................................................................................................................ |
32 |
Zoom Function.................................................................................................................................................................... |
33 |
Selecting Audio/Subtitle Language..................................................................................................................................... |
34 |
Moving Directly to a Scene/Song ....................................................................................................................................... |
35 |
Using Disc Menu ................................................................................................................................................................ |
36 |
Using the Title Menu........................................................................................................................................................... |
37 |
SETUP |
|
Setting the Language ......................................................................................................................................................... |
38 |
Setting TV Screen type....................................................................................................................................................... |
39 |
Setting Parental Controls (Rating Level) ............................................................................................................................ |
41 |
Setting the Password.......................................................................................................................................................... |
42 |
Setting the DRC (Dynamic Range Compression) .............................................................................................................. |
43 |
AV SYNC Setup ................................................................................................................................................................. |
44 |
RADIO OPERATION |
|
About RDS broadcasting............................................................................................................................................................................... |
45 |
Listening to Radio............................................................................................................................................................... |
47 |
Presetting Stations ............................................................................................................................................................. |
48 |
MISCELLANEOUS |
|
CD RIPPING Function........................................................................................................................................................ |
49 |
Timer Function.................................................................................................................................................................... |
50 |
Canceling the Timer ........................................................................................................................................................... |
51 |
Power Sound / Power Bass / Treble Level / Bass Level Function ..................................................................................... |
52 |
DSP/EQ Function .............................................................................................................................................................. |
53 |
Sleep Timer Function / Mute Function................................................................................................................................ |
54 |
DEMO Function / DIMMER Function / ECO function ......................................................................................................... |
55 |
Connecting Headphones.................................................................................................................................................... |
56 |
Cautions on Handling and Storing Discs............................................................................................................................ |
57 |
Before Calling for Service................................................................................................................................................... |
58 |
Notes on Terminology ........................................................................................................................................................ |
60 |
Specifications ..................................................................................................................................................................... |
61 |
ENG
PREPARATION
4


 Notes on Discs
DVD (Digital Versatile Disc) offers fantastic audio and video, thanks to Dolby Digital surround sound and MPEG-2 video compression technology. Now you can enjoy these realistic effects in the home, as if you were in a movie theater or concert hall.
1 ~ |
6 |
DVD players and the discs are coded by region. These regional codes must |
match in order for the disc to play. If the codes do not match, the disc will not play. The Region Number for this player is given on the rear panel of the player. (Your DVD player will only play DVDs that are labeled with identical region codes.)
 Playable Discs
Disc Type |
Mark (Logo) |
Recorded Signals |
Disc Size |
Max. Playing Time |
||
|
|
|
|
|
|
|
|
|
|
|
|
12cm |
Approx. 240 min. (single-sided) |
|
|
|
|
Audio + Video |
Approx. 480 min. (double-sided) |
|
|
|
|
|
|
||
DVD-VIDEO |
|
|
|
|
|
|
|
|
|
8cm |
Approx. 80 min. (single-sided) |
||
|
|
|
|
|||
|
V I D E O |
|
Approx. 160 min. (double-sided) |
|||
|
|
|
|
|
|
|
AUDIO-CD |
COMPACT |
Audio |
12cm |
74 min. |
||
|
|
|
|
|
|
|
|
DIGITAL AUDIO |
|
8cm |
20 min. |
||
|
|
|
|
|
|
|
DivX |
|
|
|
Audio + Video |
12cm |
74 min. |
|
|
|
|
8cm |
20 min. |
|
|
|
|
|
|||
|
|
|
|
|
||
|
|
|
|
|
|
|
 Do not use the following types of disc!
•LD, CD-G, CD-I, CD-ROM and DVD-ROM discs cannot be played on this player.
If such discs are played, a <This disc cannot be played. Please check the disc.> message appears on the TV screen.
•DVD discs purchased abroad may not play on this player.
If such discs are played, a <This disc cannot be played. Please check the regional code.> message appears on the TV screen.
 Copy Protection
•Many DVD discs are encoded with copy protection. Because of this, you should only connect your DVD player directly to your TV, not to a VCR. Connecting to a VCR results in a distorted picture from copyprotected DVD discs.
•This product incorporates copyright protection technology that is protected by methods claims of certain U.S. patents and other intellectual property rights owned by Macrovision Corporation and other rights owners.
Use of this copyright protection technology must be authorized by Macrovision Corporation, and is intended for home and other limited viewing uses only unless otherwise authorized by Macrovision Corporation.
Reverse engineering or disassembly is prohibited.
5

ENG
Disc Recording Format
This product does not support Secure (DRM) Media files.
CD-R Discs
•Some CD-R discs may not be playable depending on the disc recording device (CD-Recorder or PC) and the condition of the disc.
•Use a 650MB/74 minute CD-R disc. Do not use CD-R discs over 700MB/80 minute as they may not be played back.
•Some CD-RW (Rewritable) media, may not be playable.
•Only CD-Rs that are properly "closed" can be fully played. If the session is closed but the disc is left open, you may not be able to fully play the disc.
CD-R MP3 Discs
•Only CD-R discs with MP3 files in ISO 9660 or Joliet format can be played.
•MP3 file names should be 8 characters or less in length and contain no blank spaces or special characters (. / = +).
•Use discs recorded with a compression/decompression data rate greater than 128Kbps.
•Only files with the ".mp3" and ".MP3" extensions can be played.
•Only a consecutively written multisession disc can be played. If there is a blank segment in the Multisession disc, the disc can be played only up to the blank segment.
•If the disc is not closed, it will take longer to begin playback and not all of the recorded files may be played.
•For files encoded in Variable Bit Rate (VBR) format, i.e. files encoded in both low bit rate and high bit rate (e.g., 32Kbps ~ 320Kbps), the sound may skip during playback.
•A maximum of 500 tracks can be played per CD.
•A maximum of 300 folders can be played per CD.
CD-R JPEG Discs
•Only files with the "jpg" extensions can be played.
•If the disc is not closed, it will take longer to start playing and not all of the recorded files may be played.
•Only CD-R discs with JPEG files in ISO 9660 or Joliet format can be played.
•JPEG file names should be 8 characters or less in length and contain no blank spaces or special characters (. / = +).
•Only a consecutively written multisession disc can be played. If there is a blank segment in the multisession disc, the disc can be played only up to the blank segment.
•A maximum of 9,999 images can be stored on a single CD.
•When playing a Kodak/Fuji Picture CD, only the JPEG files in the picture folder can be played.
•Picture discs other than Kodak/Fuji Picture CDs may take longer to start playing or may not play at all.
DVD R/RW, CD-R/RW DivX Discs
•Software updates for incompatible formats are not supported. (Example : QPEL, GMC, resolution higher than 720 x 480 pixels, etc.)
•Sections with a high frame rate might not be played while playing a DivX file.
DivX® is a digital video format created by DivX, Inc. This is an official DivX Certified or DivX Ultra Certified device that plays DivX video.
6


 Description
—Front Panel— |
|
|
|
|
4 |
1 |
2 |
3 |
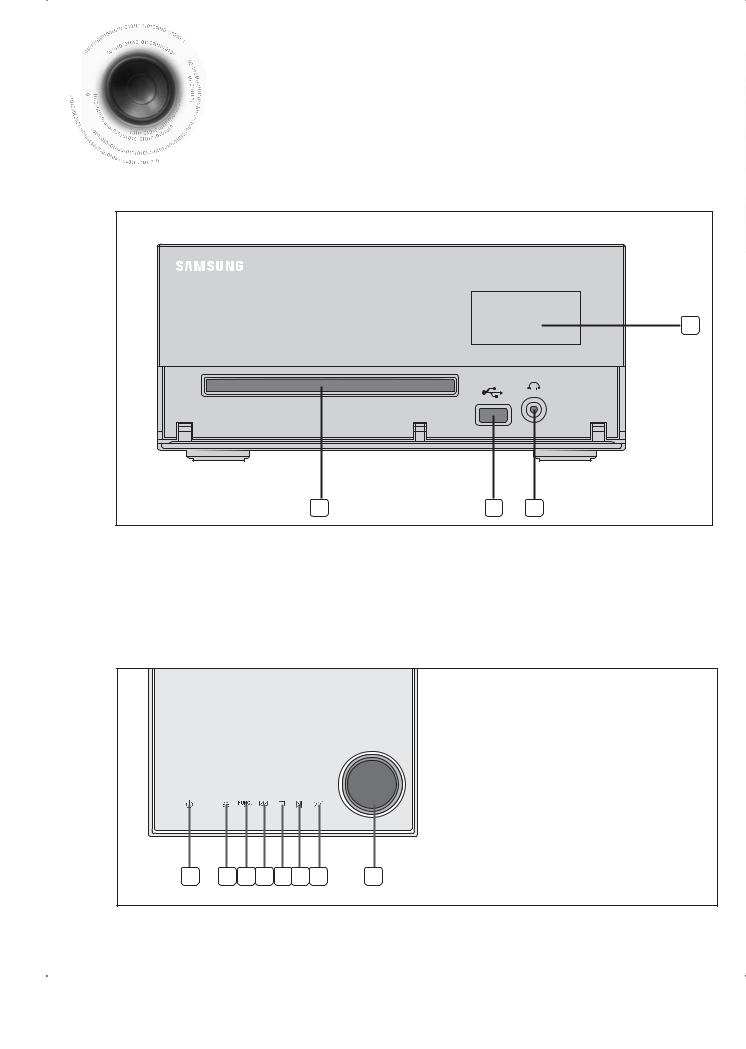
1.COMPACT DISC COMPARTMENT
2.USB JACK
3.HEADPHONE JACK
4.WINDOW DISPLAY
—Top Panel—
1. POWER BUTTON
2. OPEN/CLOSE BUTTON
3. FUNCTION BUTTON
4. SEARCH FUNCTION BUTTON(DOWN)
5. TUNING MODE OR STOP BUTTON
6. PLAY/PAUSE BUTTON
7. SEARCH FUNCTION BUTTON(UP)
8. VOLUME CONTROL KNOB
1 |
2 |
3 4 |
5 6 |
7 |
8 |
7

—Rear Panel—
MM-DG35 |
1. |
AUX IN |
|
2. |
FM Antenna Connector |
8 |
3. HDMI OUT Connector |
|
|
4. |
Video Output Connector |
|
|
|
|
|
|
|
|
Connect the TV's video input jacks |
|
|
|
|
|
|
|
|
(VIDEO IN) to the VIDEO OUT |
|
|
|
|
|
|
|
|
connector. |
|
|
|
|
|
|
|
5. |
Scart Connector |
|
|
|
|
|
|
|
6. |
Speaker Connector |
|
|
|
|
|
|
|
|
Terminals |
|
|
|
|
|
|
|
7. Cool Fan |
|
|
|
|
|
|
|
|
8. Clamp-Wire (Fasten the |
|
|
|
|
|
|
|
|
|
speaker wires.) |
1 |
2 |
3 |
4 |
5 |
6 |
7 |
|
|
MM-DG36 |
|
|
|
|
|
1. |
AUX IN |
|
|
|
|
|
|
|
|
2. |
FM Antenna Connector |
|
|
|
|
|
|
8 |
3. HDMI OUT Connector |
|
|
|
|
|
|
|
|
4. |
Video Output Connector |
|
|
|
|
|
|
|
|
Connect the TV's video input jacks |
|
|
|
|
|
|
|
|
(VIDEO IN) to the VIDEO OUT |
|
|
|
|
|
|
|
|
connector. |
|
|
|
|
|
|
|
5. |
Scart Connector |
|
|
|
|
|
|
|
6. |
Speaker Connector |
|
|
|
|
|
|
|
|
Terminals |
|
|
|
|
|
|
|
7. Cool Fan |
|
|
|
|
|
|
|
|
8. Clamp-Wire (Fasten the |
|
|
|
|
|
|
|
|
|
speaker wires.) |
1 |
2 |
3 |
4 |
5 |
6 |
7 |
|
|
All those pictures of Rear panel are based on MODEL:MM-DG36 |
|
|
||||||
MM-DG35: 2.0 Channel Speaker Output |
|
|
|
|||||
MM-DG36: 2.1 Channel Speaker Output |
|
|
|
|||||
ENG
PREPARATION
8


 Description
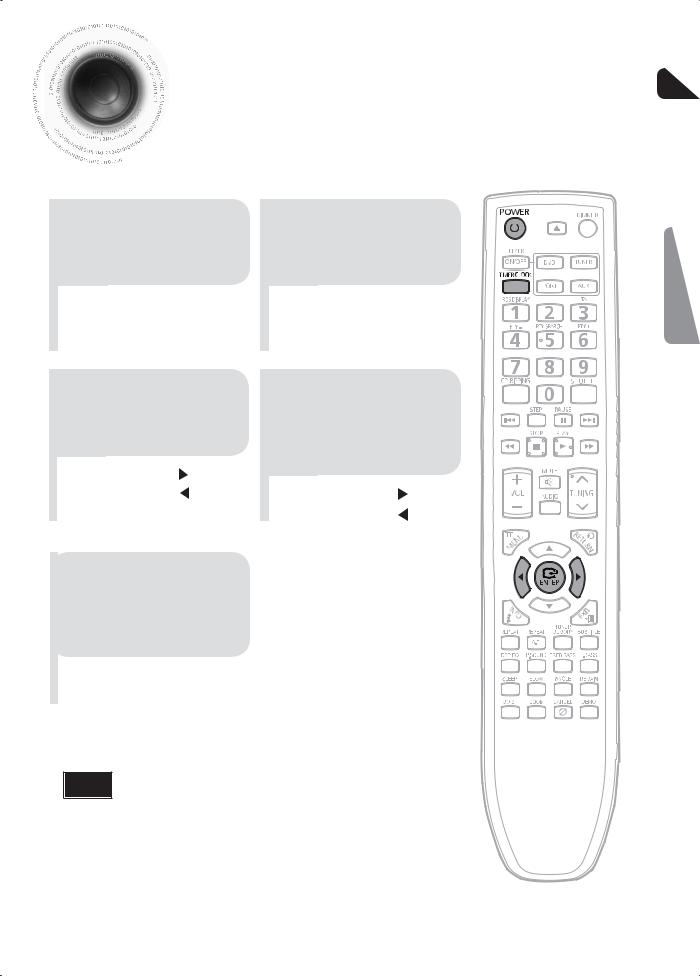
—Remote Control—
|
OPEN/CLOSE button |
|
POWER button |
DIMMER button |
|
TIMER ON/OFF button |
DVD button |
|
TUNER button |
|
|
|
|
|
TIMER/CLOCK button |
AUX button |
|
|
PORT button |
|
Number(0~9) buttons |
RDS SELECTION buttons |
|
CD RIPPING button |
SHUFFLE button |
|
STEP button |
PAUSE button |
|
CD Skip buttons |
Play button |
Stop button |
|
||
|
SEARCH buttons |
|
|
MUTE button |
|
VOLUME button |
TUNING button/Tuning Preset button |
|
|
||
|
AUDIO button |
|
MENU button |
RETURN button |
|
|
|
|
Cursor/ENTER button |
|
|
INFO button |
EXIT button |
|
REPEAT button 


 DSP/EQ button
SLEEP button 


MO/ST button 
 SLOW button
ZOOM button POWER SOUND button
REPEAT A-B button
 SUBTITLE button
 POWER BASS button
 REMAIN button
 DEMO button
TUNER MEMORY button TREB/BASS button
CANCEL button
ANGLE button
9
Insert Remote Batteries
1 Remove the battery |
2 |
Insert two 1.5V AAA |
3 |
Replace the battery |
cover in the direction |
|
batteries, paying |
|
cover. |
of the arrow. |
|
attention to the correct |
|
|
|
|
polarities (+ and –). |
|
|
|
|
|
|
|
ENG
PREPARATION
Caution |
Follow these precautions to avoid leaking or cracking cells: |
|
• Place batteries in the remote control so they match the polarity:(+) to (+)and (–)to (–). |
||
|
||
|
||
|
• Use the correct type of batteries.Batteries that look similar may differ in voltage. |
|
|
• Always replace both batteries at the same time. |
|
|
• Do not expose batteries to heat or flame. |
Range of Operation of the Remote Control
The remote control can be used up to approximately 23 feet/7 meters in a straight line. It can also be operated at a horizontal angle of up to 30° from the remote control sensor.
30 30
30
10


 Connecting
 the Speakers


 Before moving or installing the product, be sure to turn off the power and


 disconnect the power cord.
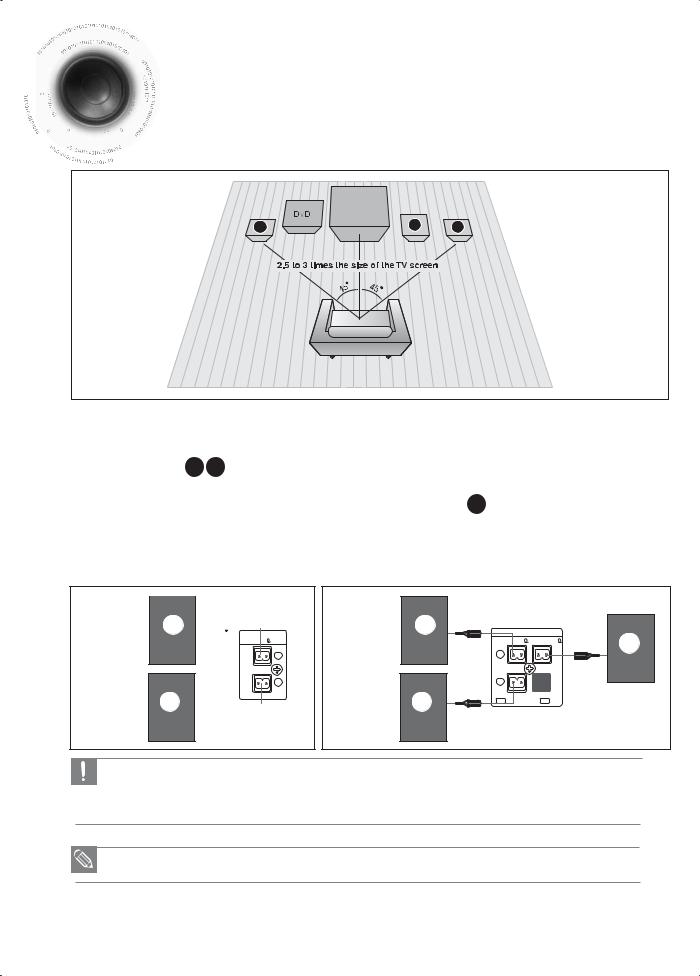
L |
SW |
R |
Position of the DVD Player
• Place it on a stand or cabinet shelf, or under the TV stand.
Front Speakers L R
•Place these speakers in front of your listening position, facing inwards (about 45°) toward you.
•Place the speakers so that their tweeters will be at the same height as your ear.
Selecting the Listening Position
The listening position should be located about 2.5 to 3 times the distance of the TV's screen size away from the TV.
Example : For 32" TVs 2~2.4m (6~8feet)
For 55" TVs 3.5~4m (11~13feet)
Subwoofer SW
•The position of the subwoofer is not so critical. Place it anywhere you like.
MM-DG35 |
|
MM-DG36 |
|
L  L
L
SPEAKERS
OUT (6 )
L
R
R  R
R
SPEAKERS OUT
FRONT(6 ) SUB WOOFER(4 )
L
R
SW
•Do not let children play with or near the speakers. They could get hurt if a speaker falls.
•Keep the speaker out of reach of children so as to prevent children from inserting their hands or alien substances into the duct (hole) of the subwoofer speaker.
•Do not hang the subwoofer on the wall through the duct (hole).
•If you place a speaker near your TV set, screen color may be distorted because of the magnetic field generated by the speaker. If this occurs, place the speaker away from your TV set.
11
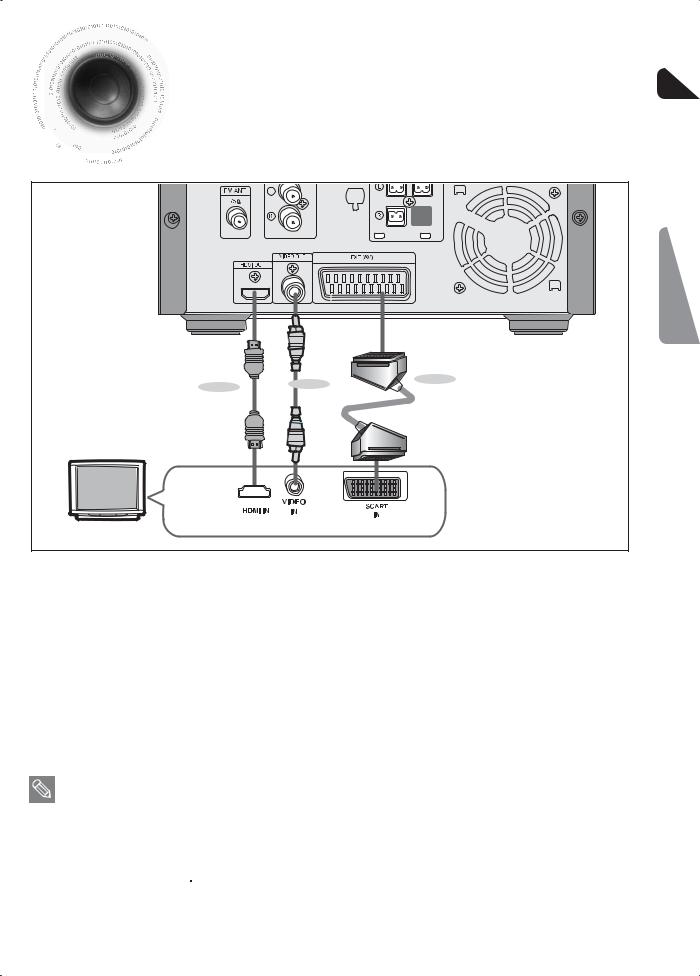
Connecting the Video Out to your TV
ENG
Please be sure to turn off the power and unplug the power cord before moving or


 installing this unit.


 Please choose one video connection method.
|
|
CONNECTIONS |
METHOD 1 |
METHOD 3 |
METHOD 2 |
|
||
(supplied) |
|
|
|
|
.......METHOD 1 : HDMI |
(Best Quality) |
Connect the HDMI cable (not supplied) from the HDMI OUT jack on the back of the DVD Player to the HDMI IN jack on your TV.
.......METHOD 2 : Scart |
(Better Quality) |
If your television is equipped with an SCART input, connect an Scart Jack (not supplied) from the AV OUT jack on the back panel of the main unit to the SCART IN jack on your television.
.......METHOD 3 : Composite Video |
(Good Quality) |
Connect the supplied Video cable from the VIDEO OUT jack on the back of the DVD Player to the VIDEO IN jack on your TV.
•Resolutions available for the HDMI output are 480p/576p, 720p,1080i/1080p. See page 15 for resolution setting.
•After making the video connection, set the Video input source on your TV to match the corresponding Video output (HDMI, Component or Composite) on your Micro Component.
See your TV owner's manual for more information on how to select the TV's Video Input source.
•If you use an HDMI cable to connect a Samsung TV to the main unit, you can operate the Micro Component using the TV's remote control. (This is only available with SAMSUNG TV's that support Anynet+(HDMI-CEC).)
• If your TV has the 


 logo, then it supports the Anynet+ function.
• If your set is connected scart jack, the TV source will auto turn to scart mode.
12


 HDMI
HDMI Function
 HDMI Auto Detection Function
The player's video output will automatically change to HDMI mode when connecting an HDMI cable while power is on.
•HDMI (High Definition Multimedia Interface)
HDMI is an interface that enables the digital transmission of video and audio data with just a single connector.
Using HDMI, the Micro Component System transmits a digital video and audio signal and displays a vivid picture on a TV having an HDMI input jack.
•HDMI connection description
HDMI connector - Supports video and digital audio data.
—HDMI outputs only a pure digital signal to the TV.
—If your TV does not support HDCP (High-bandwidth Digital Content Protection), random noise appears on the screen.
•Why does Samsung use HDMI?
Analogueue TV's require an Analogueue video/audio signal. However, when playing a DVD, the data transmitted to a TV is digital. Therefore either a digital-to-Analogueue converter (in the Micro Component System) or an Analogueue- to-digital converter (in the TV) is required. During this conversion, the picture quality is degraded due to noise and signal loss. HDMI technology is superior because it requires no D/A conversion and is a pure digital signal from the player to your TV.
•What is the HDCP?
HDCP (High-band width Digital Content Protection) is a system for protecting DVD content outputted via HDMI from being copied. It provides a secure digital link between a video source (PC, DVD. etc) and a display device (TV, projector. etc). Content is encrypted at the source device to prevent unauthorized copies from being made.
•What is Anynet+?
Anynet+ is a convenient function that offers linked operation of this unit through Samsung TV's with the Anynet+ feature.
—If your Samsung TV has an 

 logo, then it supports the Anynet+ function.
—If you turn on the player and insert a DVD disc, the player will start playing the disc, and the TV will turn on automatically and switch to HDMI mode.
—If you turn on the player and press the Play button with a DVD disc already inserted, the TV will immediately turn on and switch to HDMI mode.
—Regarding more information of using Anynet+(HDMI-CEC), please refer to your TV’s user manual.
13

 Using Anynet+(HDMI-CEC)
Anynet+ is a function that enables you to control other Samsung Devices with your Samsung TV's remote control. Anynet + can be used by connecting this Micro Component System to a SAMSUNG TV using a HDMI Cable. This is only available with SAMSUNG TV's that support Anynet+.
1. Connect the main unit of the Micro Component System to a Samsung TV with an HDMI cable. (See page 12)
2. Set the Anynet+ function on your TV.
You can operate the Micro Component System by using the TV remote control. (Available TV buttons : ,
, ,
,  ,
,
 , S,T and W,X buttons,
 ~
~ button)
Press the Anynet+ button on the TV remote control, select Micro Component form Select Device to connect and set the option of each item below.
• View TV : If Anynet+(HDMI CEC) is set to on and you select
View TV, the Micro Component will automatically switch to stop mode.
•Menu on Device : You can access and control the Micro Component menu.
•Device Operation : The Micro Component disc playback information will be displayed.
You can control the Disc operation of the Micro Component such as title, chapter and subtitle change.
•Receive is not available.
•When you playback CD during CEC ON, if you turn off the TV Power, the Micro Component doesn't automatically turn off the Power.
 BD Wise (Samsung products only)
You can select to use the BD Wise menu only if the Micro Component is connected to a Samsung TV that supports BD Wise using an HDMI cable.
• What is BD Wise?
BD Wise automatically adjusts BD Wise-compliant Samsung products to the optimal settings between them.This feature is enabled only if BD Wise-compliant Samsung products are connected to each other using an HDMI cable.
•To use BD Wise
1.Use an HDMI cable to connect the Micro Component to a BD Wise-compliant Samsung TV.
2.Set each BD Wise menu of the Micro Component and the Samsung TV to On, respectively.
— This will optimize the picture quality according to the content (In the disc, DVD, etc) that you want to play.
—This will also optimize the picture quality between the Micro Component and your BD Wise-compliant Samsung TV.
•If you want to change the resolution in BD Wise mode, you must set BD mode to Off in advance.
•If you set the BD Wise mode to off, the resolution of the connected TV will be adjusted to its maximum resolution automatically.
•BD Wise will be disabled if the player is connected to a device that does not support BD Wise.
ENG
CONNECTIONS
14


 HDMI Function(continue)

 Why use HDMI (High Definition Multimedia Interface)?


 This device transmits a DVD video signal digitally without the process of converting to analog.


 You will get sharper digital pictures when using an HDMI connection.
 Setting the HDMI Audio
The audio signals transmitted over the HDMI Cable can be toggled ON/OFF.
1.In Stop mode, press the MENU button.
2.Press the Cursor ,
,  button to move to <Audio> and then press the ENTER button.
3.Press the Cursor ,
,  button to move to <HDMI AUDIO> and then press the ENTER button.
4.Press the Cursor ,
,  button to select <ON> or <OFF> and then press the ENTER button.
•ON : Both video and audio signals are transmitted over the HDMI connection cable, and audio is output through your TV speakers only.
•OFF : Video is transmitted over the HDMI connection cable only, and audio is output through the Micro Component speakers only.
 Press the RETURN button to return to the previous level.
 Press the EXIT button to exit the setup screen.
•The default setting of this function is HDMI AUDIO OFF.
•HDMI AUDIO is automatically down-mixed to 2ch for TV speakers.
•ECHO/P.SOUND/DSP/EQ function is not available when HDMI AUDIO is ON.
•MIC output is not available while HDMI AUDIO ON.
 Setting the HDMI Resolution
The function allows the user to select the screen resolution for HDMI output.
1.In Stop mode, press the MENU button.
2.Press the Cursor ,
,  button to move to <Setup> and then press the ENTER button.
3.Press the Cursor ,
,  button to move to <Display Setup> and then press the ENTER button.
4.Press the Cursor ,
,  button to move to <HDMI Resolution> and then press the ENTER button.
5.Press the Cursor ,
,  button to select the desired item and then press the ENTER button.
•Resolutions available for the HDMI output are 480p/576p, 720p, 1080i, 1080p.
•SD(Standard Definition) resolution is 480p/576p and HD(High Definition) resolution is 720p, 1080i, 1080p.
 Press the RETURN button to return to the previous level.
 Press the EXIT button to exit the setup screen.
• If the TV does not support the configured resolution, you will not be able to see the picture
|
properly. |
|
• See your TV owner's manual for more information on how to select the TV's Video Input |
15 |
source. |
|
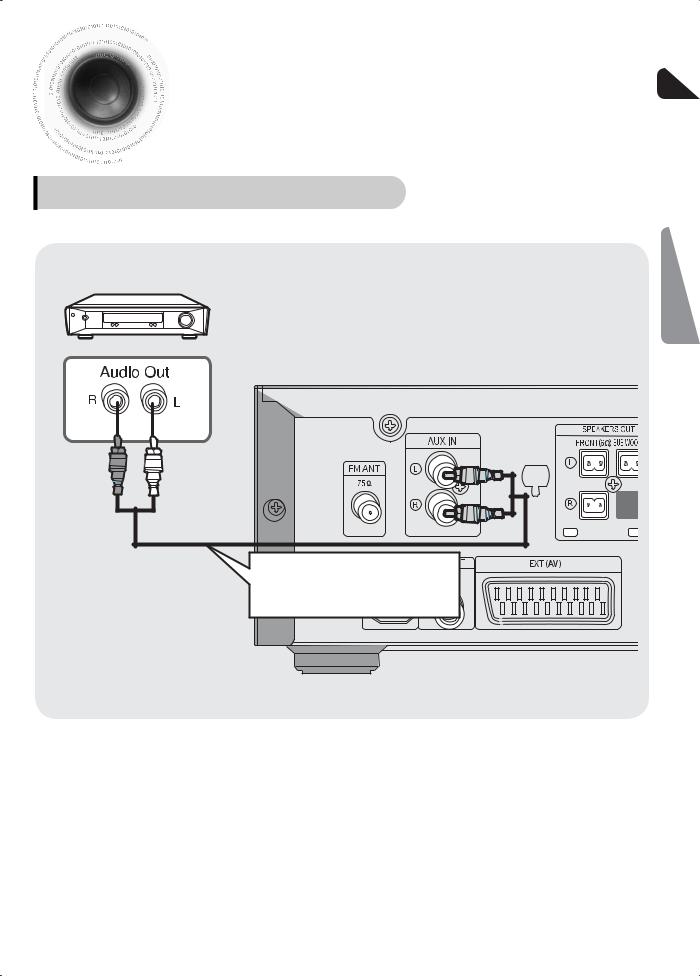
 Connecting External Components ENG
Connecting an External Analog Component
Example: Analog signal components such as a VCR, Camcorder, and TV.
CONNECTIONS
(not supplied)
Audio Cable
If the external analog component has only one Audio Out, connect either left or right.
1
2
Connect AUX IN on the player to Audio Out on the external analog component.
• Be sure to match connector colors.
Press AUX to select AUX.
• ‘AUX’ appears in the display.
16
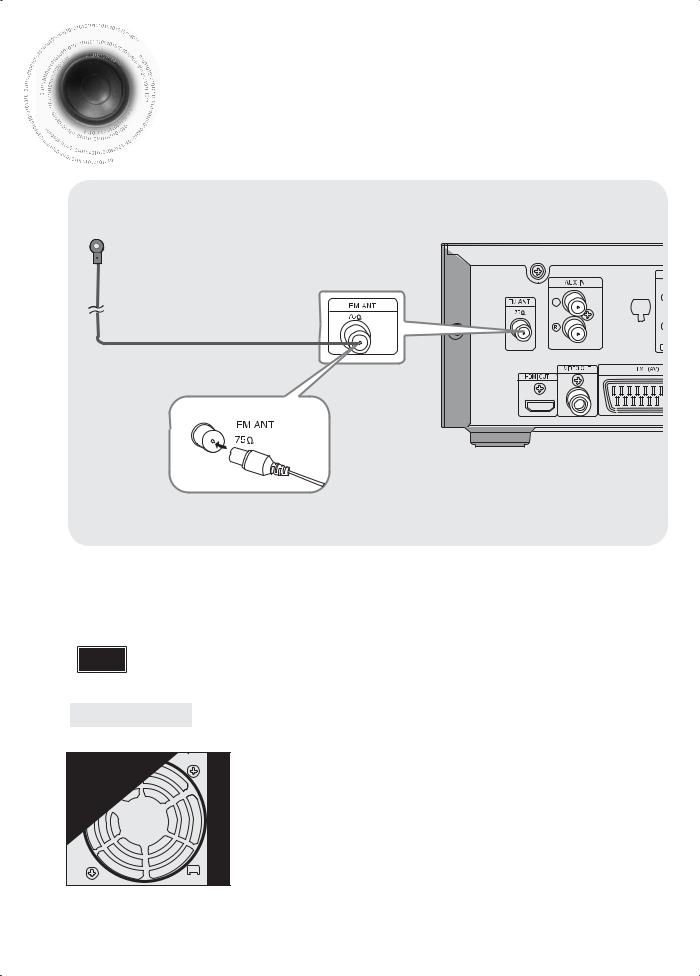

 Connecting
 the FM Antennas
FM Antenna (supplied)
1 Connect the FM antenna supplied to the FM 75Ω COAXIAL Jack.
2 Slowly move the antenna wire around until you find a location where reception is good, then fasten it to a wall or other rigid surface.
Note • This unit does not receive AM broadcasts.
Cooling Fan The cooling fan supplies cool air to the unit to prevent overheating.
Please observe the following cautions for your safety.
• Make sure the unit is well-ventilated. If the unit has poor ventilation, the temperature inside the unit could rise and may damage it.
•Do not obstruct the cooling fan or ventilation holes. (If the cooling fan or ventilation holes are covered with a newspaper or cloth, heat may build up inside the unit and fire may result.)
17


 Setting the Clock
|
For each step, you have a few seconds to set the required options. |
||||
|
If you exceed this time, you must start again. |
||||
Switch the system on |
|
|
|
|
|
|
|
|
|
||
|
Press TIMER/CLOCK |
||||
by pressing POWER |
|
||||
|
|
|
|
||
1button. |
|
2 |
twice. |
|
|
|
|
|
|
||
• "CLOCK" is displayed.
Press ENTER. |
When the correct |
|
hour is displayed, |
||
3 The hour flashes. |
4 press ENTER. |
|
• Increase the hours : |
The minutes flash. |
|
• Increase the minutes : |
||
• Decrease the hours : |
||
|
• Decrease the minutes : |
5 |
|
When the correct |
|
time is displayed, |
|
|
press ENTER. |
|
|
|
|
•"TIMER" appears in the display.
•The current time is now set.
Note • You can display the time, even when you are using another function, by pressing
TIMER/CLOCK once.
•You can also use 

 on the panel front instead of
 buttons in step 3,4.
ENG
CONNECTIONS
18

 Checking the Remaining


 Time
Time
DVD
1Press the REMAIN
button.
•For checking the remaining time of a title or chapter being played.
Each time the REMAIN button is pressed , the time is displayed as below:
TITLE REMAIN TIME
CD MP3
1Press the REMAIN
button.
If you press the REMAIN button, the remaining time is displayed.
To cancel this function, press the REMAIN button again.
CHAPTER REMAIN TIME
ELAPSED TIME
19
 Loading...