


HT-H7500WM

HT-H7500WM
HT-H7750WM
Blu-ray™
Home Entertainment System
user manual
imagine the possibilities
Thank you for purchasing this Samsung product.
To receive more complete service,
please register your product at
www.samsung.com/register

Safety Information
CAUTION
RISK OF ELECTRIC SHOCK DO NOT OPEN
CAUTION: TO REDUCE THE RISK OF ELECTRIC SHOCK, DO
NOT REMOVE THE COVER (OR BACK). THERE ARE NO USER
SERVICEABLE PARTS INSIDE. REFER ALL SERVICING TO
• The slots and openings in the cabinet and in the back
or bottom are provided for necessary ventilation. To
ensure reliable operation of this apparatus, and to
protect it from overheating, these slots and openings
must never be blocked or covered.
- Do not place this apparatus in a confined space,
such as a bookcase, or built-in cabinet, unless
proper ventilation is provided.
- Do not place this apparatus near or over a radiator
or heat register, or where it is exposed to direct
sunlight.
- Do not place vessels (vases etc.) containing water
on this apparatus. A water spill can cause a fire or
electric shock.
• Do not expose this apparatus to rain or place it near
water (near a bathtub, washbowl, kitchen sink, or
laundry tub, in a wet basement, or near a swimming
pool, etc.). If this apparatus accidentally gets wet,
unplug it and contact an authorized dealer immediately.
• This apparatus uses batteries. In your community,
there might be environmental regulations that require
you to dispose of these batteries properly. Please
contact your local authorities for disposal or recycling
information.
• Do not overload wall outlets, extension cords or
adaptors beyond their capacity, since this can result in
fire or electric shock.
• Route power-supply cords so that they are not likely to
be walked on or pinched by items placed on or against
them. Pay particular attention to cords at the plug end,
at wall outlets, and the point where they exit from the
apparatus.
• To protect this apparatus from a lightning storm, or
when it is left unattended and unused for long periods
of time, unplug it from the wall outlet and disconnect
the antenna or cable system. This will prevent damage
to the set due to lightning and power line surges.
• Before connecting the AC power cord to the DC
adaptor outlet, make sure the voltage designation of
the DC adaptor corresponds to the local electrical
supply.
QUALIFIED PERSONNEL.
• Never insert anything metallic into the open parts
• To avoid electric shock, never touch the inside of this
• Make sure to plug the power cord in until it is firmly
• If this apparatus does not operate normally - in
• Maintenance of Cabinet.
• Be sure to pull the power plug out of the outlet if the
• Contact an authorized service centre for information
This symbol indicates that high voltage is
present inside. It is dangerous to make
any kind of contact with any internal part
of this product.
This symbol indicates that important
literature concerning operation and
maintenance has been included with this
product.
of this apparatus. Doing so may create a danger of
electric shock.
apparatus. Only a qualified technician should open this
apparatus.
seated. When unplugging the power cord from a wall
outlet, always pull on the power cord's plug. Never
unplug by pulling on the power cord. Do not touch the
power cord with wet hands.
particular, if there are any unusual sounds or smells
coming from it - unplug it immediately and contact an
authorized dealer or service centre.
- Before connecting other components to this
product, be sure to turn them off.
- If you move your product suddenly from a cold place
to a warm place, condensation may occur on the
operating parts and lens and cause abnormal disc
playback. If this occurs, unplug the product, wait for
two hours, and then connect the plug to the power
outlet. Then, insert the disc, and try to play back
again.
product is to remain unused or if you are leaving the
house for an extended period of time (especially when
children, elderly, or disabled people will be left alone in
the house).
- Accumulated dust can cause an electric shock, an
electric leakage, or a fire by causing the power cord
to generate sparks and heat or the insulation to
deteriorate.
if you intend to install your product in a location with
heavy dust, high or low temperatures, high humidity,
chemical substances, or where it will operate 24 hours
a day such as in an airport, a train station, etc. Failing
to do so may lead to serious damage of your product.
2 - English

• Use only a properly grounded plug and wall outlet.
- An improper ground may cause electric shock or
equipment damage. (Class l Equipment only.)
• To turn this apparatus off completely, you must
disconnect it from the wall outlet. Consequently, the
wall outlet and power plug must be readily accessible
at all times.
• Do not allow children to hang on the product.
• Store the accessories (battery, etc.) in a location safely
out of the reach of children.
• Do not install the product in an unstable location such
as a shaky self, a slanted floor, or a location exposed
to vibration.
• Do not drop or strike the product. If the product is
damaged, disconnect the power cord and contact a
service centre.
• To clean this apparatus, unplug the power cord from
the wall outlet and wipe the product using a soft,
dry cloth. Do not use any chemicals such as wax,
benzene, alcohol, thinners, insecticide, air fresheners,
lubricants, or detergent. These chemicals can damage
the appearance of the product or erase the printing on
the product.
• Do not expose this apparatus to dripping or splashing.
Do not put objects filled with liquids, such as vases on
the apparatus.
• Do not dispose of batteries in a fire.
• Do not plug multiple electric devices into the same wall
socket. Overloading a socket can cause it to overheat,
resulting in a fire.
• There is danger of an explosion if you replace the
batteries used in the remote with the wrong type of
battery. Replace only with the same or equivalent type.
WARNING :
• TO PREVENT THE SPREAD OF FIRE,
KEEP CANDLES AND OTHER ITEMS
WITH OPEN FLAMES AWAY FROM
THIS PRODUCT AT ALL TIMES.
CLASS 1 LASER PRODUCT
This product is classified as a CLASS 1 LASER product.
Use of controls, adjustments or performance of
procedures other than those specified herein may result
in hazardous radiation exposure.
CAUTION :
• INVISIBLE LASER RADIATION WHEN OPEN AND
INTERLOCKS DEFEATED, AVOID EXPOSURE TO
BEAM.
CLASS 1 LASER PRODUCT
KLASSE 1 LASER PRODUKT
LUOKAN 1 LASER LAITE
KLASS 1 LASER APPARAT
PRODUCTO LÁSER CLASE 1
3D Precautions
IMPORTANT HEALTH AND SAFETY INFORMATION FOR
3D PICTURES.
Read and understand the following safety information
before using the 3D function.
• Some viewers may experience discomfort while viewing
3D TV such as dizziness, nausea, and headaches.
If you experience any such symptom, stop viewing 3D
TV, remove the 3D Active Glasses, and rest.
• Watching 3D images for an extended period of time
may cause eye strain. If you feel eye strain, stop
viewing 3D TV, remove your 3D Active Glasses, and
rest.
• A responsible adult should frequently check on children
who are using the 3D function.
If there are any reports of tired eyes, headaches,
dizziness, or nausea, have the child stop viewing 3D
TV and rest.
• Do not use the 3D Active Glasses for other purposes
(such as general eyeglasses, sunglasses, protective
goggles, etc.)
• Do not use the 3D function or 3D Active Glasses while
walking or moving around. Using the 3D function or 3D
Active Glasses while moving around may cause you to
bump into objects, trip, and/or fall, and cause serious
injury.
• If you want to enjoy 3D content, connect a 3D device
(3D compliant AV receiver or TV) to the product’s HDMI
OUT port using a high-speed HDMI cable. Put on 3D
glasses before playing the 3D content.
• The product outputs 3D signals only through an HDMI
cable connected to the HDMI OUT port.
• The video resolution in 3D play mode is fixed to the
resolution of the original 3D video. You can not change
the resolution.
• Some functions such as BD Wise, screen size
adjustment, and resolution adjustment may not operate
properly in 3D play mode.
• You must use a high-speed HDMI cable for proper
output of the 3D signal.
• Stay at least three times the width of the screen from
the TV when watching 3D images. For example, if
you have a 46 inch screen, stay 3.5 meters from the
screen.
• Place the 3D video screen at eye level for the best 3D
picture.
• When the product is connected to some 3D devices,
the 3D effect may not function properly.
• This product does not convert 2D content into 3D.
• "Blu-ray 3D" and "Blu-ray 3D" logo are trademarks of
the Blu-ray Disc Association.
Safety Information
3 - English

Contents
GETTING STARTED
5 Accessories
5 Speaker Components
6 Front Panel
7 Rear Panel
8 Remote Control
CONNECTIONS
9 Connecting the Speakers
12 Attaching the Toroidal Ferrite Core to the Power
Cord of the Wireless Receiver Module (SWA-
6000)
13 Connecting to a TV and External Devices
14 Connecting to a Network Router
SETTINGS
15 The Initial Settings Procedure
15 The Home Screen at a Glance
16 Accessing the Settings Screen
16 Settings Menu Functions
22 Network Setup
24 Wi-Fi Direct
25 Upgrading Software
PLAYING CONTENT
27 Playing Commercial Discs
27 Playing Multimedia Files
29 Controlling Video Playback
32 Controlling Music Playback
37 Using Bluetooth
40 Playing Photo Contents
41 Listening to the Radio
42
Using the Special Effects Remote Control Buttons
NETWORK SERVICES
43 Logging In to Your Samsung Account
43 Adding a Credit Card
43 Before Using FILMS AND TV SHOWS or
SAMSUNG APPS
44 Using FILMS AND TV SHOWS
45 Using SAMSUNG APPS
47 Screen Mirroring
47 Using the Web Browser
50 Linking your Internet Service Accounts to the
Product
50 BD-LIVE™
APPENDIX
51 Additional Information
52 Disk and Format Compatibility
59 Troubleshooting
62 Specifications
64 Licences
Wiring the Main Power Supply Plug (UK Only)
IMPORTANT NOTICE : The mains lead on this equipment is supplied with a moulded plug incorporating a fuse.
The value of the fuse is indicated on the pin face of the plug and if it requires replacing, a fuse approved to BS1362
of the same rating must be used. Never use the plug with the fuse cover removed. If the cover is detachable and
a replacement is required, it must be of the same colour as the fuse fitted in the plug. Replacement covers are
available from your dealer. If the fitted plug is not suitable for the power points in your house or the cable is not long
enough to reach a power point, you should obtain a suitable safety approved extension lead or consult your dealer
for assistance. However, if there is no alternative to cutting off the plug, remove the fuse and then safely dispose of
the plug. Do not connect the plug to a mains socket as there is a risk of shock hazard from the bared flexible cord.
Never attempt to insert bare wires directly into a mains socket. A plug and fuse must be used at all times.
IMPORTANT : The wires in the mains lead are coloured in accordance with the following code:– BLUE = NEUTRAL
BROWN = LIVE As these colours may not correspond to the coloured markings identifying the terminals in your
plug, proceed as follows:–The wire coloured BLUE must be connected to the terminal marked with the letter N or
coloured BLUE or BLACK. The wire coloured BROWN must be connected to the terminal marked with the letter L
or coloured BROWN or RED.
IMPORTANT : DO NOT CONNECT EITHER WIRE TO THE EARTH TERMINAL WHICH IS MARKED WITH
LETTER E OR BY THE EARTH SYMBOL U, OR COLOURED GREEN OR GREEN AND YELLOW.
4 - English
Getting Started
Figures and illustrations in this User Manual are provided for reference only and may differ from actual
product appearance.
An administration fee may be charged if either
a. an engineer is called out at your request and there is no defect in the product (i.e. where you have
failed to read this user manual)
b. you bring the unit to a repair centre and there is no defect in the product (i.e. where you have failed
to read this user manual).
The amount of such administration charge will be advised to you before any work or home visit is
carried out.
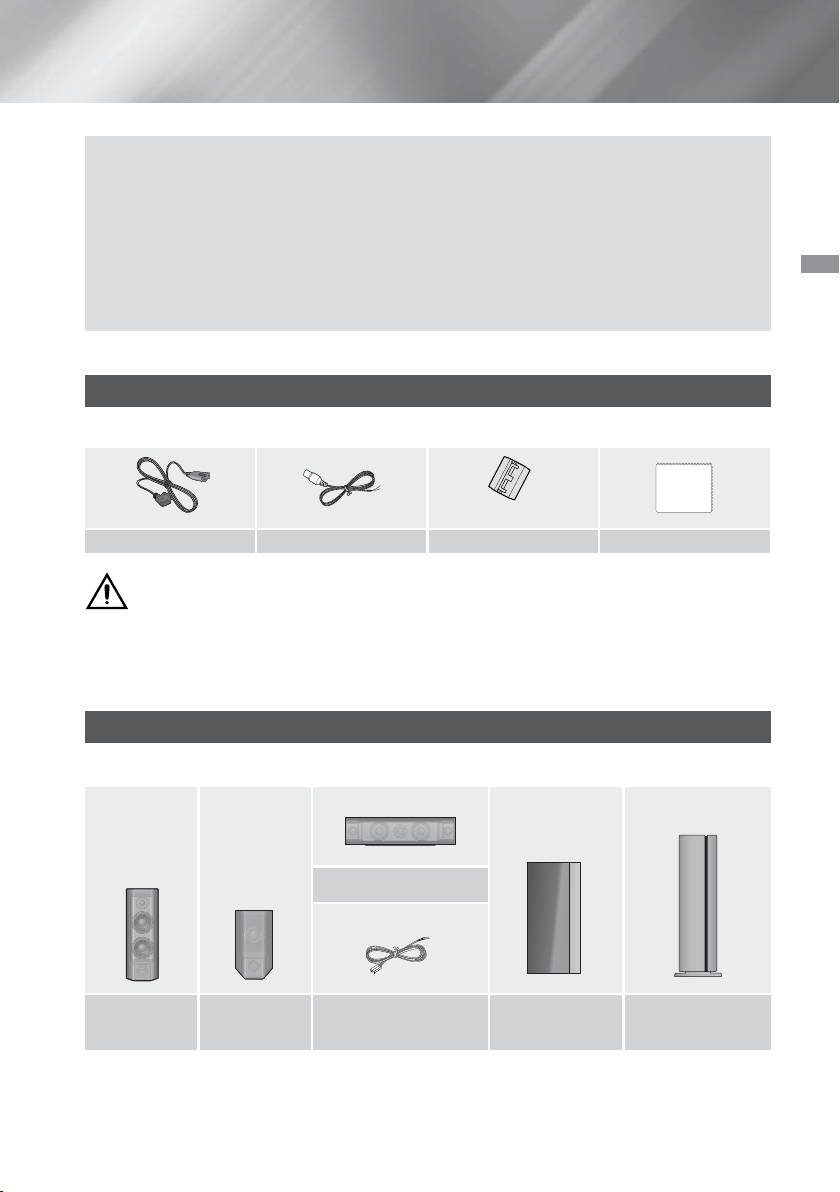
Check the box for the accessories and speaker components listed or shown below.
Accessories
• Remote Control • Lithium Battery • User Manual
(For Power cord)
Power Cable FM Antenna
WARNING, DO NOT INGEST BATTERY, CHEMICAL BURN HAZARD,
[The remote control supplied with] This product contains a coin/button cell battery.
If the coin/button cell battery is swallowed, it can cause severe internal burns in just 2 hours and
can lead to death. Keep new and used batteries away from children. If the battery compartment does not
close securely, stop using the product and keep it away from children. If you think batteries might have been
swallowed or placed inside any part of the body, seek immediate medical attention.
Toroidal Ferrite Core
Soft Cloth
Getting Started
Speaker Components
HT-H7500WM - 5.1CH
Centre
Front x 2 Surround x 2 Speaker Cable x 6 Subwoofer
5 - English
Wireless Receiver
Module (SWA-6000)
Getting Started
HT-H7750WM - 7.1CH
Speaker Cable x 2
Front/
Front Top x 2
Screw (5x20) x 16
Stand Base x 4 Centre
Stand x 4 Surround x 2 Subwoofer
Front Panel
DISPLAY ICONS
FUNCTION STOP PLAY/PAUSE
OPEN/
CLOSE
NFC
VOLUME
CONTROL
POWER
DISPLAY
Wireless Receiver
Module (SWA-6000)
VACUUM TUBE AMP
U
M
U
T
C
U
A
B
V
E
D
S
N
O
E
-
U
H
N
G
D
I
H
5V 0.5A
DISC TRAY
Cellular phones or mobile devices placed near the vacuum tube amp or electronic products placed on the
✎
USBREMOTE CONTROL SENSOR
top of the product can cause audio noise or distortion.
When the product is on, do not let children touch the product's surface. It will be hot.
✎
To upgrade the product's software through the USB jack, you must use a USB flash drive.
✎
6 - English
When the product displays a Blu-ray Disc menu, you cannot start the movie by pressing the button on
✎
the product or the remote. To play the movie, you must select Play Movie or Start in the disc menu, and then
press the
If you are using the Internet or are playing content from a USB device on your TV through the home cinema,
✎
you cannot select the BD/DVD mode with the
OK
button.
SOURCE button. To select the BD/DVD mode, exit the
Internet or stop the content you are playing on the TV, and then select the BD/DVD mode.
To use the NFC function, tag the compatible Bluetooth source device to the N on the top of the product
✎
(See page 39).
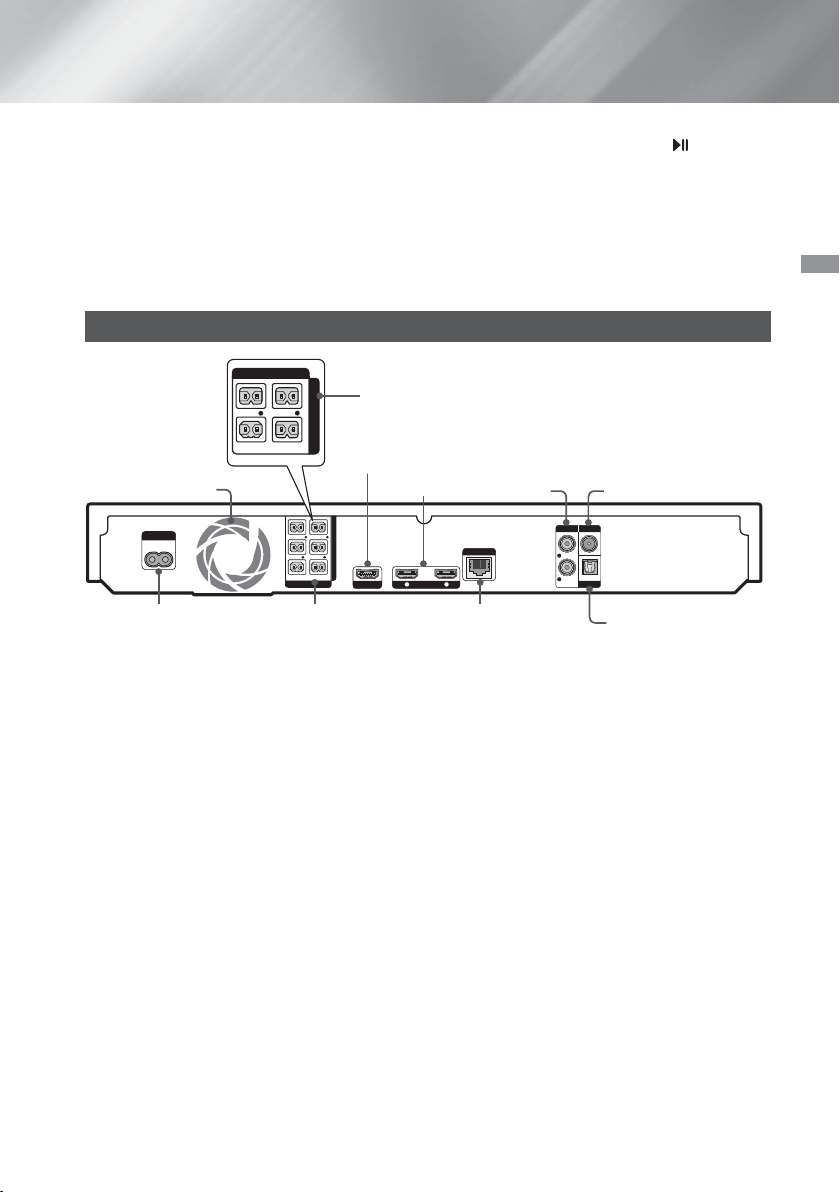
Rear Panel
SPEAKERS OUT
L
FRONT
R
FRONT
CENTER
SUBWOOFER
COOLING FAN * FM ANTENNA
* In case of HT-H7500WM
IMPEDANCE : 3
HDMI OUT
HDMI IN
AUX IN
Getting Started
POWER
POWER CORD LAN TERMINAL
SPEAKER OUTPUT
FRONT TOP
FRONT
SUBWOOFER
SPEAKERS OUT
L
R
FRONT TOP
L
FRONT
R
IMPEDANCE : 3
CENTER
HDMI OUT
1 2
LAN
HDMI IN
CONNECTORS
AUX IN FM ANT
L
OPTICAL
R
DIGITAL
AUDIO IN
EXTERNAL DIGITAL
AUDIO IN (OPTICAL)
* Connecting the FM Antenna
1. Connect the supplied FM antenna to the FM ANT Jack.
2. Slowly move the antenna wire around until you find a location where reception is good, then fasten it to a
wall or other rigid surface.
Maintain a minimum of 10 cm of clear space on all sides of the home cinema to ensure adequate ventilation.
✎
Do not obstruct the cooling fan or ventilation holes.
This product does not receive AM broadcasts.
✎
7 - English
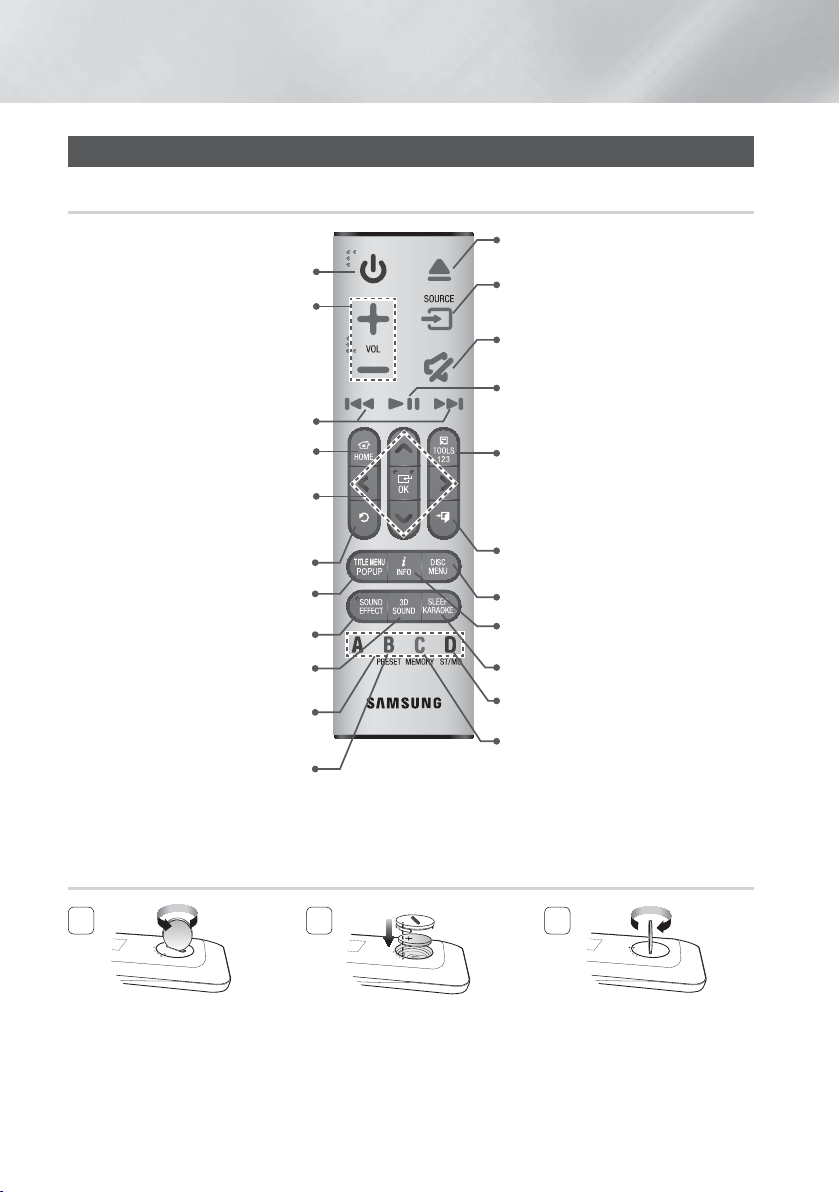
Getting Started
Remote Control
Tour of the Remote Control
Turn the product on and off.
Adjust the volume.
Press to skip backwards([) or
Press and hold to search
backwards(() or forwards()).
Press to move to the Home screen.
Select on-screen menu items and
,. :
Search for active FM stations
and to change channels.
Return to the previous menu.
Use to enter the Popup menu/Title
Press to apply sound effects.
Press to apply the DTS Neo:Fusion II
These buttons are used both for
menus on the product and also several
Press to select MANUAL/PRESET in
forwards(])
or
change menu values.
menu.
or 3D sound effect.
Blu-ray Disc functions.
the Tuner function.
Press to open and close the disc tray.
Press to select the Home Cinema's
mode (HDMI, AUX, BD/DVD, etc.).
Cut off the sound temporarily.
Press to play disc or files.
or
Press to pause playing.
Press to use the Tools menu.
or
To display the number keypad (may
include function keys when applicable)
on the screen, press and hold the
button.
Press to stop the disc playing or to exist
the menu.
Press to view the disc menu.
Use to display the playback information
when playing a Blu-ray/DVD disc or files.
Set a Sleep time to shut off the product.
Select STEREO or MONO for radio
broadcasts.
Use to set a preset radio frequency.
While playing multimedia content in SAMSUNG APPS, press and hold 5 button on the remote to pause
✎
playback. To stop playback, press and hold
e
(
EXIT) button on the remote.
Installing batteries in the Remote Control
1
Use a coin to turn the remote
control cover anti-clockwise to
remove it as shown in the figure
above.
2
Insert a 3V lithium battery. Keep
the positive (+) pole upward when
inserting the battery. Put the
battery cover on and align the '●'
marks side by side as shown in
the figure above.
3
Use a coin to turn the cover
clockwise as far as it will go to fix
it in place.
8 - English
Connections
This section describes various methods of connecting the product to other external components.
Before moving or installing the product, be sure to turn off the power and disconnect the power cord.
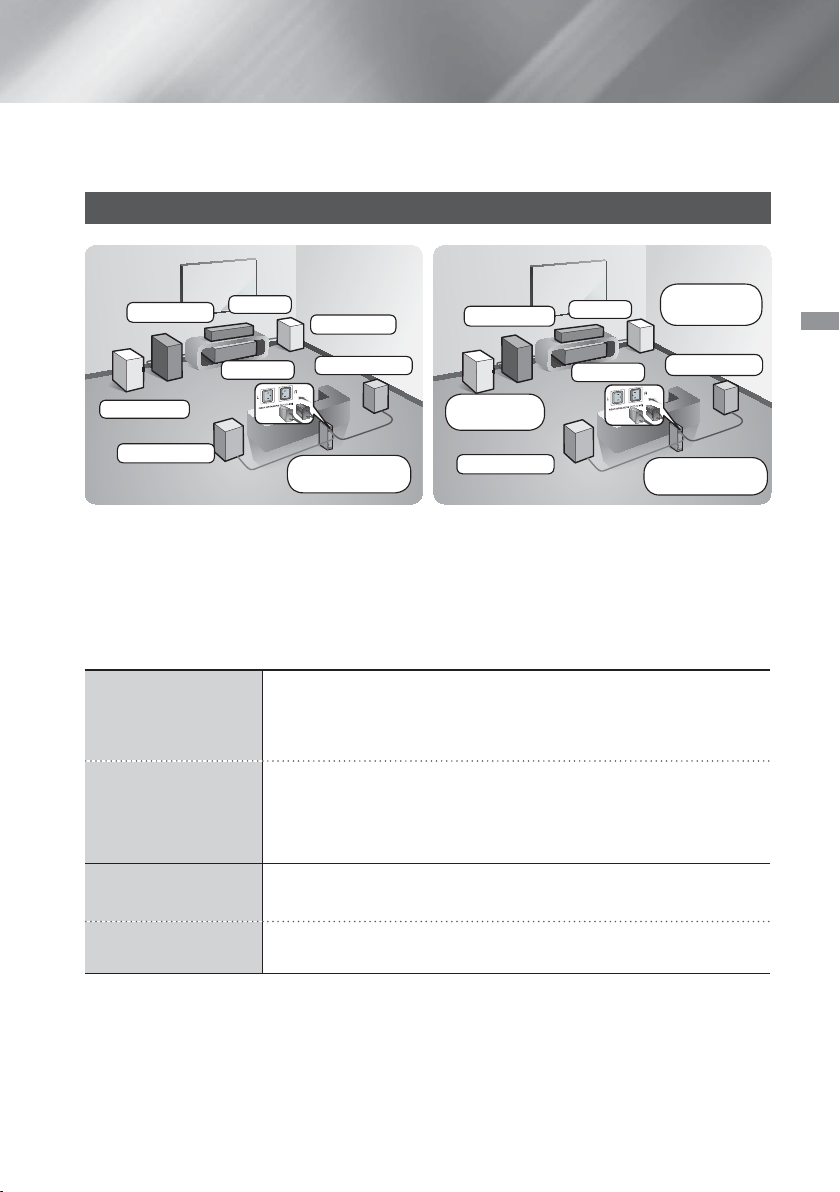
Connecting the Speakers
Subwoofer
Front (L)
Surround (L)
* HT-H7500WM
Position of the product
Place it on a stand or cabinet shelf, or under the TV stand.
Selecting the Listening Position
The listening position should be located about 2.5 to 3 times the TV's screen size away from the TV. For
example, if you have a 46 inch screen, locate the listening position 2.92 to 3.50 meters from the screen.
HT-H7500WM :
Front Speakers
HT-H7750WM :
Front/Front Top
Speakers
HT-H7500WM :
Centre Speaker
HT-H7750WM :
Centre Speaker
Centre
Front (R)
Product
Surround (R)
Wireless
Receiver Module
Place these speakers in front of your listening position, facing inwards (about
45°) toward you. Place the front speakers so that their tweeters will be at the
same height as your ear. Align the front face of the front speakers with the front
face of the centre speaker or place them slightly in front of the centre speakers.
Place these speakers in front of your listening position, facing inwards (about
45°) toward you. Place the front speakers so that their tweeters will be at the
same height as your ear. Align the front face of the front/front top speakers with
the front face of the centre speaker or place them slightly in front of the centre
speakers.
It is best to install the Centre Speaker at the same height as the front speakers.
You can also install it directly over or under the TV.
It is best to install the Centre Speaker at the same height as the front/front top
speakers. You can also install it directly over or under the TV.
Subwoofer
Front/
Front Top (L)
Surround (L)
* HT-H7750WM
Centre
Product
Front/
Front Top (R)
Surround (R)
Wireless
Receiver Module
Connections
9 - English
Connections
Place these speakers to the side of your listening position. If there isn't enough
room, place these speakers so they face each other. Position them about 60 to
Surround Speakers
90cm above your ear, facing slightly downward.
* Unlike the front and centre speakers, the surround speakers are used mainly
for sound effects. Sound will not come from them all the time.
Subwoofer
* Surround speakers must be connected to the wireless receiver module.
* The appearance of your speakers may differ from the illustrations in this manual.
* Each speaker has a coloured label on its back or underside. Each cable has a single coloured band
near its end. Match the band on each cable to the speaker label by colour, and then connect the
cable to the speaker. See page 11 for exact instructions.
The position of the subwoofer is not so critical. Place it anywhere you like.
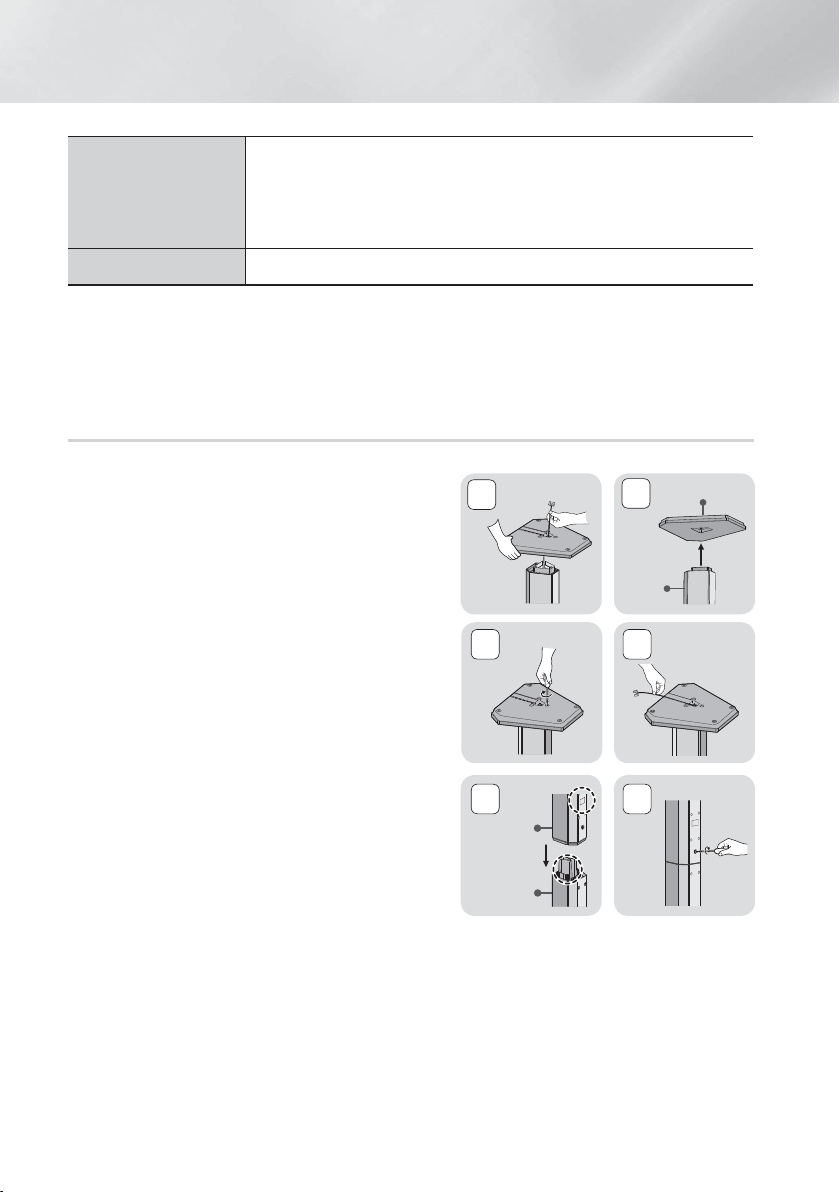
Installing the Speakers on the Tallboy Stands
* HT-H7750WM only
1. Find the speaker cable that is attached to the Stand.
Turn the Stand and Stand Base upside-down, unravel
the speaker cable, and then draw it through the hole in
the Stand Base.
Handle the Stand carefully. It is heavy.
✎
2. Connect the Stand Base to the bottom of the Stand.
3. Insert three 5x20 screws into the marked holes in the
Stand Base, and then tighten them with a screwdriver as
shown in the illustration.
4. Place the speaker cable into the slot on the bottom of
the stand base.
5. Connect the assembled stand and a speaker together by
matching the labels on the stand and speaker with each
other as shown in the picture.
6. Insert a screw (5x20) into the hole on the rear of the
speaker and tighten by turning it clockwise with a
screwdriver.
7. Repeat steps 1 through 6 with the other speaker and
stand.
1
3
5 6
Speaker
Stand
2
Stand
4
Stand Base
10 - English
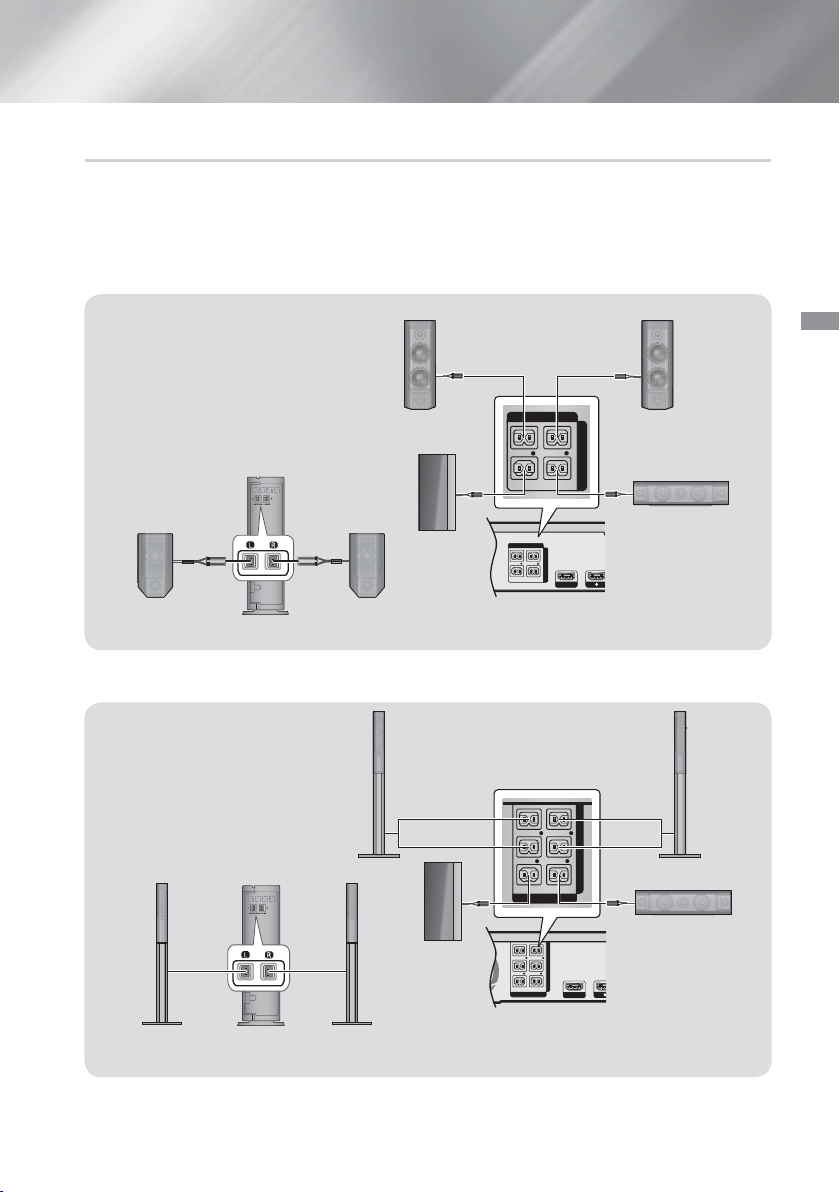
Speaker Cable Connections
HDMI OUT
1
SPEAKERS OUT
CENTER
SUBWOOFER
FRONT
L
FRONT
R
IMPEDANCE : 3
HDMI OUT
1
SPEAKERS OUT
CENTER
SUBWOOFER
FRONT
L
FRONT
R
FRONT TOP
L
FRONT TOP
R
IMPEDANCE : 3
1. Match each speaker cable bundle to the correct speaker by matching the colour coded plug on each
bundle to the coloured sticker on the bottom or back of each speaker.
2. Connect the speaker wire plugs from each speaker to the back of the product by matching the colours of
the speaker plugs to the colours of the speaker jacks.
HT-H7500WM
HT-H7750WM
Wireless Receiver Module
Surround Speaker (R)Surround Speaker (L)
Front Top/
Front Speaker (R)
Wireless Receiver Module
Subwoofer
Front Speaker (L)Front Speaker (R)
SPEAKERS OUT
FRONT
R
FRONT
CENTER
SUBWOOFER
Front Speaker (L)
R
FRONT TOP
FRONT TOP
FRONT
R
FRONT
CENTER
SUBWOOFER
SPEAKERS OUT
L
L
L
IMPEDANCE : 3
Connections
IMPEDANCE : 3
Centre Speaker
Front Top/
Surround Speaker (L) Surround Speaker (R)
* This product should be connected with the SWA-6000 only.
Centre Speaker
Subwoofer
11 - English

Connections
If you place a speaker near your TV set, the screen colour may be distorted because of the magnetic field.
✎
Place the wireless receiver module at the rear of the listening position. If the wireless receiver module is too
✎
close to the product, sound from the speakers may be disrupted because of interference.
If you use a device such as a microwave oven, wireless LAN Card, Bluetooth device, or any other device
✎
that uses the 2.4/5.8GHz frequencies near the product, sound from the speakers may be disrupted because
of interference.
The maximum transmission distance from the product to the wireless receiver module is about 10m, but
✎
may vary depending on your operating environment. If a steel-concrete wall or metallic wall is between the
product and the wireless receiver module, the system may not operate at all, because the radio waves
cannot penetrate metal.
If the product doesn't make a wireless connection, you need to run an ID Set between the product and
✎
wireless receiver module. With the product turned off, press and hold
for 5 seconds. Turn on the wireless receiver module. Then, press and hold the "ID SET" button on the back
of the wireless receiver module for 5 seconds, and then turn the product on.
| CAUTION |
If you want to install the speakers on the wall, fasten screws or nails (not provided) firmly to the wall wherever
you want to hang a speaker, and then, using the hole in the rear of each speaker, carefully hang each
speaker on a screw or nail.
Do not let children play with or near the speakers. They could get hurt if a speaker falls.
When connecting the speaker wires to the speakers, make sure that the polarity (+/ –) is correct.
Keep the subwoofer speaker out of reach of children to prevent children from inserting their hands or alien
substances into the duct (hole) of the subwoofer speaker.
Do not hang the subwoofer on the wall using the duct (hole).
The wireless receiving antenna is built into the wireless receiver module. Keep it away from water and
moisture.
For optimal listening performance, make sure that the area around the wireless receiver module location is
clear of any obstructions.
In 2-CH mode, you will hear no sound from the wireless surround speakers.
(mute) button on the remote control
Attaching the Toroidal Ferrite Core to the Power Cord of the Wireless
Receiver Module (SWA-6000)
If you attach a Toroidal ferrite core to the power cord of the wireless
receiver module, it will help prevent RF interference from radio signals.
1. Pull the fixing tab of the Toroidal ferrite core to open it.
2. Make two loops in the wireless receiver module power cord.
3. Attach the Toroidal ferrite core to the wireless receiver module's
power cord as shown in the figure on the right, and then close it
by pressing it until it clicks.
• Attach the ferrite core as close to the Wireless Receiver Module
as possible.
12 - English
Connecting to a TV and External Devices
HDMI OUT
HDMI IN
1 2
LAN
AUX IN FM ANT
OPTICAL
DIGITAL
AUDIO IN
L
R
OPTICAL OUTAUDIO OUTHDMI OUTHDMI IN
HDMI OUT
HDMI IN
1 2
LAN
POWER
AUX IN FM ANT
OPTICAL
DIGITAL
AUDIO IN
L
R
SPEAKERS OUT
CENTER
SUBWOOFER
FRONT
L
FRONT
R
FRONT TOP
L
FRONT TOP
R
IMPEDANCE : 3
Red
R
White
W
Method 1 Method 3
Method 2
Connections
External
Devices
Connecting to a TV
Connect an HDMI cable (not supplied) from the HDMI OUT jack on the back of the product to the HDMI IN jack on
your TV. If the TV supports ARC, you can hear the audio from your TV through the home cinema with only this cable
connected. See page 18 in this manual and the section on ARC in your TV's user's manual for details.
Connecting to External Devices
Method 1 HDMI IN : Connecting to an External Component with an HDMI Cable
Connect an HDMI cable (not supplied) from the HDMI IN jack on the back of the product to the HDMI OUT jack
on your digital device. Select the HDMI1 or HDMI2 mode.
Method 2 AUX IN : Connecting an External Analogue Component
Using an RCA audio cable (not supplied), connect the AUDIO In jack on the product to the AUDIO Out jack on
the external analogue component. Select the AUX mode.
• Be sure to match the colours on the cable plugs to the colours on the input and output jacks.
Method 3 OPTICAL : Connecting an External Digital Audio Component
Use to connect the digital audio output of digital signal components such as Cable Boxes and Satellite
Receivers (Set-Top-Boxes) to the home cinema. Using a digital optical cable (not supplied), connect the Optical
Digital Audio In jack on the product to the Digital Optical Out jack of the external digital device using a digital
optical cable. Select the D. IN mode.
To see video from your Cable Box/Satellite receiver, you must connect its video output directly to your TV.
✎
This system supports Digital sampling frequencies of 32 kHz or higher from external digital components.
✎
This system supports only DTS and Dolby Digital audio. MPEG audio, a bitstream format, is not supported.
✎
Selecting an External Device to Use
To select an external device after you have connected it, press the SOURCE button. Each time you press the
button, the mode changes in this order : BD/DVD D. IN AUX HDMI1 HDMI2 FM BT
13 - English
Connections
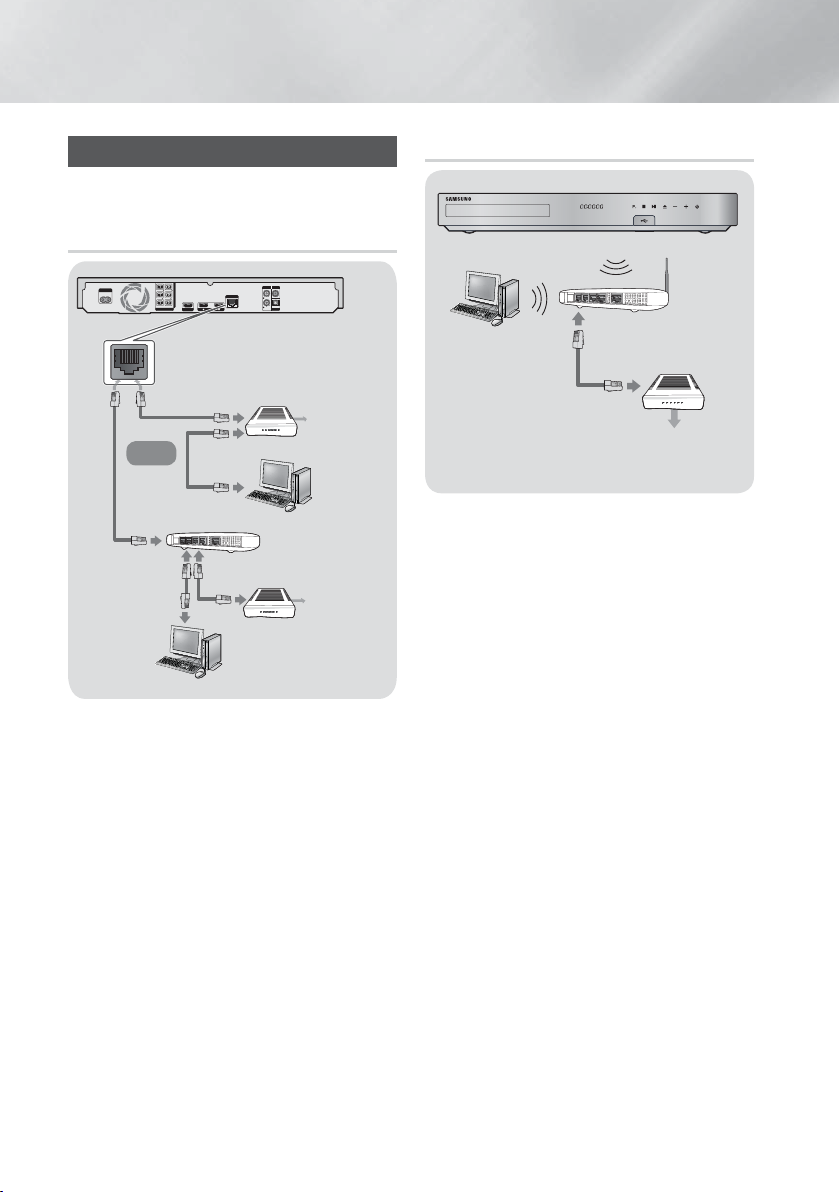
Connecting to a Network Router
You can connect your product to your network router
using one of the methods illustrated below.
Wired Network
POWER
L
R
FRONT TOP
FRONT TOP
L
FRONT
R
FRONT
IMPEDANCE : 3
CENTER
SUBWOOFER
SPEAKERS OUT
1 2
HDMI OUT
Broadband modem
(with integrated router)
Or
Router
Your router or your Internet Service Provider's
✎
policies may prevent the product from accessing
Samsung's software update server. If this occurs,
contact your Internet Service Provider (ISP) for
more information.
DSL users, please use a router to make a network
✎
connection.
To use the DLNA function, you must connect your
✎
PC to your network as shown in the illustrations
above.
The connection can be wired or wireless.
LAN
HDMI IN
AUX IN FM ANT
L
OPTICAL
R
DIGITAL
AUDIO IN
Broadband
modem
Broadband
service
Broadband
service
Wireless Network
Wireless IP sharer
Broadband
service
If your wireless IP router supports DHCP, this
✎
product can use a DHCP or static IP address to
connect to the wireless network.
Set your wireless IP router to Infrastructure mode.
✎
Ad-hoc mode is not supported.
The product supports only the following wireless
✎
security key protocols:
- WEP (OPEN/SHARED), WPA-PSK (TKIP/AES),
WPA2-PSK (TKIP/AES)
Select a channel on the wireless IP router that is
✎
not currently being used. If the channel set for
the wireless IP router is currently being used by
another device nearby, it will result in interference
and communication failure.
In compliance with the newest Wi-Fi certification
✎
specifications, Samsung home cinemas do not
support WEP, TKIP, or TKIP-AES (WPS2 Mixed)
security encryption in networks running in the
802.11n mode.
Wireless LAN, by its nature, may cause
✎
interference, depending on the operating
conditions (AP performance, distance, obstacles,
interference by other radio devices, etc).
14 - English
Settings
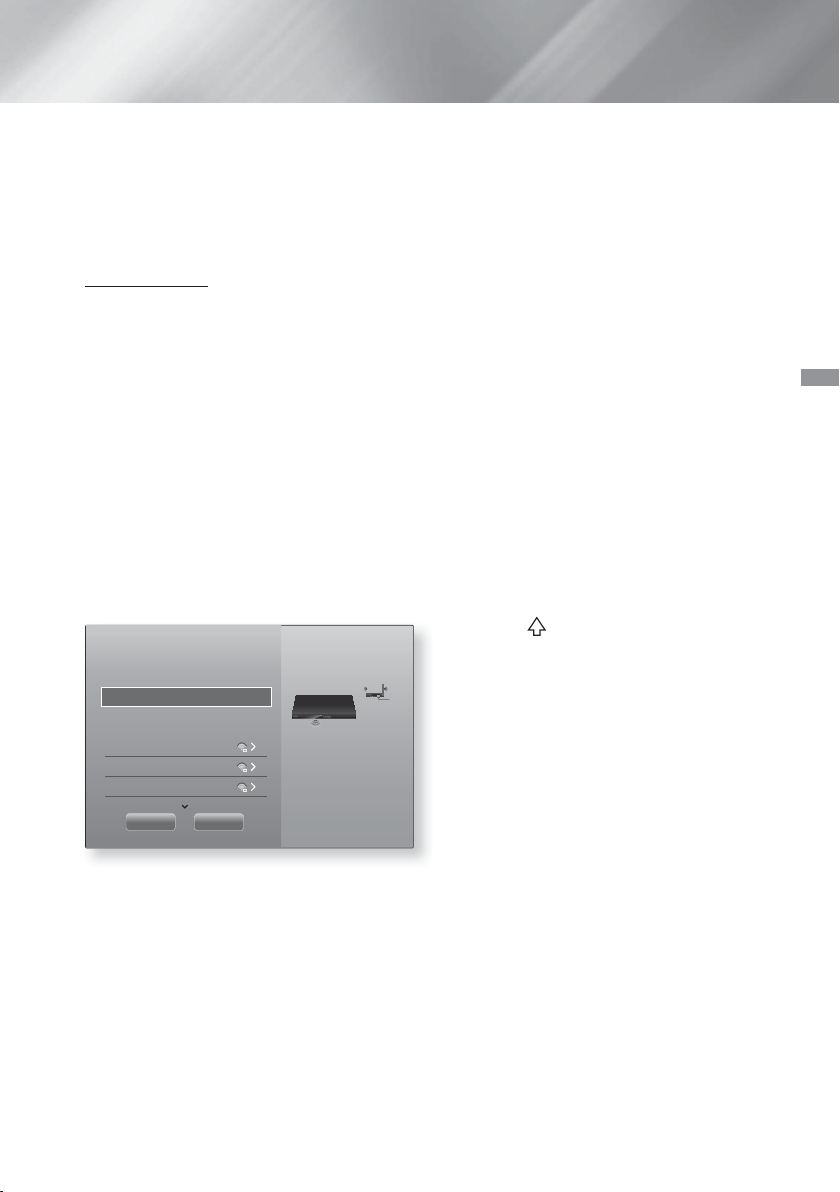
The Initial Settings Procedure
• The Home menu will not appear if you do not
configure the initial settings.
• The OSD (On Screen Display) may change in
this product after you upgrade the software
version.
• The access steps may differ depending on the
menu you selected.
After you have finished connecting the home cinema
to your TV, turn on the TV, and then turn on the
home cinema. The first initial setup screen appears.
The setup screens appear in this order: Language,
Network Configuration, Terms and Conditions, Screen
Resolution (Aspect Ratio), and Speaker Layout.
Depending on the software version installed on your
home cinema, you may also see the Software Update
screen. Follow the instructions displayed on each
screen, which will guide you through the easy setup
procedure.
If you are not ready to set up the network
configuration or it is problematic, you can select Skip
and set it up later.
To edit your settings after the initial setup, select
✎
Settings > System > Setup in the Home screen
or select the Reset option. (See page 21)
(See page 22)
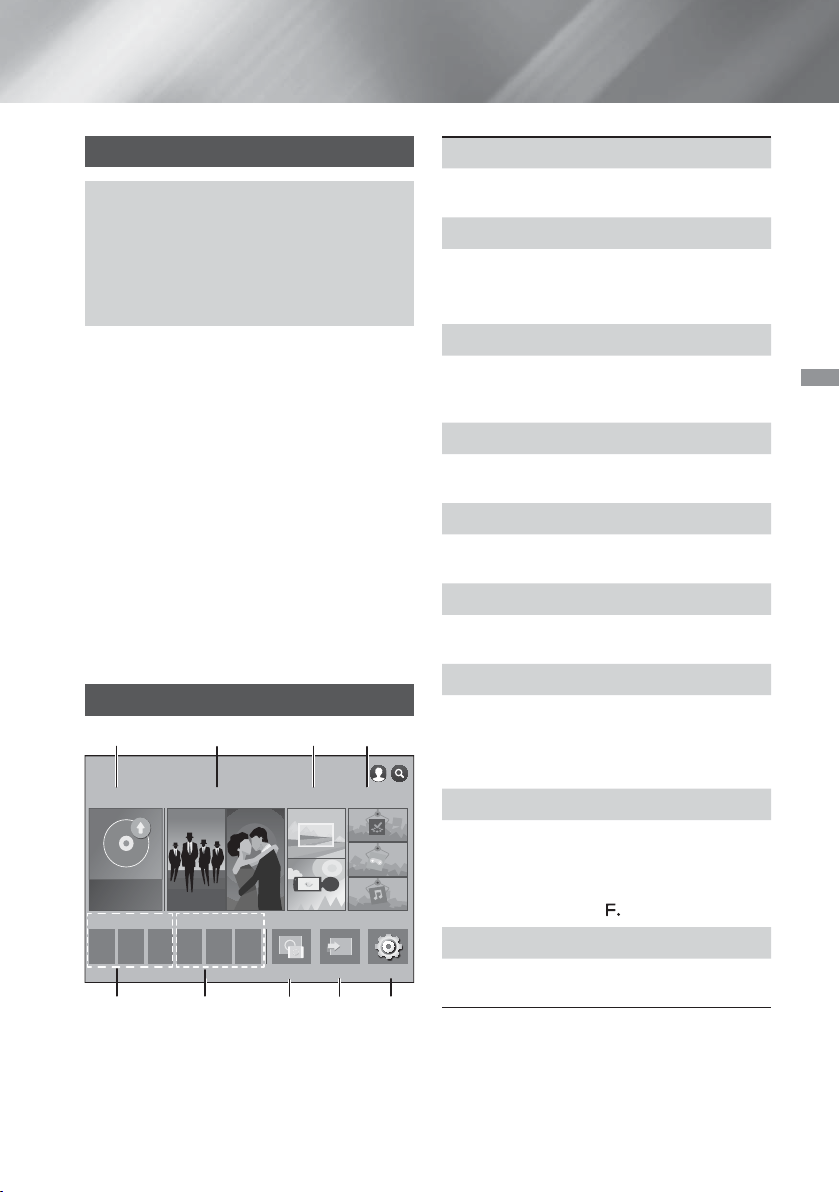
The Home Screen at a Glance
1234
PLAY DISC
RECOMMENDED MY APPS
App 1 App 2 App 3 App 4 App 5 App 6
FILMS AND TV SHOWS
No Disc
MULTIMEDIA
Screen Mirroring
SAMSUNG APPS
Function Settings
56 897
PLAY DISC
1
Displays information about the disc currently in the
disc tray. Press
FILMS AND TV SHOWS
2
Download movies and TV Shows from the Internet.
Depending on your country, this menu function
✎
may not be supported.
MULTIMEDIA
3
Play photos, videos, or music content from Discs,
USB devices, PCs, mobile devices, or cloud
services.
SAMSUNG APPS
4
Download/Access various for pay or free-of-charge
applications.
RECOMMENDED
5
A list of useful and popular apps we recommend
you download.
MY APPS
6
Displays downloaded and installed apps. You can
change the display order. (See page 45)
Screen Mirroring
7
Set up the wireless mirroring function between the
home cinema and a smart phone or tablet.
Depending on your country, this menu function
✎
may not be supported.
Function
8
Use to switch between external devices connected
to Digital In, Aux, HDMI 1, or HDMI 2, to switch to
the Tuner, or to switch to a connected Bluetooth
device. You can also use the remote's
button or the main unit's
Settings
9
Set various functions to suit your personal
preferences.
OK to start playing the disc.
SOURCE
button.
Settings
15 - English
Settings
Selecting an Option on the Home Screen
1. To select an option on the Home screen, move
the cursor using the
highlights the option of your choice, and then
press the
If you leave the product in the stop mode for more
✎
than 5 minutes without using it, a screen saver
will appear on your TV. If the product is left in the
screen saver mode for more than 20 minutes, the
power will automatically turn off.
OK button.
78:;
buttons until it
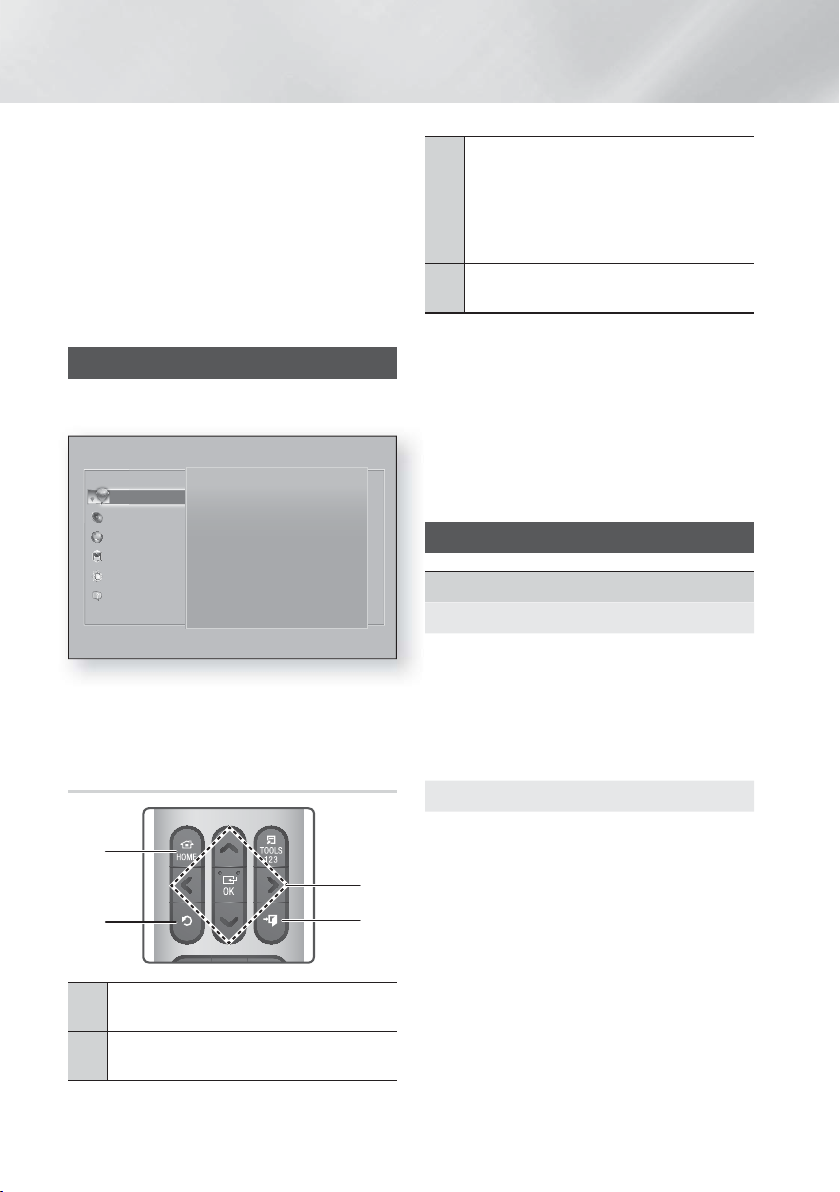
Accessing the Settings Screen
1. Select Settings on the Home screen, and then
press OK. The Settings screen appears.
Settings
Picture
Picture
Sound
Network
Smart Hub
System
Support
2. To access the menus, sub-menus, and options
on the Settings screen, please refer to the
remote control illustration below.
UHD Output Auto
3D Settings
TV Aspect Ratio
BD Wise Off
Resolution Auto
Movie Frame (24 fps) Auto
DVD 24 fps Conversion Off
16:9 Original
Buttons on the Remote Control Used
for the Settings Menu
1
3
2
HOME Button : Press to move to the Home
1
screen.
RETURN) Button : Press to return to the
(
'
2
previous menu.
4
OK / DIRECTION Button :
78:;
• Press
select an item.
3
• Press the OK button to activate the
currently selected item or confirm a
setting.
EXIT) Button : Press to exit the current
(
e
4
menu.
to move the cursor or
Detailed Function Information
Each Settings function, menu item, and individual
option is explained in detail on-screen. To view an
explanation, use the
function, menu item, or option. The explanation will
usually appear on the right of the screen.
A short description of each Settings function
starts below. Additional information on some of the
functions is also in the Appendix of this manual.
78:;
buttons to select the
Settings Menu Functions
Picture
UHD Output
This option outputs HDMI video at UHD (Ultra High
Definition) resolution. This is only available when
Movie Frame is set to Auto.
To use this feature, you must connect the
✎
product to a device that supports UHD
resolution and you must have content that
plays at 24Fs (film speed).
3D Settings
Set up the 3D related functions.
3D Blu-ray Playback Mode: Select whether to
play a Blu-ray Disc with 3D contents in 3D Mode. If
you move to the Home or Smart Hub Home menu
while in 3D mode, the product will switch to 2D
automatically.
Screen Size: Enter the size of the TV attached to
the product. The product will automatically adjust
the 3D output to the screen size of the TV.
Carefully read the health and safety information
✎
before viewing
3D content. (See page 3)
16 - English

TV Aspect Ratio
Lets you adjust the output of the product to the
screen size of your TV. (See page 51)
BD Wise
BD Wise is Samsung’s latest inter-connectivity
feature.
When you connect a Samsung product and a
Samsung TV with BD Wise to each other via
HDMI, and BD Wise is on in both the product
and TV, the product outputs video at the video
resolution and frame rate of the Blu-ray/DVD Disc.
Resolution
Lets you set the output resolution of the HDMI
video signal to BD Wise, Auto, 1080p, 1080i,
720p, 576p/480p. The number indicates the
number of lines of video per frame. The i and
p indicate interlaced and progressive scan,
respectively.
The more lines, the higher quality.
Movie Frame (24 fps)
Setting the Movie Frame (24 fps) feature to
Auto lets the product adjust its HDMI output to
24 frames per second automatically for improved
picture quality if attached to a 24Fs compatible TV.
• You can enjoy the Movie Frame (24 fps) feature
only on a TV supporting this frame rate.
• Movie Frame is only available when the product
is in the HDMI 1080p output resolution modes.
DVD 24 fps Conversion
Converts DVD playback to 24 frames per second
and outputs it via HDMI. This option is only
available when Movie Frame (24 fps) is set to on.
Fit Screen Size
Lets you select the optimal size for the Smart Hub
or Screen Mirroring Screen.
HDMI Colour Format
Lets you set the colour space format for the HDMI
output to match the capabilities of the connected
device (TV, monitor, etc).
HDMI Deep Colour
Lets you set the product to output video from the
HDMI OUT jack with Deep Colour. Deep Colour
provides more accurate colour reproduction with
greater colour depth.
Progressive Mode
Lets you improve picture quality when viewing
DVDs.
Sound
Simple Speaker Setup (HT-H7500WM only)
Lets you configure the settings of the speakers
you have connected to obtain the best possible
surround sound.
Normal Mode : Select if you have set up your
speakers in the recommended speaker layout
with the surround speakers next to or behind the
listening positions.
Simple Mode : Select if you have put your
surround speakers in front of the listening position.
Downmixes the front sound to the surround sound
speakers.
SFE, Virtual 7.1 will not operate when the
✎
Simple Mode is on.
Speaker Settings
Sound Output : Lets you select which speakers
are active, either the TV's speakers or the home
cinema's speakers.
Settings (Home theatre speakers) : Lets you
adjust the following speaker settings and turn the
test tone on and off so you can test the speakers.
- Volume Level : Lets you adjust the relative
loudness of each speaker from 6dB to -6dB.
For example, if you like deep bass, you can
increase the loudness of the subwoofer by
6dB.
:
- Distance
distance of each speaker from the listening
position up to 10
distance, the louder the speaker will be.
- Speaker Test
surround sound configuration. Press Stop
Test to stop the test while it is in progress.
Lets you adjust the relative
meters
. The farther the
:
Begins a test to set the best
Settings
17 - English

Settings
Settings (Multiroom Link)
through a remote speaker that is connected to
the home cinema through your home network.
To use the network speaker, select
If there is a network speaker available, it will
appear on the screen.
- Don't Use : The network speaker is not used.
- Multiroom
audio. All network speakers output the same
audio regardless of channel using the PCM
format only.
SOUND EFFECT and 3D SOUND are not
✎
applied if
The network speaker is not available when
✎
Screen Mirroring is active.
For further details, refer to the Multiroom Link
✎
manual from the web site.
www.samsung.com > Support > Search for the
product name > Multiroom Link > Download
PDF
Sound Customiser
Sound Customiser lets you calibrate the home
cinema for the optimal sound quality based on
your hearing level and the ambient conditions.
To create a Custom Sound Profile, follow these
steps:
1. In the Sound Customiser Menu, select Add
Custom Sound.
2. On the next screen, select Start. The Preview
screen appears.
3. Select Preview to preview the Test Sound.
Select Next, and then press
4. A 6-step test will start. During each stage,
the TV will sound a test tone at a different
frequency. The tone will begin softly and
increase in volume. Select Yes when you can
hear the test tone. If you want to listen to it
again, select Retry. Each time you select
Yes, the TV will move on to the next tone.
Once the test is complete, a screen appears
that lets you compare the original sound to
the calibrated sound.
5. Select Next, and then press the
continue. The on-screen keyboard appears
with a default profile name.
6. Enter a name for the calibrated sound profile
or accept the default name, select Done, and
then press the
: The network speaker outputs
Multiroom
: You can enjoy sound
is set to on.
OK to continue.
OK button.
Multiroom
OK button to
.
7. Select Done on the next screen, and then
press the OK button. The Sound Customiser
screen reappears.
Custom Sound Profile : Select a Sound Profile
you created to activate it. Or select Hearing
Impaired, a Custom Sound Profile especially
composed of large sounds for those with hearing
disorders.
If there are more than 3 Custom Sounds
✎
registered, Family mode will be activated which
is composed of the average value of all registered
profiles.
Add Custom Sound : Create and add a new
Custom Sound Profile. See the instructions
above.
Edit Custom Sound : Choose a Custom Sound
Profile to modify it. Follow the same steps you
used when creating a sound profile. This function is
only available if you have added a Custom Sound
Profile using Add Custom Sound. (See above.)
Manage Custom Sound : Rename or delete
Custom Sound Profiles. This function is only
available if you have added a Custom Sound
Profile using Add Custom Sound. To select a
profile, highlight the check box to the right of the
profile, and then select Rename or Delete.
Equaliser
Lets you configure the Equaliser settings manually.
Smart Volume
Lets you set the product so that the volume
remains stable when a scene change occurs or
when you change the channel.
Audio Return Channel
Lets you direct the sound from the TV to the Home
Cinema speakers. Requires an HDMI connection
and an Audio Return Channel (ARC) compatible
TV.
• If Audio Return Channel is set to On and you
are using an HDMI cable to connect the product
to the TV, digital optical input is disabled.
• If Audio Return Channel is set to Auto and you
are using an HDMI cable to connect the product
to the TV, ARC or digital optical input is selected
automatically.
18 - English

Digital Output
Lets you set the Digital Output to match the
capabilities of the AV receiver you’ve connected to
the product. For more details, please refer to the
digital output selection table. (See page 57)
Dynamic Range Control
Lets you apply dynamic range control to Dolby
Digital, Dolby Digital Plus, and Dolby TrueHD audio.
Auto: Automatically controls the dynamic range
of Dolby TrueHD audio, based on information in
the Dolby TrueHD soundtrack. Also turns dynamic
range control off for Dolby Digital and Dolby Digital
Plus.
Off: Leaves the dynamic range uncompressed,
letting you hear the original sound.
On: Turns dynamic range control on for all three
Dolby formats. Quieter sounds are made louder
and the volume of loud sounds is reduced.
Downmixing Mode
Lets you select the multi-channel downmix method
that is compatible with your stereo system. You
can choose to have the product downmix to
Normal Stereo or to Surround Compatible.
Audio Sync
When the product is attached to a digital TV, lets
you adjust the audio delay so that the audio syncs
with the video. You can set the delay between 0
and 300 milliseconds.
The Auto function in Audio Sync is guaranteed
✎
to work only with a Samsung TV that supports
the ARC function (the Anynet+ function).
Network
Network Status
Lets you check the current network and Internet
status.
Network Settings
Lets you configure the network connection so
you can enjoy various features such as Internet
services or AllShare Wi-Fi functionality, and perform
software upgrades.
Wi-Fi Direct
Lets you connect a Wi-Fi Direct device to the
product using a peer-to-peer network, without the
need for a wireless router. Note that if the product
is connected to a wireless network, it may be
disconnected when you use Wi-Fi Direct. (See
page 24)
Text files, such as files with a .TXT or .DOC
✎
extension, will not display when you are using the
Wi-Fi Direct function.
Multimedia Device Settings
Allow other devices on your network, such as smart
phones and tablets, to share content with your
product.
Device Name
Lets you assign an identifying name to the product.
You use this name to identify the product when
you are connecting external Wi-Fi devices (smart
phones, tablets, etc.) to it.
BD-Live Settings
Lets you set various BD-Live functions. BD-Live
allows you to access extra features available on
some Blu-ray Discs if you are connected to the
Internet.
BD-Live Internet Connection : Lets you fully
allow, partly allow, or prohibit a BD-Live Internet
connection.
BD Data Management : Manage BD data
downloaded from a BD-Live service or Blu-ray
Disc.
To use BD-Live, you must insert a USB storage
✎
device into the home cinema's USB port.
Settings
19 - English

Settings
Smart Hub
VOD Rating Lock
Lets you lock access to Video on Demand (VOD)
content based on its rating. To use, you must enter
the security PIN.
the Num pad appears on the screen. When the Num
pad appears, select a number using the
button and then press the OK button.
The default security PIN is 0000.
✎
Depending on your country, this menu function
✎
may not be supported.
Caption
Use to modify captions on VOD playback that
supports closed captions. Lets you change
displayed caption's font colour and size.
The Caption function does not work with VOD
✎
services that don't support closed captions.
For some VOD services that do support closed
captions, the functions settings may not be
applied.
Depending on your country, this menu function
✎
may not be supported.
Terms & Policy
Samsung account Terms and Conditions,
Privacy Policy
You can view the terms of use and privacy policy
for Smart Hub, Samsung accounts, and various
other services.
Reset Smart Hub
Resets all Smart Hub settings to their default
settings. To use, you must enter the security PIN.
Press and hold the 123 button until the Num pad
appears on the screen. When the Num pad appears,
select a number using the
press the OK button.
The default security PIN is 0000.
✎
Press and hold the 123 button until
78:;
78:;
button and then
System
Setup
Lets you re-run the Initial Settings procedure.
Refer to the descriptions displayed on the screen.
Quick start
Lets you set the product to turn on quickly by
decreasing the boot time.
If this function is set to On, Standby power
✎
consumption will increase. (About 12W ~ 20W)
Language
Lets you select the language you prefer for the onscreen menu, disc menu, audio, subtitles, etc.
• The language you select for the disc menu,
disc audio, or subtitles will only appear if it is
supported on the disc.
Device Manager
Lets you connect a wireless USB keyboard or
mouse to the USB port on the front of the product.
Keyboard Settings: Lets you configure a
wireless USB keyboard connected to the
product.
You can use the keyboard only when a
✎
QWERTY keyboard screen or window appears
in the Web Browser.
Mouse Settings: Lets you configure a wireless
USB mouse connected to the product. You can
use the mouse in the product's menu in the
same way you use a mouse on your PC.
To use a mouse with the product's menu:
product
1. Connect the USB mouse to the
2. Click the primary button you selected in
Mouse Settings. The Simple Menu appears.
3. Click the menu options you want.
Some USB HID keyboards and mice may not be
✎
compatible with your product.
Some HID keyboard keys may not work.
✎
Wired USB keyboards are not supported.
✎
Some applications may not be supported.
✎
If a wireless HID Keyboard does not operate
✎
because of interference, move the keyboard closer
to the
product.
.
20 - English

Security
Press and hold the 123 button until the Num pad
appears on the screen. When the Num pad appears,
select a number using the
press the OK button.
0000. Enter the default PIN to access the security
function if you haven't created your own PIN.
BD Parental Rating: Prevents playback of
Blu-ray Discs with a rating equal to or above a
specific age rating you have set unless you enter
the PIN.
DVD Parental Rating: Prevents playback of
DVDs with a rating above a specific numerical
rating you have set unless you enter the PIN.
Change PIN: Lets you change the 4-digit PIN
used to access security functions.
If you forget your PIN
1. Remove any disc or USB storage device.
2. Press and hold the @ button on the front
panel for 5 seconds or more.
All settings will revert to the factory default
settings.
When the factory default settings are restored,
✎
all the user stored BD data is deleted.
General
Lets you specify the display brightness and time
zone.
Front Display: Lets you change the brightness
of the front panel.
Time Zone: You can specify the time zone that
is applicable to your area.
Menu Transparency: Lets you adjust the
transparency of the menu box.
Anynet+ (HDMI-CEC)
Anynet+ is a convenient function that offers linked
operations with other Samsung products that have
the Anynet+ feature, and lets you control those
products with one Samsung TV remote. To operate
this function, you must connect this product to an
Anynet+ Samsung TV using an HDMI cable.
To use an Anynet+ (HDMI-CEC) function, follow
the instructions below.
1) Connect the product to an Anynet+ (HDMI-
CEC)-compliant Samsung TV using HDMI
Cable.
78:;
The default security PIN is
button and then
2) Set the Anynet+ (HDMI-CEC) feature to On
in both the TV and the product.
3) Search for and then select the product in the
TV's Anynet+ (HDMI-CEC) list. For more
exact instructions, see the Anynet+ section of
the TV's user's manual.
DivX® Video On Demand
View DivX® VOD Registration Codes to purchase
and play DivX® VOD contents.
Support
Remote Management
When activated, lets Samsung Call Centre agents
diagnose and fix problems with the product
remotely. Requires an active Internet connection.
Remote Management service might not be
available in some countries.
Software Update
For more information about the Software Update
function, see "Upgrading Software" on page 25.
Usage Mode
Lets you set the Usage Mode. If you are using the
home cinema at home, always select Home Use.
Store Demo is for retail display settings only.
Contact Samsung
Provides contact information for assistance with
your product.
Reset
Reverts all settings to their defaults except for the
network and Smart Hub settings. Requires that
you enter your security PIN.
button until the Num pad appears on the screen.
When the Num pad appears, select a number using
78:;
the
The default security PIN is 0000.
button and then press the OK button.
Press and hold the 123
Settings
21 - English
Settings
Network Setup
When you connect this product to a network, you
can use network based applications and functions
such as Smart Hub and BD-LIVE, and upgrade the
product's software through the network connection.
For more information about accessing and using
Internet services, see the Network Services chapter
of this manual on pages 43~50. Instructions for
configuring the network connection start below.
Configuring Your Network Connection
If you didn't configure your network connection during
the initial settings procedure or you need to reset the
network connection, follow the directions below.
Before you begin, contact your Internet Service
Provider to find out if your IP address is static or
dynamic. If it is dynamic, and you have a wired
or wireless network, we recommend using the
Automatic configuration procedures described below.
If you are connecting to a wired network, connect the
product to your router using a LAN cable before you
start the configuration procedure.
To begin configuring your network connection, follow
these steps:
1. In the Home screen, select Settings, and then
press the
2. Select Network, and then press the
3. Select Network Settings, and then press the
OK button.
4. Go to the instructions for Wired networks
starting or the instructions for Wireless networks
starting on the next page.
Wired Network
Wired – Automatic
After following Steps 1 to 3 above:
1. In the Network Settings screen, change
Network type to Wired. Then, select Connect
and press the OK button. The product detects
the wired connection, verifies the network
connection, and then connects to the network.
2. When it is done, highlight OK, and then press
OK button.
OK button.
OK button.
Wired - Manual
If you have a static IP address or the automatic
procedure does not work, you'll need to set the
Network Settings values manually.
After following Steps 1 to 3 above:
1. In the Network Settings screen, change
Network type to Wired. Then, select Connect
and press the
OK button.
The product searches for a network, and then
displays the connection failed message.
If it is possible to connect the home cinema to
✎
your network wirelessly, select Change Network
at this point, change the Network type to
Wireless, and then go to the instructions for
wireless networks on the next page.
Network Settings
Wired network connection failed.
Unable to connect to the network. Try the following: check if your IP address is set
correctly in IP Settings. Contact your Internet service provider for more information.
Change Network IP Settings Retry Close
MAC Address XX:XX:XX:XX:XX:XX
IP Address 0. 0. 0. 0
Subnet Mask 0. 0. 0. 0
Gateway 0. 0. 0. 0
DNS Server 0. 0. 0. 0
2. Use the :; buttons to select IP Settings,
and then press the OK button. The IP Settings
screen appears.
3. Select the IP setting field, and then set it to
Enter manually.
4. Select a parameter to enter (IP Address, for
example), and then press
OK. Use the 78
buttons on the remote control to enter the
numbers for the parameter.
Or use the Num
keypad to enter a parameter number.Press and
hold the 123 button until the Num pad appears on
the screen. When the Num pad appears, select a
number using the
the OK button.
78:;
Use the :; buttons on the
button and then press
remote control to move from entry field to entry
field within a parameter. When done with one
parameter, press the
OK button.
5. Press the 7 or 8 button to move to another
parameter, and then enter the numbers for that
parameter following the instructions in Step 4.
6. Repeat Steps 4 and 5 until you have filled in all
parameters.
22 - English
You can get the network parameter values from
✎
your Internet provider.
7. When finished entering all the parameter values,
select OK, and then press the
OK button. The
home cinema verifies the network connection
and then connects to the network.
Wireless Network
You can set up a wireless network connection in three
ways:
- Wireless Automatic
- Wireless Manual
- WPS(PBC)
Before you configure the wireless network
connection, disconnect any wireless network devices
currently connected to the product or, if applicable,
the product's current wired connection.
Wireless - Automatic
After following Steps 1 to 3 in "Configuring Your
Network Connection" on page 22:
1. In the Network Settings screen, change
Network type to Wireless. The product
searches for and then displays a list of the
available networks.
Network Settings
Select your network type.
Network type Wireless
Wireless network
si-ap
iptime
KIMING_VTOWER
Refresh WPS(PBC)
You can connect your Bluray player to the internet.
Please select which wireless
network to use.
2. Select the desired network, and then press the
OK button.
3. On the Security screen, enter your network's
security code or pass phrase.
Enter letters by selecting a letter with
78:;
buttons, and then pressing OK button.
4. When finished, select Done, and then press the
OK button. The product verifies the network
connection and then connects to the network.
You should be able to find the security code or
✎
pass phrase on one of the set up screens you
used to set up your router or modem.
Wireless - Manual
If you have a static IP address or the Automatic
procedure does not work, you'll need to set the
Network Settings values manually.
After following Steps 1 to 3 in "Configuring Your
Network Connection" on page 22:
1. In the Network Settings screen, change
Network type to Wireless. The product
searches for and then displays a list of the
available networks.
2. Scroll through the list, select the desired network
or Add Network, and then press the
OK button.
3. If you selected a network in Step 2, go to Step 6.
If you selected Add Network, go to Step 4.
4. Enter your wireless network or wireless router's
name.
• Enter letters by selecting a letter with the
78:;
buttons, and then pressing the OK
button.
• To display capital letters (or redisplay lower
case letters if capital letters are displayed),
select
, and then press the OK button.
• To display symbols and punctuation, select
123#&, and then press the
OK button. To
redisplay letters, select 123#&, and then press
the OK button.
When finished, select Done, and then press the
OK button.
5. On the Security type screen that appears,
use the ,. buttons to select the network's
Security type, and then press the OK button.
On the next screen, enter your network's
security code or pass phrase.
• Enter letters by selecting a letter with the
78:;
buttons, and then pressing the
OK
button.
When finished, select Done, and then press
OK button. The product searches for the
the
network.
6. The Network connection fail screen appears.
Use:; buttons to select IP Settings, and then
press the
OK button.
Settings
23 - English

Settings
7. Select the IP setting field, and then set it to
Enter manually.
8. Select a network parameter to enter (IP
Address, for example), and then press
button. Use the 78 buttons on the remote
control to enter the numbers for the parameter.
Or use the Num keypad to enter a parameter
number.Press and hold the 123 button until the
Num pad appears on the screen. When the Num
pad appears, select a number using the
button and then press the OK button.
buttons on the remote control to move from
entry field to entry field within a parameter. When
done with one value, press the
9. Press the , or . button to move to another
parameter, and then enter the numbers for that
parameter following the instructions in Step 8.
10. Repeat Steps 8 and 9 until you have filled in all
parameters.
You can get the Network parameter values from
✎
your Internet provider.
11. When finished, select OK, and then press the
OK button. The Security screen appears.
12. On the Security screen, enter your network's
security code or pass phrase. Enter letters by
selecting a letter with the
then pressing the
13. When finished, select Done at the right of the
screen, and then press the
product verifies the network connection and
then connects to the network.
14. After the home cinema verifies the network,
select OK, and then press the OK button.
You can also begin the Manual Network setup by
✎
going to Settings > Network > Network Status.
WPS(PBC)
One of the easiest ways to set up the wireless
network connection is using the WPS(PBC) function.
If your wireless router has a WPS(PBC) button, follow
these steps:
After following Steps 1 to 3 in "Configuring Your
Network Connection" on page 22:
1. In the Network Settings screen, change
Network type to Wireless. The product
searches for and then displays a list of the
available networks.
2. Scroll the list down, select WPS(PBC), and then
press the
OK button.
78:;
OK button.
OK button. The
OK
78:;
Use the :;
OK button.
buttons, and
3. Press the WPS(PBC) button on your router
within two minutes. Your product automatically
acquires all the network settings values it needs
and connects to your network after the network
connection is verified.
4. When it is done, highlight OK, and then press
the OK button.
For a WPS connection, set your wireless router’s
✎
security encryption to AES. WEP security
encryption does not support a WPS connection.
Wi-Fi Direct
The Wi-Fi Direct function allows you to connect
Wi-Fi Direct devices to the product and each other
using a peer-to-peer network, without a wireless
router.
Some Wi-Fi Direct devices may not support the
✎
AllShare function if connected via Wi-Fi Direct. If
this is the case, change the network connection
method you used to connect the device to the
home cinema.
Wi-Fi Direct transmissions can interfere with
✎
Bluetooth signals. Before you use the Bluetooth
function, we strongly recommend that you turn off
the Wi-Fi Direct function on any device in which
it is currently on.
1. Turn on the Wi-Fi Direct device and activate its
Wi-Fi Direct function.
2. In the Home screen, select Settings, and then
press the
3. Select Network, and then press the OK button.
4. Select Wi-Fi Direct, and then press the
button.
The Wi-Fi Direct devices that you can connect
the home cinema to appear.
Settings
OK button.
Wi-Fi Direct
Device Name : [HTS]H7500WM
Select your Wi-Fi Direct device to connect to.
AndroidXXXXXXX Disconnected
OK
Refresh
Close
24 - English

5. You have three ways to complete the Wi-Fi
connection:
• Through the Wi-Fi device.
• Through the product using PBC.
• Through the product using a PIN.
Each is covered below.
Through the Wi-Fi Device
1. On the Wi-Fi device, follow the device's
procedure for connecting to another Wi-Fi
Direct device. See the device's user manual for
instructions.
2. When you have completed the procedure, you
should see a pop-up on your TV screen saying
that a device that supports Wi-Fi Direct has
requested to connect. Select OK, and then
press the OK button to accept.
3. The Connecting pop-up appears, followed by
the Connected pop-up. When it closes, you
should see the device listed on the Wi-Fi Direct
screen as connected.
• The PBC and PIN procedures connect devices
automatically.
Through the Product Using PBC
1. Select the Wi-Fi Direct device you want to
connect to this product, and then press the OK
button.
2. The Connecting pop-up appears, followed by
the Connected pop-up. When it closes, you
should see the device listed on the Wi-Fi Direct
screen as connected.
Through the Product Using a PIN
1. Select the Wi-Fi Direct device you want to
connect to this product, and then press the OK
button.
2. The PIN pop-up appears.
3. Note the PIN code in the pop-up, and then enter
it into the appropriate field in the Wi-Fi Direct
device you want to connect.
4. The Connecting pop-up appears, followed by
the Connected pop-up. When it closes, you
should see the device listed on the Wi-Fi Direct
screen as connected.
The current wired or wireless network connection
✎
will be disconnected when you use the Wi-Fi
Direct function.
Text files, such as files with a .TXT or .DOC
✎
extension, will not display when you are using the
Wi-Fi Direct function.
Upgrading Software
The Software Update menu allows you to upgrade
the product’s software for performance improvements
or additional services.
• Never turn the product off or back on manually
during the update process.
1. In the Home menu, select Settings, and then
press the
2. Select Support, and then press the
3. Select Software Update, and then press the
OK button.
4. To download update software and update now,
select Update now, and then press the OK
button. See "Update now" on the next page for
details.
5. To let the product download update software
automatically when available, select Auto
update, and then press the
page 26)
The upgrade is complete when the product turns
✎
off, and then turns on again by itself.
Samsung Electronics takes no legal responsibility
✎
for product malfunction caused by an unstable
Internet connection or consumer negligence
during a software upgrade.
If you want to cancel the upgrade while the
✎
upgrade software is downloading, press the
button.
When a system upgrade is in progress, "UPDATE"
✎
is displayed on the front panel.
OK button.
OK button.
OK button. (See
OK
Settings
25 - English

Settings
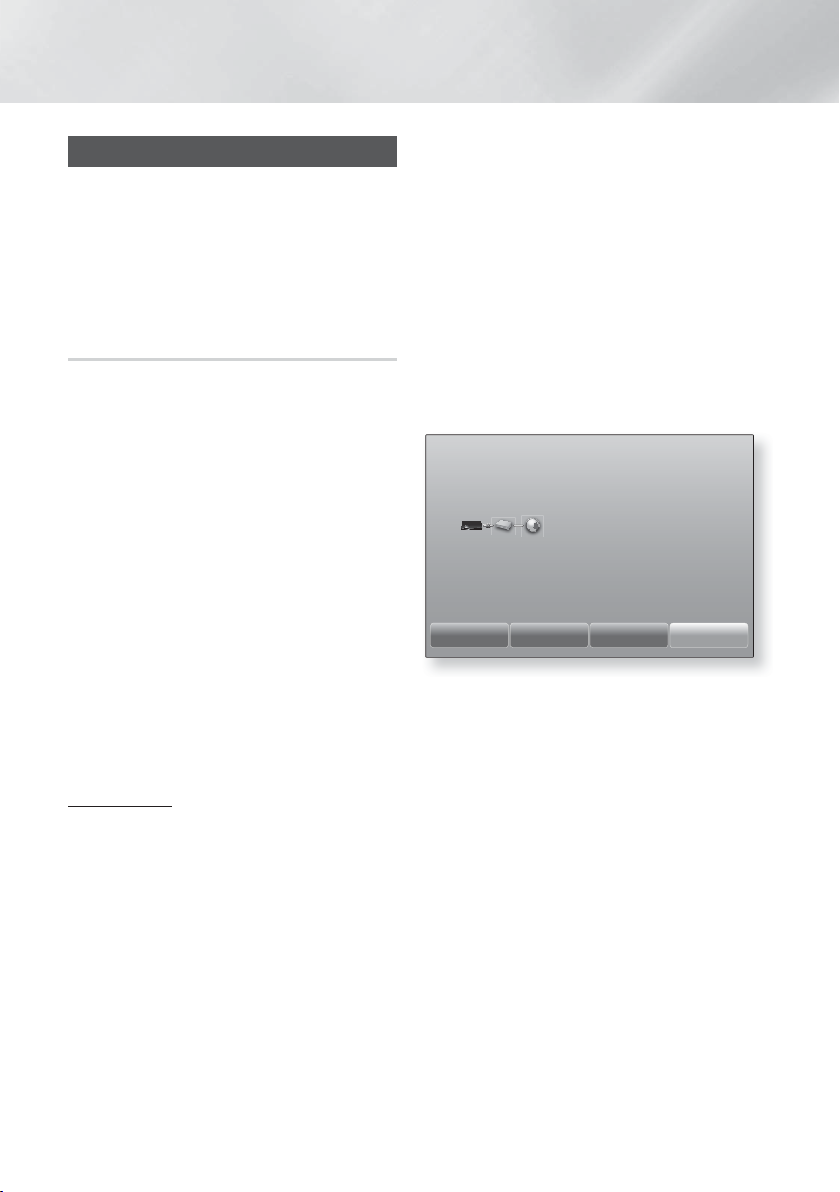
Update now
You can use Update now to update the software
through your network connection or by using a USB
flash drive. The network instructions are below. The
USB flash drive instructions are on this page.
1. Select Update now, and then press the
button. The Update now pop-up appears.
2. The product searches on line for the latest
software version.
3. If it does not find an update, the "There are no
new updates for you at the moment." pop-up
appears. Press the OK button to exit.
4. If it finds a new version, the Update Request
pop-up appears.
5. Select OK. The product upgrades the software,
turns off, and then turns on automatically.
6. If you do not select OK or Cancel in one minute,
the product stores the new upgrade software.
You can upgrade the software later using Auto
update.
7. If you select Cancel, the product cancells the
upgrade.
When the system upgrade is done, check the
✎
software details in the Product Information section
of the Contact Samsung screen.
Do not turn off the product during the Software
✎
Upgrade. It may cause the product to malfunction.
OK
Auto update
You can set the Auto update function so that the
product downloads new upgrade software when it is
in Auto update mode.
In Auto update mode, the product is on, but its
Internet connection is active. This allows the product to
download upgrade software automatically, when you
are not using it.
1. Press the 78 buttons to select Auto update
mode, and then press the OK button.
2. Select On or Off.
If you select On, the product will automatically
download new upgrade software when it is
in Auto update mode with the power on. If it
downloads new upgrade software, the product
will ask you if you want to install it when you turn
the product on.
To use the Auto update function, your product
✎
must be connected to the Internet.
Update by USB
1. Visit www.samsung.com.
2. Click SUPPORT on the top right of the page.
3. Enter the product's model number into the
search field. As you enter the model number, a
drop down will display products that match the
model number.
4. Left click your product's model number in the
drop down list.
5. On the page that appears, scroll down to and
then click Firmware Manuals & Downloads.
6. Click Firmware in the centre of the page.
7. Click the ZIP button in the File column on the
right side of the page.
8. Click Send in the first pop-up that appears.
Click OK in the second pop-up to download and
save the firmware file to your PC.
9. Unzip the zip archive to your computer. You
should have a single folder with the same name
as the zip file.
10. Copy the folder to a USB flash drive.
11. Make sure no disc is inserted in the product,
and then insert the USB flash drive into the USB
port of the product.
12. In the product’s menu, go to Settings >
Support > Software Update.
13. Select Update now.
14. The product searches for the software on the
USB drive. When it finds the software, the
Update Request pop-up appears.
15. Select OK. The product upgrades the software,
turns off, and then turns on automatically.
16. There should be no disc in the product when
you upgrade the software using the USB jack.
When the system upgrade is done, check the
✎
software details in the Product Information section
of the Contact Samsung screen.
Do not turn off the product during the software
✎
upgrade. It may cause the product to malfunction.
Software upgrades using the USB jack must be
✎
performed with a USB flash drive only.
26 - English
Playing Content
Your home cinema can play content located on Bluray/DVD/CD discs, USB devices, PCs, smart phones,
tablets, and on the Web.
To play content located on your PC or a mobile
device, you must connect the PC or mobile device
and the product to your network. To play content on
your PC, you must also download and install AllShare
network software or already have DLNA network
software on your PC.
PCs running Windows 7 and Windows 8 have
✎
DLNA software (Play To) built in.
Playing Commercial Discs
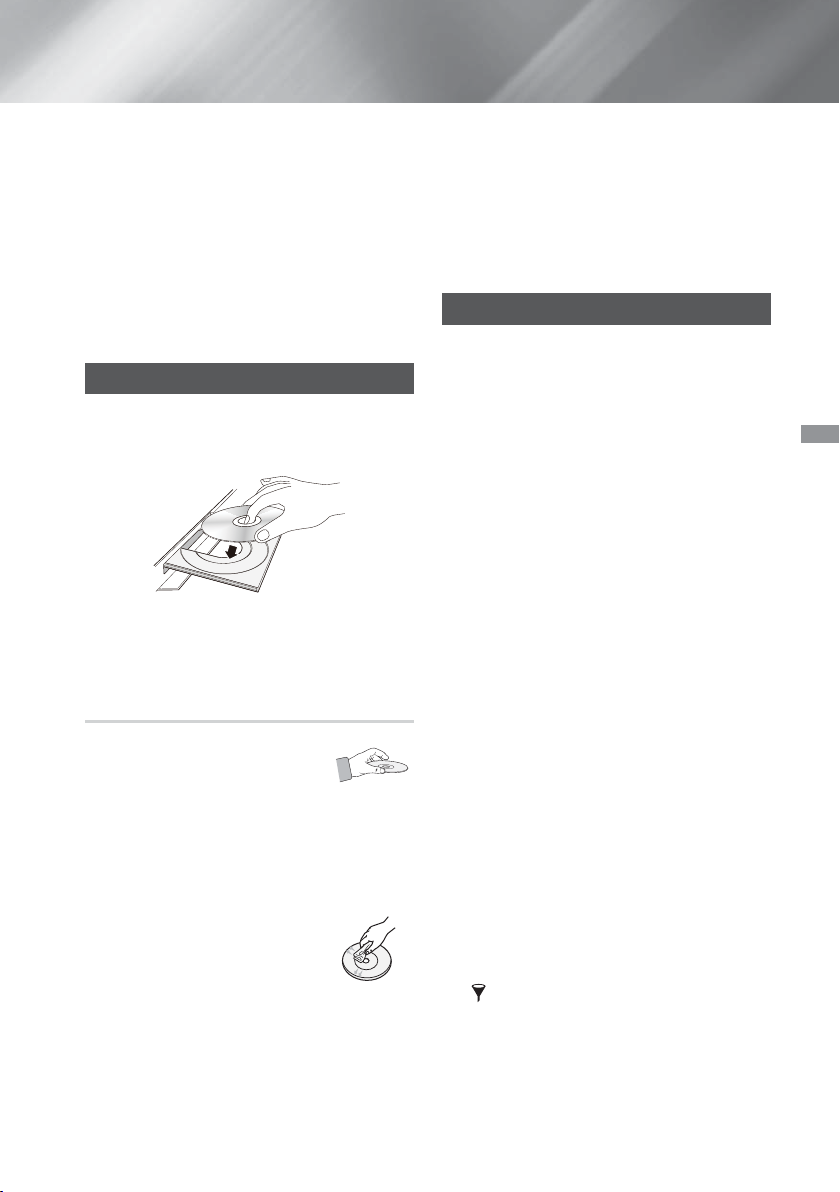
1. Press the button to open the disc tray.
2. Place a disc gently into the disc tray with the
disc’s label facing up.
3. Press the button to close the disc tray.
Playback starts automatically.
4. If playback does not start automatically, press
the p button on the remote.
Disc Storage & Management
• Holding Discs
- Fingerprints or scratches on
a disc may reduce sound and
picture quality or cause skipping.
- Avoid touching the surface of a disc where data
has been recorded.
- Hold the disc by the edges so that fingerprints
will not get on the surface.
- Do not stick paper or tape on the disc.
• Cleaning Discs
- If you get fingerprints or dirt on a
disc, clean it with a mild detergent
diluted in water and wipe with a
soft cloth.
- When cleaning, wipe gently from the inside to the
outside of the disc.
- Disc Storage
Do not keep in direct sunlight.
Keep in a cool ventilated area.
Keep in a clean protective jacket and store
vertically.
Playing Multimedia Files
1. In the Home screen, select MULTIMEDIA, and
then press the OK button. The Recently Played
screen appears.
2. Select Storage, Network Device, or Storage
Service at the bottom of the screen.
• Storage - Displays storage devices connected
to the product.
• Network Device - Displays mobile devices,
PCs, tablets, and similar devices connected
through the network.
• Storage Service - Displays the cloud services
you are logged in to.
When you select an item, information about the
✎
item scrolls across the bottom of the item's listing
window.
3. Select an item or device, and then press the
button. A screen appears listing the contents
of the item or device. Depending on how the
contents are arranged, you will see either
folders, individual files, or both.
4. If necessary, use the
a folder, and then press the
5. Use the
6. The selected file plays.
7. Press the ' (
8. Go to pages 29~41 for instructions that
To list only one type of media file, use the Filter
✎
(
device screen.
78:;
or play, and then press the
or the
screen.
explain how to control playback of videos,
music, and pictures on a storage device.
(
EXIT) button to return to the Home
e
) function in the top-right corner of the item or
78:;
buttons to select a file to view
RETURN) button to exit a folder
buttons to select
OK button.
OK button.
OK
Playing Content
27 - English
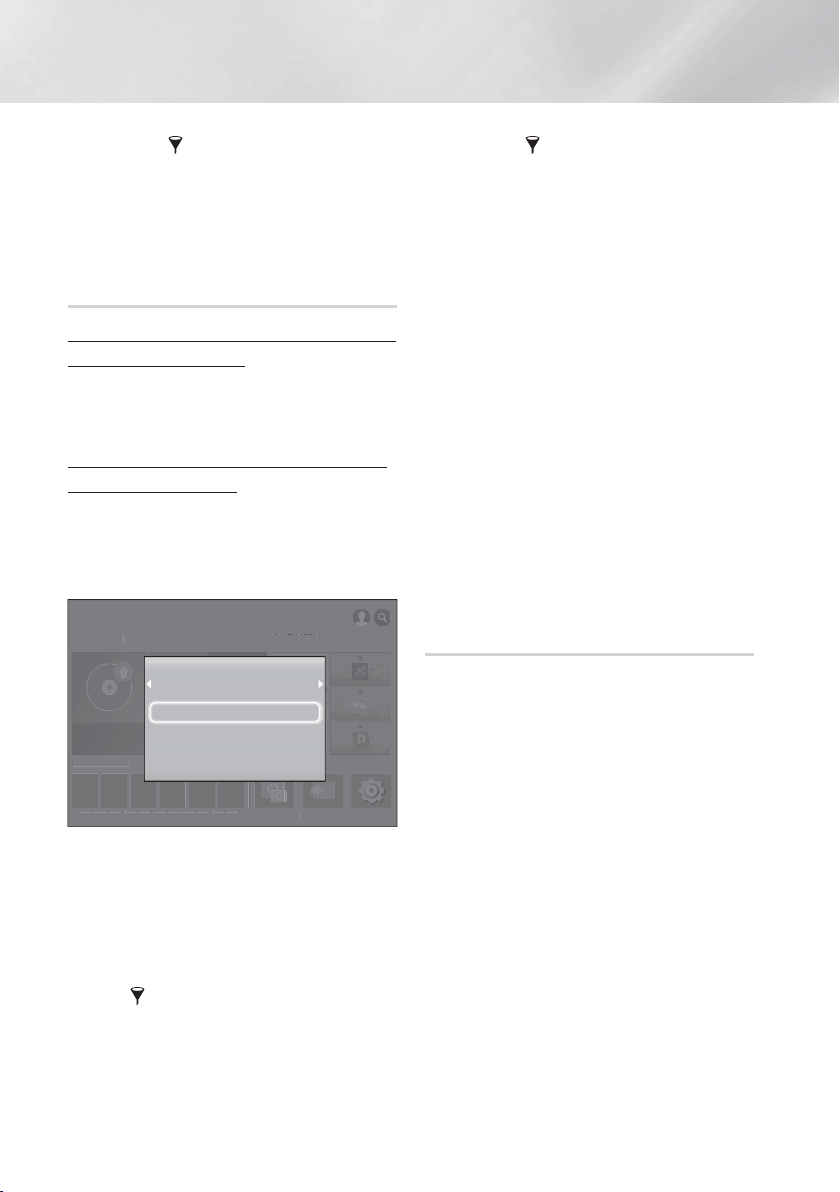
Playing Content
SC
App
App 2
App 3
App
App
App 6
S
g
Functio
F
A
SAMSUNG
S
No Di
sc
In the Filter( ) drop down, select Photos,
✎
Videos, or Music.
Even though the product will display folders that
✎
contain all content types, it will only display files
of the content type you selected For example, if
you selected Music, you will only be able to see
music files.
Playing Files on a Storage Device
Method 1 : If the product is turned on after you
connect a storage device
1. Turn the product on.
2. Follow the directions in “Playing Multimedia
Files” on page 27. In Step 2, select Storage.
Method 2 : If you connect a USB device while
the product is turned on
1. Connect the storage device to the product. (a
recorded CD, a USB device, etc.) The "New
device connected." pop-up appears. If two or
more storage devices are connected, use the
:;
buttons to switch between devices.
PLAY DISC
PLAY DI
RECOMMENDED MY APPS
RECOMMENDED
App 1 App 2 App 3 App 4 App 5 App 6
✎
2. Use the 78 buttons to select All Content,
✎
FILMS AND TV SHOWS
ILMS AND TV SHOWSMULTIMEDI
No Disc
1
New device connected.
USB Flash Disk
All Content
Photos
Videos
Music
4
5
MULTIMEDIA
Screen Mirroring
creen Mirrorin
SAMSUNG APPS
Function Settings
nSettings
If the pop-up does not appear, go to Method 1.
Photos, Videos, or Music, and then press the
OK button. Depending on how the contents are
arranged, you will see either folders, individual
files, or both.
To list only one type of media file, use the
) function in the top-right corner of the
Filter(
item or device screen.
APP
In the Filter( ) drop down, select Photos,
✎
Videos, or Music.
Even though the product will display folders that
✎
contain all content types, it will only display files
of the content type you selected For example, if
you selected Music, you will only be able to see
music files.
3. If necessary, use the
a folder, and then press the
78:;
OK button.
buttons to select
4. Select a file to view or play, and then press the
OK button.
5. Press the ' (RETURN) button to exit a folder
or the
(EXIT) button to return to the Home
e
screen.
6. Go to pages 29~41 for instructions that
explain how to control playback of videos,
music, and pictures on a storage device.
If you insert a disc when playing a USB device
✎
or phone, the device mode changes to "Disc"
automatically.
If your cellular phone is DLNA compatible, you
✎
can play contents without connecting a USB
cable.
Playing Media Content Saved on a
Computer/Mobile Device
You can play media content on the Home cinema that
is stored on a computer or mobile device connected
to the same network as the Home cinema.
Samsung Link software must be installed on
✎
the computer that contains the content you
want to play on the Home cinema. The mobile
device must support Samsung Link. For more
information, visit Samsung’s content and service
portal at http://link.samsung.com.
You may experience compatibility issues when
✎
attempting to play media files via a third-party
DLNA server.
The content shared by a computer or a mobile
✎
device may not play depending on the encoding
type and file format of the content. In addition,
some functions may not be available.
The media content may not play smoothly
✎
depending on the network status. If this occurs,
use a USB storage device.
28 - English
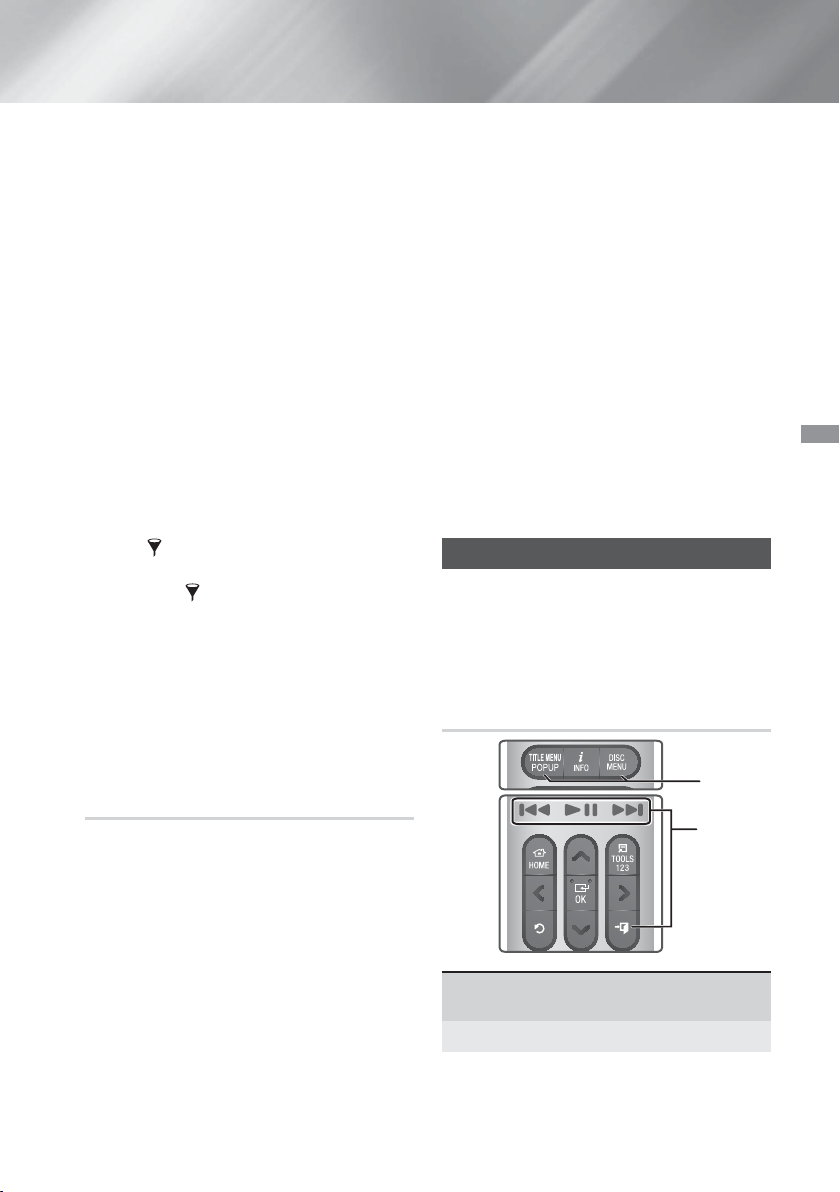
1. In the Home screen, select MULTIMEDIA, and
then press the OK button.
2. Select Network Device at the bottom of the
screen, and then press the
devices connected to the same network as the
Home cinema are listed.
3. Select a storage device, and then press the
OK button. The folders and files shared by the
selected storage device are listed.
4. If necessary, use the
a folder, and then press the OK button.
5. Select a file to view or play, and then press the
OK button.
6. Press the ' (
or the
screen.
7. Go to pages 29~41 for instructions that
explain how to control playback of videos,
music, and pictures on a storage device.
To list only one type of media file, use the
✎
Filter(
item or device screen.
In the Filter( ) drop down, select Photos,
✎
Videos, or Music.
Even though the product will display folders that
✎
contain all content types, it will only display files
of the content type you selected For example, if
you selected Music, you will only be able to see
music files.
Alternatively, move to the media content to play
✎
and press the
RETURN) button to exit a folder
(
EXIT) button to return to the Home
e
) function in the top-right corner of the
OK button to play the content.
OK button. Storages
78:;
buttons to select
Playing Media Content Saved in a
Cloud Service
Dropbox and SkyDrive and other cloud services save
user content such as photos, videos, and music files
on a remote server accessible through the Internet.
When your home cinema is connected to the Internet,
you can view or play the media content saved in a
cloud service through the home cinema.
To play the content in a cloud service, you must
✎
log into your Samsung account and link the
Samsung account to the cloud service account.
For the information about linking your Samsung
account to a cloud service account, refer to the
"Logging In to Your Samsung Account" section.
1. In the Home screen, move to MULTIMEDIA and
press OK button.
2. Select Storage Service at the bottom of the
screen.
3. The cloud services linked with your Samsung
account appear.
4. Select a cloud service. The folders and files in
the selected cloud service are listed.
5. If necessary, use the
a folder, and then press the
6. Select a file to view or play, and then press the
OK button.
7. Press the ' (RETURN) button to exit a folder
8. Go to pages 29~41 for instructions that
or the
screen.
explain how to control playback of videos,
music, and pictures located in a Storage
Service.
(EXIT) button to return to the Home
e
78:;
OK button.
buttons to select
Controlling Video Playback
You can control the playback of video content located
on a Blu-ray/DVD disc, USB device, mobile device,
or PC. Depending on the disc or contents, some of
the functions described in this manual may not be
available.
Buttons on the Remote Control used
for Video Playback
1
2
Using the disc menu, title menu, popup
1
menu, and title list
DISC MENU
During playback, press this button to display the
Disc menu.
Playing Content
29 - English

Playing Content
TITLE MENU
During playback, press this button to display the
Title menu or Popup menu.
• If your disc has a playlist, press the Sort By
button to go to the playlist.
Playback related buttons
2
The product does not play sound in Search, or
Slow mode.
• To return to normal speed playback, press the
p
button.
p
(
e
Fast
Motion
Play
Slow
Motion
Play
Skip
Motion
Play
Starts/Pauses playback.
Stops playback.
EXIT)
During playback, press and hold
[
the
or ] button.
Each time you press and hold the
[
or ] button, the playback
speed will change.
In pause mode, press and hold
the ] button.
Each time you press and hold the
]
button, the playback speed
will change.
During playback, press the
]
button.
Each time you press the
]
button, the disc moves to the
previous or next chapter or file.
[
[
or
Using the TOOLS Menu
Commercial Discs
During playback, press the TOOLS button.
File-based Video
During playback, press the TOOLS button.
Use the :; buttons to select Settings(
upper right corner, and then press the OK button.
Play from the beginning
Select to return to the beginning of the movie, and
then press the OK button.
T
) in the
or
3D
Use 3D menu to select the Side by Side or Top
Bottom option if the 3D content currently playing
does not appear properly in 3D mode.
Use 3D menu for 3D content only. If you apply
✎
the
Side by Side
content, it will not be displayed properly.
Select Scene
You can use the Select Scene function during
playback to view or start a movie from the scene
of your choice.
If the index information in the file is damaged or
✎
the file does not support indexing, you will not
be able to use the Select Scene function.
If you are using the DLNA function after
✎
connecting to a computer through your
network, Select Scene may not be supported.
Search Titles :
on the disc or device, select to start a different
title.
1. Select Search Titles, and then press the
OK button.
2. Use the 78 buttons to select a title, and
then press the OK button.
Chapter Search :
your choice.
1. Select Chapter Search, and then press the
OK button.
2. Use the 78 buttons to select a chapter,
and then press the
Search Time Bar :
a selected time point.
1. Select Search Time Bar, and then press
the
2.
Press and hold the 123 button until the Num
pad appears on the screen. When the Num
pad appears, select a number using the
,.
button.
You can also
✎
or rewind the movie. The movie advances or
rewinds one minute each time you press the
:;
buttons.
or
Top Bottom
If there is more than one movie
Select to play the chapter of
OK button.
Select to play the movie from
OK button.
:;
button and then press the OK
use the:; buttons to advance
format to 2D
30 - English
 Loading...