


 Loading...
HT-BD2E
5.1CH Blu-ray
Home Cinema System
user manual
imagine the possibilities
Thank you for purchasing a Samsung product.
To receive a more complete service, please register your product at
www.samsung.com/global/register

key features of your new Blu-ray Home Cinema
PLAYER FEATURES
Playback of many disc types, plus an FM Tuner
The HT-BD2E allows you to play various discs, including BD-ROM, DVD-VIDEO,
DVD-RW/-R(V mode), CD, MP3-CD and CD-R/RW, with a sophisticated FM tuner, all in a single player.
Full HD Audio Decoding Support (DD,DD+,DOLBY TRUE-HD,DTS,DTS-HD HRA, DTS-HD MA)
Please refer to www.DOLBY.COM and DTS.COM for more detail.
TV Screen Saver Function
If the main unit remains in stop mode for 10 minutes, the Samsung logo appears on TV screen.
The HT-BD2E automatically switches itself into the power saving mode after 20 minutes in the Screen Saver mode.
Power Saving Function
The HT-BD2E automatically shuts itself off after 30 minutes in Stop mode.
HDMI
HDMI transmits DVD video and audio signals simultaneously, and provides a clearer picture. The 1080p(Full HD) resolution provides even clearer pictures.
Anynet+(HDMI-CEC) Function
Anynet+ is a function that can be used to operate the main unit of this system using a Samsung TV remote control, by connecting the Blu-ray Home Theater to a SAMSUNG TV using an HDMI Cable. (This is only available with
SAMSUNG TVs that support Anynet+.)
BLU-RAY DISC FEATURES
Blu-ray Discs can store 25 GB (single layer) or 50 GB (dual layer) on a single sided disc - about 5 to 10 times the capacity of a DVD. Blu-ray Discs also support the highest quality HD video available in the industry (up to 1920 x 1080 at 40 Mbit/sec) - Large capacity means no compromise on video quality. Furthermore, a Blu-ray Disc has the same familiar size and look as DVD.
*The following Blu-ray Disc features are disc dependant and will vary. Appearance and navigation of features will also vary from disc to disc. Not all discs will have the features described below.
Video highlights
The BD-ROM format for movie distribution supports three highly advanced video codecs, including AVC, VC-1, and MPEG-2. HD video resolutions are also available:
•1920 x 1080 HD
•1280 x 720 HD
For High-Definition Playback
To view high-definition contents in BD discs, an HDTV (High Definition Television) is required. Some discs may require using the player's HDMI OUT to view high-definition content. The ability to view high-definition content on BD discs may be
limited depending on the resolution of your TV.

graphic planes |
|
|
|
|
|
|
|
|
|
|
|
|
|
|
|
|
|
|
|
|
|
|
Two individual, full HD resolution (1920x1080) graphic |
|
|
|
|
|
|
|
|
|
|
|
|
|
|
|
|
|
|
|
|
|
|
layers are available, on top of the HD video layer. |
|
|
|
PLAY MOVIE |
LAngUAgES |
SCEnE SELECTIOnS |
PREVIEWS |
|
|
|
|
|
|
|||||||||
|
|
|
|
|
|
|
|
|
|
|
|
|
|
|
|
|
|
|
|
|
|
|
One layer is assigned to video-related graphics (like |
|
|
|
|
|
|
|
|
|
|
|
|
|
|
|
|
|
|
|
|
|
Graphic |
subtitles), and the other layer is assigned to interactive |
|
|
|
|
|
|
|
|
|
|
|
|
|
|
|
|
|
|
|
|
|
|
|
|
|
|
|
|
|
|
|
|
|
|
|
|
|
|
|
|
|
|
|
||
elements, such as buttons or menus. Various wipes, |
|
|
|
|
|
|
|
|
|
|
|
|
|
|
|
|
|
|
|
|
|
Planes |
fades and scroll effects may be available on both |
|
|
|
|
|
|
|
|
|
|
|
|
|
|
|
|
|
|
|
|
|
|
layers. |
|
|
|
|
|
|
|
% |
|
|
|
|
|
|
|
|
|
|
|
|
|
|
|
|
|
|
3 |
|
4 |
5 |
6 |
7 |
8 |
9 |
10 |
11 |
12 |
13 |
14 |
15 |
|
|
|
|
|
|
|
|
|
|
|
|
|
|
|
|||||||||||||
Menu graphics |
|
|
|
|
|
|
|
|
|
|
|
|
|
|
|
|
|
|
|
|
|
|
|
|
|
|
|
|
|
|
|
|
|
|
|
|
|
|
|
|
|
|
|
|
|
Support 256 full color resolution graphics and |
|
|
|
|
|
|
|
|
|
|
|
|
|
|
|
|
|
|
|
|
|
|
HD Video |
|
|
|
|
|
|
|
|
|
|
|
|
|
|
|
|
|
|||||
animation, thereby greatly surpassing the capabilities |
|
|
|
|
|
|
|
|
|
|
|
|
|
|
|
|
|
|||||
|
|
|
|
|
|
|
|
|
|
|
|
|
|
|
|
|
|
|
|
|
|
|
of DVD-Video. Unlike DVD, Menus can be accessed during video playback. |
|
|
|
|
|
|
|
|
|
|
|
|
|
|
||||||||
Menu sounds |
|
|
|
|
|
|
|
|
|
|
|
|
|
|
|
|
|
|
|
|
|
|
When you highlight or select a menu option on a Blu-ray Disc, |
|
|
|
|
|
|
|
|
|
|
|
|
|
|
|
|
|
|
|
|||
sounds can be heard such as button clicks or a voice-over |
|
|
PLAY MOVIE |
|
LAngUAgES |
|
SCEnE SELECTIOnS |
PREVIEWS |
|
|
|
|||||||||||
|
|
|
|
|
|
|
|
|
|
|
|
|
|
|
|
|
|
|
||||
explaining the highlighted menu choice. |
|
|
|
|
|
|
|
|
|
|
|
|
|
|
|
|
|
|
|
|
|
|
Multi-page/PopUp Menus |
|
|
|
|
|
|
|
|
|
|
|
|
|
|
|
|
|
|
|
|
|
|
With DVD-Video, playback is interrupted each time a new |
|
|
|
|
|
|
|
|
|
|
|
|
|
|
|
|
|
|
|
|||
menu screen is accessed. Due to Blu-ray Disc's ability to |
|
|
|
|
|
|
|
|
% |
|
|
|
|
|
|
|
|
|
|
|
|
|
preload data from the disc without interrupting playback, a |
|
|
3 |
4 |
5 |
6 |
7 |
8 |
9 |
10 |
11 |
12 |
13 |
14 15 |
|
|
|
|
||||
menu may consist of several pages.
You can browse through the menu pages or select different menu paths, while the audio and video remain playing in the background.
Interactivity
Certain Blu-ray Discs may contain Animated menus and Trivia games.
User Browsable Slideshows
With Blu-ray Discs, you can browse through various still pictures while the audio remains playing.
Subtitles
Depending on what is contained on the Blu-ray Disc, you may be able to select different font styles, sizes and colors for the subtitles, Subtitles may also be animated, scrolled or faded in and out.
WHAT’S InCLUDED
Check for the supplied accessories below.
Video Cable |
FM Antenna |
User's Manual |
HDMI Cable |
Remote Control / Batteries (AAA size) |
gB
3

safety information
Safety Warnings
TO REDUCE THE RISK OF ELECTRIC SHOCK, DO NOT REMOVE THE COVER(OR BACK).
NO USER-SERVICEABLE PARTS ARE INSIDE. REFER SERVICING TO QUALIFIED SERVICE PERSONNEL.
CAUTION
RISK OF ELECTRIC SHOCK
DO NOT OPEN
CLASS 1 LASER PRODUCT KLASSE 1 LASER PRODUKT LUOKAN 1 LASER LAITE KLASS 1 LASER APPARAT PRODUCTO LASER CLASE 1
This symbol indicates “dangerous voltage” inside the product that presents a risk of electric shock or personal injury.
This symbol indicates important instructions accompanying the product.
CLASS 1 LASER PRODUCT
This Compact Disc player is classified as a CLASS 1 LASER product.
Use of controls, adjustments or performance of procedures other than those specified herein may result in hazardous radiation exposure.
CAUTION : INVISIBLE LASER RADIATION WHEN OPEN AND INTERLOCKS DEFEATED, AVOID EXPOSURE TO BEAM.
WARNING : To reduce the risk of fire or electric shock, do not expose this appliance to rain or moisture. CAUTION : TO PREVENT ELECTRIC SHOCK, MATCH WIDE BLADE OF PLUG TO WIDE SLOT, FULLY INSERT.
•This apparatus shall always be connected to a AC outlet with a protective grounding connection.
•To disconnect the apparatus from the mains, the plug must be pulled out from the mains socket, therefore the mains plug shall be readily operable.
CAUTION
•Apparatus shall not be exposed to dripping or splashing and no objects filled with liquids, such as vases, shall be placed on the apparatus.
•The Mains plug is used as a disconnect device and shall stay readily operable at any time.
Wiring the Main Power Supply Plug (UK Only)
IMPORTANT NOTICE
The mains lead on this equipment is supplied with a moulded plug incorporating a fuse. The value of the fuse is indicated on the pin face of the plug and if it requires replacing, a fuse approved to BS1362 of the same rating must be used.
Never use the plug with the fuse cover removed. If the cover is detachable and a replacement is required, it must be of the same colour as the fuse fitted in the plug. Replacement covers are available from your dealer.
If the fitted plug is not suitable for the power points in your house or the cable is not long enough to reach a power point, you should obtain a suitable safety approved extension lead or consult your dealer for assistance.
However, if there is no alternative to cutting off the plug, remove the fuse and then safely dispose of the plug. Do not connect the plug to a main socket as there is a risk of shock hazard from the bared flexible cord.
Never attempt to insert bare wires directly into a main socket. A plug and fuse must be used at all times.
IMPORTANT
The wires in the mains lead are coloured in accordance with the following code:– BLUE = NEUTRAL BROWN = LIVE As these colours may not correspond to the coloured markings identifying the terminals in your plug, proceed as follows:– The wire coloured BLUE must be connected to the terminal marked with the letter N or coloured BLUE or BLACK.
The wire coloured BROWN must be connected to the terminal marked with the letter L or coloured BROWN or RED.
WARNING : DO NOT CONNECT EITHER WIRE TO THE EARTH TERMINAL WHICH IS MARKED WITH THE LETTER E OR BY THE EARTH SYMBOL  , OR COLOURED GREEN OR GREEN AND YELLOW.
This marking shown on the product or its literature, indicates that it should not be disposed with other household wastes at the end of its working life. To prevent possible harm to the environment or human health from uncontrolled waste disposal, please separate this from other types of wastes and recycle it responsibly to promote the sustainable reuse of material resources. Household users should contact either the retailer where they purchased this product, or their local government office, for details of where and how they can take this item for environmentally safe recycling. Business users should contact their supplier and check the terms and conditions of the purchase contract. This product should not be mixed with other
commercial wastes for disposal.
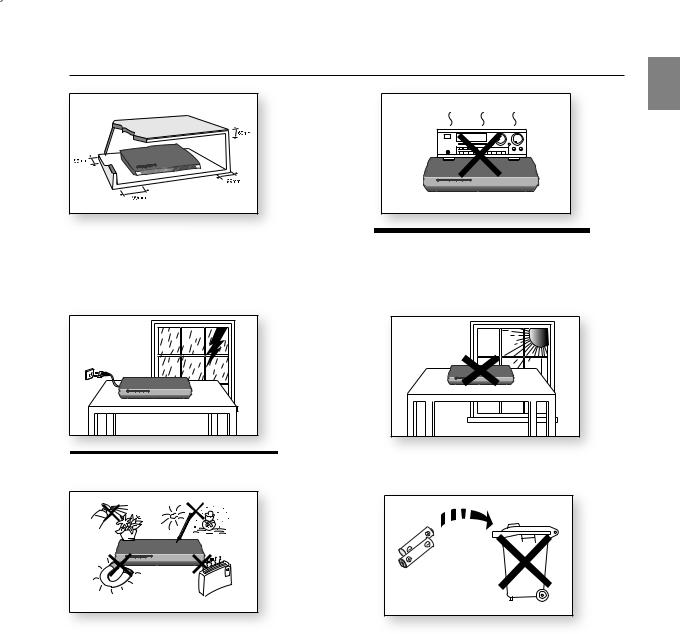
PRECAUTIOnS
gB

 mplies with the identifica your player horizontally, on a suitable base (furniture), with enough space around it for ventilation (7.5~10cm). Make sure the ventilation slots are not covered. Do not stack anything on top of the player. Do not place the player on amplifiers or other equipment which may become hot. Before moving the player, ensure the Disc Insert Hole is empty. This player is designed for continuous use. Switching off the Blu-ray Home Cinemar to the stand-by mode does not disconnect the electrical supply. In order to disconnect the player completely from the power supply, remove the main plug from the wall outlet, especially when left unused for a long period of time.
from the wall outlet. Voltage peaks due to lightning could damage the unit.
Protect the player from moisture (i.e. vases) , and excess heat (e.g.fireplace) or equipment creating strong magnetic or electric fields (i.e.speakers...). Disconnect the power cable from the AC supply if the player malfunctions. Your player is not intended for industrial use. Use of this product is for personal use only.
Condensation may occur if your player or disc has been stored in cold temperatures. If transporting the player during the winter,
wait approximately 2 hours until the unit has reached room temperature before using.
Do not expose the unit to direct sunlight or other heat sources. This could lead to overheating and malfunction of the unit.
The batteries used with this product contain chemicals that are harmful to the environment.
Do not dispose of batteries in the general household trash.
5

contents
key features of your new
Blu-ray Home Cinema
2
safety information
4
getting started
8
description
12
remote control
14
connections
18
2 Player Features
2Blu-ray Disc Features
3What’s included
4Safety Warnings
5Precautions
8Before Reading the User’s Manual
9Disc Type and Characteristics
12Front Panel
13Rear Panel
14Tour of the Remote Control
16Setting the Remote Control
18 Connecting the Speakers
20 Connecting the Video Out to your TV
22Connecting Audio from External Components
24Connecting to Samsung's FTP/Internet site for Software Upgrades
25Connecting the FM Antenna
basic functions of your
Blu-ray Home Cinema
26
system setup
30
26Before Playing
27Using the remote control to operate the Blu-ray Home Cinema or your samsung TV
28Playing a Disc
29Using the Search and Skip Functions
29Slow Motion Play/Step Motion Play
30On-Screen Menu Navigation
31Setting up the Language Options
32Setting up the Audio Options
33Setting up the Speaker Options
36 Setting up the Video Display/Output Options
39 Setting up the HDMI setup options
41 Setting up the Parental Lock

system upgrade
43
watching a movie
47
listening to music
53
Viewing a Picture
56
sound mode
58
radio
60
convenient function
63
troubleshooting
64
appendix
66
43 Firmware Upgrade
45 System Information
45 Network Setup
47Using the Display Function
48Using the Disc Menu & Popup/Title Menu
49Repeat Play
50Selecting the Audio Language
50Selecting the Subtitle Language
51Changing the Camera Angle
51Using the Bookmark Function
53Playing an Audio CD(CD-DA)
53Playing an MP3
53Audio CD(CD-DA)/MP3 Screen Elements
54Buttons on the Remote Control used for Audio CD(CD-DA)/ MP3 disc playback
54 Repeat Audio CD(CD-DA) & MP3
56Viewing a Picture
56Slide Show
56Rotate
57Zoom
57Go To Photo List
58SFE(Sound Field Effect) Mode
58NEO:6 mode
59Dolby Pro Logic II Mode
59Dolby Pro Logic II Effect
60Listening to Radio
60Presetting Stations
61About RDS broadcasting
63 Sleep Timer Function
63Adjusting Display Brightness
63Mute Function
64Troubleshooting
66Cautions on Handling and Storing Discs
67Specifications
GB

getting started
Before Reading the User’s Manual
Make sure to check the following terms before reading the user manual.
Icons that will be used in manual
Icon |
Term |
Definition |
|
|
|
h |
BD-ROM |
This involves a function available on a BD-ROM. |
Z |
DVD-VIDEO |
This involves a function available on DVD-Video or DVD-R/DVD-RW discs |
that have been recorded and finalized in Video Mode. |
||
|
|
|
C |
DVD-RW |
This involves a function available on DVD-RW. (V mode and finalized only) |
V |
DVD-R |
This involves a function available on DVD-R. (V mode and finalized only) |
B |
Audio CD |
This involves a function available on a data CD (CD-R or CD-RW). |
G |
JPEG |
This involves a function available on CD-R/-RW, DVD-R/-RW discs. |
A |
MP3 |
This involves a function available on CD-R/-RW, DVD-R/-RW discs. |
|
Caution |
This involves a case where a function does not operate or settings may be |
|
cancelled. |
|
|
|
|
|
|
|
M |
Note |
This involves tips or instructions on the page that help each function |
operate. |
About the use of this user’s manual
1)Be sure to be familiar with Safety Instructions before using this product. (See pages 4~5)
2)If a problem occurs, check the Troubleshooting. (See pages 64~65)
Copyright
©2007 Samsung Electronics Co.,Ltd.
All rights reserved; No part or whole of this user’s manual may be reproduced or copied without the prior written permission of Samsung Electronics Co.,Ltd.
Disc Type and Characteristics
Disc types that can be played
Disc Types |
Disc Logo |
Recorded content |
Disc Shape |
Max. Playing minute |
|
|
|
|
|
|
|
BD-ROM |
|
|
AUDIO + VIDEO |
Single sided (25GB/50GB) |
Playing time depends |
|
|
on the Title |
|||
|
|
|
|
|
|
|
|
|
|
|
|
|
|
|
|
Single sided(12 cm) |
240 |
|
|
|
|
|
|
DVD-VIDEO |
|
|
AUDIO + VIDEO |
Double sided(12 cm) |
480 |
|
|
|
|
||
|
|
Single sided(8 cm) |
80 |
||
|
|
|
|
||
|
|
|
|
||
|
|
|
|
|
|
|
|
|
|
Double sided(8 cm) |
160 |
|
|
|
|
|
|
AUDIO-CD |
|
|
AUDIO |
Single sided(12 cm) |
74 |
|
|
|
|
||
|
|
Single sided(8 cm) |
20 |
||
|
|
|
|
||
|
|
|
|
|
|
DVD-RW |
|
|
|
|
480 |
(V mode and |
|
|
AUDIO + VIDEO |
12 cm (4.7GB) |
|
|
|
(EX : Extended Play) |
|||
finalized only) |
|
|
|
|
|
|
|
|
|
|
|
|
|
|
|
|
|
DVD-R |
|
|
|
|
480 |
(V mode and |
|
|
AUDIO + VIDEO |
12 cm (4.7GB) |
|
|
|
(EX : Extended Play) |
|||
finalized only) |
|
|
|
|
|
|
|
|
|
|
|
|
|
|
|
|
|
CD-R/-RW |
|
|
JPEG |
– |
– |
DVD-RW/-R |
|
|
MP3 |
||
|
|
|
|
||
|
|
|
|
|
|
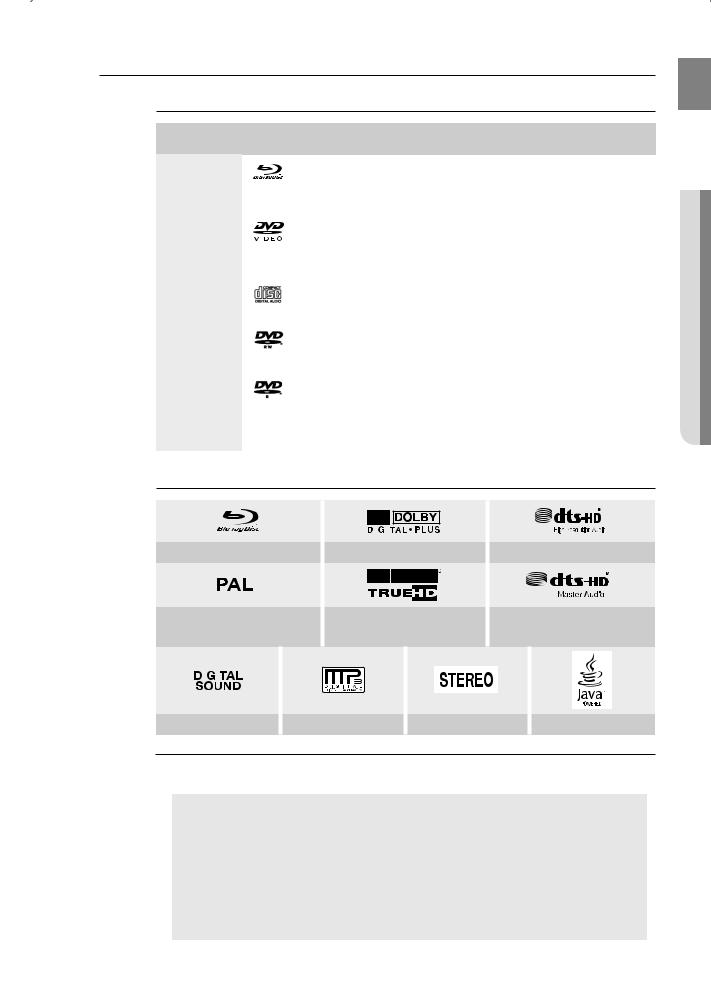
Logos of Discs that can be played
GB
Started Getting ●
|
|
|
|
|
|
Blu-ray Disc |
Dolby Digital Plus |
DTS-HD High Resolution Audio |
|||
|
|
|
|
|
|
|
|
|
|
|
PAL broadcast system in |
Dolby TrueHD |
DTS-HD Master Audio |
||||||||
U.K, France, Germany, etc. |
||||||||||
|
|
|
|
|||||||
|
|
|
|
|
|
|
|
|
|
|
|
|
|
|
|
|
|
|
|
|
|
|
|
|
|
|
|
|
|
|
|
|
|
|
|
|
|
|
|
|
|
|
|
|
|
|
|
|
|
|
|
|
|
|
|
|
|
|
|
|
|
|
|
|
|
Digital Audio |
MP3 |
Stereo |
Java |
M Manufactured under license from Dolby Laboratories. “Dolby” and the double-D symbol are trademarks of Dolby Laboratories.
Manufactured under license under U.S. Patent #’s: 5,451,942; 5,956,674; 5,974,380; 5,978,762; 6,226,616; 6,487,535 & other U.S. and worldwide patents issued & pending. DTS is a registered trademark and the DTS logos, Symbol, DTS-HD, DTS-HD High Resolution Audio and DTS-HD High Res Audio are trademarks of DTS, Inc. © 1996-2007 DTS, Inc. All Rights Reserved.
Manufactured under license under U.S. Patent #'s:5,451,942; 5,956,674; 5,974,380;
5,978,762; 6,226,616; 6,487,535 & other U.S. and worldwide patents issued & pending. |
|
DTS is a registered trademark and the DTS logos, Symbol, DTS-HD and DTS-HD Master |
|
Audio are trademarks of DTS, Inc. © 1996-2007 DTS, Inc. All Rights Reserved. |
|
|

getting started
Discs that cannot be played
• BD-R, BD-RE |
• DVD-RW(VR mode) |
• HD DVD Disc |
• DVD-ROM/PD/MV-Disc, etc |
• DVD-RAM |
• CVD/CD-ROM/CDV/CD-G/CD-I/LD |
• 3.9 GB DVD-R Disc for Authoring. |
• 8cm MD (mini disc) |
M Some commercial discs and DVD discs purchased outside your region may not be playable with this product. When these discs are played, either “No disc.” or “Please check the regional code of the disc.” will be displayed.
If a DVD-R/-RW disc has not been recorded properly in DVD video format, it will not be playable.
The unit cannot play CD-R/-RW and DVD-RW/-R recorded content such as divx, avi, mpg, mov, wma.
Region code
Both the Blu-ray Home cinema and the discs are coded by region. These regional codes must match in order to play the disc. If the codes do not match, the disc will not play. The Region Number for this Bluray Home cinema is described on the rear panel of the Blu-ray Home cinema.
BD Region Code |
Area |
ANorth America, Central America, South America, Korea, Japan, Taiwan, Hong Kong and South East Asia.
BEurope, Greenland, French territories, Middle East, Africa, Australia and New Zealand.
CIndia, China, Russia, Central and South Asia.
DVD-Video |
Area |
DVD-Video |
Area |
|
Region Code |
Region Code |
|||
|
|
|||
1 |
USA, Canada |
6 |
China |
|
2 |
Japan, Europe, South Africa, Middle East, |
7 |
Unspecified Special Use |
|
Greenland |
||||
|
|
|
||
3 |
Korea, Taiwan, Hong Kong, parts of South |
8 |
Airlines/Cruise Ships (including Mexico) |
|
East Asia |
||||
|
|
|
||
4 |
Australia, New Zealand, Latin America |
9 |
Region free |
|
(including Mexico) |
||||
|
|
|
||
5 |
Eastern Europe, Russia, India, Africa |
|
|
Blu-ray Disc Compatibility
Blu-ray Disc is a new and evolving format. Accordingly, disc compatibility issues are possible. Not all discs are compatible and not every disc will play back. For additional information, refer to the Compliance and Compatibility Notice section of this Manual. If you encounter compatibility problems, please contact the SAMSUNG customer care center. This Samsung Blu-ray Home cinema (HT-BD2E) supports only the BD-ROM Profile 1 version 1.0 specification. If you want to play later version discs, you may need to update player's firmware. www.samsung.com/
global/register
M Playback may not work for some types of discs, or when specific operations, such as angle change and aspect ratio adjustment, are being performed. Information about the discs is written in detail on the box. Please refer to this if necessary.
Do not allow the disc to become dirty or scratched. Fingerprints, dirt, dust, scratches or deposits of cigarette smoke on the recording surface may make it impossible to use the disc for playback.
When a BD-Java title is played, loading may take longer than a normal title, or some functions may perform slowly.
10
Disc Types
BD-ROM
Blu-ray Disc Read Only Memory. A BD-ROM disc contains pre-recorded data. Although a BD-ROM may contain any form of data, most BD-ROM discs will contain movies in High Definition format, for playback on Blu-ray Home Cinemas. This unit can play back pre-recorded commercial BD-ROM discs.
DVD-Video
• A digital versatile disc (DVD) can contain up to 135-minutes of images, 8 audio languages and 32 subtitle languages. It is equipped with MPEG-2 picture compression and Dolby Digital surround, allowing you to enjoy vivid and clear theatre quality images.
• When switching from the first layer to the second layer of a dual-layered DVD Video disc, there may be momentary distortion in the image and sound. This is not a malfunction of the unit.
• Once a DVD-RW/-R recorded in Video Mode is finalized, it becomes DVD-Video. Pre-recorded (prestamped) commercial DVDs with movies are also referred to as DVD-Videos. This unit can play back pre-recorded commercial DVD discs (DVD-Video discs) with movies.
Audio CD
• An audio disc on which 44.1kHz PCM Audio is recorded.
• This unit can play back CD-DA format audio CD-R and CD-RW discs.
• The unit may not be able to play some CD-R or CD-RW discs due to the condition of the recording.
CD-R/-RW
• Use a 700MB(80 minutes) CD-R/-RW disc. If possible, do not use a 800MB(90 minutes) or above disc, as the disc may not play back.
• If the CD-R/-RW disc was not recorded as a closed session, you may experience delays when playing back the beginning of the disc or all recorded files may not play.
• Some CD-R/-RW discs may not be playable with this unit, depending on the device which was used to burn them. For contents recorded on CD-R/-RW media from CDs for your personal use, playability may vary depending on contents and discs.
DVD-R Disc Playback
• Once a DVD-R recorded in Video Mode is finalized, it becomes DVD-Video.
• This unit can play back DVD-R discs recorded and finalized with a Samsung DVD video recorder. It may not be able to play some DVD-R discs depending on the disc and the condition of the recording.
DVD-RW Disc Playback
•Playback can be performed with DVD-RW discs in the Video Mode and finalized only.
•Once a DVD-RW recorded in Video Mode is finalized, it becomes DVD-Video. Ability to play back may depend on recording conditions.
Disc Format
Using MP3 disc
• CD-R/-RW, DVD-RW/-R recorded with UDF, ISO9660 or JOLIET format can be played back.
• Only MP3 files with the “.mp3” or “.MP3” extension can be played.
• Playable bit-rate range is from 56 Kbps to 320 Kbps.
• Playable sample-rate is 32KHz to 48KHz.
• The unit can handle a maximum of 1500 files and folders under a parent folder. For MP3 files recorded with a VBR(Variable Bit Rates), the sound may cut in and out.
Using JPEG disc
• CD-R/-RW, DVD-RW/-R recorded with UDF, ISO9660 or JOLIET format can be played back.
• Only JPEG files with the ".jpg", ".JPG", ".jpeg" or "JPEG" extension can be displayed.
• Progressive JPEG is supported.
DVD-RW/-R (V)
•This is a format that is used for recording data on a DVD-RW or DVD-R disc. The disc can be played by this Blu-ray Home Cinema once it has been finalized.
•If a disc that has been recorded in Video Mode by a different maker’s recorder but has not been finalized, it cannot be played by this Blu-ray Home Cinema.
GB
Started Getting ●
11
description
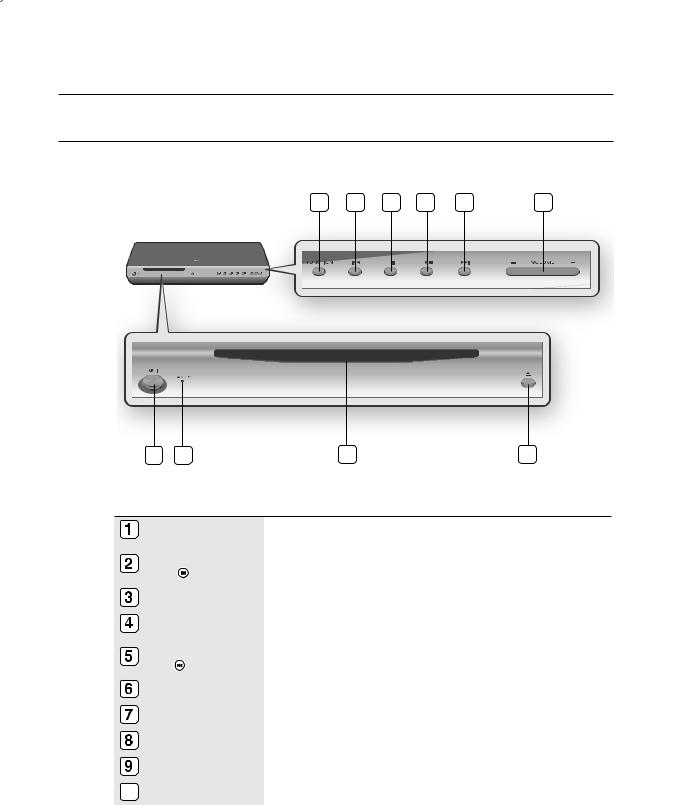
Front Panel
1 |
2 |
3 |
4 |
5 |
6 |
10 |
9 |
8 |
7 |
FUNCTION BUTTON |
The mode switches as follows : BD/DVD D.IN 1 D.IN 2 AUX FM. |
|
|
|
|
TUNING DOWN & |
Goes back to the previous title/chapter/track. |
|
SKIP ( |
) BUTTON |
Tunes down the FM frequency band. |
|
|
|
STOP BUTTON |
Stops disc playback. |
|
|
|
|
PLAY/PAUSE BUTTON |
Plays a disc or pauses playback. |
|
|
|
|
TUNING UP & |
Goes to the next title/chapter/track. |
|
SKIP( |
) BUTTON |
Tunes up the FM frequency band. |
|
|
|
Volume Control BUTTONS |
Volume adjustment. |
|
|
|
|
EJECT BUTTON |
Eject the disc. |
|
|
|
|
DISC SLOT |
Insert a disc. |
|
|
|
|
STANDBY INDICATOR |
When the unit is first plugged in, this indicator lights. |
|
|
|
|
10 POWER BUTTON |
Turns the Blu-ray Home Cinema on and off. |
|
|
|
|
12
Rear Panel
GB
1 |
2 |
3 |
4 |
5 |
6 |
7 |
|
|
|
|
|
|
FM |
Description ●
9 |
8 |
AUX IN JACKS |
Connect to the 2CH analog output of an external device (such as a VCR) |
|
|
|
|
VIDEO OUTPUT JACK |
Connect your TV's Video Input jack (VIDEO IN) to the VIDEO OUT Jack on this unit. |
|
|
|
|
COMPONENT VIDEO |
Connect a TV with Component video inputs to these jacks. |
|
OUTPUT JACKS |
||
|
||
|
|
|
EXTERNAL DIGITAL |
|
|
OPTICAL INPUT |
Use this to connect external equipment capable of digital output. |
|
JACKS(OPTICAL1, |
||
|
||
OPTICAL2) |
|
|
|
|
|
HDMI OUT JACK |
Use the HDMI cable, connect this HDMI output terminal to the HDMI input terminal on |
|
your TV for the best quality picture. |
||
|
||
|
|
|
LAN TERMINAL |
Connect this LAN terminal to the LAN terminal on your modem for software upgrades. |
|
|
|
|
FM 75Ω COAXIAL |
Connect the FM antenna. |
|
JACK |
||
|
||
|
|
|
COOLING FAN |
The fan always revolves when the power is on. Ensure a minimum of 10cm of clear |
|
space on all sides of the fan when installing the product. |
||
|
||
|
|
|
5.1 CHANNEL |
|
|
SPEAKER OUTPUT |
Connect the front, center, surround, subwoofer speakers. |
|
CONNECTORS |
|
|
|
|
13
remote control
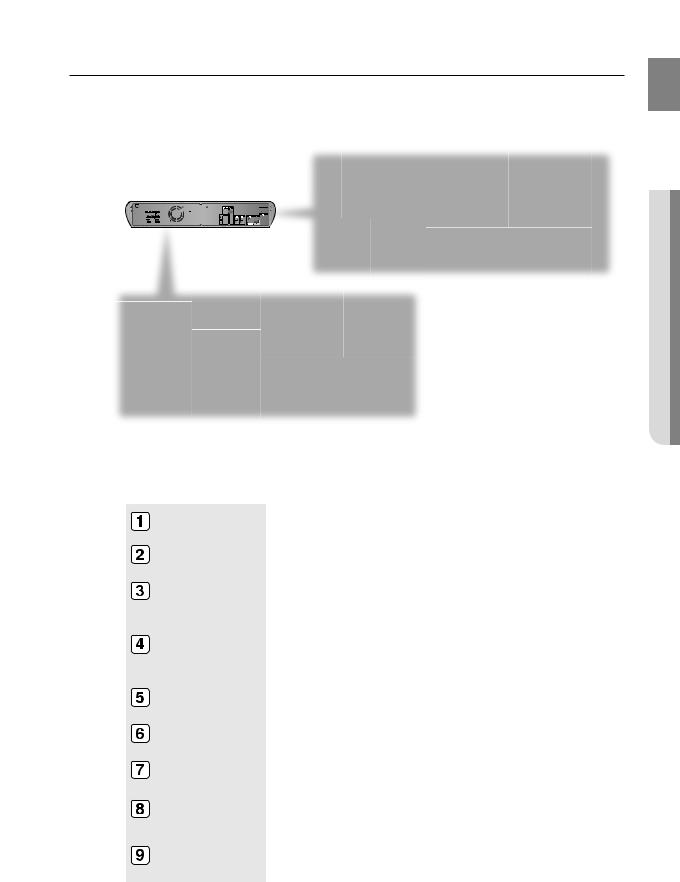
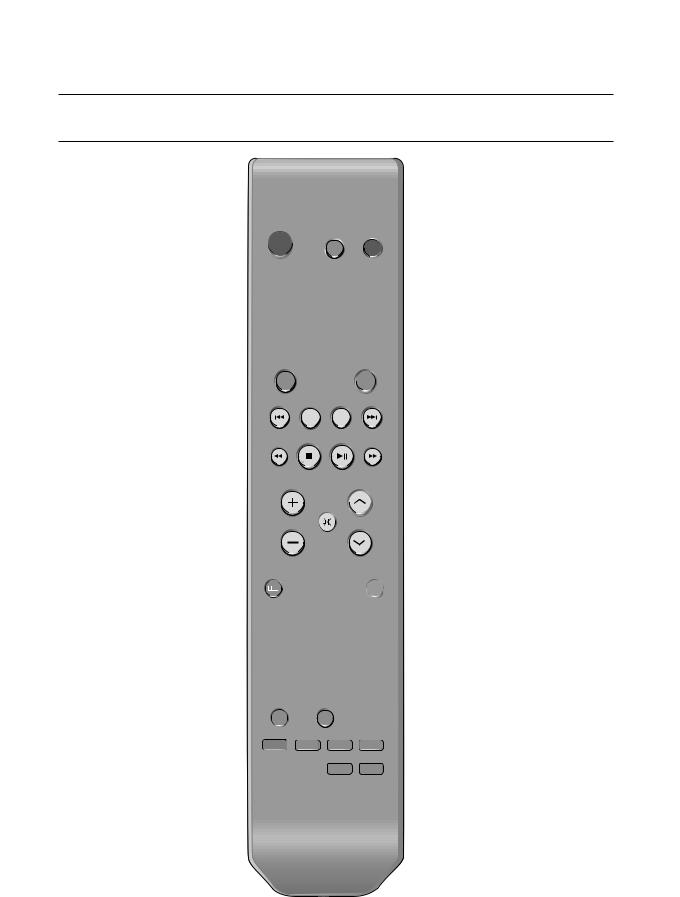
Tour of the Remote Control
1 |
18 |
|
2 |
||
19 |
||
|
||
3 |
20 |
|
4 |
21 |
|
5 |
22 |
|
6 |
23 |
|
7 |
|
|
|
24 |
|
8 |
25 |
|
|
26 |
|
9 |
27 |
|
|
28 |
|
|
29 |
|
10 |
30 |
|
11 |
31 |
|
12 |
||
32 |
||
13 |
33 |
|
14 |
34 |
|
15 |
35 |
|
16 |
36 |
|
|
||
17 |
|
14

1 |
BD RECEIVER button |
2 |
TV button |
3 |
POWER button |
4 |
Number (0~9) buttons |
5 |
SLEEP button |
6 |
SLOW, MO/ST button |
7 |
Tuning Preset/CD Skip buttons |
8 |
VOLUME button |
9 |
MENU button |
10 |
POPUP MENU, TITLE MENU button |
11 |
Color buttons |
12 |
INFO button |
13 |
TUNER MEMORY, MARKER button |
14 |
ZOOM button |
15 |
AUDIO button |
16 |
DIMMER button |
17 |
SUB TITLE button |
|
BD button |
18 TUNER button
 AUX button
 D.IN button
19 |
EJECT button |
20 |
TV/VIDEO button |
21 |
RDS Selection buttons |
22 |
CANCEL button |
23 |
STEP button |
 PLAY/PAUSE button
24 STOP button

 SEARCH buttons
25TUNING/CH button
26MUTE button
27RETURN button
28Cursor/Enter button
29DISC MENU button
30EXIT button
31
 PL II MODE button
32
 PL II EFFECT button
33SFE MODE button
34REPEAT A-B button
35NEO:6 MODE button
36REPEAT button
Insert Remote Batteries
GB
control remote ●
1.Remove the battery cover in the direction of the arrow.
2. Insert two 1.5V AAA batteries, paying |
3. Replace the battery |
attention to the correct polarities |
cover. |
(+ and –). |
|
M Follow these precautions to avoid leaking or cracking cells:
Place batteries in the remote control so they match the polarity : (+) to (+) and (–) to (–).
Use the correct type of batteries. Batteries that look similar may differ in voltage.
Always replace both batteries at the same time.
Do not expose the batteries to heat or a flame.
15
remote control
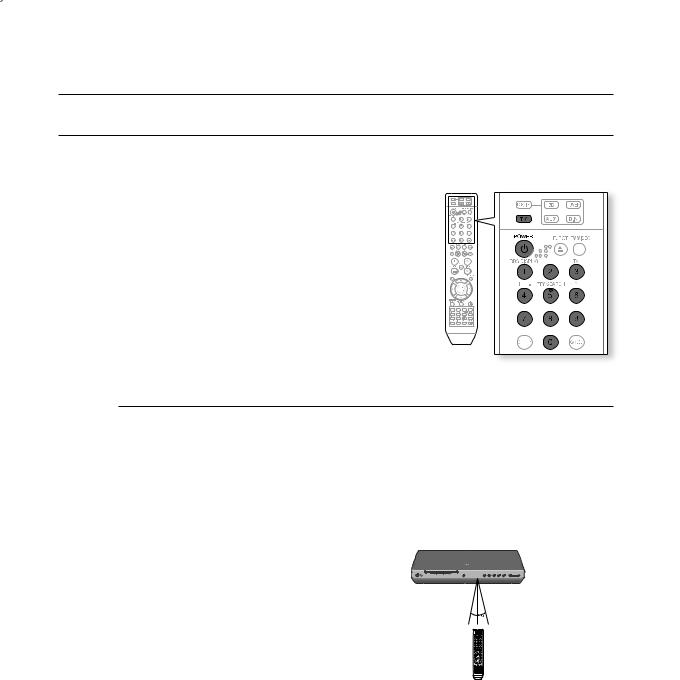
SETTIng THE REMOTE COnTROL
You can control certain functions of your TV with this remote control.
When operating a TV with the remote control
1. Press the TV button to set the remote to TV mode. 2. Press the POWER button to turn on the TV.
3. While holding down the POWER button, enter the code corresponding to your brand of TV.
• If there is more than one code listed for your TV in the able, enter one at a time to determine which code works.
Example : For a Samsung TV
While holding down the POWER button, use the number buttons to enter 00, 15, 16, 17 and 40.
4. If the TV turns off, the setting is complete.
•You can use the TV POWER, VOLUME, CHANNEL, and Numeric buttons (0~9).
M The remote control may not work on some brands of TVs. Also, some operations may not be possible depending on your brand of TV.
If you do not set the remote control with the code for your brand of TV, the remote control will work on a Samsung TV by default.
Operation Range of the Remote Control
The remote control can be used up to approximately 23 feet (7 meters) in a straight line. It can also be operated at a
horizontal angle of up to 30° from the remote control sensor.
1

TV Brand Code List
No. |
Brand |
Code |
No. |
Brand |
Code |
1 |
Admiral (M.Wards) |
56, 57, 58 |
44 |
MTC |
18 |
|
|
|
|
|
|
2 |
A Mark |
01, 15 |
45 |
NEC |
18, 19, 20, 40, 59, 60 |
|
|
|
|
|
|
3 |
Anam |
01, 02, 03, 04, 05, 06, 07, 08, 09, 10, 11, |
46 |
Nikei |
03 |
|
|
|
|
|
|
|
|
12, 13, 14 |
47 |
Onking |
03 |
|
|
|
|
|
|
4 |
AOC |
01, 18, 40, 48 |
48 |
Onwa |
03 |
|
|
|
|
|
|
5 |
Bell & Howell (M.Wards) |
57, 58, 81 |
49 |
Panasonic |
06, 07, 08, 09, 54, 66, 67, 73, 74 |
|
|
|
|
|
|
6 |
Brocsonic |
59, 60 |
50 |
Penney |
18 |
|
|
|
|
|
|
7 |
Candle |
18 |
51 |
Philco |
03, 15, 17, 18, 48, 54, 59, 62, 69, 90 |
|
|
|
|
|
|
8 |
Cetronic |
03 |
52 |
Philips |
15, 17, 18, 40, 48, 54, 62, 72 |
|
|
|
|
|
|
9 |
Citizen |
03, 18, 25 |
53 |
Pioneer |
63, 66, 80, 91 |
|
|
|
|
|
|
10 |
Cinema |
97 |
54 |
Portland |
15, 18, 59 |
|
|
|
|
|
|
11 |
Classic |
03 |
55 |
Proton |
40 |
|
|
|
|
|
|
12 |
Concerto |
18 |
56 |
Quasar |
06, 66, 67 |
|
|
|
|
|
|
13 |
Contec |
46 |
57 |
Radio Shack |
17, 48, 56, 60, 61, 75 |
|
|
|
|
|
|
14 |
Coronado |
15 |
58 |
RCA/Proscan |
18, 59, 67, 76, 77, 78, 92, 93, 94 |
|
|
|
|
|
|
15 |
Craig |
03, 05, 61, 82, 83, 84 |
59 |
Realistic |
03, 19 |
|
|
|
|
|
|
16 |
Croslex |
62 |
60 |
Sampo |
40 |
|
|
|
|
|
|
17 |
Crown |
03 |
61 |
Samsung |
00, 15, 16, 17, 40, 43, 46, 47, 48, 49, |
|
|
|
|
|
|
18 |
Curtis Mates |
59, 61, 63 |
|
|
59, 60, 98 |
|
|
|
|
|
|
19 |
CXC |
03 |
62 |
Sanyo |
19, 61, 65 |
|
|
|
|
|
|
20 |
Daewoo |
02, 03, 04, 15, 16, 17, 18, 19, 20, 21, 22, 23, 24, |
63 |
Scott |
03, 40, 60, 61 |
|
|
25, 26, 27, 28, 29, 30, 32, 34, 35, 36, 48, 59, 90 |
|
|
|
|
|
64 |
Sears |
15, 18, 19 |
|
|
|
|
|
|
|
21 |
Daytron |
40 |
65 |
Sharp |
15, 57, 64 |
|
|
|
|
|
|
22 |
Dynasty |
03 |
66 |
Signature 2000 (M.Wards) |
57, 58 |
|
|
|
|
|
|
23 |
Emerson |
03, 15, 40, 46, 59, 61, 64, 82, 83, 84, 85 |
67 |
Sony |
50, 51, 52, 53, 55 |
|
|
|
|
|
|
24 |
Fisher |
19, 65 |
68 |
Soundesign |
03, 40 |
|
|
|
|
|
|
25 |
Funai |
03 |
69 |
Spectricon |
01 |
|
|
|
|
|
|
26 |
Futuretech |
03 |
70 |
SSS |
18 |
|
|
|
|
|
|
27 |
General Electric (GE) |
06, 40, 56, 59, 66, 67, 68 |
71 |
Sylvania |
18, 40, 48, 54, 59, 60, 62 |
|
|
|
|
|
|
28 |
Hall Mark |
40 |
72 |
Symphonic |
61, 95, 96 |
|
|
|
|
|
|
29 |
Hitachi |
15, 18, 50, 59, 69 |
73 |
Tatung |
06 |
|
|
|
|
|
|
30 |
Inkel |
45 |
74 |
Techwood |
18 |
|
|
|
|
|
|
31 |
JC Penny |
56, 59, 67, 86 |
75 |
Teknika |
03, 15, 18, 25 |
|
|
|
|
|
|
32 |
JVC |
70 |
76 |
TMK |
18, 40 |
|
|
|
|
|
|
33 |
KTV |
59, 61, 87, 88 |
77 |
Toshiba |
19, 57, 63, 71 |
|
|
|
|
|
|
34 |
KEC |
03, 15, 40 |
78 |
Vidtech |
18 |
|
|
|
|
|
|
35 |
KMC |
15 |
79 |
Videch |
59, 60, 69 |
|
|
|
|
|
|
36 |
LG (Goldstar) |
01, 15, 16, 17, 37, 38, 39, 40, 41, 42, 43, 44 |
80 |
Wards |
15, 17, 18, 40, 48, 54, 60, 64 |
|
|
|
|
|
|
37 |
Luxman |
18 |
81 |
Yamaha |
18 |
38 |
LXI (Sears) |
19, 54, 56, 59, 60, 62, 63, 65, 71 |
82 |
York |
40 |
|
|
|
|
|
|
39 |
Magnavox |
15, 17, 18, 48, 54, 59, 60, 62, 72, 89 |
83 |
Yupiteru |
03 |
40 |
Marantz |
40, 54 |
84 |
Zenith |
58, 79 |
|
|
|
|
|
|
41 |
Matsui |
54 |
85 |
Zonda |
01 |
|
|
|
|
|
|
42 |
MGA |
18, 40 |
86 |
Dongyang |
03, 54 |
|
|
|
|
|
|
43 |
Mitsubishi/MGA |
18, 40, 59, 60, 75 |
|
|
|
GB
control remote ●
17

connections
This section involves various methods of connecting the Blu-ray Home Cinema to other external components. Before moving or installing the product, be sure to turn off the power and disconnect the power cord.
Connecting the Speakers
Position of the Blu-ray Home Cinema
Place it on a stand or cabinet shelf, or under the TV stand.
Selecting the Listening Position
The listening position should be located about 2.5 to 3 times the distance of the TV's screen size away from the TV. Example : For 32" TVs 2~2.4m (6~8feet)
For 55" TVs 3.5~4m (11~13feet)
Front Speakersei
Place these speakers in front of your listening position, facing inwards (about 45°) toward you. Place the speakers so that their tweeters will be at the same height as your ear.
Align the front face of the front speakers with the front face of the center speaker or place them slightly in front of the center speakers.
Center Speaker f
It is best to install it at the same height as the front speakers. You can also install it directly over or under the TV.
Surround Speakers hj
Place these speakers to the side of your listening position. If there isn't enough room, place these speakers so they face each other. Place them about 60 to 90cm (2 to 3feet) above your ear, facing slightly downward.
*Unlike the front and center speakers, the rear speakers are used to handle mainly sound effects and sound will not come from them all the time.
Subwoofer 
The position of the subwoofer is not so critical. Place it anywhere you like.
18

Connecting The Speakers
1. |
Press down the terminal tab on the back of the speaker. |
|
gB |
|
|
||
. Insert the black wire into the black terminal (–) and the red wire into |
|
|
|
|
the red (+) terminal, and then release the tab. |
|
|
3. |
Connect the connecting plugs to the back of the Blu-ray Home |
Black |
Red |
|
Cinema by matching the colors of the speaker plugs to the speaker |
||
|
jacks. |
|
● |
|
|
|
COnnECTIOnS |
Center Speaker
 Front Speaker (L)
Front Speaker (R) 


Surround Speaker (R) |
Surround Speaker (L) |
Subwoofer Speaker
Do not let children play with or near the speakers. They could get hurt if a speaker falls.
When connecting the speaker wires to the speakers, make sure that the polarity (+/–) is correct.
Keep the subwoofer speaker out of reach of children so as to prevent children from inserting their hands or alien substances into the duct (hole) of the subwoofer speaker.
Do not hang the subwoofer on the wall through the duct (hole).
M If you place a speaker near your TV set, screen color may be distorted because of the magnetic fi eld generated by the speaker. If this occurs, place the speaker away from your TV set.
1

connections
Connecting the Video Out to your TV
Choose one of the three methods for connecting to a TV.
|
|
|
|
|
|
|
|
|
|
|
|
|
|
|
|
|
|
|
|
|
|
|
|
|
|
|
|
|
|
|
|
|
|
|
|
|
|
|
|
|
|
|
|
|
|
|
|
|
|
|
|
|
|
|
|
|
|
|
|
|
|
|
|
|
|
|
|
|
|
|
|
|
|
|
|
|
|
|
|
|
|
|
|
|
|
|
|
|
|
|
|
|
|
|
|
|
|
|
|
|
|
|
|
|
|
|
|
|
|
|
|
|
|
|
|
|
|
|
|
|
|
|
|
|
|
|
|
|
|
|
|
|
|
|
|
|
|
|
|
|
|
|
|
|
|
|
|
|
|
|
|
|
|
|
|
|
|
|
|
|
|
|
|
|
|
|
|
|
|
|
|
|
|
|
|
|
|
|
|
|
|
|
|
|
|
|
|
|
|
|
|
|
|
|
|
|
|
|
|
|
|
|
|
|
|
|
|
|
|
|
|
|
|
|
|
|
|
|
|
|
|
|
|
|
|
|
|
|
|
|
|
|
|
|
|
|
|
|
|
|
|
|
|
|
|
|
|
|
|
|
|
|
|
|
|
|
|
|
|
|
|
|
|
|
|
|
|
|
|
|
|
|
|
|
|
|
|
|
|
|
|
|
|
|
|
|
|
|
|
|
|
|
|
|
|
|
|
|
|
|
|
|
|
|
|
|
METHOD3 |
METHOD2 |
|
METHOD1 |
|||||||||||||||||||
|
|
|
|
|
|
|
|
|
|
(supplied) |
|
|
|
|
|
|
|
(supplied) |
||||||||||||||
|
|
|
|
|
|
|
|
|
|
|
|
|
|
|
|
|
|
|
|
|
|
|
|
|
|
|
|
|
|
|
|
|
|
|
|
|
|
|
|
|
|
|
|
|
|
|
|
|
|
|
|
|
|
|
|
|
|
|
|
|
|
|
|
|
|
|
|
|
|
|
|
|
|
|
|
|
|
|
|
|
|
|
|
|
|
|
|
|
|
|
|
|
|
|
|
|
|
|
|
|
|
|
|
|
|
|
|
|
|
|
|
|
|
|
|
|
|
|
|
|
|
|
|
|
|
|
|
|
|
|
|
|
|
|
|
|
|
|
|
|
|
|
|
|
|
|
|
|
|
|
|
|
|
|
|
|
|
|
|
|
|
|
|
|
|
|
|
|
|
|
|
|
|
|
|
|
|
|
|
|
.......METHOD 1 : HDMI |
(Best Quality) |
||||||
Connect the HDMI cable from the HDMI OUT jack on the back of the Blu-ray Home Cinema to the HDMI IN jack on your TV.
M Depending on your TV, certain HDMI output resolutions may not work.
If an HDMI cable is connected from the player to a TV, the Blu-ray Home Cinema’s output is set to HDMI automatically within 10 seconds.
If you are using the Anynet + feature (see page 42) and Component and HDMI are both connected, HDMI mode is automatically selected.
When you connect the player to the TV using the HDMI cable for the first time or to a new TV, the HDMI output resolution will be automatically set to the highest provided by the TV.
If you connect a Samsung TV to the Blu-ray Home Cinema using an HDMI cable, the player can be easily operated using the TV remote control. (This is only available with Samsung TVs that support the Anynet+ feature.)
(See page 42)
If the HDMI cable is connected or removed during playback of a CDDA, MP3 or JPEG file, the player will stop playing.
After making the video connection, set the Video input source on your TV to match the corresponding Video output (HDMI, Component or Composite) on your Home Cinema.
See your TV owner's manual for more information on how to select the TV's Video Input source.
20
HDMI Auto Detection Function
The player's video output will automatically change to HDMI mode when connecting an HDMI cable while power is on. For possible HDMI resolutions, see page 38.
•HDMI (High Definition Multimedia Interface)
HDMI is an interface that enables the digital transmission of video and audio data with just a single connector.
Using HDMI, the Blu-ray Home Cinema transmits a digital video and audio signal and displays a vivid picture on a TV having an HDMI input jack.
•HDMI connection description
HDMI connector - Supports video and digital audio data.
-HDMI outputs only a pure digital signal to the TV.
-If your TV does not support HDCP (High-bandwidth Digital Content Protection), random noise appears on the screen.
•Why does Samsung use HDMI?
Analog TVs require an analog video/audio signal. However, when playing a BD/DVD, the data
transmitted to a TV is digital. Therefore either a digital-to-analog converter (in the Blu-ray Home Cinema) or an analog-to-digital converter (in the TV) is required. During this conversion, the picture quality is degraded due to noise and signal loss. HDMI technology is superior because it requires no D/A conversion and is a pure digital signal from the player to your TV.
•What is the HDCP?
HDCP (High-band width Digital Content Protection) is a system for protecting BD/DVD content outputted via HDMI from being copied. It provides a secure digital link between a video source (PC, DVD. etc) and a display device (TV, projector. etc). Content is encrypted at the source device to prevent unauthorized copies from being made.
•What is Anynet+?
Anynet+ is a convenient function that offers linked operation of this unit through Samsung TVs with the Anynet+ feature.
- If your Samsung TV has an 

 logo, then it supports the Anynet+ function.
-If you turn on the player and insert a disc, the player will start playing the disc, and the TV will turn on automatically and switch to HDMI mode.
-If you turn on the player and press the Play button with a disc already inserted, the TV will immediately turn on and switch to HDMI mode.
METHOD 2 : Component Video .... (Better Quality)
If your television is equipped with Component Video inputs, connect a Component video cable(not supplied) from the Component Video Output (Pr, Pb and Y) Jacks on the back of the Blu-ray Home Cinema to the Component Video Input Jacks on your TV.
M You can select from a variety of resolution settings such as 1080i, 720p, 576p/480p and 576i/480i, depending on the disc type. (See page 38)
The actual resolution may differ from the setting in the SETUP menu if both Component and HDMI cables are connected. The resolution may also be different depending on the disc. (See page 38)
After making the video connection, set the Video input source on your TV to match the corresponding Video output (HDMI, Component or Composite) on your Home Cinema.
See your TV owner's manual for more information on how to select the TV's Video Input source.
METHOD 3 : Composite Video ....... |
(Good Quality) |
Connect the supplied Video cable from the VIDEO OUT jack on the back of the Blu-ray Home Cinema to the VIDEO IN jack on your TV.
M The VIDEO source is always output in 576i/480i resolution regardless of the resolution set in the SETUP menu. (See page 38)
After making the video connection, set the Video input source on your TV to match the corresponding Video output (HDMI, Component or Composite) on your Home Cinema.
See your TV owner's manual for more information on how to select the TV's Video Input source.
GB
connections ●
21
Loading...