


HT-C460
Digital Home
Cinema System
user manual
Imagine the possibilities
Thank you for purchasing this Samsung product. To receive more complete service,
please register your product at
www.samsung.com/register
HT-C460-EUR_ENG-0503.indd Sec1:1 |
2010-05-03 6:04:32 |
Safety Information
Safety Warnings
TO REDUCE THE RISK OF ELECTRIC SHOCK, DO NOT REMOVE THE COVER(OR BACK).
NO USER-SERVICEABLE PARTS ARE INSIDE. REFER SERVICING TO QUALIFIED SERVICE PERSONNEL.
|
|
|
|
|
|
|
|
|
|
|
|
CAUTION |
|
|
|
|
|
|
|
RISK OF ELECTRIC SHOCK |
|
|
|
|
|
|
|
DO NOT OPEN |
|
|
|
|
|
|
|
|
|
|
|
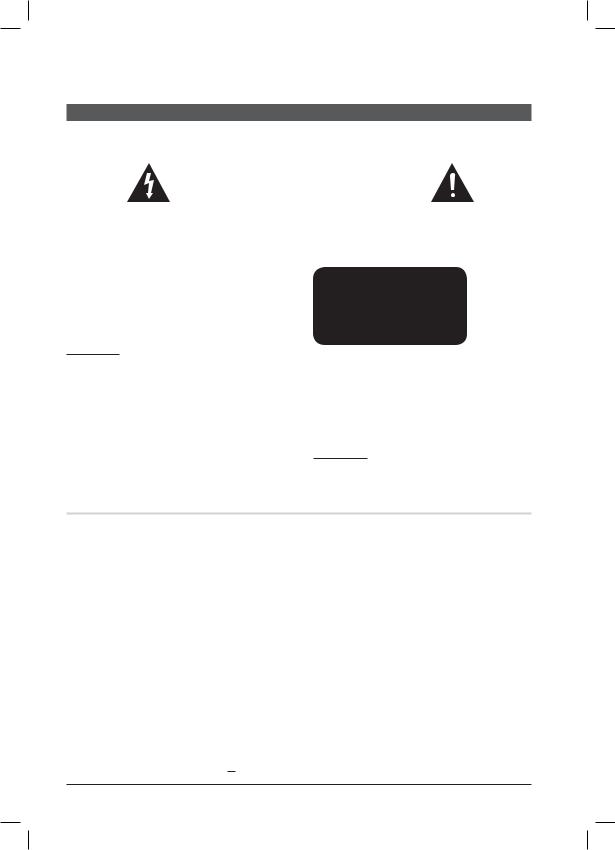
This symbol indicates “dangerous voltage” |
CAUTION : TO PREVENT ELECTRIC |
This symbol indicates important |
|||||
inside the product that presents a risk of |
SHOCK, MATCH WIDE BLADE OF PLUG TO |
instructions accompanying the |
|||||
electric shock or personal injury. |
WIDE SLOT, FULLY INSERT. |
product. |
|||||
|
|
|
|
|
|
|
|
WARNING |
|
|
CLASS 1 |
LASER PRODUCT |
|||
|
|
|
|
||||
• To reduce the risk of fire or electric shock, do |
|||||||
KLASSE 1 |
LASER PRODUKT |
||||||
not expose this appliance to rain or moisture. |
LUOKAN 1 |
LASER LAITE |
|||||
|
|
|
|
KLASS 1 |
LASER APPARAT |
||
|
|
|
|
PRODUCTO |
LÁSER CLASE 1 |
||
CAUTION
•Apparatus shall not be exposed to dripping or splashing and no objects filled with liquids, such as vases, shall be placed on the apparatus.
•The Mains plug is used as a disconnect device and shall stay readily operable at any time.
•This apparatus shall always be connected to a AC outlet with a protective grounding connection.
•To disconnect the apparatus from the mains, the plug must be pulled out from the mains socket, therefore the mains plug shall be readily operable.
CLASS 1 LASER PRODUCT
This Compact Disc player is classified as a CLASS 1 LASER product.
Use of controls, adjustments or performance of procedures other than those specified herein may result in hazardous radiation exposure.
CAUTION
•INVISIBLE LASER RADIATION WHEN OPEN AND INTERLOCKS DEFEATED, AVOID EXPOSURE TO BEAM.
Wiring the Main Power Supply Plug (UK Only)
IMPORTANT NOTICE
The mains lead on this equipment is supplied with a moulded plug incorporating a fuse. The value of the fuse is indicated on the pin face of the plug and if it requires replacing, a fuse approved to BS1362 of the same rating must be used. Never use the plug with the fuse cover removed. If the cover is detachable and a replacement is required, it must be of the same colour as the fuse fitted in the plug. Replacement covers are available from your dealer. If the fitted plug is not suitable for the power points in your house or the cable is not long enough to reach a power point, you should obtain a suitable safety approved extension lead or consult your dealer for assistance. However, if there is no alternative to cutting off the plug, remove the fuse and then safely dispose of the plug. Do not connect the plug to a mains socket as there is a risk of shock hazard from the bared flexible cord. Never attempt to insert bare wires directly into a mains socket. A plug and fuse must be used at all times.
IMPORTANT
The wires in the mains lead are coloured in accordance with the following code:– BLUE = NEUTRAL BROWN = LIVE As these colours may not correspond to the coloured markings identifying the terminals in your plug, proceed as follows:–The wire coloured BLUE must be connected to the terminal marked with the letter N or coloured BLUE or BLACK. The wire coloured BROWN must be connected to the terminal marked with the letter L or coloured BROWN or RED.
WARNING : DO NOT CONNECT EITHER WIRE TO THE EARTH TERMINAL WHICH IS MARKED WITH LETTER E OR BY THE EARTH SYMBOL  , OR COLOURED GREEN OR GREEN AND YELLOW.
2 English
HT-C460-EUR_ENG-0503.indd 2 |
2010-05-03 6:04:49 |
Precautions
•Ensure that the AC power supply in your house complies with the identification sticker located on the back of your product.
•Install your product horizontally, on a suitable base (furniture), with enough space around it for ventilation (7.5~10cm).
•Do not place the product on amplifiers or other equipment which may become hot. Make sure the ventilation slots are not covered.
•Do not stack anything on top of the product.
•Before moving the product, ensure the Disc Insert Hole is empty.
•In order to disconnect the product completely from the power supply, remove the AC plug from the wall outlet, especially when left unused for a long period of time.
•During thunderstorms, disconnect the AC plug from the wall outlet. Voltage peaks due to lightning could damage the product.
•Do not expose the product to direct sunlight or other heat sources. This could lead to overheating and malfunction of the product.
•Protect the product from moisture, and excess heat or equipment creating strong magnetic or electric fields (i.e. speakers.).
•Disconnect the power cable from the AC supply if the product malfunctions.
•Your product is not intended for industrial use. Use of this product is for personal use only.
•Condensation may occur if your product or disc has been stored in cold temperatures. If transporting the product during the winter, wait approximately 2 hours until the product has reached room temperature before using.
•The batteries used with this product contain chemicals that are harmful to the environment. Do not dispose of batteries in the general household trash.
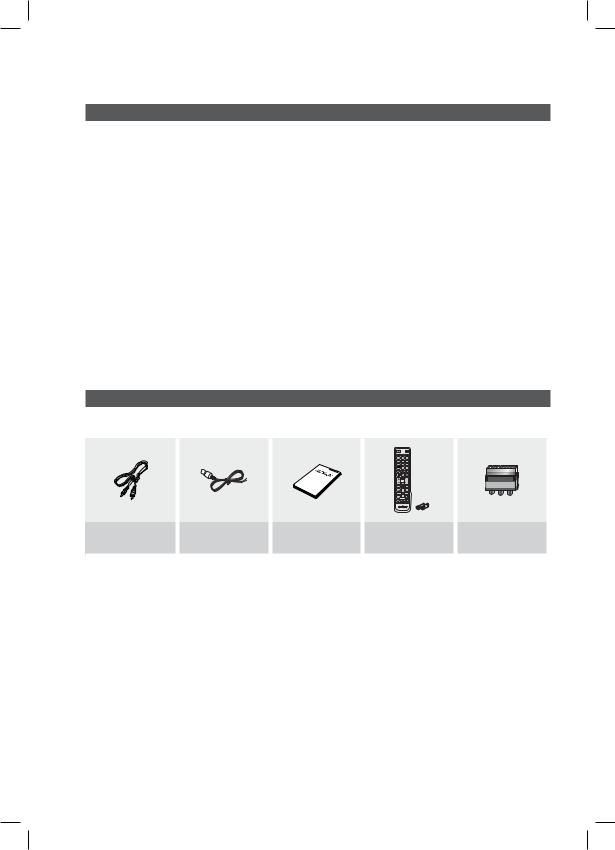
Accessories
Check for the supplied accessories below.
Video Cable |
FM Antenna |
User's Manual |
Remote Control/Batteries |
Scart Adapter |
|
(AAA size) |
(Europe only) |
||||
|
|
|
English 3
HT-C460-EUR_ENG-0503.indd 3 |
2010-05-03 6:04:49 |

Safety Information
Cautions on Handling and Storing Discs
Small scratches on the disc may reduce sound and picture quality or cause skipping.
Be especially careful not to scratch discs when handling them.
Holding discs
•Do not touch the playback side of the disc.
•Hold the disc by the edges so that fingerprints will not get on the surface.
•Do not stick paper or tape on the disc.
Disc Storage
•Do not keep in direct sunlight
•Keep in a cool ventilated area
•Keep in a clean Protection jacket. Store vertically.
NOTE
Do not allow the discs to become contaminated with dirt.
Do not load cracked or scratched discs.
Handling and Storing Discs
If you get fingerprints or dirt on the disc, clean it with a mild detergent diluted in water and wipe with a soft cloth.
•When cleaning, wipe gently from the inside to the outside of the disc
NOTE
Condensation may form if warm air comes into contact with cold parts inside the product. When condensation forms inside the product, it may not operate correctly. If this occurs, remove the disc and let the product stand for 1 or 2 hours with the power on.
4 English
Licence
•ABOUT DIVX VIDEO: DivX® is a digital video format created by DivX,Inc. This is an official DivX Certified device that plays DivX video. Visit www.divx.com for more
information and software tools to convert your files into DivX video. ABOUT DIVX VIDEO-ON-DEMAND: This DivX Certified® device must be registered in order to play DivX Video-on-Demand (VOD) content. To generate the registration code, locate the DivX VOD section in the device setup menu. Go to vod.divx.com with this code to complete the registration process and learn more about DivX VOD.
•DivX Certified® to play DivX ® video
•Dolby and the double-D symbol are registered trademarks of Dolby Laboratories.
•“Pat. 7,295,673; 7,460,688; 7,519,274”
Copyright
© 2010 Samsung Electronics Co., Ltd. All rights reserved.
Copy Protection
•Many DVD discs are encoded with copy protection. Because of this, you should only connect your product directly to your TV, not to a VCR. Connecting to a VCR results in a distorted picture from copy-protected DVD discs.
•“This item incorporates copy protection technology that is protected by U.S. patents and other intellectual property rights of Rovi Corporation. Reverse engineering and disassembly are prohibited.”
HT-C460-EUR_ENG-0503.indd 4 |
2010-05-03 6:04:49 |

Contents
SAFETY INFORMATION
2
GETTING STARTED
7
CONNECTIONS
15
SETUP
21
2Safety Warnings
3Precautions
3Accessories
4Cautions on Handling and Storing Discs
4Licence
4Copyright
4Copy Protection
7Icons that will be used in manual
7Disc Types and Characteristics 11 Description
11 Front Panel
12 Rear Panel
13 Remote control
15 Connecting the Speakers
17 Connecting the Video Out to your TV
19Connecting the FM Antenna
20Connecting Audio from External Components
21Before Starting (Initial Setting)
21Setting the Setup menu
22Display
22 |
TV Aspect |
22 |
BD Wise |
22Resolution
22HDMI Format
23Audio
23Speaker Setting
24DRC (Dynamic Range Compression)
24AV-SYNC
24HDMI AUDIO
25EQ Optimizer
25System
25Initial Setting
25DivX(R) Registration
25Language
25Security
25Parental Rating
25Change Password
25Support
25Product Information
 ENGLISH
English 5
HT-C460-EUR_ENG-0503.indd 5 |
2010-05-03 6:04:49 |

Contents
BASIC FUNCTIONS
26
ADVANCED FUNCTIONS
34
26 Disc Playback
26Audio CD(CD-DA)/MP3/WMA Playback
27JPEG File Playback
27 Using the Playback Function
31 Sound Mode
33Listening to Radio
34USB Function
34 CD Ripping
OTHER INFORMATION
35
35Troubleshooting
36Language code list
37Specifications
• Figures and illustrations in this User Manual are provided for reference only and may differ from actual product appearance.
6 English
HT-C460-EUR_ENG-0503.indd 6 |
2010-05-03 6:04:50 |
Getting Started
Icons that will be used in manual
Make sure to check the following terms before reading the user manual.
Icon |
Term |
Definition |
|
|
This involves a function |
d |
|
available with DVD-Video or |
DVD |
DVD±R/±RW discs that |
|
|
|
have been recorded and |
|
|
finalised in Video Mode. |
|
|
|
B |
|
This involves a function |
CD |
available with a data CD |
|
|
|
(CD DA, CD-R/-RW). |
|
|
|
A |
|
This involves a function |
MP3 |
available with CD-R/-RW |
|
|
|
discs. |
|
|
|
G |
|
This involves a function |
JPEG |
available with CD-R/-RW |
|
|
|
discs. |
|
|
|
D |
|
This involves a function |
DivX |
available with MPEG4 discs. |
|
|
|
(DVD±R/±RW, CD-R/-RW) |
|
|
|
|
|
This involves a case where a |
!CAUTION function does not operate or
settings may be cancelled.
This involves tips or instructionsNOTE on the page that help each
function operate.
Shortcut
This function provides direct and
Key
easy access pressing the button on the remote control.
|
01 |
|
|
Getting |
|
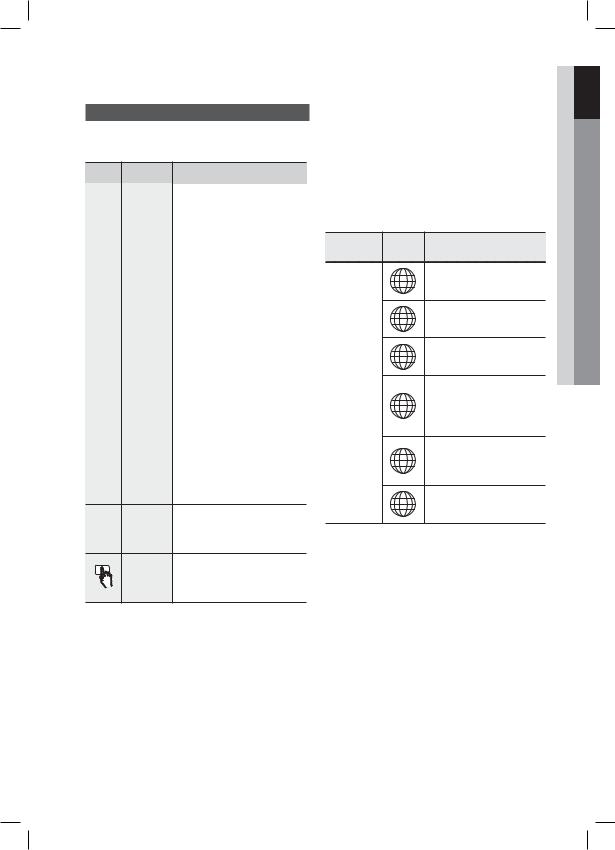
Disc Types and Characteristics |
||
|
||
Region Code |
Started |
|
|
||
The product and the discs are coded by region. These |
|
|
regional codes must match in order for the disc to play. If the |
|
|
codes do not match, the disc will not play. |
|
Disc Type |
Region |
Area |
|
Code |
|||
|
|
The U.S., U.S. territories and 1 Canada
2 |
Europe, Japan, the Middle East, |
Egypt, South Africa, Greenland |
|
3 |
Taiwan, Korea, the Philippines, |
Indonesia, Hong Kong |
|
DVD-VIDEO |
Mexico, South America, Central |
4 |
America, Australia, New Zealand, |
|
Pacific Islands, Caribbean |
5 |
Russia, Eastern Europe, India, |
most of Africa, North Korea, |
|
|
Mongolia |
6 |
China |
English 7
HT-C460-EUR_ENG-0503.indd 7 |
2010-05-03 6:04:50 |

Getting Started
Disc types that can be played
Disc Types & |
Recorded |
Disc |
Max. Playing Time |
|
Mark (Logo) |
Signals |
Size |
||
|
||||
|
|
|
|
|
|
|
|
Approx. 240 min. |
|
|
|
12 cm |
(single-sided) |
|
|
AUDIO |
Approx. 480 min. |
||
|
|
|||
|
|
(double-sided) |
||
|
+ |
|
||
|
|
Approx. 80 min. |
||
DVD-VIDEO |
VIDEO |
|
||
8 cm |
(single-sided) |
|||
|
|
Approx. 160 min. |
||
|
|
|
||
|
|
|
(double-sided) |
|
|
|
|
|
|
|
|
12 cm |
74 min. |
|
|
AUDIO |
|
|
|
AUDIO-CD |
8 cm |
20 min. |
||
|
||||
|
|
|
||
|
|
|
|
|
|
AUDIO |
12 cm |
- |
|
|
+ |
|||
|
|
|
||
DivX |
8 cm |
- |
||
VIDEO |
Do not use the following type of discs!
•LD, CD-G, CD-I, CD-ROM, DVD-ROM and DVD-RAM discs cannot be played on this product. If such discs are played, a <WRONG DISC FORMAT> message appears on the TV screen.
•DVD discs purchased abroad may not play on this product.
If such discs are played, a <Wrong Region. Please check Disc.> message appears on the TV screen.
Disc Types And Disc Format
This product does not support Secure (DRM) Media files.
CD-R Discs
•Some CD-R discs may not be playable depending on the disc recording device (CD-Recorder or PC) and the condition of the disc.
•Use a 650MB/74 minute CD-R disc.
Do not use CD-R discs over 700MB/80 minutes as they may not be played back.
•Some CD-RW (Rewritable) media, may not be playable.
•Only CD-Rs that are properly "closed" can be fully played. If the session is closed but the disc is left open, you may not be able to fully play the disc.
8 English
CD-R MP3 Discs
•Only CD-R discs with MP3 files in ISO 9660 or Joliet format can be played.
•MP3 file names should contain no blank spaces or special characters (. / = +).
•Use discs recorded with a compression/ decompression data rate greater than 128Kbps.
•Only files with the ".mp3" and ".MP3" extensions can be played.
•Only a consecutively written multisession disc can be played. If there is a blank segment in the Multisession disc, the disc can be played only up to the blank segment.
•If the disc is not closed, it will take longer to begin playback and not all of the recorded files may be played.
•For files encoded in Variable Bit Rate (VBR) format, i.e. files encoded in both low bit rate and high bit rate (e.g., 32Kbps ~ 320Kbps), the sound may skip during playback.
•A maximum of 500 tracks can be played per CD.
•A maximum of 300 folders can be played per CD.
CD-R JPEG Discs
•Only files with the "jpg" extensions can be played.
•If the disc is not closed, it will take longer to start playing and not all of the recorded files may be played.
•Only CD-R discs with JPEG files in ISO 9660 or Joliet format can be played.
•JPEG file names should be 8 characters or less in length and contain no blank spaces or special characters (. / = +).
•Only a consecutively written multisession disc can be played. If there is a blank segment in the multisession disc, the disc can be played only up to the blank segment.
•A maximum of 999 images can be stored on a folder.
•When playing a Kodak/Fuji Picture CD, only the JPEG files in the picture folder can be played.
•Picture discs other than Kodak/Fuji Picture CDs may take longer to start playing or may not play at all.
HT-C460-EUR_ENG-0503.indd 8 |
2010-05-03 6:04:50 |

DVD±R/±RW, CD-R/RW Discs
•Software updates for incompatible formats are not supported.
(Example : QPEL, GMC, resolutions higher than 800 x 600 pixels, etc.)
•If a DVD-R/-RW disc has not been recorded properly in DVD Video format, it will not be playable.
DivX (Digital internet video express)
DivX is a video file format developed by Microsoft and is based on MPEG4 compression technology to provide audio and video data over the Internet in real-time.
MPEG4 is used for video encoding and MP3 for audio encoding, enabling to watch a movie at near DVD-quality video and audio.
Supported Formats (DivX)
This product only supports the following media formats. If both video and audio formats are not supported, the user may experience problems such as broken images or no sound.
Supported Video Formats
Format |
|
Supported Versions |
|
|
|
|
|
|
|
AVI |
|
DivX3.11~DivX5.1, XviD |
||
WMV |
|
V1/V2/V3/V7 |
|
|
Supported Audio Formats |
|
|||
|
|
|
|
|
Format |
|
Bit Rate |
|
Sampling |
|
|
Frequency |
||
|
|
|
|
|
MP3 |
|
80~320kbps |
|
44.1khz |
WMA |
|
56~128kbps |
|
|
|
|
|
||
AC3 |
|
128~384kbps |
|
44.1/48khz |
|
|
|
|
|
DTS |
|
1.5Mbps |
|
44.1khz |
|
|
|
|
|
•DivX files, including audio and video files, created in the DTS format can only support up to 6Mbps.
•Aspect Ratio : Although the default DivX resolution is 640x480 pixels, this product supports up to 720x480 pixels. TV screen resolutions higher than 800 will not be supported.
|
|
01 |
• |
When you play a disc whose sampling frequency is |
Getting |
|
||
|
higher than 48khz or 320kbps, you may experience |
|
|
shaking on the screen during playback. |
Started |
|
while playing a DivX file. |
|
• |
Sections with a high frame rate might not be played |
|
• Since this product only provides encoding formats authorized by DivX Networks, Inc., a DivX file created by the user might not play.
USB Host Specification
USB Host Specification
•Supports USB 1.1 or USB 2.0 compliant devices.
•Supports devices connected using the USB A type cable.
•Supports UMS (USB Mass Storage Device) V1.0 compliant devices.
•Supports devices with drives formatted in the FAT(FAT, FAT16, FAT32)file system.
Non-compliance
•Does not support a device that requires installing a separate driver on a PC (Windows).
•Does not support connection to a USB hub.
•A USB device that is connected using a USB extension cable may not be recognized.
•A USB device requiring a separate power source needs to be connected to the product with the separate power connection.
Operational Limitations
•If the connected device has multiple drives (or partitions) installed, only one drive (or partition) can be connected.
•A device supporting USB 1.1 alone may cause a difference in the picture quality, depending on the device.
English 9
HT-C460-EUR_ENG-0503.indd 9 |
2010-05-03 6:04:50 |

Getting Started
USB Devices that can be used with the
product
•USB Storage Device, MP3 Player, Digital Camera
•USB card Reader: One slot USB card reader and Multi slot USB card reader.
-The USB card reader may not be supported, depending on the manufacturer.
-If you install multiple memory devices into a multi card reader, you may experience problems.
Supported file Formats
Format |
Still |
Music |
|
Movie |
|||
Picture |
|
||||||
|
|
|
|
|
|
||
|
|
|
|
|
|
|
|
File name |
JPG |
MP3 |
WMA |
WMV |
|
DivX |
|
|
|
|
|
|
|
|
|
File |
JPG |
.MP3 |
.WMA |
.WMV |
|
.AVI |
|
extension |
.JPEG |
|
|||||
|
|
|
|
|
|||
|
|
|
|
|
|
|
|
Bit rate |
– |
80~320 |
56~128 |
4Mbps |
|
4Mbps |
|
kbps |
kbps |
|
|||||
|
|
|
|
|
|||
|
|
|
|
|
|
|
|
Version |
|
|
|
V1,V2, |
|
DivX3.11~ |
|
– |
– |
V8 |
|
DivX5.1, |
|||
V3,V7 |
|
||||||
|
|
|
|
|
XviD |
||
|
|
|
|
|
|
||
|
|
|
|
|
|
||
Pixel |
640x480 |
– |
– |
720x480 |
|||
|
|
|
|
|
|
|
|
Sampling |
– |
44.1kHz |
44.1kHz |
44.1KHz~ 48KHz |
|||
Frequency |
|||||||
|
|
|
|
|
|
||
|
|
|
|
|
|
|
|
•CBI (Control/Bulk/Interrupt) is not supported.
•Digital Cameras that use PTP protocol or require additional program installation when connected to a PC are not supported.
•A device using NTFS file system is not supported. (The system supports only the FAT file system and will not play a movie larger than 1 GB in USB mode.)
•Some MP3 players, when connected to this product, may not operate depending on the sector size of their file system.
•The USB host function is not supported if a product that transfers media files by its manufacturer specific program is connected.
•Does not operate with Janus enabled MTP (Media Transfer Protocol) devices.
NOTE
The external HDD device is not supported.
10 English
HT-C460-EUR_ENG-0503.indd 10 |
2010-05-03 6:04:50 |

Front Panel
1
Description
2 |
3 |
4 |
5 |
6 |
7 |
8 |
9 |
10 |
11 |
12 |
Started Getting 01
|
|
|
|
|
|
|
|
|
|
|
|
|
|
|
|
|
|
|
|
|
|
|
|
|
|
|
|
|
|
|
|
|
|
|
|
|
|
|
|
|
|
|
|
|
|
|
|
|
|
|
|
|
|
|
|
|
|
|
|
|
|
|
|
|
|
|
|
|
|
|
|
|
|
|
|
|
|
|
|
|
|
|
|
|
|
|
|
|
|
|
|
|
|
|
|
|
|
|
|
|
|
|
|
|
|
|
|
|
|
|
|
|
|
|
|
|
|
|
|
|
|
|
|
|
|
|
|
|
|
|
|
|
|
|
|
|
|
|
|
|
|
|
|
|
|
|
|
|
|
|
|
|
|
|
|
|
|
|
|
|
|
|
|
|
|
|
|
|
|
|
|
|
|
|
|
|
|
|
|
|
|
|
|
|
|
|
|
|
|
|
|
|
|
|
|
|
|
|
|
|
|
|
|
|
|
|
|
|
|
|
|
|
|
|
|
|
|
|
|
|
|
|
|
1 |
DISC TRAY |
|
|
|
|
Insert disc here. |
|||||||||||||||||||||
|
|
|
|
|
|
|
|
|
|
|
|
|
|
|
|||||||||||||
2 |
DISPLAY |
|
|
|
|
Displays the playing status, time, etc. |
|||||||||||||||||||||
|
|
|
|
|
|
|
|
|
|
|
|
|
|||||||||||||||
3 |
REMOTE CONTROL SENSOR |
|
|
Detects signals from the remote control. |
|||||||||||||||||||||||
|
|
|
|
|
|
|
|
|
|
|
|
|
|
||||||||||||||
4 |
OPEN/CLOSE BUTTON ( |
) |
|
|
Opens and closes the disc tray. |
||||||||||||||||||||||
|
|
|
|
|
|
|
|
|
|
|
|
|
|
|
|
||||||||||||
5 |
FUNCTION BUTTON ( |
) |
|
|
The mode switches as follows : |
||||||||||||||||||||||
|
|
DVD/CD D.IN AUX USB FM. |
|||||||||||||||||||||||||
|
|
|
|
|
|
|
|
|
|||||||||||||||||||
6 |
TUNING DOWN & SKIP BUTTON ( |
) |
Goes back to the previous title/chapter/track. |
||||||||||||||||||||||||
Tunes down the FM frequency band. |
|||||||||||||||||||||||||||
|
|
|
|
|
|
|
|
|
|||||||||||||||||||
|
|
|
|
|
|
|
|
|
|
|
|
|
|
|
|||||||||||||
7 |
STOP BUTTON ( |
) |
|
|
|
Stops disc playback. |
|||||||||||||||||||||
|
|
|
|
|
|
|
|
|
|
|
|
|
|
||||||||||||||
8 |
PLAY/PAUSE BUTTON ( |
) |
|
|
Plays a disc or pauses playback. |
||||||||||||||||||||||
|
|
|
|
|
|
|
|
|
|
|
|
|
|
|
|
||||||||||||
9 |
TUNING UP & SKIP BUTTON ( |
) |
Goes to the next title/chapter/track. |
||||||||||||||||||||||||
Tunes up the FM frequency band. |
|||||||||||||||||||||||||||
|
|
|
|
|
|
|
|
|
|||||||||||||||||||
|
|
|
|
|
|
|
|
|
|
|
|
||||||||||||||||
10 |
VOLUME CONTROL BUTTON ( |
, ) |
Volume adjustment. |
||||||||||||||||||||||||
|
|
|
|
|
|
|
|
|
|
|
|
|
|
|
|||||||||||||
11 |
POWER BUTTON ( |
) |
|
|
|
Turns the product on and off. |
|||||||||||||||||||||
|
|
|
|
|
|
|
|
|
|
|
|
|
|
|
|
||||||||||||
12 |
USB PORT |
|
|
|
|
Connect here and play files from external USB storage devices such as |
|||||||||||||||||||||
|
|
|
|
MP3 players, USB flash memory, etc. |
|||||||||||||||||||||||
|
|
|
|
|
|
|
|
|
|||||||||||||||||||
|
|
|
|
|
|
|
|
|
|
|
|
|
|
|
|
|
|
|
|
|
|
|
|
|
|
|
|
English 11
HT-C460-EUR_ENG-0503.indd 11 |
2010-05-03 6:04:50 |
Getting Started
Rear Panel
1 |
2 |
3 |
4 |
5 |
6 |
7 |
|
|
VIDEO |
|
|
|
FM ANT . |
|
|
OUT |
|
|
|
|
|
DIGITAL |
HDMI OUT |
|
|
|
|
|
AUDIO IN |
|
|
|
|
|
|
|
|
|
|
|
|
|
OPTICAL |
|
|
|
|
|
AUX IN |
COMPONENT |
OUT |
1 |
5.1 CHANNEL SPEAKER OUTPUT |
Connect the front, centre, rear speakers and subwoofer. |
|
CONNECTORS |
|||
|
|
||
2 |
EXTERNAL DIGITAL OPTICAL IN JACK |
Use this to connect external equipment capable of digital output. |
|
(DIGITAL AUDIO IN) |
|||
|
|
||
3 |
HDMI OUT JACK |
Using an HDMI cable, connect this HDMI output jack to the HDMI input jack |
|
on your TV for the best quality picture. |
|||
|
|
||
4 |
AUX IN JACKS |
Connect to the 2CH Analogue output of an external device (such as a VCR). |
|
|
|
|
|
5 |
VIDEO OUT JACK |
Connect your TV's Video Input jack (VIDEO IN) to the VIDEO OUT jack. |
|
|
|
|
|
6 |
COMPONENT VIDEO OUTPUT JACKS |
Connect a TV with Component video inputs to these jacks. |
|
|
|
|
|
7 |
FM ANTENA JACK |
Connect the FM antenna. |
|
|
|
|
12 English
HT-C460-EUR_ENG-0503.indd 12 |
2010-05-03 6:04:51 |
 Loading...