


 Loading...
SI\MSUNG
U S E R M A N UA L
Galaxy J7 Refine
Table of contents
Special features |
1 |
Meet Bixby |
2 |
Face recognition |
2 |
Direct Share |
2 |
Media volume limiter |
2 |
Multi window |
2 |
Getting started |
3 |
Front view |
4 |
Back view |
6 |
Set up your device |
7 |
Assemble your device |
8 |
Start using your device |
10 |
Learn about your device |
14 |
Navigation |
15 |
Home screen |
17 |
Customize your Home screen |
18 |
Status bar |
24 |
Notification panel |
26 |
Bixby |
28 |
Face recognition |
30 |
Multi window |
31 |
Enter text |
33 |
Emergency mode |
36 |
i SPT_J737P_EN_UM_TN_RED_061318_FINAL
Apps |
38 |
Samsung Gear |
97 |
Use apps |
39 |
Samsung Notes |
98 |
Calculator |
44 |
Samsung+ |
100 |
Calendar |
46 |
Smart-Things |
101 |
Camera and video |
49 |
Settings |
102 |
Clock |
54 |
Access Settings |
103 |
Contacts |
58 |
Search for Settings |
103 |
66 |
Connections |
104 |
|
Galaxy Apps |
69 |
Wi-Fi |
105 |
Gallery |
70 |
Bluetooth |
108 |
Google Apps |
75 |
Phone visibility |
110 |
Internet |
77 |
Data usage |
110 |
Messages |
81 |
Airplane mode |
112 |
My Files |
84 |
Mobile hotspot |
112 |
Phone |
86 |
Tethering |
115 |
ii
Mobile networks |
115 |
Separate app sound |
127 |
Location |
116 |
Notifications |
128 |
Nearby device scanning |
118 |
Manage notifications |
129 |
Connect to a printer |
118 |
Smart alert |
129 |
Virtual Private Networks |
119 |
Display |
130 |
Sounds and vibration |
121 |
Screen off settings |
131 |
Sound mode |
122 |
Screen brightness |
131 |
Vibrations |
122 |
Blue light filter |
132 |
Volume |
123 |
Font and screen zoom |
132 |
Ringtone |
124 |
Screen quality |
133 |
Notification sounds |
124 |
One-handed mode |
133 |
Do not disturb |
124 |
Device maintenance |
134 |
System sounds |
125 |
Quick optimization |
135 |
Key-tap feedback |
125 |
Battery |
135 |
Sound quality and effects |
126 |
Storage |
136 |
iii
Memory |
138 |
Install unknown apps |
152 |
Language and input |
138 |
Secure Folder |
152 |
Date and time |
142 |
App permission monitor |
153 |
Report diagnostic information |
143 |
Secure startup |
153 |
Reset |
143 |
Encrypt SD card |
154 |
Factory data reset |
144 |
View passwords |
154 |
Auto restart |
146 |
Security update service |
154 |
System updates |
147 |
Device administration |
155 |
Lock screen and security |
148 |
Credential storage |
155 |
Screen lock types |
149 |
Knox active protection |
156 |
Biometric locks |
150 |
Advanced security settings |
156 |
Clock and information |
150 |
Accounts |
158 |
Google Play Protect |
150 |
Samsung Cloud |
159 |
Find My Mobile |
151 |
Add an account |
159 |
Security update |
151 |
Backup and restore |
161 |
iv
Google settings |
162 |
Accessibility |
163 |
Vision |
164 |
Hearing |
165 |
Dexterity and interaction |
166 |
More accessibility settings |
167 |
Accessibility services |
167 |
Other settings |
168 |
Help |
169 |
Manage game features |
169 |
Device assistance app |
169 |
Dual messenger |
170 |
About phone |
170 |
Getting help |
171 |
Videos |
171 |
Smart Simulator |
171 |
Tips and Tricks |
171 |
Samsung Care |
171 |
Legal |
172 |
Legal information |
173 |
v
Special features
Learnaboutyourmobiledevice’s specialfeatures.

Meet Bixby
Bixbycanhelpyouunderstandyoursettingsandsetup yourSamsungdevice.
Formoreinformation,see “Bixby”onpage 28.
Face recognition
Configurefacialrecognitionsecuritytoaddanextra layerofsecuritywhenusingyourdevice.
Formoreinformation,see “Facerecognition”on page 30.
Direct Share
Sharecontentwithspecificpeopledirectly. Formore
information,see “Directshare”onpage 65.
Media volume limiter
Limitthemaximumoutputofthedevice’svolume. For moreinformation,see “Mediavolumelimiter”on page 123.
Multi window
Multitaskbyusingtwoapplicationsatthesametime.
Formoreinformation,see “Multiwindow”onpage 31.
Special features |
2 |
Getting started
Learnaboutyourmobiledevice hardware,assemblyprocedures, andhowtogetstartedusing yournewdevice.
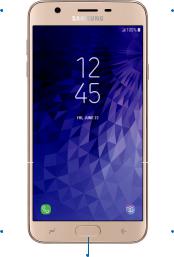
Front view
Front camera |
|
|
|
Proximity sensor |
|
|
Volume keys 
 Power key
Recent apps |
|
|
|
Back |
|
|
Home key
Devicesandsoftwareareconstantlyevolving—theillustrationsyouseehereareforreferenceonly.
Getting started |
4 |
•Proximity sensor
–Turns off the screen and disables touch functionality during a call when the device is in close proximity to the body.
–Turns the screen back on and enables touch functionalityduring a call when the device is outside a specific range from the body.
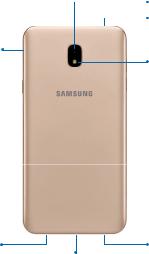
•Power key
–Press to turn the screen on or off.
–Press and hold to select a power control option.
•Volume keys
–Adjust the volume for ringtones,media, notifications,and system sounds. For more information,see “Volume” on page 123.
–In the camera app,press a volume key to take a photo.
Getting started |
5 |
Setup your device
Learnhowtosetupyour device for the firsttime.

Assemble your device
InstallaSIMcardandanoptionalmemorycard (not included),andchargeyourdevicebeforeusing.
Install aSIMcard and memory card
Whenyousubscribetoacellularnetwork,youare providedwithaSIMcard. Youmaybeabletouseyour previousSIMcard. Contactyourserviceproviderfor moredetails.
Warning:SmallcomponentssuchasSIM cardsand memorycardscanposeachokingrisk. Pleasebe carefulwhenhandlingthesecardstoavoiddamaging them.
YoucaninstallanoptionalmicroSD™ memorycard (not included)toaddmorememoryspacetoyour device. Amemorycardcanbeinstalledatanytime. It isnotnecessarytoinstallitpriortousingthedevice.
Caution:Becarefulwhenusingtheremovaltoolto
ejectaninternalcardtray.
1.Insert the removal tool into the hole on the SIM card/Memorycard tray,and then push until the tray pops out.
2.Place the SIM card on the tray with the gold contacts facing down.
3.Place the memory card on the tray with the gold contacts facing down.
4.Slide the SIM card/Memory card tray back into the slot.
Set up your device |
8 |
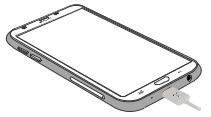
Chargethebattery
Yourdeviceispoweredbyarechargeablebattery. A charger(chargingheadandUSBcable)isincluded withthedeviceforchargingthebatteryfromany standardoutlet.
Note:Youshoulddrytheinsideofthechargingport beforeinsertingapowerconnectortochargeyour device. Ifthechargingportisnotfullydry,yourdevice mayoperateabnormally. Forexample,itmaycharge moreslowlyoroverheat.
Thebatterycomespartiallycharged. Youcanusethe devicewhilecharging.
Caution:Useonlychargingdevicesthatareapproved bySamsung. Samsungaccessoriesaredesignedfor yourdevicetomaximizebatterylife. Usingother accessoriesmayvoidyourwarrantyandmaycause damage.
1.Insert the USB cable into the USB charger/Accessoryport.
2.Connect the USB cable to the charging head,and then plug the charging head into a standard outlet.
3.Unplug the charging head from the outlet and remove the USB cable from the device when charging is complete.
Set up your device |
9 |
Start using your device
Theinstructionsbelowexplainhowtoturnyourdevice
onoroff.
Toturnthedeviceon:
uPress and hold the Power key until the device turns on.
Toturnthedeviceoff:
1.Press and hold the Power key.
2.Tap Power off,and confirm when prompted.
UsetheSetup Wizard
Thefirsttimeyouturnyourdeviceon,theSetupWizard guidesyouthroughthebasicsofsettingupyour device.
Followthepromptstochooseadefaultlanguage, connecttoaWi-Fi® network,setupaccounts,choose locationservices,learnaboutyourdevice’sfeatures, andmore.
Set up your device |
10 |

Lock orunlock yourdevice
Useyourdevice’sscreenlockfeaturestosecureyour device. Bydefault,thedevicelocksautomatically whenthescreentimesout.
Tolockthedevice:
uPress the Power key. Tounlockthedevice:
uPress the Power key,or press the Home key,and then drag your finger across the screen.
ThedefaultScreenlockonyourdeviceisSwipe.
To chooseasecurescreenlock,see “Setasecurescreen lock”onpage 149.
Add aGoogleaccount
YournewdeviceusesyourGoogle™ accounttofully utilizeitsAndroid™ features.
1.From a Home screen,swipe up to access Apps.
2.Tap Settings > Cloud and accounts > Accounts.
3.Tap + Add account > Google.
Note:WhenyousignintoaGoogleaccount,Factory ResetProtection(FRP)isactivated. FRPrequiresyour Googleaccountinformationwhenresettingtofactory settings. Formoreinformation,see “Factoryreset protection”onpage 145.
Set up your device |
11 |

Add aSamsung account
CreateaSamsungaccountforaccesstoSamsung
contentandappsonyourdevice.
1.From a Home screen,swipe up to access Apps.
2.Tap Settings > Cloud and accounts > Accounts.
3.Tap + Add account > Samsung account.
Note: To quickly access your Samsung account,tap
 Settings >
 Samsung account.
Add anemail account
Viewandmanageallofyouremailaccounts.
1.From a Home screen,swipe up to access Apps.
2.Tap Settings > Cloud and accounts > Accounts.
3.Tap + Add account > Email.
Transferdatafrom yourold device
UseSmartSwitch™ totransfercontacts,photos,and othercontentfromyourolddevice. Formore information,visitsamsung.com/us/support/owners/ app/smart-switch.
TouseSmartSwitch:
1.From a Home screen,swipe up to access Apps, and then tap Settings > Cloud and accounts >
Smart Switch.
2.Follow the prompts and select the content to transfer.
Visitsamsung.com/smartswitchformoreinformation.
Set up your device |
12 |

Setup yourvoicemail
YoucanaccessyourvoicemailfromaHomescreen.
1.From a Home screen,tap Phone.
2.Tap Voicemail.
3.Follow the tutorial to create a password,record a greeting,and record your name.
Formoreinformation,see “Voicemail”onpage 95.
Set up your device |
13 |
Learn about your device
Learnsomeofthekeyfeaturesofyour mobiledevice,includingthescreensand icons,aswellashowtonavigatethe deviceandentertextusingthekeyboard.
Navigation
Pleasenotethatatouchscreenrespondsbesttoa lighttouchfromthepadofyourfingeroracapacitive stylus. Usingexcessiveforceorametallicobjecton thetouchscreenmaydamagethetemperedglass surfaceandvoidthewarranty.
Tap
Lightlytapitemstoselectorlaunchthem.
•Tap the keyboard to enter characters or text.
•Tap an item to select it.
•Tap an app shortcut to launch the app.
Double-tap
Lightlytapitemstwicetoselectorlaunchthem. • Double-tap an image to zoom in or out.
Touchand hold
Touchandholditemstoactivatethem.
•Touch and hold a field to display a pop-up menu of options.
Swipe
Lightlydragyourfingerverticallyorhorizontally acrossthescreen.
•Swipe the screen to unlock the device.
•Swipe the screen to scroll through the Home screens or menu options.
Drag
Touchandholdanitem,andthenmoveittoanew
location.
•Drag an app shortcut to add it to a Home screen.
•Drag a widget to place it in a new location on a Home screen.
Learn about your device |
15 |

Pinchand spread
Pinchthescreenusingyourthumbandforefingeror
spreadbymovingyourfingersapart.
•Pinch the screen to zoom out while viewing a picture or a web page.
•Spread your fingers on the screen to zoom in while viewing a picture or a web page.
Commonoptions
Thedeviceusesbasiccommandoptionstoperform |
|
commonactions. |
|
• |
.More options: Tap to view more menu options |
|
for a screen. |
• |
Delete: Tap to select items to delete. |
• |
Share: Tap to select items to share,and then |
|
choose a sharing method. |
• |
Edit: Tap to customize the screen. |
• On/Off:Taptoturntheoptionon(C))oroff(CD).
• Menu: Tap to view available options for
the field.
Learn about your device |
16 |

Customize your
Home screen
YourdevicehasmultipleHomescreenstoholdapp shortcutsandwidgets. Youcanadd,remove,change theorderofscreens,aswellaschooseadifferent mainHomescreen.
1.From a Home screen,pinch the screen.
2.Use these options to manage screens:
•To align shortcuts into a line at the top of a
screen,tap 1::-1 Align top.
LJ
•To align shortcuts into a line at the bottom of
a screen,tap  Align bottom.
• |
To remove a Home screen,tap ®Remove. |
• |
To set a screen as the main Home screen,tap |
|
Main. This screen is displayed when you |
|
press the Home key. |
•To change the order of screens,touch and hold a screen,and then drag it to a new position.
•To add a screen,swipe to the end of the screens,and then tap +Add.
•To enable Bixby Home,swipe right,and then tap On/Off.
Learn about your device |
18 |

App shortcuts
Youcanuseappshortcutstolaunchanappfromany
Homescreen.
1.From a Home screen,swipe up to access Apps.
2.Touch and hold an app shortcut to open the options menu.
3.Tap Add to Home.
Toremoveashortcut:
1.Touch and hold an app shortcut to open the options menu.
2.Tap  Remove from Home.
•Removing a shortcut does not delete the app, it just removes the shortcut from a Home screen.
TomoveashortcutfromoneHomescreentoanother:
1.Touch and hold an app shortcut to release it.
2.Drag the app shortcut to a new Home screen,and then release it.
Usefolders
YoucanorganizeAppshortcutsinfoldersonan Apps listscreenandHomescreen.
Formoreinformation,see “Createandusefolders”on page 41.
Learn about your device |
19 |
Wallpapers
ChangethelookoftheHomeandLockscreenswith wallpaper. Youcandisplayafavoritepictureorchoose frompreloadedwallpapers.
1.From a Home screen,pinch the screen.
2.Tap Wallpapers to customize.
3.Tap View all to see all available wallpapers.
4.Tap an image to choose it.
•Tap the screen or screens you want to apply the wallpaper to.
5.Tap Set as wallpaper,and confirm when prompted.
Themes
SetthethemetobeappliedtoyourHomeandLock
screens,wallpapers,andappicons.
1.From a Home screen,pinch the screen.
2.Tap Themes to customize.
•Tap a theme to preview and download it to My themes.
3.Tap View all to see downloaded themes.
4.Tap a theme,and then tap Apply to apply the selected theme.
Learn about your device |
20 |
Icons
Applycustomiconstoreplacebuilt-inappicons.
1.From a Home screen,pinch the screen.
2.Tap Wallpapers > Icons to customize.
3.Tap an icon set to preview and download it to My icons.
• Tap View all to see downloaded icons.
4.Tap an icon,and then tap Apply to apply the selected icon set.
Icon frames
Youcanshowiconswithshadedframestomakethem standoutontheHomescreenandAppslistscreen.
1.From a Home screen,swipe up to access Apps.
2.Tap Settings > Display > Icon frames and choose one of the following options:
•Icons only: Show icons only.
•Icons with frames: Show icons with shaded frames.
3.Tap Done,and confirm when prompted.
Learn about your device |
21 |
Widgets
Widgetsaresimpleapplicationextensionsthatrunon
aHomescreen.
ToaddawidgettoaHomescreen:
1.From a Home screen,pinch the screen.
2.Tap Widgets.
3.Touch and hold a widget,drag it to a Home screen,and release it.
ToremoveawidgetfromaHomescreen:
1.From a Home screen,touch and hold a widget to open the options menu.
2.Tap Remove from Home screen.
Homescreensettings
CustomizeyourHomeandAppsscreens.
1.From a Home screen,pinch the screen.
2.Tap Home screen settings to customize:
•Home screen layout: Set your device to have a Home and Apps screen,or only a Home screen where all apps are located.
•Home screen grid: Choose a dimension option to determine how icons are arranged on the Home screen.
•Apps screen grid: Choose a dimension option to determine how icons are arranged on the Apps screen.
•Apps button: Add an apps button to the Home screen for easy access to the Apps screen.
•App icon badges: Select how to show icon badges when apps receive notifications.
Learn about your device |
22 |
•Add apps to Home screen: Automatically add newly downloaded apps to the Home screen.
•Quick-open notification panel: Enable this feature to open the Notification panel from the Home screen by swiping down.
•Hide apps: Select apps to hide.
•About Home screen: View version information.
Easymode
Switchbetweenthedefaultscreenlayoutanda simplerlayout. TheEasymodelayouthaslargertext andicons,makingforamorestraightforwardvisual experience.
1.From a Home screen,swipe up to access Apps.
2.Tap Settings > Display > Easymode.
3.Tap Easymode to enable this feature.
4.Tap Done to confirm.
Todisable Easymode:
1.From a Home screen,swipe up to access Apps.
2.Tap Settings > Display > Easymode >
Standard mode.
3.Tap Done to exit Easy mode.
Learn about your device |
23 |

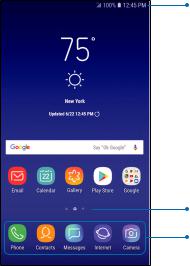
Status bar
TheStatusbarprovidesdeviceinformationonthe
rightsideandnotificationalertsontheleft.
Statusicons |
|
||
• |
Battery full |
||
|
|||
0 |
Battery low |
||
|
Battery charging |
||
~! |
Vibrate mode |
||
~ |
Mute mode |
||
LTEII |
|
™ |
|
4G LTE active |
|||
.ii |
|||
~ |
Network not available |
||
~ |
Wi-Fi active |
||
0 |
Location service active |
||
Notificationicons
..... |
Missed call |
|
~ |
|
|
\. |
Call in progress |
|
~ |
Call on hold |
|
m |
New email |
|
QO |
New voicemail |
|
.. |
||
New message |
||
:t |
File download in progress |
|
1 |
File upload in progress |
|
,a- |
Wi-Fi available |
|
~? |
||
~· |
App updates available |
|
|
Learn about your device |
24 |
Loading...