


 Loading...
Operating Instructions and Cooking Guide
SPEED COOK OVEN
FQ159ST / FQ159UST
Owner’s Manual


Contents
Using This Manual . . . . . . . . . . . . . . . . . . . . . . . . . . . . . . . . . . . . . . . 2
Important Safety Instructions. . . . . . . . . . . . . . . . . . . . . . . . . . . . . . . . . . |
2 |
Precautions to Avoid Possible Exposure to Excessive Microwave . . . . . . . . . . . . |
2 |
Installation and Connection . . . . . . . . . . . . . . . . . . . . . . . . . . . . . . . . . . |
6 |
Setting the Clock . . . . . . . . . . . . . . . . . . . . . . . . . . . . . . . . . . . . . . . . 7
Oven Features . . . . . . . . . . . . . . . . . . . . . . . . . . . . . . . . . . . . . . . . . 8
Accessories . . . . . . . . . . . . . . . . . . . . . . . . . . . . . . . . . . . . . . . . . . 9
Control Panel. . . . . . . . . . . . . . . . . . . . . . . . . . . . . . . . . . . . . . . . . .10
Types of Heating . . . . . . . . . . . . . . . . . . . . . . . . . . . . . . . . . . . . . . . .11
Using Oven Mode . . . . . . . . . . . . . . . . . . . . . . . . . . . . . . . . . . . . . . . |
12 |
Setting Oven Mode . . . . . . . . . . . . . . . . . . . . . . . . . . . . . . . . . . . . |
12 |
Dual Convection Setting . . . . . . . . . . . . . . . . . . . . . . . . . . . . . . . . . . |
14 |
Convection + Top Heat Setting . . . . . . . . . . . . . . . . . . . . . . . . . . . . . . |
15 |
Conventional Heat Setting . . . . . . . . . . . . . . . . . . . . . . . . . . . . . . . . . |
16 |
Grill Setting. . . . . . . . . . . . . . . . . . . . . . . . . . . . . . . . . . . . . . . . . |
17 |
Convection + Bottom Heat Setting. . . . . . . . . . . . . . . . . . . . . . . . . . . . . |
18 |
Setting Cook Time . . . . . . . . . . . . . . . . . . . . . . . . . . . . . . . . . . . . . . .19 Setting End Time. . . . . . . . . . . . . . . . . . . . . . . . . . . . . . . . . . . . . . . .20 Cooking Time Reservation Function . . . . . . . . . . . . . . . . . . . . . . . . . . . . . .21 Using Speed Menu Mode . . . . . . . . . . . . . . . . . . . . . . . . . . . . . . . . . . .22 Setting Speed Menu Mode. . . . . . . . . . . . . . . . . . . . . . . . . . . . . . . . .22 Guide to Auto Speed Menu Settings. . . . . . . . . . . . . . . . . . . . . . . . . . . .23
Using Speed Defrost Mode . . . . . . . . . . . . . . . . . . . . . . . . . . . . . . . . . . |
25 |
Setting Speed Defrost Mode. . . . . . . . . . . . . . . . . . . . . . . . . . . . . . . . |
25 |
Guide to Auto Speed Defrost Settings . . . . . . . . . . . . . . . . . . . . . . . . . . . |
26 |
How a Microwave Oven Works . . . . . . . . . . . . . . . . . . . . . . . . . . . . . . . . |
27 |
Using Microwave Mode . . . . . . . . . . . . . . . . . . . . . . . . . . . . . . . . . . . . |
28 |
Setting Microwave Mode. . . . . . . . . . . . . . . . . . . . . . . . . . . . . . . . . . |
28 |
Guide to Microwave Power Levels. . . . . . . . . . . . . . . . . . . . . . . . . . . . . |
29 |
Microwave Cookware Guide. . . . . . . . . . . . . . . . . . . . . . . . . . . . . . . . |
30 |
Microwave Cooking Guide. . . . . . . . . . . . . . . . . . . . . . . . . . . . . . . . . |
32 |
Switching Off the Beeper. . . . . . . . . . . . . . . . . . . . . . . . . . . . . . . . . . . . |
38 |
Child Safety Lock . . . . . . . . . . . . . . . . . . . . . . . . . . . . . . . . . . . . . . . |
39 |
Using the Steam Clean Feature . . . . . . . . . . . . . . . . . . . . . . . . . . . . . . . .40
Cleaning Your Microwave Oven . . . . . . . . . . . . . . . . . . . . . . . . . . . . . . . .41
Storing and Repairing Your Microwave Oven . . . . . . . . . . . . . . . . . . . . . . . . .41
Troubleshooting . . . . . . . . . . . . . . . . . . . . . . . . . . . . . . . . . . . . . . . .42
Error Code . . . . . . . . . . . . . . . . . . . . . . . . . . . . . . . . . . . . . . . . . . .43
Technical Specifications . . . . . . . . . . . . . . . . . . . . . . . . . . . . . . . . . . . .44
1

|
Using This Manual |
|
EN |
Thank you for purchasing a SAMSUNG speed cook oven. |
|
Your Owner’s Manual contains important safety instructions and essential infor- |
||
|
||
|
mation on using and caring for your new speed cook oven. |
Before using your oven, please read all the information in this manual and keep it for future reference.
Ahandy quick look-up guide explaining basic cooking operations is provided inside the front cover for your convenience.
Important Safety Instructions 

PRECAUTIONS TO AVOID POSSIBLE EXPOSURE TO EXCESSIVE MICROWAVE ENERGY
Failure to observe the following safety precautions may result in harmful exposure to microwave energy.
(a)Under no circumstances should any attempt be made to operate the oven with the door open or to tamper with the safety interlocks (door latches) or to insert anything into the safety interlock holes.
(b)Do not place any object between the oven door and front face or allow food or cleaner residues to accumulate on sealing surfaces. Ensure that the door and door sealing surfaces are kept clean by wiping after use first with a damp cloth and then with a soft dry cloth.
(c)Do not operate the oven if it is damaged until it has been repaired by a qualified microwave service technician trained by the manufacturer. It is particularly important that the oven door closes properly and that there is no damage to the:
(1)Door (bent)
(2)Door hinges (broken or loose)
(3)door seals and sealing surfaces
(d)The oven should not be adjusted or repaired by anyone other than a properly qualified microwave service technician trained by the manufacturer.
WARNING
Accessible parts may become hot during use. Young children should be kept away.
●Do not use harsh abrasive cleaners or sharp metal scrapers to clean the oven door glass since they can scratch the surface, which may result in shattering of the glass. (if provided)
●When moving heating elements, make sure to use the equipment designed to move heating element while wearing safety gloves provided with the product, and see if temperature drops sufficiently (at least 10 minutes after grill or combination cooking operation) after operation.
●For safety reasons do not clean the appliance with a steam jet or high pressure cleaner.
2
Important Safety Instructions (Continued) |
|
|
IMPORTANT SAFETY INSTRUCTIONS. |
EN |
|
READ CAREFULLYAND KEEP FOR FUTURE REFERENCE. |
||
|
Before cooking food or liquids in your microwave oven, please check that the following safety precautions are taken.
●Only use utensils that are suitable for use in microwave ovens;
DO NOT use any metallic containers, Dinnerware with gold or silver trimmings, Skewers, forks, etc.
Remove wire twist ties from paper or plastic bags.
Reason Electric arcing or sparking may occur and may damage the oven.
●When heating food in plastic or paper containers, keep an eye on the oven due to the possibility of ignition;
Do not use your microwave oven to dry newspapers or clothes
●If smoke is observed, switch off or unplug the appliance and keep the door closed in order to stifle any flames;
●Microwave heating of beverages can result in delayed eruptive boiling, therefore care must be taken when handling the container; To prevent this situation
ALWAYS allow a standing time of at least 20 seconds after the oven has been switched off so that the temperature can equalize.
Stir during heating, if necessary, and ALWAYS stir after heating.
In the event of scalding, follow these FIRST AID instructions:
*Immerse the scalded area in cold water for at least 10 minutes.
*Cover with a clean, dry dressing.
*Do not apply any creams, oils or lotions.
●NEVER fill the container to the top and choose a container that is wider at the top than at the bottom to prevent the liquid from boiling over. Bottles with narrow necks may also explode if overheated.
NEVER heat a babys bottle with the teat on, as the bottle may explode if overheated.
●The contents of feeding bottles and baby food jars shall be stirred or shaken and the temperature checked before consumption, in order to avoid burns;
3

Important Safety Instructions (Continued)
EN |
● Eggs in their shell and whole hard-boiled eggs should not be heated in microwave |
||
ovens since they may explode, even after microwave heating has ended; |
|||
|
|||
|
Also do not heat airtight or vacuum-sealed bottles, jars, containers, nuts in shells, |
||
|
tomatoes etc. |
||
|
● The oven should be cleaned regularly and any food deposits removed; |
||
|
● Failure to maintain the oven in a clean condition could lead to deterioration of the sur- |
||
|
face that could adversely affect the life of the appliance and possibly result in a hazard- |
||
|
ous situation; |
||
|
● DO NOT cover the ventilation slots with cloths or paper. They may catch fire as hot air is |
||
|
evacuated from the oven. |
||
|
The oven may overheat and automatically switch itself off. It will remain inoperable until |
||
|
it has cooled sufficiently. |
||
|
● ALWAYS use oven gloves when removing a dish from the oven to avoid unintentional |
||
|
burn. |
|
|
|
● DO NOT touch heating elements or interior oven walls until the oven be cooled down. |
||
|
● Do not immerse the power cable or plug in water and keep the power cable away from |
||
|
heated surfaces. |
||
|
Do not operate this appliance if it has a damaged power cable or plug. |
||
|
● Stand at arms length from the oven when opening the door. |
||
|
Reason |
The hot air or steam released may cause scalding. |
|
|
● You may notice a Clicking sound during operation(especially when the oven is defrost- |
||
|
ing). |
|
|
|
Reason |
This sound is normal when the electrical power output is changing. |
|
|
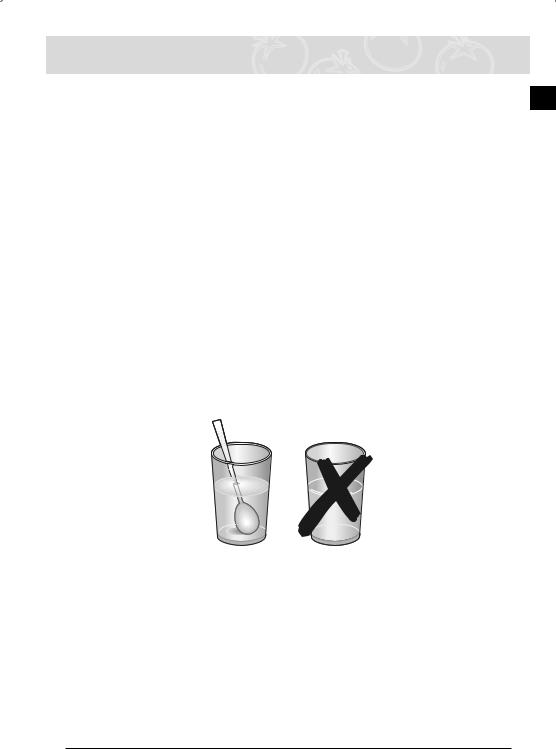
● DO NOT operate the microwave oven when it is empty. The power will be cut off auto- |
||
|
matically for safety. You can operate normally after letting it stand for over 30 minutes. |
||
|
It is best to leave a glass of water inside the oven at all times.The water will absorb the |
||
|
microwaves energy if the oven accidently started. |
||
4

Important Safety Instructions (Continued)
IMPORTANT |
EN |
|
●Young children should NEVER be allowed to use or play with the microwave oven. Nor should they be left unattended near the microwave oven when it is in use. Items of interest to children should not be stored or hidden just above the oven.
●This appliance is not intended for use by persons (including children) with reduced physical, sensory or mental capabilities, or lack of experience and knowledge, unless they have been given supervision or instruction concerning use of the appliance by a person responsible for their safety.
●Children should be supervised to ensure that they do not play with the appliance.
●During use the appliance becomes hot. Care should be taken to avoid touching heating elements inside the oven.
●DO NOT use harsh abrasive cleaners or sharp metal scrapers to clean the oven door glass since they can scratch the surface, which may result in shattering of the glass.(If provided)
WARNING:
If the door or door seals are damaged, the oven must not be operated until it has been repaired by a competent person.
WARNING:
It is hazardous for anyone other than a comperent person to carry out any service or repair operation which involves the removal of a cover which gives protection against exposure to microwave energy.
WARNING:
Liquids and other foods must not be heated in sealed containers since they are liable to explode.
WARNING:
Only allow children to use the oven without supervision when adequate instructions have been given so that the child is able to use the oven in a safe way and understands the hazards of improper use.
WARNING:
When the appliance is operated in the combination mode, children should only use the oven under adult supervision due to the temperatures generated.
WARNING:
Accessible parts may become hot during use. Young children should be kept away. ● The microwave oven shall not be placed in a cabinet
5
|
Installation and Connection |
|
EN |
● This appliance is NOT intended for use in a commercial environment. |
|
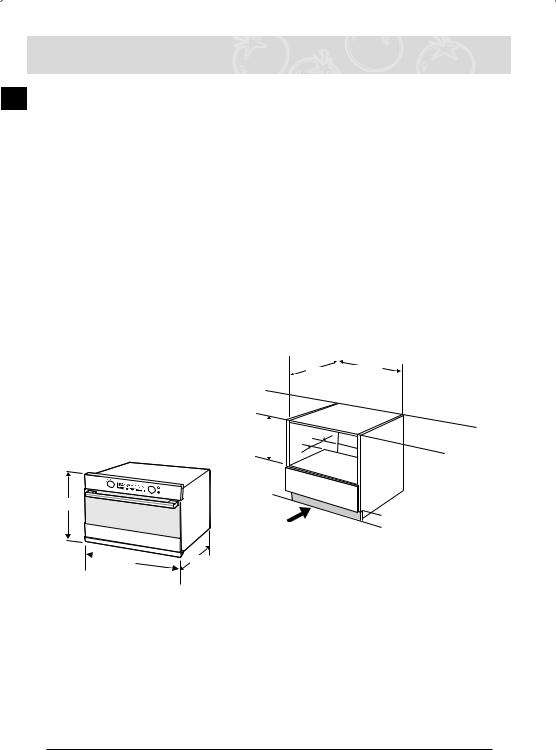
● Please observe the installation instructions provided and note that this appliance should |
||
|
||
|
only be installed by a qualified technician. |
|
|
● The appliance is fitted with a plug and must only be connected to a properly installed |
|
|
earthed socket. The fuse protection must be rated at 16 amps (L or B-type miniature circuit |
|
|
breakers). |
|
|
● In case a new socket is need, installation and cable connection must only be done by a |
|
|
qualified electrician. If the plug is no longer accessible following installation, a pole discon- |
|
|
necting device must be present on the installation site with a contact gap of at least 3 mm. |
|
|
● Adapters, multiway strips and extension cords must not be used. Overloading can result in |
|
|
fire. |
|
|
● Plug in |
|
|
When the appliance has been connected for the first time, all segments are lit for a second. |
|
|
After 3 seconds, 12:00 flashes in the display prompting you to select the clock. Do not |
|
|
forget to reset the clock when you switch to and from summer or winter. |
min |
min 564 |
550 |
max 568 |
|
|
min 446 |
|
max 450 |
50 |
460
200 cm2
 595
595
6
Setting the Clock |
|
|
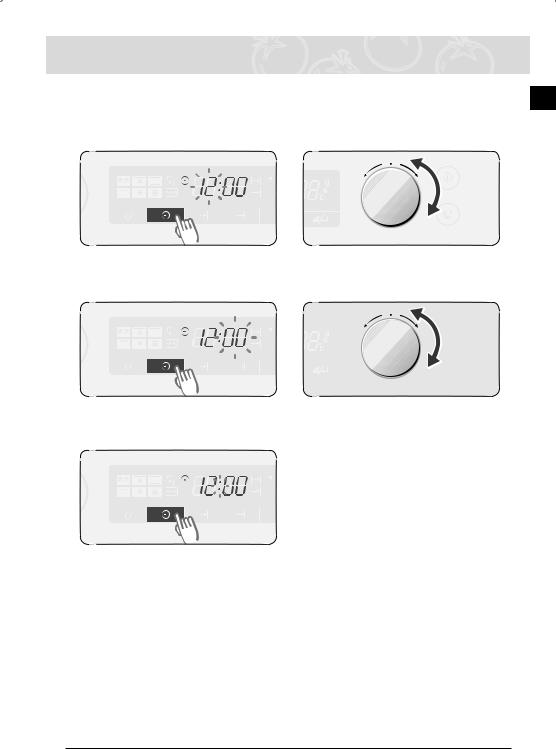
When the appliance is first plugged in, the DISPLAY lights up. After three sec- |
EN |
|
onds, the Clock symbol and “12:00” blink on the DISPLAY. |
||
|
||
Setting the Clock |
|
|
|
|
|
|
|
Press CLOCK . The “12” starts |
Turn MULTI-FUNCTION SELECTOR |
|
1blinking. |
2to set hour. |
|
|
|
|
Press CLOCK again. The “00” starts |
Turn MULTI-FUNCTION SELECTOR |
||
3blinking. |
4to set minute. |
||
|
|
|
|
|
|
|
|
|
|
|
|
5Press CLOCK again. The clock sets by itself within 5 seconds.
7

Oven Features
EN |
Contro Panel |
Top Heating Elements 

Oven Light
Level 5
Level 4
Oven Levels
Level 3
Level 2 
Microwave Level 1 

Safety Door Lock
Door
Door Handle
Note
●Shelf levels are numbered from the bottom up.
●The levels 4 and 5 are mainly used for grill function.
●The microwave level is mainly used for microwave function.
●Please refer to Cooking Guides provided throughout this booklet to determine appropriate shelf level for your dishes.
8
Accessories
The following accessories are provided with your microwave oven: |
EN |
|
1 |
Ceramic Tray |
2 |
Two Baking Trays |
(Useful for Microwave Mode) |
(DO NOT use for Microwave Mode.) |
Grill insert
Ceramic Tray
3 |
Grill Insert for Ceramic Tray |
4 |
Oven Rack |
(Useful for Speed Menu and Grill |
(DO NOT use for Microwave Mode.) |
Mode)
Note
Please refer to Cooking Guides provided throughout this booklet to determine appropriate accessory for your dishes.
9
Control Panel
EN |
2 3 |
4 |
5 |
7 |
16 |
|
|
1 |
6 |
8 |
9 |
10 |
11 |
12 |
13 |
14 |
15 |
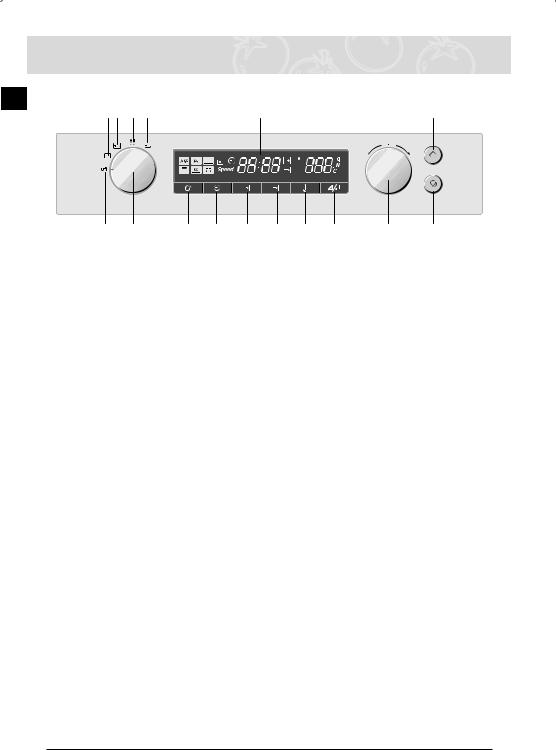
1. |
OFF |
|
|
|
|
9. |
CLOCK |
|
|
|
2. |
OVEN MODE |
|
|
|
10.COOK TIME |
|
|
|||
3. |
SPEED MENU MODE |
|
|
|
11.END TIME |
|
|
|||
4. |
SPEED DEFROST MODE |
|
|
12.TEMPERATURE |
|
|
||||
5. |
MICROWAVE MODE |
|
|
|
13.POWER LEVEL/ENTER |
|
||||
6. |
MODE SELECTOR |
|
|
|
14.MULTI-FUNCTION SELECTOR |
|||||
7. |
DISPLAY |
|
|
|
|
15.STOP / CANCEL |
|
|
||
8. |
STEAM CLEAN |
|
|
|
16.START |
|
|
|
||
Using Pop Up Dials Note
The MODE SELECTOR (6) and MULTI-FUNCTION SELECTOR (14) are pop up dials. Simply press and turn to desired setting.
10
Types of Heating |
|
|
The following chart summarizes the various heating modes and settings avail- |
EN |
|
able on your oven. Use the Cooking Guides in the pages that follow to determine |
||
|
||
the appropriate mode and setting for all your recipes. |
|
|
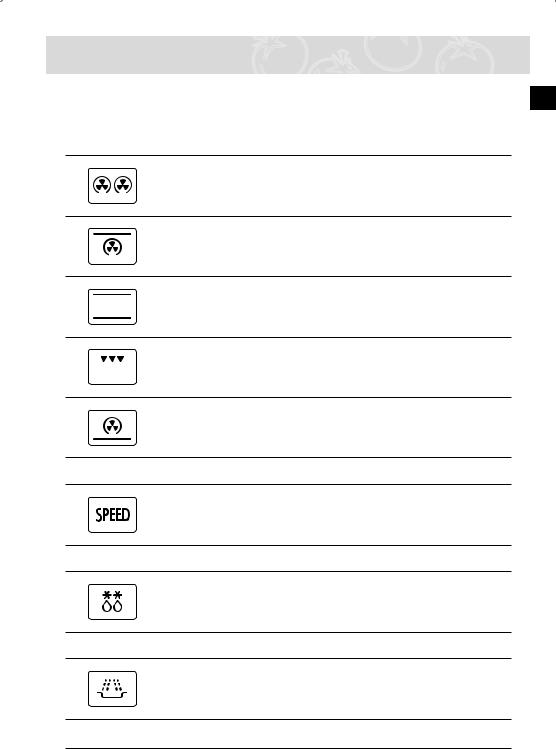
OVEN MODE |
|
Dual Convection Setting
Food is heated by hot air from the left and right sides of the oven. This setting provides uniform heating and is ideal for baking.
Convection + Top Heat Setting
Hot air and top heating element combine, making this setting ideal for crisping and browning. Especially recommended for meats.
Conventional Heat Setting
Heat comes from top and bottom heating elements. This setting is suitable for baking and roasting.
Grill Setting
Food is heated by the top heating element.
Convection + Bottom Heat Setting
Hot air and the bottom heating element combine so food can be crisped and browned.
SPEED MENU MODE
Choose from twelve pre-programmed speed menu settings to conveniently cook, roast or bake your favourite foods. Cooking time and power level are automatically set. Simply select the programme and weight to start cooking.
SPEED DEFROST MODE
Choose from five pre-programmed speed defrost settings for defrosting.
Defrosting time and power level are automatically set. Simply select the programme and weight to start defrosting.
MICROWAVE MODE
Microwave energy is used to cook and defrost foods. It provides fast efficient cooking without changing the colour or form of food. Power level and cooking time are manually set to suit various dishes.
11
|
Using Oven Mode |
|
EN |
Five settings are available under this mode. Check Cooking Guides on pages |
|
14 - 18 to determine appropriate setting. |
||
|
||
|
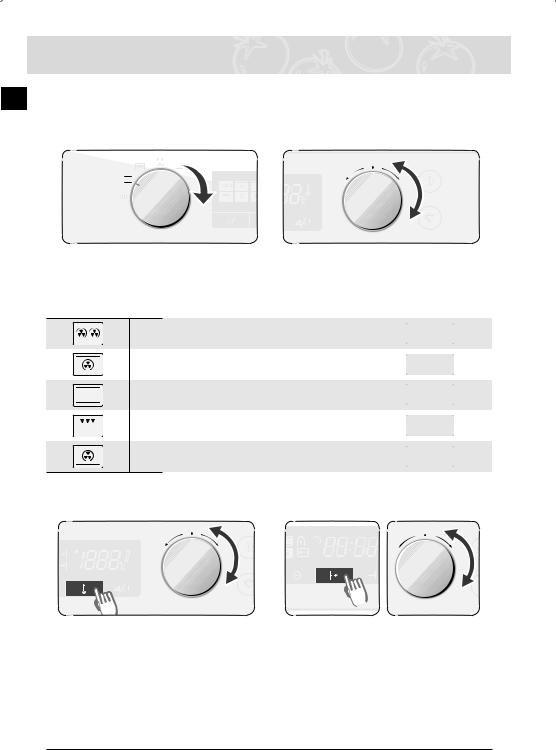
Setting Oven Mode |
|
|
|
|
Turn MODE SELECTOR Dial to oven |
Turn MULTI-FUNCTION SELECTOR |
1mode position. |
2Dial to desired oven mode. The oven |
|
|
|
mode and recommended temperature |
|
|
will be displayed. |
Dual Convection
Convection + Top Heat
Conventional Heat
Grill
Convection + Bottom Heat
Note
The convection heater and grill heater switch on and off constantly to regulate the temperature.
|
|
|
|
|
|
|
|
|
|
|
|
|
To change temperature, press |
To set cooking time, press COOK |
|
3TEMPERATURE and turn MULTI- |
4TIME and turn MULTI-FUNCTION |
||
|
FUNCTION SELECTOR to set desired |
SELECTOR to set desired cooking |
|
|
temperature. |
time. |
|
12
Using Oven Mode (Continued)

EN
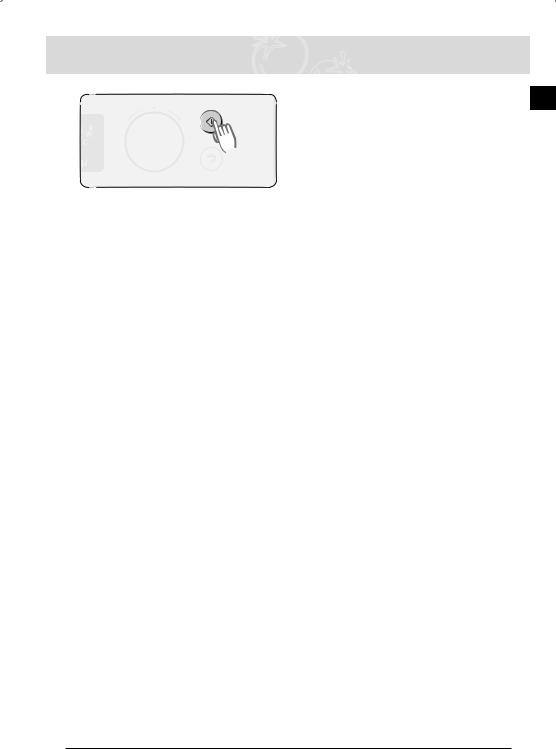
5Press START.
►The TEMPERATURE indicator on display will be lit and the indicator will blink after the temperature is reached.
Note
1)During cooking, COOK TIME and TEMPERATURE are available to change the setting.
2)In Oven Mode settings, the convection heater and top and bottom heating elements switch off and on throughout cooking to regulate the temperature.
3)During cooking, the inside temperature is displayed by pressing TEMPERATURE and
POWER LEVEL / ENTER at the same time.
Important
When using Oven Mode, be sure glass baking dishes are suitable for 40 - 250 °C cooking temperatures.
13
Loading...