


 Loading...
Usermanual
Tableofcontents
Special features |
1 |
Getting started |
2 |
Front view |
3 |
Back view |
4 |
Assemble your device |
5 |
Install a SIM card and memory card |
6 |
Charge the battery |
7 |
Start using your device |
8 |
Use the Setup Wizard |
8 |
Lock or unlock your device |
9 |
Add a Google account |
9 |
Add a Samsung account |
10 |
Add an email account |
10 |
Transfer data from your old device |
10 |
Set up your voicemail |
11 |
Navigation |
12 |
Navigation bar |
13 |
Common options |
15 |
Home screen |
16 |
Customize your Home screen |
17 |
Status bar |
23 |
Notification panel |
25 |
Bixby |
28 |
i MET_A600T1_EN_UM_TN_RI9_110118_FINAL
Flexible security |
29 |
Multi window |
32 |
Enter text |
34 |
Emergency mode |
37 |
Apps |
40 |
Using apps |
41 |
Access apps |
41 |
Add an apps shortcut |
41 |
Search for apps |
41 |
Galaxy Essentials |
42 |
Uninstall or disable apps |
42 |
Sort apps |
42 |
Create and use folders |
43 |
App settings |
44 |
Samsung apps |
46 |
Calculator |
46 |
Calendar |
47 |
Camera and video |
50 |
Clock |
55 |
Contacts |
59 |
66 |
|
Galaxy Apps |
69 |
Galaxy Wearable |
70 |
Gallery |
71 |
Internet |
76 |
Messages |
80 |
My Files |
83 |
Phone |
85 |
Samsung+ |
97 |
Samsung Health |
99 |
ii
Samsung Notes |
101 |
YouTube |
109 |
Secure Folder |
103 |
MetroPCS apps |
110 |
SmartThings |
106 |
App Store |
110 |
Google apps |
107 |
Device Unlock |
110 |
Chrome |
107 |
metroZONE |
110 |
Drive |
107 |
Mobile Hotspot |
110 |
Duo |
107 |
myMetro |
110 |
Gmail |
107 |
name ID |
110 |
107 |
Additional apps |
111 |
|
Google One |
107 |
Lookout |
111 |
Maps |
108 |
Settings |
112 |
Photos |
108 |
Access Settings |
113 |
|
|
||
Play Movies & TV |
108 |
Search for Settings |
113 |
|
|
||
Play Music |
108 |
Connections |
114 |
|
|
||
Play Store |
108 |
Wi-Fi |
114 |
|
|
iii
Bluetooth |
117 |
Volume |
130 |
Phone visibility |
119 |
Ringtone |
131 |
Data usage |
119 |
Notification sounds |
131 |
Airplane mode |
121 |
Do not disturb |
132 |
NFC and payment |
121 |
System sounds |
132 |
Mobile hotspot |
122 |
Key-tap feedback |
133 |
Tethering |
124 |
Sound quality and effects |
133 |
Mobile networks |
125 |
Separate app sound |
134 |
Location |
125 |
Notifications |
134 |
Nearby device scanning |
127 |
Manage notifications |
134 |
Connect to a printer |
127 |
Smart alert |
135 |
Virtual Private Networks |
128 |
Display |
135 |
Sounds and vibration |
129 |
Screen off settings |
135 |
|
|
||
Sound mode |
129 |
Screen brightness |
136 |
Vibrations |
130 |
Blue light filter |
137 |
iv
Font and screen zoom |
137 |
Software update |
151 |
Screen quality |
138 |
Lock screen and security |
151 |
Full screen apps |
138 |
Screen lock types |
151 |
One-handed mode |
138 |
Clock and information |
152 |
Device maintenance |
139 |
Biometrics |
153 |
Quick optimization |
139 |
Google Play Protect |
153 |
Battery |
139 |
Find My Mobile |
154 |
Storage |
140 |
Security update |
154 |
Memory |
142 |
Install unknown apps |
155 |
Language and input |
142 |
Samsung Pass |
155 |
Date and time |
146 |
Secure Folder |
156 |
Report diagnostic information |
147 |
App permission monitor |
156 |
Reset |
147 |
Secure startup |
156 |
Factory data reset |
148 |
Encrypt SD card |
157 |
Auto restart |
150 |
Set up SIM card lock |
157 |
v
View passwords |
157 |
More accessibility settings |
167 |
Security update service |
158 |
Accessibility services |
167 |
Device administration |
158 |
Other settings |
168 |
Credential storage |
159 |
Help |
168 |
Knox active protection |
159 |
Automatic unlock |
168 |
Advanced security settings |
159 |
Device assistance app |
169 |
Accounts |
160 |
Dual messenger |
169 |
Samsung Cloud |
160 |
About phone |
170 |
Add an account |
161 |
Getting help |
171 |
Backup and restore |
162 |
Videos |
171 |
Google settings |
163 |
Smart Simulator |
171 |
|
|
||
Accessibility |
164 |
Tips |
171 |
|
|
||
Vision |
164 |
Samsung Care |
171 |
|
|
||
Hearing |
165 |
Legal |
172 |
Dexterity and interaction |
|
||
166 |
Intellectual property |
173 |
|
|
|
vi
Open source software |
174 |
Disclaimer of warranties; exclusion of |
|
liability |
174 |
Modification of software |
175 |
Samsung Knox |
175 |
Restricting children’s access to your mobile |
|
device |
176 |
Samsung Electronics America, Inc. |
176 |
vii
Special features
 Meet Bixby
Bixby can help you understand your settings and set up your Samsung device. See Bixby on page 28.
 Media volume limiter
Limit the maximum output of the device’s volume. See Media volume limiter on page 131.
Flexible security
Use a combination of screen and biometric locks to secure your device. See Flexible security on page 29.
Camera
The camera on your device has several unique features, such as:
•Adjustable LED
•Stickers
•Night mode
See Camera and video on page 50.
Special features |
1 |
Getting started
Front view |
3 |
Back view |
4 |
Assemble your device |
5 |
Start using your device |
8 |
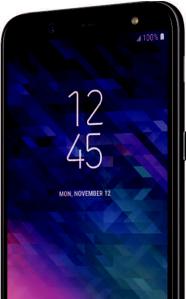
Front view
 Proximity sensor
Front camera |
|
|
|
Flash |
|
|
|
Volume keys 
 Power key
Devicesandsoftwareareconstantlyevolving—theillustrationsyouseehereareforreferenceonly.
Getting started |
3 |

Back view
 Rear camera
Speaker |
|
|
|
Flash |
|
|
|
||
|
|
|
|
|
|
|
|
|
|
SIM/microSD |
|
|
|
|
|
|
card tray |
Headset jack |
|
|
|
|
|
USB charger/ |
|
|
|
|
|
||
|
||||||
Microphone |
|
|
|
|
|
Accessory port |
|
|
Devicesandsoftwareareconstantlyevolving—theillustrationsyouseehereareforreferenceonly.
Getting started |
4 |
Assemble your device
Learn about your mobile device hardware, assembly procedures, and how to get started using your new device.
SIM
Devicesandsoftwareareconstantlyevolving—theillustrationsyouseehereareforreferenceonly.
Getting started |
5 |
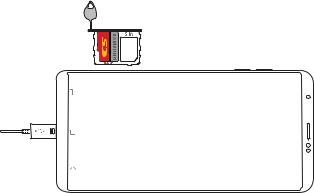
InstallaSIM cardand memory card
When you subscribe to a cellular network, you are provided with a SIM card. You may be able to use your previous SIM card.
You can install an optional microSD™ memory card (not included) to add more memory space to your device. A memory card can be installed at any time. It is not necessary to install it prior to using the device.
Caution: Be careful when using the removal tool to eject an internal card tray.
1.Insert the removal tool into the hole on the SIM card/Memory card tray, and then push until the tray pops out.
2.Place the SIM card on the tray with the gold contacts facing down.
3.Place the memory card on the tray with the gold contacts facing down.
4.Slide the SIM card/Memory card tray back into the slot.
Getting started |
6 |
Charge the battery
Your device is powered by a rechargeable battery. A charger (charging head and USB cable) is included with the device for charging the battery from any standard outlet.
The battery comes partially charged. You can use the device while charging.
Note: Use only charging devices and batteries that are approved by Samsung. Samsung charging devices and batteries are designed for your device to maximize battery life. Using other charging devices and batteries may void your warranty and may cause damage.
1.Insert the USB cable into the USB charger/Accessory port.
2.Connect the USB cable to the charging head, and then plug the charging head into a standard outlet.
3.Unplug the charging head from the outlet and remove the USB cable from the device when charging is complete.
While charging, the device and the charger may become hot and stop charging. This usually does not affect the device’s lifespan or performance and is in the device’s normal range of operation.
Disconnect the charger from the device and wait for the device to cool down. For more information, visit samsung.com/us/support/answer/ANS00076952.
Getting started |
7 |
Start using your device
The instructions below explain how to turn your device on or off.
To turn the device on:
uPress and hold the Power key until the device turns on.
To turn the device off:
1.Press and hold the Power key.
2.Tap Power off, and confirm when prompted.
Use the SetupWizard
The first time you turn your device on, the Setup Wizard guides you through the basics of setting up your device.
Follow the prompts to choose a default language, connect to a Wi-Fi® network, set up accounts, choose location services, learn about your device’s features, and more.
Getting started |
8 |
Lockorunlockyourdevice
Use your device’s screen lock features to secure your device. By default, the device locks automatically when the screen times out.
To lock the device:
uPress the Power key. To unlock the device:
uPress the Power key, and then drag your finger across the screen.
The default Screen lock on your device is Swipe. To choose a secure screen lock, see Set a secure screen lock on page 151.
AddaGoogle account
Your new device uses your Google™ account to fully utilize its Android™ features.
1.From  Settings, tap Cloud and accounts >
Accounts.
2.Tap  Add account > Google.
Note: When you sign in to a Google account, Factory Reset Protection (FRP) is activated. FRP requires your Google account information when resetting to factory settings. For more information, see Factory reset protection on page 149.
Getting started |
9 |
AddaSamsungaccount
Create a Samsung account for access to Samsung content and apps on your device.
1.From  Settings, tap Cloud and accounts >
Accounts.
2.Tap  Add account > Samsung account.
Note: To quickly access your Samsung account, tap
 Settings >
 Samsung account.
Addanemailaccount
View and manage all of your email accounts.
1.From  Settings, tap Cloud and accounts >
Accounts.
2.Tap  Add account > Email.
Transferdatafromyour olddevice
Use Smart Switch™ to transfer contacts, photos, and other content from your old device.
For more information, visit samsung.com/us/support/ owners/app/smart-switch.
To use Smart Switch:
1.From  Settings, tap Cloud and accounts >
Smart Switch.
2.Follow the prompts and select the content to transfer.
Visit samsung.com/smartswitch for more information.
Getting started |
10 |

Set upyourvoicemail
You can access your voicemail from a Home screen.
1.From a Home screen, tap  Phone.
2.Touch and hold 

 Voicemail.
3.Follow the tutorial to create a password, record a greeting, and record your name.
For more information, see Voicemail on page 94.
Getting started |
11 |
Navigation
Please note that a touchscreen responds best to a light touch from the pad of your finger or a capacitive stylus. Using excessive force or a metallic object on the touchscreen may damage the tempered glass surface and void the warranty.
Tap
Lightly tap items to select or launch them.
•Tap the keyboard to enter characters or text.
•Tap an item to select it.
•Tap an app shortcut to launch the app.
Double-tap
Lightly tap items twice to select or launch them.
• Double-tap an image to zoom in or out.
Touch andhold
Touch and hold items to activate them.
•Touch and hold a field to display a pop-up menu of options.
Swipe
Lightly drag your finger vertically or horizontally across the screen.
•Swipe the screen to unlock the device.
•Swipe the screen to scroll through the Home screens or menu options.
Drag
Touch and hold an item, and then move it to a new location.
•Drag an app shortcut to add it to a Home screen.
•Drag a widget to place it in a new location.
Getting started |
12 |
Pinch andspread
Pinch the screen using your thumb and forefinger or spread by moving your fingers apart.
•Pinch the screen to zoom out while viewing a picture or a web page.
•Spread your fingers on the screen to zoom in while viewing a picture or a web page.
Navigationbar
The Navigation bar, at the bottom of the screen, displays the navigation keys.
Navigation keys
Hide/Show
Getting started |
13 |
Full screen mode
The navigation keys are hidden in full screen mode.
To enter or exit full screen mode:
uDouble-tap the Hide/Show icon to the left of the navigation keys.
To view the navigation keys in full screen mode:
uSwipe up from the bottom of the screen to display the Navigation bar.
Navigation bar settings
You can configure the Navigation bar background color and button layout.
uFrom  Settings, tap Display > Navigation bar
• Show and hide button: Add a button on the left side of the navigation bar to show or hide the Navigation bar.
•Background color: Choose a color for the background of the Navigation bar.
•Button layout: Choose the order of the navigation keys.
Getting started |
14 |

Commonoptions
The device uses basic command options to perform common actions.
• More options: Tap to view more menu options
for a screen.
• Delete: Tap to select items to delete.
• Share: Tap to select items to share, and then
choose a sharing method.
• Edit: Tap to customize the screen.
•On/Off: Tap to turn the option on ( ) or off
( ).
).
• Menu: Tap to view available options for
the field.
Getting started |
15 |
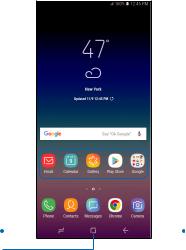
Home screen
 Status bar
 App shortcuts
Recent apps |
|
|
|
Back |
|
|
Home 
Devicesandsoftwareareconstantlyevolving—theillustrationsyouseehereareforreferenceonly.
Getting started |
16 |

Customize your
Home screen
Your device has multiple Home screens to hold app shortcuts and widgets. You can add, remove, change the order of screens, as well as choose a different main Home screen.
1.From a Home screen, pinch the screen.
2.Use these options to manage screens:
•To align shortcuts into a line at the top of a screen, tap  Align top.
•To align shortcuts into a line at the bottom of a screen, tap  Align bottom.
•To remove a Home screen, tap  Remove.
•To set a screen as the main Home screen, tap  Main. This screen is displayed when you tap
  Home.
Home.
•To change the order of screens, touch and hold a screen, and then drag it to a new position.
•To add a screen, swipe to the end of the screens, and then tap  Add.
Add.
•To enable Bixby Home, swipe right, and then tap On/Off.
Getting started |
17 |

Appshortcuts
You can use app shortcuts to launch an app from any Home screen.
1.From Apps, touch and hold an app shortcut to open the options menu.
2.Tap  Add to Home.
To remove a shortcut:
1.Touch and hold an app shortcut to open the options menu.
2.Tap  Remove from Home.
•Removing a shortcut does not delete the app, it just removes the shortcut from a Home screen.
To move a shortcut from one Home screen to another:
1.Touch and hold an app shortcut to release it.
2.Drag the app shortcut to a new Home screen, and then release it.
Use folders
You can organize App shortcuts in folders on an Apps list screen and Home screen.
For more information, see Create and use folders on page 43.
Getting started |
18 |
Wallpapers
Change the look of the Home and Lock screens with wallpaper. You can display a favorite picture or choose from preloaded wallpapers.
1.From a Home screen, pinch the screen.
2.Tap Wallpapers to customize.
3.Tap View all to see all available wallpapers.
4.Tap an image to choose it.
•Tap the screen or screens you want to apply the wallpaper to.
5.Tap Set as wallpaper, and confirm when prompted.
Themes
Set the theme to be applied to your Home and Lock screens, wallpapers, and app icons.
1.From a Home screen, pinch the screen.
2.Tap Themes to customize.
•Tap a theme to preview and download it to My themes.
3.Tap View all to see downloaded themes.
4.Tap a theme, and then tap Apply to apply the selected theme.
Getting started |
19 |
Icons
Apply custom icons to replace built-in app icons.
1.From a Home screen, pinch the screen.
2.Tap Wallpapers > Icons to customize.
3.Tap an icon set to preview and download it to My icons.
• Tap View all to see downloaded icons.
4.Tap an icon, and then tap Apply to apply the selected icon set.
Icon frames
You can show icons with shaded frames to make them stand out on the Home screen and Apps list screen.
1.From  Settings, tap Display > Icon frames and choose one of the following options:
•Icons only: Show icons only.
•Icons with frames: Show frames around icons.
2.Tap Done, and confirm when prompted.
Getting started |
20 |
Widgets
Widgets are simple application extensions that run on a Home screen.
To add a widget to a Home screen:
1.From a Home screen, pinch the screen.
2.Tap Widgets.
3.Touch and hold a widget, drag it to a Home screen, and release it.
To remove a widget from a Home screen:
1.From a Home screen, touch and hold a widget to open the options menu.
2.Tap  Remove from Home screen.
Home screen settings
Customize your Home and Apps screens.
1.From a Home screen, pinch the screen.
2.Tap Home screen settings to customize:
•Home screen layout: Set your device to have separate Home and Apps screens, or only a Home screen where all apps are located.
•Home screen grid: Choose a dimension option to determine how icons are arranged on the Home screen.
•Apps screen grid: Choose a dimension option to determine how icons are arranged on the Apps screen.
•Apps button: Add a button to the Home screen for easy access to the Apps screen.
•App icon badges: Select how to show icon badges when apps receive notifications.
•Add apps to Home screen: Automatically add newly downloaded apps to the Home screen.
Getting started |
21 |
•Quick-open notification panel: Enable this feature to open the Notification panel from the Home screen by swiping down.
•Portrait mode only: Prevent the Home screen from rotating to Landscape mode.
•Hide apps: Select apps to hide.
•About Home screen: View version information.
Easymode
Switch between the default screen layout and a simpler layout. The Easy mode layout has larger text and icons, making for a more straightforward visual experience.
1.From  Settings, tap Display > Easy mode.
2.Tap Easy mode to enable this feature.
3.Tap Done to confirm.
To disable Easy mode:
1.From  Settings, tap Display > Easy mode >
Standard mode.
2.Tap Done to exit Easy mode.
Getting started |
22 |
Loading...