


 Loading...
Usermanual
Tableofcontents
Special features |
1 |
Getting started |
2 |
Front view |
3 |
Back view |
4 |
Keyboard cover |
5 |
Connect the keyboard cover |
5 |
Function Keys |
6 |
Touchpad |
7 |
Keyboard Settings |
8 |
Assemble your device |
8 |
Install a SIM card and memory card |
8 |
Charge the battery |
10 |
Battery Saver |
11 |
S Pen |
12 |
Start using your device |
14 |
Use the Setup Wizard |
14 |
Restart the device |
15 |
Add an email account |
15 |
Transfer data between devices |
16 |
Update the device |
16 |
Navigation |
17 |
Start screen |
19 |
Taskbar |
20 |
i SPT_W737P_EN_UM_TN_RJ3_102418_FINAL
Task View Start menu App tiles Tablet mode Action center Multi desktop Split screen view S Pen functions Enter text
Apps
Install Apps
Uninstall Apps
Open Apps
Close Apps
App Settings
21
23
24
25
26
29
31
33
37
38
39
39
40
40
41
ii
Samsung Flow |
41 |
Samsung Gallery |
42 |
Samsung Notes |
42 |
Compose a Note |
42 |
Edit Notes |
43 |
Browse Notes |
43 |
Dolby Atmos |
44 |
Settings |
45 |
Access Settings |
46 |
Connections |
46 |
Devices |
46 |
Network and Internet |
47 |
Display |
48 |
Lock Screen and Security |
49 |
Fingerprint |
50 |
Phone |
60 |
|
Password |
50 |
Gaming |
61 |
|
PIN |
51 |
Getting help |
62 |
|
Dynamic Lock |
51 |
Videos |
62 |
|
Sign-in privacy options |
52 |
Smart Simulator |
62 |
|
|
|
|||
Privacy |
52 |
Tips |
62 |
|
|
|
|||
Update and Security |
54 |
Samsung Care |
62 |
|
Device Maintenance |
|
|||
55 |
Legal |
63 |
||
System |
|
|||
55 |
Intellectual property |
64 |
||
Time and Language |
57 |
|||
Open source software |
65 |
|||
Book Settings |
57 |
|||
Disclaimer of warranties; exclusion of liability65 |
||||
Accounts |
58 |
|||
|
|
|||
Accessibility |
59 |
Modification of software |
66 |
|
|
|
|||
Ease of Access |
59 |
Restricting children’s access to your mobile |
|
|
device |
67 |
|||
Other settings |
|
|||
60 |
Samsung Electronics America, Inc. |
67 |
||
|
|
|||
iii

Special features
 S Pen
S Pen
The S Pen™ is a stylus designed for special functions with Samsung Galaxy devices. See
S Pen functions on page 33.
Samsung Flow
Easily unlock and sign in to your tablet with a smartphone equipped with a fingerprint scanner. See Samsung Flow on page 41.
Cortana
Cortana is your digital agent. She’ll help you get things done. The more you use Cortana, the more personalized your experience will be. See Cortana on page 20
 Fingerprint scanner
Use your fingerprint as an alternative to entering passwords in certain apps. For more information, see Lock Screen and Security on page 49.
Special features |
1 |

Getting started
Front view |
3 |
Back view |
4 |
Keyboard cover |
5 |
Assemble your device |
8 |
Start using your device |
14 |
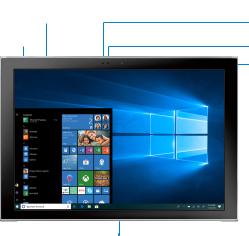
Front view
Volume keys 
Power key 
Keyboard dock port
 LED indicator
 Light sensor
 Front camera
 Headset jack
 USB port
 USB port/External display port
Devicesandsoftwareareconstantlyevolving—theillustrationsyouseehereareforreferenceonly.
Getting started |
3 |

Back view
Rear camera 
Fingerprint 
scanner
Speaker |
|
|
|
Speaker |
|
|
 SIM card/microSD card tray
Kickstand
Devicesandsoftwareareconstantlyevolving—theillustrationsyouseehereareforreferenceonly.
Getting started |
4 |

Keyboard cover
Connecting the device to the Keyboard cover allows you to use a traditional keyboard and touchpad. The touchpad will register pressure on the right or left side, so you can use the touchpad like a mouse.
Connect the keyboard cover
1.Connect the keyboard dock port at the bottom of the device to the connector on the Keyboard cover.
2.Lift the keyboard cover slightly and push it towards the screen.
3.Flip out the kickstand.
Note: Use care when connecting and removing the tablet from the keyboard case. Make sure that the Keyboard Cover is securely attached to your device.
Getting started |
5 |
WARNING: This device and certain accessories (sold separately) contain magnets that can affect the operation of implanted pacemakers, defibrillators, insulin pumps or other electronic medical devices within the range of 15 cm (6 inches). IF YOU USE ANY OF THESE MEDICAL DEVICES, CONSULT WITH YOUR PHYSICIAN BEFORE USING THIS DEVICE AND ACCESSORIES THAT CONTAIN MAGNETS.
FunctionKeys
Use function keys to easily access features and change settings, such as brightness and volume.
uSimultaneously press and hold the Fn key and press a function key.
If you lock the Fn key, you can use function keys without pressing the Fn key.
To lock the Fn key:
u Tap the Fn Lock key.
Getting started |
6 |
Key |
Function |
F1 |
Launch Settings. |
|
|
F2 |
Decrease the brightness of the display. |
|
|
F3 |
Increase the brightness of the display. |
|
|
F4 |
Switch between the LCD and a connected |
external display. |
|
|
|
F5 |
Lock the touchpad. |
|
|
F6 |
Mute or unmute the audio. |
|
|
F7 |
Decrease the volume. |
|
|
F8 |
Increase the volume. |
|
|
F9 |
Turn the Keyboard light on or off. |
|
|
F10 |
Open the task view screen. |
|
|
F11 |
Enter full screen mode (may not be available |
for all apps). |
|
|
|
F12 |
Activate or deactivate Airplane mode. |
|
|
Touchpad
Use the touchpad to move the cursor or select items. The left and right side of the touchpad function the same as the left and right buttons of a mouse.
Note: Use only your fingers on the touchpad.
Basic touchpadfunctions
•Move: To move the cursor, move your finger on the touchpad.
•Click: Tap the touchpad.
•Double-click: Double-tap the touchpad or left side of the touchpad twice.
•Right-click: Tap the right side of the touchpad to perform the right-click function.
•Drag: To move an item, select and drag it to the target position while touching and holding the touchpad.
Getting started |
7 |
KeyboardSettings
When you close the Keyboard Cover, your device will enter sleep mode. When you open the cover and set the device in position using the stand, the screen will turn on.
1.Tap  Start > Windows system > Control panel >
Hardware and sound > Power options.
2.Tap Choose what closing the lid does from the list on the side.
3.Configure the When I close the lid settings.
Assemble your device
Learn about your mobile device hardware, assembly procedures, and how to get started using your new device.
InstallaSIM cardand memory card
When you subscribe to a cellular network, you are provided with a SIM card. You may be able to use your previous SIM card.
You can install an optional microSD™ memory card (not included) to add more memory space to your device. A memory card can be installed at any time. It is not necessary to install it prior to using the device.
Caution: Be careful when using the removal tool to eject an internal card tray.
Getting started |
8 |
1.Insert the removal tool into the hole on the SIM card/Memory card tray, and then push until the tray pops out.
2.Turn the tray over and place the SIM card in the bottom of the tray.
•Make sure that the card’s gold contacts face outward and that the card is positioned as shown.
3.Turn the tray over and place the memory card on the top of the tray with gold contacts facing down.
4.Slide the SIM card/Memory card tray back into the slot.
Getting started |
9 |
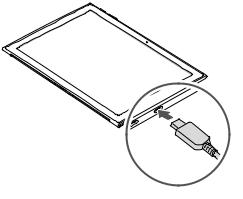
Charge the battery
Your device is powered by a rechargeable battery. A charger (charging head and USB cable) is included with the device for charging the battery from any standard outlet.
The battery comes partially charged. You can use the device while charging.
Note: Use only charging devices and batteries that are approved by Samsung. Samsung charging devices and batteries are designed for your device to maximize battery life. Using other charging devices and batteries may void your warranty and may cause damage.
1.Insert the USB cable into the USB charger/Accessory port.
2.Connect the USB cable to the charging head, and then plug the charging head into a standard outlet.
Getting started |
10 |

3.Unplug the charging head from the outlet and remove the USB cable from the device when charging is complete.
While charging, the device and the charger may become hot and stop charging. This usually does not affect the device’s lifespan or performance and is in the device’s normal range of operation.
Disconnect the charger from the device and wait for the device to cool down. For more information, visit samsung.com/us/support/answer/ANS00076952.
Battery Saver
Save the battery power by limiting the device’s functions.
1.On the taskbar, tap  Start >
  Settings >
System > Battery.
2.Tap the checkmark next to Turn battery saver on automatically if my battery falls below to activate it.
3.Drag the slider to the desired remaining battery percentage.
For a quick check of your battery level, view the battery charge indicator located in the bottom right corner of your device’s display. A solid color ( 
 ) indicates a full charge.
Getting started |
11 |
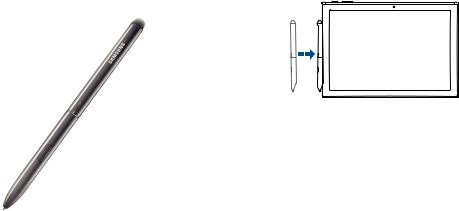
SPen
The S Pen is a stylus that assists you in performing various functions. For more information, see SPen functions onpage 33.
 S PEN BUTTON
Store the SPen
The S Pen can temporarily be stored on the left side of the device.
Note: The device must be turned on for the S Pen to be placed here. The S Pen should be stored in its protective cover when not in use.
Getting started |
12 |

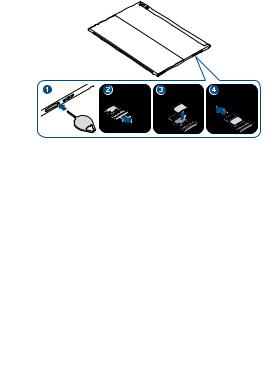
Replace the SPen tip
You can replace the tip of the S Pen with the included kit.
1. Use tweezers to pull out the S Pen tip.
2.Insert the new pen tip and press until it clicks in place.
Getting started |
13 |
Start using your device
The instructions below explain how to turn your device on or off.
To turn the device on:
uPress and hold the Power key until the device turns on.
To turn the device off:
u Tap  Start >
  Power > Shut down.
- or -
In Tablet mode, tap  Power > Shut down.
- or -
Press and hold the Power key until the locked screen appears, and then drag the locked screen downwards.
Use the SetupWizard
The first time you turn your device on, the Setup Wizard guides you through the basics of setting up your device.
Follow the prompts to choose a default language, connect to a Wi-Fi® network, set up accounts, choose location services, learn about your device’s features, and more.
Getting started |
14 |
Restart the device
To restart the device:
u Tap  Start >
  Power > Restart.
- or -
In Tablet mode, tap  Power > Restart.
If your device is frozen and unresponsive:
1.Press and hold the Power key for more than 10 seconds until the device turns off.
2.Press and hold the Power key again to restart it.
Addanemailaccount
Add an email account to your device.
1.On the taskbar, tap  Start >
  Settings.
2.Tap Accounts > Email & app accounts.
3.Tap Add an account and follow the prompts.
Getting started |
15 |
Transferdatabetween devices
Move audio, video, image, or other types of files between your tablet and a mobile device.
Caution: Do not disconnect the USB cable from the device when you are transferring files. Doing so may cause data loss or device damage.
Note: The devices may not connect properly if they are connected via a USB hub. Directly connect devices via your device’s USB charger/Accessory port.
1.Connect a mobile device to your tablet using the USB cable.
2.Transfer files between your tablet and the connected device.
Update the device
Keep your device up to date by downloading and installing updates, such as service packs and patches, for the operating system and other Microsoft® apps.
The device is set to download and install updates automatically.
To check for available updates manually:
1.On the taskbar, tap  Start >
  Settings.
2.Tap Update & security > Windows update > Check for updates.
Getting started |
16 |
Navigation
Please note that a touchscreen responds best to a light touch from the pad of your finger or a capacitive stylus. Using excessive force or a metallic object on the touchscreen may damage the tempered glass surface and void the warranty.
Tap
Lightly tap items to select or launch them.
•Tap the keyboard to enter characters or text.
•Tap an item to select it.
•Tap an app shortcut to launch the app.
Double-tap
Lightly tap items twice to select or launch them.
• Double-tap an image to zoom in or out.
Touch andhold
Touch and hold items to activate them.
•Touch and hold a field to display a pop-up menu of options.
Swipe
Lightly drag your finger vertically or horizontally across the screen.
•Swipe the screen to unlock the device.
•Swipe the screen to scroll through the Home screens or menu options.
Drag
Touch and hold an item, and then move it to a new location.
•Drag an app shortcut to add it to a Home screen.
•Drag a widget to place it in a new location.
Getting started |
17 |
Pinch andspread
Pinch the screen using your thumb and forefinger or spread by moving your fingers apart.
•Pinch the screen to zoom out while viewing a picture or a web page.
•Spread your fingers on the screen to zoom in while viewing a picture or a web page.
Getting started |
18 |
Loading...