


User Manual
Manual de usuario
RT2781BE
EN
ES
Scan for more user manual details or visit
Consulte para obtener más detalles del manual del usuario o visite
www.RCAav.com
It’s important to read this instruction prior to using your new product for the first time.
Es importante leer este manual antes de usar por vez primera su euipo.
FCC Information
CAUTION: TO REDUCE THE RISK OF ELECTRIC SHOCK, DO NOT REMOVE COVER (OR BACK). NO USER SERVICEABLE PARTS INSIDE. REFER SERVICING TO QUALIFIED SERVICE PERSONNEL.
THE |
LIGHTNING |
FLASH AND ARROWHEAD |
WITHIN |
THE |
TRIANGLE IS |
A WARNING SIGN ALERTING |
YOU OF |
“DANGEROUS VOLTAGE” INSIDE THE PRODUCT.
THE EXCLAMATION POINT WITHIN THE TRIANGLE IS A WARNINGSIGNALERTINGYOUOFIMPORTANTINSTRUCTIONS ACCOMPANYING THE PRODUCT.
FCC INFORMATION
This equipment has been tested and found to comply with the limits for a Class B digital device, pursuant to part 15 of the FCC Rules. These limits are designed to provide reasonable protection against harmful interference in a residential installation. This equipment generates, uses and can radiate radio frequency energy and, if not installed and used in accordance with the instructions, may cause harmful interference to radio communications.
However, there is no guarantee that interference will not occur in a particular installation. If this equipment does cause harmful interference to radio or television reception, which can be determined by turning the equipment off and on, the user is encouraged to try to correct the interference by one or more of the following measures:
•Reorient or relocate the receiving antenna.
•Increase the separation between the equipment and receiver.
•Connect the equipment into an outlet on a circuit different from that to which the receiver is connected.
•Consult the dealer or an experienced radio / TV technician for help.
WARNING: Changes or modifications to this unit not expressly approved by the party responsible for compliance could void the user's authority to operate the equipment.
This class B digital apparatus meets all requirements of the Canadian Interference - Causing Equipment Regulations.
The Shock Hazard Marking and Associated Graphical Symbol is provided on the bottom panel of unit.
Refer to the identification / rating label located on the back panel of your product for its proper operating voltage.
IMPORTANT: The power cord can be unplugged to turn off the main power to the unit. It should also be easily accessible in an emergency.
•Leave sufficient space around the appliance to allow adequate ventilation: 10cm on either side and at the back, as well as 7cm above it are ideal.
WARNING: To reduce the risk of fire or electric shock, do not expose this apparatus to rain or moisture. The apparatus shall not be exposed to dripping or splashing and that no objects filled with liquids, such as vases, should be placed on the apparatus.
CAN ICES-003(B)/NMB-3 (B)
FCC Information
For Your Safety
The AC power plug is polarized (one blade is wider than the other) and only fits into AC power outlets one way. If the plug
won’t go into the outlet completely, turn the plug over and try to insert it the other way.
If it still won’t fit, contact a qualified electrician to change the outlet, or use a different one. Do not
attempt to bypass this safety feature.
CAUTION:
• To prevent electric shock, match wide blade of plug to wide slot, fully EN insert.
• The apparatus shall not be exposed to dripping or splashing and that no objects filled with liquids, such as vases, shall be placed on apparatus.
• The mains plug is used as disconnect device. The mains plug of apparatus should not be obstructed OR should be easily accessed during intended use. To be completely disconnect the power input, the mains plug of apparatus shall be disconnected from the mains.
Service Information
This product should be serviced only by those specially trained in appropriate servicing techniques. For instructions on how to obtain service, refer to the warranty included in this user manual.
Connecting for Power
Make sure you connect all your other electronic components and the speakers before plugging your unit into the outlet. Plug the power cord in the wall outlet, matching the wide blade of the plug with the wide slot in the outlet. Be sure to insert the plug completely.
Technical Specification
Product: Home Theater System with Bluetooth® Wireless Technology Brand: RCA
Electrical Consumption
Power Supply: 120V ~ 60Hz
Headset Safety
•Do not play your headset at a high volume. Hearing experts warn against extended high-volume play.
•If you experience a ringing in your ears, reduce volume or discontinue use.
•You should use extreme caution or temporarily discontinue use in potentially hazardous situations.
•Even if your headset is an open-air type designed to let you hear outside sounds, don't turn up the volume so high that you are unable to hear what is around you.
•Excessive sound pressure from earphones and headphone can cause hearing loss.
- 1 -
Important Safety
Instructions
Please read and save for future reference.
Some of the following information may not apply to your particular product; however, as with any electronic product, precautions should be observed during handling and use.
•Read these instructions.
•Keep these instructions. EN • Heed all warnings.
•Follow all instructions.
•Do not use this apparatus near water.
•Clean only with a dry cloth.
•Do not block any ventilation openings. Install in accordance with the manufacturer’s instructions.
•Do not install near any heat sources such as radiators, heat registers, stoves, or other apparatus (Including amplifiers) that produce heat.
•Do not defeat the safety purpose of the polarized or groundingtype plug. A polarized plug has two blades with one wider than the other. A grounding type plug has two blades and a third grounding prong. The wide blade or the third prong is provided for your safety. If the provided plug does not fit into your wall outlet, consult an electrician for replacement of the obsolete outlet.
•Protect the power cord from being walked on or pinched particularly at plugs, convenience receptacles, and the point where they exit from the apparatus.
•Only use attachments / accessories specified by the manufacturer.
•Use only with a cart, stand, tripod, bracket or table specified by the
manufacturer, or sold with the apparatus. When
a cart is used, use caution when moving the cart / apparatus combination to avoid injury from tip-over.
• Unplug this apparatus during lightning storms or when unused for long periods of time.
• Refer all servicing to qualified service personnel. Servicing is required when the apparatus has been damaged in any way, such as the power cord or plug
is damaged, liquid has been spilled or objects have fallen into the apparatus, the apparatus has been exposed to rain or moisture, does not operate normally, or has been dropped.
Connections and Setup
•One main unit
•One remote control with batteries
•Onepairoffrontspeakers,onepairofrearspeakers,onecenterspeaker and one subwoofer
•One pig-tail antenna wire
•One AM loop antenna
•One pair of audio cable for analog connections
•One English & Spanish user manuals
Main Unit
Use Manual
Left and right |
Left and right |
|
|
Center speaker |
|||
front speakers |
rear speakers |
|
|
|
AM loop antenna |
|
|
Remote |
|
|
|
control with |
Pig-tail |
Audio cable for |
|
batteries |
|||
antenna wire |
analog connections |
||
|
Setup and Maintenance of the Unit
Additional safety information |
Provides spaces for sufficient ventilation as indicated: |
• Apparatusshallnotbeexposedtodrippingorsplashingandnoobjects |
|
|
|
filled with liquids, such as vases, shall be placed on the apparatus. |
|
• Always leave sufficient space around the product for ventilation. Do |
Front View |
|
|
not place product in or on a bed, rug, in a bookcase or cabinet that |
|
|
may prevent air flow through vent openings. |
|
• Do not place lighted candles, cigarettes, cigars, etc. on the product. |
|
|
• |
ConnectpowercordonlytoACpowersourceasmarkedontheproduct. |
|
• Care should be taken so that objects do not fall into the product. |
|
|
• Do not attempt to disassemble the cabinet. This product does not |
|
|
|
contain customer serviceable components. |
|
If your product operates on batteries, adhere to the following |
|
|
Side View |
||
|
|
|
|
||
precautions: |
|
|
|
|
|
A. Any battery may leak electrolyte if mixed with a different battery type, |
|
|
|
|
|
• |
Do not connect to the AC power cords until all connections are |
||||
inserted incorrectly, or if all batteries are not replaced at the same time. |
|||||
B. Any battery may leak electrolyte or explode if disposed of in fire or an |
|
completed. |
|||
attempt is made to charge a battery not intended to be recharged. |
• Donotuseyoursetimmediatelyaftertransferringitfromacoldplace |
||||
C. Discard leaky batteries immediately. Leaking batteries can cause skin |
|||||
burns or other personal injury. When discarding batteries, be sure to |
|
to a warm place: there is risk of condensation. |
|||
• Do not expose your set to water and excessively high temperatures. |
|||||
disposeoftheminapropermanner,accordingtoyourstate/provincial |
|||||
and local regulations. |
• After having disconnected your set, clean the case with a soft cloth, |
||||
D. Battery shall not be exposed to excessive heat such as sunshine, fire |
|
or with a slightly damp leather chamois. Never using strong solvents. |
|||
or the like. |
• Place an amplifier near the top shelf of the stand so heated air rising |
||||
Important battery information |
|
from it will not affect other components. If you have a satellite receiver, |
|||
• Do not mix different types of batteries or new and old batteries. Do |
|
you should place it on the top shelf. |
|||
not mix alkaline, standard (carbonzinc), or rechargeable (ni-cad, ni- |
Protect your Components from Overheating |
||||
mh, etc) batteries. |
• |
Do not block ventilation holes in any component. Arrange the |
|||
• In order to avoid any risk of explosion, observethe polarities |
|||||
indicated inside the battery compartment. Replace only with the |
|
components so that air can circulate freely. |
|||
type of batteries specified. Do not dispose of them in a fire or |
• Do not stack components directly on top of each other. |
||||
recharge them. |
• Donotplacetheunitnearothercomponentsthatgenerateheatsuch |
||||
• If you are not using the remote control for a long period of time, |
|
as heating vents. |
|||
remove the batteries. |
• Allowadequateventilationwhenplacingyourcomponentsinastand. |
||||
• Do not dispose of batteries in a fire. Batteries may explode or leak. |
|||||
• Place an amplifier near the top shelf of the stand so heated air rising |
|||||
• When discarding batteries, environmental problems must be |
|||||
considered and local rules or laws governing the disposal of these |
|
from it will not affect other components. If you have a satellite receiver, |
|||
|
you should place it on the top shelf. |
||||
batteries must be strictly followed. |
|
||||
- 2 - |
|
|
|
||
Connections and Setup
Connecting to Audio Components
Digital Audio in Connection
Digital Input
Connect components, such as DVD players, Satellite receiver/Cable boxes, BD (Blu-ray DiscTM) players or TVs, capable of outputting Dolby Digital (Surround Sound) or standard PCM (Stereo) format digital signals.
Note: “Blu-ray Disc” is a trademark of Blu-ray Disc Association.
Digital Connection
The digital audio jacks can accept Dolby Digital (Surround Sound) or PCM (Stereo) signals when compatible components are connected.
•This unit provides two optical and one coaxial digital input jacks for the connection of your components that have digital audio outputs.
•ToconnectDVDplayer,Satellitereceiver,Cablebox,Blu-rayplayerorTVthat has a digital audio output, use a coaxial digital (not included) or an optical digital cable (not included) to carry the audio signal and enjoy Dolby Digital sound quality.
•A separate optical or coaxial cable is needed for each digital connection.
Analog Audio Signals
Analog Audio Signals
EN
OR
Notes:
•If your TV has digital audio output, you can connect it to the corresponding digital audio input of the system instead of using analog connection.
•Optical and coaxial cables carry only the audio portion of the signal.
Blu-ray player
Satellite receiver
DVD player
BD/DVD/SAT-CABLE/TV/LINE-IN
Optical Digital In (Audio)
Connect to optical digital output of Cable box, Satellite receiver, DVD, Blu-ray player, TV or other compatible devices using the Optical Fiber Cable (not included).
BD/DVD/SAT-CABLE/TV/LINE-IN
Coaxial Digital In (Audio)
Connect to coaxial digital output of DVD, Cable box, Satellite receiver, TV or other compatible devices using the Coaxial Digital Cable (not included).
BD/DVD/SAT-CABLE/TV/LINE-IN
Connecting the Antennas
Connect the AM and FM antennas to the AM and FM terminals on the system’s back panel.
They must be hooked up in order to receive clear reception. For FM reception, extend antenna to its full length. For AM reception, rotate the antenna horizontally to get better reception.
- 3 -

Connections and Setup
AM Loop Antenna and FM Indoor Antenna
1.Uncoil the antenna wire and locate the base end of the AM antenna.
2.Press down on the antennas tab to open the terminal.
3.Insert the antenna wires into the terminal and release the tabs to secure the wires in place.
4.Make sure the white wire on the AM loop antenna is inserted into the AM loop terminal and the other wire is inserted into the ground loop terminal.
Connecting the speakers
Speaker wires are color-coded to match the terminals. Connect the
speaker wire from the back of each speaker to the corresponding color |
Center |
|
EN terminal at the back of the unit. Press down the tab to open the terminal |
Speaker |
|
and insert the wire. Release the tab to lock wire in the terminal. |
Subwoofer |
|
When connecting the speakers, make sure the polarities (“+“ speaker |
|
|
wire to “+“ on the unit. For example, red wire to red terminal on the |
|
|
unit) of speaker wires and terminals match. |
|
|
If the cords are reversed, the sound will be distorted. Do not let the |
Purple and Black |
|
speaker wires touch each other, it will damage the Home Theater’s |
||
|
||
amplifier. |
|
|
Front Speakers |
|
|
(Surround Sound) |
|
Black and Green |
Right |
Left |
and Red Black |
and White Black |
|
Positioning Speakers
3
1
2
1
3 |
4 |
Courtesy Dolby Laboratories
1. Left, Right (Front Speakers)
Front speakers carry primarily music and sound effects.
2. Center
In surround mode, the center speaker carries most of the dialog as well as music and effects.
It should be set between the left and right speakers.
3. Surround (Rear Speakers)
The surround speakers’ overall sound balance should be as close as possible to the front speakers. Proper placement is vital to establish an evenly distributed sound field.
4. Subwoofer
A subwoofer is designed to reproduce powerful low bass effects (explosions, the rumble of spaceships, etc.).
Magnetic Shielding
Speakers placed less than two feet from the TV set must be magnetically shielded in order to prevent picture distortion. Center speaker provided with this unit is magnetically shielded to protect your TV set.
Grey and Black |
Blue and Black |
Right Left
Rear Speakers
(Surround Sound)
Front Speaker Placement
For best results, follow the speaker placement below.
Alignment
Align the center speaker evenly with (A) or slightly behind (B) (the left and right speakers), but not ahead of them.
Courtesy Dolby Laboratories
Angle |
|
|
Place the left and right speakers |
A |
|
to form a 45-degree angle with |
||
|
||
your favorite viewing position to |
|
|
duplicate the soundtrack mixer’s |
|
|
perspective. |
|
|
Height |
B |
|
The three front speakers should |
||
be as close as possible to the same |
|
|
height. This often requires placing |
Courtesy Dolby Laboratories |
|
the center speaker directly on top |
||
|
||
(A) or beneath (B) the TV set. |
|
- 4 -
Connections and Setup
Better Surround Placement
Location
If possible, place surround speakers to either side of the listening area, not behind it.
Height
If space permits, install surround speakers 2-3 feet above viewers. This helps to minimize localization effects.
Aiming
Aim surround speakers straight across the room, not down at viewers, to help create a more open, spacious surround sound field.
Courtesy Dolby Laboratories
Alternative Surround Placement
Rear wall
If rear wall mounting is the only choice, aim the speakers at each other (A), towards the front (B) or towards the sidewalls (C, D).
Experiment with placement until sounds seem to surround you, rather than come from behind you.
Courtesy Dolby Laboratories
No adjacent walls
Surround speakers can go on stands facing each other to approximate sidewall mounting (A), or to the sides or rear of the viewing area, aimed upwards; they can go right on the floor, or preferably, a few feet off the floor such as on end tables (B).
Manufactured under license from Dolby Laboratories.
Dolby, Pro Logic, and the double-D symbol are registered trademarks of Dolby Laboratories.
Dolby Digital
The Dolby Digital mode lets you enjoy full digital surround from software processed in the Dolby Digital format. Dolby Digital provides better sound quality and a more powerful presence than conventional Dolby Surround. This unit is equipped with Dolby Digital 5.1-channel so that you can enjoy enhanced full digital surround sound. The new system provides stereo separation of the rear speakers (Rear-Right, Rear-Left). Adding the subwoofer channel to the 5 channels for bass sounds (counted as 0.1 channel) results in 5.1 channels (or 6 Channels) that bring you the most sophisticated Dolby Digital sound enjoyment.
Playback via Bluetooth® enabled devices
The unit can be paired and connected to the Bluetooth® enabled devices such as a smart phone.
INITIAL DEVICE PAIRING AND CONNECTION
In order to pair and connect your Bluetooth® device for the first time:
1.Press the button to turn on the unit.
2.Press SOURCE button or  button on the remote control to select
the BT mode. Turn on the Bluetooth® device you wish to pair and EN connect.
3.On your Bluetooth® enabled device, search for the “RT2781BE” in the list of discovered devices and select it.
It may take the unit and Bluetooth® enabled device a few seconds to pair.
4.If it is successful, the front display of the main unit will show “CONNECTED”.
5.You can now enjoy audio from the unit.
Notes:
•If your Bluetooth device (e.g. Smart phone etc.) need the PIN code while pairing, please enter 4-digit number: 0000.
•The unit can only be connected to one Bluetooth® device at a time.
RECONNECTING A BLUETOOTH® ENABLED DEVICE
Bluetooth® enabled devices must be reconnected when the device has been turned off or the unit has been turned off.
1.Press the button to turn on the unit.
2.Press SOURCE button or  button on the remote control to select the BT mode. Turn on the Bluetooth® device that has already been paired with the unit.
3.Depending on your Bluetooth device, your device may automatically connect to the unit.
If the device does not automatically connect to the unit, then search for the “RT2781BE” in its list of your Bluetooth® devices and select it.
4.If it is successful, the front display of the main unit will show “CONNECTED”.
5.You can now enjoy audio from the unit.
PAIR AND CONNECT WITH ANOTHER NEW DEVICE
In order to pair the unit to a new device, you must first disconnect the currently paired and connected Bluetooth® device from the unit.
1.On the currently paired and connected Bluetooth® device, select the “RT2781BE” from the list of currently paired and connected devices, and disconnect it. Please refer to your Bluetooth® enabled device User’s Guide for direction on how to disconnect a device. Or turn off the Bluetooth® device.
2.Follow the Initial device pairing and connection instructions above.
The Bluetooth® word mark and logos are registered trademarks owned by Bluetooth SIG, Inc.
- 5 -
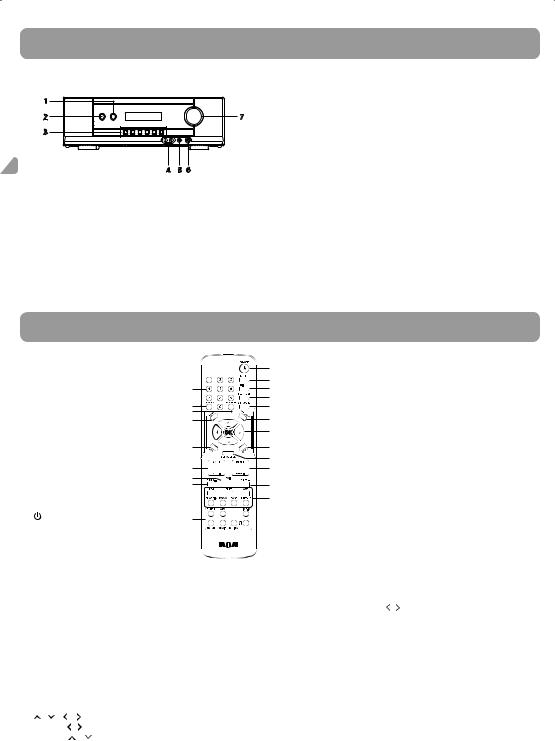
Unit Controls
Main Unit
1 |
|
2 |
7 |
3 |
|
EN |
4 |
5 |
6 |
|
1. (SOURCE button)
Selects the sources.
2. ON/STANDBY button
Turns on / off the unit. When the unit is turned on, the unit will go to the mode it was in before powered off.
3. /
/ (SURROUND buttons)
Selects among digital surround sound effects. (HALL/CHURCH/ CONCERT/LIVING ROOM/CAVE/ARENA/STEREO/DOLBY PL II MUSIC/ DOLBY PL II MOVIE/DOLBY PL EMULATION) depending on input signal.
Adjusts value in SETUP MENU.
 /
/ (TUNING buttons)
Tunes in to desired stations in AM/FM mode.

 /
/
 (PRESET buttons)
Selects preset stations in AM/FM mode; Selects item to be set in SETUP MENU.
4.AUX 3 jacks
Connects game consoles or other AV products that have AUX audio outputs.
5.LINE-IN jack
Connects portable audio devices or other AV products that have a LINE-OUT jack.
6.PHONES jack
7.MASTER VOLUME
Adjusts the volume.
|
Remote Control |
|
|
|
|
|
|
|||
Install two “AAA” batteries in the remote |
|
|
8. |
LEVEL |
|
|
||||
control prior to use. |
|
1 |
|
Speaker level setting. Refer to “Advanced Sound Control” for details. |
||||||
NOTES: |
|
|
|
2 |
9. |
SUBWOOFER |
|
|
||
|
|
13 |
3 |
|
Selects among subwoofer |
sound levels. [BALANCE (SWF:BAL), |
||||
• |
Batteries shall not be exposed to |
|
||||||||
|
4 |
|
STRONG (SWF:STRG), POWERFUL (SWF:PWRF) or SOFT] by pressing |
|||||||
|
excessive heat such as sunshine, fire |
|
|
|||||||
|
14 |
5 |
|
|||||||
|
|
SUBWOOFER. The setting is also available in SETUP MENU. |
||||||||
|
or the like. |
|
|
15 |
|
|
||||
|
|
|
16 |
6 |
10. MEM + / MEM - |
|
|
|||
• Do not mix old and new batteries. |
|
|
||||||||
|
7 |
|
Selects programmed stations in AM/FM mode. |
|||||||
• Do not mix alkaline, standard (carbon- |
|
|
||||||||
|
|
11. TUNER + |
|
|
||||||
|
zinc), or rechargeable (Ni-Cad, Ni-MH, |
17 |
8 |
|
|
|||||
|
|
Tap to increase the radio frequency in AM/FM mode. |
||||||||
|
etc.) batteries. |
|
9 |
|
||||||
|
|
|
Press and hold to search |
next available station in ascending |
||||||
|
|
|
|
|
|
|
||||
|
|
|
|
|
18 |
10 |
|
|||
|
|
|
|
|
|
frequencies. |
|
|
||
|
|
|
|
|
19 |
|
|
|
|
|
|
|
|
|
|
|
12. EQ buttons |
|
|
||
|
|
|
|
|
20 |
11 |
|
|
||
|
|
|
|
|
|
12 |
|
Selects among preset equalizer mode (POP, FLAT, JAZZ, CLASSIC, |
||
|
|
|
|
|
|
|
ROCK, BASS and TREBLE). Press the corresponding button to select |
|||
|
|
|
|
|
|
|
|
|||
1. |
ON•OFF |
|
21 |
|
|
the desired sound mode. This function is only available in Stereo |
||||
|
Turns on/off the unit. |
|
|
|
mode. |
|
|
|||
2. |
SLEEP |
|
|
|
|
13. Number buttons |
|
|
||
|
Selects sleep time. |
|
|
|
Directly accesses a preset station in AM/FM mode. |
|||||
3. |
NIGHT |
|
|
|
|
14. MEMORY |
|
|
||
|
|
|
|
|
Stores stations as preset stations in AM/FM mode. |
|||||
|
Selects among night mode options (MODE RATE / QUIET / OFF) |
|
||||||||
|
15. MONO/ST |
|
|
|||||||
|
which compresses the volume difference between normal voices |
|
|
|||||||
|
|
Selects between Stereo and Mono sound in FM mode. |
||||||||
|
and sounds such as explosions. (Available only during Dolby digital |
|
||||||||
|
16. SETUP |
|
|
|||||||
|
signal playback). |
|
|
|
|
|||||
|
|
|
|
Enters Setup mode. Use |
/ |
to select among setup options. |
||||
4. |
TEST TONE |
|
|
|
|
|||||
|
|
|
17. MUTE |
|
|
|||||
|
Speaker test tone setting. Refer to “Advanced Sound Control” for |
|
|
|||||||
|
|
Mutes all sound. |
|
|
||||||
|
details. |
|
|
|
|
|
|
|
||
|
|
|
|
|
18. VOL + / VOL - |
|
|
|||
5. |
SURROUND |
|
|
|
|
|
||||
|
|
|
|
Adjusts the volume. |
|
|
||||
|
Selects among digital surround sound |
effects. (HALL/CHURCH/ |
|
|
|
|||||
|
19. EXIT |
|
|
|||||||
|
CONCERT/LIVING ROOM/CAVE/ARENA/STEREO/DOLBY PL II MUSIC/ |
|
|
|||||||
|
|
Exits the current setting. |
|
|
||||||
|
DOLBY PL II MOVIE/DOLBY PL EMULATION) depending on input |
|
|
|
||||||
|
20. TUNER - |
|
|
|||||||
|
signal. |
|
|
|
|
|
|
|||
|
|
|
|
|
|
Tap to decrease the radio frequency in AM/FM mode. |
||||
6. |
DISTANCE |
|
|
|
|
|||||
|
|
|
|
Press and hold to search |
next available station in descending |
|||||
|
Adjusts the speakers’ listening distance. |
|
|
|
||||||
|
|
|
|
frequencies. |
|
|
||||
7. |
/ |
/ |
/ |
/ OK |
|
|
|
|
|
|
|
|
21. Source buttons |
|
|
||||||
|
• |
Press |
/ |
to select among setting items in Setup mode. |
|
|
|
|||
|
|
|
Selects audio sources. |
|
|
|||||
|
• |
Press |
/ |
to adjust the values when the display shows the |
|
|
|
|||
|
|
|
|
|
||||||
|
|
setup you want to change. |
|
|
|
|
|
|
||
•Press OK to confirm your selection.
- 6 -
 Loading...