


User manual
Manuel de l’utilisateur
Manual del Usuario
RTS796B EN
FR
ES
It is important to read this instruction book prior to using your new product for the first time.
Il est important de lire ce manuel d’instructions avant d’utiliser l’appareil pour la première fois.
Es importante que lea este libro de instrucciones antes de comenzar a usar su nuevo producto.
The lightning flash with an arrowhead symbol, within the equilateral triangle, is intended to alert the user to the presence of uninsulated “dangerous voltage” within the product’s enclosure that may be of
sufficient magnitude to cause an electric shock.
Le symbole de l’éclair avec la flèche dessinée à l’intérieur d’un triangle avertit l’utilisateur de la présence de « tension dangereuse » non isolée au sein du logement du produit qui peut avoir une amplitude suffisante pour constituer un risque d’électrocution.
El símbolo del relámpago terminado en flecha que se encuentra dentro de un triángulo equilátero tiene el propósito de alertar al usuario acerca de la existencia de “tensión peligrosa” no aislada dentro de la caja del producto que puede ser de suficiente magnitud como para constituir un riesgo de descarga.
The exclamation point within the equilateral triangle is intended to alert the user to the presence of important operating and maintenance (servicing) instructions in this user manual.
Le point d’exclamation dessiné à l’intérieur d’un triangle avertit l’utilisateur de la présence d’importantes instructions d’utilisation et d’entretien (réparation) dans ce manuel de l’utilisateur.
El signo de admiración dentro de un triángulo equilátero tiene como propósito alertar al usuario acerca de la presencia de instrucciones operativas y de mantenimiento (reparación) importantes en este manual de usuario.
The symbol for Class II (Double Insulation)
Symbole pour classe II (double isolation)
Símbolo de Clase II (Doble aislamiento)
RTS796B 3L IB.indd 1 |
|
|
2/18/2014 10:07:36 |
|
|
||
|
|
|
|
SAFETY INSTRUCTIONS
WARNING: THE APPARATUS SHALL NOT BE EXPOSED TO DRIPPING OR SPLASHING AND THAT NO OBJECTS FILLED WITH LIQUIDS, SUCH
AS VASES, SHALL BE PLACED ON APPARATUS. WARNING: TO REDUCE THE RISK OF FIRE OR ELECTRIC SHOCK, DO NOT EXPOSE THE APPLIANCE TO RAIN OR MOISTURE.
CAUTION: USE OF CONTROLS OR ADJUSTMENTS OR EN PERFORMANCE OF PROCEDURES OTHER THAN THOSE SPECIFIED MAY RESULT IN HAZARDOUS RADIATION
EXPOSURE.
CAUTION: DANGER OF EXPLOSION IF BATTERY IS INCORRECTLY REPLACED. REPLACE ONLY WITH THE SAME OR EQUIVALENT TYPE.
CAUTION: TO REDUCE THE RISK OF FIRE, DO NOT PLACE ANY HEATING OR COOKING APPARATUS BENEATH THIS UNIT.
CAUTION: TO PREVENT ELECTRIC SHOCK, MATCH WIDE BLADE OF PLUG TO WIDE SLOT OF POWER OUTLET, THEN FULLY INSERT.
On Placement
•Do not use the unit in places that are extremely hot, cold, dusty, or humid.
•The ventilation should not be impeded by covering the ventilation openings with items such as newspaper, table-cloths, curtains, etc.
On Safety
•When connecting or disconnecting the AC power cord, grip the plug and not the cord itself. Pulling the cord may damage it and create a hazard.
•When you are not going to use the unit for a long period of time, disconnect the AC power cord.
•No naked flame sources such as lighted candles should be placed on the AC power cord and the unit.
•Leave a minimum of 10 cm around the apparatus for ventilation.
•Attention should be drawn to the environmental aspects of battery disposal.
•Use of apparatus in moderate climates.
On Condensation
•When left in a heated room where it is warm and damp, water droplets or condensation may form inside the unit. When there is condensation inside the unit, the unit may not function normally. Let the unit stand for 1 to 2 hours before turning the power on, or gradually heat the room and let the unit dry before use.
Rating Plate Location
• The rating plate is located at the rear of unit.
WARNING:
• Should any trouble occur, disconnect the AC power cord and refer servicing to a
qualified technician.
•Mains plug is used as the disconnect device, it shall remain readily operable and should not be obstructed during intended use. To be completely disconnected the apparatus from supply mains, the mains plug of the apparatus shall be disconnected from the mains socket outlet completely.
FCC Information
NOTE: This equipment has been tested and found to comply with the limits for a Class B digital device, pursuant to part 15 of the FCC Rules. These limits
2
are designed to provide reasonable protection against harmful interference in a residential installation. This equipment generates, uses, and can radiate radio frequency energy and, if not installed and used in accordance with the instructions, may cause harmful interference to radio communications. However, there is no guarantee that interference will not occur in a particular installation. If this equipment does cause harmful interference to radio or television reception, which can be determined by turning the equipment off and on, the user is encouraged to try to correct the interference by one or more of the following measures:
•Reorient or relocate the receiving antenna.
•Increase the separation between the equipment and receiver.
•Connect the equipment into an outlet on a circuit different from that to which the receiver is connected.
•Consult the dealer or an experienced radio/TV technician for help.
Warning: Changes or modifications to this unit not expressly approved by the party responsible for compliance could void the user’s authority to operate the equipment.
For Customers in Canada
This apparatus complies with the Class B limits for radio noise emission set out in radio interference regulations.
CAN ICES-3 (B) / NMB-3 (B)
IMPORTANT SAFETY INSTRUCTIONS
1.Read these instructions.
2.Keep these instructions.
3.Heed all warnings.
4.Follow all instructions.
5.Do not use this apparatus near water.
6.Clean only with a dry cloth.
7.Do not block any ventilation openings. Install in accordance with the manufacturer’s instructions.
8.Do not install near any heat sources such
RTS796B 3L IB.indd 2 |
|
|
2/18/2014 10:07:36 |
|
|
||
|
|
|
|
as radiators, heat registers, stoves, or other apparatus (including amplifiers) that produce heat.
9.Do not defeat the safety purpose of the polarized or grounding-type. A polarized power plug has two blades with one wider than the other.
A grounding type power plug has two blades and a third grounding prong. The wide blade or the third prong is provided for your safety.
When the provided power cord does not fit into your AC power outlet, consult an electrician for replacement of the obsolete outlet.
10.Protect the AC power cord from being walked on or pinched particularly at the power plug, convenience receptacles, and the point where they exit from the apparatus.
11.Only use attachments/accessories specified by
the manufacturer.
12. Use only with the cart, stand, tripod, bracket, or table specified by the manufacturer, or sold with
the apparatus. When a cart is used, 
use caution when moving the cart/apparatus combination to avoid injury from tip-over.
13.Unplug this apparatus during lightning storms or when unused for long periods of time.
14.Refer all servicing to qualified service personnel.
Servicing is required when the apparatus has EN been damaged in any way, such as the AC power cord is damaged, liquid has spilled or objects have fallen into the apparatus, the apparatus
has been exposed to rain or moisture, does not operate normally, or has been dropped.
remote control
using the remote control
•Point the remote control at the REMOTE SENSOR located on the unit (see Front Panel illustration for precise location).
•When there is a strong ambient light source, the performance of the infrared REMOTE SENSOR may be degraded, causing unreliable operation.
•The recommended effective distance for remote operation is about 16 feet (5 meters).
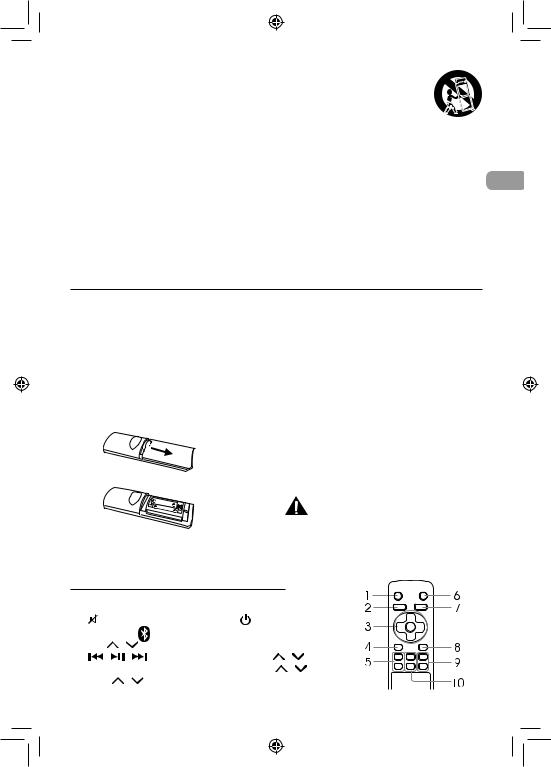
To Change Remote BatterIES
1.Open the battery door.
2.Insert two AAA batteries.
Battery Replacement
When the batteries become weak, the operating distance of the remote control is greatly reduced and you will need to replace them.
Notes:
• If the remote control is not going to be used for a long time, remove the batteries to avoid corrosion damage caused by battery leakage.
• Do not mix old and new batteries. Do not mix ALKALINE, standard (CARBON-ZINC) or rechargeable (NICKEL-CADMIUM) batteries.
•Always remove batteries as soon as they become weak.
•Weak batteries can leak and severely damage the remote control.
•WARNING: Do not dispose of batteries in a fire. batteries may explode or leak.
CAUTION:
Danger of explosion if battery is incorrectly replaced. Replace only with the same or
equivalent type.
LOCATION OF CONTROLS
remote control
1. |
MUTE button |
6. |
button |
|
|
|||
2. |
BLUETOOTH |
button |
7. |
LINE IN button |
|
|||
3. |
VOL |
/ |
|
button |
8. |
OPTICAL button |
|
|
|
/ |
|
/ |
button |
9. |
TREBLE |
/ |
button |
4. |
AUX button |
|
10 |
SOURCE |
/ |
button |
||
5. |
BASS |
|
/ |
button |
|
|
|
|
|
|
|
|
|
|
|
|
3 |
RTS796B 3L IB.indd |
3 |
|
|
|
|
2/18/2014 10:07:36 |
||

SOUNDBASE
1.
 Standby/ON button
2. |
SOURCE |
button |
3. |
BLUETOOTH |
/ LEVEL indicator |
4. |
LINE IN / LEVEL indicator |
|
5.AUX IN / LEVEL indicator
6. |
OPTICAL IN / LEVEL indicator |
|
EN 7. |
/ |
VOLUME button |
8. |
AUX IN R / L jack |
|
9. |
LINE IN 3.5mm jack |
|
10. |
OPTICAL IN jack |
|
11. |
Remote Sensor |
|
Accessories
Please locate the included accessories. To |
order replacement units, visit http://www.RCAav.com |
|
|
Remote control (with battery) |
x 1 |
|
||
|
Audio Cable |
x 1 |
|
||
ConnectionS
Connect audio through aN ANALOG AUDIO CABLE
1.Connect an Audio Cable (not included) from the AUX IN jacks to the AUDIO OUT jacks of your TV, Set-Top Box or Blu-ray/DVD Player.
2.Connect a 3.5mm Audio Cable (included) from the LINE IN jack to the AUDIO OUT jacks or from the AUX IN jacks to the Headphone Out jack of your TV, Set-Top Box or Blu-ray/DVD Player.
Connect audio through a digital optical cable
3.Connect an Optical Cable (not included) from the OPTICAL IN jack to the OPTICAL OUT jack of your TV, SetTop Box or Blu-ray/DVD Player.
Note: OPTICAL IN only supports PCM signal. You may need to activate PCM (Downmix) on your source device, e.g. TV, Set-Top Box or Blu-ray/DVD Player.
Plug one end of a 3.5mm Audio Cable (not included) into the LINE IN jack and other end into your iPad®, iPhone®, iPod® or other audio devices.
4
RTS796B 3L IB.indd 4 |
|
|
2/18/2014 10:07:37 |
|
|
||
|
|
|
|
BLUETOOTH PAIRING |
|
Basic Operation |
Before Bluetooth pairing, you should turn on the Bluetooth function of your other device (such as, mobile phone with Bluetooth function).
1. Press SOURCE button on the unit or button on the remote control to select BT (Bluetooth) mode. The Bluetooth indicator light on the soundbase will blink.
2.On your device (mobile phone, MP3 player, etc.), select RCA RTS796B from the list of available
Bluetooth connections.
Note: If your Bluetooth device (such as, mobile phone) requires a password while pairing, please enter 4-digit number: 0000.
•If the Bluetooth pairing is successful, the
Bluetooth indicator will illuminate.
•If the Bluetooth pairing is unsuccessful, the
Bluetooth indicator will blink at slow speed. Please try again.
To disconnect the currently paired device
1.On your currently paired and connected device, select RCA RTS796B from the list and disconnect it. Or
2.Turn off the connected device.
Enjoy the music through Bluetooth
• |
Press |
|
to begin or pause playback |
||
• |
Press |
|
/ |
|
to select a specific track |
|
|
||||
•Press and hold  /
/  to start moving backward/forward at high speed.
TROUBLESHOOTING
1. Press 

 button on the Soundbase or button on the remote to turn on the unit.
2.Press SOURCE  /
/ on the remote to select
AUX IN, OPTICAL IN, LINE IN or Bluetooth source
(input). The LEDs located on top of Soundbase will indicate the currently-selected source.
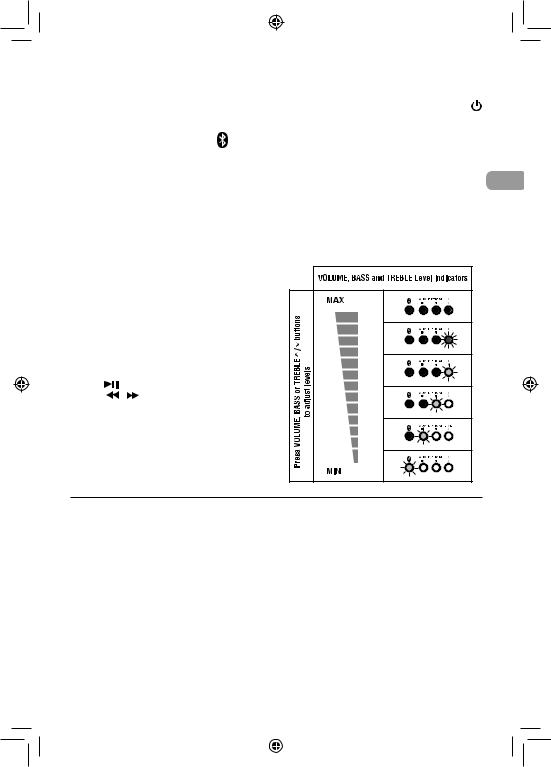
3.Press VOLUME  /
/  , BASS
  /
/  or TREBLE
 /
/ on the remote to adjust Volume, EN Bass or Treble levels. When adjusting Volume,
Bass or Treble, the four LEDs will temporarily display the current level setting (see illustration).
Note: When mute is enabled, the 4 LED indicators will flash. Press the MUTE button on the remote control to disable the mute function and LED flashing stop.
The unit does not switch on.
•Make sure it is plugged in.
•Press STANDBY/ON button to turn on the
Soundbase.
I have no sound.
•Press the VOLUME  /
/  button on the top of the Soundbase or VOL
  /
/  button on the remote.
•Ensure the source you’ve selected is outputting audio. If you’re using “audio out” from your TV, ensure your TV is configured to output audio (see TV’s menu settings).
•Ensure your AV connections are properly made
(ensure you don’t have any loose connections).
•Ensure you’ve selected the correct source (input)
- the LEDs located on the top of the Soundbase
will indicate the currently-selected source (input).
•Mute is activated (the 4 LEDs on top of the
Soundbase flashes). Press the mute button on the remote control.
•Ensure the input source is selected PCM output on the setup menu of the input device.
Cannot setup Bluetooth pairing
•Reset the bluetooth connection by turning off and on your connectind device, or this Soundbase, or select other SOURCE on this Soundbase then back to BT mode again.
The remote control doesn’t work
•If battery is weak, please replace the battery and ensure the new battery is installed correctly.
•Please ensure there is nothing blocking the remote sensor on the front of the Soundbase.
Specifications and external appearance are subject to change without notice.
5
RTS796B 3L IB.indd 5 |
|
|
2/18/2014 10:07:37 |
|
|
||
|
|
|
|
 Loading...