


VR712HF
Table of contents
 Loading...
VCR
User’s Guide
Changing Entertainment. Again.
VR648HF/VR712HF
Important Information
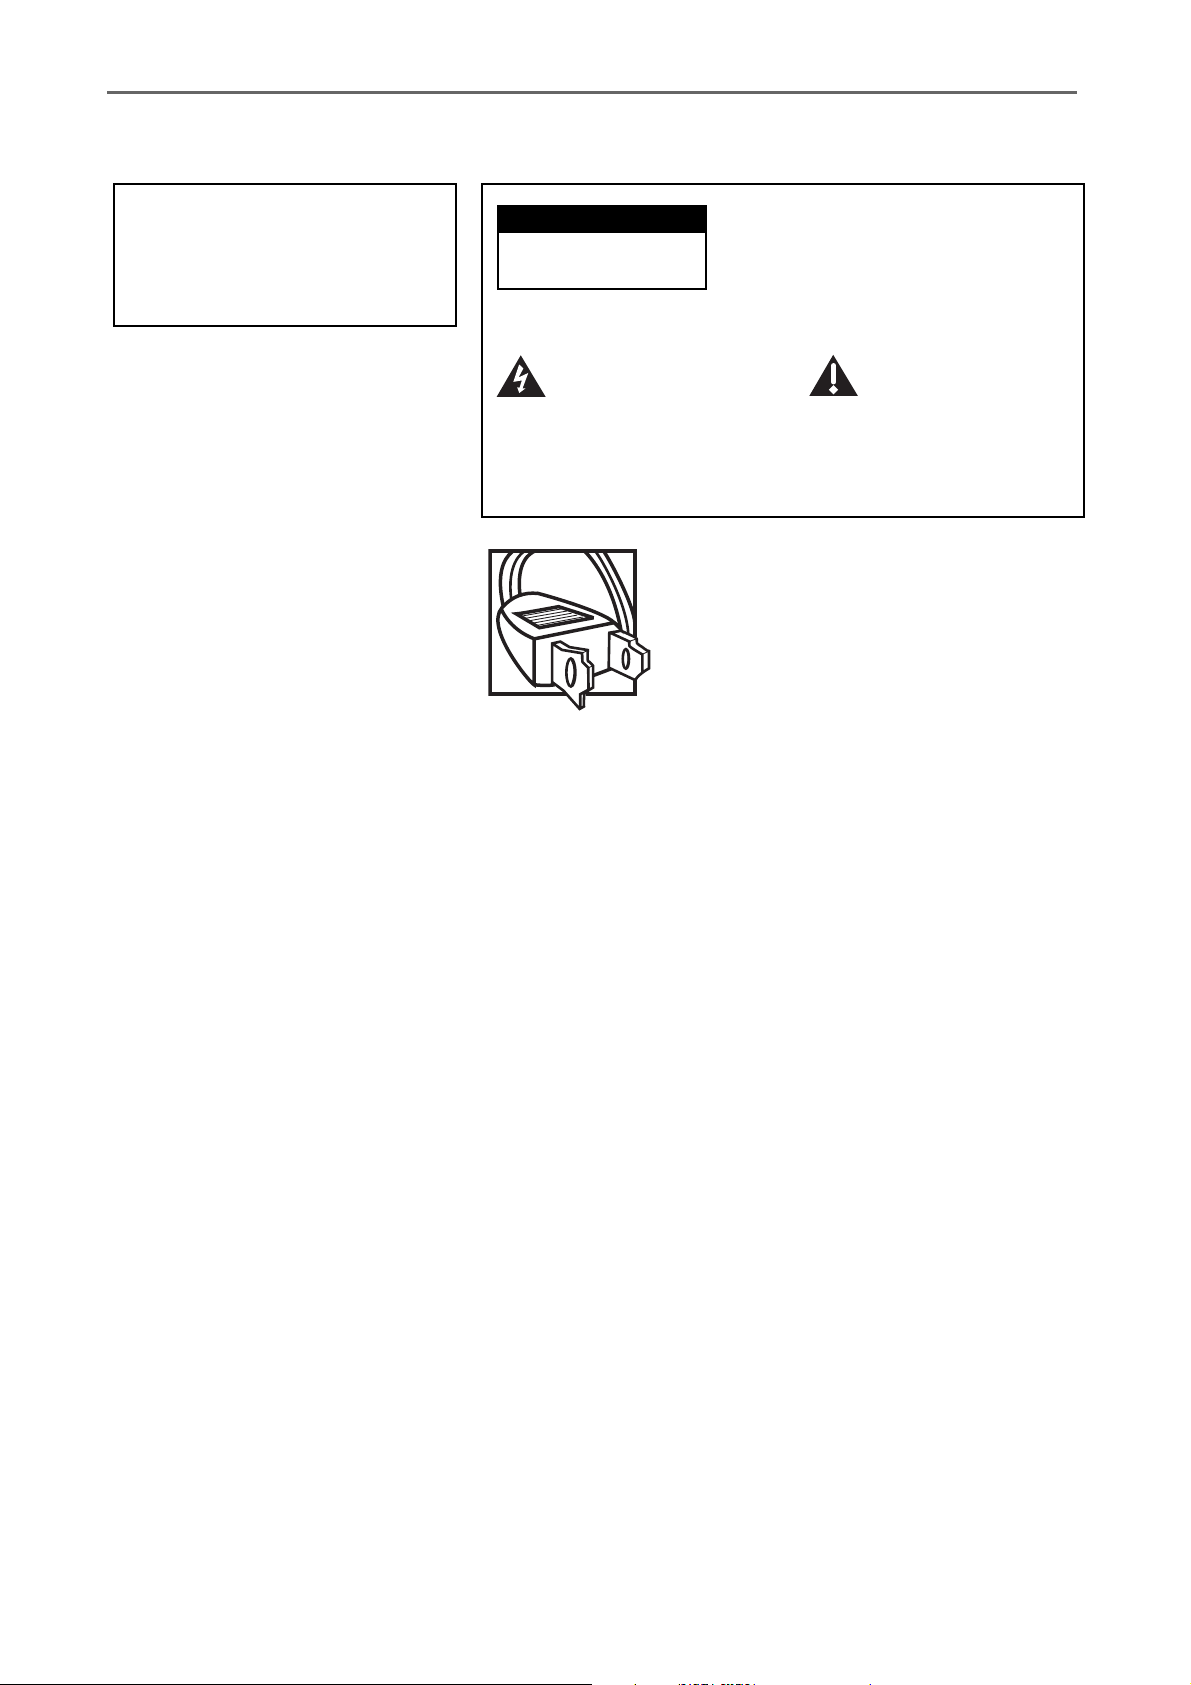
WARNING
To reduce the risk of fire or
electric shock, do not expose
this product to rain or moisture.
CAUTION
RISK OF ELECTRIC
SHOCK. DO NOT OPEN.
This symbol indicates
"dangerous voltage"
inside the product that
presents a risk of
electric shock or
personal injury.
Refer to the identification/rating label located on the back
panel of your product for its proper operating voltage.
FCC Regulations state that unauthorized changes or
modifications to this equipment may void the user’s authority
to operate it.
Cable TV Installer: This reminder is provided to call your
attention to Article 820-40 of the National Electrical Code
(Section 54 of the Canadian Electrical Code, Part 1) which
provides guidelines for proper grounding and, in particular,
specifies that the cable ground shall be connected to the
grounding system of the building as close to the point of cable
entry as practical.
Caution: To reduce the risk of
electric shock, do not remove cover
(or back). No user serviceable parts
inside. Refer servicing to qualified
service personnel.
This symbol
indicates important
instructions
accompanying the
product.
Caution: To prevent electric shock, match
wide blade of plug to wide slot, fully
insert.
Attention: Pour éviter les chocs
électriques, introduire la lame la plus large
de la fiche dans la borne correspondante
de la prise et pousser jusqú au fond.
Product Registration
Please fill out the product registration card and return it immediately. Returning the card allows us to
contact you if needed.
Product Information
Keep your sales receipt to obtain warranty parts and service and for proof of purchase. Attach it here
and record the serial and model numbers in case you need them. The numbers are located on the back
of the product.
Model No.____________________________________________________________________________
Serial No. ____________________________________________________________________________
Purchase Date:________________________________________________________________________
Dealer/Address/Phone: ________________________________________________________________
COMMERCIAL ADVANCE and MOVIE ADVANCE are registered trademarks of SRT, Inc.; a Jerry Iggulden invention licensed in association
with Arthur D. Little Enterprises.

Table of Contents
Chapter 1: Connections & Setup
Things to Consider Before Connecting Components ..................................................... 3
Cables Needed to Connect Components to Your VCR ................................................... 4
Choose Your Connection .................................................................................................. 4
TV + VCR ..................................................................................................................... 5
TV + VCR + Satellite Receiver..................................................................................... 6
TV + VCR + Cable Box................................................................................................. 7
Put Batteries in the Remote Control ............................................................................... 8
Turn on the TV and VCR ...................................................................................................8
Using the Remote Control to Choose On-screen Menu Items.......................................8
Complete the on-screen setup guide ........................................................................8
VCR Basics ....................................................................................................................... 10
Playing a tape ........................................................................................................... 10
Automatic Rewind ................................................................................................... 10
Tape Eject .................................................................................................................. 10
Basic Recording ............................................................................................................... 10
Check the Safety Tab................................................................................................ 10
Chapter 2: Remote Control
The Buttons on the Remote Control ............................................................................. 11
Using the INPUT Button ....................................................................................12
Programming the Remote to Operate Other Components .........................................13
Find Out If You Need to Program the Remote ....................................................... 13
Programming the Remote ....................................................................................... 13
Using Automatic Code Search ........................................................................... 13
Using Direct Entry ..............................................................................................14
How to Use the Remote After You’ve Programmed It .......................................... 14
Code List ..........................................................................................................................15
Chapter 3: VCR Features
Recording Features ......................................................................................................... 17
Express Recording (XPR) .......................................................................................... 17
Timer Recording .......................................................................................................18
Stopping a Timer Recording..............................................................................18
Reviewing and Clearing Programs .................................................................... 18
Index Search....................................................................................................................19
Zero Search .....................................................................................................................19
Pro-Tect Plus™ Locking Feature..................................................................................... 19
Time Counter .................................................................................................................. 20
Info Display .....................................................................................................................20
COMMERCIAL ADVANCE ................................................................................................ 21
COMMERCIAL ADVANCE Marking ..........................................................................21
COMMERCIAL ADVANCE Playback.......................................................................... 22
COMMERCIAL ADVANCE Display ............................................................................ 23
MOVIE ADVANCE ............................................................................................................ 23
To Override the Show Previews Mode: ...................................................................23
1

Table of Contents
Chapter 4: On-Screen Menus
Explanation of the Menu System .................................................................................. 27
Timer Recordings ...................................................................................................... 27
Time........................................................................................................................... 27
Channels ................................................................................................................... 27
Auto Channel Search .........................................................................................27
Add/Remove Channels ....................................................................................... 28
Signal Type .........................................................................................................28
Cable Box Setup .................................................................................................28
VCR Output Channel ......................................................................................... 28
Setup ......................................................................................................................... 29
Preferences ............................................................................................................... 29
Remote Control .................................................................................................. 29
Auto Play ............................................................................................................29
Auto TV/VCR ....................................................................................................... 29
EnergySaver........................................................................................................ 29
Front Panel .........................................................................................................29
Tape Speed ......................................................................................................... 30
Recording Speeds ............................................................................................... 30
Set Auto Repeat ................................................................................................. 30
COMMERCIAL ADVANCE ................................................................................... 30
Audio ........................................................................................................................ 30
Reception ........................................................................................................... 30
Tape Playback ..................................................................................................... 30
Language .................................................................................................................. 30
Chapter 5: Additional Information
Troubleshooting.............................................................................................................. 31
Questions and Answers About COMMERCIAL ADVANCE ........................................... 34
Display Panel...................................................................................................................35
Glossary ...........................................................................................................................35
Limited Warranty............................................................................................................ 36
How to Find Your TV’s Video Input Channel ................................................................ 38
Index ................................................................................................................................ 41
2

Chapter 1: Connections & Setup
Things to Consider Before Connecting Components
Protect Components From Power Surges
• Connect all components before plugging any power cords into the wall outlet.
• Always turn off the TV and other components before you connect or disconnect any cables.
Position Cables to Avoid Audio Hum or Interference
• Insert all cable plugs firmly into their jacks.
• Place any Audio/Video (A/V) cables to the side(s) of the TV’s back panel instead of straight down the back after
connecting components.
• Try not to coil any twin-lead cables and keep them away from all A/V cables as much as possible.
• Make sure all antennas and cables are properly grounded. Refer to the Safety Tips sheet packed with your unit for
detailed information.
Protect Components From Overheating
• Never block ventilation slots in any component. Arrange the components so that air can circulate freely.
• Do not stack components.
• Allow adequate ventilation when placing components in a stand.
• Place an amplifier or satellite receiver on the top shelf of a stand so heated air rising from it will not flow around
other components.
Chapter 1 3
Chapter 1: Connections & Setup
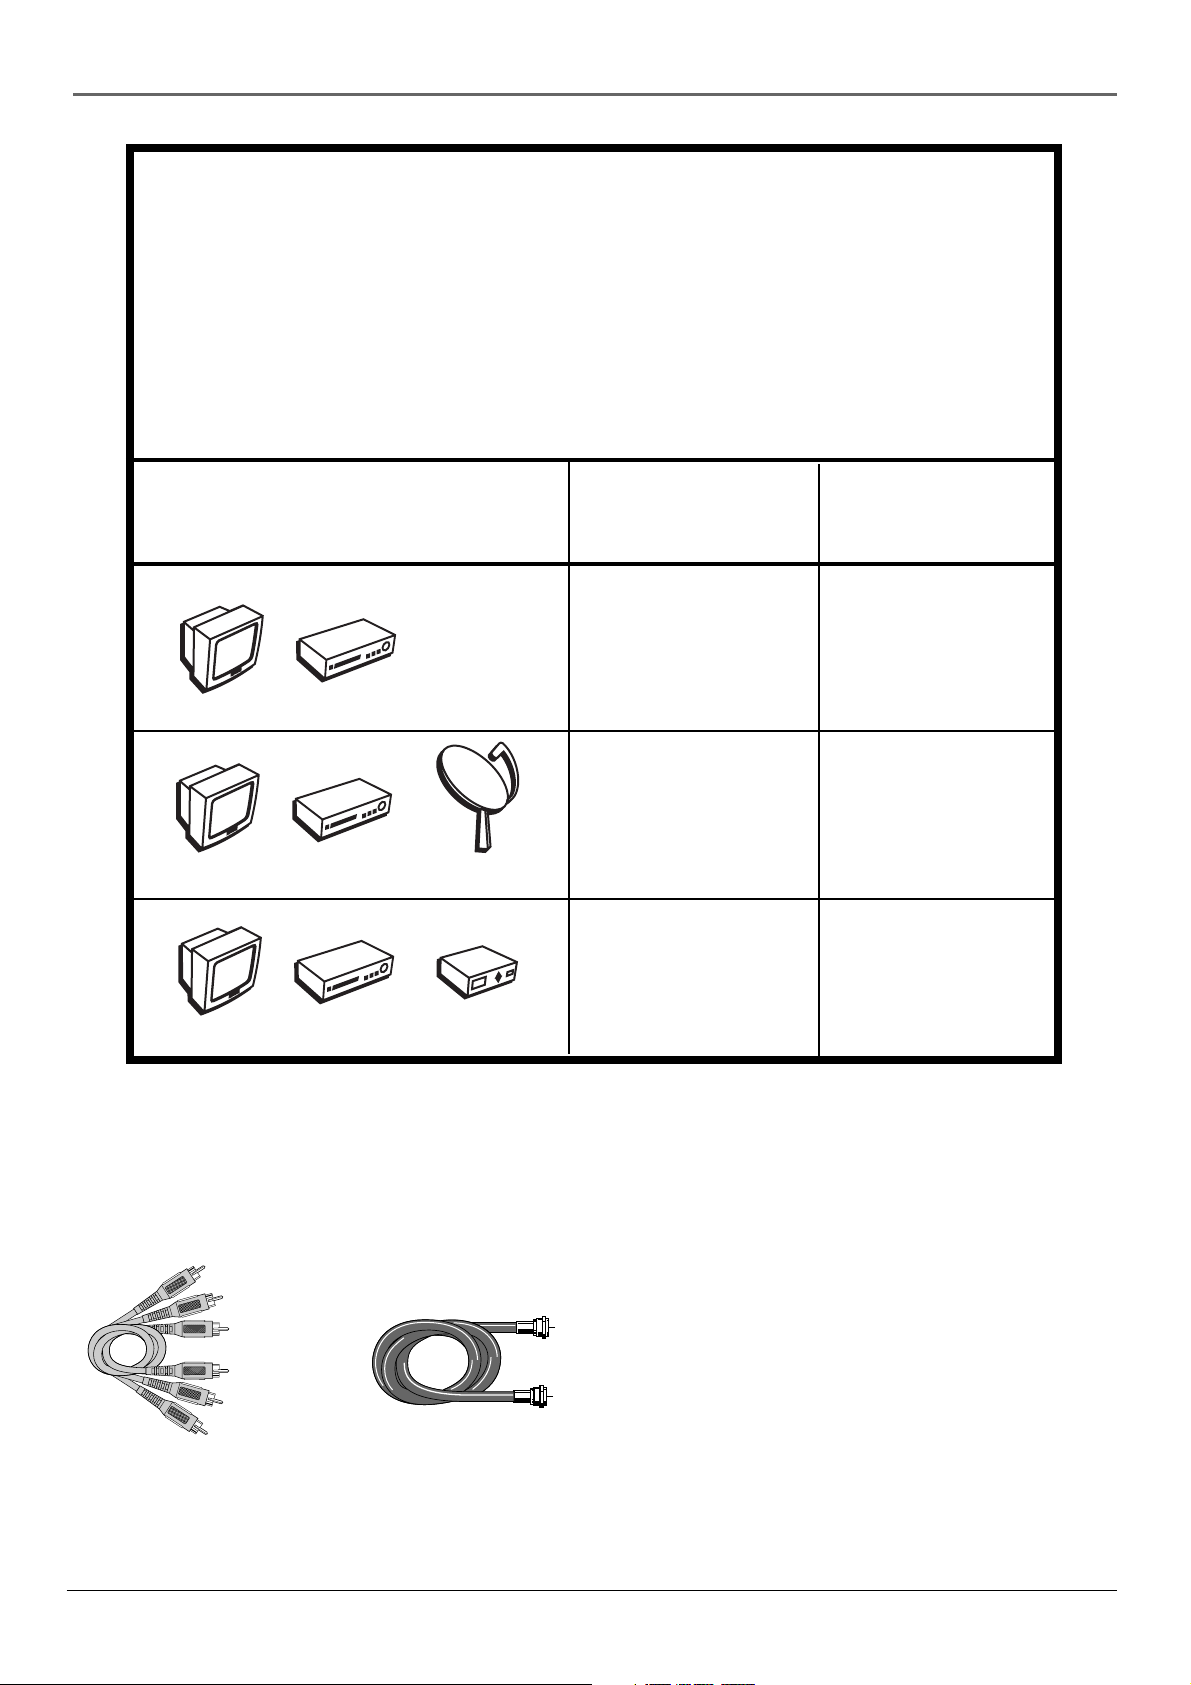
Choose Your Connection
There are several ways to hook up your VCR, depending on the components connected. Please
use the following chart to determine which connection is best for you and proceed to the
appropriate page.
Note: If you prefer, we can provide you with the name of an Authorized Service
Representative who will visit your home for a fee to install your electronic entertainment
system and to instruct you in its operation. For details about this service, call 1-888-206-3359.
Components
V
T
V
T
V
T
Connection Go To
Title
TV + VCR page 5
R
C
V
TV + VCR + page 6
R
C
V
Satellite
Satellite Receiver
TV + VCR +
x
o
R
C
V
C
B
e
l
b
a
Cable Box page 7
Cables Needed to Connect Components to Your VCR
The pictures below show the cables needed for the connections represented in this book.
Audio/Video cables
4 Chapter 1
Coaxial cable
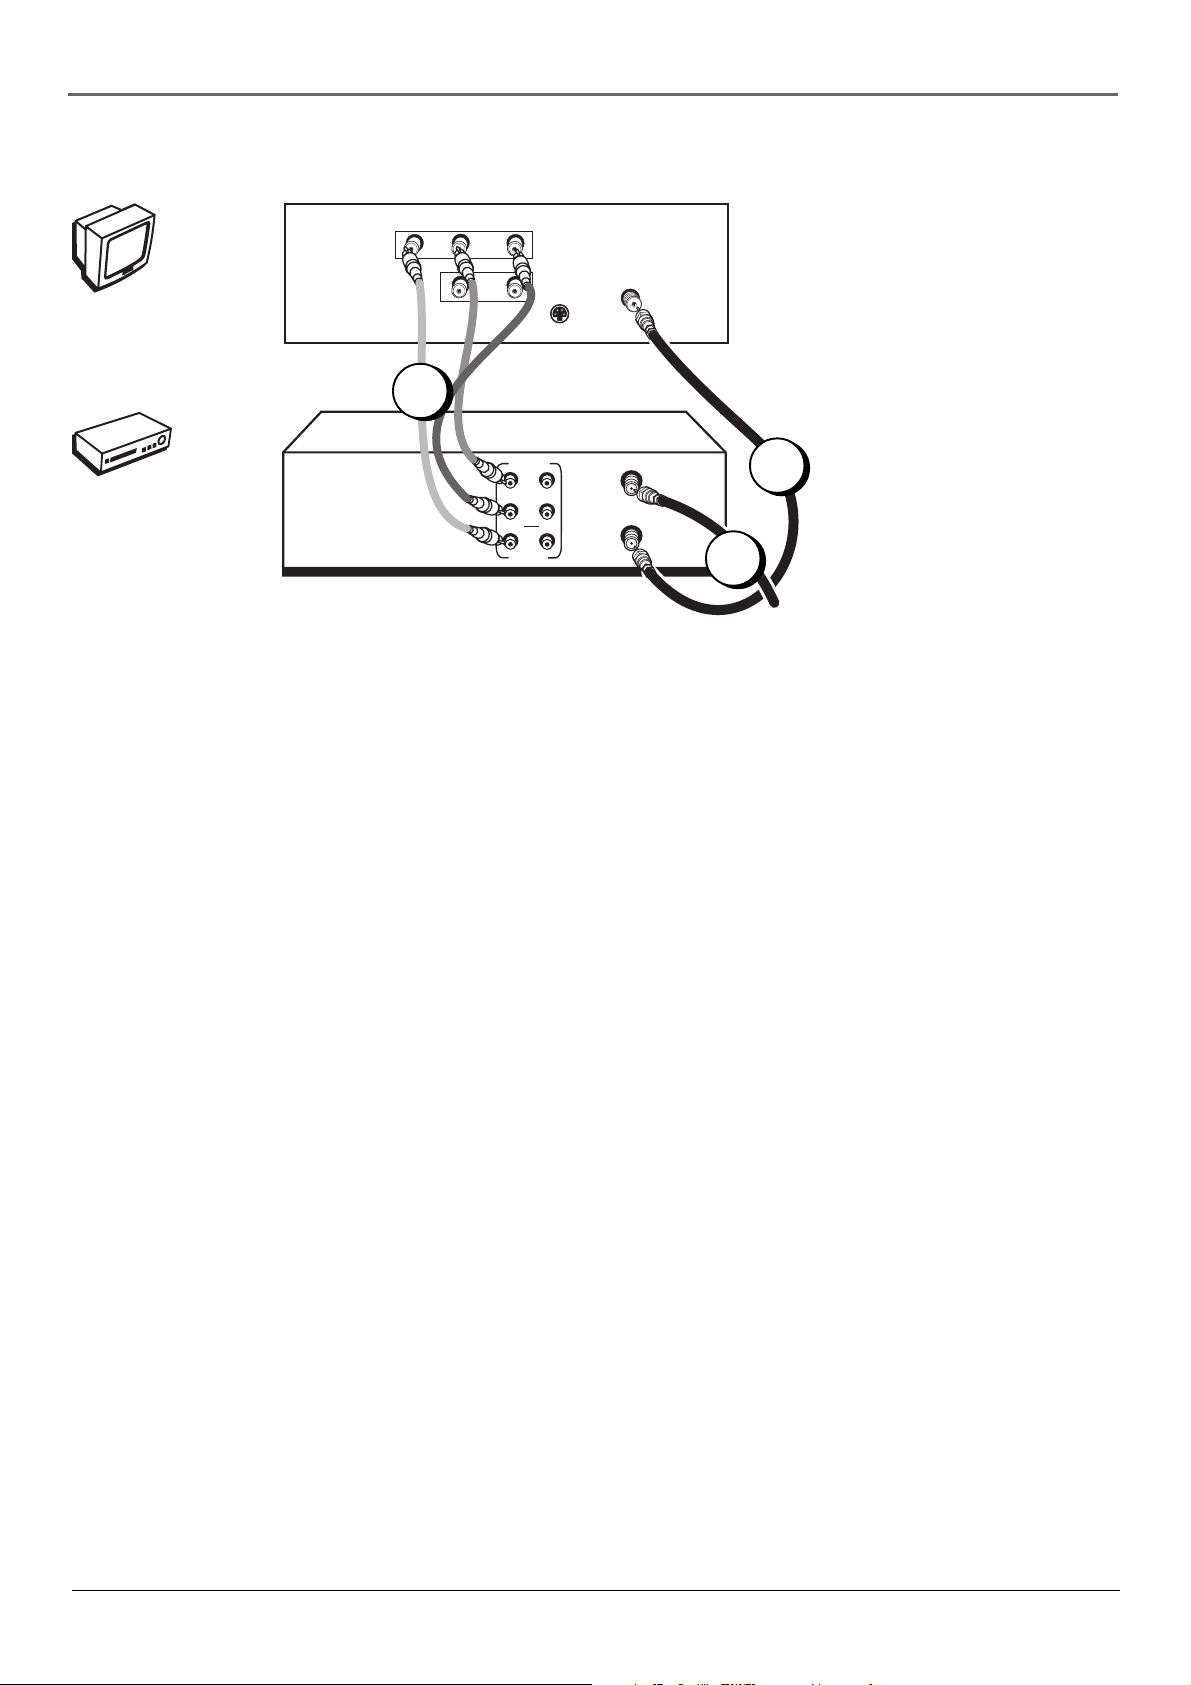
Chapter 1: Connections & Setup
TV (back panel)
VIDEO
V
T
AUDIO
L / MONO
R
IN
L
OUT
S-VIDEO
CABLE/
ANTENNA
The back of your TV might not look
exactly like the one shown here.
VCR
R
C
V
1B
OUT
AUDIO
VIDEO
ANT. IN
R
L
IN
RF OUT
1A
2
From Cable
or Antenna
TV + VCR
1. Connect the VCR to the TV
A. Connect one end of the supplied RF coaxial cable to the RF OUT jack on the back of
the VCR and the other end to the TV’s antenna in jack (sometimes labeled CABLE/
ANTENNA).
– OR –
B. Connect audio/video cables to the AUDIO OUT R and L jacks on the back of the VCR
(color coded, red and white), and to the VIDEO OUT jack (yellow). Connect the other
ends of the cables to the corresponding input jacks on the TV (sometimes labeled
VIDEO, AUDIO L/MONO, and AUDIO R).
2. Connect the antenna/cable feed to the VCR
Connect the cable or antenna RF coaxial cable to the ANT. IN jack on your VCR.
Go To Page 8
Chapter 1 5

Chapter 1: Connections & Setup
TV
VIDEO
V
T
VCR
AUDIO
L / MONO
R
IN
L
OUT
S-VIDEO
CABLE/
ANTENNA
R
C
V
SATELLITE
RECEIVER
OUT
VIDEO
R
L
S-VIDEO
e
t
i
l
l
e
t
a
S
AUDIO
OUT
VIDEO
IN FROM ANT
OUT TO TV
IN
ANT. IN
R
L
RF OUT
SATELLITE
IN
From Cable
or TV Antenna
CH3
CH4
From
Satellite
TV + VCR + Satellite Receiver
1. Connect the VCR to the TV
A. Connect one end of the supplied RF coaxial cable to the RF OUT jack on the back of the
VCR and the other end to the TV’s antenna in jack (sometimes labeled CABLE/ANTENNA).
– OR –
B. Connect audio/video cables to the AUDIO OUT R and L jacks on the back of the VCR
(color coded, red and white), and to the VIDEO OUT jack (yellow). Connect the other
ends of the cables to the corresponding input jacks on the TV (sometimes labeled VIDEO,
AUDIO L/MONO, and AUDIO R).
2. Connect satellite receiver to the VCR
A. Connect an RF coaxial cable to the RF output jack on the satellite receiver (sometimes
labeled OUT TO TV) and to the ANT. IN jack on the VCR.
– OR –
B. Connect audio/video cables to the AUDIO IN R and L jacks on the back of the VCR (color
coded, red and white), and to the VIDEO IN jack (yellow). Connect the other ends of the
cables to the corresponding output jacks on the satellite receiver (sometimes labeled
VIDEO, AUDIO L, and AUDIO R).
3. Connect the antenna to your satellite receiver
If necessary, connect an antenna or cable box RF coaxial cable (not included) to the antenna
input jack on the satellite receiver (sometimes labeled IN FROM ANTENNA).
4. Connect the satellite feed to the satellite receiver
If it’s not already connected, connect the satellite receiver’s RF coaxial cable feed (not
included) to the satellite input jack on the satellite receiver (sometimes labeled
SATELLITE IN).
Go To Page 8
6 Chapter 1
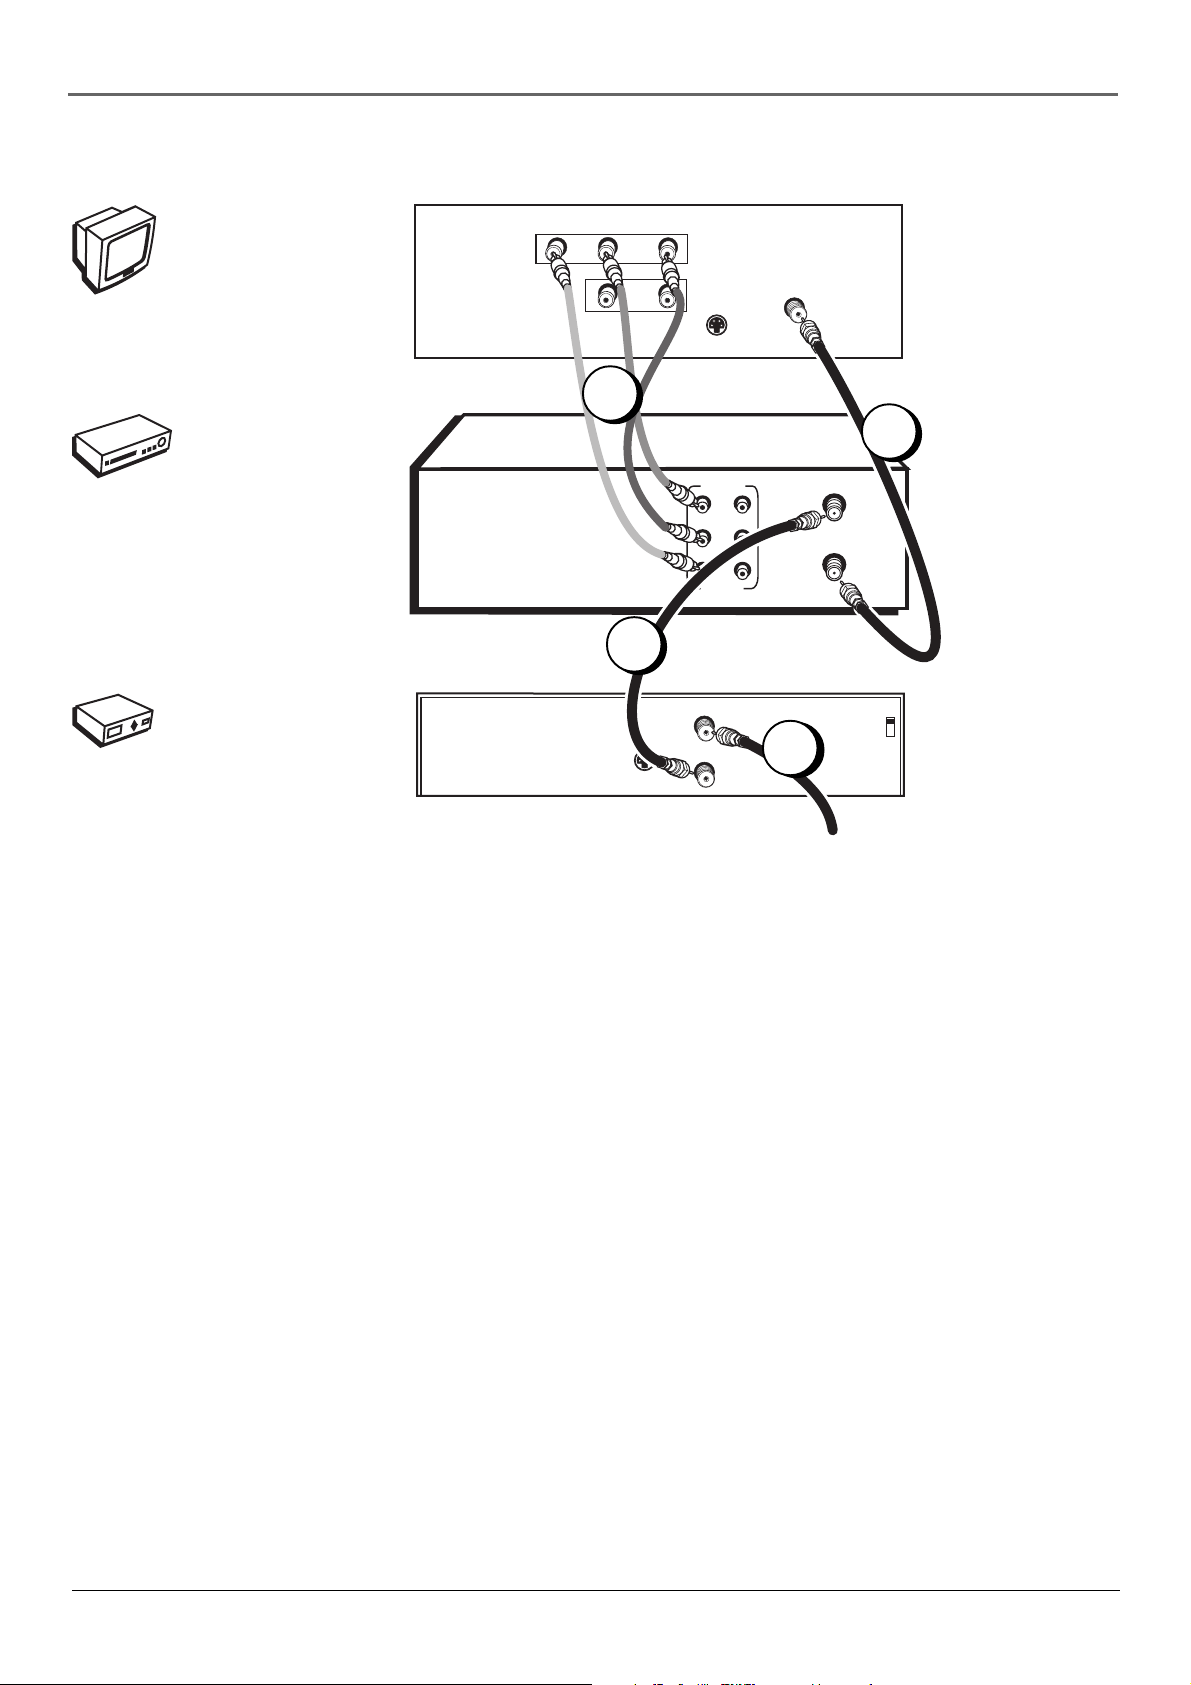
Chapter 1: Connections & Setup
TV
VIDEO
V
T
AUDIO
L / MONO
R
IN
L
OUT
S-VIDEO
CABLE/
ANTENNA
The back of your TV
might not look exactly
like the one shown here.
VCR
1B
1A
R
C
V
OUT
AUDIO
IN
VIDEO
ANT. IN
R
L
RF OUT
2
CABLE BOX
IN FROM ANT
x
o
B
e
l
b
a
C
OUT TO TV
S-VIDEO
3
TV + VCR + Cable Box
1. Connect the VCR to the TV
A. Connect one end of the supplied RF coaxial cable to the RF OUT jack on the back of
the VCR and the other end to the TV’s antenna in jack (sometimes labeled CABLE/
ANTENNA).
– OR –
B. Connect audio/video cables to the AUDIO OUT R and L jacks on the back of the VCR
(color coded, red and white), and to the VIDEO OUT jack (yellow). Connect the other
ends of the cables to the corresponding input jacks on the TV (sometimes labeled
VIDEO, AUDIO L/MONO, and AUDIO R).
CH3
CH4
From Cable
Feed
The back of your cable
box might not look
exactly like the one
shown here.
2. Connect the cable box to the VCR
Connect one end of a second RF coaxial cable (not included) to the cable box’s TV output
jack (sometimes labeled OUT TO TV) and the other end to the ANT. IN jack on the VCR.
3. Connect the cable feed to your cable box
If it’s not already connected, connect the RF coaxial cable feed (not included) to the
antenna input jack on the cable box (sometimes labeled IN FROM ANTENNA).
Go To Page 8
Chapter 1 7
Chapter 1: Connections & Setup
Put Batteries in the Remote Control
1. Insert the batteries matching the polarities (+ and –) on the batteries with the diagram in the battery compartment.
Turn on the TV and VCR
1. Turn on the TV (if the TV you’ve connected to the VCR is an RCA, GE, Proscan, or Scenium TV, press the TV button
on the remote packed with your VCR).
2. Tune the TV to the correct Video Input Channel.
• If you used a coaxial cable to connect your VCR to your TV, tune the TV to channel 3. Your TV must be set to
channel 3 the first time you set up the VCR. See page 28 for instructions on how to change the output channel
once you have started setup.
• If you used audio/video cables to connect your VCR, tune the TV to its Video Input Channel (see page 38).
Using the Remote Control to Choose On-screen Menu Items
To select an on-screen item, press the MENU button, then the number button on the remote control that matches the
on-screen number. Selecting a menu item can take you to another menu, activate a choice, or activate a data entry field
(such as the hour field in the Set Time menu).
If a number doesn’t appear next to an on-screen menu, use the arrow buttons to highlight an item on the screen, and
press OK to select the highlighted item.
Complete the on-screen setup guide
Select a language.
Seleccione un idioma.
Choisissez une langue.
1>English
2 Español
3 Français
The first time you turn on the VCR,
you’ll be asked to select the
language for the on-screen menus.
VCR MAIN MENU
1 Timer Recordings
2 Time
3 Channels
4 Setup
5 Preferences
6 Audio
7 Language
0 Exit
To help you use the VCR as quickly as possible, an on-screen setup
guide walks you through several important menu screens the first time
you turn on your VCR. The first menu item asks you to select the
language for the on-screen menus. The other setup menu items are
listed in this section.
LANGUAGE menu: determines the language in which the on-screen
displays and menus appear.
Note: If you ever need to change some of the settings in any of the menus that
appear in the setup procedure, go to the VCR MAIN MENU (press MENU on the
remote) and choose Setup (press 4).
If you ever need to change some of
the settings in any of the menus that
appear in the setup procedure,
choose Setup (press 4 on the remote)
from the VCR MAIN MENU.
8 Chapter 1
Chapter 1: Connections & Setup
CHANNELS menu – submenus are listed below.
Auto Channel Search – automatically searches for channels so that they are stored in the VCR’s channel list (the
list of channels that are accessed when you press the CH +/– buttons.
Add/Remove Channels – allows you to manually add or remove channels from the channel list. This is helpful if
the channel’s signal is weak. See Auto Channel Search on page 27.
Signal Type – press 3 to go back and forth between the two signal types: Cable and Antenna. When the setting
you want is on the screen, press 0 to Exit (the VCR MAIN MENU appears and your signal setting is saved). Press 0
again to return to normal viewing.
CABLE BOX SETUP
Do you use your cable
box to receive ALL
channels or only SOME
channels?
1 ALL channels
2 Only SOME channels
3 Cancel setup
CABLE BOX SETUP
On what channel does
the VCR receive signals
from the cable box?
(usually 3, 4, or Video)
--
Enter 01-13 or INPUT
Press MENU to cancel
TIME
1 Set Time and Date
2 Auto Clock Set: ON
3 Set Time Zone
4 Set Daylight Saving
Time Data was found
on channel 20.
0 Exit
Cable Box Setup – This setup applies only when all channels
are received through a cable box. In this case, the VCR will
default to the channel used to view cable box programming
during timer recordings. If you use your cable box to receive
only some channels, you won’t be able to use this feature and
will have to change the channels on your cable box and VCR
manually.
If you choose ALL Channels, enter the output channel of the
cable box (usually 03 or 04), or if A/V jacks connect the VCR to
the cable box, press the INPUT button on the VCR’s remote
control.
TIME menu – accesses settings for VCR’s time and date information.
Set Time and Date– allows you to manually set the VCR’s time
and date information instead of using the Auto Clock Set feature.
When the SET TIME AND DATE menu is on the screen, use the
number buttons on the remote to enter the information — you
must press 0 before single digits (for example, 03/17/02 for
March 17th, 2002).
Auto Clock Set – press the 2 button repeatedly to switch
between on and off. If you turn Auto Clock off, you’ll need to
manually set the time and date in order for the VCR’s recording
features to work. (Only available in some areas.)
Set Time Zone – When the SET TIME ZONE menu is on the
screen, use the number buttons on the remote to enter the
information.
If you select Automatic for your time zone, the VCR sets the
clock using the first time information it finds from the broadcast
signal. If the time set isn’t correct, select another time zone or set
the time manually.
SET TIME ZONE
What is your Time Zone?
1 Eastern
2 Central
3 Mountain
4 Pacific
5 Alaska
6 Hawaii
7 Automatic
Press MENU to continue
Set Daylight Saving – adjust this setting to allow for daylight
saving time (DST).
If you choose Automatic for the time zone, the VCR sets the
clock using any DST information broadcast in the channel’s
signal.
Note: All additional menu items are explained in Chapter 4.
Chapter 1 9

Chapter 1: Connections & Setup
VCR Basics
Once your initial settings are complete, you can begin using your VCR. In order to begin, you must first understand
some basic concepts.
Playing a tape
1. Tune the TV to your VCR viewing channel (03, 04, or the Video Input Channel).
2. Insert a tape in the VCR.
If the Auto Play feature is set to ON, the tape automatically begins playback (the safety tab on the tape must be
removed).
• Press FORWARD or REVERSE to cue the tape to the desired position during Play mode.
• To advance the tape 30 seconds at a time during Play mode, press the SEARCH button on the remote control
(each time you press SEARCH, 30 seconds is added to the amount of tape that is scanned — up to 5 minutes).
• Press PLAY (if necessary) to begin tape play.
• Press PAUSE to stop action. For slow-motion playback, press FORWARD and/or REVERSE (while picture is
paused). To move one frame at a time, press FORWARD on the remote (while paused).
• Press TRACKING + or – to remove any streaks from the picture, if necessary.
• Press STOP/EJECT (or STOP on the remote) to stop playback.
Automatic Rewind
The VCR automatically rewinds the tape if it reaches the end of the tape during playback. While rewinding, you can
press the ON•OFF button (the VCR will turn off after it rewinds the tape). If the tape has no safety tab, it will be
ejected.
Tape Eject
Press the STOP/EJECT button on the VCR when stopped to eject the tape. You can also press and hold the remote
control’s STOP button for three seconds.
Basic Recording
1. Set the tape speed by pressing the SPEED button on the remote control (see Tape Speed on page 30 for information
about recording speeds).
2. Press the RECORD button to begin recording.
3. Press the STOP button to halt recording.
If you just want to pause the recording for a short time (like during a commercial), press PAUSE instead of STOP.
Check the Safety Tab
Make sure there is a tape in the VCR with its safety tab in place. You
cannot record on a tape if the safety tab has been removed. If the
Safety Tab
safety tab is removed and you want to record, simply cover the hole
with adhesive tape.
10 Chapter 1

Chapter 2: Remote Control
The Buttons on the Remote Control
ON•OFF
REVERSE
INFO
MUTE
1
4
7
TV
RECORD
L
O
V
CLEAR MENU
2
5
8
U
P
T
N
I
0
TRACKING
VCR
PLAY FORWARD
STOP PAUSE
A
H
N
C
C
SEARCH
V
O
L
GO BACK
N
H
A
SPEED
3
6
9
V
C
•
R
V
T
F.A DV
(0-9) Number buttons Selects channels up to 99 by pressing two
number buttons. Selects 3-digit channels by pressing and holding 1
until 1 – – appears on screen. Then press the other two numbers.
Backlight Lights up some of the buttons in the dark (VR712HF only).
CHAN up and down Selects next higher or lower channel in the
VCR’s channel list.
FORWARD Fast forwards the tape when the VCR is stop in stop
mode. This button also searches forward if pressed during playback.
During play-pause mode, this button starts slow-motion advance and
each press of the button during slow-motion advance increases the
speed incrementally.
F. ADV (Frame Advance) Advances a tape one frame at a time
during play-pause mode.
GO BACK Switches between the current and previous channels.
INFO Shows the status displays on screen of the VCR or TV
(whichever component is set as the remote control’s active device).
INPUT Selects between the Video Input Channel and the VCR’s tuner.
Video Input Channel refers to the signal coming from the component
connected to audio/video input jacks on the back or front of the VCR
(L1 designates the back panel A/V jacks and L2 designates the front
panel A/V jacks).
MENU Displays the VCR’s on-screen menu system.
MUTE Reduces the TV’s volume to a minimum level on some
compatible TVs.
Notes: The TV and VCR
buttons also turn on most RCA,
GE, Proscan, and Scenium
products.
The remote control shown here
has a backlight button and is
included with the VR712HF
only. The VR648HF remote
doesn’t have a backlight
button.
ON•OFF Turns the VCR on or off when the remote control is set to
operate the VCR. Also turns other compatible components on or off.
PAUSE Pauses playback or recording modes. Press PAUSE again to
return to active playback or recording.
PLAY Plays a tape.
RECORD Starts record mode on tapes with the safety tab intact.
Pressed repeatedly to set a recording duration for the Express
Recording feature.
REVERSE Rewinds the tape when the VCR is in stop mode. Searches
backward through a tape during playback mode. Starts slow motion
playback during play-pause mode with each press of the button
decreasing the slow-motion speed.
SEARCH Displays the MOVIE ADVANCE screen for prerecorded
movies. When pressed repeatedly, this button also displays Index and
Zero Search menus on screen. During playback mode, pressing
SEARCH starts COMMERCIAL ADVANCE skipping.
SPEED Overrides the default recording speed (either SP or SLP).
STOP Stops the current VCR function (record, playback, rewind, etc).
TRACKING up and down Allows for manual reduction of streaks
that may appear in the picture during playback mode. Reduces picture
“jitter” during play-pause mode.
TV Turns on a compatible RCA, GE, Proscan, or Scenium TV and puts
the remote control in TV-operating mode. Also used with the ON•OFF
button to turn on a different brand of TV (if programmed).
Chapter 2 11
Loading...