


VCR
User’s Guide
Changing Entertainment. Again.
VR546/VR637HF
Important Information
WARNING
To reduce the risk of fire or electric shock, do not expose this product to rain or moisture.
CAUTION |
Caution: To reduce the risk of |
RISK OF ELECTRIC |
electric shock, do not remove cover |
SHOCK. DO NOT OPEN. |
(or back). No user serviceable parts |
inside. Refer servicing to qualified service personnel.
This symbol indicates |
This symbol |
"dangerous voltage" |
indicates important |
inside the product that |
instructions |
presents a risk of |
accompanying the |
electric shock or |
product. |
personal injury. |
|
Caution: To prevent electric shock, match wide blade of plug to wide slot, fully insert.
Attention: Pour éviter les chocs électriques, introduire la lame la plus large de la fiche dans la borne correspondante de la prise et pousser jusqú au fond.
Refer to the identification/rating label located on the back panel of your product for its proper operating voltage.
FCC Regulations state that unauthorized changes or modifications to this equipment may void the user’s authority to operate it.
Cable TV Installer: This reminder is provided to call your attention to Article 820-40 of the National Electrical Code (Section 54 of the Canadian Electrical Code, Part 1) which provides guidelines for proper grounding and, in particular, specifies that the cable ground shall be connected to the grounding system of the building as close to the point of cable entry as practical.
Product Registration
Please fill out the product registration card and return it immediately. Returning the card allows us to contact you if needed.
Product Information
Keep your sales receipt to obtain warranty parts and service and for proof of purchase. Attach it here and record the serial and model numbers in case you need them. The numbers are located on the back of the product.
Model No. ____________________________________________________________________________
Serial No. ____________________________________________________________________________
Purchase Date: ________________________________________________________________________
Dealer/Address/Phone: ________________________________________________________________

Table of Contents
Chapter 1: Connections & Setup ........................................................................................................ |
3 |
Things to Consider Before Connecting Components .......................................................................... |
3 |
Choose Your Connection ....................................................................................................................... |
4 |
Cables Needed to Connect Components to Your VCR ........................................................................ |
4 |
TV + VCR ............................................................................................................................................................ |
5 |
TV + VCR + Satellite Receiver ............................................................................................................................ |
6 |
TV + VCR + Cable Box ........................................................................................................................................ |
7 |
Put Batteries in the Remote Control .................................................................................................... |
8 |
Turn on the TV and VCR ........................................................................................................................ |
8 |
Using the Remote Control to Choose On-Screen Menu Items ............................................................ |
8 |
Complete the On-screen Setup Guide .................................................................................................. |
8 |
VCR Basics............................................................................................................................................. |
10 |
Playing a Tape .................................................................................................................................................. |
10 |
Automatic Rewind ........................................................................................................................................... |
10 |
Tape Eject ......................................................................................................................................................... |
10 |
Basic Recording .................................................................................................................................... |
10 |
Check the Safety Tab ....................................................................................................................................... |
10 |
Using the Remote Control .................................................................................................................. |
11 |
Buttons of the Remote Control ...................................................................................................................... |
11 |
Using the Input Button ................................................................................................................................... |
12 |
Chapter 2: VCR Features ................................................................................................ |
13 |
Recording Features .............................................................................................................................. |
13 |
Express Recording (XPR) ...................................................................................................................... |
13 |
Timer Recording .................................................................................................................................. |
14 |
Stopping a Timer recording ................................................................................................................ |
14 |
Reviewing and Clearing Programs ..................................................................................................... |
14 |
Index Search ......................................................................................................................................... |
15 |
Go-To- Search ....................................................................................................................................... |
15 |
Pro-Tect Plus Locking Feature ............................................................................................................. |
15 |
Time Counter ....................................................................................................................................... |
16 |
Info Display .......................................................................................................................................... |
16 |
Chapter 3: On-Screen Menus ........................................................................................ |
17 |
Explanation of the Menu System ....................................................................................................... |
17 |
Timer Recordings ................................................................................................................................. |
17 |
Time ...................................................................................................................................................... |
17 |
Set Time and Date ........................................................................................................................................... |
17 |
Auto Clock Set ................................................................................................................................................. |
17 |
Set Time Zone .................................................................................................................................................. |
17 |
Set Daylight-Saving ......................................................................................................................................... |
17 |
Channels ............................................................................................................................................... |
18 |
Auto Channel Search ....................................................................................................................................... |
18 |
Add/Remove Channels .................................................................................................................................... |
18 |
Signal Type ....................................................................................................................................................... |
18 |
Cable Box Setup ............................................................................................................................................... |
19 |
VCR Output Channel ....................................................................................................................................... |
19 |
1

Table of Contents
Chapter 3: On-Screen Menus (Continued) |
|
Preferences ........................................................................................................................................... |
19 |
Remote Control ............................................................................................................................................... |
19 |
Auto Play .......................................................................................................................................................... |
19 |
Auto TV/VCR .................................................................................................................................................... |
19 |
EnergySaver ..................................................................................................................................................... |
19 |
Front Panel ....................................................................................................................................................... |
20 |
Tape Speed ....................................................................................................................................................... |
20 |
Set Auto Repeat .............................................................................................................................................. |
20 |
Audio .................................................................................................................................................... |
20 |
Reception ......................................................................................................................................................... |
20 |
Tape Playback .................................................................................................................................................. |
20 |
Language ............................................................................................................................................. |
20 |
Chapter 4: Additional Information .............................................................................. |
21 |
Troubleshooting .................................................................................................................................. |
21 |
Display Panel ........................................................................................................................................ |
24 |
Glossary ................................................................................................................................................ |
24 |
Limited Warranty ................................................................................................................................. |
25 |
How to Find Your TV’s Video Input Channel ..................................................................................... |
27 |
Index ..................................................................................................................................................... |
28 |
2

Chapter 1: Connections & Setup
Things to Consider Before Connecting Components
This Book Covers Two Models (VR546 and VR637HF)
•Model VR546 (mono)
•Model VR637 (hi-fi)
The graphics in this user’s guide show the VR637HF, so the jacks on the front and back of the VCR are different from those on the VR546. The VR546 also does not have the Audio menu.
Protect Components From Power Surges
•Connect all components before plugging any power cords into the wall outlet.
•Always turn off the TV and other components before you connect or disconnect any cables.
Position Cables to Avoid Audio Hum or Interference
•Insert all cable plugs firmly into their jacks.
•Place any Audio/Video (A/V) cables to the side(s) of the TV’s back panel instead of straight down the back after connecting components.
•Try not to coil any twin-lead cables and keep them away from all A/V cables as much as possible.
•Make sure all antennas and cables are properly grounded. Refer to the Safety Tips sheet packed with your unit for detailed information.
Protect Components From Overheating
•Never block ventilation slots in any component. Arrange the components so that air can circulate freely.
•Do not stack components.
•Allow adequate ventilation when placing components in a stand.
•Place an amplifier or satellite receiver on the top shelf of a stand so heated air rising from it will not flow around other components.
Chapter 1 |
3 |
Chapter 1: Connections & Setup
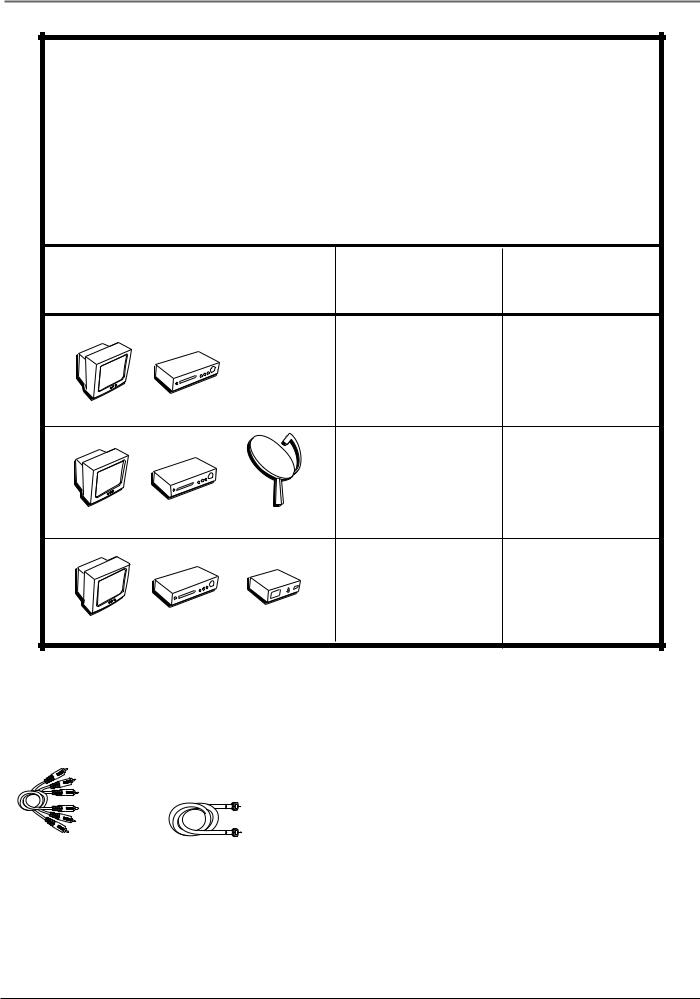
Choose Your Connection
There are several ways to hook up your VCR, depending on the components connected. Please use the following chart to determine which connection is best for you and proceed to the appropriate page.
Note: If you prefer, we can provide you with the name of an Authorized Service Representative who will visit your home for a fee to install your electronic entertainment system and to instruct you in its operation. For details about this service, call 1-888-206-3359.
V T
Components |
Connection |
Go To |
|
Title |
|
TV + VCR |
page 5 |
|
R |
C |
|
V |
|
V T
V T
|
R |
C |
|
V |
|
|
R |
C |
|
V |
|
|
|
|
|
|
TV + VCR + |
page 6 |
Satellite |
Satellite Receiver |
|
||||
|
|
|||||
|
|
|
|
x |
TV + VCR + |
|
|
|
|
|
|
|
|
|
|
le |
o |
Cable Box |
page 7 |
|
|
|
B |
|
|
|
|
|
b |
|
|
|
|
|
a |
|
|
|
|
|
|
C |
|
|
|
|
|
|
Cables Needed to Connect Components to Your VCR
The pictures below show the cables needed for the connections represented in this book.
Audio/Video cables |
Coaxial cable |
4 |
Chapter 1 |
Chapter 1: Connections & Setup
V T
TV (back panel)
VIDEO |
|
AUDIO |
|
R |
L / MONO |
||
|
|||
|
|
IN |
|
|
|
L |
OUT
CABLE/
ANTENNA
S-VIDEO
VCR 1B
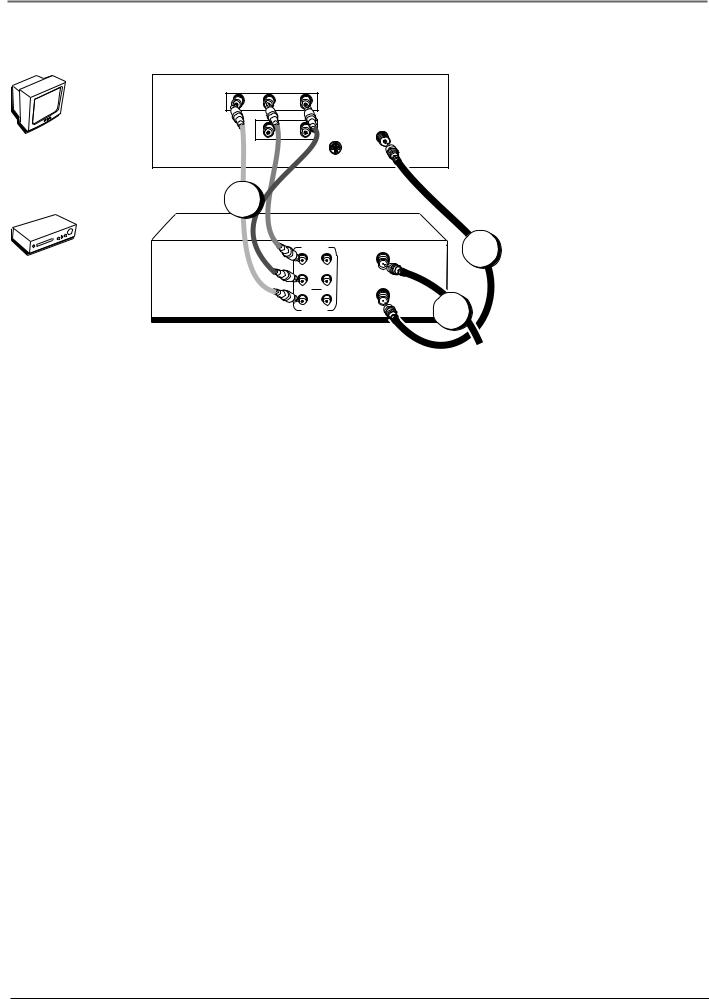
The back of your TV might not look exactly like the one shown here.
|
R |
C |
|
V |
|
AUDIO |
ANT. IN |
1A |
The VCR pictured here is model |
|
R |
||
|
L |
|
VR637HF and shows stereo audio |
|
|
jacks. Model VR546 is mono and |
|
OUT IN |
RF OUT |
|
|
|
|
will not have separate left and |
|
|
2 |
|
|
VIDEO |
|
right audio jacks. Use connection |
|
|
|
1A for model VR546. |
|
|
|
From Cable |
|
|
|
or Antenna |
|
TV + VCR
1.Connect the VCR to the TV
A.Connect one end of the supplied RF coaxial cable to the RF OUT jack on the back of the VCR and the other end to the TV’s antenna in jack.
–OR –
B.(VR637HF only): Connect audio/video cables to the AUDIO OUT R and L jacks on the back of the VCR (color coded, red and white), and the VIDEO OUT jack (yellow). Connect the other ends of the cables to the corresponding input jacks on the TV (sometimes labeled VIDEO, AUDIO L/MONO, and AUDIO R).
2.Connect the antenna/cable feed to the VCR
Connect the cable or antenna RF coaxial cable to the ANT. IN jack on your VCR.
Go To Page 8
Chapter 1 |
5 |

Chapter 1: Connections & Setup
V
T
|
R |
C |
|
V |
|
|
|
|
|
|
e |
|
|
|
|
t |
|
|
|
|
i |
||
|
|
l |
|
||
|
|
l |
|
|
|
|
e |
|
|
|
|
|
t |
|
|
|
|
a |
|
|
|
|
|
S |
|
|
|
|
|
TV
|
VIDEO |
|
AUDIO |
L / MONO |
|
|
|
|
R |
|
|
||
|
|
|
|
|
||
|
|
|
|
IN |
|
|
|
|
|
|
L |
|
|
|
|
|
|
OUT |
|
|
|
|
|
|
|
CABLE/ |
|
|
|
|
|
|
ANTENNA |
|
|
|
|
|
S-VIDEO |
|
|
VCR |
|
1B |
|
|
|
|
|
|
|
|
R |
ANT. IN |
1A |
|
|
|
|
AUDIO |
|
|
|
|
|
|
L |
RF OUT |
|
|
|
|
|
OUT IN |
|
|
|
|
|
|
|
|
|
|
|
|
|
VIDEO |
|
|
SATELLITE |
|
|
2A |
2B |
|
|
|
|
|
|
|
||
RECEIVER |
|
|
|
|
|
|
|
|
|
|
IN FROM ANT |
CH3 |
|
|
|
|
|
|
|
|
|
OUT |
|
|
|
CH4 |
|
|
|
|
|
OUT TO TV |
SATELLITE |
|
VIDEO |
R |
L |
S-VIDEO |
IN |
|
|
|
|
|
|
|
||
3 4
From Cable
or TV Antenna From Satellite
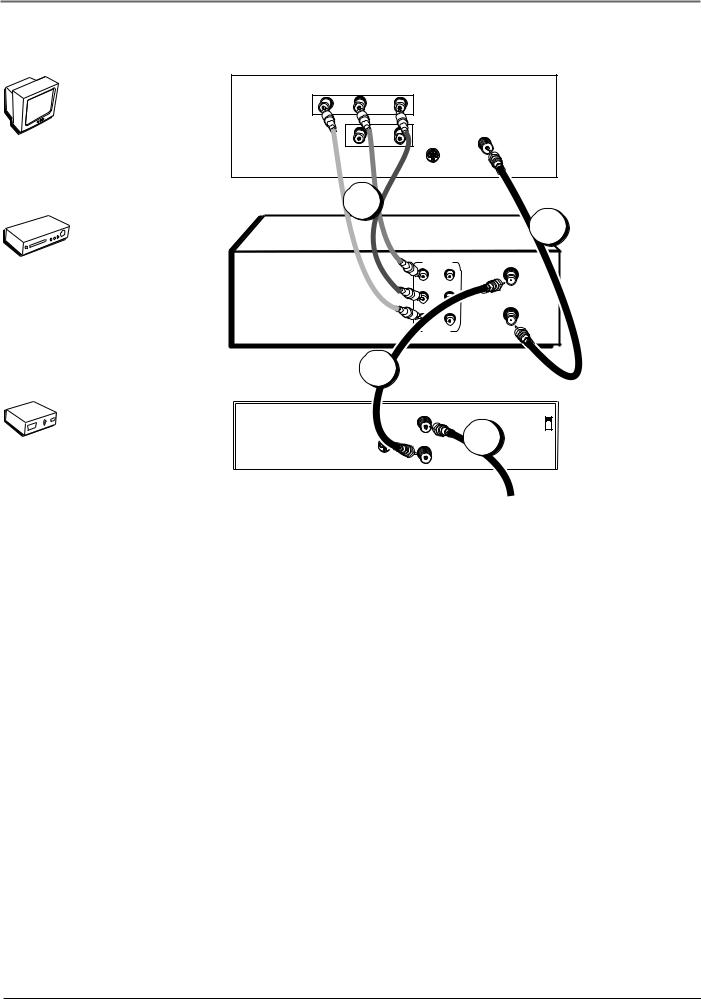
The back of your TV might not look exactly like the one shown here.
The VCR pictured here is model VR637HF and shows stereo audio jacks. Model VR546 is mono and will not have separate left and right audio jacks. Use connection 1A and 2A for model VR546.
The back of your satellite receiver might not look exactly like the one shown here.
TV + VCR + Satellite Receiver
1.Connect the VCR to the TV
A.Connect one end of the supplied RF coaxial cable to the RF OUT jack on the back of the VCR and the other end to the TV’s antenna in jack.
–OR –
B.Connect audio/video cables to the AUDIO OUT R and L jacks on the back of the VCR (color coded, red and white), and the VIDEO OUT jack (yellow). Connect the other ends of the cables to the corresponding input jacks on the TV (sometimes labeled VIDEO, AUDIO L/MONO, and AUDIO R).
2.Connect satellite receiver to the VCR
A.Connect an RF coaxial cable to the RF output jack on the satellite receiver and to the ANT. IN jack on the VCR.
–OR –
B.Connect audio/video cables to the AUDIO IN R and L jacks on the back of the VCR (color coded, red and white), and the VIDEO IN jack (yellow). Connect the other ends of the cables to the corresponding output jacks on the satellite receiver (sometimes labeled VIDEO, AUDIO L/MONO, and AUDIO R).
3.Connect the antenna to your satellite receiver
If necessary, connect an antenna or cable box RF coaxial cable (not included) to the antenna input jack on the satellite receiver.
4.Connect the satellite feed to the satellite receiver
Connect the satellite receiver’s RF coaxial cable feed (not included) to the satellite input jack on the satellite receiver.
Go To Page 8
6 |
Chapter 1 |
Chapter 1: Connections & Setup
V T
TV
VIDEO |
|
AUDIO |
|
R |
L / MONO |
|
|
|
|
||
|
|
IN |
|
|
|
L |
The back of your TV |
|
|
might not look exactly |
|
|
|
OUT |
|
|
|
CABLE/ |
like the one shown here. |
|
|
ANTENNA |
|
|
|
S-VIDEO |
|
|
R |
C |
|
V |
|
VCR |
1B |
|
The VCR pictured here is |
|
|
1A |
model VR637HF and |
|
|
shows stereo audio jacks. |
|
|
|
|
Model VR546 is mono |
|
AUDIO |
ANT. IN |
and will not have |
|
separate left and right |
||
|
R |
|
|
|
|
audio jacks. Use |
|
|
|
|
|
|
L |
RF OUT |
connection 1A for model |
|
OUT IN |
VR546. |
|
|
|
||
|
VIDEO |
|
|
|
|
|
|
|
x |
|
|
|
|
o |
|
|
|
|
B |
|
|
|
|
e |
|
|
|
|
|
l |
|
|
|
|
b |
|
|
|
|
a |
|
|
|
|
|
C |
|
|
|
|
|
2
CABLE BOX
IN FROM ANT |
|
CH3 |
|
|
|
|
3 |
CH4 |
OUT TO TV |
|
S-VIDEO
From Cable
Feed
The back of your cable box might not look exactly like the one shown here.
TV + VCR + Cable Box
1.Connect the VCR to the TV
A.Connect one end of the supplied RF coaxial cable to the RF OUT jack on the back of the VCR and the other end to the TV’s antenna in jack.
–OR –
B.Connect audio/video cables to the AUDIO OUT R and L jacks on the back of the VCR (color coded, red and white), and the VIDEO OUT jack (yellow). Connect the other ends of the cables to the corresponding input jacks on the TV (sometimes labeled VIDEO, AUDIO L/MONO, and AUDIO R).
2.Connect the cable box to the VCR
Connect one end of a second RF coaxial cable (not included) to the cable box’s TV output jack and the other end to the ANT. IN jack on the VCR.
3.Connect the cable feed to your cable box
Connect the RF coaxial cable feed (not included) to the antenna input jack on the cable box.
Go To Page 8
Chapter 1 |
7 |

Chapter 1: Connections & Setup
Put Batteries in the Remote Control
1.Insert the batteries matching the polarities (+ and –) on the batteries with the diagram in the battery compartment.
Turn on the TV and VCR
1.Turn on the TV (if the TV you’ve connected to the VCR is an RCA, GE, Proscan, or Scenium TV, press the TV button on the remote packed with your VCR).
2.Tune the TV to the correct Video Input Channel.
•If you used a coaxial cable to connect your VCR to your TV, tune the TV to channel 3. Your TV must be set to channel 3 the first time you set up the VCR. See page 19 for instructions on how to change the output channel once you have started setup.
•If you used audio/video cables to connect your VCR, tune the TV to its Video Input Channel (see page 27).
Using the Remote Control to Choose On-screen Menu Items
To select an on-screen item, press the MENU button, then the number button on the remote control that matches the on-screen number. Selecting a menu item can take you to another menu, activate a choice, or activate a data entry field (such as the hour field in the Set Time menu).
If a number doesn’t appear next to an on-screen menu, use the arrow buttons to highlight an item on the screen, and press OK to select the highlighted item.
Select a language. Seleccione un idioma. Choisissez une langue.
1>English
2Español
3Français
The first time you turn on the VCR, you’ll be asked to select the language for the on-screen menus.
VCR MAIN MENU
1 Timer Recordings
2Time
3Channels
4Setup
5Preferences
6Audio
7Language
0 Exit
If you ever need to change some of the settings in any of the menus that appear in the setup procedure, choose Setup (press 4 on the remote) from the VCR MAIN MENU. Note that the VR546 does not have the Audio menu, as it is a mono model.
Complete the on-screen setup guide
To help you use the VCR as quickly as possible, an on-screen setup guide walks you through several important menu screens the first time you turn on your VCR. The first menu item asks you to select the language for the on-screen menus. The other setup menu items are listed in this section.
LANGUAGE menu: determines the language in which the on-screen displays and menus appear.
Note: If you ever need to change some of the settings in any of the menus that appear in the setup procedure, go to the VCR MAIN MENU (press MENU on the remote) and choose Setup (press 4).
8 |
Chapter 1 |
 Loading...