


 Loading...
user manual
SL5004
SL5008
SL5016
SLC5004
SLC5008
SLC5016
It is important to read this user manual prior to using your new product for the first time.

Contents
Safety information |
|
FCC information ............................................................................... |
3 |
Manufacturer/Responsible party ............................................... |
3 |
Product registration ........................................................................ |
4 |
For your records ............................................................................... |
4 |
Important battery information ................................................... |
4 |
Electrostatic disturbance............................................................... |
4 |
Headset safety .................................................................................. |
4 |
IMPORTANT SAFETY INFORMATION.......................................... |
5 |
End user license agreement |
|
End user license agreement......................................................... |
6 |
Before you begin |
|
Connecting to the computer....................................................... |
9 |
Charging the player......................................................................... |
9 |
Managing files on your RCA Player |
|
Using RCA easyRip........................................................................... |
10 |
Using Windows Explorer................................................................ |
10 |
Deleting files from the player...................................................... |
11 |
Disconnecting the player from the PC..................................... |
11 |
General controls |
|
Turning the player on and off...................................................... |
12 |
Locking the front panel keys ....................................................... |
12 |
Resetting the player ........................................................................ |
12 |
Using the menus |
|
Menu types......................................................................................... |
13 |
Menu navigation .............................................................................. |
13 |
The Home menu............................................................................... |
14 |
Music |
|
Playing music files............................................................................ |
15 |
Music playback.................................................................................. |
15 |
Music playback display .................................................................. |
15 |
Pictures |
|
Playing picture files ......................................................................... |
16 |
Picture viewing ................................................................................. |
16 |
Videos |
|
Playing video files ............................................................................ |
17 |
Video viewing.................................................................................... |
17 |
Radio |
|
Playing FM radio............................................................................... |
18 |
Storing and recalling preset stations........................................ |
18 |
Improving FM radio sound........................................................... |
19 |
Recording FM radio ......................................................................... |
19 |
Playing back FM radio recordings.............................................. |
20 |
Copying recordings to your PC................................................... |
20 |
Audiobooks |
|
Playing audiobooks......................................................................... |
21 |
Audiobooks playback controls.................................................... |
21 |
Skipping through audiobook sections .................................... |
21 |
Favorites |
|
Creating a "Favorites" playlist ...................................................... |
22 |
Removing files from "Favorites" playlist .................................. |
22 |
Voice Memo |
|
Recording voice memo.................................................................. |
23 |
Playing back voice memo ............................................................. |
23 |
Copying recordings to your PC................................................... |
23 |
Settings |
|
Changing the player’s settings.................................................... |
24 |
Shuffle ................................................................................................. |
24 |
Equalizer .............................................................................................. |
24 |
Customize menu .............................................................................. |
24 |
Slideshow............................................................................................ |
24 |
Brightness .......................................................................................... |
24 |
Screensaver ........................................................................................ |
24 |
Power save ......................................................................................... |
24 |
RecDur (Record duration) ............................................................. |
24 |
FreqStep (Frequency Step) ........................................................... |
24 |
Language ........................................................................................... |
24 |
Protocol................................................................................................ |
24 |
System info ......................................................................................... |
24 |
Restore defaults ................................................................................ |
24 |
Additional information |
|
Tips and troubleshooting.............................................................. |
25 |
Check for updates............................................................................ |
26 |
Technical specification ................................................................... |
26 |
Specifications..................................................................................... |
26 |
Limited warranty |
|
Limited warranty .............................................................................. |
27 |
2

Safety information
FCC information
This device complies with part 15 of the FCC rules. Operation is subject to the following two conditions:
(1) This device may not cause harmful interference, and (2) This device must accept any interference received including interference which may cause undesired operation.
This equipment has been tested and found to comply with the limits for a Class B digital device, pursuant to Part 15 of the FCC Rules. These limits are designed to provide reasonable protection against harmful interference in a residential installation. This equipment generates, uses and can radiate radio frequency energy and, if not installed and used in accordance with the instructions, may cause harmful interference to radio communications. However, there is no guarantee that interference will not occur in a particular installation.
If this equipment does cause harmful interference to radio or television reception, which can be determined by turning the equipment off and on, the user is encouraged to try to correct the interference by one or more of the following measures:
•Reorient or relocate the receiving antenna.
•Increase the separation between the equipment and receiver.
•Connect the equipment into an outlet on a circuit different from that to which the receiver is connected.
•Consult the dealer or an experienced radio / TV technician for help.
In accordance with FCC requirements, changes or modifications not expressly approved by manufacturer could void the user’s authority to operate this product.
This Class B digital apparatus complies with Canadian ICES-003.
Cet appareil numérique de la classe B est conforme à la norme NMB-003 du Canada.
RCA |
RCA |
SL5004 |
SLC5004 |
RCA |
RCA |
SL5008 |
SLC5008 |
RCA |
RCA |
SL5016 |
SLC5016 |
3
Safety information
Product registration
You can go to www.rcaaudiovideo.com for online registration.
For your records
Keep your sales receipt for proof of purchase to obtain warranty parts and service.
In the event that service should be required, you may need both the model number and the serial number. In the space below, record the date and place of purchase, and the serial number:
Model No.
Date of Purchase
Place of Purchase Serial No.
Important battery information
Warning: Your product contains a battery and charging system which is designed to work in temperatures that do not exceed 50°C (122°F).
Leaving this product in a closed automobile or the trunk of an automobile where temperatures may exceed 50°C may result in permanent battery damage, fire, or explosion. Please remove your product from the automobile when you exit, do not place your product in the trunk of your automobile, and do not leave your product in any location where temperatures may exceed 50°C.
Important Battery Precautions
•Any battery may present a risk of fire, explosion, or chemical burn if abused. Do not try to charge a battery that is not intended to be recharged, do not incinerate, and do not puncture.
•Non-rechargeable batteries, such as alkaline batteries, may leak if left in your product for a long period of time. Remove the batteries from the product if you are not going to use it for a month or more.
•If your product uses more than one battery, do not mix types and make sure they are inserted correctly. Mixing types or inserting incorrectly may cause them to leak.
•Discard any leaky or deformed battery immediately. They may cause skin burns or other personal injury.
•Please help to protect the environment by recycling or disposing of batteries according to federal, state, and local regulations.
To minimize the risk of fire, explosion, or chemical burn, observe the following precautions:
•Do not use an unauthorized battery. Use only the rechargeable battery that came with your product or that is listed in the user’s guide.
•Do not use unauthorized chargers or power adapters. Use only chargers that came with your product or that is listed in the user’s guide.
•Do not attempt to open the rechargeable battery or battery pack. There are no user serviceable parts inside.
•Do not leave in a hot automobile or in temperatures exceeding 50°C (122°F).
Caution: Danger of explosion if battery is incorrectly replaced. Replace only with the same or equivalent type.
Electrostatic disturbance
This unit may temporarily cease to function if subjected to electrostatic disturbance. To resume normal operation, you may reset the player by pressing and holding MENU for more than 10 seconds.
Precautions for the player
•Do not use the unit immediately after transportation from a cold place to a warm place; condensation problems may result.
•Avoid shock to the unit.
•Do not store the unit near fire, places with high temperature or in direct sunlight. Exposure to direct sunlight or extreme heat (such as inside a parked car) may cause damage or malfunction.
•Do not expose to rain or moisture.
•Do not operate or store unit in places with frequent static electricity or electrical noise (e.g. speaker, TV set).
•Clean the unit with a soft cloth or a damp chamois leather. Never use solvents.
•The unit must only be opened by qualified personnel.
Headset safety
To use a headset safely, please keep the following in mind:
•Do not play your headset at a high volume. Hearing experts advise against continuous extended play.
•If you experience ringing in your ears, turn down the volume or stop using the headset.
4

Safety information
•Do not use a headset while driving a motorized vehicle or riding a bike. It may cause a traffic hazard and is illegal in many areas.
•Even if your headset is an open-air type designed to let you hear outside sounds, don’t turn up the volume so high that can’t hear sounds around you.
Keep player out of direct sunlight. Exposure to direct sunlight or extreme heat (such as inside a parked car) may cause damage or malfunction.
IMPORTANT SAFETY INFORMATION
PLEASE READ AND SAVE FOR FUTURE REFERENCE
Some of the following information may not apply to your particular product; however, as with any electronic product, precautions should be observed during handling and use.
•Read these instructions.
•Keep these instructions.
•Heed all warnings.
•Follow all instructions.
•Do not use this apparatus near water.
•Clean only with dry cloth.
•Do not block any ventilation openings. Install in accordance with the manufacturer’s instructions.
•Do not install near any heat sources such as radiators, heat registers, stoves, or other apparatus (including amplifiers) that produce heat.
•Do not defeat the safety purpose of the polarized or grounding-type plug. A polarized plug has two blades with one wider than the other. A grounding type plug has two blades and a third grounding prong. The wide blade or the third prong is provided for your safety. If the provided plug does not fit into your outlet, consult an electrician for replacement of the obsolete outlet.
•Protect the power cord from being walked on or pinched particularly at plugs, convenience receptacles, and the point where they exit from the apparatus.
•Only use attachments/accessories specified by the manufacturer.
•Use only with the cart, stand,
tripod, bracket, or table specified by the manufacturer, or sold with the apparatus. When a cart is used, use caution when moving the cart/ apparatus combination to avoid injury from tip-over.
•Unplug this apparatus during lightning storms or when unused for long periods of time.
•Refer all servicing to qualified service personnel. Servicing is required when the apparatus has been damaged in any way, such as power-supply cord or plug is damaged, liquid has been spilled or objects have fallen into the apparatus, the apparatus has been exposed to rain or moisture, does not operate normally, or has been dropped.
•ADDITIONAL SAFETY INFORMATION
•Apparatus shall not be exposed to dripping or splashing and no objects filled with liquids, such as vases, shall be placed on the apparatus.
•Always leave sufficient space around the product for ventilation. Do not place product in or on a bed, rug, in a bookcase or cabinet that may prevent air flow through vent openings.
•Do not place lighted candles, cigarettes, cigars, etc. on the product.
•Connect power cord only to AC power source as marked on the product.
•Care should be taken so that objects do not fall into the product.
•Do not attempt to disassemble the cabinet. This product does not contain customer serviceable components.
•The marking information is located at the bottom of apparatus.
•Caution marking is located at bottom of apparatus.
Important Battery Precautions
•Any battery may present a risk of fire, explosion, or chemical burn if abused. Do not try to charge a battery that is not intended to be recharged, do not incinerate, and do not puncture.
•Non-rechargeable batteries, such as alkaline batteries, may leak if left in your product for a long period of time. Remove the batteries from the product if you are not going to use it for a month or more.
•If your product uses more than one battery, do not mix types and make sure they are inserted correctly. Mixing types or inserting incorrectly may cause them to leak.
•Discard any leaky or deformed battery immediately. They may cause skin burns or other personal injury.
•Please help to protect the environment by recycling or disposing of batteries according to federal, state, and local regulations.
•Do not expose batteries to excessive heat (for example, by leaving them in sunlight or close to fire).
5

End user license agreement
End user license agreement
IMPORTANT: READ CAREFULLY BEFORE DOWNLOADING OR INSTALLING THIS SOFTWARE!
THIS END USER LICENSE AGREEMENT (THIS “EULA”) IS A LEGAL AGREEMENT BETWEEN YOU AND AUDIOVOX CORPORATION AND, AS APPLICABLE, ANY AUDIOVOX SUBSIDIARY, AS DEFINED BELOW (COLLECTIVELY “AUDIOVOX”), FOR THE RCA BRANDED PORTABLE DIGITAL AUDIO/VIDEO DEVICE APPLICATION/DRIVER SOFTWARE PROGRAM WHICH MAY INCLUDE ASSOCIATED SOFTWARE COMPONENTS, SOFTWARE LICENSED BY AUDIOVOX FROM THIRD PARTIES (“LICENSORS”) AND ASSOCIATED DOCUMENTATION, IF ANY (COLLECTIVELY, THE “PROGRAM”). THIS EULA CONTAINS IMPORTANT LEGAL LIMITATIONS, RESTRICTIONS AND DISCLAIMERS, AND ALSO SPECIFIES THE DURATION OF YOUR LICENSE.
BY INSTALLING THE PROGRAM OR CLICKING ON THE ACCEPTANCE BUTTON OF THE PROGRAM, COPYING OR OTHERWISE USING THE PROGRAM, YOU ACKNOWLEDGE AND AGREE THAT YOU HAVE READ THIS EULA, UNDERSTAND IT, AND AGREE TO BE BOUND BY ITS TERMS AND CONDITIONS. THIS PROGRAM IS PROTECTED BY COPYRIGHT LAWS AND INTERNATIONAL COPYRIGHT TREATIES, AS WELL AS OTHER INTELLECTUAL PROPERTY LAWS AND TREATIES. YOU MAY USE THE PROGRAM ONLY IN ACCORDANCE WITH THIS EULA, AND ANY SUCH USE IS HEREBY UNDERSTOOD TO BE CONDITIONAL UPON YOUR SPECIFIC AGREEMENT TO THE UNMODIFIED TERMS SET FORTH HEREIN. IF YOU DO NOT AGREE WITH ALL OF THE TERMS OF THIS EULA, CLICK ON THE REJECTION BUTTON AND/ OR DO NOT INSTALL THE PROGRAM AND/OR DO NOT USE THE PROGRAM.
1. LICENSE
(a)Under this EULA, you are granted a non-exclusive, nonsublicenseable, non-assignable and non-transferable (except as expressly set forth below) license (i) to use and install the Program on a single workstation, and (ii) to make one (1) copy of the Program into any machine-readable form for backup of the Program, provided the copy contains all of the original Program's proprietary notices.
(b)You may transfer the Program and license to another party only as a part of the RCA branded Portable Digital Audio/ Video Device (“A/V Device”), and only if the other party agrees to accept the terms and conditions of this EULA. If you transfer the Program, you must at the same time either transfer all copies to the same party or destroy any copies not transferred.
(c)The terms of this EULA will govern any software upgrades or updates provided by AUDIOVOX that replace and/or supplement the original Program, unless such upgrade or update is accompanied by separate license terms and conditions in which case the terms of that separate license will govern. You acknowledge and agree that AUDIOVOX may automatically download upgrades or updates to the Program software to your computer in order to update, enhance, and/or further develop the Program.
2. LICENSE RESTRICTIONS
(a)Except for the licenses expressly granted to you in this EULA, no other licenses or rights are granted or implied.
(b)You may not (i) make the Program available over a network where it could be used by multiple computers at the same time; (ii) modify, translate, reverse engineer, decompile, disassemble (except to the extent that this restriction is expressly prohibited by law), or create derivative works
based upon the Program; (iii) copy the Program, except as expressly permitted herein; (iv) remove or alter any copyright notices on all copies of the Program; or (v) rent, lease or lend the Program. You agree that you shall only use the Program in a manner that complies with all applicable laws in the jurisdictions in which you use the Program, including, but not limited to, applicable restrictions concerning copyright and other intellectual property rights.
(c)The Program may contain pre-release code that does not perform at the level of a final code release. In such case, the Program may not operate properly. Updated versions of the Program may be downloaded from www.rcaaudiovideo. com/downloads
(d)AUDIOVOX is not obligated to provide support services for the Program.
(e)The Program is provided with “RESTRICTED RIGHTS”. Use, duplication, or disclosure by the U.S. Government is subject to restrictions as set forth in subparagraph (c)(1)(ii) of DFARS 252.227-7013, or FAR 52.227-19, or in FAR 52.227-14 Alt. III, as applicable.
3. TERM AND TERMINATION
(a)Your license is effective on the date you accept this EULA and remains in effect until this EULA is terminated by either party.
(b)You may terminate this EULA and the associated license, without any notice or delay, by destroying or permanently erasing the Program and all copies thereof.
(c)If you fail to comply with any of the terms of this EULA, in whole or part, your license will automatically terminate without notice from AUDIOVOX.
(d)Upon termination of this EULA and your associated license, you shall cease all use of the Program and destroy or permanently erase the Program and all full or partial copies thereof.
4. WARRANTY DISCLAIMER
THE PROGRAM IS PROVIDED “AS IS” WITHOUT WARRANTY OF ANY KIND, EITHER EXPRESSED OR IMPLIED, INCLUDING, BUT NOT LIMITED TO THE IMPLIED WARRANTIES OF MERCHANTABILITY, FITNESS FOR A PARTICULAR PURPOSE, TITLE OR NONINFRINGEMENT. THE ENTIRE RISK AS TO THE QUALITY AND PERFORMANCE OF THE PROGRAM IS WITH YOU. SHOULD THE PROGRAM PROVE DEFECTIVE, YOU (AND NOT AUDIOVOX, ITS SUPPLIERS, OR ITS DEALERS) ASSUME THE ENTIRE COST FOR ALL NECESSARY REPAIR OR CORRECTION.
This exclusion of warranty may not be allowed under some applicable laws. As a result, the above exclusion may not apply to you, and you may have other rights depending on the law that applies to you.
5. OWNERSHIP RIGHTS
All title and intellectual property rights, including but not limited to copyrights, in and to the Program and any copies thereof are owned by AUDIOVOX, its Licensors or its suppliers. All title and intellectual property rights in and to the content which may be accessed through use of the Program is the property of the respective content owner and may be protected by applicable copyright or other intellectual property laws and treaties. This license grants you no rights to use such content. All rights not expressly granted are reserved by AUDIOVOX or its Licensors.
6
End user license agreement
6. LIMITATION OF LIABILITY
(a)TO THE MAXIMUM EXTENT PERMITTED BY APPLICABLE LAW, IN NO EVENT SHALL AUDIOVOX, OR ITS DEALERS BE LIABLE FOR ANY SPECIAL, INCIDENTAL, INDIRECT, OR CONSEQUENTIAL DAMAGES WHATSOEVER (INCLUDING, WITHOUT LIMITATION, DAMAGES FOR LOSS OF PROFITS, BUSINESS INTERRUPTION, CORRUPTION OF FILES, LOSS OF BUSINESS INFORMATION, OR ANY OTHER PECUNIARY LOSS) REGARDLESS OF CAUSE OR FORM OF ACTION, INCLUDING CONTRACT, TORT, OR NEGLIGENCE, ARISING OUT OF YOUR USE OF OR INABILITY TO USE THE PROGRAM, EVEN IF AUDIOVOX HAS BEEN ADVISED OF THE POSSIBILITY OF SUCH DAMAGES. BECAUSE SOME STATES AND JURISDICTIONS DO NOT ALLOW THE EXCLUSION OR LIMITATION OF LIABILITY OF CONSEQUENTIAL OR INCIDENTAL DAMAGES, THE ABOVE LIMITATION MAY NOT APPLY TO YOU.
(b)YOU ASSUME RESPONSIBILITY FOR THE SELECTION OF THE APPROPRIATE PROGRAM TO ACHIEVE YOUR INTENDED RESULTS, AND FOR THE INSTALLATION, USE, AND RESULTS OBTAINED.
7. WINDOWS MEDIA
The software embedded within your A/V Device (the “Device Firmware”) contains software licensed from Microsoft that enables you to play Windows Media Audio (WMA) files (“WMA Software”). The WMA Software is licensed to you for use with your A/V Device under the following conditions. By installing and using this version of the Device Firmware, you are agreeing to these conditions. IF YOU DO NOT AGREE TO THE END USER CONDITIONS OF THIS SECTION 7, DO NOT INSTALL OR USE THIS VERSION OF THE DEVICE FIRMWARE.
The WMA Software is protected by copyright and other intellectual property laws. This protection also extends to documentation for the WMA Software, whether in written or electronic form.
GRANT OF LICENSE: The WMA Software is only licensed to you as follows:
You may use this version of the Device Firmware containing the WMA Software only as such use relates to your A/V Device.
You may not reverse engineer, decompile, or disassemble the WMA Software, except and only to the extent that such activity is expressly permitted by applicable law.
You may transfer your right to use the Device Firmware only as part of a sale or transfer of your A/V Device, on the condition that the recipient agrees to the conditions set forth herein. If the version of the Device Firmware that you are transferring is an upgrade, you must also transfer all prior versions of the Device Firmware that you have which include the WMA Software. MICROSOFT IS NOT PROVIDING ANY WARRANTY OF ANY KIND TO YOU FOR THE WMA SOFTWARE, AND MICROSOFT MAKES NO REPRESENTATION CONCERNING THE OPERABILITY OF THE WMA SOFTWARE.
The WMA Software is of U.S. origin. Any export of this version of the Device Firmware must comply with all applicable international and national laws, including the U.S. Export Administration Regulations, that apply to the WMA Software incorporated in the Device Firmware.
Content owners use Windows Media digital rights management technology (“WMDRM”) to protect their intellectual property, including copyrights. This device uses WMDRM software to access WMDRM-protected content. If the WMDRM software fails
to protect the content, content owners may ask Microsoft to revoke the software’s ability to use WMDRM to play or copy protected content. Revocation does not affect unprotected content. When you download licenses for protected content, you agree that Microsoft may include a revocation list with the licenses. Content owners may require you to upgrade WMDRM to access their content. If you decline to accept an upgrade, you will not be able to access content that requires the upgrade.
8. THIRD PARTY SOFTWARE
ANY THIRD PARTY SOFTWARE THAT MAY BE PROVIDED WITH THE PROGRAM IS INCLUDED FOR USE AT YOUR OPTION. IF YOU CHOOSE TO USE SUCH THIRD PARTY SOFTWARE, THEN SUCH USE SHALL BE GOVERNED BY SUCH THIRD PARTY'S LICENSE AGREEMENT, AN ELECTRONIC COPY OF WHICH WILL BE INSTALLED IN THE APPROPRIATE FOLDER ON YOUR COMPUTER UPON INSTALLATION OF THE SOFTWARE. AUDIOVOX IS NOT RESPONSIBLE FOR ANY THIRD PARTY’S SOFTWARE AND SHALL HAVE NO LIABILITY FOR YOUR USE OF THIRD PARTY SOFTWARE.
9. GOVERNING LAW
If you acquired this A/V Device in the United States, this EULA shall be governed and construed in accordance with the laws of the State of Indiana, U.S.A. without regard to its conflict of laws principles. If you acquired this A/V Device outside the United States or the European Union, then local law may apply.
10. GENERAL TERMS
This EULA can only be modified by a written agreement signed by you and AUDIOVOX, and changes from the terms and conditions of this EULA made in any other manner will be of no effect. If any portion of this EULA shall be held invalid, illegal, or unenforceable, the validity, legality, and enforceability of the remainder of the Agreement shall not in any way be affected or impaired thereby. This EULA is the complete and exclusive statement of the agreement between you and AUDIOVOX, which supersedes all proposals or prior agreements, oral or written, and all other communications between you and AUDIOVOX, relating to the subject matter of this hereof. AUDIOVOX’S Licensors shall be considered third party beneficiaries of this Agreement and shall have the right to enforce the terms herein.
“AUDIOVOX SUBSIDIARY” shall mean any person, corporation, or other organization, domestic or foreign, including but not limited to subsidiaries, that is directly or indirectly controlled by Audiovox Corporation including, but not limited to, Audiovox Consumer Electronics, Inc. and Audiovox Electronics Corporation. For purposes of this definition only, the term “control” means the possession of the power to direct or cause the direction of the management and policies of an entity, whether by ownership of voting stock or partnership interest, by contract, or otherwise, including direct or indirect ownership of at least fifty percent (50%) of the voting interest in the entity in
question.
7

Before you begin
Dear RCA Customer,
Thank you for purchasing the Player. This product will play mp3 and Windows Media™ audio (WMA) content as well as content purchased from most online music download services.
RCA EasyRip™ Media Software, installed automatically when you connected this player to your PC, lets you import music files from CDs and other sources, organize your music library, and transfer unprotected MP3 and WMA files to and from this player.
To transfer DRM-protected files to this player, you must use the application provided by the online music store.
Copyright warning
This player is for your personal use only. Unauthorized recording or duplication of copyrighted material may infringe upon the rights of third parties and may be contrary to copyright laws.
Back up your data
As with any portable player, you must back up the drive regularly. The manufacturer is not responsible for lost data.
Computer system requirements
•Pentium III 500MHz or higher recommended
•Windows® XP (service pack 1 or higher) or Windows Vista™
•Internet Explorer 6.0 or higher with Internet access
•Windows Media Player 10 or higher
•250MB or more free hard disk space for the software
•128MB RAM (256MB recommended)
•CD-ROM drive capable of digital audio extraction
•USB port (2.0 recommended)
•Sound card
Secure music transfer requirements
The default setting of this player is in MSC (Mass Storage Class) mode when connected to your PC. To enable function of transferring subscription music content to the player, select MTP (Media Transfer Protocol) mode under Protocol in the player's Settings menu (refer to page 24).
Getting the latest software, firmware and information
Go to www.rcaaudiovideo.com/downloads for the latest firmware, RCA EasyRip Media Software and user manual for your player. Follow the instructions there to download and install files.
Unpacking your player
All of the items listed below should have been packed in the box with your player.
•RCA player (contains music management software installer and user manual)
•Quick Start Guide
•USB cable
•Earphones
Frequently asked questions
For answers to frequently asked questions (FAQ), go to www.rcaaudiovideo.com/faq.
Windows, Windows Media, and Windows Vista are trademarks or registered trademarks of Microsoft Corporation in the United States and other countries.
8

Before you begin
Connecting to the computer
•Connect the player to your computer with the USB cable provided. The player will turn on automatically.
•The player will be connected in MSC (Mass Storage Class) mode. It will appear as a drive letter on your computer and behave as a detachable drive for file transfer in one or both directions.
•The RCA EasyRip™ Media Software installer (stored in the player*) will launch automatically. Click NEXT to begin the installation and follow the instructions to install the software on your PC.
•The software installer can be deleted from the player after installation to free up more storage spaces.
|
|
|
|
Player |
|
|
USB port of your |
||||||||
|
|
|
|
|
|
computer |
|
|
|
|
|||||
|
|
|
|
|
|
|
|
|
|
|
|
|
|
|
|
|
|
|
|
|
|
|
|
|
|
|
|
|
|
|
|
|
|
|
|
|
|
|
|
|
|
|
|
|
|
|
|
|
|
|
|
|
|
|
|
|
|
|
|
|
|
|
|
|
|
|
|
|
|
|
|
|
|
|
|
|
|
|
|
• It might take several seconds for the player to be detected. Click Refresh in My Computer or Windows Explorer to make sure the player has been detected.
•The player is capable of transferring files at USB 2.0. If USB 2.0 port is available on your computer, use it to connect to your player.
The player is still backward compatible with the older USB 1.1 ports. However, you will not be able to take full advantage of the potential speed increase.
•IMPORTANT: Don’t disconnect the USB cable to the PC or the player during the software installation.
•If the installer does not auto-launch, locate and right-click the associated drive letter (i.e. Lyra Slider) to show the option menu and select the “Install RCA EasyRip™” option.
USB cable
To enable function of launching RCA EasyRip installer stored in the player, the player must be in MSC mode which can
be selected under Protocol in the
Settings menu. The default setting of this player is already in MSC mode. Refer to page 24 for more information.
Charging the player
The player charges automatically every time you connect it to your computer. To fully charge the player, make sure your computer is on and the device is connected for at least 3 hours. Refer to the battery level icon  on the display to check the battery level. Recharge the player when the icon is empty.
* The latest software can be downloaded from www.rcaaudiovideo.com.
9
Managing files on your RCA Player
Before you begin using your RCA player, you’ll want to copy your media files to the player. You can use any of the following methods to transfer content:
•RCA EasyRip
•Drag and drop files in Windows Explorer
•Software provided by online music stores
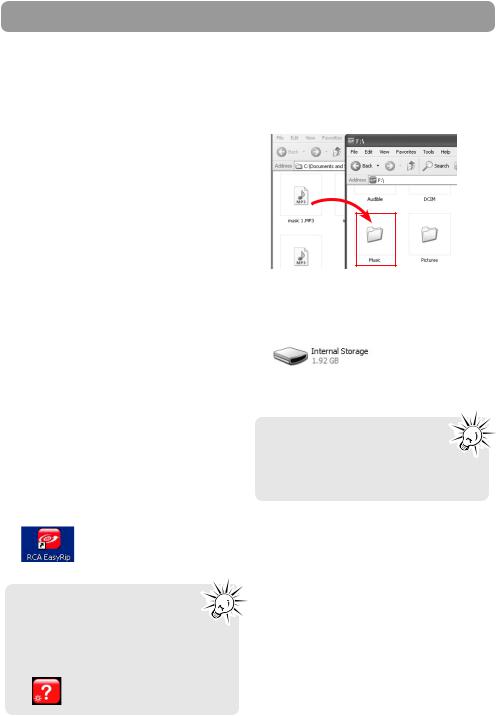
Using Windows Explorer
To copy files in Windows XP with Windows Media Player 10 installed:
1.Open the player in Windows Explorer.
2.Drag and drop music files onto the Music folder.
To transfer DRM-protected content, use the software provided by the online music store.
The following sections explain how to copy unprotected files to the player. For instructions on transferring protected files, please refer to the documentation for the software you use to transfer the files.
Using RCA easyRip
The RCA easyRip software was installed automatically the first time you connected this player to your PC.
easyRip lets you:
•Import music from CDs
•Organize your music library on your PC
•Create playlists
•Copy files from your library to the player
•Copy files from the player to your library
•Delete files from the player
To start easyRip:
•Click on the RCA system tray icon and select RCA easyRip from the menu.
•Double-click the easyRip icon on your PC’s desktop. The easyRip dock appears at the side of your screen.
• Video files must be transferred via easyRip, which automatically converts the files to optimal format.
•Help – For detailed explanation on using easyRip, click the Help widget on the module dock.
To copy files in Windows Vista or Window XP with Windows Media Player 11 installed:
1.Open the player in Windows Explorer
2.Open Internal Storage.
3.Drag and drop music files.
• Drag-and-drop picture files onto the root level or a specific folder of the player for viewing.
•Video files must be converted and transferred via RCA easyRip for playback.
10
Managing files on your RCA Player
Deleting files from the player
For any files you have transferred to the player, you may delete them while you have connected the player with your computer.
1.Open the player in Windows Explorer and then navigate to the folder containing the files.
2.Select the files you want to remove and then press the Delete key on the keyboard of your PC.
•It is best to remove subscription files from the player by using Windows Media Player.
Disconnecting the player from the PC
If Windows sees the player as an MTP device:
•Unplug the player from the PC when no file transfer is in progress.
If Windows sees the player as a removable disk:
1.In the Windows system tray, click the Safely Remove Hardware icon  and then select the player from the list of devices.
2.When the Safe to remove hardware message appears, unplug the player from the PC.
Do not disconnect the USB connection during file download. Doing so may corrupt system files or the files being downloaded.
11

General controls
Slide the display to |
Display |
open or close the |
|
control panel |
|
|
Increase/decrease volume |
Scroll up |
Power on/off, Menu |
|
|
Skip back/reverse/menu back |
Skip forward/fast forward/menu advance |
Play/pause |
Scroll down |
Earphones jack |
USB jack |
|
Microphone |
Turning the player on and off
To turn the player on, press and hold MENU . Press and hold MENU
 again to turn the player off.
Locking the front panel keys
Slide the display down to close the control panel.
Resetting the player
If the player stops operating properly, you can reset it by pressing and holding MENU for more than 10 seconds.
12

Using the menus
Menu types
The player has two types of menu:
Player menu
The player menu appears when you turn on the player or if you press MENU while listening to the player. It lets you:
•Browse for and play music, audiobook, video and picture files
•Listen to the radio
•Record and play back voice memos
•Change the player’s settings – language, display brightness, etc.
Menu titles
Settings
Artists
Now Playing
Albums
Music |
Titles |
|
|
Pictures |
Genres |
|
Videos
Years
Menu items
Option menu
The option menu appears if you press
 while listening to the player. It provides different options depending on what you are listening to when you press
 .
.
Now Playing |
|
Pause |
|
001/090 |
mp3 320k |
001/090 |
mp3 320k |
Resume
|
|
Press |
|
|
|
Repeat |
Off |
|||
|
|
|
|
|
Counting Crows |
|||||
|
|
|
|
|
|
|
|
|||
|
|
|
|
|
|
|
|
Add to Favorites |
|
|
|
All My Friends |
|
|
|
|
|
|
Delete |
ThisDesertLife |
|
|
Counting Crows |
|
|
|
|
|
|
|
|
|
|
ThisDesertLife |
|
|
|
|
|
|
|
|
|
00:05:30 |
00:06:15 |
|
|
|
00:05:30 |
|
00:06:15 |
|||
"Now playing" |
|
|
|
|
|
|
Option menu |
|||
|
screen |
|
|
|
|
|
|
|
|
|
Menu navigation
When a menu is displayed:
•Press + and – to scroll up and down the list of menu items. (The Home menu shows one item at a time; other menus show five at a time.)
•Press
 to go to the next menu level. Press
 to return to the previous menu level.
Press +
Artists |
Press |
|
|
Artist1 |
|||||
|
|||||||||
Albums |
|
Artist2 |
|||||||
|
|
|
|
|
|
|
|
||
|
|
|
|
|
|
|
|
||
Titles |
|
|
|
|
|
|
|
|
Artist3 |
Genres |
Press |
|
|
|
|
|
Artist4 |
||
Years |
|
|
|
Artist5 |
|||||
|
|
|
|
|
|
|
|
||
|
|
|
|
|
|
|
|
||
|
|
|
|
|
|
|
|
|
|
Press –
•If the highlighted item is playable (for example, an audio file), press
 to start playback.
|
|
|
|
|
|
|
|
001/090 |
mp3 320k |
Song 1 |
|
|
|
|
|
|
|
|
All My Friends |
|
|
|
|
|
|
|
|
|
|
Song2 |
|
|
|
|
|
|
|
|
|
Song3 |
Press |
|
|
|
|
|
Counting Crows |
||
|
|
|
|||||||
|
|
|
|
|
|
|
|
ThisDesertLife |
|
Song4 |
|
|
|
|
|
|
|
|
|
Song5 |
|
|
|
|
|
|
|
00:05:30 |
00:06:15 |
|
|
|
|
|
|
|
|
||
•If the highlighted item indicates the current setting (for example, the repeat mode setting), press
 to change the setting.
001/090 |
mp3 320k |
|
|
|
|
001/090 |
mp3 320k |
Resume |
|
|
|
|
|
Resume |
|
All My Friends |
|
|
|
|
All My Friends |
||
Repeat |
Off |
Press |
|
Repeat |
All |
||
Counting Crows |
|
Counting Crows |
|||||
Add to Favorites |
|
|
|
|
|
Add to Favorites |
|
DeleteThisDesertLife |
|
|
|
|
DeleteThisDesertLife |
||
00:05:30 |
00:06:15 |
|
|
|
|
00:05:30 |
00:06:15 |
|
|
|
|
|
|
|
|
13

Using the menus
The Home menu
The top-level or “Home” menu is always displayed when you press MENU . The menu options are:
Now Playing
Available only during playback. Press
 to return to the currently playing file.
Music
Press
 to play all the music files on the player. Press
 to enter the Music menu and choose an artist, album, genre, year, or individual title.
Pictures
Press
 to play a slideshow of all the image files on the player.
Videos
Press
 to play all the videos on the player.
Radio
Press
 to listen to the radio. Press
 to enter the Radio menu and choose to either listen to the radio or play recordings of previous radio shows.
Audiobooks
Press
 to play all the audiobooks on the player. Press
 to enter the Audiobook menu and choose a particular audiobook.
Favorites
As you listen to music, you can add individual titles to a “favorites” playlist. Press
 to play the entire playlist. Press

 to enter the Favorites menu and choose a particular title or edit the playlist.
Voice memo
Press
 to enter the Voice memo menu and choose to either start recording or play recordings of previous voice memo.
Settings
Press
 to enter the Settings menu, which lets you:
•Choose the shuffle playback mode
•Choose an equalizer setting
•Customize the music menu
•Set the slideshow image duration
•Change the screen brightness
•Change the screensaver setting
•Turn on/off the automatic shutdown feature
•Choose a record duration setting
•Switch between US and European radio frequency steps
•Change the language of the player’s menus
•Switch between MTP and MSC modes
•Display the firmware version, space used, and space available
•Reset the player’s settings to the factory defaults
14
Music
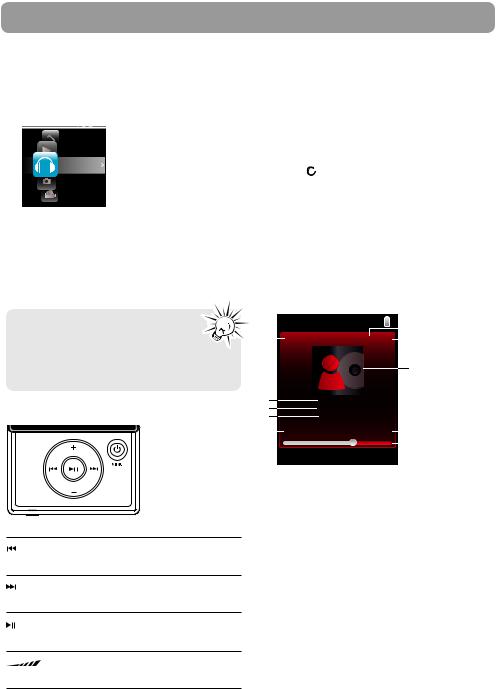
Playing music files
The player sorts your music files by artist, album, track name (title), genre and year.
1.Press MENU to display the Home menu, then press + or – to select Music.
Settings
Now Playing
Music
Pictures
Videos
• To play all the files on the player, press
 .
.
•To start playback at a particular artist, album, title, genre or year, press
 to enter the Music menu. Use + or – and
 or
or
 to navigate through the menus and select the desired item, then press
 .
.
The item that you can select for playback is not limited to a single file, you may select an artist, an album and
then press to start playback of all files within your selected item.
Option menu (music playback)
Press
 to show or hide the Option menu during playback. Press + or – to highlight an option and then press
 to confirm the selection or change the setting.
The following options are available:
•Resume – to resume playback
•Repeat – press
 repeatedly to select repeat current 1
 or all files
  (corresponding icon shows on the display)
•Add to Favorites – to add the current file in the Favorites playlist (read page 22). If the file is already in the playlist, this option changes to Clear from Favorites to remove the current file from the playlist
•Delete – to remove current file from the player
Music playback display
|
|
Now Playing |
|
|
|
10 |
1 |
|
|
|
|
|
|
|
001/090 |
mp3 320k |
9 |
|||
|
|
|
|
|
||
8
Music playback
2All My Friends
3Counting Crows
4ThisDesertLife
5 |
|
00:05:30 |
00:06:15 |
|
|
7 |
|
|
|
|
|||||
|
|
|
|
|
|
6 |
|
|
|
|
|
|
|||
Skips to the previous file*, press and hold to scan backwards within a file
Skips to the next file, press and hold to scan forward within a file
Starts/ pauses playback and shows/ hides the Option menu
Increases or decreases the volume during playback
* Press 
 within the beginning 4 seconds of the current music file to skip to previous file. Otherwise, you will return to the beginning of the current file.
1.Current file number/total number of files
2.Song name
3.Artist name
4.Album name
5.Elapsed playback time
6.Playback progress bar
7.File total time
8.Album art
9.File bitrate
10.File type
The information provided in the playback screen depends upon the ID3 tags that have been set up for the music file.
15

Pictures
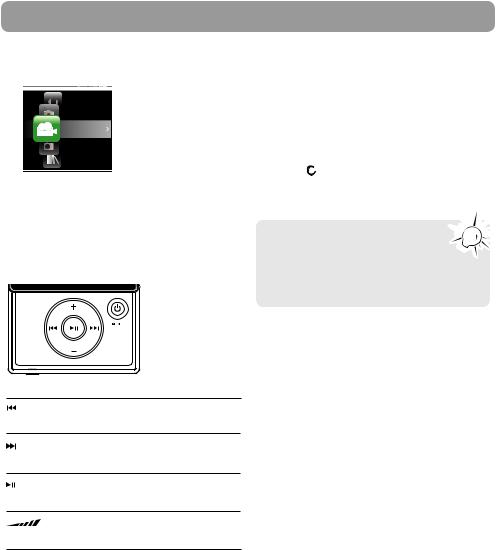
Playing picture files
1.Press MENU to display the Home menu, then press + or – to select Pictures.
Now Playing
Music
Pictures
Videos
Radio
2.To view all the pictures in file name order, press  .
.
•To start playback at a particular picture, press

to enter the Picture menu. Use + or – and 
 or
or  to navigate through the menus and select the desired item, then press
 .
.
Picture viewing
Goes back, skips backward
Advances, skips forward
Starts/pauses slideshow if it is activated, also shows/hides the Option menu
Option menu (picture viewing)
Press
 to show or hide the Option menu during playback. Press + or – to highlight an option and then press
 to confirm the selection or change the setting.
The following options are available:
•Resume – to resume playback
•Slideshow – to select the viewing time for each picture during a slideshow. Press 
 repeatedly to select among off, 3, 5, 10 and 15 seconds
•Delete – to remove current file from the player
Refer to page 10 for transferring picture files to the player.
16
Videos
Playing video files
1.Press MENU to display the Home menu, then press + or – to select Videos.
Music
Pictures
Videos
Radio
Audiobooks
2. To view all the videos in file name order, press
 .
.
•To start playback at a particular video, press
 to enter the Video menu. Use + or – and
 or
or
 to navigate through the menus and select the desired item, then press
 .
.
Video viewing
Goes back, skips backward*. Press and hold to scan backwards within a file
Advances, skips forward. Press and hold to scan forward within a file
Starts/pauses playback and shows/hides the option menu
Increases or decreases the volume during playback
* Press 
 within the beginning 4 seconds of the current file to skip to previous file. Otherwise, you will return to the beginning of the current file.
Option menu (video playback)
Press
 to show or hide the Option menu during playback. Press + or – to highlight an option and then press
 to confirm the selection or change the setting.
The following options are available:
•Resume – to resume playback
•Repeat – press
 repeatedly to select repeat current 1
 or all files
  (corresponding icon shows on the display)
•Delete – to remove current file from the player
Video files must be converted to optimal  format for playback on this player. The
  RCA EasyRip Media Software can convert
the video files automatically while transferring to the player. Refer to page 10 for details.
17

Radio
The radio uses the earphones as an antenna. For better reception, extend the earphone cable as far as possible.
Playing FM radio
To turn the radio on:
1.Press MENU to display the player menu.
2.Press + or – to select Radio and press
 to enter the radio menu.
Pictures
Videos
Radio
Audiobooks
Favorites
3.While Listen is highlighted, press
 to start listening. The frequency screen appears.
Listen
Playback
To tune the radio:
•Press and hold 
 or
or
 to start scanning through the frequency range. The player stops scanning when it detects the next station.
•Press 
 or
or
 to step through the frequency range.
To turn the radio off:
•Either turn the player off or press MENU and choose a different option.
Storing and recalling preset stations
You can store up to 20 preset stations in the player.
To store the currently playing station as a preset:
1.Press
 to display the Option menu.
2.Press + or – to highlight Save to Preset and then
press
 .
.
•If all 20 preset station numbers are occupied, the option changes to Replace Preset.
Back
Save to Preset
Mode |
Stereo |
Start Recording
3.The first available preset number is displayed. Press + or – to select a different preset number if desired.
•If you choose a preset number that already contains an FM station, you will replace the existing station with the new station.
4. Press
 to highlight Yes and then press
 .
.
Save to Preset01?
No |
Yes |
To listen to a preset station:
1.When the radio is playing, press 
 to display the Option menu.
2.Press + or – to highlight Tuning and press
 to switch from Manual to Preset.
Save to Preset
Mode |
Stereo |
Start Recording
Tuning Manual
3.Press + or – to highlight Back and press
 to return to the frequency screen.
18

Radio
4.Press 
 or
or
 to choose the desired station preset number. The preset number shows at the top left of the screen.
Listen
P01 |
Stereo |
||
|
|
|
Preset number |
|
|
|
|
FM |
103.00 MHz |
||
87.593 98 103 108
Improving FM radio sound
If stereo reception is noisy, you can often reduce the noise by switching to mono.
To switch between stereo and mono:
1.While the radio is playing, press
 to display the Option menu.
2.Press + or – to highlight Mode and then press
 to switch between Stereo and Mono.
Back
Save to Preset
Mode |
Stereo |
Start Recording |
|
3.Press + or – to highlight Back and press
 to return to the frequency screen.
Recording FM radio
You can record the radio and play back recordings as well as copy the recordings (WAV files) to your PC.
To record the currently playing radio station:
1.Press
 to display the Option menu.
2.Press + or – to highlight Start Recording and then press
 to start recording.
Back
Save to Preset
Mode |
Stereo |
Start Recording
•Press
 to pause or resume recording.
3. Press MENU to stop recording.
•The player names each recording FMRecXXX.wav where XXX is a unique number.
To record for a specific duration:
Refer to RecDur on page 24.
19

Radio
Playing back FM radio recordings
To play back a recording:
1.Press MENU to display the player menu.
2.Press + or – to select Radio and press
 to enter the radio menu.
3.Press + or – to highlight Playback and press
 to see the list of recordings.
Listen
Playback
4.Press + or – to select a recording and press
 to start playback.
Option menu (recording playback)
Press
 to show or hide the Option menu during playback. Press + or – to highlight an option and then press
 to confirm the selection or change the setting.
The following options are available:
•Resume – to resume playback
•Repeat – press
 repeatedly to select repeat current 1
 or all files
  (corresponding icon shows on the display)
•Delete – to remove current file from the player
Copying recordings to your PC
Recordings are stored as WAV files in the “FMRecord” folder on the player.
To copy recordings to the PC:
1.Plug the player into the PC.
2.Open the player’s Record folder.
3.Select the files you want to copy and drag and drop them onto a folder on the PC.
•Almost all audio applications can play WAV files.
20
Audiobooks
Playing audiobooks
Audiobook playback is similar to music playback.
1.Press MENU to display the Home menu, then press + or – to select Audiobooks.
Videos
Radio
Audiobooks 
Favorites
Voice Memo
•To play all the audiobooks in file name order, press .
.
•To play back a particular audiobook, press
 to enter the Audiobooks menu. Use + or – to select the desired item, then press
 .
.
Audiobooks playback controls
Skips to previous file/section, press and hold to scan backward within a file
Skips to the next file or section, press and hold to scan forward within a file
Starts/pauses playback and shows/ hides the option menu
Increases or decreases the volume during playback
Option menu (Audiobook playback)
Press
 to show or hide the Option menu during playback. Press + or – to highlight an option and then press
 to confirm the selection or change the setting.
The following options are available:
•Resume – to resume playback
•Skipping – to select section-by-section or file- by-file skipping (read below section for details)
•Delete – to remove current file from the player
Skipping through audiobook sections
If the currently playing audiobook contains sections, you can choose to skip forward and back between sections when you press 
 or
or
 , instead of skipping between files.
To choose section-by-section skipping:
1.Press
 to pause playback and display the Option menu.
2.Press + or – to select Skipping, then press
 to switch to Section.
Resume
Repeat
Skipping Section
Delete File
3. Press + to select Resume and press
 to resume playback.
•Section-by-section skipping is indicated by Sect on the display.
Now Playing
Sect 2/5
•The player returns to file-by-file skipping automatically when you play another file or turn the player off.
21
Favorites
Creating a "Favorites" playlist
You can create a playlist of your favorite music by adding new files to the playlist as you listen to them. This function is not available for other media formats such as videos, pictures, audiobooks and recordings.
To add the currently playing music file in the playlist:
1.Press
 to pause playback and display the Option menu.
2.Press + or – to highlight Add to Favorites and then press
 .
.
Resume
Repeat |
Off |
 Add to Favorites
Delete
•Added Successfully shows on the display.
•Repeat the above steps for adding more music files.
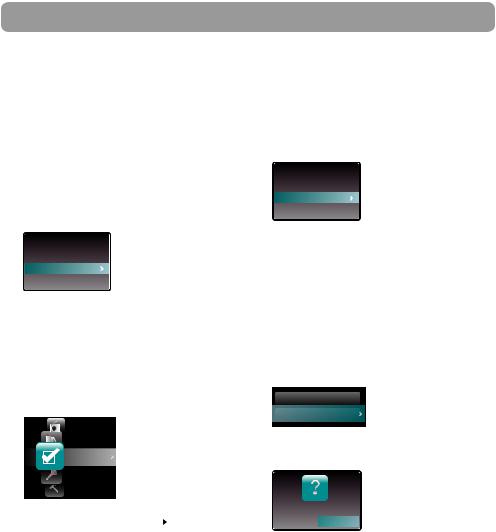
To listen to the Favorites playlist:
1.Press MENU to display the Home menu.
2.Press + or – to select Favorites.
Home
Radio
Audiobooks
Favorites
Voice Memo
Settings
Removing files from "Favorites" playlist
To remove a music file from the playlist:
1.While the music file is playing, press
 to pause playback and display the Option menu.
2.Press + or – to highlight Clear from Favorites and press
 .
.
Resume
Repeat |
Off |
 Clear from Favorites
Delete
3.Press
 to highlight Yes and then press
 to remove the file from the playlist.
To remove all music files from the playlist:
1.Press MENU to display the Home menu.
2.Press + or – to select Favorites and press
 to enter the Favorites menu.
3.Press + or – to highlight Clear Favorites and
press
 .
.
Favorites
Play Music
Clear Favorites
4.Press
 to highlight Yes and then press
 to remove all files from the playlist.
|
|
|
|
|
|
Clear Favorites |
• To play the entire playlist, press |
|
|
|
. |
No |
Yes |
|
|
|||||
|
|
•To play back a particular file, press
 to enter the Favorites menu and then press
 to list the files. Press + or – to select the desired file and press
 .
.
22
Voice Memo
Recording voice memo
You can record voice and play back recordings as well as copy the recordings (WAV files) to your PC.
To record voice:
1.Press MENU to display the Home menu.
2.Press + or – to select Voice Memo.
Audiobooks
Favorites
Voice Memo
Settings
Now Playing
3.Press
 to highlight Start Recording and press
 to start recording.
Start Recording
Playback
•Press
 to pause or resume recording.
•The microphone is located at the back of the player.
4. Press MENU to stop recording.
•The player names each recording VRecXXX.wav where XXX is a unique number.
To record for a specific duration:
Refer to RecDur on page 24.
Playing back voice memo
To play back a recording:
1.Press MENU to display the player menu.
2.Press + or – to select Voice Memo and press
 to enter the voice memo menu.
3.Press + or – to highlight Playback and press
 to see the list of recordings.
Start Recording
Playback
4.Press + or – to select a recording and press
 to start playback.
Option menu (recording playback)
Press
 to show or hide the Option menu during playback. Press + or – to highlight an option and then press
 to confirm the selection or change the setting.
The following options are available:
•Resume – to resume playback
•Repeat – press 
 repeatedly to select repeat current 1
 or all files
  (corresponding icon shows on the display)
•Delete – to remove current file from the player
Copying recordings to your PC
Recordings are stored as WAV files in the “VRecord” folder on the player.
To copy recordings to the PC:
1.Plug the player into the PC.
2.Open the player’s Record folder.
3.Select the files you want to copy and drag and drop them onto a folder on the PC.
•Almost all audio applications can play WAV files.
23

Settings
Changing the player’s settings
To change the player settings:
1.Press MENU to display the Home menu.
2.Press + or – to select Settings and press
 to enter the settings menu.
Favorites
Voice Memo
Settings
Now Playing
Music
3. Press + or – to select a setting and then press 
 to change it.
Settings
Shuffle |
Off |
Equalizer |
Jazz |
Customize Menu |
|
Slideshow |
3s |
Brightness |
1 |
Shuffle
•Press
 repeatedly to select shuffle on or off. Music files (mp3/wma/wav) will be played randomly when shuffle is activated.
•The shuffle icon (  ) shows on display when shuffle is on.
Equalizer
•Press
 repeatedly to choose an equalizer setting (Flat, Bass, Graphic, Pop, Rock and Jazz).
Setting Graphic mode:
•Press
 repeatedly until Graphic appears and then press
 . In graphic mode, you can customize the five band equalizer. Press
 or
or
 to select a band and then press + or – to adjust
the band level. When finished, press MENU to exit Graphic mode.
Customize menu
To select what you wish to display in the submenu of the Music menu: Artists, Album, Titles, Genres, and Years.
Slideshow
To select the slideshow image duration. Press 
 repeatedly to select among: off, 3, 5, 10 and 15 seconds.
Brightness
To adjust the display light brightness.
Screensaver
To set the duration (10s, 20s, 30s and 1m) before the screensaver activates.
Power save
To set the time interval (Off, 1m, 2m, 5m and 10m) before the player turns off if no key is pressed.
RecDur (Record duration)
To change the duration (Max, 5 minutes, 30 minutes, 1 hour) for radio and voice memo recording.
FreqStep (Frequency Step)
To changes the way that the player scans through the radio frequencies. Switch to EU if you bring the player to Europe; switch back to US when you return to North America.
Language
To change the language of the player menus.
Protocol
To switch between MSC (Mass Storage Class) and MTP (Media Transfer Protocol) modes when connected to your PC. To enable function of transferring subscription music content, select MTP mode.
System info
To show the amount of free space available and the firmware version.
Restore defaults
To reset all menus to factory defaults.
24

Additional information
Tips and troubleshooting
Cannot delete files on the player.
•For any files you have transferred to the player, you may delete them while you have connected the player with your computer. Highlight the unwanted file in the player’s file directory on your computer and press the delete key on your computer to delete the file. Subscribed files are best to be removed through Windows Media® Player.
•For deleting files from the player, refer to Option menu from page 15-23 for details.
Player repeats same tracks or all tracks.
•Repeat play is turned on. Press the PLAY button to show the option menu and change the play mode.
Audio distorted at high volume.
•Change the Equalizer mode to Flat.
•Turn down the volume.
The audio tracks on my player keep skipping or popping.
•You’ll need to re-record the audio track – make sure you close all other applications on your PC when you record.
•Try recording with Error Correction setting turned on.
Player turns itself off.
•Your player turns itself off if you leave it in pause mode or navigation mode for the duration specified in PowerSave setting.
The player cannot be turned on.
•Battery is empty.
•Ensure the keys lock is not activated.
•Reset the player by pressing and holding MENU for more than 10 seconds.
•If the player still cannot be turned on after resetting, perform a firmware upgrade to restore it.
•Please go to www.rcaaudiovideo.com for more details.
Player does not respond to key presses.
•If your player stops responding to key presses, you can reset it by pressing and holding
MENU for more than 10 seconds. Most of your settings will be preserved; only the settings that you have changed after your last power off will be lost.
•This player may temporarily cease to function if subjected to electrostatic disturbance.
To resume normal operation, it may be necessary to cycle the power off and back on or you can reset it by pressing and holding MENU for more than 10 seconds.
Player cannot play WMA songs.
•Secure music download files must be transferred to your player through the Windows Media Player or the application recommended by your online music download service (Note: Services and applications must be Windows Media audio-compliant and support Digital Rights Management.) (Apple iTunes music content is not supported).
The player takes a long time to read files in a folder.
•File reading may take longer if too many files are put in a single folder. Re-organize your files into a number of folders.
Song information is not showing correctly.
•Song information may not match your current player’s language setting. Change the language setting.
Cannot view picture files.
•The player only supports .jpg extension file, and do not support other formats like .bmp, .tiff,
.jpeg.
Cannot play video files.
•All video contents must be converted by RCA EasyRip software which comes with the player. Other format of video file will not be supported.
Cannot play audible files.
•Make sure the file format is correct. The player supports Format 4 Audible file.
The player reports that it is full.
•You have filled the capacity of the internal memory of the player.
•You have exceeded the maximum number of items that this player supports. Your player can only support up to 4000 media items (including folders & files) within eight hierarchy of folder in maximum.
25
Additional information
Cannot playback tracks on the player.
•Make sure audio tracks are encoded in the mp3 or Windows Media formats at supported bitrates.
•Bitrates support by the player: mp3 – 32 to 320 kbps
wma – 48 to 192 kbps
•WMA files may be DRM protected and you don’t have the proper rights (license) to play the files.
•Check the website and/or application help system of the music download service provider from where the content was purchased from for license acquisition details. For more information on how license acquisition works, go to www. microsoft.com/windowsmedia/drm.
Cannot playback songs downloaded from my paid Music Server Provider subscription service.
•The internal clock in your portable player may not be up to date. Downloading a new subscription song from your Music Server Provider should update your player's clock and allow it to playback all your songs again.
•The license for your subscription songs may have expired. Synchronize your device with your PC again to obtain an update to your license. If the problem persists, please contact your Music Service Provider for additional support.
Cannot transfer subscription music content to the player.
•To enable function of transferring subscription music content, select MTP mode under Protocol in the Settings menu. Refer to page 24 for more information.
What is MTP mode?
•MTP (Media Transfer Protocol) mode is essential if you want to transfer DRM10 content to your player. In MTP mode your player will no longer show up as a drive letter. So programs that were designed to work with a player that shows up as a drive letter will not be able to work directly with the player.
Cannot launch RCA EasyRip installer stored in the player to install EasyRip on my PC.
•To enable function of launching RCA EasyRip installer stored in the player, select MSC mode under Protocol in the Settings menu. Refer to page 24 for more information.
Check for updates
Visit www.rcaaudiovideo.com for the latest news and firmware upgrades for our digital media player.
Technical specification
Product: Digital Audio Player Brand: RCA
Model: SL5004, SL5008, SL5016, SLC5004, SLC5008, SLC5016
Electrical Consumption: 3.7V Lithium battery (builtin)
Specifications
Hardware
•Dimensions: 51 mm H, 78.5 mm W, 15.8 mm D
•Unit Weight: 66 g
•Stereo Headphones jack
•USB Connection Jack
•Battery Operated: Rechargeable lithium battery
USB Drive
•External USB Drive: When connected to a computer via USB, the player is capable of storing any file type allowing the user a fast, convenient method of storing, retrieving, and transferring files. This includes word processing files, presentations, spreadsheets and any other computer files.
•Capacity: SL5004/SLC5004 - 4GB; SL5008, SLC5008 - 8GB, SL5016/SLC5016 - 16GB
•Connection: USB 2.0, Hi-speed capable
Software
•Includes the player applications and media management software.
26

Limited warranty
Limited warranty
12 Month Limited Warranty
Applies to RCA Audio/Video Products
AUDIOVOX ELECTRONICS CORP. (the Company) warrants to the original retail purchaser of this product that should this product or any part thereof, under normal use and conditions, be proven defective in material or workmanship within 12 months from the date of original purchase, such defect(s) will be repaired or replaced with reconditioned product (at the Company's option) without charge for parts and repair labor.
To obtain repair or replacement within the terms of this Warranty, the product is to be delivered with proof of warranty coverage (e.g. dated bill of sale), specification of defect(s), transportation prepaid, to the Company at the address shown below.
This Warranty does not extend to the elimination of externally generated static or noise, to correction of antenna problems, loss/interruptions of broadcast or internet service, to costs incurred for installation, removal or reinstallation of product, to corruptions caused by computer viruses, spyware or other malware, to loss of media, files, data or content, or to damage to tapes, discs, removable memory devices or cards, speakers, accessories, computers, computer peripherals, other media players, home networks or vehicle electrical systems.
This Warranty does not apply to any product or part thereof which, in the opinion of the Company, has suffered or been damaged through alteration, improper installation, mishandling, misuse, neglect, accident, or by removal or defacement of the factory serial number/bar code label(s). THE EXTENT OF THE COMPANY'S LIABILITY UNDER THIS WARRANTY IS LIMITED TO THE REPAIR OR REPLACEMENT PROVIDED ABOVE AND, IN NO EVENT, SHALL THE COMPANY'S LIABILITY EXCEED THE PURCHASE PRICE PAID BY PURCHASER FOR THE PRODUCT.
This Warranty is in lieu of all other express warranties or liabilities. ANY IMPLIED WARRANTIES, INCLUDING ANY IMPLIED WARRANTY OF MERCHANTABILITY, SHALL BE LIMITED TO THE DURATION OF THIS WRITTEN WARRANTY. ANY ACTION FOR BREACH OF ANY WARRANTY HEREUNDER INCLUDING ANY IMPLIED WARRANTY OF MERCHANTABILITY MUST BE BROUGHT WITHIN A PERIOD OF 24 MONTHS FROM DATE OF ORIGINAL PURCHASE. IN NO CASE SHALL THE COMPANY BE LIABLE FOR ANY CONSEQUENTIAL OR INCIDENTAL DAMAGES FOR BREACH OF THIS OR ANY OTHER WARRANTY. No person or representative is authorized to assume for the Company any liability other than expressed herein in connection with the sale of this product.
Some states do not allow limitations on how long an implied warranty lasts or the exclusion or limitation of incidental or consequential damage so the above limitations or exclusions may not apply to you. This Warranty gives you specific legal rights and you may also have other rights which vary from state to state.
How to make a warranty claim:
•If your product is capable of storing content (such as an mp3 player, digital voice recorder, etc), it is recommended to make periodic backup copies of content stored on the product. If applicable, before shipping a product, make a back up copy of content or data stored on the device. Also, it is advisable to remove any personal content which you would not want exposed to others. IT IS LIKELY THAT CONTENTS AND DATA ON THE DEVICE WILL BE LOST DURING SERVICE AND REFORMATTING. AUDIOVOX ACCEPTS NO LIABILITY FOR LOST CONTENT OR DATA, OR FOR THE SECURITY OF ANY PERSONAL CONTENT OR DATA ON THE RETURNED DEVICE. Product will be returned with factory default settings, and without any pre-loaded content which may have been installed in the originally purchased products. Consumer will be responsible for reloading data and content. Consumer will be responsible to restore any personal preference settings.
27
Loading...