


 Loading...
QP2531, QP2530, QP2522, QP2521, QP2520


empty page before TOC

English 6
Dansk 23
Deutsch 39
Español 58
Français 75
Italiano 92 Nederlands 109 Norsk 126 Português 141 Suomi 158 Svenska 174
Türkçe 190
Ελληνικα 206

6 English
Introduction
Congratulations on your purchase and welcome to Philips! To fully benefit from the support that Philips offers, register your product at www.philips.com/welcome.
General description (Fig. 1)
1Blade
2Blade release slide
3On/off button
4Battery status indicator (QP2531, QP2530 only)
5Small plug
6Battery charge indicator (QP2522, QP2521, QP2520 only)
7Supply unit (QP2531, QP2530: adapter type HQ850. QP2522, QP2521, QP2520: adapter type A00390.)
8Replacement blade (QP2531, QP2522 only)
9Click-on stubble comb 5mm
10Click-on stubble comb 3mm (QP2531, QP2530, QP2520 only)
11Click-on stubble comb 2mm (QP2531, QP2530 only)
12Clickon stubble comb 1mm
Important safety information
Read this important information carefully before you use the appliance and its accessories and save it for future reference. The accessories supplied may vary for different products.
English

English 7
Danger
- Keep the supply unit dry.
Warning
-The supply unit contains a transformer. Do not cut off the supply unit to replace it with another plug, as this causes a hazardous situation.
-Only charge the appliance with the supply unit provided.

8 English
-This appliance can be used by children aged from 8 years and above and persons with reduced physical, sensory or mental capabilities or lack of experience and knowledge if they have been given supervision or instruction concerning use of the appliance in a safe way and understand the hazards involved. Children shall not play with the appliance. Cleaning and user maintenance shall not be made by children without supervision.
-Always unplug the appliance before you clean it under the tap.

English 9
-Always check the appliance before you use it. Do not use the appliance if it is damaged, as this may cause injury. Always replace a damaged part with one of the original type.
-Do not open the appliance to replace the rechargeable battery.
Caution
- Never immerse the charging stand in water and do not rinse it under the tap.
-Never use water hotter than 80°C to rinse the appliance.
-Only use this appliance for its intended purpose as shown in the user manual.
-For hygienic reasons, the appliance should only be used by one person.

10 English
-Never use compressed air, scouring pads, abrasive cleaning agents or aggressive liquids such as petrol or acetone to clean the appliance.
-Do not use the supply unit in or near wall sockets that contain or have contained an electric air freshener to prevent irreparable damage to the supply unit.
Electromagnetic fields (EMF)
-This Philips appliance complies with all applicable standards and regulations regarding exposure to electromagnetic fields.
General
- This appliance is waterproof. It is suitable for use in the bath or shower and for cleaning under the tap. For safety reasons, the appliance can therefore only be used without cord.
-The appliance is suitable for mains voltages ranging from 100 to 240 volts.
-The supply unit transforms 100-240 volts to a safe low voltage of less than 24 volts.
Charging
Note: This appliance can only be used without cord.
English 11
QP2531, QP2530: Charging normally takes approx. 4 hours.
QP2522, QP2521, QP2520: Charging normally takes approx. 8 hours.
A fully charged appliance has an operating time of up to 60 minutes (QP2531, QP2530) or 45 minutes (QP2522, QP2521, QP2520).
Charge the appliance before you use it for the first time and when the battery charge indicator indicates that the battery is almost empty.
Battery status indicator QP2531, QP2530:
When the battery status indicator light flashes orange, the battery is almost empty.
To indicate that the appliance is charging, the battery status indicator light flashes green.
When the battery is fully charged, the battery status indicator lights up green continuously.
Approx. 30 minutes after the battery is fully charged or when you disconnect the appliance from the mains, the light of the battery status indicator switches off automatically.
Battery charge indicator QP2522, QP2521, QP2520:
The battery status is indicated by the performance of the appliance. When the appliance starts working more slowly, the battery is almost empty and needs to be charged for optimal performance.

12 English
Charging with the adapter
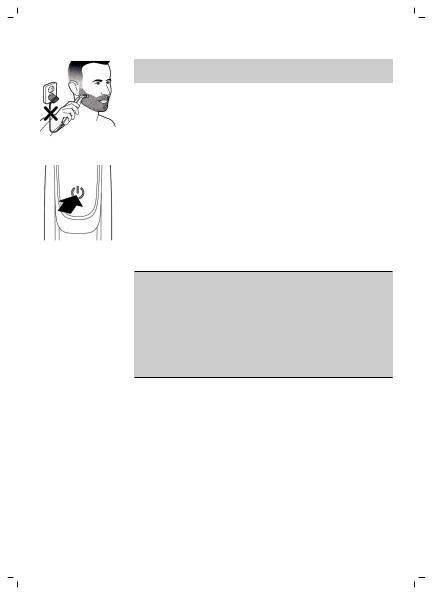
1Insert the small plug into the appliance and put the adapter in the wall socket.
2QP2522, QP2521, QP2520 only: The battery charge indicator on the adapter lights up continuously, when the appliance is connected to the mains.
3After charging, remove the adapter from the wall socket and pull the small plug out of the appliance.
Using the appliance
You can use the appliance to trim, edge or shave facial hair (beard, moustache and sideburns). Shave for a smooth result, trim to obtain a certain length and edge to create perfect edges and sharp lines. This appliance is not intended for shaving, edging or trimming hairs on lower body parts or scalp hair. Take your time when you first start to use the appliance. You have to acquire practice with the appliance.
Note: This appliance can only be used without cord.
Switching the appliance on and off
1To switch on the appliance, press the on/off button once.
2To switch off the appliance, press the on/off button once.
English 13
Shaving
Warning: Before you use the appliance, always check the blade for damage or wear. If the blade is damaged or worn, do not use the appliance, as injury may occur. Replace a damaged blade before you use the appliance (see chapter ‘Replacement’).
Shaving tips and tricks
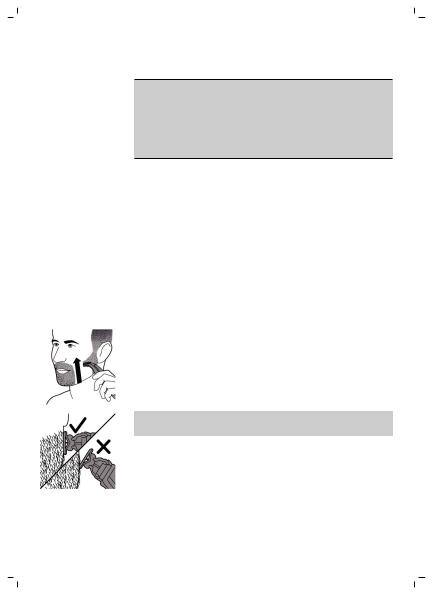
-Make sure that the blade is in full contact with the skin by placing it flat on the skin.
-For the best result, move the appliance against the grain.
-Make long strokes while you press lightly.
-You can use the appliance dry or wet with gel or foam, even in the shower.
-Shaving a clean beard and face gives the best results.
1Switch on the appliance.
2Place the blade on the skin and move the appliance up or against the grain in long strokes while you press it lightly.
Note: Make sure you hold the surface of the blade flat against your skin.
3Switch off and clean the appliance after every use (see ‘Cleaning and maintenance’).
Edging
You can also use both edges of the blade to create sharp lines and perfect edges. Hold the appliance in such a way that the blade is perpendicular to

14 English
the skin and one of its edges touches the skin. This allows more precise detailing of sideburns and the area around the mouth and nose.
1To use the blade for creating sharp edges and lines, use either edge of the blade.
2Switch on the appliance.
3Place the edge of the blade perpendicular onto the skin.
-Make straight strokes while applying gentle pressure.
4Switch off and clean the appliance after every use (see ‘Cleaning and maintenance’).
Trimming with comb
The click-on stubble combs allow you to trim hair to different lengths.
QP2531, QP2530 come with 4 click-on stubble combs: 5mm, 3mm, 2mm, 1mm.
QP2520 comes with 3 click-on stubble combs: 5mm, 3mm, 1mm.
QP2522, QP2521 come with 2 click-on stubble combs: 5mm, 1mm.
Start with the 5mm comb to acquire practice with this appliance.
The indication on each comb corresponds to the hair length in millimeters.

English 15
Tips
-Always make sure that the tips of the clickon stubble comb point in the direction in which you move the appliance.
-Make sure that the flat part of the comb is always in full contact with the skin to obtain an even trimming result.
-Since hair grows in different directions, you need to move the appliance in different directions as well (upward, downward or across).
-Trimming is easier when the skin and hair are dry.
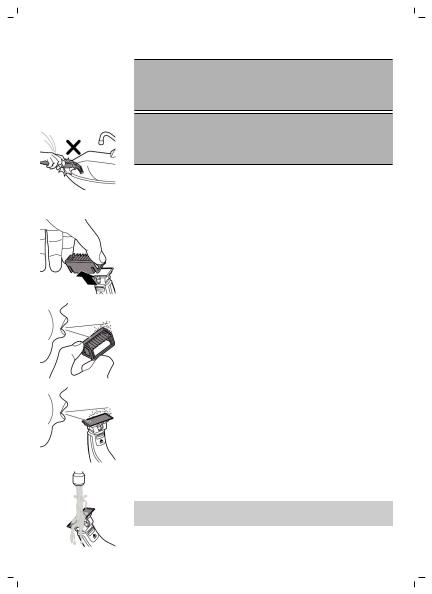
1Place the comb onto the blade, with the teeth of the comb pointing upwards.
Note: Always trim in the direction of the teeth of the comb. This will give you the best results.
2Switch on the appliance.
3Place the comb onto the skin and move the appliance in the direction of the teeth of the comb.
Note: For the best result, move it against the grain.
4Switch off and clean the appliance after every use (see ‘Cleaning and maintenance’).
5To remove the comb, hold it on both sides and pull it off the blade.
Cleaning and maintenance
Clean the appliance after every use.
16 English
Caution: Never use compressed air, scouring pads, abrasive cleaning agents or aggressive liquids such as petrol or acetone to clean the appliance.
Caution: Do not tap the appliance against a surface to remove water from it, as this may cause damage. Replace the blade if it is damaged.
Cleaning the appliance
1Remove the comb from the blade. Always turn the appliance off before putting on or taking off combs.
2If a lot of hairs have accumulated on the comb, first blow them off.
3If a lot of hairs have accumulated on the appliance, first blow them off.
4Then switch on the appliance and rinse the blade with lukewarm water.
Caution: Do not dry the blade with a towel or a tissue as this may cause damage.

English 17
5Then rinse the comb with lukewarm water.
6Let the appliance and comb dry.
Note: The blade is fragile. Handle it carefully.
Replace the blade if it is damaged.
Storage
Note: We advise you to let the appliance and its attachments dry before you store them for the next use.
1Always attach the click-on stubble comb on the blade to protect the blade from damage during travelling or storage.
Replacement
Replacing the blade
For optimal cutting and gliding performance of the blade, we advise you to replace the blade every 4 months or when it no longer provides the shaving or trimming results you expect. The advice of replacing every 4 months is based on two full shaves a week. Depending on your usage behavior the exact lifetime of the blade could be longer or shorter. Similar to what you would experience with a manual blade, the blade becomes blunt over time, which results in increased hair pulling and reduced cutting performance.

18 English |
|
|
1 Push the blade release slide upwards carefully, |
2 |
and hold the blade on its sides to remove the |
1 |
blade and prevent it from flying away. |
|
2Hold the new blade on its sides and press it onto the handle (‘click’).
Note: When you hear a click the new blade is placed correctly and ready for use.
Ordering accessories
To buy accessories or spare parts, visit www.shop.philips.com/service or go to your Philips dealer. You can also contact the Philips Consumer Care Center in your country (see the worldwide guarantee leaflet for contact details).
The following parts are available:
-QP210 Blade 1-pack
-QP220 Blade 2-pack
Recycling
- This symbol means that this product shall not be disposed of with normal household waste (2012/19/EU).

English 19
- This symbol means that this product contains a built-in rechargeable battery which shall not be disposed of with normal household waste (2006/66/EC). We strongly advise you to take your product to an official collection point or a Philips service centre to have a professional remove the rechargeable battery.
-Follow your country’s rules for the separate collection of electrical and electronic products and rechargeable batteries. Correct disposal helps prevent negative consequences for the environment and human health.
Removing the rechargeable battery
Caution: Only remove the rechargeable battery when you discard the appliance. Make sure the battery is completely empty when you remove it.
Note: We strongly advise you to have a professional remove the rechargeable battery.
1Disconnect the appliance from the mains and let the appliance run until the motor stops.
2Remove the blade from the appliance.
3Remove the bottom of the appliance by bending it downwards and pull it off.
4Take out the battery compartment by separating the bottom part from the top part.

20 English
5Separate the battery section from the bottom part.
6Lift the battery out of the inner body with the screwdriver. The battery is connected with double-sided tape.
Warning: Be careful, the battery strips are very sharp.
Guarantee and support
If you need information or support, please visit www.philips.com/support or read the separate worldwide guarantee leaflet.
Guarantee restrictions
The blade is not covered by the terms of the international guarantee because it is subject to wear.
Troubleshooting
This chapter summarizes the most common problems you could encounter with the appliance. If you are unable to solve the problem with the information below, visit www.philips.com/support for a list of frequently asked questions or contact the Consumer Care Center in your country.
|
|
English |
21 |
Problem |
Possible cause |
Solution |
|
|
|
|
|
The appliance |
The appliance has |
Switch off the appliance. |
|
does not charge |
to be switched off |
|
|
when it is |
when you charge it. |
|
|
connected to the |
|
|
|
mains. |
|
|
|
|
|
|
|
I cannot switch |
You cannot use the |
Disconnect the appliance |
|
on the appliance |
appliance when it |
from the mains before use. |
|
when it is |
is charging. You |
|
|
connected to the |
can only use the |
|
|
mains. |
appliance without |
|
|
|
cord. |
|
|
|
|
|
|
The appliance |
The rechargeable |
Charge the appliance (see |
|
does not work |
battery is empty. |
chapter ‘Charging’). |
|
anymore. |
|
QP2530: During charging, |
|
|
|
the battery charge |
|
|
|
indicator flashes. QP2520: |
|
|
|
During charging, the |
|
|
|
charge indicator on the |
|
|
|
adapter lights up. If the |
|
|
|
battery charge indicator |
|
|
|
does not flash or light up, |
|
|
|
check whether there is a |
|
|
|
power failure or if the wall |
|
|
|
socket is live. If there is no |
|
|
|
power failure and the wall |
|
|
|
socket is live but the |
|
|
|
battery charge indicator |
|
|
|
still does not flash or light |
|
|
|
up, take the appliance to |
|
|
|
your dealer or a Philips |
|
|
|
service center. |
|
|
|
|
|
|
The blade is |
Switch on the appliance |
|
|
blocked by dirt. |
and rinse the blade under |
|
|
|
the tap with warm water. |
|
Hold the blade in a cup with warm water (60°C and no hotter) for approx.30 seconds.

22 English |
|
|
Problem |
Possible cause |
Solution |
|
|
|
The appliance |
The blade is placed |
Push the blade onto the |
doesn’t cut hairs |
on the handle |
appliance until you hear a |
anymore. |
incorrectly. |
click. |
|
|
|
|
The blade is |
Replace the blade with a |
|
damaged or worn. |
new one. See chapter |
|
|
‘Replacement’. |
|
|
|
The appliance |
The blade is |
Replace the blade with a |
makes a strange |
damaged or worn. |
new one. See chapter |
noise. |
|
‘Replacement’. |
|
|
|
|
The blade is placed |
Remove and reattach the |
|
onto the handle |
blade. Push it onto the |
|
incorrectly. |
appliance until you hear a |
|
|
click. |
|
|
|
|
The blade is |
Remove the blade and |
|
blocked by dirt. |
clean it thoroughly. |
|
|
|
The appliance |
The blade is |
Remove the blade and |
doesn’t function |
blocked by dirt. |
clean it thoroughly. |
optimally |
|
|
anymore. |
|
|
|
|
|
|
The blade is |
Replace the blade with a |
|
subject to wear and |
new one. See chapter |
|
therefore its |
‘Replacement’. |
|
performance |
|
|
decreases over |
|
|
time. |
|
|
|
|
|
The blade is a |
Replace the blade with a |
|
delicate part of the |
new one. See chapter |
|
appliance and can |
‘Replacement’. |
|
easily be damaged. |
|
|
If the blade is |
|
|
damaged, it may |
|
|
not function |
|
|
optimally anymore. |
|
|
|
|

Dansk 23
Introduktion
Tillykke med dit køb, og velkommen til Philips! For at få fuldt udbytte af den support, Philips tilbyder, skal du registrere dit produkt på www.philips.com/welcome.
Generel beskrivelse (fig. 1)
1Knivenhed
2Udløser til knivenhed
3On/off-knap
4Batteristatusindikator (kun QP2531, QP2530)
5Lille stik
6Batteriopladningsindikator (kun QP2522, QP2521, QP2520)
7Forsyningsenhed (QP2531, QP2530: adaptertype HQ850. QP2522, QP2521, QP2520: adaptertype A00390).
8Udskiftningsknivenhed (kun QP2531, QP2522)
9Stubbekam til at klikke på 5 mm
10Stubbekam til at klikke på 3 mm (kun QP2531, QP2530, QP2520)
11Stubbekam til at klikke på 2 mm (kun QP2531, QP2530)
12Stubbekam til at klikke på 1 mm
Vigtige sikkerhedsoplysninger
Læs disse vigtige oplysninger omhyggeligt igennem, inden apparatet og tilbehøret tages i brug, og gem dem til eventuel senere brug. Det medfølgende tilbehør kan variere for forskellige produkter.
Dansk

24 Dansk
Fare
- Hold forsyningsenheden tør.
Advarsel
-Strømforsyningsenheden indeholder en transformator. Klip ikke strømforsyningsenheden af og udskift den med et andet stik, da dette vil føre til farlige situationer.
-Brug kun den medfølgende strømforsyningsenhed ved opladning af apparatet.
-Dette apparat må bruges af børn fra 8 år og opefter og personer med reducerede fysiske, sensoriske eller mentale evner eller manglende erfaring og viden, hvis de er blevet instrueret i sikker brug af apparatet og forstår de medfølgende risici. Lad ikke børn lege med apparatet. Rengøring og vedligeholdelse må ikke foretages af børn uden opsyn.
-Tag altid stikket ud af apparatet, inden det skylles under vandhanen.
-Kontroller altid apparatet, inden du anvender det. Anvend ikke apparatet, hvis det er beskadiget, da dette kan forårsage personskade. Udskift altid en beskadiget del med en tilsvarende original type.
-Apparatet må ikke åbnes i forbindelse med udskiftning af det genopladelige batteri.

Dansk 25
Forsigtig
-Opladeren må aldrig kommes ned i vand eller skylles under vandhanen.
-Rens aldrig apparatet med vand, der er varmere
end 80°C.
-Brug kun apparatet til det tilsigtede formål som vist i brugervejledningen.
-Af hygiejniske grunde bør apparatet kun anvendes af en og samme person.
-Brug aldrig trykluft, skuresvampe eller skrappe rengøringsmidler, som f.eks. benzin, acetone eller lignende, til rengøring af apparatet.
-Brug ikke strømforsyningsenheden i eller i nærheden af stikkontakter, som indeholder eller har indeholdt en elektrisk luftfrisker, for at forhindre uoprettelig beskadigelse af strømforsyningsenheden.
Elektromagnetiske felter (EMF)
-Dette Philips-apparat overholder alle branchens gældende standarder og regler angående eksponering for elektromagnetiske felter.
Generelt
- Dette apparat er vandtæt. Apparatet er velegnet til brug i badet eller under bruseren og kan rengøres under vandhanen. Af sikkerhedsmæssige årsager kan apparatet kun betjenes trådløst.
-Apparatet kan tilsluttes netspændinger mellem 100 og 240 V.

26 Dansk
-Strømforsyningsenheden omformer 100-240 Volt til en lav sikkerhedsspænding under 24 Volt.
Opladning
Bemærk: Dette apparat kan kun bruges uden ledning.
QP2531, QP2530: Opladning tager normalt ca. 4 timer.
QP2522, QP2521, QP2520: Opladning tager normalt ca. 8 timer.
Et fuldt opladet apparat har en brugstid på op til 60 minutter (QP2531, QP2530) eller 45 minutter (QP2522, QP2521, QP2520).
Oplad apparatet, før du bruger det første gang, og når batteriopladningsindikatoren viser, at batteriet næsten er tomt.
Batteristatusindikator QP2531, QP2530:
Når batteristatusindikatoren blinker orange, er batteriet næsten tomt.
For at indikere, at apparatet oplades, blinker batteristatusindikatoren grønt.

Dansk 27
Når batteriet er fuldt opladet, lyser batteristatusindikatoren konstant grønt.
Ca. 30 minutter efter at batteriet er fuldt opladet, eller når du kobler apparatet fra stikkontakten, slukkes batteristatusindikatorens lys automatisk.
Batteriopladningsindikator QP2522, QP2521, QP2520:
Batteristatus angives af apparatets ydeevne. Når apparatet begynder at køre langsommere, er batteriet næsten tomt og skal oplades for at opnå optimal ydeevne.
Opladning med adapter
1Sæt det lille stik i apparatet, og sæt adapteren i stikkontakten.
2Kun QP2522, QP2521, QP2520: Batteriopladningsindikatoren på adapterens lyser konstant, når apparatet er koblet til stikkontakten.
3Efter opladning skal du tage adapteren ud af stikkontakten og tage det lille stik ud af apparatet.
Sådan bruges apparatet
Du kan bruge apparatet til at trimme, rette kanter på eller barbere ansigtshår (skæg, overskæg og bakkenbarter). Barber for at opnå et glat resultat, trim for at opnå en bestemt længde, og ret kanter for at skabe perfekte kanter og skarpe linjer. Dette apparat er ikke beregnet til barbering, kantretning eller trimning af hår på de nedre kropsdele eller hovedhår. Tag dig god tid, når du begynder at bruge apparatet første gang. Du skal vænne dig lidt til at bruge apparatet.
28 Dansk
Bemærk: Dette apparat kan kun bruges uden ledning.
Sådan tændes og slukkes apparatet
1Apparatet tændes ved at trykke én gang på on/off-knappen.
2Apparatet slukkes ved at trykke én gang på on/off-knappen.
Barbering
Advarsel: Inden du bruger apparatet, skal du altid kontrollere, om knivenheden er beskadiget eller slidt. Hvis knivenheden er beskadiget eller slidt, må du ikke bruge apparatet, da du kan risikere at komme til skade. Udskift en beskadiget knivenhed, inden du bruger apparatet (se afsnittet "Udskiftning").
Barberingstips og tricks
-Sørg for, at knivenheden er i fuld kontakt med huden ved at anbringe den fladt på huden.
-Bevæg apparatet mod hårene for at opnå det bedste resultat.
-Brug lange strøg, mens du trykker let.
-Du kan bruge apparatet på et tørt eller vådt ansigt med sæbe eller skum, også under bruseren.
-Resultatet bliver bedst, hvis skægget og ansigtet er rent.
1 Tænd for apparatet.

Dansk 29
2Anbring knivenheden på huden, og før apparatet op eller mod hårene med lange strøg, mens du trykker let.
Bemærk: Sørg for at holde knivenhedens overflade fladt mod huden.
3Sluk for apparatet, og rengør apparatet før hver brug (se "Rengøring og vedligeholdelse").
Kantretning
Du kan også bruge begge knivenhedens kanter til at skabe skarpe linjer og perfekte kanter. Hold apparatet i en sådan vinkel, at knivenheden er vinkelret på huden, og en af dens kanter berører huden. Dette gør det muligt at tilrette bakkenbarter og området omkring munden og næsen mere præcist.
1Du kan bruge en af knivenhedens kanter til at skabe skarpe kanter og linjer.
2Tænd for apparatet.
3Placer knivenhedens kant vinkelret på huden.

30 Dansk
- Brug lige strøg, mens du trykker let.
4Sluk for apparatet, og rengør apparatet før hver brug (se "Rengøring og vedligeholdelse").
Trimning med kam
Med kammene, der kan klikkes på, kan du trimme hår til forskellige længder.
QP2531, QP2530 leveres med fire stubbekamme, der kan klikkes på: 5 mm, 3 mm, 2 mm, 1 mm.
QP2520 leveres med tre stubbekamme, der kan klikkes på: 5 mm, 3 mm, 1 mm.
QP2522, QP2521 leveres med to stubbekamme, der kan klikkes på: 5 mm, 1 mm.
Begynd med 5 mm-kammen for at vænne dig til at bruge apparatet.
Angivelsen på den enkelte kam svarer til hårlængden i millimeter.
Gode råd
-Sørg altid for, at spidserne på stubbekammen, der kan klikkes på, peger i den retning, du bevæger apparatet.
-Sørg for, at den flade del af kammen altid er i fuld kontakt med huden for at opnå et ensartet trimningsresultat.
-Da hår vokser i forskellige retninger, skal du også bevæge apparatet i forskellige retninger (opad, nedad eller på tværs).
-Trimningen er nemmest på tør hud og hår.
Loading...