


PT919
PT866
PT860
PT845
PT739
PT737
PT731
PT730
PT727
PT726
PT725
PT723
PT721
PT720
User manual

1

PT919, PT866, PT860, PT845, PT739, PT737, PT731, PT730, PT727, PT726, PT725, PT723, PT721, PT720
ENGLISH 4 INDONESIA 15
26
BAHASA MELAYU 37
48
TIẾNGVIỆT 59
70
81 
 102 113
4 ENGLISH
Introduction
Congratulations on your purchase and welcome to Philips!
To fully benefit from the support that Philips offers, register your product at www.philips.com/welcome.
Please read this user manual, as it contains information about the wonderful features of this shaver as well as some tips to make shaving easier and more enjoyable.
General description (Fig. 1)
1Protection cap
2Shaving unit
3Shaving unit release button
4Shaver on/off button
5Shaving head symbol
6Charging light
7Charging stand (PT866*/PT739*)
8Pouch (PT866*)
9Adapter
10Cleaning brush
11Trimmer release slide (PT919/PT866/PT860/PT845/PT739/PT737/ PT731 only)
12Trimmer (PT919/PT866/PT860/PT845/PT739/PT737/PT731 only)
Note:You can find the type number on the back of the shaver.
* only for UK, Holland, Germany, France,Turkey, Sweden, Finland, Norwegia, Denmark, Italy, Portugal, Spain and Greece.
Important
Read this user manual carefully before you use the appliance and save it for future reference.
Danger
-- Keep the adapter dry.
Warning
-- The adapter contains a transformer. Do not cut off the adapter to replace it with another plug, as this causes a hazardous situation.
-- The appliance is not intended for use by persons (including children) with reduced physical, sensory or mental capabilities, or lack of experience and knowledge, unless they have been given supervision or instruction concerning use of the appliance by a person responsible for their safety.
-- Children should be supervised to ensure that they do not play with the appliance.
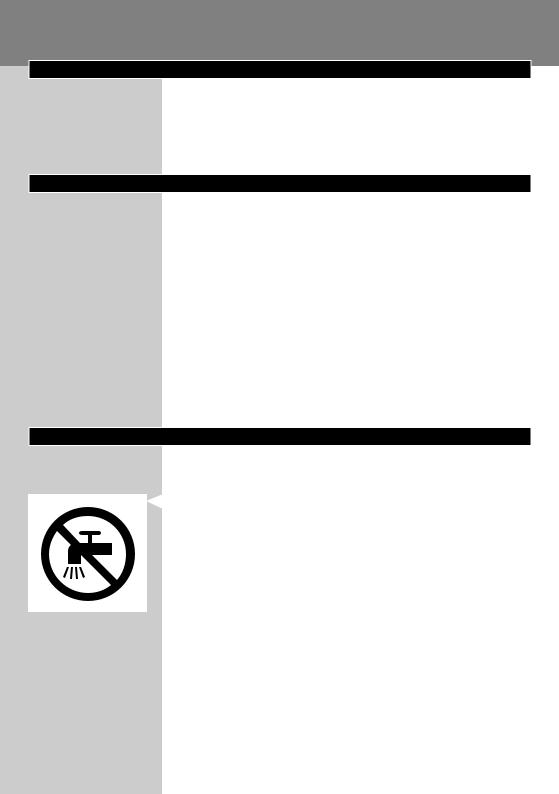
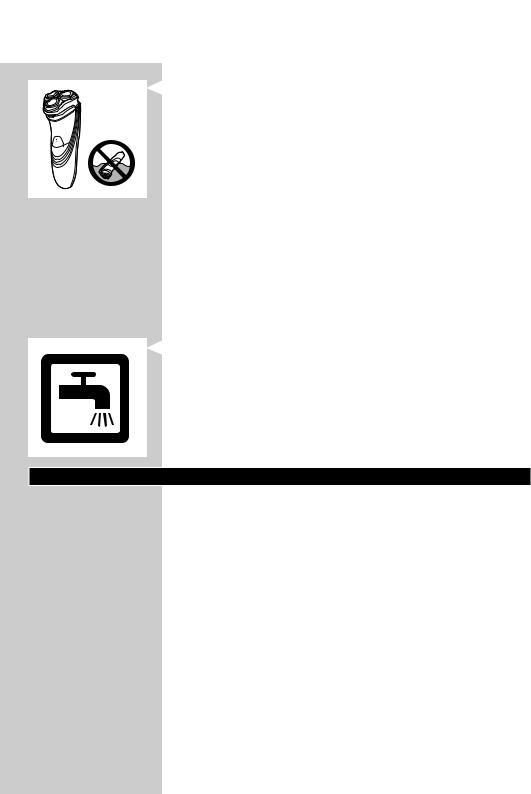
-- Always unplug the shaver before you clean it under the tap.
ENGLISH 5
Caution
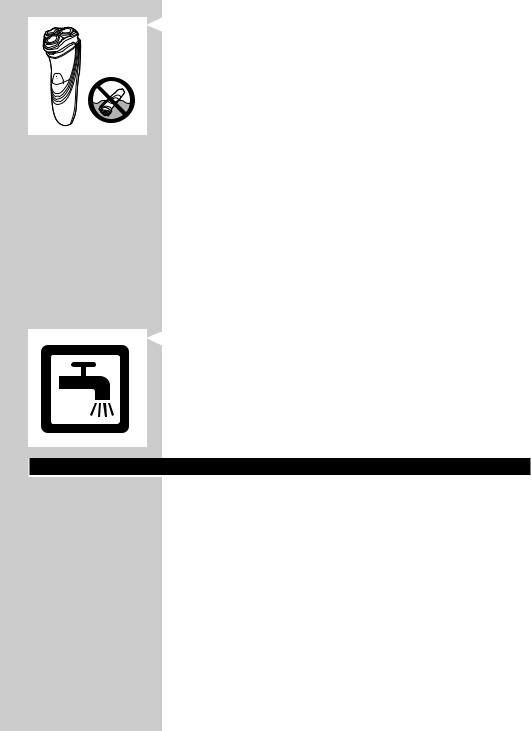
-- Never immerse the shaver in water.
-- Do not use the shaver in the bath or in the shower.
-- Never use water hotter than 80°C to rinse the shaver.
-- Be careful with hot water.Always check if the water is not too hot, to prevent your hands from getting burnt.
-- The shaver is not dishwasher-proof.
-- Water may leak from the socket at the bottom of the shaver when you rinse it.This is normal and not dangerous because all electronics are enclosed in a sealed power unit inside the shaver.
-- Do not use the shaver, adapter or any other part if it is damaged, as this may cause injury.Always replace a damaged adapter, charger or part with one of the original type.
-- Use, charge and store the appliance at a temperature between 10°C and 35°C.
-- Always place and use the shaver on a surface that is fluid-resistant. -- Only use the adapter, charger and accessories supplied.
-- Always put the protection cap on the shaver to prevent damage and to avoid dirt accumulation in the shaving heads.
Compliance with standards
-- This Philips appliance complies with all standards and regulations regarding exposure to electromagnetic fields (EMF) and can be safely cleaned under the tap.
General
-- The appliance is equipped with an automatic voltage selector and is suitable for mains voltages ranging from 100 to 240 volts.
-- The adapter transforms 100-240 volts to a safe low voltage of less than 24 volts.
Charging
PT919/PT866/PT860: It takes approx. 1 hour to fully charge the shaver.
PT845/PT739/PT737/PT731/PT730//PT727/PT726/PT725/PT721/PT720:
It takes approx. 8 hours to fully charge the shaver.
When you charge the shaver for the first time or after a long period of disuse, let it charge until the charging light lights up continuously.
A fully charged shaver provides up to 50 (PT919/PT866/PT860) or up to 45 shaving minutes (PT845/PT739/PT737/PT731/PT730//PT727/PT726/ PT725/PT721/PT720).
The shaving time may be less than 50 (PT919/PT866/PT860) or 45 shaving minutes (PT845/PT739/PT737/PT731/PT730//PT727/PT726/PT725/
PT721/PT720) as a result of your shaving behaviour, your cleaning habits or your beard type.
6 ENGLISH
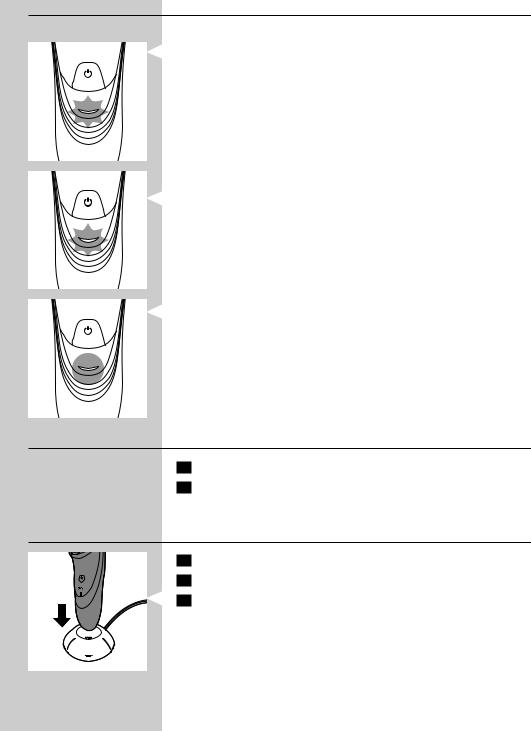
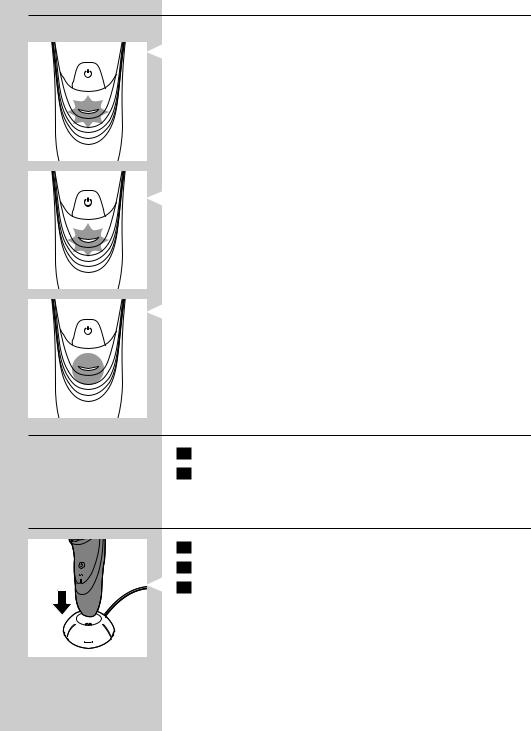
Charge indications
Battery low
-- When the battery is almost empty (when there are only 5 or fewer shaving minutes left), the charging light starts to flash orange.
-- When you switch off the shaver, the charging light continues to flash orange for a few seconds.
Quick charging
-- When you start charging the empty battery, the charging light alternately flashes orange and green.After approx. 3 minutes, the charging light continues to flash green. The shaver now contains enough energy for a 5-minute shave.
Charging
-- When the shaver is charging, the charging light flashes green.
Battery fully charged
-- When the battery is fully charged, the charging light lights up green continuously.
Note:After approx.30 minutes,the charging light goes out to save energy.
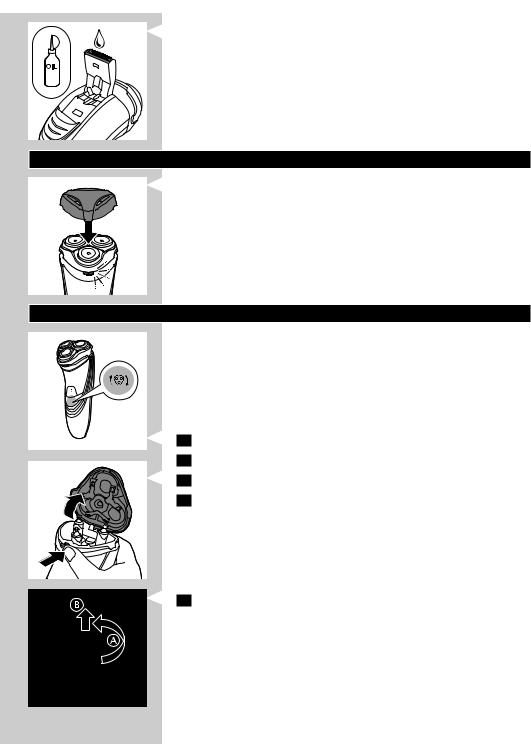
Charging with the adapter
1Put the small plug in the shaver.
2Put the adapter in the wall socket.
,, The charging light shows the charging status of the shaver (see section ‘Charge indications’ in this chapter).
Charging in the charging stand (PT866/PT739 only)
1 Put the small plug in the charging stand.
2 Put the adapter in the wall socket.
3 Place the shaver in the charging stand.
,, The charging light shows the charging status of the shaver (see section ‘Charge indications’ in this chapter).
ENGLISH 7
Using the shaver
Note:You can also use the shaver directly from the mains.Simply connect the shaver to the mains.
Shaving
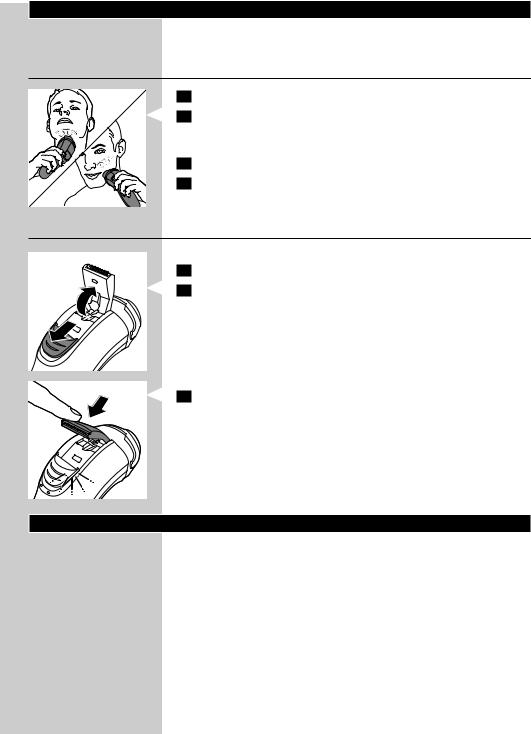
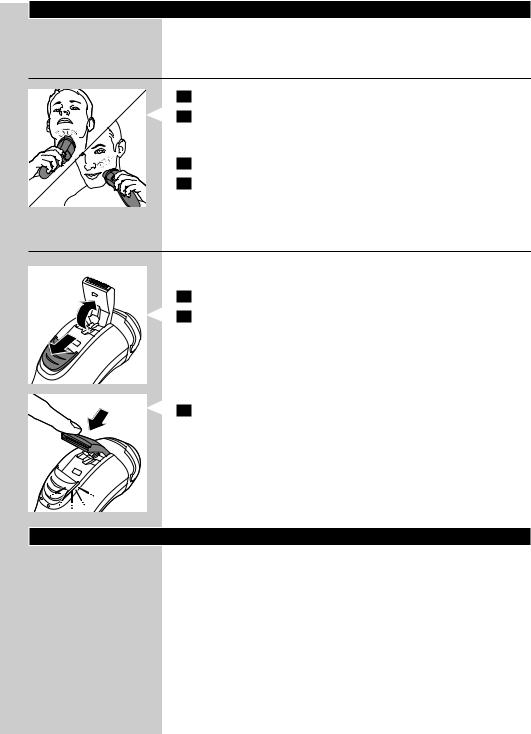
1Press the on/off button once to switch on the shaver.
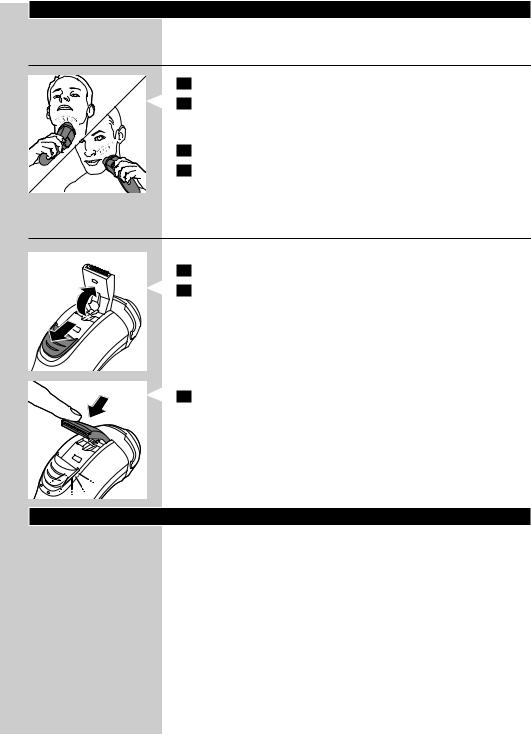
2Move the shaving heads over your skin. Make circular movements.
-- Your skin may need 2 or 3 weeks to get accustomed to the Philips shaving system.
3Press the on/off button once to switch off the shaver.
4Clean the shaver (see chapter ‘Cleaning and maintenance’).
Trimming (PT919/PT866/PT860/PT845/PT739/PT737/PT731 only)
You can use the trimmer to groom your sideburns and moustache.
1Press the on/off button once to switch on the shaver.
2Push the trimmer slide downwards to open the trimmer. ,, You can now start trimming.
3After trimming, close the trimmer and switch off the shaver.
Cleaning and maintenance
Never use compressed air, scouring pads, abrasive cleaning agents or aggressive liquids such as petrol or acetone to clean the appliance.
-- Clean the shaver after every shave for optimal shaving performance. -- Regular cleaning guarantees better shaving performance.
-- For the best cleaning results, we advise you to use the Philips Cleaning spray (HQ110).
-- Be careful with hot water.Always check if the water is not too hot, to prevent your hands from getting burnt.
Note:Water may leak from the socket at the bottom of the shaver when you rinse it.This is normal and not dangerous because all electronics are enclosed in a sealed power unit inside the shaver.
8 ENGLISH
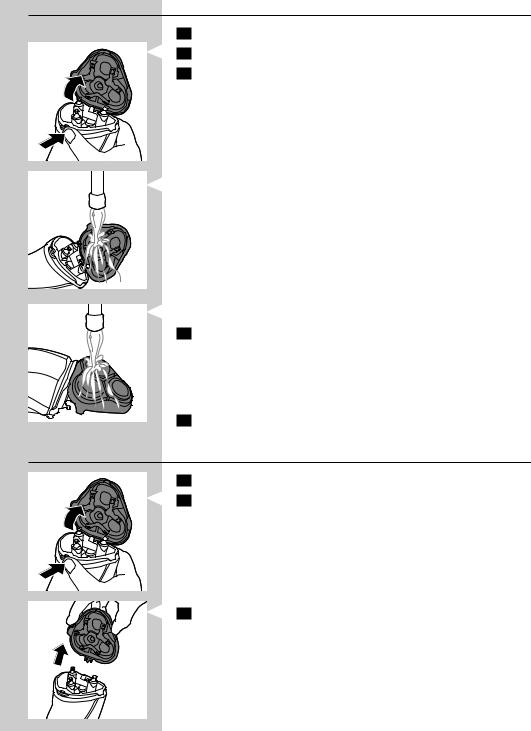
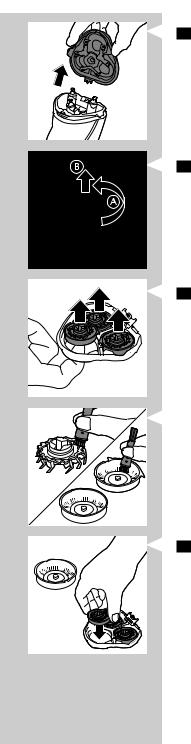
Cleaning the shaving unit under the tap
1Switch off the shaver and disconnect it from the mains.
2Press the release button to open the shaving unit.
3Rinse the shaving unit and hair chamber under a hot tap for 30 seconds.
Be careful with hot water.Always check if the water is not too hot, to prevent your hands from getting burnt.
-- Rinse the hair chamber and the inside of the shaving unit.
-- Rinse the outside of the shaving unit.
4 Close the shaving unit and shake off excess water.
Be careful not to hit the shaving unit against anything while shaking off excess water.
Never dry the shaving unit and the hair chamber with a towel or tissue, as this may damage the shaving heads and the coupling spindles.
5Open the shaving unit again and leave it open to let the shaver dry completely.
Cleaning the shaving unit with the cleaning brush
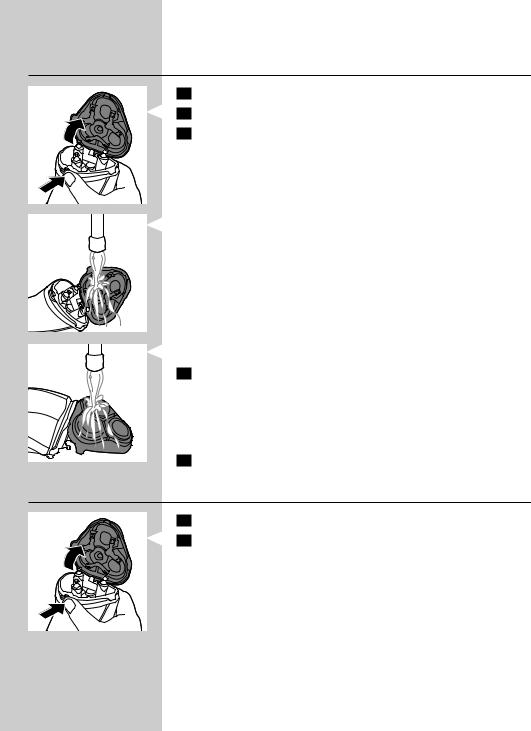
1 Switch off the shaver and disconnect it from the mains. 2 Press the release button to open the shaving unit.
3 Pull the shaving unit off the shaver.
ENGLISH 9
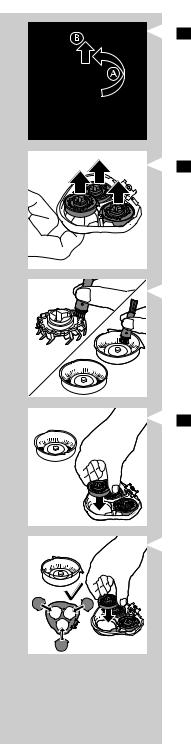
4Turn the lock anticlockwise (A) and remove the retaining frame (B).
5Remove and clean one shaving head at a time. Each shaving head consists of a cutter and a guard.
Note:Do not clean more than one cutter and guard at a time,since they are all matching sets.If you accidentally mix up the cutters and guards,it may take several weeks before optimal shaving performance is restored.
-- Remove the cutter from the shaving guard and clean it with the brush.
-- Clean the inside and outside of the shaving guard with the brush.
6 Put the shaving heads back into the shaving unit.
Note:Make sure that the projections of the shaving heads fit exactly into the recesses.
10 ENGLISH
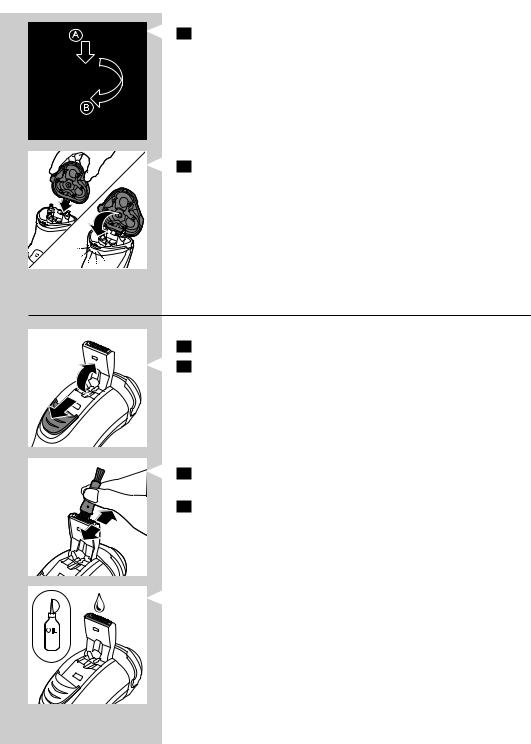
7 Put the retaining frame back into the shaving unit (A) and turn the lock clockwise (B).
8 Insert the lug of the shaving unit into the slot in the top of the shaver. Then close the shaving unit.
Note:If the shaving unit does not close smoothly,check if you have inserted the shaving heads properly and if the retaining frame is locked.
Cleaning the trimmer with the cleaning brush (PT919/PT866/
PT860/PT845/PT739/PT737/PT731 only)
Clean the trimmer every time you have used it.
1 Switch off the shaver and disconnect it from the mains. 2 Push the trimmer slide downwards to open the trimmer.
3Clean the trimmer with the short-bristled side of the cleaning brush. Brush up and down along the trimmer teeth.
4Close the trimmer (‘ click’).
Tip:For optimal trimming performance,lubricate the trimmer teeth with a drop of sewing machine oil every six months.
ENGLISH 11
Storage
-- Put the protection cap on the shaver after use to prevent damage and to avoid dirt accumulation in the shaving heads.
-- PT866 only: Store the appliance and the accessories in the pouch.
Replacement
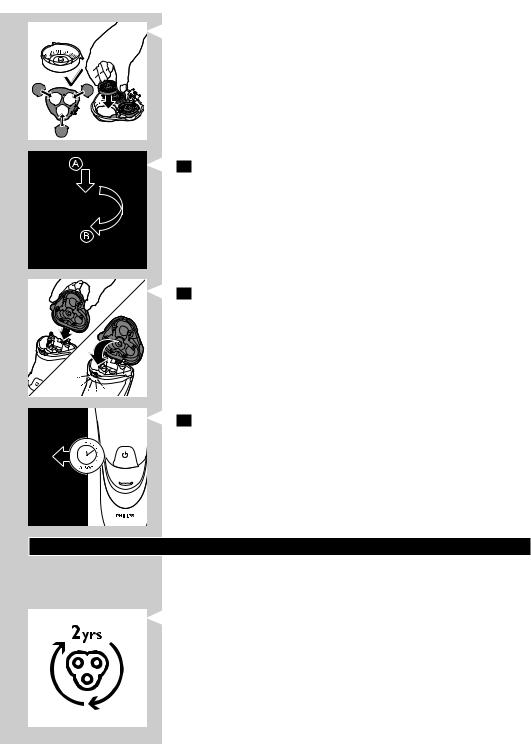
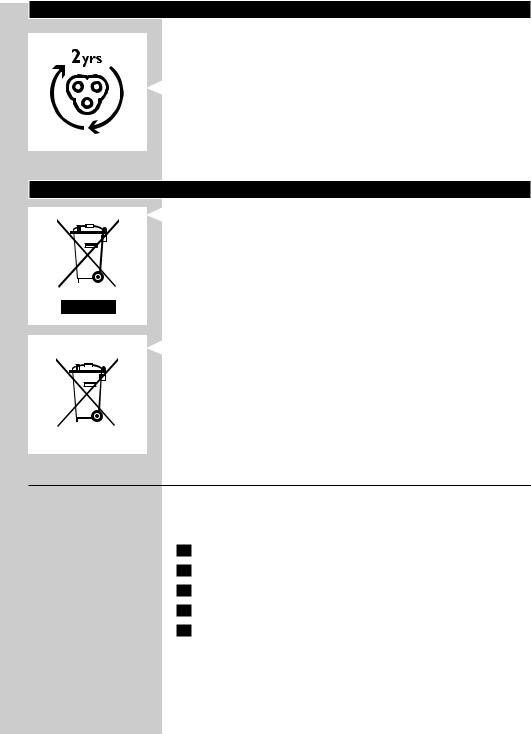
For maximum shaving performance, we advise you to replace the shaving heads every two years.
Replacement reminder
The shaving head symbol will light up to indicate that the shaving heads need to be replaced. Replace damaged shaving heads right away.
Only replace the shaving heads with original HQ8 or HQ9 (PT919 only) Philips Shaving Heads.
1The shaving head symbol lights up orange continuously.
2Switch off the shaver. Disconnect the shaver from the mains.
3Press the release button to open the shaving unit.
4Pull the shaving unit off the shaver.
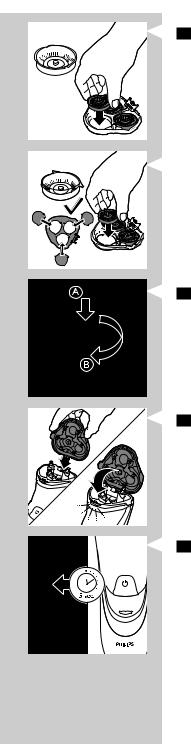
5Turn the lock anticlockwise (A) and remove the retaining frame (B).
6Remove the shaving heads and place new ones in the shaving unit.
12 ENGLISH
Note:Make sure that the projections of the shaving heads fit exactly into the recesses.
7 Put the retaining frame back into the shaving unit (A) and turn the lock clockwise (B).
8 Insert the lug of the new shaving unit into the slot in the top of the shaver.Then close the shaving unit.
Note:If the shaving unit does not close smoothly,check if you have inserted the shaving heads properly and if the retaining frame is locked.
9Press and hold the on/off button for 5 seconds to reset the replacement reminder on the shaver.The orange light goes out.
Accessories
To retain the top performance of your shaver, make sure you clean it regularly and replace its shaving heads at the recommended time.
Shaving heads
-- We advise you to replace your shaving heads every two years. Always replace with HQ8 or HQ9 (PT919 only) Philips Shaving Heads
Cleaning
-- Use Cleaning spray (HQ110) to clean the shaving heads thoroughly.
ENGLISH 13
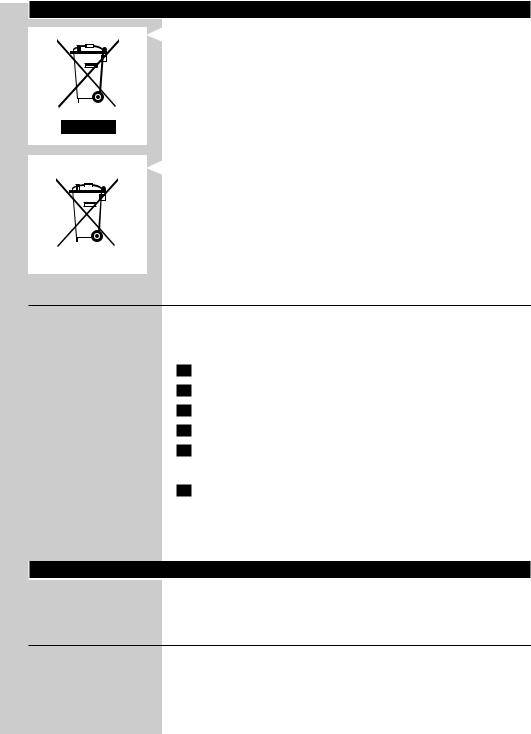
Environment
-- Do not throw away the appliance with the normal household waste at the end of their life, but hand them in at an official collection point for recycling. By doing this, you help to preserve the environment.
-- The built-in rechargeable shaver battery contains substances that may pollute the environment. Always remove the battery before you discard or hand in the shaver at an official collection point. Dispose of the battery at an official collection point for batteries. If you have trouble removing the battery, you can also take the appliance to a
Philips service centre.The staff of this centre will remove the battery for you and will dispose of it in an environmentally safe way.
Removing the rechargeable shaver battery
Only remove the rechargeable battery when you discard the shaver. Make sure the rechargeable battery is completely empty when you remove it.
1Disconnect the shaver from the mains.
2Let the shaver run until it stops.
3Undo the screws in the back of the shaver and in the hair chamber.
4Remove the front panel and the back panel.
5Bend the 6 hooks aside and take out the power unit.
Be careful, the hooks are sharp. 6 Remove the battery.
Be careful, the battery strips are sharp.
Do not connect the shaver to the mains again after you have removed the rechargeable battery.
Guarantee and support
If you need information or support, please visit www.philips.com/ support or read the separate worldwide guarantee leaflet. If there is no Consumer Care Centre in your country, go to your local Philips dealer.
Guarantee restrictions
The shaving heads (cutters and guards) are not covered by the terms of the international guarantee because they are subject to wear.

14 ENGLISH
Troubleshooting
This chapter summarises the most common problems you could encounter with the appliance. If you are unable to solve the problem with the information below, contact the Consumer Care Centre in your country.
Problem |
Possible cause |
Solution |
|
|
|
The shaver does |
The shaving heads are |
Replace the shaving heads (see chapter |
not shave as well |
damaged or worn. |
‘Replacement’). |
as it used to. |
|
|
|
Long hairs obstruct the |
|
shaving heads. |
|
You have not inserted the |
|
shaving heads properly. |
The shaver does |
The rechargeable battery |
not work when I |
is empty. |
press the on/off |
|
button. |
|
|
The temperature of the |
|
shaver is too high. In this |
|
case, the shaver does not |
|
work. |
Water leaks from |
This is normal and not |
the shaver after |
dangerous. |
cleaning. |
|
Clean the shaving heads one by one (see chapter ‘Cleaning and maintenance’).
Make sure that the projections of the shaving heads fit exactly into the recesses (see chapter
‘Cleaning and maintenance’).
Recharge the battery (see chapter ‘Charging’) or connect the shaver to the mains.
As soon as the temperature of the shaver has dropped sufficiently, you can switch on the shaver again.
During rinsing some water may collect between the power unit and the housing. After rinsing this water flows out through the socket.The power unit is completely watertight so water cannot reach the electronic parts of the shaver.Your shaver continues to be absolutely safe.

INDONESIA 15
Pendahuluan
Selamat atas pembelian Anda dan selamat datang di Philips!
Untuk memanfaatkan sepenuhnya dukungan yang ditawarkan Philips, daftarkan produk Anda di www.philips.com/welcome.
Baca petunjuk pengguna ini yang berisi informasi mengenai berbagai fitur menarik serta sejumlah saran agar lebih mudah dan menyenangkan dalam menggunakan alat cukur ini.
Gambaran umum (Gbr. 1)
1Tutup pelindung
2Unit pencukur
3Tombol pelepas unit cukur
4Tombol on/off alat cukur
5Simbol alat cukur
6Lampu pengisian daya
7Dudukan pengisi daya (PT866*/PT739*)
8Kantung (PT866*)
9Adaptor
10Sikat pembersih
11Geseran pelepas pemangkas (hanya PT919/PT866/PT860/PT845/
PT739/PT737/PT731)
12Pemangkas (hanya PT919/PT866/PT860/PT845/PT739/PT737/PT731)
Catatan:Anda bisa menemukan nomor tipe pada bagian belakang alat cukur.
* hanya untuk UK, Belanda, Jerman, Prancis,Turki, Swedia, Finlandia, Norwegia, Denmark, Itali, Portugal, Spanyol, danYunani.
Penting
Bacalah petunjuk penggunaan ini dengan saksama sebelum Anda menggunakan alat dan simpanlah sebagai referensi di masa mendatang.
Bahaya
-- Jaga adaptor agar tetap kering.
Peringatan
-- Adaptor berisi trafo. Jangan memotong adaptor untuk menggantinya dengan steker lain, karena ini dapat membahayakan.
-- Alat ini tidak dimaksudkan untuk digunakan oleh orang (termasuk anakanak) dengan cacat fisik, indera atau kecakapan mental yang kurang, atau kurang pengalaman dan pengetahuan, kecuali jika mereka diberikan pengawasan atau petunjuk mengenai penggunaan alat oleh orang yang bertanggung jawab bagi keselamatan mereka.
-- Anak kecil harus diawasi untuk memastikan mereka tidak bermain-main dengan alat ini.
-- Selalu cabut steker dari alat cukur sebelum membersihkannya di bawah keran.
16 INDONESIA
Perhatian
-- Jangan sekali-kali merendam alat cukur di dalam air.
-- Jangan menggunakan alat cukur di saat mandi atau bersiram.
-- Jangan sekali-kali menggunakan air yang lebih panas dari 80 °C untuk membilas alat cukur.
-- Hati-hati dengan air panas. Selalu periksa apakah air tidak terlalu panas agar tangan Anda tidak melepuh.
-- Alat cukur tidak tahan terhadap mesin cuci piring.
-- Air mungkin merembes keluar dari soket di bagian bawah alat cukur saat Anda membilasnya. Hal ini normal dan tidak berbahaya karena semua komponen elektronik tersimpan dalam unit daya yang tertutup rapat dalam alat cukur.
-- Jangan gunakan alat cukur, adaptor atau komponen lainnya jika telah rusak, karena dapat menyebabkan luka. Gantilah selalu adaptor, pengisi daya atau komponen yang rusak dengan tipe yang asli.
-- Gunakan, isi daya baterai dan simpan alat pada suhu antara 10°C dan 35°C.
-- Selalu letakkan dan gunakan alat cukur pada permukaan yang tahan terhadap cairan.
-- Hanya gunakan adaptor, pengisi daya dan aksesori yang disertakan.
-- Selalu kenakan tutup pelindung pada alat cukur untuk mencegah kerusakan dan untuk menghindari kotoran terkumpul di kepala pencukur.
Memenuhi standar
-- Alat Philips ini sesuai dengan semua standar dan peraturan perihal paparan terhadap medan elektromegnet (EMF) dan aman dibersihkan di bawah keran.
Umum
-- Alat ini dilengkapi pemilih voltase otomatis dan cocok untuk voltase listrik mulai 100 sampai 240 volt.
-- Adaptor mengubah voltase 100-240 volt menjadi voltase rendah yang aman di bawah 24 volt.
Pengisian daya
PT919/PT866/PT860: Butuh waktu kira-kira 1 jam hingga baterai alat cukur penuh. PT845/PT739/PT737/PT731/PT730//PT727/PT726/PT725/PT721/PT720: Butuh waktu kira-kira 8 jam hingga baterai alat cukur penuh.
Apabila Anda mengisi daya alat cukur untuk pertama kali atau setelah lama tidak digunakan, biarkan daya diisi hingga lampu pengisian daya menyala terus-menerus.
Alat cukur dengan baterai penuh dapat beroperasi hingga 50 (PT919/ PT866/PT860) atau hingga 45 menit bercukur (PT845/PT739/PT737/ PT731/PT730//PT727/PT726/PT725/PT721/PT720).
Waktu bercukur mungkin kurang dari 50 (PT919/PT866/PT860) atau 45 menit bercukur (PT845/PT739/PT737/PT731/PT730//PT727/PT726/
PT725/PT721/PT720) tergantung cara Anda mencukur, kebiasaan Anda membersihkan atau jenis cambang Anda.

INDONESIA 17
Indikator daya
Baterai tinggal sedikit
-- Bila baterai hampir habis (hanya bisa digunakan untuk pencukuran selama 5 menit atau kurang), lampu pengisian daya akan mulai berkedip jingga.
-- Bila Anda mematikan alat cukur, lampu pengisian daya akan terus berkedip jingga selama beberapa detik.
Pengisian cepat
-- Ketika Anda mulai mengisi daya baterai kosong, lampu pengisian daya berkedip jingga dan hijau secara bergantian. Setelah sekitar 3 menit, lampu pengisian daya terus berkedip hijau. Alat cukur kini punya cukup energi untuk pencukuran selama 5 menit.
Pengisian daya
-- Saat alat cukur diisi daya, lampu pengisian daya berkedip hijau.
Baterai terisi penuh
-- Saat baterai terisi penuh, lampu pengisian daya akan terus menyala hijau.
Catatan:Setelah sekitar 30 menit,lampu pengisian daya akan padam untuk menghemat energi.
Mengisi daya dengan adaptor
1Pasang steker kecil di alat cukur.
2Pasang adaptor ke stopkontak dinding.
,, Lampu pengisian daya menunjukkan status pengisian daya alat cukur (lihat bagian ‘Indikator pengisian’ pada bab ini).
Mengisi daya di dudukan pengisi baterai(PT866/PT739 only)
1Pasang steker kecil ke dudukan pengisi baterai.
2Pasang adaptor ke stopkontak dinding.
3Letakkan alat cukur dalam dudukan pengisi baterai.
,, Lampu pengisian daya menunjukkan status pengisian daya alat cukur (lihat bagian ‘Indikator pengisian’ pada bab ini).
18 INDONESIA
Menggunakan alat cukur
Catatan:Anda juga dapat menggunakan alat cukur langsung dari stopkontak.
Cukup hubungkan alat cukur ke stopkontak.
Mencukur
1 Tekan tombol on/off satu kali untuk menghidupkan alat cukur.
2 Gerakkan kepala cukur pada kulit Anda. Lakukan gerakan memutar.
-- Kulit Anda mungkin butuh 2 atau 3 minggu untuk terbiasa dengan sistem cukur Philips.
3 Tekan tombol on/off sekali untuk mematikan alat cukur.
4 Bersihkan alat cukur (lihat bab ‘Membersihkan dan Pemeliharaan’).
Pemangkas (hanya PT919/PT866/PT860/PT845/PT739/PT737/
PT731)
Anda dapat menggunakan pemangkas untuk merapikan cambang dan kumis.
1Tekan tombol on/off satu kali untuk menghidupkan alat cukur.
2Sorong penggeser ke bawah untuk membuka pemangkas.
,, Sekarang Anda dapat mulai memangkas.
3 Setelah memangkas, tutup pemangkas dan matikan alat cukur.
Membersihkan dan pemeliharaan
Jangan sekali-kali menggunakan udara bertekanan, sabut gosok, bahan pembersih abrasif atau cairan agresif seperti bensin atau aseton untuk membersihkan alat.
-- Bersihkan alat cukur setiap kali selesai mencukur agar kinerja pencukuran optimal.
-- Membersihkan secara teratur akan menjamin kinerja pencukuran yang lebih baik.
-- Untuk hasil pembersihan terbaik, kami sarankan Anda menggunakan semprotan Philips Cleaning (HQ110).
-- Hati-hati dengan air panas. Selalu periksa apakah air tidak terlalu panas agar tangan Anda tidak melepuh.
INDONESIA 19
Catatan:Air mungkin merembes keluar dari soket di bagian bawah alat cukur saat Anda membilasnya.Hal ini normal dan tidak berbahaya karena semua komponen elektronik tersimpan dalam unit daya yang tertutup rapat dalam alat cukur.
Membersihkan unit cukur di bawah keran
1Matikan alat cukur dan lepaskan dari listrik.
2Tekan tombol pelepas untuk membuka unit cukur.
3Bersihkan unit cukur dan wadah rambut di bawah keran air panas selama 30 detik.
Hati-hati dengan air panas. Selalu periksa apakah air tidak terlalu panas agar tangan Anda tidak melepuh.
-- Bilas wadah rambut dan bagian dalam unit cukur.
-- Bilas bagian luar unit cukur.
4 Tutup unit cukur dan kibaskan untuk membuang air yang tertinggal.
Berhati-hatilah agar unit cukur tidak terbentur dengan apa pun saat mengibaskan sisa air.
Jangan keringkan unit cukur dan ruang rambut dengan handuk atau kertas tisu, karena bisa merusak kepala cukur dan poros kumparan.
5Buka kembali unit cukur dan biarkan terbuka sampai alat cukur kering sama sekali.
Membersihkan unit cukur dengan sikat pembersih
1Matikan alat cukur dan lepaskan dari listrik.
2Tekan tombol pelepas untuk membuka unit cukur.
20 INDONESIA
3 Lepaskan unit pencukur dari alat cukur.
4 Putar kunci berlawanan arah jarum jam (A) lalu lepaskan bingkai penahannya (B).
5 Lepaskan dan bersihkan kepala cukur satu per satu. Setiap kepala cukur terdiri atas sebuah pemotong dan pelindung.
Catatan:Jangan membersihkan lebih dari satu pemotong dan pelindung sekaligus,karena keduanya merupakan pasangan.Jika secara tidak sengaja Anda mencampuradukkan pemotong dan pelindung,akan dibutuhkan beberapa minggu sebelum alat cukur dapat kembali optimal.
-- Lepaskan pemotong dari pelindungnya dan bersihkan dengan sikat.
-- Bersihkan bagian dalam dan luar pelindung cukur dengan sikat.
6 Kembalikan kepala cukur ke dalam unit cukur.
INDONESIA 21
Catatan:Pastikan bahwa kepala pencukur tepat masuk ke dalam wadahnya.
7Masukkan kembali rangka penahan ke dalam unit cukur (A) lalu putar kunci searah jarum jam (B).
8Masukkan tonjolan pada unit pencukur ke dalam selot di bagian atas alat cukur. Kemudian tutup unit pencukur.
Catatan:Jika unit cukur tidak menutup rapat,periksa apakah Anda sudah memasukkan kepala alat cukur dengan tepat dan apakah bingkai penahan terkunci.
Membersihkan pemangkas dengan sikat pembersih (hanya PT919/PT866/PT860/PT845/PT739/PT737/PT731)
Bersihkan pemangkas setiap kali Anda selesai menggunakannya.
1Matikan alat cukur dan lepaskan dari listrik.
2Sorong penggeser ke bawah untuk membuka pemangkas.
3Bersihkan pemangkas dengan bagian samping sikat pembersih. Sikat bagian atas dan bawah di sepanjang gigi-gigi pemangkas.
4Tutuplah pemangkas (hingga berbunyi ‘klik’).
22 INDONESIA
Tip:Agar performa pemangkas optimal,lumasi gigi-gigi pemangkas dengan setetes minyak mesin jahit setiap enam bulan.
Penyimpanan
-- Pasang tutup pelindung pada alat cukur setelah digunakan untuk mencegah kerusakan dan menghindari kotoran menumpuk pada kepala pencukur.
-- Hanya PT866: Simpan alat dan aksesorinya dalam kantungnya.
Penggantian
Untuk performa pencukuran yang maksimal, kami sarankan agar Anda mengganti kepala cukur setiap dua tahun.
Pengingat penggantian
Simbol kepala cukur akan menyala untuk menunjukkan bahwa kepala cukur perlu diganti. Ganti kepala cukur yang rusak segera.
Ganti kepala cukur hanya dengan yang asli Philips Shaving Heads HQ8 atau HQ9 (hanya PT919).
1Simbol kepala cukur akan menyala jingga secara terus menerus.
2Matikan alat cukur. Lepaskan alat cukur dari listrik.
3Tekan tombol pelepas untuk membuka unit cukur.
4 Lepaskan unit pencukur dari alat cukur.
5 Putar kunci berlawanan arah jarum jam (A) lalu lepaskan bingkai penahannya (B).
INDONESIA 23
6 Lepaskan kepala cukur dan pasang kepala cukur baru pada unit cukur.
Catatan:Pastikan bahwa kepala pencukur tepat masuk ke dalam wadahnya.
7Masukkan kembali rangka penahan ke dalam unit cukur (A) lalu putar kunci searah jarum jam (B).
8Masukkan tonjolan pada unit pencukur baru ke dalam selot di bagian atas alat cukur. Kemudian tutup unit pencukur.
Catatan:Jika unit cukur tidak menutup rapat,periksa apakah Anda sudah memasukkan kepala alat cukur dengan tepat dan apakah bingkai penahan terkunci.
9Tekan dan tahan tombol on/off selama 5 detik untuk menyetel ulang pengingat penggantian alat cukur. Lampu jingga mati.
24 INDONESIA
Aksesori
Untuk menjaga performa terbaik alat cukur Anda, pastikan membersihkannya dengan teratur dan mengganti kepala pencukur di waktu yang disarankan.
Kepala pencukur
-- Kami sarankan Anda untuk mengganti kepala cukur setiap dua tahun.
Selalu ganti dengan Philips Shaving Heads HQ8 atau HQ9
(hanya PT919)
Membersihkan
-- Gunakan semprotan Pembersih (HQ110) untuk membersihkan kepala pencukur secara menyeluruh.
Lingkungan
-- Jangan membuang alat bersama limbah rumah tangga biasa jika alat sudah tidak bisa dipakai lagi, tetapi serahkan ke tempat pengumpulan barang bekas yang resmi untuk didaur ulang. Dengan melakukan hal ini,
Anda ikut membantu melestarikan lingkungan.
-- Baterai isi-ulang alat cukur yang terpasang mengandung bahan yang dapat mencemari lingkungan. Selalu keluarkan baterai sebelum membuang pencukur atau membawanya ke tempat pengumpulan resmi. Buang baterai bekas di tempat pengumpulan resmi untuk baterai.
Jika Anda sulit mengeluarkan baterai,Anda pun dapat membawa alat tersebut ke pusat layanan Philips yang akan membantu Anda mengeluarkan baterai dan membuangnya dengan cara yang ramah lingkungan.
Melepas baterai isi ulang alat cukur
Hanya keluarkan baterai isi ulang apabila Anda akan membuang alat cukur. Pastikan baterai isi ulang benar-benar habis sewaktu Anda mengeluarkannya.
1Lepaskan alat cukur dari listrik.
2Biarkan alat cukur berjalan sampai berhenti sendiri.
3Buka sekrup pada bagian belakang alat cukur dan pada wadah rambut.
4Lepaskan panel depan dan panel belakang.
5Bengkokkan 6 pengait ke samping dan lepas unit daya listrik.
Berhati-hatilah, pengait ini tajam.

INDONESIA 25
6 Keluarkan baterai. Berhati-hatilah, strip baterai tajam.
Jangan menghubungkan lagi alat cukur ke listrik setelah baterai isi ulang dikeluarkan.
Garansi dan dukungan
Jika Anda memerlukan informasi atau dukungan, silakan kunjungi www.philips.com/support atau baca pamflet garansi internasional. Jika Pusat Layanan Konsumen Philips tidak ada di negara Anda, kunjungi dealer Philips di daerah Anda.
Batasan garansi
Kepala pencukur (pemotong dan pelindung) tidak tercakup dalam ketentuan garansi internasional karena tergantung pada pemakaian.
Pemecahan masalah
Bab ini merangkum masalah-masalah paling umum yang mungkin Anda temui pada alat. Jika Anda tidak mampu mengatasi masalah dengan informasi di bawah, hubungi Pusat Layanan Pelanggan di negara Anda.
Masalah |
Kemungkinan |
Solusi |
|
penyebab |
|
|
|
|
Alat cukur tidak |
Kepala cukur rusak |
Ganti kepala pencukur (lihat bab‘Penggantian’). |
mencukur sebaik |
atau aus. |
|
biasanya. |
|
|
|
Rambut yang panjang |
Bersihkan kepala cukur satu per satu (lihat bab |
|
menghalangi kepala |
‘Membersihkan dan pemeliharaan’). |
|
cukur. |
|
|
Anda belum |
Pastikan bahwa tonjolan kepala cukur tepat masuk |
|
memasang kepala |
ke dalam wadahnya (lihat bab‘Membersihkan dan |
|
pencukur dengan |
Pemeliharaan’). |
|
benar. |
|
Alat cukur tidak mau |
Baterai isi-ulangnya |
Isi ulang baterainya (lihat bab‘Pengisian daya’) atau |
hidup sewaktu saya |
habis. |
hubungkan alat cukur ke arus listrik. |
menekan tombol |
|
|
on/off. |
|
|
Suhu alat cukur terlalu tinggi. Dalam hal ini, alat cukur tidak berfungsi.
Begitu suhu alat cukur sudah cukup dingin,Anda dapat menghidupkan kembali alat cukur tersebut.
Air merembes keluar |
Ini normal dan tidak |
Selama pembilasan air mungkin terkumpul di antara unit |
dari alat cukur setelah |
berbahaya. |
daya dan wadah. Setelah pembilasan air ini akan keluar |
dibersihkan. |
|
melalui soket. Unit daya benar-benar kedap air sehingga |
|
|
air tidak dapat mencapai komponen listrik alat cukur. Alat |
|
|
cukur Anda tetap menjadi alat yang benar-benar aman. |
26
!www.philips.co.kr/membership
.
.
( 1)
1
2
3
4
5
6
7 (PT866*/PT739*)
8 (PT866*)
9
10
11 (PT919/PT866/PT860/PT845/ PT739/PT737/PT731 )
12 (PT919/PT866/PT860/PT845/PT739/PT737/ PT731 )
: .
* : , , , , ,, , , , , , ,
.
-- .
-- . .
-- .
-- . -- .

27
-- .
-- .
-- 80°C .
-- . .
-- .
-- . , .
-- . ,.
-- 10°C - 35°C ,.
-- .
-- , ,.
-- .
-- EMF ( ) .
-- 100 ~ 240V.
-- 100-240V 24V.
PT919/PT866/PT860: 1. PT845/PT739/PT737/PT731/PT730//PT727/PT726/PT725/ PT721/PT720: 8.
,.
50 (PT919/PT866/PT860) 45 (PT845/PT739/PT737/PT731/PT730//PT727/PT726/ PT725/PT721/PT720) .
, 50 (PT919/PT866/PT860) 45 (PT845/PT739/PT737/ PT731/PT730//PT727/PT726/PT725/PT721/PT720).
28
-- ( 5 ),.
-- .
-- . 3. 5.
-- .
-- .
: 30 .
1.
2.
,, ( ‘ ’ ).
(PT866/PT739 )
1 .
2 .
3 .
,, ( ‘ ’ ).
29
: .
1.
2.
-- 2-3.
3 .
4 (‘ ’ ).
(PT919/PT866/PT860/PT845/PT739/PT737/PT731
)
.
1.
2. ,, .
3 .
, , ,.
-- .
-- .
-- (HQ110) .
-- . .
: . , .

30
1 .
2 .
3 30.
..
-- .
-- .
4 .
.
..
5 십시오.
1 .
2 .
3 .
 Loading...