


SpeechAir
Smart Voice Recorder
PSP2000 series
User manual

Table of contents
1 Important information |
4 |
Safety instructions |
4 |
Cleaning and disinfection |
4 |
Disposal of your old product |
5 |
About this user manual |
6 |
2 Your smart voice recorder |
7 |
Product highlights |
7 |
What’s in the box |
7 |
Overview of the recorder |
8 |
Overview of the docking station |
9 |
3 Getting started |
10 |
Charging the battery |
10 |
Charge via USB power supply |
10 |
Charge via docking station |
10 |
Charge via computer |
11 |
Turn the device on and off |
11 |
4 Using your voice recorder |
12 |
Using the touch screen |
12 |
Home screen |
12 |
Customize your Home screen |
13 |
Add and remove items and widgets |
13 |
Manage Home screen panels |
14 |
Organize folders |
14 |
Status bar and notification panel |
14 |
Status bar |
14 |
Notification panel |
15 |
Lock screen |
15 |
Set screen lock |
15 |
Set the date and time |
16 |
Set the device and input language |
16 |
Change the device language |
16 |
Change the input language |
16 |
Switch between input languages |
16 |
Using apps |
16 |
Preinstalled apps |
16 |
Install apps |
16 |
Uninstall apps |
17 |
Change the screen orientation |
17 |
Typing text |
17 |
Enter text |
17 |
Copy and paste text |
18 |
Using Wi-Fi |
18 |
Using Bluetooth |
19 |
Capture screenshots |
19 |
Change sound settings and sound mode |
20 |
Power saving |
20 |
Using email app |
21 |
Set up an email account |
21 |
Add further email accounts |
21 |
Remove email accounts |
22 |
Send an email |
22 |
Email account settings |
22 |
Device settings |
22 |
5 |
Philips Voice Recorder App |
24 |
|
Open the app |
24 |
|
One-touch start |
24 |
|
Recording screen |
25 |
|
Record dictations |
26 |
|
Define settings prior to recording |
26 |
|
Record a dictation |
27 |
|
Voice-activated recording |
28 |
2 |
|
|
Playback |
28 |
Delete a dictation |
29 |
Edit a dictation |
29 |
Insert, overwrite or append recording |
29 |
Add index marks |
29 |
Add keywords |
30 |
Add pictures |
31 |
Change dictation name |
31 |
Lock dictations/EOL |
32 |
Mark priority dictations |
32 |
Add barcodes |
32 |
Send a dictation |
33 |
Send a dictation via email |
33 |
Send a dictation to Philips SpeechLive |
33 |
Send a dictation to Philips SpeechLive |
|
transcription service |
34 |
Send a dictation to Philips SpeechLive |
|
speech recognition service |
35 |
Send a dictation to Philips SpeechExec |
|
mobile server |
36 |
Send a dictation to Philips dictation hub |
36 |
Send a dictation via Philips SpeechExec |
|
software |
37 |
Send a dictation to Philips SpeechExec |
|
Enterprise |
37 |
Send a dictation to a network folder |
38 |
Using data lists |
38 |
Data list options |
39 |
Dictation Mode |
40 |
Dictation app settings |
40 |
6 Device and data management |
44 |
Transfer data to and from the computer |
44 |
Reset your device and data |
44 |
Device reset |
44 |
Factory data reset |
45 |
Updating your device |
45 |
7 Philips SpeechAir management software |
46 |
|
Install SpeechAir management software |
46 |
|
Configure SpeechAir with SpeechAir |
|
|
management software |
|
46 |
Device configuration screen |
|
46 |
Configure SpeechAir and Philips Voice |
|
|
Recorder App settings |
|
47 |
|
|
|
8 Philips remote device management |
|
|
software |
|
48 |
Manage configurations with the Philips remote |
|
|
device management software |
|
48 |
Connect to the remote device management |
|
|
server |
|
48 |
Set a refresh interval for synchronizing |
|
|
configuration updates |
|
48 |
Receive configuration updates |
|
49 |
|
|
|
9 Using SpeechAir with Philips SpeechExec |
|
|
software |
|
50 |
Install SpeechExec on your computer |
50 |
|
Configure SpeechAir in SpeechExec |
|
50 |
Configure SpeechAir with the SpeechAir |
|
|
wizard |
|
50 |
Configure delivery methods for SpeechAir |
50 |
|
Download dictations to SpeechExec |
|
51 |
Table |
of contents |
|

10Service and support |
52 |
Display device information |
52 |
Display information about Philips Voice |
|
Recorder App |
52 |
Send email to technical support |
52 |
Contact our supporting Philips partners |
52 |
Open source software |
52 |
Troubleshooting |
53 |
|
|
11Technical data |
56 |
3

1Important information
Don’t make any adjustments and modifications that aren’t described in this manual. Follow all safety instructions to ensure proper operation of the device. The manufacturer assumes no liability for damages resulting from non-compliance with the safety instructions.
Safety instructions
•Protect the device from rain and liquids to prevent damage to the device or a short circuit.
•Don’t expose the device to excessive heat caused by placing it on a heating device or in direct sunlight.
•Protect the cables from damage by being trapped, particularly at the plugs and where cables exit the housing.
•Back up your data and recordings. The manufacturer’s warranty doesn’t cover loss of data resulting from user actions.
•Don’t perform any maintenance operations that aren’t described in this user manual. Don’t disassemble the device into its component parts to carry out repairs. The device may only be repaired in authorized service centers.
Rechargeable built-in battery
•Don’t attempt to replace the battery yourself. The battery may only be replaced in authorized service centers.
•Before your battery is replaced by an authorized service center, back up your data and recordings.
•Batteries contain substances that may pollute the environment. Used batteries should be disposed of at an official collection point.
Data reset
Philips SpeechAir has an internal memory with 1 GB RAM and 16 GB built-in storage. If you want to perform a factory data reset, observe the following cautions:
•Back up your data and recordings. Performing a factory data reset will delete all data on your device.
•Formatting the memory on a computer may cause incompatibilities with your device. Format the memory only on the device.
Hearing protection
Observe the following guidelines when you use headphones:
•Set the volume to a moderate level and don’t use headphones to listen for excessively long periods of time.
•Be particularly careful to avoid adjusting the volume to a level that your hearing can’t deal with.
•Don’t turn the volume up so high that you can’t hear what is going on around you.
•In potentially dangerous situations, be particularly careful or temporarily discontinue use.
•Don’t use headphones while you are operating a motorized vehicle, cycling, skateboarding, and so on. You could be a hazard to yourself and other road users, and possibly be breaking the law.
Medical device interference
SpeechAir contains components that emit electromagnetic waves. Electromagnetic waves might interfere with the operation of a pacemaker. Keep a safe distance of separation between SpeechAir and your pacemaker.
Use in aircraft
Wireless transmitters can negatively affect the operation of other electronic equipment, causing them to malfunction. Turn off SpeechAir or use Airplane mode when you travel in aircraft. In Airplane mode, SpeechAir’s signal transmitting functions are turned off.
Legal restrictions on recording
•The use of the device’s recording function is subject to the legal restrictions that may apply in your country. You should also respect the privacy and personal rights of third parties if you record talks or lectures.
•If you want to record telephone calls, check if this is legal in your country. In certain countries, you may be legally required to inform the person you are conversing with on the telephone that you are recording the conversation.
Cleaning and disinfection
•Before cleaning, disconnect all cables from the device.
•To clean the device, use a soft dry cloth.
•To disinfect the device, use products for disinfection of surfaces in clinical areas and patient care equipment, such as surface disinfectant wipes.
•Don’t use harsh chemicals or strong detergents.
•Avoid getting moisture in openings.
•Don’t rub or strike the surface with anything hard or sharp as this may scratch or damage the surface permanently.
4 Important information

Disposal of your old product
Europe
A crossed-out wheeled bin symbol attached to |
|
a product indicates that the product is covered |
|
by the European Directive 2011/65/EU. Please |
|
get informed about the local separate collection |
|
system for electrical and electronic products. |
fghe |
Please act according to your local rules and |
› |
don’t dispose of your old products with your normal household waste. Correct disposal of your old product helps to prevent potential negative consequences for the environment and human health.
United States
Rechargeable Li-ion battery:
•Your product is designed and manufactured with high quality materials and components, which can be recycled and reused. For recycling information, please contact your local waste management facilities or visit www.recycle.philips.com.
•This appliance contains a rechargeable lithium-ion battery which must be disposed of properly.
•Contact your local town or city officials for battery disposal information.
You can also call 1-800-822-8837 or visit www. call2recycle.org for battery drop-off locations.
•For assistance, visit our website www.philips.com/support or call 1-800-243-3050 toll free.
Rechargeable NiMH battery:
•Your product is designed and manufactured with high quality materials and components, which can be recycled and reused. For recycling information, please contact your local waste management facilities or visit www.recycle.philips.com.
•This appliance contains a rechargeable NiMH battery which must be disposed of properly.
•Contact your local town or city officials for battery disposal information.
You can also call 1-800-822-8837 or visit www. call2recycle.org for battery drop-off locations.
•For assistance, visit our website www.philips.com/support or call 1-800-243-3050 toll free.
Canada
Rechargeable Li-ion battery:
•Your product is designed and manufactured with high quality materials and components, which can be recycled and reused. For recycling information, please contact your local waste management facilities or visit www.recycle.philips.com.
•This appliance contains a rechargeable lithium-ion battery which mustbe disposed of properly.
•Contact your local town or city officials for battery disposal information.
You can also call 888-224-9764 or visit www.call2recycle.ca for battery drop-off locations.
•For assistance, visit our website www.philips.com/ support or call
1-800-243-7884 toll free.
Rechargeable NiMH battery:
•Your product is designed and manufactured with high quality materials and components, which can be recycled and reused. For recycling information, please contact your local waste management facilities or visit www.recycle.philips.com.
•This appliance contains a rechargeable NiMH battery which must be disposed of properly.
•Contact your local town or city officials for battery disposal information.
•You can also call 888-224-9764 or visit www.call2recycle.ca for battery drop-off locations.
•For assistance, visit our website www.philips.com/support or call 1-800-243-7884 toll free
Important information |
5 |

About this user manual
Find a quick overview of your device on the next pages. For detailed description, see the following chapters of this user manual. Read the instructions carefully.
Model-specific features
This user manual describes different models of the device product range. Please note that some features are only available on certain models.
Symbols used
Tip
•This symbol identifies information that helps you to use your device more efficiently and simply.
Note
•This symbol indicates notices which you should observe when handling or operating the device.
Caution
•This symbol warns of damage to the device and possible data loss. Damage can be caused by improper handling.
6 Important information

2Your smart voice recorder
We are delighted that you have chosen a Philips device. Visit our website for comprehensive support, such as user manuals, software downloads, warranty information and more: www.philips.com/dictation.
Product highlights
•Three dedicated microphones for optimized voice recording
•Power saving mode for longer battery lifetime
•Gorilla glass touch screen and shockproof housing for durability
•Wear-free and ergonomic slide switch and function button for efficient single-handed operation
•Wi-Fi, LAN, Bluetooth, USB and VoIP for staying connected anywhere you go
•Barcode scanner and camera for quick file association and proof documentation
•File encryption for maximum data security
•Android OS for intuitive use
•Philips Voice Recorder App for professional dictation features (optional)
•Docking station for fast battery charging and data transfer
•Dictation workflow software for an even more efficient workflow (optional)
What’s in the box
Recorder |
Docking station |
|
|
|
|
|
|
|
Inlay |
|
|
Product key for |
||||
|
|
|
|
|
|
|
SpeechExec |
|
|
|
|
|
|
|
software |
|
|
|
|
|
|
|
|
|
|
|
|
|
|
|
|
|
|
|
|
|
|
|
|
|
|
|
|
|
|
|
|
|
|
|
|
|
|
|
|
|
|
|
|
|
|
|
|
Micro USB |
Headphones |
cable |
|
Quick start guide
Power supply unit |
Quick start guide |
and outlet adapters |
|
Your smart voice recorder |
7 |

Overview of the recorder
3
4
5
2
6
7
1 |
8 |
9
10
11
14
15
13
12 |
16 |
|
|
|
17 |
|
18 |
21 |
|
20 |
19 |
|
1 Touch screen
2Telephony speaker
3Headphones jack
4External microphone jack
5Recording LED light
6Dictation microphone (directional microphone)
7Dictation microphone (directional microphone)
8Function button
9Slide switch
10 Power button
11Reset hole
12Speaker
13Camera flash
14Dictation microphone (directional microphone)
15Camera
16360° meeting microphone (omnidirectional microphone)
17Volume up button
18Volume down button
19Telephony microphone (VoIP)
20 Docking station connector
21 Micro USB port
8 Important information
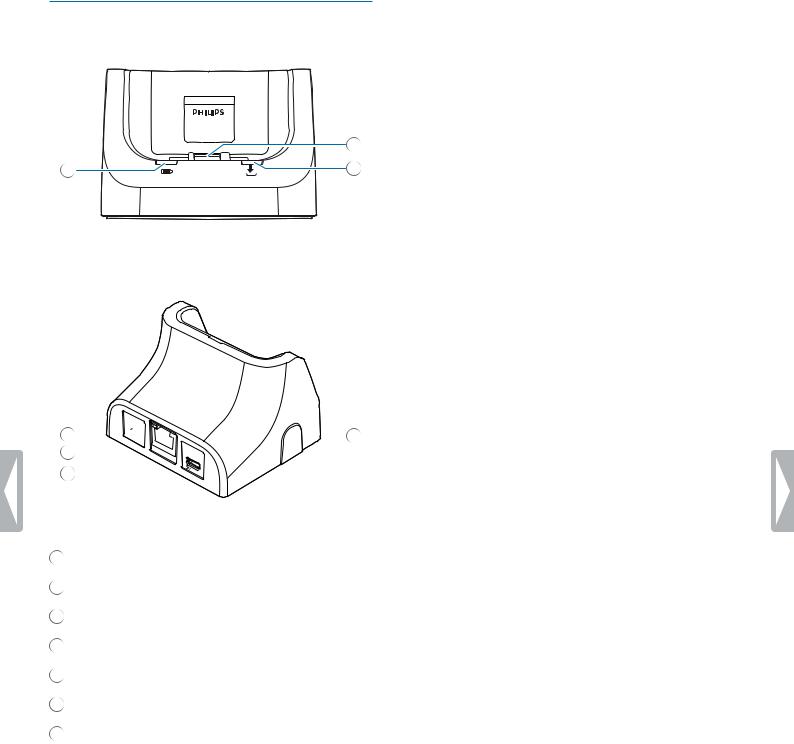
Overview of the docking station
|
2 |
1 |
3 |
6

 7 5
7 5
4
1 Charging LED light
2Docking station connector
3Data transfer LED light
4Data transfer micro USB port
5LAN port
6Charging micro USB port
7Kensington Security Slot
Important information |
9 |

3 Getting started
Caution
•Before you connect and install your recorder, first read the safety instructions (see Safety instructions).
Charging the battery
Charge the built-in battery before you use the device for the first time or if you haven’t used it for an extended time period. If the battery is completely discharged and your device turns off, allow the battery to charge for a while before you turn on the device.
Note
•The length of the USB cable might impact the charging speed. Longer cables usually extend the charging time.
Charge via USB power supply
Note
•The included USB power supply is a US standard power supply. Depending on your region, you might need to use the supplied outlet adapters to fit regional power outlets.
XX The battery icon 

 appears on the touch screen after a few seconds if the device is turned off. This indication disappears after some seconds. To reactivate the indication, press the Power button once.
XX The charging battery icon 
 on the status bar of the Home screen shows the charging status if the device is turned on.
Charge via docking station
If you charge your device via docking station, make sure that the micro USB connector is connected to the charging micro USB port marked with 5V DC.
Charge without case
XX The red charging LED on the docking station illuminates.
XX The charging battery icon 

 appears on the touch screen after a few seconds if the device is turned off. This indication disappears after some seconds. To reactivate the indication, press the Power button once.
XX The charging battery icon 
 on the status bar of the Home screen shows the charging status if the device is turned on.
Charge with case (optional)
To charge your SpeechAir with the shock-proof case via docking station, first remove the inlay from the docking station. Afterwards, proceed as described in Charge without case.
10 Getting started
Charge via computer
Before you charge the battery via computer, make sure that your computer is turned on.
Note
•If you charge your device via computer instead of using the power supply, the charging speed might slow down due to a lower charging current.
XX The battery icon 

 appears on the touch screen after a few seconds if the device is turned off. This indication disappears when after some seconds. To reactivate the indication, press the Power button once.
XX The USB icon  appears on the touch screen if the device is turned on.
Turn the device on and off
To turn the device on:
•Press and hold the Power button for six seconds until the device gently vibrates.
To turn the device off:
1Press and hold the Power button for one second. XX The Power off pop-up window appears.
2Tap Power off.
Getting started |
11 |
4Using your voice recorder
Using the touch screen
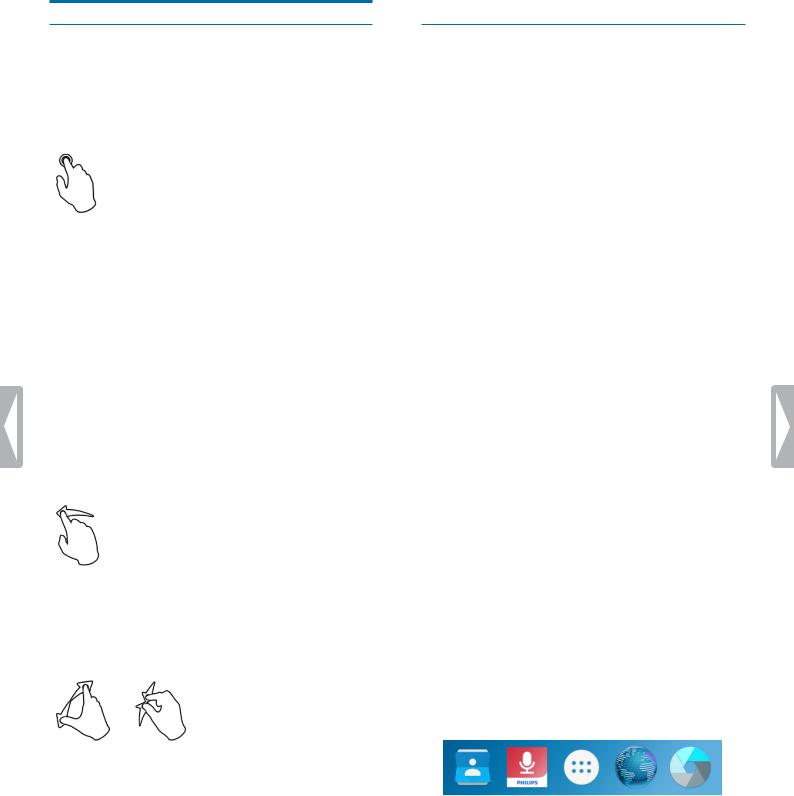
The interface of your SpeechAir is operated by touching the screen. To operate the interface, use the following basic gestures:
Tapping
To open an application and to select or unselect an item or menu option:
• Gently tap the item with your fingertip.
To zoom in an image or a web page:
• Double-tap the screen.
To return to the original display size:
• Double-tap the screen again.
To access available options for a selected item:
• Tap and hold the item.
Swiping
To scroll through or switch lists and screens:
• Swipe up, down, left, or right.
Spreading and pinching
To gradually zoom in a part of an image or web page:
•Place your fingers on the screen and spread them apart.
To gradually zoom out again:
•Place your fingers on the screen and pinch them together.
Dragging
To move an item:
• Tap and hold an item and drag it to a new position.
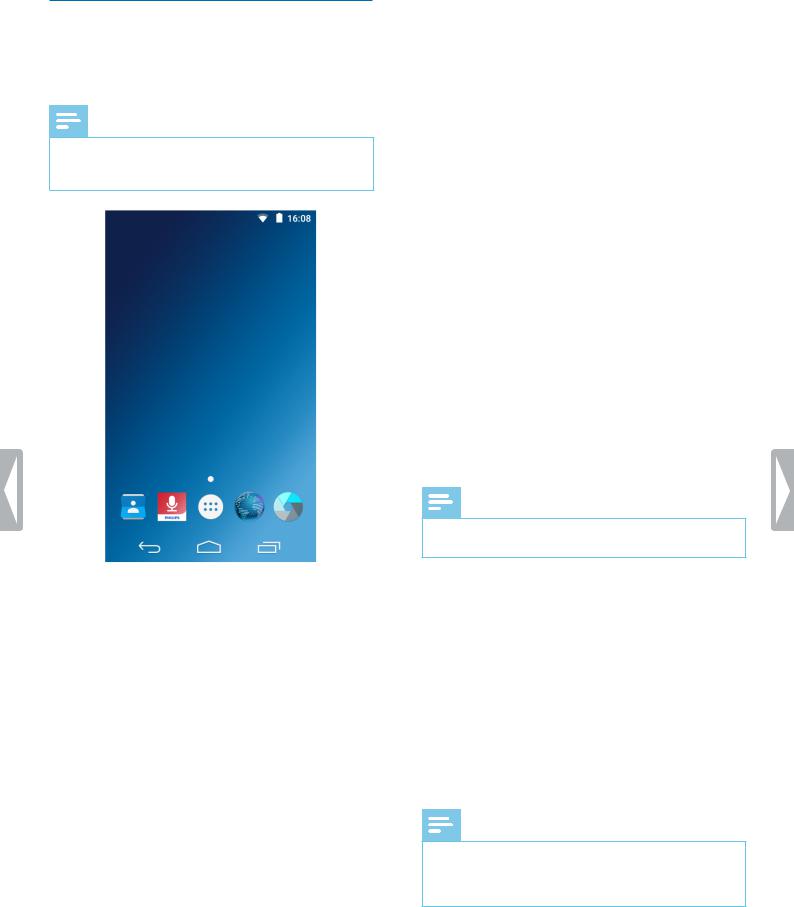
Home screen
From the Home screen, you can access the main features on your recorder and view the status of your device.
Customize your Home screen by adding your favorite apps, widgets and folders, so they’re always just a tap away.
You can open the Home screen from anywhere on your device by tapping the Home key  .
.
Keys
At the bottom of your display, no matter which app or feature you are just using, you will always find the navigation bar with the following keys:
Back key 
•Opens the previous screen you were working in, even if it was in a different app. Once you back up to the Home screen, you can’t go back any further.
Home key 
• Opens the central Home screen.
Recent Apps key 
•Opens a list of thumbnail images of apps you’ve worked with recently. This way you can easily and quickly switch between apps or close running apps. To open an app, tap it. To remove a thumbnail from the list, swipe it left or right.
Close Keyboard key 
•Closes the on-screen keypad and replaces the Back key. This key is only available when the keyboard is open. When you tap the Close Keyboard key, the Back key appears on the display again.
Favorites tray
You will find the Favorites tray at the bottom of the Home screen. The Favorites tray is a quick way to access your favorite apps. It is always available when your Home screen is open.
To change the apps on the Favorites tray, see Add items to Favorites tray.
12 Using your voice recorder
Customize your Home screen
Create your Home screen according to your own preferences. Add apps, widgets, or folders to your Home screen, add Home screen panels, or customize the Favorites tray.
Note
•Depending on the configuration of your device, the starting panel might look different than the starting panel described here.
Add and remove items and widgets
On the All Apps screen, you can find all apps, preinstalled as well as newly installed apps.
To open the All Apps screen, tap the shortcut  on the Home screen.
The All Apps screen has multiple panels. Depending on the number of apps, the device automatically adds new panels. To scroll through the panels, swipe left or right.
For more information, see Manage Home screen panels.
Add items to Home screen
To move an app or a folder from the All Apps screen to the Home screen:
1Open the All Apps screen.
2Tap and hold an app or a folder on the All Apps screen, and then drag it to the Home screen.
To move an app or a folder from the All Apps screen to a particular panel of the Home screen:
1Open the All Apps screen.
2Tap and hold an item on the All Apps screen and then drag it left or right to the desired panel.
Add widgets to Home screen
Widgets are small apps that provide specific information and convenient access on your Home screen, such as the bookmarks widget. There are two preinstalled widget panels.
1Tap and hold an empty area on the Home screen.
2Tap Widgets.
3Tap and hold a widget, and then drag it to the Home screen.
To add widgets to a particular panel of the Home screen:
1Tap and hold an empty area on the Home screen.
2Tap Widgets.
3Tap and hold a widget, and then drag it left or right to the desired panel.
Add items to Favorites tray
Note
•Before you can add items to the Favorites tray, first remove existing items.
You will find the Favorites tray at the bottom of all Home screen panels. With the Favorites tray, you can easily and quickly access frequently used apps and folders. Apart from the non-movable All Apps screen shortcut, you can arrange your Favorites tray as you like.
To move an item to the Favorites tray:
• Tap and hold the item and drag it to the Favorites tray.
To remove an item from the Favorites tray:
•Tap and hold the item and drag it either to Remove at the top of the screen or to a Home screen panel.
Remove items and widgets
Note
•By removing items and widgets from the Home screen or Favorites tray, you don’t uninstall them.
To uninstall items and widgets, see Uninstall apps.
To remove an item or a widget:
•Tap and hold the item on the Home screen, and then drag it to Remove at the top of the screen.
Using your voice recorder 13

Manage Home screen panels
The Home screen has multiple panels. When you use your device for the first time or have reset your data, you will see only the starting panel.
Remove a panel
•Tap and hold an item on the desired panel and drag it either to Remove at the top of the screen or to a different panel.
XX When you have moved or removed all icons on a panel, the panel is empty and the device automatically removes it.
Move a panel
1Tap and hold an empty area on the Home screen. XX A panel preview appears.
2Tap and hold a desired panel and then drag it to a new location.
To scroll through the panels:
• Swipe left or right.
Organize folders
Create a folder
You can create folders on any Home screen panel and also drag them to the Favorites tray.
To create a folder:
• Tap and hold an item and drag it onto another item.
Repeat this step with multiple items which you would like to have in the same folder.
To name or rename a folder:
1Tap the folder.
XX All apps in the folder are displayed.
2Tap Unnamed Folder or the existing name of the folder.
3Name the folder.
Remove a folder
To remove a folder including all its apps:
•Tap and hold the folder and then drag it to Remove at the top of the screen.
To only delete a folder, but keep its apps:
• Tap the folder. Tap and hold each app and drag it out. XX The folder is deleted automatically.
Status bar and notification panel
Status bar
Note
•In some apps, the status bar might not appear. To view the status bar from these apps, swipe down from the top of the screen.
The status bar at the top of the screen shows indicator icons. On the left side of the status bar, you will find new notifications, such as email notifications. On the right side of the status bar, status information is displayed, such as the time, battery status, or Wi-Fi connection.
Find the most common status bar icons in the following table:
Icon |
Meaning |
Wi-Fi connected
Bluetooth activated
Battery power level
Charging battery
Airplane mode activated
“Do not disturb“ mode activated
New email
Recording dictation (when outside the recording screen of Philips Voice Recorder App)
14 Using your voice recorder

Notification panel
The notification panel allows you to see a preview of your notifications on the status bar, which you can either acknowledge or clear. You can also access Quick Settings from the notification panel and quickly adjust basic settings.
Open the notification panel
• Swipe down from the top of the screen.
Close the notification panel
• Swipe up on the screen.
Note
•Indicator icons remain on the status bar until you either acknowledge or clear them.
Acknowledge a notification
• Tap the notification.
Clear all notifications
• Tap  .
.
Quick Settings
The notification panel also allows you access to Quick Settings, where you can quickly adjust basic settings, such as Wi-Fi or Bluetooth, and access the Settings menu.
To access Quick Settings:
Swipe down twice from the top of the screen.
Lock screen
When you use your SpeechAir for the first time or have reset your data, no screen lock is set.
You can lock the touch screen when it’s active to prevent any unwanted device operations or access as well as to save battery power. When your device is on and not used for a set time period, the screen turns off and locks automatically.
Tip
• The status bar is also displayed in lock screen mode.
Lock and unlock the screen
To turn off and lock the screen:
• Briefly press the Power button.
To turn on and unlock the screen:
• Briefly press the Power button again.
Set screen lock
You can change the screen lock method by using one of the following options: None, Slide, PIN, Password.
1Tap Settings  on the Home screen or on the All Apps screen.
2Swipe down and tap Security.
3Tap Screen lock.
4Select a screen lock method.
None
Choose this option to deactivate the screen lock.
Swipe
Choose the swipe lock method to unlock the screen.
Pattern
Define a pattern to unlock the screen.
PIN
Enter a personal PIN code consisting of 4-16 digits to unlock the screen.
Password
Enter your personal password consisting of 4-16 characters to unlock the screen.
Note
•If you have set a PIN code or password and want to change your screen lock method, first confirm the old PIN or password.
•Longer PIN codes and passwords are safer than short ones.
•It is very important that you remember your PIN or password. If you forget this information, it might not be possible to restore important data.
Using your voice recorder 15

Set the date and time
You can always change the date and time on your device and how they are displayed. Choose if you want SpeechAir to set the date and time automatically or change the settings manually.
To set the date and time automatically,
1Tap Settings  on the Home screen or on the All Apps screen.
2Swipe down and tap Date & time.
3Mark the checkbox next to Automatic date & time.
To set the date and time manually:
1Tap Settings  on the Home screen or on the All Apps screen.
2Swipe down and tap Date & time.
3Unmark the checkbox next to Automatic date & time.
4Tap Set date or Set time.
5Swipe up or down to set the desired date or time.
In the Date & time menu, you can also select a time zone and the date and time format.
Set the device and input language
You can always change the device and input language.
If you choose a device language, the device sets the relevant input language automatically.
Change the device language
1Tap Settings  on the Home screen or on the All Apps screen.
2Swipe down and tap Language & input.
3Tap Language, and then select the language to use.
Change the input language
1Tap Settings  on the Home screen or on the All Apps screen.
2Swipe down and tap Language & input.
3In the Keyboard & Input methods sub-menu, tap Android Keyboard (AOSP).
4Tap Languages.
XX The Languages window opens.
5Make sure that the checkbox next to Use system language is unmarked.
6Change the language or select multiple languages to use from the list by marking the relevant checkboxes.
Switch between input languages
If you have selected two or more input languages, you can switch between the languages on your keyboard.
1Tap and hold the space key on your keyboard.
XX The Change keyboard pop-up window appears.
2Select the desired language from the list.
Alternatively, tap  next to the space key to switch between the input languages. For more information about using the keyboard, see Typing text.
Using apps
Preinstalled apps
You can find multiple preinstalled apps on your SpeechAir. This allows you to perform basic tasks with your SpeechAir, such as sending an email, browsing the Internet, or taking photos. Four apps are already set on the Favorites tray. More apps are available on the All Apps screen.
To open the All Apps screen, tap the All Apps screen shortcut  on the Home screen. See more information about organizing apps in Customize your Home screen.
Install apps
SpeechAir doesn’t support Google Play Store due to security reasons. However, you can install apps by copying and downloading an installation file (.apk file, for example, Filename_xy.apk) for the relevant app to your SpeechAir. This installation file is necessary to install an app on your SpeechAir. We highly recommend using a source you trust for downloading installation files.
Note
•Only the preinstalled apps have been tested for SpeechAir. Download and install apps from external sources only at your own risk. Philips assumes no liability for the functioning of any external apps.
•If you use apps from external sources, make sure that they are compatible with Android 6.0.
•Before you download apps from external sources, make sure that the checkbox in Settings > Security >
Unknown sources is marked.
16 Using your voice recorder

To install apps via installation file:
Note
•Make sure that your SpeechAir is turned on when you connect it to the computer. Your computer can only detect SpeechAir when it is turned on.
1Connect your device to the computer.
2Open Windows Explorer on a Windows computer, or open Finder on a Mac computer.
XX SpeechAir is recognized as an external drive.
3Double-click the SpeechAir drive.
XX The content of your SpeechAir is displayed in a new window.
4Drag the downloaded installation file (.apk file, for example, Filename_xy.apk) to the SpeechAir window. XX The .apk file is now available on your SpeechAir.
5Disconnect your device from the computer.
6Tap  on SpeechAir, and then tap Explorer
  .
.
7Tap SPEECHAIR.
8Swipe to the .apk file, for example, Filename_XY, and tap the .apk file.
9Tap Install.
XX The app is installed.
Uninstall apps
Caution
•It is not possible to uninstall preinstalled apps, you can only disable them.
•Disabling preinstalled apps might cause other apps to misbehave and will delete associated data for the relevant app.
•Disable: Disable preinstalled apps that can’t be uninstalled from the device.
•Uninstall: Uninstall newly installed apps
To uninstall or disable an app:
1Tap Settings  on the Home screen or on the All Apps screen.
2Tap Apps.
3Select the app you want to disable or uninstall.
4Tap Uninstall or Disable.
Alternatively, uninstall an app following the next steps:
1Open the All Apps screen.
2Tap and hold the app you would like to uninstall.
3Drag it to Uninstall in the upper right corner of the screen.
XX A pop-up window appears asking you to cancel or confirm uninstalling the app.
4Tap OK.
Change the screen orientation
Tip
•If your screen doesn’t automatically change the view when you turn your device sideways, swipe twice from the top of the screen to enter Quick settings and then tap Portrait to switch from portrait view to Autorotate.
In many apps, you can change the view of your screen when you rotate your device. The screen automatically changes the orientation from portrait to landscape when you turn the device sideways. When entering text, you can turn the device sideways to bring up a bigger keyboard.
Typing text
Tip
•If the on-screen keyboard doesn’t open automatically, tap the text field to open the keyboard.
You can enter text with the on-screen Android keyboard (AOSP). The on-screen keyboard opens automatically when you use apps and options where entering text is needed. Set and use multiple keyboard languages, and switch between them while typing (see Change the input language).
You can also rotate your device to change the keyboard view from portrait to landscape and bring up a bigger keyboard.
Enter text
•Tap each letter on the keyboard individually.
•To uppercase, tap shift.
•To use caps lock, double-tap Shift.
•To release caps lock, tap Shift again.
Delete text
• Tap  on the keyboard.
Enter additional characters
• Tap the additional character key  on the keyboard. XX The additional character key automatically
changes to a letter key.
Return to the text keyboard
• Tap the letter key  on the keyboard.
Using your voice recorder 17

Enter language-specific characters
1Select the desired input language on your keyboard as described in Switch between input languages.
2Tap and hold the desired key.
XX A pop-up window appears above the key showing available characters.
3Select a character by dragging your finger left or right to the desired character, and then release your finger.
Hide the keyboard
•Tap  on the Home screen when the on-screen keyboard is open.
Copy and paste text
1Tap and hold or double-click part of the entered text. XX The selected part of the text is marked.
2Tap and drag  or
or  left or right to select the text you would like to copy or cut.
XX An action bar appears at the top of the screen showing available options.
3Select COPY or CUT.
4Place the cursor by tapping and holding where you would like to insert the text.
5Tap PASTE above the marked text.
Using Wi-Fi
Use Wi-Fi to connect your SpeechAir to the Internet or other network devices wirelessly anywhere a Wi-Fi access point or hotspot is available.
Note
•Using Wi-Fi might consume additional battery power. Turn off Wi-Fi when not in use to save battery power.
•The Wi-Fi signal strength might vary depending on obstacles and the distance between the device and Wi-Fi access point.
Turn on Wi-Fi
1Tap Settings  on the Home screen.
2Tap the Wi-Fi switch or drag it to the right to turn on Wi-Fi.
XX Your device searches for available Wi-Fi networks.
Alternatively, turn on Wi-Fi by using Quick Settings:
1Swipe down twice from the top of the screen.
2Tap the crossed out Wi-Fi symbol.
XX Your device searches for available Wi-Fi networks.
Connect to a Wi-Fi network
Note
•If you select a secured network, you will be prompted to enter the relevant password or network key.
•If you select an open network, you will be automatically connected to the network.
1Tap Settings  on the Home screen.
2Tap Wi-Fi.
XX All available Wi-Fi networks are displayed.
3Select a Wi-Fi network to connect to.
4Tap Connect.
XX is displayed on the status bar once you are connected.
Alternatively, connect to a Wi-Fi network by using Quick Settings:
1Swipe down twice from the top of the screen.
2Tap Wi-Fi.
XX All available Wi-Fi networks are displayed.
3Select a Wi-Fi network to connect to.
4Tap Connect.
XX is displayed on the status bar once you are connected.
Change the Wi-Fi network
1Tap Settings  on the Home screen.
2Tap Wi-Fi.
XX All available Wi-Fi networks are displayed.
3Select a different Wi-Fi network to connect to.
Alternatively, change the Wi-Fi network by using Quick Settings:
1Swipe down twice from the top of the screen.
2Tap the active Wi-Fi network below the Wi-Fi symbol. XX All available Wi-Fi networks are displayed.
3Select a different Wi-Fi network to connect to.
If you have turned on Wi-Fi, but haven’t connected to a network yet, a Wi-Fi symbol with a question mark is
displayed on the status bar. This notification informs you that there are Wi-Fi networks available.
To open the Wi-Fi network notification:
1Swipe down from the top of the screen.
2Tap the Wi-Fi notification.
XX All available Wi-Fi networks are displayed.
18 Using your voice recorder
 Loading...