


42-3D6C01-00
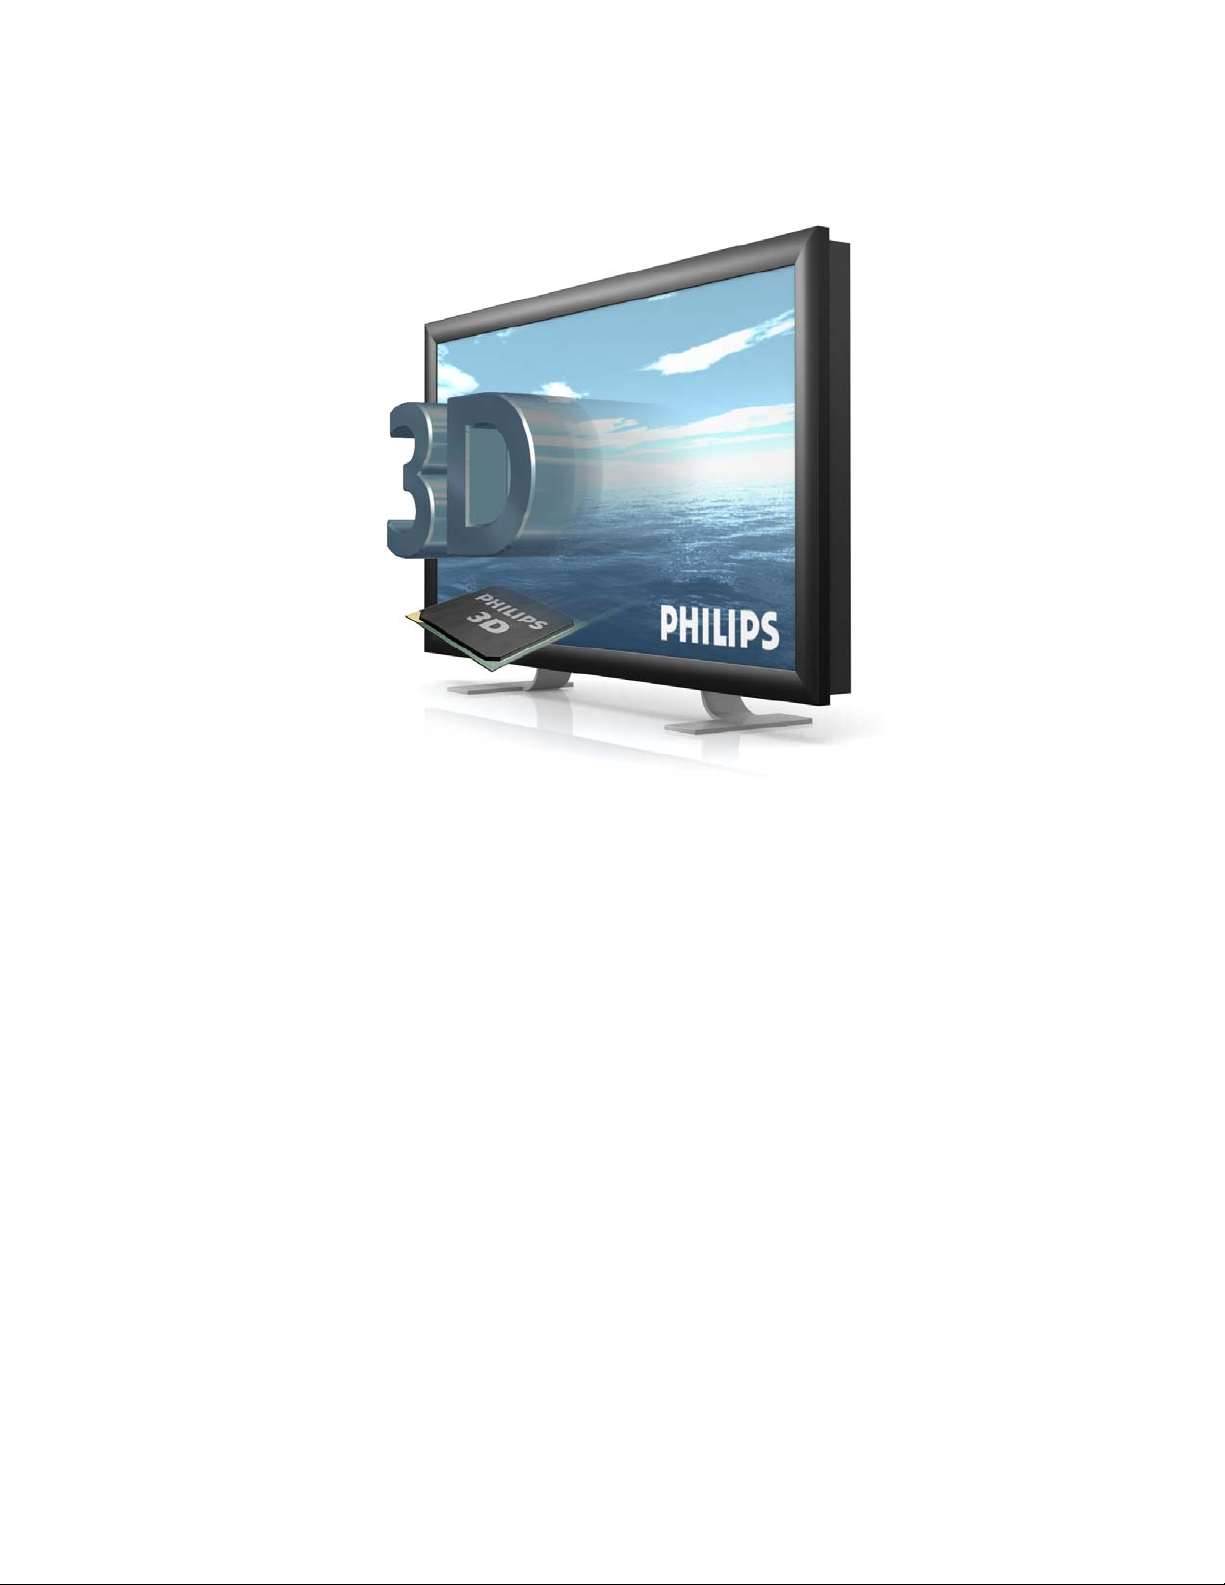
42-inch 3D-Intelligent Display
42-3D6C01/00
42-3D6W01/00
42-3D6C02/00
42-3D6W02/00
User Manual
Philips 3D Solutions
Warning this is a class A product. In a domestic
environment this product may cause radio interference
in which case the user may be required to take
adequate measures.
Safety Instructions for 3D display
Read and follow these instructions:
1. This product must be earthed.
2. The mains plug or appliance inlet is used as the disconnect device and
should be easily accessible.
3. Use only an approved power cord or interconnection cable.
4. Unplug the product if you are not going to use it for a long period of time.
5. Unplug the product if you need to clean it, use a slightly damp cloth. Never
use alcohol, solvents or ammonia-based liquids.
6. Refer all servicing to qualified service personnel
7. Do not block any ventilation holes.
8. To avoid electric shock, do not expose to rain or excessive moisture.
9. Do not store or use the product in locations exposed to excessive heat,
direct sunlight, extreme cold or in dusty environments.
10. Avoid moving the product between locations with large temperature
differences.
11. Choose a location within the following temperature and humidity ranges.
• Temperature: 0- 35°C
• Humidity : 20-80% RH
12. Avoid hitting or dropping during operation and transportation.

Mounting
The display can be placed on a table stand or wall-mounted. The table stand is
supplied as standard; the mounting bracket can be purchased separately. This
bracket can also be used as an adapter in combination with universal wall
supports, ceiling supports or universal floor stands (e.g. Vogel’s Professional).
Fitting the table stand
Only use the stand supplied with the set, making sure that the fasteners are
properly tightened. Never use a makeshift stand, or legs fixed using wood screws.
Using the mounting bracket
The standard VESA mount holes on the mounting bracket allow the user to install
the Philips 3D display on any VESA MIS-E compatible wall support, ceiling
support or floor stand.
Important: Use a VESA MIS-E compatible support suitable for the weight of this
3D Display.
Always secure the mounting bracket to the display using 4 screws. This helps
avoid potentially dangerous situations when lifting the display out of the mounting
bracket.
Positioning the display
For the best results, choose a place where there is no direct light shining onto the
screen, and which is some distance away from radiators or other sources of heat.
Leave a space of at least 10 cm all around the display for ventilation, making sure
that curtains, cupboards etc. cannot obstruct the airflow through the ventilation
apertures. The display is intended for use in a public places only and should
never be operated or stored in excessively hot or humid conditions.
Avertissement – Ce produit est un produit de classe A.
Dans un environnement domestique, ce produit peut
causer un brouillage radioélectrique. L’utilisateur
pourrait avoir à prendre des mesures appropriées à
cet égard.
Instructions de sécurité pour l’écran 3D
Prière de lire et respecter les instructions suivantes :
1. Cet appareil doit être connecté à la terre.
2. La fiche secteur ou la prise d’entrée de l'appareil est utilisée comme
dispositif de débranchement et doit être facilement accessible.
3. Utilisez uniquement un cordon d’alimentation ou un câble d’interconnexion
approuvé.
4. Déconnectez l’appareil si vous ne l’utilisez pas pendant une période
prolongée.
5. Déconnectez l’appareil pour le nettoyer ; utilisez un chiffon légèrement
humidifié. Ne jamais utiliser de l’alcool, des solvants ou des produits à
base d’ammoniac.
6. Confiez les opérations d’entretien au personnel d’entretien qualifié.
7. Ne pas bloquer les orifices d’aération.
8. Afin d’éviter tout choc électrique, ne pas exposer l’appareil à la pluie, ni à
un taux d’humidité excessif.
9. Ne pas entreposer ni utiliser l’appareil dans des lieux poussiéreux ou
exposés à une chaleur excessive, aux rayons du soleil ou à des
températures excessivement basses.
10. Évitez de transporter l’appareil entre deux endroits entre lesquels il y a une
grande différence de température.
11. Veillez à ce que le lieu d’entreposage ou d’utilisation ait les
caractéristiques de température et de taux d’humidité suivantes :
• Température: 0-35°C
• Humidité relative : 20-80%
12. Évitez les chocs ou la chute de l’appareil pendant son utilisation ou
pendant le transport.

Montage
L’écran peut être placé sur un support de table ou monté au mur. Le support de
table est fourni avec l’appareil et le support de montage au mur est vendu
séparément. Ce support peut également servir d’adaptateur combiné à un support
de plafond ou encore à un support mural ou de plancher de type universel (par ex.,
modèle Vogel Professional).
Installation du support de table
N’utilisez que le support fourni avec l’ensemble en vous assurant de bien serrer les
dispositifs d'attache. N’utilisez jamais de support improvisé ni de pattes fixées à
l'aide de vis à bois.
Utilisation du support de montage
Les trous de montage VESA standards sur le support de montage permettent à
l’utilisateur d’installer l’écran Philips 3D sur tout support conforme à la norme VESA
MIS-E, qu’il soit de type mural, de plafond ou de plancher.
Important : Utilisez un support conforme à la norme VESA MIS-E qui convient au
poids de cet écran 3D.
Assurez-vous de fixer le support de montage à l’écran au moyen de 4 vis. Vous
éviterez ainsi toute situation dangereuse en soulevant l'écran hors du support de
montage.
Positionnement de l’écran
Pour obtenir de meilleurs résultats, choisissez un endroit éloigné des appareils de
chauffage et autres appareils dégageant de la chaleur et où aucune lumière directe
n’est réfléchie sur l’écran. Laissez un espace d’au moins 10 cm tout autour de
l’écran pour permettre une aération adéquate, en vous assurant que les rideaux,
armoires et autres n’empêchent pas l’air de circuler par les grilles d’aération.
L’écran a été conçu pour fonctionner dans des environnements publics et ne
devrait jamais être utilisé ou rangé dans un endroit extrêmement chaud ou humide.
Document Information
Info Content
Title 42 inch 3D Display, User Manual (9922 159 01 73 1 090401)
Date 01 April 2009
Security The material and the information contained herein are
proprietary to Philips 3D Solutions. Copying, reproduction,
adaptation, modification or dissemination in whole or part is not
permitted without the prior written consent of Philips 3D
Solutions.
Contact http://www.philips.com/3dsolutions

Display User Manual
3D Solutions
01 April 2009
©2009 Philips Electronics Nederland B.V. 7 of 25
Table of Contents
1 Introduction ............................................................................................................................................................................. 8
2 Product features ................................................................................................................................................................... 9
2.1 Global product features ........................................................................................................................................... 9
2.2 Technical aspects and details ............................................................................................................................. 10
2.3 Cosmetic specifications ......................................................................................................................................... 11
3 Scope of supply, Set up and mounting ..................................................................................................................... 14
3.1 Scope of Supply ....................................................................................................................................................... 14
3.2 Image retention ......................................................................................................................................................... 14
3.3 Connecting the display .......................................................................................................................................... 15
3.4 Cleaning instructions .............................................................................................................................................. 16
3.5 Disposal of your old product ................................................................................................................................ 17
4 Software installation .......................................................................................................................................................... 18
4.1 Minimum PC requirements .................................................................................................................................. 18
4.2 Prepare PC ................................................................................................................................................................. 18
5 Environmental .....................................................................................................................................................................
19
6 Interfaces ............................................................................................................................................................................... 20
6.1 DVI-in ............................................................................................................................................................................ 20
6.2 LED ................................................................................................................................................................................ 20
7 Trademarks, Copyrights and disclaimer ................................................................................................................... 21
8 Mounting bracket ................................................................................................................................................................ 22
9 References ........................................................................................................................................................................... 25

Display User Manual
3D Solutions
01 April 2009
8 of 25 ©2009 Philips Electronics Nederland B.V.
1 Introduction
The 42-inch 3D display from Philips 3D Solutions offers state-of-the-art lenticular lens design
creating a variety of distinct autostereoscopic views. By this the viewer will benefit from the
multi-user experience along with a large comfort zone. The 42-inch 3D display is specifically
designed for a wide range of applications such as digital signage and information provision.
The display is featuring superior lens design and 3D rendering relying on proven, highly
optimized and accurate manufacturing processes. The lens design minimizes cross talk,
creating highly distinct views. The 42-3D6C01/00 and 42-3D6C02/00 are designed for optimal
viewing comfort. The 42-3D6W01/00 and 42-3D6W02/00 are designed for maximum WOW
viewing experience.
The display’s 2D-plus-depth rendering interface is open, allowing maximum flexibility. No
matter what sort of Philips 3D Solutions display is used, the content does not need
regeneration. What’s more, the rendering hardware sits inside the display, allowing for
maximum optimisation of the optical system by embedded processing.
Provided with the 42-inch 3D display are the 3DS Media Player and the Display Control Tool.
The Display Control Tool can be used to set all kinds of visualisation parameters for the 3D
display; examples are the WOW offset, the WOW range, the contrast, and the brightness. The
3DS Media Player is used for play-out for the Philips 3D Solutions 3D displays. It takes care
that the display switches to 3D mode with the appropriate 3D visualization settings.
A digital version of the 3D Display User Manual can be downloaded from our website:
www.philips.com/3dsolutions
.
 Loading...