


 NT321NE_GQ.book Page 1 Thursday, September 11, 2008 6:57 PM
Quick Reference Guide
IP Proprietary Telephone
Model No. KX-NT321
Thank you for purchasing an IP Proprietary Telephone (IP-PT). Please read this manual carefully before using this product and save this manual for future use. For more details, please refer to the manuals of the PBX.
This model supports the following PBX versions and CODEC types:
KX-TDA15/KX-TDA30: PSMPR Software File Version 4.0000 or later KX-TDA100/KX-TDA200: PMPR Software File Version 5.0000 or later KX-TDA600: PLMPR Software File Version 5.0000 or later KX-TDE100/KX-TDE200: PMMPR Software File Version 1.0000 or later
CODEC: G.729A, G.711, G.722 *1
*1 G.722 is only available for KX-TDE100/KX-TDE200.
|
Nederlands |
English/ |
|
|||||
|
|
|
|
|
|
|
|
|
|
|
|
|
|
|
|
|
|
|
Svenska |
Deutsch/ |
|
|||||
|
|
|
|
|
|
|
|
|
|
|
|
|
|
|
|
|
|
|
|
|
|
|
|
|
|
|
|
Suomi |
ol/ñEspa |
|
|
|
|||
|
|
|
|
|||||
|
|
|
|
|||||
|
|
|
|
|
|
|
|
|
|
|
|
|
|
|
|
|
|
|
Dansk |
Français/ |
|
|||||
|
|
|
|
|
|
|
|
|
|
|
|
|
|
|
|
|
|
|
Português |
Italiano/ |
|
|||||
|
|
|
|
|
|
|
|
|
|
|
|
|
|
|
|
|
|
|
|
|
|
|
|
|
|
|
|
|
|
|
|
|
|
|
|
|
|
|
|
|
|
|
|
|
|
|
|
|
|
|
|
|
|
|
|
|
|
|
|
|
|
|
|
|
|
|
|
|
|
|
|
|
|
|
|
|
|
|
|
|
 NT321NE_GQ.book Page 2 Thursday, September 11, 2008 6:57 PM
 NT321NE_GQ.book Page 3 Thursday, September 11, 2008 6:57 PM
Quick Reference Guide
IP Proprietary Telephone
Model No. KX-NT321
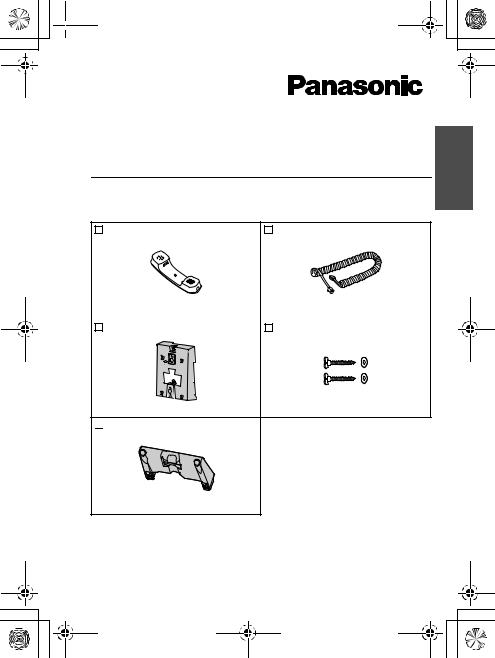
Accessories (included)
Handset |
Handset Cord |
One |
One |
Wall Mounting Adaptor |
Screws |
One |
Two |

 Stand
Stand
One
Note: In this manual, the suffix of each model number is omitted unless necessary.
3
 NT321NE_GQ.book Page 4 Thursday, September 11, 2008 6:57 PM
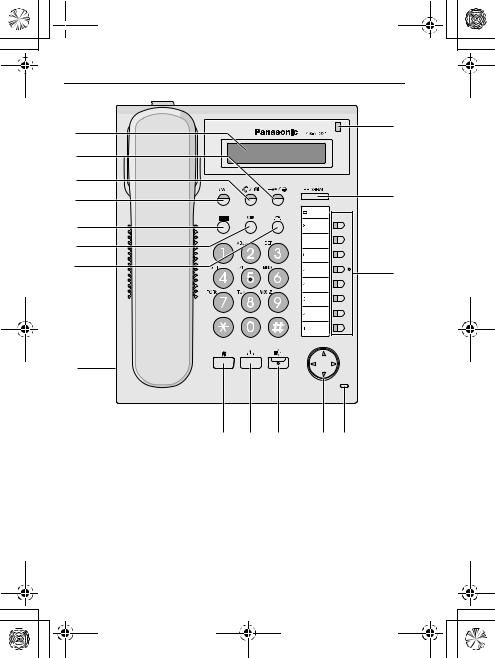
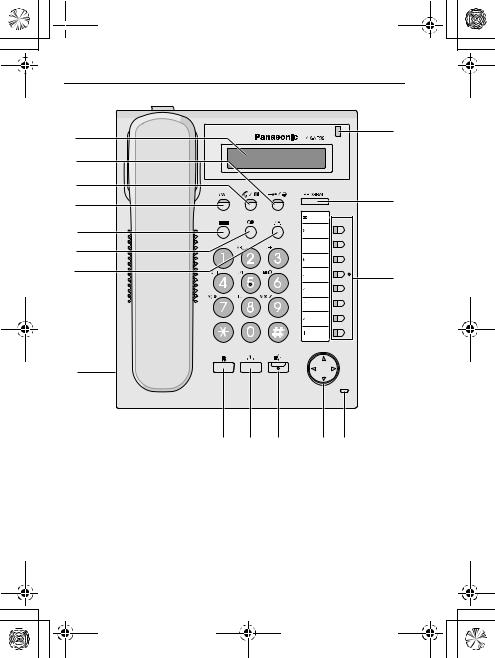
Location of Controls
A
B
C
D
E
F
G
H
I J K L M
P
O
N
4

 NT321NE_GQ.book Page 5 Thursday, September 11, 2008 6:57 PM
Location of Controls
ALCD (Liquid Crystal Display)
BAUTO DIAL/STORE: Used for System/Personal Speed Dialling or storing programme changes.
CAUTO ANS (Auto Answer)/ MUTE: Used to receive an incoming call in hands-free mode or mute the microphone/handset during a conversation.
DINTERCOM: Used to make or receive intercom calls.
EMESSAGE: Used to leave a message waiting indication or call back the party who left the message waiting indication.
FREDIAL: Used to redial the last dialled number.
GTRANSFER: Used to transfer a call to another party.
HHeadset Jack
IFLASH/RECALL: Used to disconnect the current call and make another call without hanging up.
J HOLD: Used to place a call on hold.
KSP-PHONE (Speakerphone): Used for performing hands-free operations.
LNavigator Key: Used to adjust the volume and the display contrast or select desired items.
MMicrophone: Used for hands-free conversations.
NFlexible CO Buttons: Used to seize an outside line or perform a feature that has been assigned to the key.
OPROGRAM: Used to enter and exit the personal programming mode.
PMessage/Ringer Lamp:
When you receive a call, the lamp flashes red. When someone has left you a message, the lamp stays on red.
5

 NT321NE_GQ.book Page 6 Thursday, September 11, 2008 6:57 PM
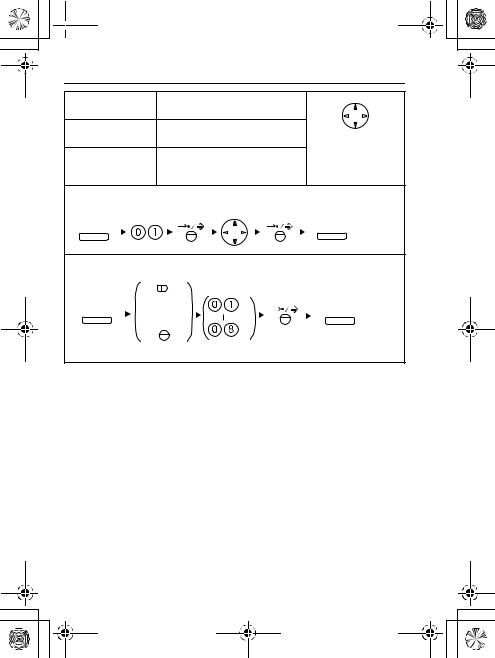
Settings
Speaker volume |
While in a hands-free |
|
||
|
conversation |
|
|
|
Handset/Headset While using the handset or |
|
|||
volume*1 |
headset |
|
Press Up to |
|
|
While on-hook or receiving a |
increase or Down |
||
Ringer volume |
to decrease the |
|||
call |
|
|||
|
|
volume. |
||
|
|
|
||
LCD Contrast |
|
|
|
|
While on-hook |
|
|
|
|
PROGRAM |
|
|
PROGRAM |
|
Ring Tone |
|
|
|
|
|
(CO) |
*2 |
|
|
PROGRAM |
OR |
|
PROGRAM |
|
INT'
Press 2 times.
*1 If you hear your own voice through the handset or headset, decrease the volume.
*2 The ring tone pattern of patterns 09 to 30 is the same as pattern 01.
6
 NT321NE_GQ.book Page 7 Thursday, September 11, 2008 6:57 PM
|
|
|
|
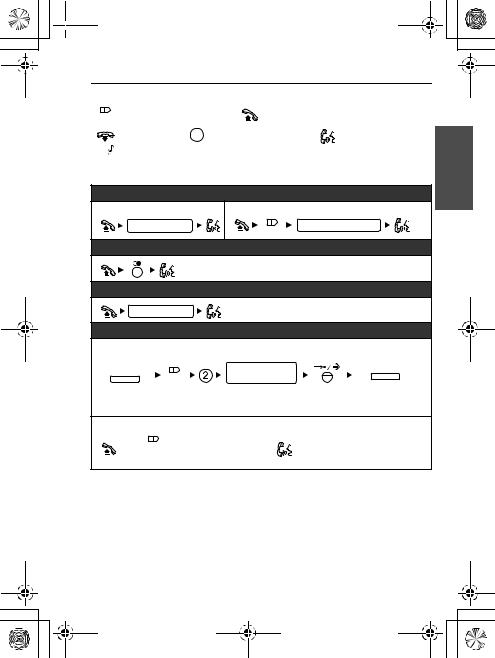
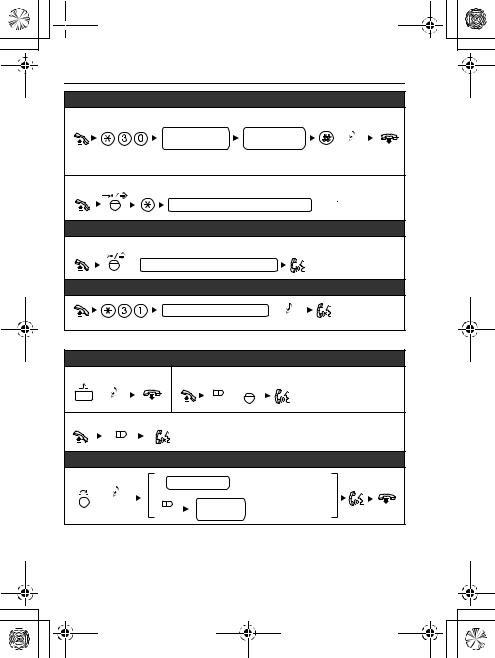
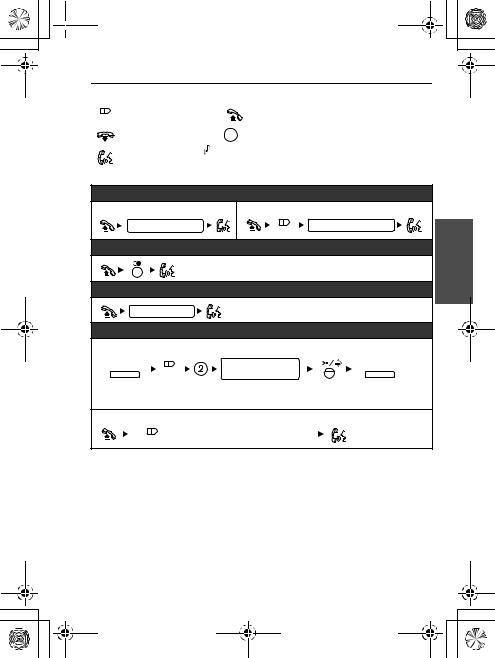
Features List |
Icon Meanings |
|
|
|
|
(CO) = Flexible CO button |
= Off-hook |
|
||
= On-hook |
= Feature number |
= Talk |
||
C. Tone = Confirmation Tone |
|
|
||
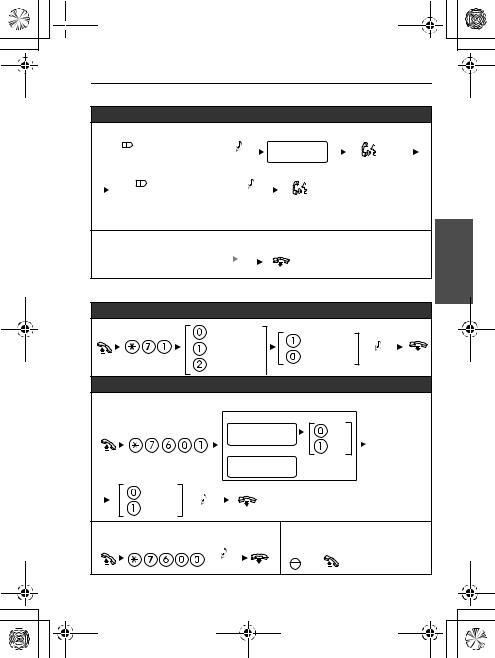
Making Calls |
|
|
|
|
|
|
Calling |
|
|
To an extension |
|
To an outside party |
|
|
extension no. |
|
(CO) |
outside phone no. |
|
|
|
|
|
|
|
|
Redial |
|
|
|
Quick Dialling |
|
|
|
quick dial no. |
|
|
|
|
|
One-touch Dialling |
|
||
To store |
|
|
|
|
PROGRAM |
|
desired no.* |
|
PROGRAM |
(CO) |
|
(max. 32 digits) |
|
|
*Enter outside line access number before outside phone number.
To dial
 (One-touch
Dialling)
assigned as a One-touch Dialling  button
7
 NT321NE_GQ.book Page 8 Thursday, September 11, 2008 6:57 PM
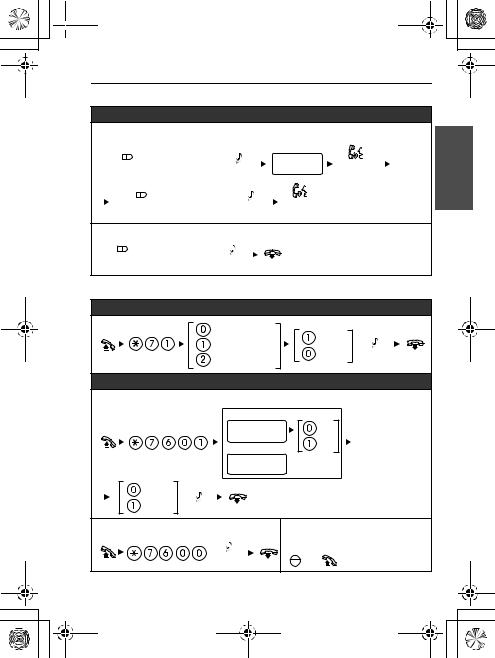
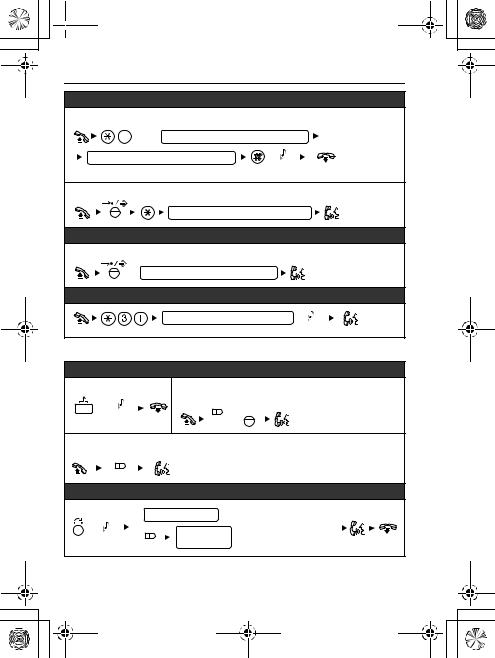
Features List
Personal Speed Dialling
To store
personal speed |
desired no.* |
|
dial no. (2 digits) |
(max. 32 digits) |
C. Tone |
|
|
* Enter outside line access number before outside phone number.
To dial
personal speed dial no. (2 digits) 

System Speed Dialling
To dial
 system speed dial no. (3 digits)
|
|
Doorphone Call |
|
doorphone no. (2 digits) |
|
|
|
C. Tone |
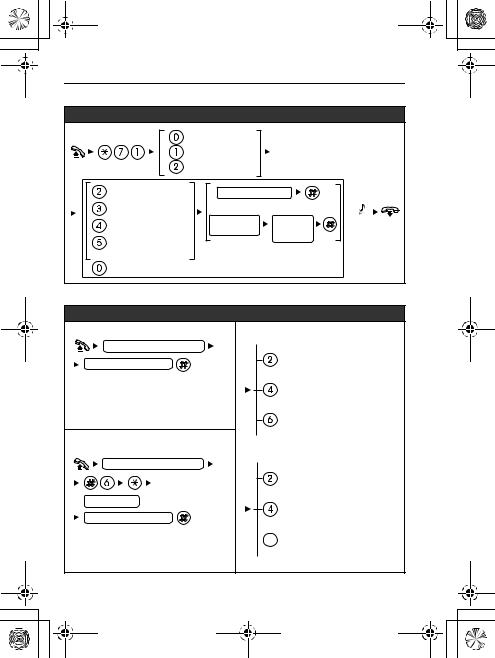
During a Conversation |
|
|
|
|
Call Hold |
To hold |
To retrieve a call at the holding extension |
|
C. Tone |
|
(CO) / INT' |
To retrieve an outside call from another extension |
||
(CO) |
|
|
|
|
Call Transfer |
|
extension no. To an extension |
|
C. Tone |
(CO) |
outside |
|
phone no. To an outside party |
|
8
 NT321NE_GQ.book Page 9 Thursday, September 11, 2008 6:57 PM
Features List
Useful Features
Multiple Party Conversation
To add other parties during a conversation (i.e., conference)
|
assigned as a |
|
desired |
|
|
Conference |
|
|
|
(Conference) |
C. Tone |
phone no. |
Talk to the |
|
|
button |
|
|
new party. |
|
|
|
|
|
|
assigned as a |
|
|
|
(Conference) Conference C. Tone |
Talk with |
|
||
|
button |
|
multiple parties. |
|
|
|
|
||
To leave a conference |
|
|
|
|
|
assigned as a |
|
|
|
(Conference) |
Conference |
B. Tone |
|
|
|
button |
|
|
|
Setting the Telephone According to Your Needs
Do Not Disturb
Both Calls |
Set |
|
|
Outside Calls |
|
||
Cancel |
C. Tone |
||
Intercom Calls |
|||
|
|
||
Timed Reminder |
|
|
|
To set |
|
|
|
12 H |
|
|
hour/minute |
AM |
|
(4 digits) |
PM |
|
24 H |
|
|
|
|
|
hour/minute |
|
|
(4 digits) |
|
1 time |
|
|
daily |
C. Tone |
|
To cancel |
To stop or answer the ring |
|
|
back |
|
|
INT' |
/ |
|
C. Tone |
|
|
|
|
9
NT321NE_GQ.book Page 10 Thursday, September 11, 2008 6:57 PM
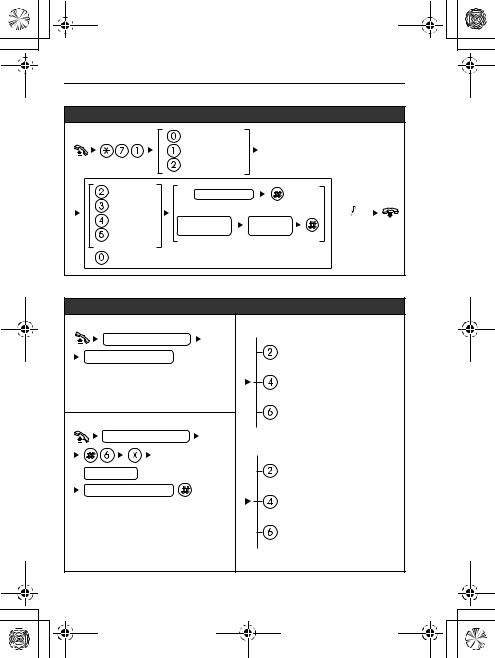
Features List
Before Leaving Your Desk
|
Call Forwarding |
|
|
|
Both Calls |
|
|
|
Outside Calls |
|
|
|
Intercom Calls |
|
|
All calls |
extension no. |
|
|
|
|
|
|
Busy |
OR |
|
|
No answer |
outside line |
outside |
C. Tone |
Busy/ |
access no. |
phone no. |
|
No answer |
|
|
|
Cancel |
|
|
|
Making Use of the Voice Mail Service
Listening to a message
From your own extension
VPS extension no.
Mailbox Password* 
*If you have no password, you can skip the last step.
From someone else’s extension
VPS extension no.
 mailbox no.
Mailbox Password*
*If you have no password, you can skip the last step.
KX-TVM series

 Listen to Message
Deliver Message

 Mailbox Management
Automated Attendant

 Message Notification
Other Features

 End Call
KX-TVP series

 Listen to Message
Deliver Message

 Check Mailbox Distribution
Automated Attendant

 Mailbox Management
Other Features

 End Call
10
 NT321NE_GQ.book Page 11 Thursday, September 11, 2008 6:57 PM
Features List
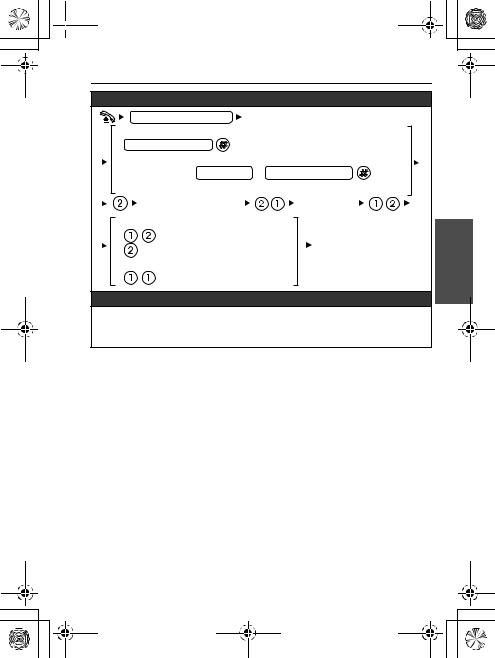
Leaving a message
VPS extension no.
From your own extension
Mailbox Password* 
From someone else’s extension


 mailbox no.
  Mailbox Password*
  * If you have no password, you can skip the last step.
Enter the desired mailbox number |
Leave |
|
a message |
||
|
To send the message immediately |
|
|
(KX-TVM series) |
|
|
(KX-TVP series) |
|
Follow the guidance |
To set the delivery time
During playback
 Repeat Voice Guidance
 Exit
Exit
•Consult your dealer or the network administrator for more details regarding feature numbers.
•It is possible to assign flexible CO buttons as feature buttons.
•Control panel/button names and descriptions can be found in "Location of Controls" on page 4.
11
 NT321NE_GQ.book Page 12 Thursday, September 11, 2008 6:57 PM
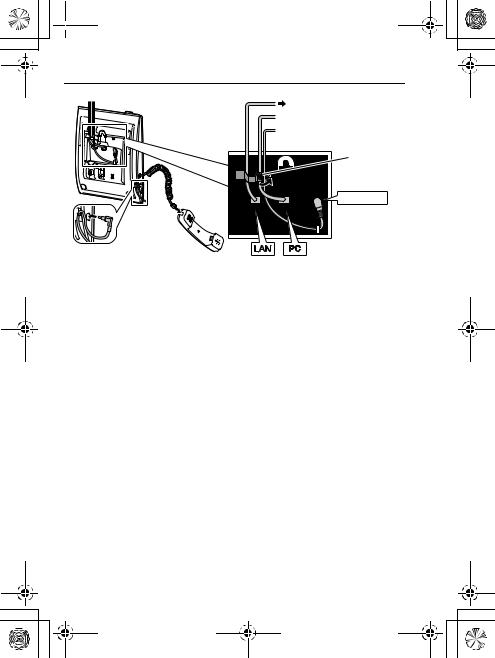
Connection
<Back view>
To a Switching Hub.
 To a PC.
 Optional AC adaptor (not included).
Clamp |
AC adaptor |
Headset
Recommended: KX-TCA89
PC connection/Switching Hub connection
•Use a straight CAT 5 (or higher) Ethernet cable (not included) that is 6.5 mm in diameter or less.
•For further information on the connection to a PC, refer to the documentation provided for the PBX.
AC adaptor
•Use a Panasonic AC adaptor KX-A239CE (PQLV206CE).
•The AC adaptor is used as the main disconnect device. Ensure that the AC outlet is located near the unit and is easily accessible.
CAUTION:
When selecting Ethernet cables
•Use flexible, high-quality, snagless (without strain relief) cables. Do not use cables with coating that may tear or crack when bent.
When connecting cables
•Ensure that the Ethernet cables and the AC adaptor cord are clamped to prevent damage to the connectors.
•Cables may be routed upwards by using the appropriate cable clamp located on the back of the unit.
When connecting a headset and AC adaptor
•Ensure that the headset cord and the AC adaptor cord are wound around the hook to prevent damage to the connectors.
12
 NT321NE_GQ.book Page 13 Thursday, September 11, 2008 6:57 PM
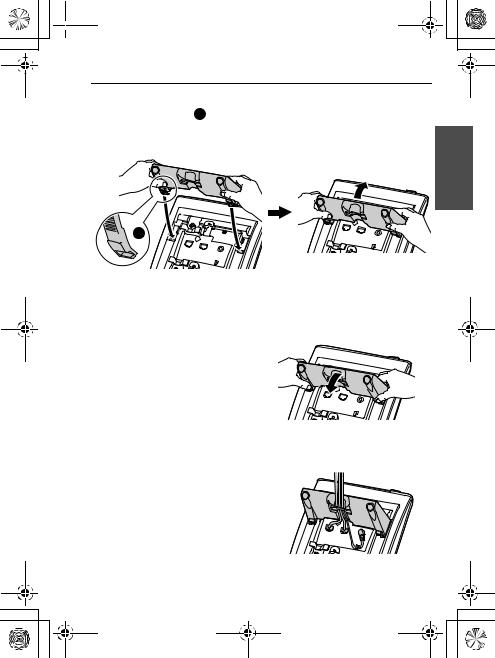
Stand Usage
Attaching the Stand
Place the catches ( A ) of the stand into hooks located in the unit. Gently push the stand in the direction indicated until it locks into place. The stand will be mounted in the high position.
 A
A
Removing the Stand
Hold the stand with both hands.
Gently rotate the stand in the direction indicated until it is released.
Cabling
When using the stand, ensure that the cables are clamped as shown.
13

 NT321NE_GQ.book Page 14 Thursday, September 11, 2008 6:57 PM
Stand Usage
Adjusting from High to Low Position
Hold the stand with both hands as shown and rotate the stand in the direction indicated until it locks into the low position ( B ).
 B 1
B 1 


Adjusting from Low to High Position
Hold the stand with both hands as shown and rotate the stand in the direction indicated until it locks into the high position ( A ).
1 |
A |
|
14
 NT321NE_GQ.book Page 15 Thursday, September 11, 2008 6:57 PM
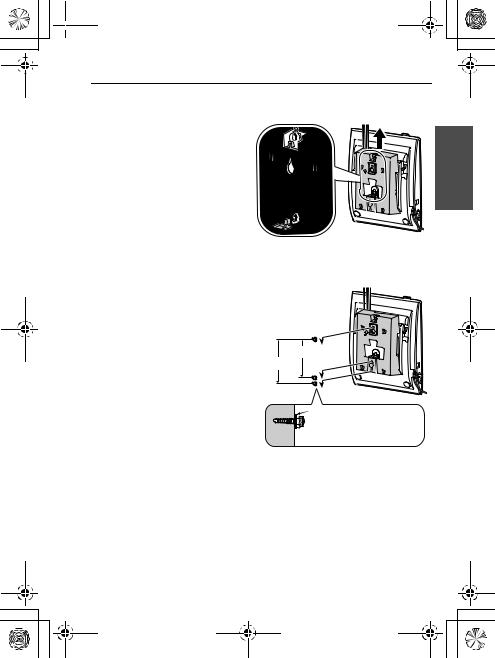
Wall Mounting
1.Remove the stand if it is attached. For information on removing the stand, refer to page 13.
2.Attach the wall mounting
adaptor as shown.
• Make sure the cables are not pinched by the wall mounting adaptor. When running the cables from the top of the unit, look through the opening in the wall mounting adaptor to confirm that the cables are not being pinched.
•Slide the wall mounting adaptor in the direction indicated until it locks into place.
3.Drive the 2 screws into the wall either 83 mm or 100
mm apart, and mount the unit on the wall.
• |
You can find a wall mounting |
|
• |
template on page 183. |
83 mm |
Make sure that the wall that |
100 mm |
|
|
the unit will be attached to is |
|
|
strong enough to support the |
|
• |
unit (approx. 1.5 kg). |
|
Make sure the cables are |
Washer |
|
• |
securely fastened to the wall. |
|
When this unit is no longer in |
Drive the screw |
|
|
use, make sure to detach it |
to this point. |
|
from the wall. |
|
15
 NT321NE_GQ.book Page 16 Thursday, September 11, 2008 6:57 PM
Wall Mounting
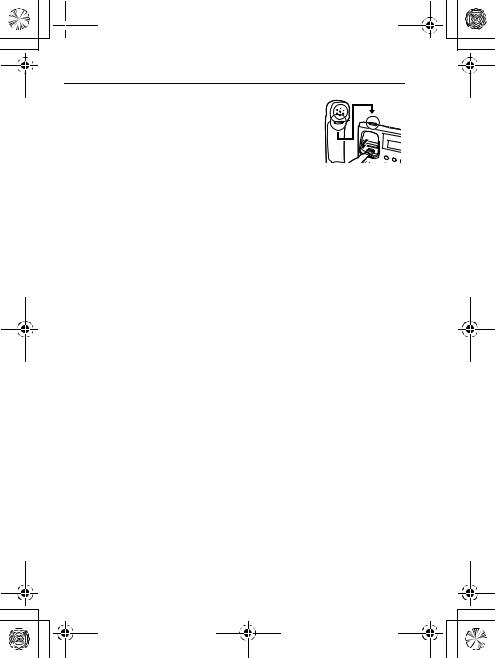
Locking the Handset Hook
Pull down the handset hook until it locks to prevent the handset from falling off the handset cradle when the unit is mounted to a wall or set at a high angle. To temporarily place the handset down during a conversation, hook it over the top edge of the unit as shown.
16
 NT321NE_GQ.book Page 17 Thursday, September 11, 2008 6:57 PM
Important Information
When using a KX-NT321 IP-PT, keep the following conditions in mind.
•If the unit does not operate properly, disconnect the unit from the Ethernet cable and then connect again.
•If you are having problems making calls, disconnect the Ethernet cable and connect a known working IP-PT. If the known working IP-PT operates properly, have the defective IP-PT repaired by an authorised Panasonic factory service centre. If the known working IP-PT does not operate properly, check the PBX and the Ethernet cable.
•Wipe the unit with a soft cloth. Do not clean the unit with abrasive powders or with chemical agents such as benzene or thinner.
•Use only the correct Panasonic handset.
•Do not disassemble this unit. Dangerous electrical shock could result. The unit must only be disassembled and repaired by qualified service technicians.
•If damage to the unit exposes any internal parts, immediately disconnect the cable or cord. If the power is supplied from the network to the IP-PT [Power-over-Ethernet], disconnect the Ethernet cable. Otherwise, disconnect the AC adaptor cord. Then return this unit to a service centre.
•Never attempt to insert wires, pins, etc. into the vents or other holes of this unit.
Take special care to follow the safety suggestions listed below.
Safety
1)The unit should only be connected to a power supply of the type described in the Quick Reference Guide or as shown on the label on the unit.
2)When left unused for a long period of time, the optional AC adaptor should be unplugged from the AC outlet, if you are using Power-over- Ethernet, disconnect the Ethernet cable.
Installation
Environment
1)Do not use this unit near water, for example, near a bathtub, washbowl or sink. Damp basements should also be avoided.
2)Keep the unit away from heating appliances and devices that generate electrical noise, such as fluorescent lamps, motors and televisions. These noise sources can interfere with the performance of the unit. It also should not be placed in rooms where the temperature is less than 5 °C or greater than 40 °C.
17
 NT321NE_GQ.book Page 18 Thursday, September 11, 2008 6:57 PM
Important Information
Placement
1)Do not place heavy objects on top of this unit.
2)Care should be taken so that objects do not fall onto, and liquids are not spilled into, the unit. Do not subject this unit to excessive smoke, dust, moisture, mechanical vibration, shock or direct sunlight.
3)Place the unit on a flat surface.
WARNING:
TO PREVENT POSSIBLE FIRE OR ELECTRIC SHOCK, DO NOT EXPOSE THIS UNIT TO RAIN OR MOISTURE.
THIS HANDSET EARPIECE IS MAGNETISED AND MAY RETAIN SMALL FERROUS OBJECTS.
THE USE OF EXCESSIVE SOUND VOLUME THROUGH EARPHONES, HEADPHONES, OR HEADSETS MAY CAUSE HEARING LOSS.
DISCONNECT THIS UNIT FROM POWER OUTLET/THE ETHERNET CABLE IF IT EMITS SMOKE, AN ABNORMAL SMELL OR MAKES UNUSUAL NOISE. THESE CONDITIONS CAN CAUSE FIRE OR ELECTRIC SHOCK. CONFIRM THAT SMOKE HAS STOPPED AND CONTACT AN AUTHORISED SERVICE CENTRE.
IMPORTANT NOTICE:
•Under power failure conditions, the IP-PT may not operate. Please ensure that a separate telephone, not dependent on local power, is available for use in remote sites in case of emergency.
•For information regarding network setup of the IP-PT such as IP addresses, please refer to the Installation Manual for the Panasonic PBX.
•If an error message is shown on your display, consult your dealer or the network administrator.
•The firmware of the KX-NT321 is protected by copyright laws and international treaty provisions, and all other applicable laws. It cannot be reverse engineered, decompiled or disassembled.
18
 NT321NE_GQ.book Page 19 Thursday, September 11, 2008 6:57 PM
Important Information
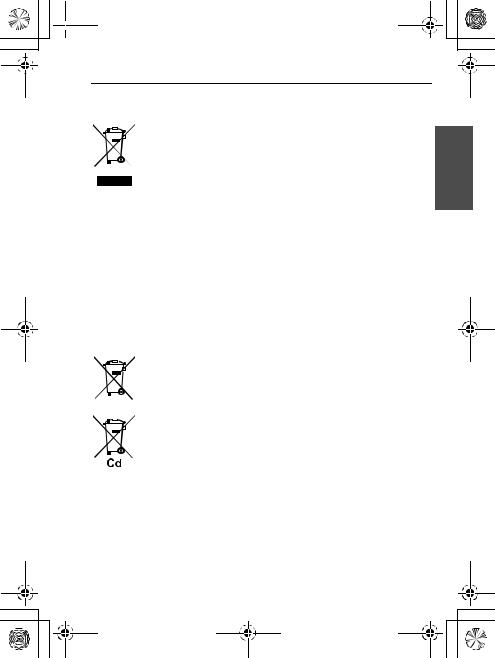
Information for Users on Collection and Disposal of Old Equipment and used Batteries
These symbols on the products, packaging, and/or accompanying documents mean that used electrical and electronic products and batteries should not be mixed with general household waste.
For proper treatment, recovery and recycling of old products and used batteries, please take them to applicable collection points, in accordance with your national legislation and the Directives 2002/96/EC and 2006/66/EC.
By disposing of these products and batteries correctly, you will help to save valuable resources and prevent any potential negative effects on human health and the environment which could otherwise arise from inappropriate waste handling.
For more information about collection and recycling of old products and batteries, please contact your local municipality, your waste disposal service or the point of sale where you purchased the items.
Penalties may be applicable for incorrect disposal of this waste, in accordance with national legislation.
For business users in the European Union
If you wish to discard electrical and electronic equipment, please contact your dealer or supplier for further information.
Information on Disposal in other Countries outside the European Union
These symbols are only valid in the European Union. If you wish to discard these items, please contact your local authorities or dealer and ask for the correct method of disposal.
Note for the battery symbol (bottom two symbol examples):
This symbol might be used in combination with a chemical symbol. In this case it complies with the requirement set by the Directive for the chemical involved.
19
 NT321NE_GQ.book Page 20 Thursday, September 11, 2008 6:57 PM
Important Information
This product is intended to be connected to a Panasonic PBX only. Panasonic Communications Company (U.K.) Ltd. declares that this equipment is in compliance with the essential requirements and other relevant provisions of Radio & Telecommunications Terminal Equipment (R&TTE) Directive 1999/5/EC.
Declarations of Conformity for the relevant Panasonic products described in this manual are available for download by visiting: http://www.doc.panasonic.de
Contact to Authorised Representative:
Panasonic Testing Centre
Panasonic Marketing Europe GmbH
Winsbergring 15, 22525 Hamburg, Germany
20
 NT321NE_GQ.book Page 21 Thursday, September 11, 2008 6:57 PM
Kurzanleitung
IP-Systemtelefon
Modell-Nr. KX-NT321
Zubehör (im Lieferumfang)
Hörer |
Hörerkabel |
|
|
|
|
1 x |
1 x |
Wandmontagehalterung |
Schrauben |
1 x |
2 x |

 Fuß
Fuß
1 x
Anmerkung: In diesem Handbuch wurde der Modellnummernzusatz, wo nicht erforderlich, weggelassen.
21
 NT321NE_GQ.book Page 22 Thursday, September 11, 2008 6:57 PM
Position der Bedienungstasten
A
B
C
D
E
F
G
H
I J K L M
P
O
N
22
 NT321NE_GQ.book Page 23 Thursday, September 11, 2008 6:57 PM
Position der Bedienungstasten
ALCD (Liquid Crystal Display)
BKURZWAHL/SPEICHERN:
Dient der zentralen/ persönlichen Kurzwahl oder dem Speichern von Änderungen an der Programmierung.
CAUTOMATISCHE ANSCHALTUNG/ STUMMSCHALTUNG: Dient der Annahme eines ankommenden Gesprächs im Freisprechmodus oder der Stummschaltung des Mikrofons/Hörers während eines Gesprächs.
DINTERNVERBINDUNG:
Dient dem Tätigen oder der Annahme eines Interngesprächs.
ENACHRICHT: Dient dem Hinterlassen einer Nachrichtenanzeige oder dem Zurückrufen eines Teilnehmers, der eine Nachrichtenanzeige hinterlassen hat.
FWAHLWIEDERHOLUNG:
Dient dem erneuten Wählen der zuletzt gewählten Nummer.
GVERMITTELN: Dient dem Vermitteln eines Gesprächs an einen anderen Teilnehmer.
HHeadset-Buchse
IFLASH/SIGNALTASTE:
Dient dem Trennen der aktuellen Verbindung mit anschließendem Tätigen eines neuen Anrufs ohne Auflegen des Hörers.
JRÜCKFRAGE: Wird verwendet, um ein Gespräch ins Halten zu legen.
KFREISPRECHEN/ LAUTHÖREN: Dient zur Verwendung des Freisprechbetriebs.
LNavigationstaste: Dient der Einstellung der Lautstärke und des Displaykontrasts sowie der Auswahl gewünschter Positionen.
MMikrophon: Wird im Freisprechbetrieb verwendet.
NVariable Tasten: Dienen zum Belegen einer Amtsleitung oder zur Ausführung einer der jeweiligen Taste zugewiesenen Funktion.
OPROG.: Dient zum Aufrufen und Verlassen des Programmiermodus.
PLeuchtelement Nachricht/ Rufsignal: Wenn Sie einen Anruf empfangen, blinkt die Lampe rot. Wenn Sie eine Nachricht erhalten haben, leuchtet die Lampe rot.
23
 NT321NE_GQ.book Page 24 Thursday, September 11, 2008 6:57 PM
Einstellungen
Lautsprecher- |
|
Im Freisprechbetrieb |
|
|
Lautstärke |
|
|
||
|
|
|
|
|
Lautstärke |
|
Bei Verwendung von Hörer |
|
|
Hörer/Headset*1 |
|
oder Headset |
|
Zum Lauterstellen |
|
|
Bei aufgelegtem Hörer oder |
Auf, zum |
|
Tonruflautstärke |
Leiserstellen Ab |
|||
|
|
Tätigen eines Anrufs |
drücken. |
|
|
|
|
|
|
LCD-Kontrast |
|
|
|
|
Bei aufgelegtem Hörer |
|
|
||
PROGRAM |
|
|
|
PROGRAM |
Rufton ändern |
|
|
|
|
|
|
(AL) |
*2 |
|
PROGRAM |
ODER |
|
PROGRAM |
|
INT'
Zweimal drücken.
*1 Wenn Sie Ihre eigene Stimme über den Hörer oder das Headset hören, verringern Sie die Lautstärke.
*2 Bei Eingaben zwischen 09 und 30 wird die Rufsignalmelodie 01 genutzt.
24
 NT321NE_GQ.book Page 25 Thursday, September 11, 2008 6:57 PM
|
Liste der Funktionen |
||
Bedeutung der Symbole |
|
|
|
(AL) = Variable Tasten |
= Hörer abheben |
|
|
= Hörer auflegen |
= Funktionskennziffer |
||
= Sprechen BS-Ton = Bestätigungston |
|
||
Anrufe tätigen |
|
|
|
|
Anrufen |
|
|
Anrufen einer Nebenstelle Anrufen eines externen Teilnehmers |
|||
Nebenstellen-Nr. |
(AL) |
Externe Rufnummer |
|
|
|
|
|
|
Wahlwiederholung |
|
|
|
Sofortwahl |
|
|
Sofortwahl-Nr. |
|
|
|
|
Zielwahl |
|
|
Speichern |
|
|
|
PROGRAM |
Gewünschte Nr.* |
|
PROGRAM |
(AL) |
(max. 32 Stellen) |
|
|
*Geben Sie die Amtskennziffer vor der externen Rufnummer ein.
Wählen
(Zielwahl) eingerichtet als Zielwahl-Taste
25
 NT321NE_GQ.book Page 26 Thursday, September 11, 2008 6:57 PM
Liste der Funktionen
Persönliche Kurzwahl
Speichern

 persönl. Kurzwahlnr. (2 Stellen)
Gewünschte Nr.* (max. 32 Stellen)
BS-Ton
* Geben Sie die Amtskennziffer vor der externen Rufnummer ein.
Wählen
persönl. Kurzwahlnr. (2 Stellen)
Zentrale Kurzwahl
Wählen
 zentrale Kurzwahlnr. (3 Stellen)
|
|
Türsprechstellen-Anruf |
|
|
|
Türsprechstellennr. (2 Stellen) |
|
|
|
|
BS-Ton |
Während eines Gesprächs |
|
||
|
|
Halten eines Gesprächs |
|
Halten |
|
Anruf zurückholen an der haltenden |
|
|
|
Nebenstelle |
|
|
BS-Ton |
(AL) / |
INT' |
|
|
||
|
|
|
|
So holen Sie ein Amtsgespräch von einer anderen Nebenstelle zurück
(AL)
Gespräch vermitteln
|
|
Nebenstellen-Nr. Anrufen einer Nebenstelle |
|
||
BS-Ton |
|
|
Externe |
Anrufen eines externen |
|
|
(AL) |
Rufnummer |
Teilnehmers |
|
|
26
 NT321NE_GQ.book Page 27 Thursday, September 11, 2008 6:57 PM
Liste der Funktionen
Hilfreiche Funktionen
Konferenzgespräch
Weitere Teilnehmer in ein Gespräch aufnehmen (d.h. Konferenz)
eingerichtet als |
Gewunschte |
(Konferenz) Konferenz-Taste BS-Ton |
Rufnummer |
|
Sprechen Sie |
eingerichtet als |
mit demneuen |
Teilnehmer. |
(Konferenz) Konferenz-Taste BS-Ton
Sprechen Sie mit mehreren Teilnehmern.
Beenden einer Konferenz
 eingerichtet als
  (Konferenz) Konferenz-Taste BS-Ton
Einstellung des Telefons entsprechend Ihren Anforderungen
Anrufschutz
Alle Anrufe |
|
Einschalten |
Amts- |
|
|
anrufe |
|
Ausschalten BS-Ton |
Intern- |
|
|
|
|
|
gespräche |
|
|
Terminruf/Weckruf |
||
Einschalten |
|
|
12 H |
|
|
Stunde/Minute |
AM |
|
(4 Stellen) |
PM |
|
24 H |
|
|
|
|
|
Stunde/Minute |
|
|
(4 Stellen) |
|
|
einmalig |
|
|
täglich BS-Ton |
|
|
Ausschalten |
Signalruf ausschalten oder |
|
|
beantworten |
|
BS-Ton |
INT' / |
|
27
NT321NE_GQ.book Page 28 Thursday, September 11, 2008 6:57 PM
Liste der Funktionen
Vor dem Verlassen des Schreibtischs
|
Rufweiterleitung |
|
||
|
Alle Anrufe |
|
|
|
|
Amtsanrufe |
|
|
|
|
Interngespräche |
|
|
|
Rufweiterleitung– |
Nebenstellen-Nr. |
|
||
Sofort |
|
|
|
|
Rufweiterleitung |
ODER |
|
||
bei Besetzt |
Amtskenn- |
Externe |
BS-Ton |
|
Rufweiterleitung |
||||
ziffer |
Ruf- |
|
||
nach Zeit |
|
|||
Rufweiterleitung |
|
nummer |
|
|
bei Besetzt oder |
|
|
|
|
nach Zeit |
|
|
|
|
Ausschalten |
|
|
|
|
Voicemail-Dienst verwenden
Eine Nachricht anhören
Von der eigenen Nebenstelle
SPS-Nebenstellen-Nr.
Mailbox-Passwort*
*Wenn Sie kein Passwort haben, können Sie den letzten Schritt weglassen.
Von der Nebenstelle einer anderen Person
SPS-Nebenstellen-Nr.
 Mailbox-Nr.
Mailbox-Passwort*
*Wenn Sie kein Passwort haben, können Sie den letzten Schritt weglassen.
Serie KX-TVM

 Nachricht anhören
Nachricht zustellen

 Mailboxverwaltung
Automatische Abfrage

 Nachrichtenhinweis
Weitere Funktionen

 Anruf beenden
Serie KX-TVP

 Nachricht anhören
Nachricht zustellen

 Mailboxverteilung prüfen
Automatische Abfrage

 Mailboxverwaltung

 Weitere Funktionen
 Anruf beenden
28
 NT321NE_GQ.book Page 29 Thursday, September 11, 2008 6:57 PM
Liste der Funktionen
Eine Nachricht hinterlassen
SPS-Nebenstellen-Nr.
Von der eigenen Nebenstelle
Mailbox-Passwort*
Von der Nebenstelle einer anderen Person


 Mailbox-Nr.
  Mailbox-Passwort*
* Wenn Sie kein Passwort haben, können Sie den letzten Schritt weglassen.
Die gewünschte |
Eine Nachricht |
|
Mailboxnummer eingeben |
hinterlassen |
|
Die Nachricht sofort senden |
|
|
(Serie KX-TVM) |
Befolgen Sie die |
|
(Serie KX-TVP) |
||
Anweisungen |
Die Zustellzeit festlegen
Beim Abspielen
 Sprachführung wiederholen
 Beenden
•Weitere Informationen zu Funktionskennziffern erhalten Sie von Ihrem Fachhändler oder Netzwerkadministrator.
•Variable Tasten können als Funktionstasten eingerichtet werden.
•Namen und Beschreibungen der Bedienelemente/Tasten finden Sie unter "Position der Bedienungstasten" auf Seite 22.
29

 NT321NE_GQ.book Page 30 Thursday, September 11, 2008 6:57 PM
Anschluss
<Rückansicht>
An einen Switching-Hub.
 An einen PC.
 Optionales Steckernetzteil (nicht im Lieferumfang).
Klemme |
Steckernetz- |
teil |
Headset
Empfohlen: KX-TCA89
PC-Verbindung/Switching-Hub-Verbindung
•Verwenden Sie ein ungekreuztes CAT 5 (oder höher) Ethernet-Kabel (nicht im Lieferumfang) mit einem Durchmesser von nicht mehr als 6,5 mm.
•Weitere Informationen zum Anschluss an einen PC finden Sie in der produktbegleitenden Dokumentation der TK-Anlage.
Steckernetzteil
•Verwenden Sie ein Panasonic Steckernetzteil KX-A239CE (PQLV206CE).
•Das Steckernetzteil dient als Hauptabschaltvorrichtung. Aus Sicherheitsgründen muss sich die Netzsteckdose in unmittelbarer Nähe des Gerätes befinden und frei zugänglich sein.
VORSICHT:
Auswahl von Ethernet-Kabeln
•Verwenden Sie flexible, hochwertige Kabel ohne Zugentlastung. Verwenden Sie keine Kabel mit einer Beschichtung, die beim Biegen reißen oder brechen kann.
Anschließen von Kabeln
•Achten Sie darauf, dass die Ethernet-Kabel und das Steckernetzteilkabel fest in der Kabelführung sitzen, um eine Beschädigung des Steckers zu vermeiden.
•Die Kabel können nach oben verlegt werden. Verwenden Sie dazu die entsprechende Kabelführung an der Geräterückseite.
Beim Anschließen eines Headsets und eines Steckernetzteils
•Um eine Beschadigung des Steckers zu verhindern, achten Sie darauf, dass Headset-kabel und Steckernetzteilkabel um den Haken gewickelt sind.
30
 Loading...