


Facsimile with Cordless Phone
KX-PW11CLH
KX-PW11CLK
Model No. KX-PW21CL
Quick Reference Guide
 The digital speaker phone (main unit) allows hands free conversations.
 Automatic dialing (Up to 99 phone numbers can be stored with names.)
 Digital answering machine with flash memory
 Auto cutter
 Hand scanner (for KX-PW21CL only)
α ALPHA 5 button
|
|
|
|
Portable |
Reset button |
|
|
|
|
|||
|
|
|
|
handset button |
|
|
|
LC display |
||||
Dial buttons |
|
|
Record button/Register button |
|
||||||||
|
|
|
|
|||||||||
|
|
|
Volume button |
|
Erase button/Select button |
|
|
|||||
|
|
|
|
|
|
Function button |
|
|
||||
|
|
|
|
|
|
|
|
|
|
|
||
|
|
|
|
|
|
|
|
|
|
|
Hand scanner button |
|
|
|
|
|
|
|
|
|
|
|
|
||
|
|
|
|
|
|
|
|
|
(KX-PW21CL only) |
|||
|
|
|
|
|
|
|
|
|
|
|
|
|
|
|
|
|
|
|
|
|
|
|
|
|
|
|
|
|
|
|
|
|
|
|
|
|
|
|
|
|
|
|
|
|
|
|
|
|
|
|
|
1 |
|
2 |
|
3 |
|
|
|
|
|
|
|
|
|
|
|
|
|
|
|
|
|
||||
|
|
A B C |
|
D E F |
|
|
|
|
|
|
|
Auto receive |
|
|
|
|
|
|
|
|
|
|
|
|
|
|
|
|
|
|
|
|
|
|
|
|
|
button |
4 |
|
5 |
|
6 |
|
|
|
|
|
|
|
|
|
|
|
|
|
|
|
|
|||||
|
|
|
|
|
|
|
|
Replay button |
||||
G H I |
|
J K L |
|
M N O |
|
|
|
|
|
|
||
|
|
|
|
|
|
|
|
|
||||
|
|
|
|
|
|
|
|
|
|
|
|
Resolution |
7 |
|
8 |
|
9 |
|
|
|
|
|
|
|
|
|
|
|
|
|
|
|
|
button |
||||
P R S |
|
T U V |
|
W X Y |
|
|
|
|
|
|
|
|
|
|
|
|
|
|
|
|
|
|
|
|
|
|
|
|
|
|
|
|
|
|||||
|
|
|
|
|
|
|
|
|
|
|
|
|
|
|
0 |
|
|
|
|
|
|
|
|
Stop button |
|
|
|
|
|
|
|
|
|
|
|
|
||
|
|
|
|
|
|
|
|
|
||||
|
|
Q Z |
|
|
|
|
|
|
|
|
|
|
|
|
|
Start/Copy button |
|
|
|
|
Search dial |
|
Redial button |
|
Hold button |
Received calls memory |
|
Flash button |
Telephone directory register button |
|||
Edit/Erase button |
||||
|
|
Speakerphone |
||
|
|
Operation guide button |
||
|
|
button |
||
|
|
Microphone |
||
|
|
|
||
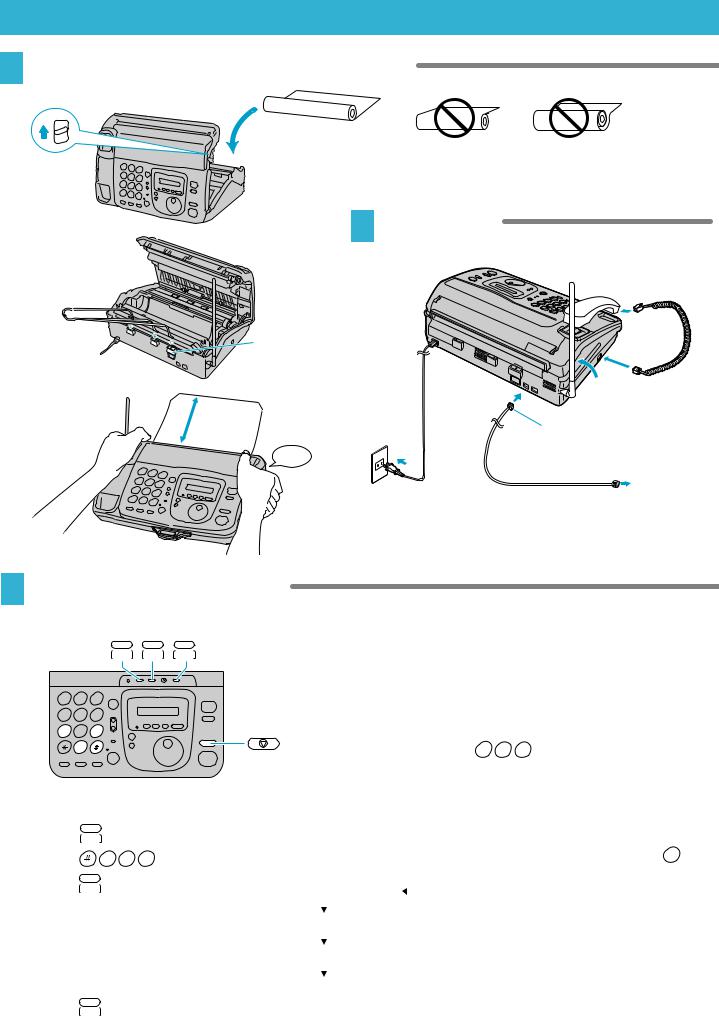
Preparations
1 Installing the recording paper and stacker
Thermal paper
Incorrect Slack
Push up to open the cover.
2 Connections
Stacker
|
|
For B4 size |
|
|
|
recording paper |
|
|
|
|
Raise the antenna. |
Close the cover. |
Approx. |
To Power |
Connect to “ ” (line). |
|
|||
|
15 cm |
Outlet |
|
|
|
||
|
|
click |
To Telephone Line |
|
|
|
3 Automatic dial mode setting
When the power cord and the telephone line cord are connected, the unit will start detecting the dial mode (tone or pulse). If you cannot dial and “ U61 ” is displayed, change the dial mode setting.
1 2 3
4 5 6
7 8 9 |
|
0
Changing the dial mode
1. Press (function).
2. Press |
0 7 9 . |
3.Press (select) to select the dial mode ( ).
4.Press (register).
5. Press  (stop).
= |
|
Tone |
|
|||
|
|
|||||
|
|
|
|
|
|
|
|
|
|
|
|
|
|
=20 |
|
|
Pulse 20pps |
|||
|
|
|
|
|
|
|
|
|
|
|
|
|
|
|
|
|
|
|
|
|
=10 |
|
Pulse 10pps |
||||
|
|
|
Auto |
|
|
|
|
|
|
|
|
|
|
|
|
|
|
|
|
|
= |
|
|
|
|||
|
|
|
||||
|
|
|
|
|
|
|
Confirming the dial mode
1.Set the dial mode to “20”.
(See “Changing the dial mode” shown on the left.)
2. Dial 1 1 7 (time signal).
If you cannot dial, change to “10”.
If you cannot dial after changing to “10”, set to “ ” (tone).
Note:
If this unit is connected to a PBX or used as an extension, dial the access code (ex. 0 ) before the time signal.
2

Setting the Date, Time, Facsimile Telephone Number and Logo
Before using your unit, program the correct date, time, facsimile telephone number and logo. These will be printed on the top of each page transmitted from your unit.
1 Setting the date and time
1 2 3
4 5 6
7 8 9
0
1. Press |
(function). |
2. Press |
0 0 1 . |
3.Enter the correct year/month/day/ hour/minute by selecting each 2 digits. Example: Aug. 10, 1998 3:05PM
Press |
9 |
8 |
0 |
8 |
1 |
0 |
1 |
5 |
0 |
5 . |
4. Press (register).
5. Press  (stop).
2 Settingnumberyour facsimile telephone
1 2 3
4 5 6
7 8 9
0
1. Press |
(function). |
2. Press |
0 0 4 . |
3.Enter your facsimile telephone number up to 20 digits.
Example: 098-765-4321
Press |
0 |
9 |
8 |
7 |
6 |
5 |
4 |
3 |
2 |
1 . |
4. Press (register).
5. Press  (stop).
3 Setting your logo
1 2 3
4 5 6
7 8 9
0
1. Press |
(function). |
2. Press |
0 0 2 . |
3.Enter your logo up to 30 characters. Refer to the character list.
4.Press (register).
5. Press  (stop).
Character List
|
|
|
|
|
|
|
|
Number of times |
||||||||||
|
1 |
2 |
3 |
4 |
5 |
6 |
7 |
8 |
9 |
10 |
11 |
12 |
13 |
14 |
15 |
16 |
17 |
18 |
1 |
|
|
|
|
|
|
|
|
|
|
1 |
|
|
|
|
|
|
|
2 |
|
|
|
|
|
A |
B |
C |
a |
b |
c |
2 |
|
|
|
|
|
|
3 |
|
|
|
|
|
D |
E |
F |
d |
e |
f |
3 |
|
|
|
|
|
|
4 |
|
|
|
|
|
|
G |
H |
I |
g |
h |
i |
4 |
|
|
|
|
|
5 |
|
|
|
|
|
J |
K |
L |
j |
k |
l |
5 |
|
|
|
|
|
|
6 |
|
|
|
|
|
M |
N |
O |
m |
n |
o |
6 |
|
|
|
|
|
|
7 |
|
|
|
|
|
P |
R |
S |
p |
r |
s |
7 |
|
|
|
|
|
|
8 |
|
|
|
|
|
|
T |
U |
V |
t |
u |
v |
8 |
|
|
|
|
|
9 |
|
|
|
|
|
W |
X |
Y |
w |
x |
y |
9 |
|
|
|
|
|
|
0 |
|
|
|
|
° |
Q |
Z |
q |
z |
0 |
( |
) |
, |
— |
. |
: |
— |
|
Example: Bill |
|
|
|
|
|
|
||
Press |
2 |
7 times. |
= |
B |
|
|
|
|
|
|
|
|
|
|
|
|
|
|
|
|
|
|
|
|
||
Press |
4 |
12 times. |
= B |
i |
|
|
|
|
|
|
|
|
|||||
|
|
|
|
|
|
|
||
Press |
5 |
11 times. |
= B i |
l |
|
|
||
|
|
|
|
|
|
|
|
|
|
|
|
|
|
|
|
||
Press |
|
1 time. |
= B i |
l |
|
|
||
|
|
|
|
|
|
|
|
|
|
|
|
|
|
|
|
||
Press |
5 |
11 times. |
= B i |
l |
l |
|
||
|
||||||||
 : To move the cursor to the left
 : To move the cursor to the right
 : To delete one character
  : To insert a space
3

Telephone Operations
1 Making/Answering voice calls
Handset
Making calls
1.Lift the handset or press  (speakerphone).
2.Dial the telephone number.
3. Talk to the other party. |
|
4.When finished, replace the handset or press (speakerphone).
Answering calls |
|
|||||
1. |
When the phone rings, lift the handset or press |
|
|
|
|
|
|
|
|
|
|||
|
(speakerphone). |
|
||||
2. |
Talk to the other party. |
|||||
3.When finished, replace the handset or press (speakerphone).
Note: |
|
When a slow beep or no sound is heard, press (start/copy) and replace the handset.
The unit will start fax receiving.
2 Paging the portable handset
Handset
1. Lift the handset or press  (speakerphone).
2. |
Press |
|
|
(portable handset). |
|
||
3. |
Talk to the portable handset user. |
|
|
4.When finished, replace the handset or press (speakerphone).
Transferring calls to the portable handset
1.Press  (portable handset) while you are talking to an outside party.
–The portable handset is paged.
2.When the portable handset user answers, tell them a call is being transferred, then hang up.
–The portable handset user can talk to the outside party.
Note:
When the portable handset user does not answer, press (portable handset) again.
You can talk to the outside party.
3 Automatic dialing
1 2 3
4 5 6
7 8 9
0

Automatic dialing
1. |
Rotate |
(search dial) until the name you want to |
||||
|
dial appears on the display. |
|
|
|||
|
|
|
||||
2. |
Lift the handset or press |
|
|
|
(speakerphone). |
|
|
|
|
||||
3. |
Talk to the other party. |
|
|
|||
4.When finished, replace the handset or press  (speakerphone).
Storing a phone number
1. Press |
|
(telephone directory register/edit/erase). |
2.Enter the station name using the dialing buttons, up to 12 characters. (See “Setting your logo” on page 2.)
3. Press (telephone directory register/edit/erase). 4. Enter the phone number up to 30 digits.
5. Press (telephone directory register/edit/erase).
– To program other stations, repeat from step 2.
6. Press  (stop) when finished.
1 2 3
4 5 6
7 8 9
0

Changing the stored name or number
1.Rotate  (search dial) until the name you want to change appears on the display.
2. Press |
|
(telephone directory register/edit/erase). |
3.Press  .
.
4.Press  or
or  to move the cursor to the incorrect character, then make the correction.
5. |
Press |
|
(telephone directory register/edit/erase). |
||
6. |
Enter the correct phone number. |
|
7. |
Press |
|
(telephone directory register/edit/erase). |
||
Erasing the stored name and number
Press  in step 3 above.
4
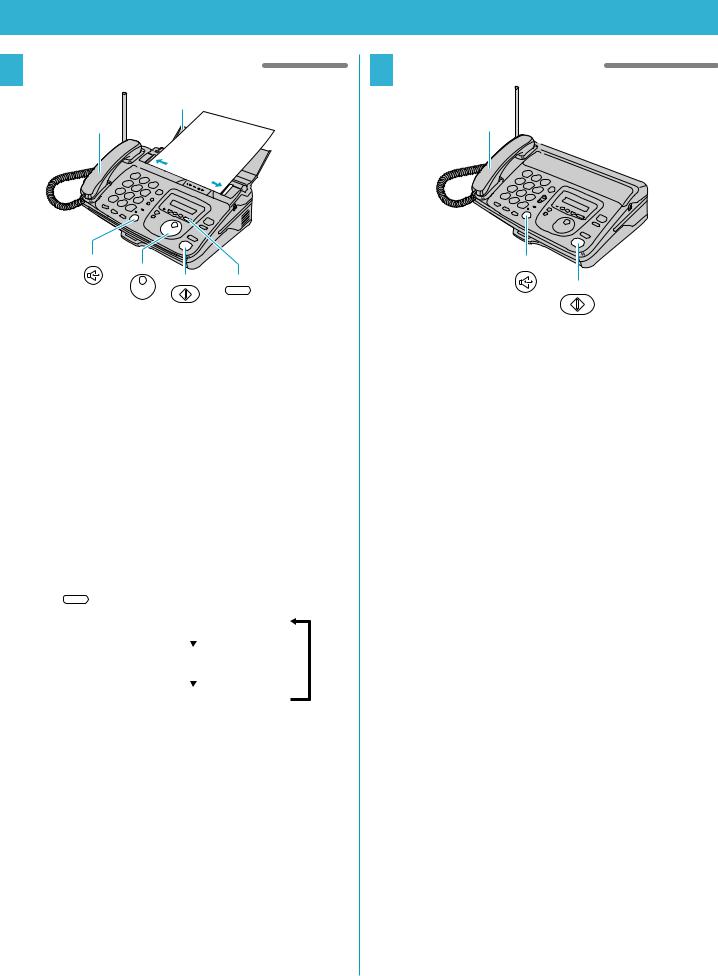
Facsimile Operations
1 Transmitting documents |
2 Receiving documents |
|
Document Tray |
|
|
Handset |
|
Handset |
|
|
|
Adjust |
the |
|
guides. |
|
|
|
|
|
Transmitting documents manually
1.Open the document tray and adjust the guides.
2.Insert the document FACE DOWN until a beep is
heard. (up to 5 sheets at a time)
3. Press  (resolution) to select the resolution.
4.Lift the handset or press  (speakerphone).
5.Dial the phone number.
6.When a fax tone is heard, press  (start/copy).
7.Replace the handset.
– The unit will start fax transmission.
Selecting the resolution
Press |
|
|
|
(resolution). |
|
||
|
|
|
|
|
= |
STANDARD |
|
|
|
|
|
|
|
|
|
|
|
|
|
|
= |
FINE |
|
|
|
|
|
|
|
|
|
|
= |
HALF TONE |
|
|
|
|
|
Transmitting documents using automatic dialing
1.Open the document tray and adjust the guides.
2.Insert the document FACE DOWN until a beep is
heard. (up to 5 sheets at a time)
3.Press  (resolution) to select the resolution.
4.Dial the phone number using the dial keys or
select the name using  (search dial).
5.Press  (start/copy).
– The unit will start fax transmission.
Receiving documents manually
1.When the unit rings, lift the handset or press  (speakerphone) to answer the call.
2.When:
–document reception is required,
–a slow beep is heard, or
–no sound is heard,
press  (start/copy).
3.Replace the handset if using it.
– The unit will start fax receiving.
5
 Loading...