


 Loading...
Owner’s Manual
4K Video Camera
Model No. HC-WXF991
HC-VX981
Please read these instructions carefully before using this product, and save this manual for future use.
Register online at http://shop.panasonic.com/support (U.S. customers only)
SQW0527

Read this first
∫ About the recording format for recording motion pictures
You can select from AVCHD*1, 4K MP4*2, MP4*2, iFrame*2 or 24p*2 recording formats to record motion pictures using this unit. (l 91)
*1 It is compatible with the AVCHD Progressive (1080/60p).
*2 It is not compatible with motion pictures recorded in AVCHD format.
AVCHD:
It is suitable for viewing on a high-definition TV or for saving to disc*3.
*3 The following methods are available for saving an image recorded in 1080/60p:
jCopy the image to a disc using the HD Writer AE 5.3.
jCopy the image to a Panasonic Blu-ray disc recorder that supports AVCHD Progressive.
≥ Blu-ray recorders are not sold in US.
4K MP4:
This is a recording format suitable for editing images.
This format can record 4K motion pictures (3840k2160/30p), which deliver a resolution four times higher than that of full high-definition motion pictures.
MP4:
This is a recording format suitable for playing back or editing on a PC.
iFrame:
This is a recording format suitable for playing back or editing on a Mac (iMovie etc.).
24p:
This allows you to record images similar to those shot on a roll of cinema film.
Images can be recorded as 4K motion pictures (3840k2160/24p) or in high-definition picture quality (1920k1080/24p).
∫ Indemnity about recorded content
Panasonic does not accept any responsibility for damages directly or indirectly due to any
type of problems that result in loss of recording or edited content, and does not guarantee any content if recording or editing does not work properly. Likewise, the above also applies in a case where any type of repair is made to the unit.
∫About Condensation
(When the lens, the viewfinder
or LCD Monitor is fogged up)
Condensation occurs when there is a change in temperature or humidity, such as when the unit is taken from outside or a cold room to a warm room. Please be careful, as it may cause the lens, the viewfinder or LCD monitor to become soiled, moldy, or damaged.
When taking the unit to a place which has a different temperature, if the unit is accustomed to the room temperature of the destination for about one hour, condensation can be prevented. (When the difference in temperature is severe, place the unit in a plastic bag or the like, remove air from the bag, and seal the bag.) When condensation has occurred, remove the battery and/or the AC adapter and leave the unit like that for about one hour. When the unit becomes accustomed to the surrounding temperature, fogginess will disappear naturally.
∫ Cards that you can use with this unit
SD Memory Card, SDHC Memory Card and SDXC Memory Card
≥4 GB or more Memory Cards that do not have the SDHC logo or 48 GB or more Memory Cards that do not have the SDXC logo are not based on SD Memory Card Specifications.
≥Refer to page 16 for more details on SD cards.
∫ For the purposes of this owner’s manual
≥SD Memory Card, SDHC Memory Card and SDXC Memory Card are referred to as the “SD card”.
- 2 -

≥The smartphone and tablet are indicated as “smartphone”.
≥Function that can be used for Motion Picture Recording Mode: 
Function that can be used for Still Picture Recording Mode: 
≥Function that can be used for the Playback Mode:
Function that can be used for the Playback Mode (motion pictures only):  Function that can be used for the Playback Mode (still pictures only):
≥Scene(s) recorded in the recording format [AVCHD]: “AVCHD scene(s)”
≥Scene(s) recorded in the recording format [4K MP4] and scene(s) recorded in 4K Photo mode: “4K MP4 scene(s)”
≥Scene(s) recorded in the recording format [MP4/iFrame], scene(s) saved in
MP4 (1920k1080/30p), MP4 (1280k720/ 30p) or MP4 (640k360/30p): “MP4/iFrame scene(s)”
≥Scene(s) recorded in the recording mode [iFrame]: “iFrame scene(s)”
≥Scene(s) recorded in the recording format [24p]: “24p scene(s)”
≥Scene(s) containing only the Main Camera’s image that was recorded separately from a simultaneously recorded normal scene when [Backup for Twin Camera] was set to [ON]: “Scene(s) recorded as Backup for Twin Camera”
≥Pages for reference are indicated by an arrow, for example: l 00
≥Model numbers are abbreviated as follows in this owner’s manual:
Model number |
Abbreviation used in |
|
this owner’s manual |
||
|
||
|
|
HC-WXF991 |
WXF991 |
[WXF991] |
HC-VX981 |
VX981 |
[VX981] |
|
|
|
This owner’s manual is designed for use with models WXF991 and VX981 . Pictures may be slightly different from the original.
≥The illustrations used in this owner’s manual show model WXF991 , however, parts of the explanation refer to different models.
≥Depending on the model, some functions are not available.
≥WXF991 and VX981 correspond to Wi-Fi® functions.
≥Features may vary, so please read carefully.
≥Not all models may be available depending on the region of purchase.
- 3 -

Contents |
|
Read this first................................................. |
2 |
Preparation |
|
Names and Functions of Main Parts............ |
7 |
Power supply................................................ |
11 |
Inserting/removing the battery............... |
11 |
Charging the battery.............................. |
12 |
Charging and recording time ................. |
13 |
Recording to a card ..................................... |
16 |
Cards that you can use with this unit..... |
16 |
Inserting/removing an SD card.............. |
17 |
Turning the unit on/off................................. |
19 |
Selecting a mode ......................................... |
20 |
Switching this unit between Recording |
|
Mode and Playback Mode..................... |
20 |
Switching this unit between Motion |
|
Picture Recording Mode and Still Picture |
|
Recording Mode .................................... |
21 |
LCD monitor/viewfinder .............................. |
22 |
How to use the touch screen................. |
22 |
Viewfinder adjustment [WXF991] .......... |
23 |
About the Touch Menu........................... |
24 |
Setting date and time................................... |
25 |
Basic |
|
Before recording.......................................... |
26 |
Recording motion pictures ......................... |
28 |
Recording still pictures............................... |
30 |
Recording still pictures in Motion Picture |
|
Recording Mode .................................... |
31 |
Registering your favorite scenes while |
|
recording 4K motion picture................... |
32 |
Motion picture/Still picture playback ......... |
33 |
Using the menu screen ............................... |
37 |
Using the Setup Menu ................................. |
38 |
Advanced (Recording) |
|
Using the zoom ............................................ |
49 |
Zoom ratio during the Still Picture |
|
Recording Mode..................................... |
49 |
HDR Movie Mode.......................................... |
50 |
Recording with the Sub Camera |
|
(Twin Camera) [WXF991] ............................. |
51 |
Changing and adjusting the settings of |
|
the Sub Camera and the Sub Window... |
54 |
Recording with the Backup for Twin |
|
Camera Function.......................................... |
57 |
Changing the Recording Mode................... |
59 |
Intelligent Auto ....................................... |
60 |
Intelligent Auto Plus............................... |
62 |
Creative Control..................................... |
62 |
HDR Movie Mode................................... |
65 |
Scene Mode........................................... |
66 |
Cinema Like Effect [WXF991]................ |
67 |
FULL HD Slow Motion Video |
|
[VX981].................................................. |
71 |
4K Photo Mode ...................................... |
71 |
Stop Motion Animation Assist ................ |
72 |
Manual recording ......................................... |
73 |
White Balance........................................ |
74 |
Manual shutter speed/iris adjustment .... |
75 |
Manual Focus adjustment...................... |
76 |
Recording with the Touch Function ........... |
79 |
Touch function icons .............................. |
79 |
Recording functions of operation icons.... |
83 |
Operation icons...................................... |
83 |
Recording functions of menus ................... |
89 |
- 4 -

Advanced (Playback) |
|
Copy/Dubbing |
Playback Operations ................................. |
103 |
Motion picture playback using |
|
operation icon...................................... |
103 |
Creating still picture from motion |
|
picture.................................................. |
104 |
Highlight & Time Frame Index ............. |
104 |
Repeat Playback ................................. |
105 |
Resuming the previous playback......... |
105 |
Setting the playback speed of |
|
FULL HD Slow Motion Video............... |
106 |
Zooming in on a still picture during |
|
playback (Playback zoom)................... |
106 |
Various playback functions ...................... |
107 |
Playing back motion pictures/still |
|
pictures by date ................................... |
107 |
4K Cropping......................................... |
108 |
Highlight Playback............................... |
112 |
Manual Edit.......................................... |
118 |
Baby Calendar..................................... |
122 |
Tagging Favorite Scene....................... |
124 |
Changing the playback settings and |
|
playing back the slide show................. |
125 |
Playing back still pictures recorded in |
|
Stop Motion Animation Assist Mode as |
|
a slide show......................................... |
127 |
Deleting scenes/still pictures ................... |
128 |
Deleting part of a scene (AVCHD/ |
|
Backup for Twin Camera).................... |
130 |
Dividing a scene (AVCHD/Backup for |
|
Twin Camera) ...................................... |
131 |
Dividing a scene to partially delete |
|
(4K MP4, MP4/iFrame)........................ |
132 |
Protecting scenes/still pictures ............ |
133 |
Convert to MP4........................................... |
134 |
Slow speed conversion............................. |
136 |
Watching Video/Pictures on your TV ....... |
137 |
Connecting with an HDMI micro cable ... |
139 |
Listening in 5.1 channel sound |
|
(AVCHD).............................................. |
140 |
Playback using VIERA Link ...................... |
140 |
Copying/playing back with a USB HDD ... |
142 |
Preparing for copying/playing back...... |
142 |
Simple copy ......................................... |
145 |
Copy selected files............................... |
145 |
Playing back the USB HDD ................. |
146 |
Dubbing with a Blu-ray disc recorder, |
|
video device, etc. ....................................... |
148 |
Using the Eye-Fi™ card............................. |
152 |
Wi-Fi |
|
Wi-Fi® function ........................................... |
155 |
[Link to Cell] ............................................... |
157 |
Preparations before using |
|
[Link to Cell] ......................................... |
158 |
Using [Link to Cell] with a direct |
|
connection............................................ |
159 |
Using [Link to Cell] with a wireless |
|
access point connection....................... |
160 |
About [Link to Cell]............................... |
161 |
[Baby Monitor]............................................ |
163 |
Preparations before using |
|
[Baby Monitor]...................................... |
163 |
Using [Baby Monitor]............................ |
164 |
[Home Cam]................................................ |
166 |
Preparations before using |
|
[Home Cam]......................................... |
166 |
Using [Home Cam]............................... |
167 |
[DLNA Play] ................................................ |
171 |
Preparations before using |
|
[DLNA Play] ......................................... |
171 |
Playing back on a TV........................... |
172 |
[Copy].......................................................... |
173 |
Preparations before using [Copy] ........ |
173 |
Copying to a PC................................... |
175 |
[Live Cast]................................................... |
177 |
Preparations before using |
|
[Live Cast]............................................ |
178 |
Broadcasting live.................................. |
179 |
Install the “Image App”.............................. |
183 |
Setting Up a Wi-Fi Connection.................. |
184 |
Using the [Wi-Fi Setup Wizard] to set |
|
up a connection.................................... |
185 |
Connecting to a wireless access |
|
point..................................................... |
186 |
Setting up a direct connection to a |
|
smartphone.......................................... |
189 |
- 5 -

Connecting from the history................. |
191 |
If the Wi-Fi connection cannot be |
|
established .......................................... |
192 |
How to Use the [Wi-Fi Setup] Menu ......... |
194 |
Wireless Twin/Multi-Camera |
|
Wireless Twin/Multi-Camera function ...... |
200 |
Notes on the Wireless Twin/ |
|
Multi-Camera function ......................... |
202 |
Using a Smartphone as a Wireless Sub |
|
Camera........................................................ |
203 |
When connecting a smartphone to this |
|
unit as a Wireless Sub Camera for the |
|
first time (To use the Wireless Twin |
|
Camera function)................................. |
203 |
When connecting a smartphone to this |
|
unit as a Wireless Sub Camera for the |
|
first time (To use the Wireless |
|
Multi-Camera function) ........................ |
207 |
When connecting for the second |
|
time or later.......................................... |
210 |
Terminating the connection.................. |
211 |
Recording with a Wireless Sub Camera |
|
(Wireless Twin/Multi-Camera)................... |
212 |
Screen display when using a Wireless |
|
Sub Camera ........................................ |
212 |
Changing the Wireless Twin Camera |
|
settings ................................................ |
215 |
Changing the Wireless Multi-Camera |
|
settings ................................................ |
216 |
If the Wi-Fi connection cannot be |
|
established (Wireless Twin/ |
|
Multi-Camera)............................................. |
220 |
With a PC |
|
What you can do with a PC ....................... |
221 |
Before Installing HD Writer AE 5.3....... |
223 |
Operating environment.............................. |
225 |
Installation .................................................. |
228 |
Connecting to a PC.................................... |
229 |
About the PC display ........................... |
231 |
Starting HD Writer AE 5.3 .......................... |
232 |
Reading the operating instructions of |
|
the software applications ..................... |
232 |
If using Mac (mass storage)...................... |
233 |
Others |
|
Indications .................................................. |
234 |
Messages.................................................... |
238 |
About recovery..................................... |
239 |
Troubleshooting......................................... |
240 |
Cautions for use......................................... |
246 |
About copyright ......................................... |
250 |
Recording modes/approximate |
|
recordable time .......................................... |
251 |
Approximate number of recordable |
|
pictures ....................................................... |
252 |
Optional accessories................................. |
254 |
About the Remote Pan Tilt Cradle ....... |
255 |
- 6 -
Preparation
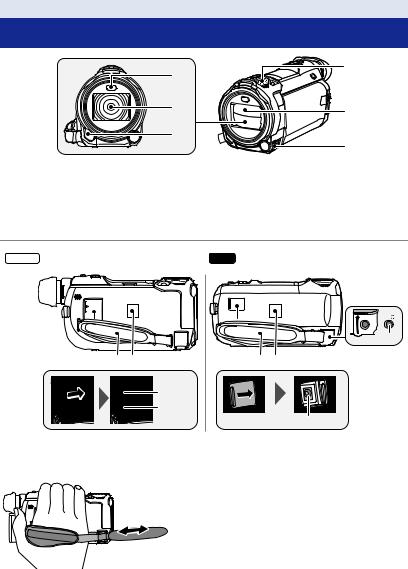
Names and Functions of Main Parts
1 |
4 |
|
|
2 |
5 |
|
|
3 |
6 |
|
1 Video light (l 86, 102)
2Lens (LEICA DICOMAR)
≥ For information on how to attach the
supplied lens hood, refer to page 27.
3 Infrared light (l 86)
4Internal microphones
5Lens cover
≥The lens cover opens in Motion Picture Recording Mode or Still Picture Recording Mode. (l 20)
6Multi Manual Dial [CAMERA FUNCTION] (l 73, 100)
WXF991 |
VX981 |
9 |
7 |
8 |
7 |
8 |
 9
9  10
10
7Grip belt
Adjust the length of the grip belt so that it fits your hand.


1Flip the belt.
2 Adjust the length.
3Replace the belt.
10
8Wi-Fi Transmitter (l 156)
9Headphone terminal [  ] (l 88)
≥Excessive sound pressure from earphones and headphones can cause hearing loss.
≥Listening at full volume for long periods may damage the user’s ears.
10 DC input terminal [DC IN] (l 12)
≥Do not use any other AC adaptors except the supplied one.
- 7 -

WXF991 |
VX981 |
11 |
21 22 |
|
|
|
12 |
|
|
|
13 |
|
12 |
|
14 |
|
|
|
|
|
13 |
|
16 |
|
14 |
|
|
|
15 |
|
15 |
|
16 |
|
|
|
|
|
17 |
18 |
19 |
17 |
18 |
19 |
20 |
21
 20
20
11 |
WXF991 only |
|
Recording mode selector button |
||
[ |
/4K PHOTO/ |
] (l 21) |
12Recording/playback button [ /
/  ] (l 20)
13HDR button [
 ] (l 50)
14Wi-Fi button [Wi-Fi]
(l 157, 163, 166, 171, 173, 177, 191, 194, 203, 207)
15Battery release lever [BATT] (l 11)
16Power button [ 
 ] (l 19)
17USB terminal [
 ] (l 142, 149, 229)
18Micro HDMI connector [HDMI] (l 137)
19A/V connector [A/V] (l 137, 151)
20Microphone terminal [MIC]
≥A compatible plug-in powered microphone can be used as an external microphone.
≥If you connect an external microphone when a setting other than [AUTO] is selected for
[MIC LEVEL] (l 99),  (Microphone input level meter) will be displayed.
≥When the unit is connected with the AC adaptor, sometimes noise may be heard
depending on the microphone type. In this case, please switch to the battery for the power supply and the noise will stop.
21Speaker
22VX981 only
Shoe adaptor release lever
[SHOE ADAPTOR RELEASE] (l 254)
- 8 -

WXF991 |
VX981 |
28
23 |
24 |
25 26 27 |
23 LCD monitor (Touch screen) (l 22)
≥ It can open up to 90o.

≥ It can rotate up to 180o A towards the lens or 90o B towards the opposite direction.
24Battery holder (l 11)
25Shoulder strap fixture
26Recording start/stop button (l 28)
27Status indicator (l 19, 184)
23 32 |
24 |
25 26 27 |
28 WXF991 only
Viewfinder (l 22)
 29 30 31
29WXF991 only
Eyecup
≥Keep the Eyecup out of reach of children to prevent swallowing.
30WXF991 only
Eyecup mount (l 27) 31 WXF991 only
Diopter adjustment dial (l 23) 32 VX981 only
Shoe adaptor mounting part [SHOE ADAPTOR] (l 254)
WXF991
33
34
33 Sub Camera (l 51) |
34 Sub Camera dial (l 52) |
- 9 -

WXF991 |
VX981 |
35 |
|
|
35 |
37 |
36 |
36 |
38 |
37 |
|
38 |
|
39 |
40 |
41 |
35 Tripod receptacle
≥ Attaching a tripod with a screw length of 5.5 mm (0.22 q) or more may damage the unit.
36Access lamp [ACCESS] (l 18)
37SD card cover (l 17)
38Card slot (l 17)
39Photoshot button [  ] (l 30)
40Zoom lever [W/T] (In Motion Picture Recording Mode or Still Picture
Recording Mode) (l 49)/
Thumbnail display switch [
 /
/ ]/ Volume lever [sVOLr] (In Playback
Mode) (l 35)
39 40
41 WXF991 only
Accessory shoe cover
42
≥Close this cover when not using the accessory shoe.
42 WXF991 only
Accessory shoe
≥You can attach a variety of optional accessories to the shoe adaptor. For information on how to attach and use those accessories, refer to their manuals.
- 10 -
Preparation
Power supply
∫ About batteries that you can use with this unit
The battery that can be used with this unit is VW-VBT190/VW-VBT380.
≥The unit has a function for distinguishing batteries which can be used safely. The dedicated battery (VW-VBT190/VW-VBT380) supports this function. The only batteries suitable for use with this unit are genuine Panasonic products and batteries manufactured by other companies and certified by Panasonic. Panasonic cannot in any way guarantee the quality, performance or safety of batteries which have been manufactured by other companies and are not genuine Panasonic products.
It has been found that counterfeit battery packs which look very similar to the genuine product are made available to purchase in some markets. Some of these battery packs are not adequately protected with internal protection to meet the requirements of appropriate safety standards. There is a possibility that these battery packs may lead to fire or explosion. Please be advised that we are not liable for any accident or failure occurring as a result of use of a counterfeit battery pack. To ensure that safe products are used we would recommend that a genuine Panasonic battery pack is used.
Inserting/removing the battery
≥ Press the power button to turn off the unit. (l 19)
Install the battery by inserting it in the direction shown in the figure.
Removing the battery
Be sure to hold down the power button until the status indicator goes off. Then remove the battery while supporting the unit to prevent it from dropping.
Move the battery release lever in the direction indicated by the arrow and remove the battery when unlocked.
Insert the battery until it clicks and locks.

- 11 -
Charging the battery
When this unit is purchased, the battery is not charged. Charge the battery fully before using this unit for the first time.
The unit is in the standby condition when the AC adaptor is connected. The primary circuit is always “live” as long as the AC adaptor is connected to an electrical outlet.
Important:
≥Do not use the AC adaptor/DC cable with any other equipment as it is designed only for this unit. Also, do not use the AC adaptor/DC cable from other equipment with this unit.
≥The battery will not be charged if the unit is turned on.
≥It is recommended to charge the battery in a temperature between 10 oC and 30 oC (50 oF and 86 oF). (The battery temperature should also be the same.)


ADC input terminal
1 Connect the DC cable to the AC adaptor and to the DC input terminal of this unit.
≥ Insert the plugs as far as they will go.
2 Insert the AC adaptor into an AC outlet.
≥The status indicator (l 9) will flash red at an interval of approximately 2 seconds (approximately 1 second on, approximately 1 second off), indicating that charging has begun.
It will turn off when the charging is completed.
∫ Connecting to the AC outlet
It is possible to use this unit with power supplied from the AC outlet by turning on the unit with the AC adaptor connected.
Even when you use the AC adaptor for recording images, keep the battery connected. This allows you to continue the recording even if a power failure occurs or the AC adaptor is unplugged from the AC outlet by accident.
∫ To charge by connecting to other device
It is possible to charge by connecting to other device with the USB cable (supplied). Please refer to page 230.
≥If the status indicator flashes at a particularly fast or slow rate, refer to page 247.
≥We recommend using Panasonic batteries (l 13).
≥If you use other batteries, we cannot guarantee the quality of this product.
≥Do not heat or expose to flame.
≥Do not leave the battery(ies) in a car exposed to direct sunlight for a long period of time with doors and windows closed.
-12 -

Charging and recording time
∫ Charging/Recording time
≥Temperature: 25 oC (77 oF)/humidity: 60%RH
≥When using the LCD monitor
≥The indicated charging time is for when the battery has been discharged completely. Charging time and recordable time vary depending on the usage conditions such as high/ low temperature.
≥Charging times in parentheses are when charging from the USB terminal.
For the WXF991
≥Maximum continuous recordable times and actual recordable times in round parentheses are the values when the viewfinder is used.
≥Maximum continuous recordable times and actual recordable times in square parentheses are the values when recording is performed with the Sub Camera in combination with the LCD monitor*1.
*1 These include times when  is displayed on the screen.
Battery model |
|
|
|
Maximum |
Actual |
|
number |
Charging |
Recording |
Recording |
continuous |
||
recordable |
||||||
[Voltage/Capacity |
time |
format |
mode |
recordable |
||
time |
||||||
(minimum)] |
|
|
|
time |
||
|
|
|
|
|||
|
|
|
|
|
|
Supplied battery/ |
|
VW-VBT190 |
2 h 20 min |
(optional) |
(5 h 20 min) |
[3.6 V/1940 mAh] |
|
|
|
|
|
1 h 25 min |
45 min |
|
[4K MP4] |
[2160] |
(1 h 30 min) |
(45 min) |
|
|
|
[1 h 5 min] |
[35 min] |
|
|
|
|
|
|
|
[1080/50M], |
1 h 40 min |
50 min |
|
|
(1 h 45 min) |
(55 min) |
||
|
[1080/28M] |
|||
|
[1 h 15 min] |
[40 min] |
||
|
|
|||
|
|
|
|
|
[MP4/ |
|
2 h |
|
|
[720] |
(2 h 5 min) |
|
||
iFrame] |
1 h |
|||
|
[1 h 25 min] |
|||
|
|
(1 h 5 min) |
||
|
|
|
||
|
|
2 h |
||
|
|
[45 min] |
||
|
[iFrame] |
(2 h 10 min) |
||
|
|
|||
|
|
[1 h 30 min] |
|
|
|
|
|
|
|
|
[1080/60p], |
1 h 40 min |
|
|
|
(1 h 45 min) |
|
||
|
[PH] |
|
||
|
[1 h 15 min] |
|
||
|
|
|
||
|
|
|
50 min |
|
|
|
1 h 40 min |
||
[AVCHD] |
[HA], [HG] |
(1 h 50 min) |
(55 min) |
|
|
|
[1 h 15 min] |
[40 min] |
|
|
|
|
|
|
|
|
1 h 40 min |
|
|
|
[HE] |
(1 h 50 min) |
|
|
|
|
[1 h 20 min] |
|
|
|
|
|
|
|
|
[2160/24p] |
1 h 35 min |
50 min |
|
|
(1 h 40 min) |
(50 min) |
||
[24p] |
|
|||
|
|
|
||
[1080/24p] |
2 h |
1 h |
||
|
||||
|
(2 h 10 min) |
(1 h 5 min) |
||
|
|
- 13 -

Battery model |
|
|
|
Maximum |
Actual |
|
number |
Charging |
Recording |
Recording |
continuous |
||
recordable |
||||||
[Voltage/Capacity |
time |
format |
mode |
recordable |
||
time |
||||||
(minimum)] |
|
|
|
time |
||
|
|
|
|
|||
|
|
|
|
|
|
VW-VBT380 |
3 h 45 min |
|
(optional) |
||
(9 h 45 min) |
||
[3.6 V/3880 mAh] |
||
|
||
|
|
|
|
3 h 5 min |
1 h 35 min |
|
[4K MP4] |
[2160] |
(3 h 15 min) |
(1 h 40 min) |
|
|
|
[2 h 25 min] |
[1 h 15 min] |
|
|
|
|
|
|
|
|
3 h 30 min |
1 h 50 min |
|
|
[1080/50M] |
(3 h 45 min) |
(1 h 55 min) |
|
|
|
[2 h 40 min] |
[1 h 25 min] |
|
|
|
|
|
|
|
|
3 h 35 min |
1 h 50 min |
|
|
[1080/28M] |
(3 h 50 min) |
(2 h) |
|
[MP4/ |
|
[2 h 45 min] |
[1 h 25 min] |
|
iFrame] |
|
4 h 10 min |
|
|
|
[720] |
(4 h 30 min) |
2 h 10 min |
|
|
|
[3 h 5 min] |
||
|
|
(2 h 20 min) |
||
|
|
|
||
|
|
4 h 15 min |
||
|
|
[1 h 35 min] |
||
|
[iFrame] |
(4 h 35 min) |
||
|
|
|||
|
|
[3 h 10 min] |
|
|
|
|
|
|
|
|
|
3 h 30 min |
1 h 50 min |
|
|
[1080/60p] |
(3 h 45 min) |
(1 h 55 min) |
|
|
|
[2 h 40 min] |
[1 h 25 min] |
|
|
|
|
|
|
|
[PH], [HA], |
3 h 35 min |
|
|
[AVCHD] |
(3 h 50 min) |
|
||
[HG] |
1 h 50 min |
|||
|
[2 h 45 min] |
|||
|
|
(2 h) |
||
|
|
|
||
|
|
3 h 40 min |
||
|
|
[1 h 25 min] |
||
|
[HE] |
(3 h 55 min) |
||
|
|
|||
|
|
[2 h 45 min] |
|
|
|
|
|
|
|
|
[2160/24p] |
3 h 25 min |
1 h 45 min |
|
|
(3 h 35 min) |
(1 h 50 min) |
||
[24p] |
|
|||
|
|
|
||
[1080/24p] |
4 h 20 min |
2 h 15 min |
||
|
||||
|
(4 h 40 min) |
(2 h 25 min) |
||
|
|
- 14 -

For the VX981
Battery model |
|
|
|
|
Maximum |
Actual |
|
number |
Charging |
Recording |
Recording |
continuous |
|||
recordable |
|||||||
[Voltage/Capacity |
time |
format |
mode |
recordable |
|||
time |
|||||||
(minimum)] |
|
|
|
|
time |
||
|
|
|
|
|
|||
|
|
|
[4K MP4] |
[2160] |
1 h 25 min |
45 min |
|
|
|
|
|
|
|
|
|
|
|
|
|
[1080/50M], |
1 h 35 min |
50 min |
|
|
|
|
[MP4/ |
[1080/28M] |
|||
|
|
|
|
|
|||
Supplied battery/ |
|
|
iFrame] |
[720], |
1 h 50 min |
55 min |
|
|
|
|
[iFrame] |
||||
VW-VBT190 |
2 h 20 min |
|
|
|
|
||
|
|
|
|
||||
(optional) |
(5 h 20 min) |
|
[1080/60p] |
1 h 35 min |
|
||
[3.6 V/1940 mAh] |
|
|
[AVCHD] |
|
|
50 min |
|
|
|
[PH], [HA], |
1 h 40 min |
||||
|
|
|
|
[HG], [HE] |
|
||
|
|
|
|
|
|
||
|
|
|
|
|
|
|
|
|
|
|
[24p] |
[2160/24p] |
1 h 35 min |
50 min |
|
|
|
|
|
|
|
||
|
|
|
[1080/24p] |
2 h |
1 h |
||
|
|
|
|
||||
|
|
|
|
|
|
|
|
Battery model |
|
|
|
|
Maximum |
Actual |
|
number |
Charging |
Recording |
Recording |
continuous |
|||
recordable |
|||||||
[Voltage/Capacity |
time |
format |
mode |
recordable |
|||
time |
|||||||
(minimum)] |
|
|
|
|
time |
||
|
|
|
|
|
|||
|
|
|
[4K MP4] |
[2160] |
3 h |
1 h 30 min |
|
|
|
|
|
|
|
|
|
|
|
|
|
[1080/50M], |
3 h 25 min |
1 h 45 min |
|
|
|
|
[MP4/ |
[1080/28M] |
|||
|
|
|
|
|
|||
|
|
|
iFrame] |
[720], |
4 h |
2 h 5 min |
|
VW-VBT380 |
|
|
|
[iFrame] |
|||
|
|
|
|
|
|||
|
|
|
|
|
|
||
(optional) |
3 h 45 min |
|
[1080/60p] |
3 h 25 min |
1 h 45 min |
||
(9 h 45 min) |
|
||||||
[3.6 V/3880 mAh] |
[AVCHD] |
[PH] |
3 h 30 min |
||||
|
|
|
|||||
|
|
|
|
|
|
||
|
|
|
|
[HA], |
3 h 30 min |
1 h 50 min |
|
|
|
|
|
[HG], [HE] |
|||
|
|
|
|
|
|
||
|
|
|
|
|
|
|
|
|
|
|
[24p] |
[2160/24p] |
3 h 20 min |
1 h 45 min |
|
|
|
|
|
|
|
||
|
|
|
[1080/24p] |
4 h 10 min |
2 h 10 min |
||
|
|
|
|
||||
|
|
|
|
|
|
|
|
≥“h” is an abbreviation for hour, “min” for minute and “s” for second.
≥These times are approximations.
≥The actual recordable time refers to the recordable time when repeatedly starting/stopping recording, turning the unit on/off, moving the zoom lever etc.
≥The batteries heat up after use or charging. This is not a malfunction.
-15 -

Battery capacity indication
≥The display changes as the battery capacity reduces.  #
#  #
#  #
#  #
#  If there is less than 3 minutes remaining, then
  will become red. If the battery discharges, then
  will flash.
≥Screen display will disappear when no touch operation is performed for a specific period of time. However, it will be constantly displayed when the remaining battery time becomes less than 30 minutes.
≥The remaining battery capacity is displayed when using the Panasonic battery that you can use for this unit. The actual time can vary depending on your actual use.
≥When using the AC adaptor or batteries made by other companies, the remaining battery capacity will not be shown.
Preparation
Recording to a card
The unit can record still pictures or motion pictures to an SD card. To record to an SD card, read the following.
Cards that you can use with this unit
Card type |
Capacity |
SD Memory Card |
512 MB to 2 GB |
SDHC Memory Card |
4 GB to 32 GB |
SDXC Memory Card |
48 GB to 128 GB |
≥Please check the latest information on the support website below. http://panasonic.jp/support/global/cs/e_cam
(This website is in English only.)
≥When using an SDHC Memory Card/SDXC Memory Card with other equipment, check the equipment is compatible with these Memory Cards.
≥An Eye-Fi X2 series SD card is required to use functions related to Eye-Fi. (l 152)
≥We do not guarantee the operation of SD cards other than the ones above. Further, SD cards with a capacity of less than 32 MB cannot be used for motion picture recording.
≥Operation is not guaranteed for all SD cards.
≥4 GB or more Memory Cards that do not have the SDHC logo or 48 GB or more Memory Cards that do not have the SDXC logo are not based on SD Memory Card Specifications.
≥When the write-protect switch A on SD card is locked, no recording,
deletion or editing will be possible on the card. ≥ Keep the Memory Card out of reach of children to prevent swallowing.
32
- 16 -

∫ About the Speed Class ratings for recording motion pictures
Depending on [REC MODE] and [REC FORMAT], the required card differs. (l 91)
Use a card that meets the following ratings of the SD Speed Class. Use of a non-compatible card may cause recording to stop suddenly.
≥SD Speed Class is the speed standards regarding continuous writing. To check the class, see the labelled side, etc. of the card.
Recording formats |
Recording modes |
Speed Class ratings |
Label examples |
4K MP4 |
[2160] |
|
24p |
All |
Class10 |
|
[1080/50M] |
|
MP4/iFrame |
[1080/28M], [720], |
|
|
[iFrame] |
Class4 or more |
AVCHD |
All |
|
≥In the following situations, you need an SD card conforming to Class 10 of the SD Speed Class Rating to record motion pictures.
Use of a non-compatible card may cause recording to stop suddenly. jFULL HD Slow Motion Video Mode (l 68, 71)
j4K Photo Mode (l 71)
jWhen [Backup for Twin Camera] is set to [ON] (l 57) j(For the WXF991 )
Slow & Quick Video Mode
Inserting/removing an SD card
When using an SD card not from Panasonic, or one previously used on other equipment, for the first time on this unit, format the SD card. (l 45) When the SD card is formatted, all of the recorded data is deleted. Once the data is deleted, it cannot be restored.
Caution:
Check that the access lamp has gone off.
WXF991


- 17 -

VX981


Access lamp [ACCESS] A
≥ When this unit is accessing the SD card, the access lamp lights up.
1 Open the SD card cover and insert (remove) the SD card into (from) the card slot B.
≥ Face the label side C in the direction shown in the illustration and press it straight in as far as it will go.
≥ Press the center of the SD card and then pull it straight out.
2 Securely close the SD card cover.
≥Securely close it until it clicks.
≥Do not touch the terminals on the back of the SD card.
≥Do not apply strong shocks, bend, or drop the SD card.
≥Electrical noise, static electricity or the failure of this unit or the SD card may damage or erase the data stored on the SD card.
≥When the card access lamp is lit, do not: jRemove the SD card
jTurn the unit off
jInsert and remove the USB cable
jExpose the unit to vibrations or shock
Performing the above while the lamp is on may result in damage to data/SD card or this unit.
≥Do not expose the terminals of the SD card to water, dirt or dust.
≥Do not place SD cards in the following areas: jIn direct sunlight
jIn very dusty or humid areas jNear a heater
jLocations susceptible to significant difference in temperature (condensation can occur.) jWhere static electricity or electromagnetic waves occur
≥To protect SD cards, return them to their cases when you are not using them.
≥About disposing of or giving away the SD card. (l 248)
-18 -
Preparation
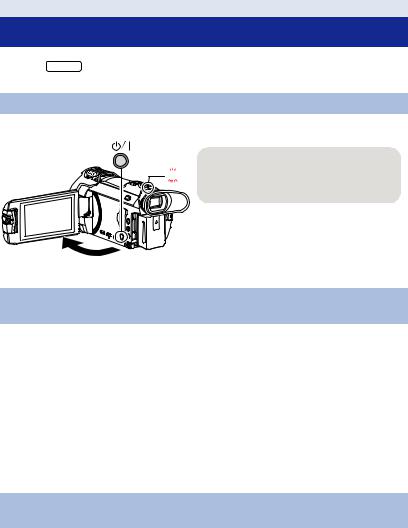
Turning the unit on/off
You can turn the unit on and off using the power button or by opening and closing the LCD monitor.
≥(For the WXF991 )
You can also turn the unit on and off using the viewfinder.
Turning the unit on and off with the power button
Open the LCD monitor and press the power button to turn on the unit.
To turn off the unit

 Hold down the power button until the status indicator goes off.
AThe status indicator lights on.
Turning the unit on and off with the LCD monitor/viewfinder [WXF991]
Opening the LCD monitor or extending the viewfinder turns on the unit. Closing the LCD monitor/ viewfinder turns off the unit.
During general use, you may find it convenient to turn the unit on/off using the LCD monitor or viewfinder.
≥The unit will not turn off unless the LCD monitor is closed and the viewfinder is retracted.
≥The unit will not turn off while recording motion pictures or connecting to Wi-Fi even if the LCD monitor is closed and the viewfinder is retracted.
≥In the following cases, opening the LCD monitor or extending the viewfinder does not turn on the unit. Press the power button to turn on the unit.
jWhen the unit is originally purchased
jWhen you have turned off the unit using the power button
≥When the viewfinder is extended, opening the LCD monitor turns off the viewfinder and turns on the LCD monitor.
Turning the unit on and off with the LCD monitor [VX981]
The unit is turned on when the LCD monitor is opened, and unit is turned off when it is closed.
During normal use, opening and closing of the LCD monitor can be conveniently used to turn the unit on/off.
≥The unit will not turn off while recording motion pictures or connecting to Wi-Fi even if the LCD monitor is closed.
-19 -
≥In the following cases, opening the LCD monitor does not turn on the unit. Press the power button to turn on the unit.
jWhen the unit is originally purchased
jWhen you have turned off the unit using the power button
∫ Overheat detection
When the internal temperature of the unit rises during use, a message will be displayed. When this happens, the unit will turn off automatically a few minutes later.
≥ Wait until the temperature has dropped before resuming use.
If you try to use the Wi-Fi function while the internal temperature of this unit is high, a message will be displayed. When this happens, the Wi-Fi function is disabled.
≥ Wait until the temperature has dropped before resuming use.
Preparation
Selecting a mode
You can switch this unit between Recording Mode (Motion Picture Recording Mode/Still Picture Recording Mode) and Playback Mode by pressing the recording/playback button.
If you touch the recording mode switching icon in Recording Mode, this unit can be switched between Motion Picture Recording Mode and Still Picture Recording Mode.
≥(For the WXF991 )
In Recording Mode, pressing the recording mode selector button allows you to switch between Motion Picture Recording Mode, 4K Photo Mode and Still Picture Recording Mode.
Motion Picture Recording Mode (l 28) |
Recording motion pictures. |
|
|
Still Picture Recording Mode (l 30) |
Recording still pictures. |
|
|
Playback Mode (l 33, 103) |
Motion picture/Still picture playback. |
|
|
Switching this unit between Recording Mode and Playback Mode
Recording/playback button
Press the button to switch this unit between Recording Mode and Playback Mode.
≥ When you turn on this unit, it starts up in Recording Mode.
- 20 -
Switching this unit between Motion Picture Recording Mode and Still Picture Recording Mode
Pressing a button to switch between Motion Picture Recording Mode and Still Picture Recording Mode
[WXF991]


Recording mode selector button
Each time you press this button, the Recording Mode
switches in the following order:
Motion Picture Recording Mode # 4K Photo Mode* #
Still Picture Recording Mode
*Still Picture Recording Mode is selected in the following situations: jWhen the Wireless Twin Camera function is in use (l 200)
jWhen [REC FORMAT] is set to [24p] (l 91) jNight Mode (l 86)
≥For information on 4K Photo Mode, refer to page 71.
Touching an icon to switch between Motion Picture Recording Mode and Still Picture Recording Mode
Touch the recording mode switching icon displayed on the LCD monitor (touch screen) to switch this unit between Motion Picture Recording Mode and Still Picture Recording Mode.
1 Press the recording/playback button to switch this unit to Recording Mode.
≥The recording mode switching icon A is displayed on the screen.
Motion Picture Recording Mode |
|
Still Picture Recording Mode |
|
2 Touch the recording mode switching icon. |
(Motion Picture Recording Mode) |
≥ Refer to page 22 for touch screen operation.
- 21 -

To display the recording mode switching icon
Display of the recording mode switching icon will disappear when no touch operation is performed for a specific period of time. To display it again, touch the screen.
≥The recording mode selector button and the recording mode switching icon are disabled when the Wireless Multi-Camera function is enabled.
≥If the recording start/stop button is pressed in Still Picture Recording Mode or Playback Mode, this unit will be switched to Motion Picture Recording Mode. During motion picture/still picture playback or in other conditions, even if the recording start/stop button is pressed, the recording mode may not be switched.
≥When you switch between Motion Picture Recording Mode, 4K Photo Mode and Still Picture Recording Mode, settings used in the original recording mode may not be maintained. (l 59)
Preparation
LCD monitor/viewfinder
How to use the touch screen
You can operate by directly touching the LCD monitor (touch screen) with your finger.
∫ Touch
Touch and release the touch screen to select icon or picture.
≥ Touch the center of the icon. ≥ Touching the touch screen will not operate while you
are touching another part of the touch screen.
∫ Slide while touching
Move your finger while pressing on the touch screen.
- 22 -

∫ About the operation icons
 /
/ /
/ /
/ :
:
Touch when changing a page or performing settings.
 :
:
Touch to return to the previous screen.
≥(For the WXF991 )
When the viewfinder is in use, on-screen icons will be displayed but disabled. Open the LCD monitor to touch them.
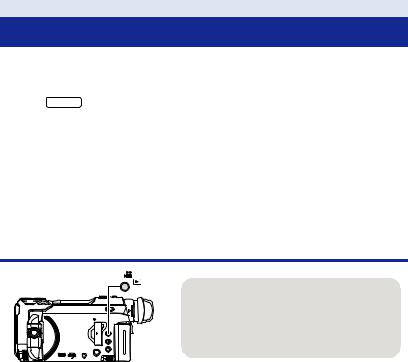
Viewfinder adjustment
[WXF991]
∫ Diopter adjustment
Adjust to make the image clear by rotating the diopter adjustment dial.
≥ Extend the viewfinder and close the LCD |
|
monitor to turn on the viewfinder. |
|
≥ The viewfinder can be raised up to |
|
approximately 60 o A. |
|
≥ When moving the viewfinder, be careful not to |
|
catch your fingers. |
|
- 23 -

About the Touch Menu
Touch  (left side)/
  (right side) of


 on the Touch Menu to switch the operation icons.
≥ It is also possible to switch the operation icons by sliding the Touch Menu right or left while touching it.
A Touch Menu
T
W
Recording Mode |
Playback Mode |
T |
FOCUS |
|
|
|
|
|
|
W |
WB |
|
|
SHTR |
|
|
|
|
|
|
|
|
IRIS |
MENU |
MENU |
|
|
|
|
|
BYou can change the operation icons to display. (l 42)
CDisplayed only in Intelligent Auto Plus Mode (l 62) and [Miniature Effect]/[8mm movie]/ [Silent movie] of the Creative Control Mode (l 62).
DDisplayed in the following situations:
jDisplayed only in [Time Lapse Rec] of the Creative Control Mode (l 62), HDR Movie Mode
(l 50), Scene Mode (l 66), Manual Mode (l 73), FULL HD Slow Motion Video Mode (l 68, 71), 4K Photo Mode (l 71), Stop Motion Animation Assist Mode (l 72)
j(For the WXF991 )
When Slow & Quick Video Mode or Slow Zoom Mode in Cinema Like Effect Mode is in use (l 67, 69)
E Displayed only when you adjust the picture quality with the Multi Manual Dial (l 100)
FDisplayed in the thumbnail view of 4K MP4 scenes. (l 33)
∫ To display the Touch Menu
Display of the Touch Menu will disappear when no touch operation is performed for a specific period of time during recording of motion picture/still picture. To display it again, touch  .
.
≥Do not touch on the LCD monitor with hard pointed tips, such as ball point pens.
-24 -

Preparation
Setting date and time
The clock is not set at the time of purchase. Make sure to set the clock.
≥When you turn on this unit, the message “Set home region and date/time.” may be displayed. Select [YES], and follow the steps below to make these settings:
jStep 3 in [SET WORLD TIME] (l 38) jSteps 2–3 of “Setting date and time”
1 Select the menu. (l 37)
MENU : [SETUP] # [CLOCK SET]
2 Touch the date or time to be set, then set the desired value using  /
/ .
.
ADisplaying the World Time setting (l 38):
 [HOME]/
  [DESTINATION]
≥ The year can be set between 2000 and 2039.
3 Touch [ENTER].
≥Touch [EXIT] to complete the setting.
≥The date and time function is driven by a built-in lithium battery.
≥If the time display becomes [- -], the built-in lithium battery needs to be charged. To recharge the built-in lithium battery, connect the AC adaptor or attach the battery to this unit. The battery is still being recharged even if the unit is off. Leave the unit as it is for approx. 24 hours and the battery will maintain the date and time for approx. 4 months.
- 25 -
Basic
Before recording
∫ Basic camera positioning
|
|
|


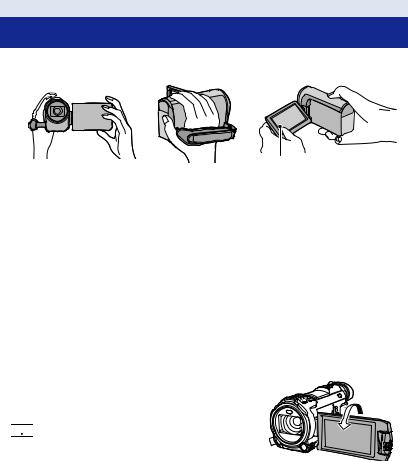
1Hold the unit with both hands.
2Put your hand through the grip belt.
3It is convenient to use the Recording button icon A when holding the unit at waist level.
≥When recording, make sure your footing is stable and there is no danger of colliding with another person or object.
≥When you are outdoors, record pictures with the sunlight behind you. If the subject is backlit, it will become dark in the recording.
≥Keep your arms near your body and separate your legs for better balance.
≥Do not cover the microphones with your hand etc.
∫ Basic motion picture recording
≥ The unit should normally be held steady when recording.
≥ If you move the unit when recording, do so slowly, maintaining a constant speed.
≥ The zoom operation is useful for recording subjects you cannot get close to, but overuse of zoom in and zoom out can make the resulting motion picture less enjoyable to watch.
∫ Recording Yourself
Rotate the LCD monitor towards the lens side.
≥ The image is horizontally flipped as if you see a mirror image. (However the image recorded is the same as a normal recording.)
≥ Only some indications will appear on the screen. When 

 appears, return the direction of the LCD monitor to
normal position and check the warning/alarm indication. (l 238)
- 26 -
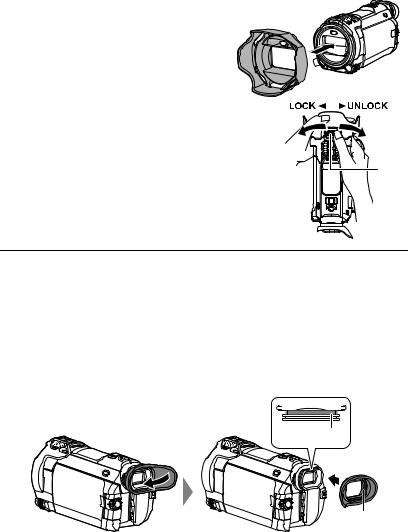
∫ Attaching/Removing the lens hood
This will reduce the extra light entering the lens in bright sunlight or backlight etc., making it possible to take clearer pictures.
How to attach the lens hood
1 Align the lens hood with this unit.
≥ Attach the lens hood so that you can see its LOCK and UNLOCK arrows from above.
2 Rotate the lens hood’s mounting ring A to the LOCK side to tighten it.
How to remove the lens hood |
|
Rotate the lens hood’s mounting ring to the UNLOCK side |
|
to loosen and remove it. |
|
|
≥When using a Filter Kit (optional) or Conversion Lens (optional), remove the lens hood.
≥Remove the lens hood when you use Night Mode ([Infrared]). (l 86)
∫ Attaching/Removing the eyecup
If you remove the eyecup, rotate it anti-clockwise by 180o and re-attach it, you can also use it with your left eye. The eyecup is attached in the orientation for right eye use at the time of purchase.
1While holding the viewfinder, pull the eyecup in the direction of arrow to remove it.
2Attach the eyecup by aligning the groove A on the eyecup mount with the inner ridge B of the eyecup.
- 27 -
Basic
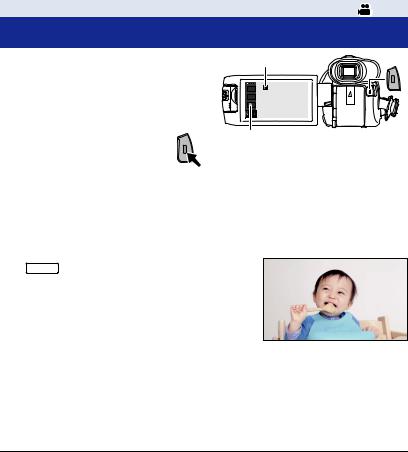
Recording motion pictures
1 |
Open the LCD monitor or extend the |
|
|
viewfinder to switch to Motion |
|
2 |
Picture Recording Mode. (l 21) |
T |
Press the recording start/stop button |
W |
|
|
||
|
to start recording. |
|
ARecording button icon
BWhen you begin recording, ; changes to ¥.
3 Press the recording start/stop button again to pause recording.
≥ Recording can also be started/stopped by touching the recording button icon.
∫ Screen indications in the Motion Picture Recording Mode
|
|
|
Recording mode |
|
|
|
|||
|
|
|
|
|
R 1h20m |
Approximate remaining recordable time |
|||
≥ When the remaining time is less than |
||||
|
|
|
1 minute, R 0h00m flashes red. |
|
|
|
|
|
|
|
|
|
Recording time elapsed |
|
|
|
|
≥ “h” is an abbreviation for hour, “m” for |
|
0h00m00s |
minute and “s” for second. |
|||
≥ Each time the unit is put into recording |
||||
|
|
|
||
|
|
|
pause, the counter display will be |
|
|
|
|
reset to 0h00m00s. |
|
|
|
|
|
|
0h00m00s
 R 1h20m
≥Screen display will disappear when no touch operation is performed for a specific period of time. To display it again, touch the screen. (l 38)
≥It will be constantly displayed when the remaining recordable time becomes less than 30 minutes.
≥If the recording/playback button is pressed during motion picture recording, the recording will stop and this unit will be switched to Playback Mode.
≥To change the recording format, change the [REC FORMAT] or [REC MODE]. (l 91)
≥Still pictures can be recorded while recording the motion picture. (l 31)
≥The images recorded between pressing the recording start/stop button to start recording and pressing it again to pause recording become one scene.
≥If the file size or recording time of a scene recorded with [REC FORMAT] set to [4K MP4], [MP4/ iFrame] or [24p] exceeds any of the values below, the scene will be divided automatically. (Recording will continue.)
jWhen using an SD Memory Card/SDHC Memory Card: Approximately 4 GB or 30 minutes jWhen using an SDXC Memory Card:
Varies depending on the setting of [REC FORMAT] and [REC MODE].
-28 -

|
|
Recording format |
Recording mode |
File size and recording time |
|||||
|
|
[4K MP4] |
|
|
[2160] |
|
|
Approx. 3 h |
|
|
|
|
|
|
|
|
|
|
|
|
|
|
|
|
[1080/50M] |
|
|
Approx. 3 h |
|
|
|
[MP4/iFrame] |
|
|
|
|
|
|
|
|
|
|
|
Other than |
|
Approx. 4 GB or 30 min |
|||
|
|
|
|
|
[1080/50M] |
|
|||
|
|
|
|
|
|
|
|
||
|
|
|
|
|
|
|
|
|
|
|
|
[24p] |
|
|
|
All |
|
|
Approx. 3 h |
|
|
|
|
|
|
|
|
||
≥ (Maximum recordable scenes of a single SD card) |
|
|
|||||||
|
|
|
|
|
|
|
|
|
|
|
|
Recording format |
|
|
[AVCHD] |
|
[4K MP4]/[MP4/iFrame]/[24p] |
||
|
|
Recordable scenes |
|
|
Approx. 3900 |
|
Approx. 89100 |
||
|
|
|
|
|
|
|
|||
|
|
Different dates (l 107) |
|
Approx. 900 |
|
Approx. 900 |
|||
|
|
|
|
|
|
|
|
|
|
≥ When the SD card contains 4K MP4 scenes, MP4/iFrame scenes, 24p scenes and still pictures, the maximum number of recordable scenes and the maximum number of different dates will be smaller than indicated in the table above.
≥ While recording is in progress, the recording will not stop even if the LCD monitor or viewfinder is closed.
≥ Put the unit in Pause mode when connecting or disconnecting an external microphone with the MIC terminal.
≥ Please refer to page 251 for detail about approximate recordable time.
≥ The maximum remaining recordable time that can be displayed for motion picture recording is 99 hours and 59 minutes. Any remaining recordable time exceeding 99 hours and 59 minutes will be displayed as “R99h59m+”. This display remains unchanged until the remaining recordable time drops to 99 hours and 59 minutes or less.
- 29 -

Basic
Recording still pictures
1 Open the LCD monitor or extend the viewfinder to switch to Still Picture Recording Mode. (l 21)
2 Press the  button halfway. (For Auto Focus only)
Focus indication:
3 Press the  button fully.
AFocus indication:
± (The white lamp flashes.): Focusing
¥ (The green lamp lights up.): When in focus No mark: When focusing is unsuccessful.
BFocus area (area inside brackets)
≥If you set the Optical Image Stabilizer function (l 80) to  ([MODE1]), then the Image Stabilizer function will be more effective. ( MEGA (MEGA Optical Image Stabilizer) will be displayed when the
  button is pressed halfway.)
≥Using a tripod is recommended when recording still pictures in dark places because the shutter speed becomes slow.
≥You can also take a picture just by touching the subject to focus. (Touch Shutter: l 82)
≥The still picture recording time may be long depending on the picture size.
≥The focus indication and the focus area may not be displayed depending on the recording conditions or the menu settings.
- 30 -
Loading...