


Oki B710DN, B720N, B730N, B720DN, B710N Setup Guide
...B710/B720/B730
Setup Guide
Guide d'installation Guía de Instalación Manual de Instalação
59405001 |
my.okidata.com |

Contents
Checking the package contents . . . . . . . . . . . . . . . 4
Installation . . . . . . . . . . . . . . . . . . . . . . . . . . . . . .4
Safety precautions . . . . . . . . . . . . . . . . . . . . . . . . . 4 Front View . . . . . . . . . . . . . . . . . . . . . . . . . . . . . . 5 Rear View . . . . . . . . . . . . . . . . . . . . . . . . . . . . . . . 5 Preparing a location for the printer . . . . . . . . . . . . . 6 Install the Face Up (Rear) Tray . . . . . . . . . . . . . . . . 6 Install the Drum-Toner Cartridge. . . . . . . . . . . . . . . 6 Load paper . . . . . . . . . . . . . . . . . . . . . . . . . . . . . . 8
Table des matières
Vérification du contenu de la boîte . . . . . . . . . . . 15
Installation . . . . . . . . . . . . . . . . . . . . . . . . . . . . . 15
Mesures de sécurité. . . . . . . . . . . . . . . . . . . . . . . . 15
Vue avant . . . . . . . . . . . . . . . . . . . . . . . . . . 16 Vue arrière. . . . . . . . . . . . . . . . . . . . . . . . . . 16
Préparation d’un emplacement pour l’imprimante . . . 17 Installation du bac (arrière) face dessus . . . . . . . . . 17 Installation de la cartouche de toner . . . . . . . . . . . . 17 Chargement du papier . . . . . . . . . . . . . . . . . . . . . . 19
Connect an Interface Cable . . . . . . . . . . . . . . . . . .9
Serial, Ethernet or Parallel . . . . . . . . . . . . . . . . . . . 9 Connect the power cord . . . . . . . . . . . . . . . . . . . . .10
Connexion d’un câble d’interface . . . . . . . . . . . . 20
Série,Ethernet ou Parallèle . . . . . . . . . . . . . . . 20
Connexion du cordon d’alimentation . . . . . . . . . . . . 21
Windows Installation. . . . . . . . . . . . . . . . . . . . . .10
Print a MenuMap. . . . . . . . . . . . . . . . . . . . . . 10 Print the Configuration Sheets . . . . . . . . . . . . 10 Installing the Printer on a Network . . . . . . . . . 10 Installing the Printer on a USB Port . . . . . . . . 11 Installing the Printer on a Parallel or Serial Port .12
Macintosh Installation . . . . . . . . . . . . . . . . . . . . .12
USB only . . . . . . . . . . . . . . . . . . . . . . . . . . . . . . .12 Install the Printer Driver . . . . . . . . . . . . . . . . . . . . .12 Add the Printer . . . . . . . . . . . . . . . . . . . . . . . . . . .12
The Control Panel. . . . . . . . . . . . . . . . . . . . . . . . .13 Navigating the Menu . . . . . . . . . . . . . . . . . . . . . .14 Setting the control panel language . . . . . . . . . . .14
Installation sous Windows . . . . . . . . . . . . . . . . . 21
Impression de MenuMap . . . . . . . . . . . . . . . . 21 Impression des feuilles de configuration . . . . . 21
Installation de l'imprimante sur un réseau . . . . . . . . 21
Installation de l'imprimante sur un port USB . . . 22 Installation de l'imprimante sur un port parallèle
ou série . . . . . . . . . . . . . . . . . . . . . . . . . . . . . 23
Installation sur Macintosh . . . . . . . . . . . . . . . . . 23
USB uniquement . . . . . . . . . . . . . . . . . . . . . . . . . . 23 Installez le pilote d’imprimante . . . . . . . . . . . . . . . . 23 Ajoutez l'imprimante . . . . . . . . . . . . . . . . . . . . . . . 23
Panneau de configuration. . . . . . . . . . . . . . . . . . 24 Navigation dans les menu. . . . . . . . . . . . . . . . . . 25
Sélection de la langue du panneau de configuration . . . . . . . . . . . . . . . . . . . . . . . . . . . 25
Contenido
Comprobación del contenido del embalaje . . . . . 26
Instalación . . . . . . . . . . . . . . . . . . . . . . . . . . . . . .26
Precauciones de seguridad . . . . . . . . . . . . . . . . . . .26
Vista frontal . . . . . . . . . . . . . . . . . . . . . . . . . 27
Vista posterior. . . . . . . . . . . . . . . . . . . . . . . . . . . .27 Preparación de una ubicación para la impresora . . . .28 Instalación de la bandeja de salida boca arriba
(posterior). . . . . . . . . . . . . . . . . . . . . . . . . . . .28 Instalación del cartucho de tóner del tambor . .28 Carga del papel . . . . . . . . . . . . . . . . . . . . . . . . . . .30
Conecte un cable de interfaz . . . . . . . . . . . . . . . .31
Serie, Ethernet o Paralelo . . . . . . . . . . . . . . . 31
Conexión del cable de alimentación . . . . . . . . . . . . .32
Instalación en Windows. . . . . . . . . . . . . . . . . . . .32
Imprima un mapa de menús . . . . . . . . . . . . . 32 Imprima las hojas de configuración. . . . . . . . . 32 Instalación de la impresora en una red . . . . . . 32
Instalación de la impresora en un puerto USB . . . . 33 Instalación de la impresora en un puerto paralelo
o serie . . . . . . . . . . . . . . . . . . . . . . . . . . . . . .34
Instalación en Macintosh . . . . . . . . . . . . . . . . . . .34
Sólo USB . . . . . . . . . . . . . . . . . . . . . . . . . . . . . . .34 Instale los controladores de la impresora . . . . . . . . .34 Agregue la impresora . . . . . . . . . . . . . . . . . . . . . . .34
Panel de control . . . . . . . . . . . . . . . . . . . . . . . . . .35 Desplazamiento por los menús . . . . . . . . . . . . . .36 Selección del idioma del panel de control . . . . . .36
Sumário
Verificação do conteúdo do pacote . . . . . . . . . . . 37
Instalação. . . . . . . . . . . . . . . . . . . . . . . . . . . . . . 37
Precauções de segurança . . . . . . . . . . . . . . . . . . . . 37
Vista frontal . . . . . . . . . . . . . . . . . . . . . . . . . 38
Vista posterior . . . . . . . . . . . . . . . . . . . . . . . . . . . 38 Preparação do local da impressora . . . . . . . . . . . . . 39 Instalação da bandeja de face para cima (posterior) . 39 Instalação do cartucho de toner com cilindro . . . . . 39 Colocação de papel . . . . . . . . . . . . . . . . . . . . . . . . 41
Conexão do cabo de interface . . . . . . . . . . . . . . 42
Serial, Ethernet ou Paralelo . . . . . . . . . . . . . . . . . . 42 Conexão do cabo de alimentação . . . . . . . . . . . . . . 43
Instalação no Windows . . . . . . . . . . . . . . . . . . . 43
Imprima o mapa de menus . . . . . . . . . . . . . . 43 Imprima as folhas de configuração . . . . . . . . . 43 Instalação da impressora em rede . . . . . . . . . 43 Instalação da impressora em porta USB . . . . . 44
Instalação da impressora em porta paralela
ou serial . . . . . . . . . . . . . . . . . . . . . . . . . . . . . 45
Instalação em Macintosh . . . . . . . . . . . . . . . . . . 45
Apenas USB . . . . . . . . . . . . . . . . . . . . . . . . . . . . 45 Instale do driver da impressora . . . . . . . . . . . . . . . 45 Adicione a impressora . . . . . . . . . . . . . . . . . . . . . . 45
Painel de controle e sistema de menu . . . . . . . . 46 Navegação nos menus . . . . . . . . . . . . . . . . . . . . 47 Seleção do idioma do painel de controle . . . . . . 47
3

Checking the package contents
Check that all items listed below are included in the printer packaging. If any items are missing or damaged, contact your dealer.
NOTE
Retain the packaging material and box for future use if there is a possibility that the printer will be moved over long distances.
•Printer
•Drum-toner cartridge
(for approximately 10,000 Letter pages at 5% coverage, i.e., 5% of the addressable print area is printed)
•250-sheet Paper Tray
•Face Up (Rear) Tray
•Power cord
•Unpacking instructions and Quick Setup Guide
•Safety and Warranty Booklet
•CD-ROM
The CD-ROM contains printer drivers, software and documentation designed to help you fully utilize your new printer. Oki has provided an interface, under MS Windows, to assist you in selecting the appropriate document or application.
Installation
Safety precautions
Electrical
This printer is 110 V or 220 – 240 V. The specifications that apply to your printer depend on your configuration.
To prevent fire or shock hazards, connect the power plug only to a properly rated, grounded power outlet.
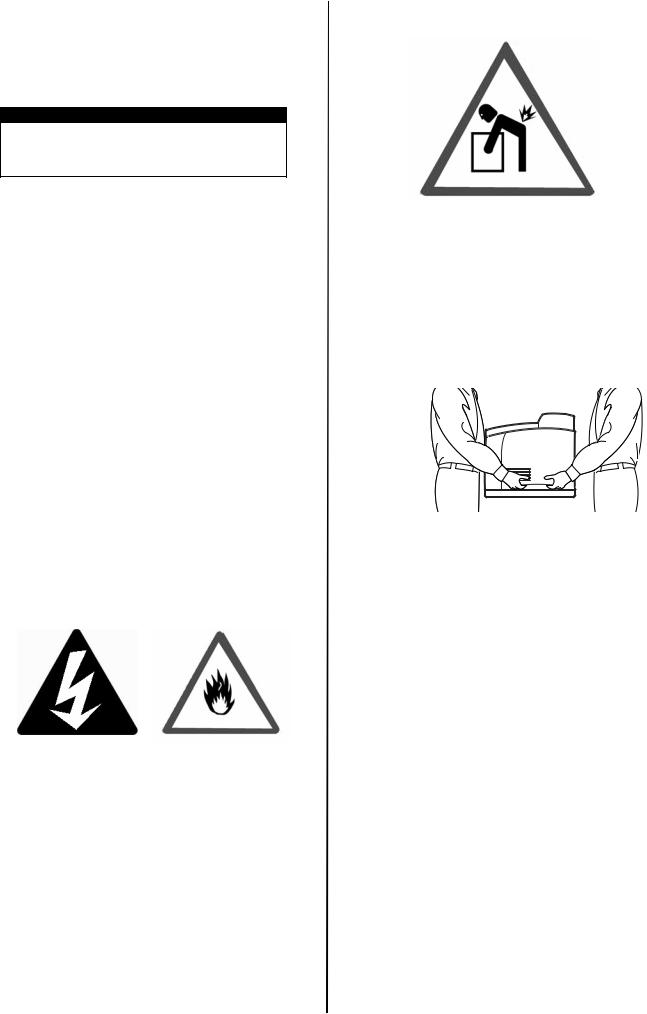
Handling the printer
•The printer is very heavy and should always be lifted by two people. The printer with consumables weighs 50 lb. (22.6 kg). Never attempt to lift the printer alone.
•To lift the printer, have two individuals facing each other from the front and rear of the printer grasp the recessed areas on each side of the printer. Do not lift the printer by grasping any area other than these recessed areas.
•When lifting the printer, maintain proper lifting posture to prevent injuries.
•Other safety information is contained in the Safety, Warranty and Regulatory Information booklet supplied with this product and should be read prior to setting up the printer.
4 / English
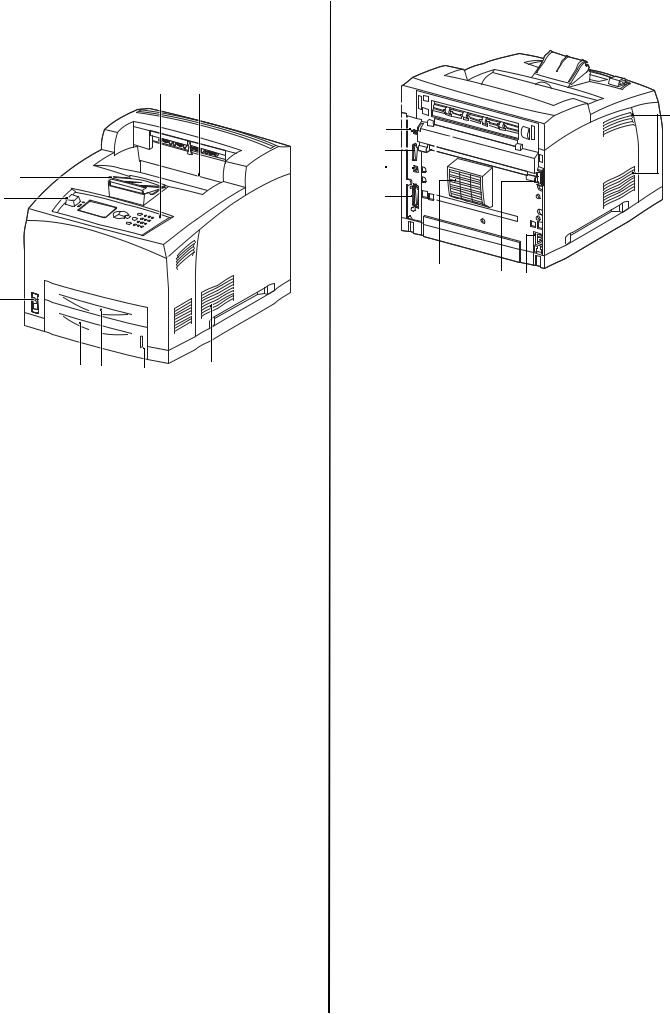
Front View
The main parts of the printer and a brief description of their functions are shown below:
2 1
8
9
7
6 |
5 |
4 |
3 |
|
|
|
1Face Down output tray
Print jobs are output here with printed side facing down.
2Operator panel
Consists of the control buttons, indicators and display.
For control panel details, refer to “The Control Panel” on page 13.
3Ventilation slots
Provide ventilation for the interior of the printer.
4Paper level indicator
Indicates the level of the remaining paper in the 550-sheet paper tray.
5Tray 1
Holds 150 sheets of paper.
6Tray 2
Holds 550 sheets of paper.
7Power switch
Switches the printer power on and off.
8Output tray extender
Flip the tray extender out to print on paper larger than Letter.
9USB Flash Drive Connector
For printing PDF and other specific types from a USB Flash Drive.
Rear View
3
13
14
12
11
3 |
15 |
10 |
|
10Power cord connector
For connecting the power cord.
11Parallel connector
For connecting a parallel cable.
12Network connector
For connecting the network cable when using the printer as a network printer. (The Network Software Kit option needs to have been installed to enable networking capability.)
13USB2 connector
For connecting a USB cable.
14Serial connector
For connecting a serial cable.
15Duplex unit connector
For connecting the duplex unit (option).
5 / English
Preparing a location for the printer
Place the machine on a level and sturdy surface that can withstand the machine weight, 50 lb. (22.6 kg). If tilted, the machine may fall over and cause injuries.
Space requirements
The printer has ventilation holes on the side and rear panels. Ensure that the printer is installed with a minimum clearance of:
•Rear: 10 inches (255 mm)
•Left Side: 8 inches (200 mm)
•Right Side: 12 inches (300 mm)
•Front: 16 inches (402 mm)
A poorly ventilated machine can cause excessive internal heat and fire.
Environmental Requirements
Ensure that the installation location meets the following conditions:
•Do not place the printer in a hot, humid, dusty or poorly ventilated environment. Prolonged exposure to such adverse conditions can result in fire or electric shock.
•Temperature range 50 – 89°F (10 – 32°C ).
•Humidity range 15 – 85% (no condensation).
•Humidity should be 70% or below at 89°F (32°C), and temperature should be 82°F (28°C) or below at 85% humidity.
NOTE
Sudden temperature fluctuations can affect print quality. Rapid heating of a cold room or moving the printer from a location with low humidity/temperature to high humidity/ temperature can cause condensation inside the printer, directly interfering with image transfer. When condensation occurs, leave the printer for at least 1 hour to acclimate to the environment before using it.
•Do not expose the printer to direct sunlight.
•Do not expose the printer to the direct draft of airconditioning or heating.
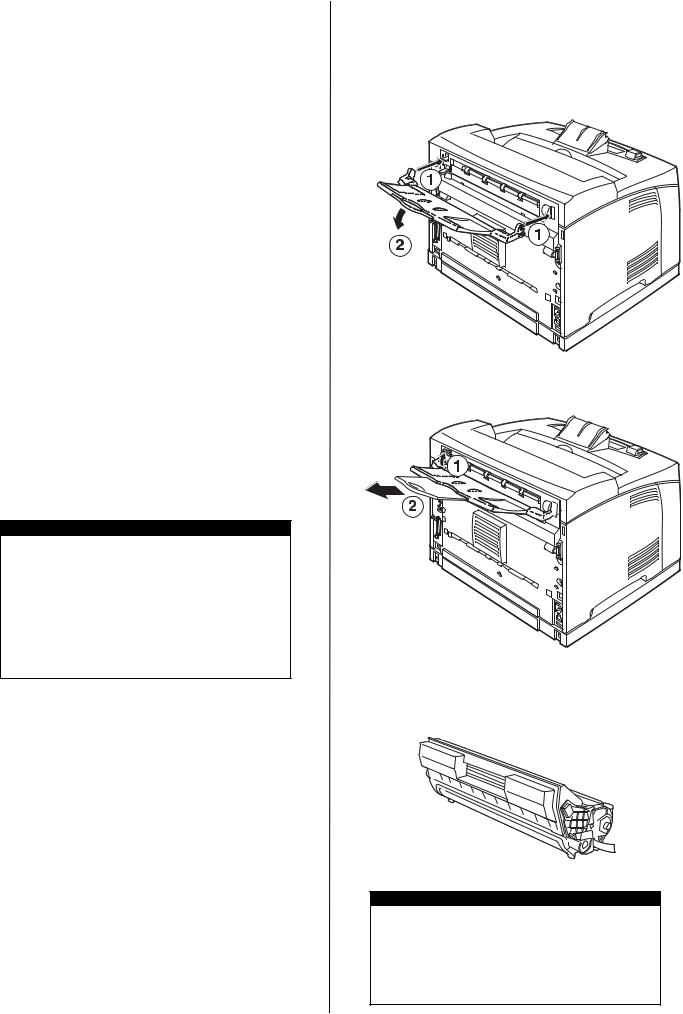
Install the Face Up (Rear)
Tray
1.Insert the right and left tabs of the face up (rear) tray into the holes at the back of the printer (1), and lower the tray into position (2).
2.Push up the rear output tray lever as shown in the diagram (1) and pull out the extension tray (2).
Install the Drum-Toner
Cartridge
NOTE
Your printer is supplied with a drum-toner cartridge with an approximate capacity of 10,000 Letter pages at 5% coverage.
Replacement drum-toner cartridges are available with approximate capacities of 15,000 pages, 20,000 pages or 25,000 pages.
6 / English

When handling the drum-toner cartridge, take note of the following points:
WARNING!
Never throw a drum-toner cartridge into an open flame as it can cause an explosion.
•Do not subject the drum-toner cartridge to direct sunlight or strong light.
•When installing the drum-toner cartridge, select a location not subject to strong light and try to finish the installation within 5 minutes.
•Do not touch the surface of the photosensitive drum. Do not let the drum-toner cartridge stand upside down or place it upside down as this may damage the drum.
•A drum shutter protects the photosensitive drum from light. Do not open the drum shutter.
•Although the toner is not harmful to the body, wash it off immediately with cold water if your hands or clothes are in contact with it.
•It is recommended to use up the drum-toner cartridge within one year of removing it from its packaging.
•Keep the drum-toner cartridge out of the reach of children.
1. Open the cover.
NOTE
When the optional offset catch tray is installed, fold the tray first before opening the cover.
WARNING!
Do not touch any parts inside the printer.
2.Take the drum-toner cartridge out of the packaging box and shake it seven or eight times as shown in the diagram.
3.Place the drum-toner cartridge on a flat surface and pull out the seal horizontally.
CAUTION!
When pulling out the seal, pull it out horizontally. The tape might break if it is pulled out diagonally.
After the seal has been pulled out, do not shake or bump the drum-toner cartridge.
4.Hold the drum-toner cartridge by the grip and insert it into the slot inside the printer.
CAUTION!
Ensure that the drum-toner cartridge is firmly located.
5. Close the cover securely.
NOTE
If the offset catch tray is folded as in Step 1, close the cover and then return the tray to its original position.
7 / English

Load paper
1.Remove the paper tray from the printer. Place it on a flat surface and remove the lid.
2.If the base plate of the paper tray is raised, push it down.
3.Squeeze the length guide and slide it to the desired paper size (1). Squeeze the right width guide and slide it to the desired paper size (2).
4.Load the paper with the side to be printed facing up and with all four corners aligned.
CAUTION!
Do not place paper over the right width guide.
Do not load paper exceeding the maximum fill line or the maximum capacity allowed.
Align the right width guide with the paper width correctly. If the right width guide is not in place, the paper will not be properly fed and this may cause paper jams.
5.Replace the lid of the paper tray and push the tray completely into the printer.
CAUTION!
The lid of the tray must be firmly closed. If not, the paper may become misaligned.
6.Depending on the types and sizes of the loaded paper, you need to configure settings on the control panel:
•Change the paper type when non-plain paper such as recycled paper, heavyweight paper or transparencies is loaded.
•Configure the paper size when custom size paper is loaded unless using Express Print, which is described under “Print Media” in the User's Guide supplied on the CD furnished with your printer.
8 / English

Connect an Interface
Cable
NOTE
Interface cables are not supplied with the printer.
Your printer has four interface connectors on the back panel.
1
2
3
4
• USB (1)
IMPORTANT!
Windows installations: Connect a USB cable only after the printer driver has been installed on the computer. See page 11.
•Serial (2)
•Network (3)
•Parallel (4)
Serial, Ethernet or Parallel (for USB Cable see page 11)
Serial
Ethernet
Parallel
For a parallel cable, lift up the wire clip on both sides to secure it after it has been inserted into the connector.
9 / English

Connect the power cord
When connecting the power cord, take heed of the information given in “Safety precautions” on page 4.
1.Ensure that the printer power switch is in the OFF <{> position.
2.Connect the power cord to the power cord connector at the back of the printer. Connect the other end of the power cord to the power outlet.
3.Press the power switch of the printer to the ON <  > position.
The power will be applied and the control panel will display that the printer is “Ready to Print”.
NOTES
>If “Found New Hardware” displays on your screen, click Cancel.
>Depending on the network environment used, it may take about one minute before the printer is ready for printing.
Windows Installation
Print a MenuMap
1.Press the <Menu> button then < > until [Information Menu] is highlighted and press <Enter>.
2.Press the <Menu> button then < > until [Information Menu] is highlighted and press <Enter>.
3.Scroll down < > to and highlight [Print Menu Map] and press <Enter> to select the highlighted menu item.
4.Press <Enter> again to execute.
A summary of the “MenuMap” prints. This shows the current configuration for each Menu item, including the network setting.
NOTE
>The layout of the [Functions] menu structure may differ depending on the (options) configuration and settings of the printer.
Print the Configuration
Sheets
1.Connect the Printer to your network via the network connection (illustrated in “Connect an Interface Cable” on page 9).
2.Turn on the Printer and wait for approximately one minute for the Network DHCP server to allocate an IP address to the Printer.
3.If your Network does not have DHCP running then it must be configured manually.
4.You can test your network connection by entering the Printer’s IP address into the browser’s Address window (see “Set the Printer Configurations via a Web Page” on page 11).
Installing the Printer on a Network
Install the Driver
1.Insert the CD in the CD-ROM drive. The CD will autorun.
If it doesn’t, click Start > Run > Browse. Browse to your CD-ROM drive, double-click Install.exe. Click OK.
2.Select your language.
3.Accept the License Agreement.
The Installer screen appears.
4.Click Install Driver.
5.Select network printer.
6.Follow the on-screen instructions.
7.When prompted, select printer emulation (PS or PCL).
10 / English
You may be required to enter the IP address for the printer. The IP address can be found on the MenuMap (printed earlier).
Test the Printer Driver Installation
To make sure the printer driver is correctly installed, print a page from any program. Reinstall the driver if the installation failed.
Activate Optional Accessories
Note: If your printer has an optional paper tray or Hard Disk Drive installed, you must enter the driver and activate it.
1.Click Start > Settings > Printers (and Faxes) on the Windows taskbar.
2.Right click the printer icon.
3.Click Properties.
4.Click the device Option tab.
5.Click [Get Information From Printer].
This will update installed device options and make them available.
Set the Printer Configurations via a Web Page
If you are working in a network environment, you can use a web browser to display the printer or job printing status and to change the settings.
Settings for the system and network ports can be configured under [Printer], [Network] and [Maintenance] on the web page.
NOTE
>The web page facility is only available when the printer is connected to the network.
>Refer to the Network User’s Guide if the web page does not appear after carrying out the steps 1 and 2 below.
1.Boot your computer, and start the web browser.
2.Enter the printer’s IP address or URL in the address input column on the web browser and press the <Enter> key.
The IP value can be found on Page 1 of the printed MenuMap under the heading “Network” (see instructions for “Print a MenuMap” on page 10).
IP Address = ###.###.###.###
When entering this number into the address of the browser you may omit leading zeros.
Installing the Printer on a USB Port
NOTE
For the USB interface, install the driver before installing the USB cable.
Install the Driver
1.Turn the printer OFF.
2.Insert the CD, in the CD-ROM drive. The CD will autorun.
If it doesn’t, click Start > Run > Browse. Browse to your CD-ROM drive, double-click Setup. Click OK.
3.Select your language. Accept the license agreement.
4.Click Install Driver.
5.Select local printer.
6.Follow the on-screen instructions.
7.When prompted, select printer emulation (PS or PCL).
8.When prompted, connect the USB cable and switch the printer ON.
Test the Printer Driver Installation
1.Click Start > Printers, and check to see if the printer icon is present.
2.If not, reinstall the driver.
3.If the Printer icon is there, highlight the icon and right click Properties, then click the Print Test Page button.
A single test page should print.
If the test page does not print:
•Check to see if the printer displays “Ready to Print”.
•Check for appropriate cable connections between the printer and the PC or Network.
If Printer Displays “Ready to print” and the cable connections are good, then reinstall the driver.
If this does not correct the problem, refer to the on-line User Guide supplied on the CD which came with the printer for further troubleshooting instructions.
11 / English

Activate Optional Accessories
Note: If your printer has an optional paper tray or Hard Disk Drive installed, you must enter the driver and activate it.
1.Click Start > Settings > SPrinters (and Faxes) on the Windows taskbar.
2.Right click the printer icon.
3.Click Properties.
4.Click the device Option tab.
5.Click [Get Information From Printer].
This will update installed device options and make them available.
Installing the Printer on a Parallel or Serial Port
NOTE
For the parallel and serial interfaces, install the driver after installing the cable.
With the interface cable installed:
1.Install the Driver
2.Test the Driver Installation
3.Activate Optional Accessories
Follow the instructions under Installing the printer on a USB Port above.
Macintosh Installation
USB only
Connect the USB cable
Install the Printer Driver
1.Turn on the printer, then turn on the computer.
2.Place the CD supplied with the printer in the CDROM drive.
3.Double-click the CD icon that appears on the desktop.
4.Open the MAC folder (OSX).
5.Double-click the Mac B7x0 Installer icon. The Installer displays with the driver pre-selected.
6.Click Install.
Add the Printer
1.Go to System Preference and click on “Print and Fax”.
2.Click Add (+) button to add the printer.
3.Select OKI USB, OKI TCP/IP, LPD, or Rendezvous/ Bonjour from the drop-down menu.
Note: If you are using USB, select OKI USB and disregard step 4.
4.Enter the printer’s IP address.
5.Select the printer model. Click Add.
6.Quit the Print and Fax.
12 / English
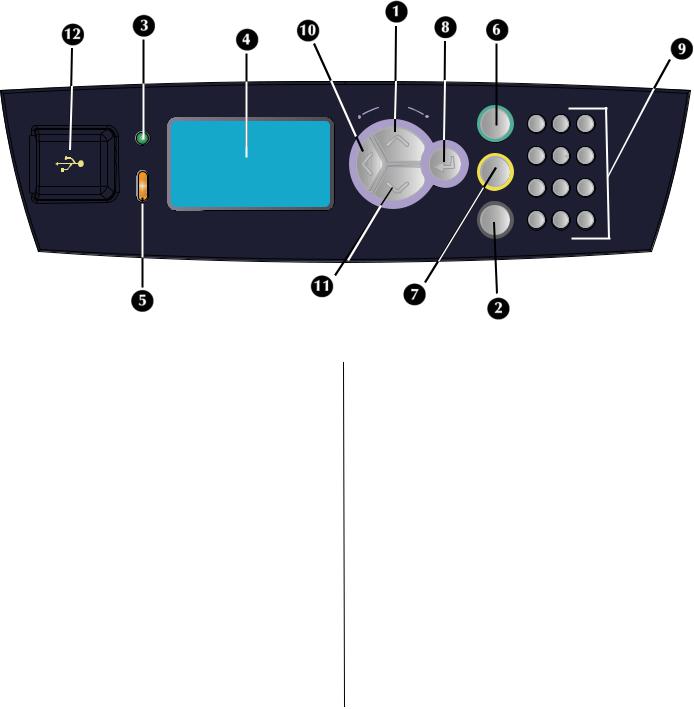
The Control Panel
For full details on the control panel, refer to the User’s Guide.
The control panel components and their functions are described below:
|
|
Menu |
On Line |
|
|
|
|
|
|
|
|
|
|
Ready |
Back |
Enter |
|
1 |
2 |
3 |
|
|
|
Cancel |
|
ABC |
DEF |
|
|
|
4 |
5 |
6 |
|
|
|
|
|
|||
|
|
|
|
GHI |
JKL |
MNO |
|
|
|
Help |
7 |
8 |
9 |
Attention |
|
|
PQRS |
TUV |
WXYZ |
|
|
|
|
||||
|
|
|
* |
|
|
|
|
|
|
|
0 |
# |
1<Menu> / < > button
Press to enter the Menu mode. Press to navigate up within the Menu structure and value.
2<Help> button
During Fault conditions (Line 5 of the display) will inform the user that the “Help” button may be pressed for more information regarding available Help Screens.
3<READY> indicator
When the light is on, the printer is ready to receive data from the computer.
4LCD display
Displays the setting items, machine status, and messages.
5<ATTENTION> indicator
When the Attention light is on, operator intervention is required.
6<On-Line> button
Press to switch from Ready status to Off-line status. When Off-line, the machine cannot receive data or process printing. Press again to resume Ready status.
7<CANCEL> button
Press to cancel printing. Press to exit Menu Mode.
8<Enter> button
Press to select the currently displayed menu item.
9<Alphanumeric> buttons
Use these to make alphanumeric entries.
10<Back> button
Press to Step backward in the Menu Structure
11 < > button
Press to navigate Down within the Menu structure and value.
12 USB Flash Drive Port
For printing PDF and other specific types from a USB Flash Drive.
13 / English

Navigating the Menu
For full details on the menu structure, refer to the User’s Guide.
Display the Menu |
<Enter> button |
|
screen |
|
|
|
|
|
Switch between the |
< > button (moves one level |
|
menu levels |
down) or < > button (moves |
|
|
||
|
one level up). |
|
|
|
|
Switch between |
< > button (displays the |
|
menus or items in the |
||
previous menu or item) or |
||
same level |
||
< > button (displays the next |
||
|
||
|
menu or item) |
|
|
|
|
To enter selected |
<Enter> button (moves to the |
|
(character) value or |
right) or <Back> button |
|
to go back and |
(moves to the left) |
|
change a (character) |
|
|
value |
|
|
|
|
When you press the <MENU> button on the control panel, you enter the printer’s menu system. At that point, the first line of the display contains the text [Functions], indicating that you are in the menu system. The second line of the display lists the active or highlighted menu item. You can scroll through the Menu Functions list by pressing the < > or <
 > buttons. Press the <Enter> button to enter the highlighted menu item, or the <Back> button to revert back to the previous menu level.
By using the button actions as indicated above, you can navigate through the menu items and their respective sub menu items list: The Upper level Menu [Functions] list contains the following menu items: Print Jobs Menu, Configuration, Information Menu, Menus and Admin Setup.
NOTE
>If you have a USB FLASH Drive installed in the USB Flash Drive Connector located on the Control Panel then [USB Drive] will show first in the Menu Functions list on the display.
NOTE
>The layout of the [Functions] menu structure may differ depending on the (options) configuration and settings of the printer.
Setting the control panel language
English is the default language. Use the following procedure to change the display language.
1.Press <Enter> to display the Menu screen.
2.Press < > until [Menus] is highlighted, then press <Enter>.
3.Press < > until [Sys Config Menu] is highlighted, then press <Enter>.
4.Press < > until [Language] is highlighted, then press <Enter>.
5.Press < > until the desired language is highlighted, then press <Enter>.
6.Press <OnLine> to complete the language setting.
14 / English
Vérification du contenu de la boîte
Vérifiez que tous les articles ci-dessous se trouvent dans l’emballage de l’imprimante. Contactez votre revendeur en cas d’élément manquant ou endommagé.
NOTE
Conservez l’emballage et la boîte si vous pensez devoir transporter l’imprimante dans le futur.
•Imprimante
•Cartouche tambour-toner
(pour environ 10 000 pages de format lettre avec couverture à 5%, c’est-à-dire que 5%de la zone d’impression est utilisée)
•Bac de papier 250 feuilles
•Bac (arrière) face dessus
•Cordon d’alimentation
•Instructions relatives au déballage et Quick Setup Guide (Guide de démarrage rapide)
•Safety and Warranty Booklet (Informations sur la garantie et la réglementation)
•CD-ROM
Le CD-ROM contient les pilotes d’imprimante, logiciel et documentation qui vous aideront à utiliser au mieux votre nouvelle imprimante. Oki a créé une interface sous MS Windows, qui vous aide à sélectionner le document ou l’application approprié.
Installation
Mesures de sécurité
Électricité
Cette imprimante fonctionne sous 110 V et 220 – 240 V. Les spécifications électriques qui
s’appliquent à votre imprimante dépendent de votre configuration.
Pour éviter de causer un incendie ou de recevoir un choc électrique, branchez la fiche de connexion uniquement sur une prise de capacité appropriée, avec mise à la terre.
Manipulation de l’imprimante
•L’imprimante est très lourde et doit toujours être soulevée par deux personnes. L’imprimante (consommables compris) pèse 22,6 kg. (50 lb). N’essayez jamais de soulever seul l’imprimante.
•Pour soulever l’imprimante, les deux personnes doivent être face à face, à l’avant et à l’arrière de l’imprimante, et saisir l’imprimante par les zones en retrait situées de chaque côté. Ne soulevez pas l’imprimante en saisissant une autre partie que ces zones en retrait.
•Lorsque vous soulevez l’imprimante, adoptez une position correcte afin d’éviter toute blessure.
•Vous trouverez d’autres informations relatives à la sécurité dans les brochures Informations de sécurité, de garantie, et de réglementation fournies avec ce produit. Vous devez prendre connaissance de ces informations avant de configurer l’imprimante.
15 / Français
 Loading...