


 Loading...
ML1100
User’s Guide
ML1120/ML1190

PREFACE
Every effort has been made to ensure that the information in this document is complete, accurate, and up-to-date. Oki Printing Solutions assumes no responsibility for the results of errors beyond its control. Oki Printing Solutions also cannot guarantee that changes in software and equipment made by other manufacturers and referred to in this guide will not affect the applicability of the information in it. Mention of software products manufactured by other companies does not necessarily constitute endorsement by Oki Printing Solutions.
While all reasonable efforts have been made to make this document as accurate and helpful as possible, we make no warranty of any kind, expressed or implied, as to the accuracy or completeness of the information contained herein.
The most up-to-date drivers and manuals are available from the Oki Printing Solutions web site:
http://www.okiprintingsolutions.com
Copyright © 2007 Oki Printing Solutions.
Oki, OKI Printing Solutions and Microline are registered trademarks of Oki Electric Industry Company, Ltd.
ENERGY STAR is a trademark of the United States Environmental Protection Agency.
Microsoft, MS-DOS and Windows are registered trademarks of Microsoft Corporation.
Other product names and brand names are registered trademarks or trademarks of their proprietors.
As an ENERGY STAR Program Participant, the manufacturer has determined that this product meets the ENERGY STAR guidelines for energy efficiency.
This product complies with the requirements of the Council Directives 89/336/EEC (EMC) and 73/23/EEC (LVD) as amended where applicable on the approximation of the laws of the member states relating to electromagnetic compatibility and low voltage.
ML1120/ML1190 User’s Guide – Preface > 2
CONTENTS
Preface . . . . . . . . . . . . . . . . . . . . . . . . . . . . . . . . . . . . 2 Notes, cautions and warnings. . . . . . . . . . . . . . . . . . . 5
Introduction . . . . . . . . . . . . . . . . . . . . . . . . . . . . . . . . 6
About this guide . . . . . . . . . . . . . . . . . . . . . . . . . . . . 6 On-line usage . . . . . . . . . . . . . . . . . . . . . . . . . . . 7 Printing pages . . . . . . . . . . . . . . . . . . . . . . . . . . . 7
Getting started . . . . . . . . . . . . . . . . . . . . . . . . . . . . . . 9
Retaining packing materials . . . . . . . . . . . . . . . . . . . . 9 Identifying component parts . . . . . . . . . . . . . . . . . . . 9 Front view . . . . . . . . . . . . . . . . . . . . . . . . . . . . . . 9 Rear view . . . . . . . . . . . . . . . . . . . . . . . . . . . . . 11 Locating your printer. . . . . . . . . . . . . . . . . . . . . . . . 12 Powering on your printer . . . . . . . . . . . . . . . . . . . . . 12 Producing a test print . . . . . . . . . . . . . . . . . . . . . . . 13
Connecting to a computer. . . . . . . . . . . . . . . . . . . . . 15
Interfaces . . . . . . . . . . . . . . . . . . . . . . . . . . . . . . . 15 Interconnection . . . . . . . . . . . . . . . . . . . . . . . . . . . 15 Installing the printer driver . . . . . . . . . . . . . . . . . . . 16 Printing a test page. . . . . . . . . . . . . . . . . . . . . . . . . 16
Printing from a computer . . . . . . . . . . . . . . . . . . . . . 17
Paper handling . . . . . . . . . . . . . . . . . . . . . . . . . . . . . 18
Loading cut sheet paper . . . . . . . . . . . . . . . . . . . . . 18 Ejecting cut sheet paper . . . . . . . . . . . . . . . . . . . . . 20 Loading continuous forms . . . . . . . . . . . . . . . . . . . . 21 Setting up continuous forms . . . . . . . . . . . . . . . . 21 Feeding continuous forms (rear feed) . . . . . . . . . . 21 Feeding continuous forms (bottom feed). . . . . . . . 25 Tearing off continuous forms . . . . . . . . . . . . . . . . . . 35 Aligning the tear-off perforations . . . . . . . . . . . . . 35 Removing continuous forms. . . . . . . . . . . . . . . . . . . 36 Setting the Paper Thickness lever . . . . . . . . . . . . . . . 38
Operating instructions . . . . . . . . . . . . . . . . . . . . . . . 40
Control panel . . . . . . . . . . . . . . . . . . . . . . . . . . . . . 40 ML1120. . . . . . . . . . . . . . . . . . . . . . . . . . . . . . . 40 ML1190. . . . . . . . . . . . . . . . . . . . . . . . . . . . . . . 42 Buttons . . . . . . . . . . . . . . . . . . . . . . . . . . . . . . . . . 44 Setting menu values . . . . . . . . . . . . . . . . . . . . . . . . 45 Confirming current settings . . . . . . . . . . . . . . . . . 45 Menu setting . . . . . . . . . . . . . . . . . . . . . . . . . . . 46
ML1120/ML1190 User’s Guide – Preface > 3
Menu items and settings . . . . . . . . . . . . . . . . . . . 47 Initialising menu settings . . . . . . . . . . . . . . . . . . 55 Adjusting TOF position . . . . . . . . . . . . . . . . . . . . . . 56 Printer style (impact mode) settings . . . . . . . . . . . . . 57
Troubleshooting . . . . . . . . . . . . . . . . . . . . . . . . . . . . 58
Clearing paper jams . . . . . . . . . . . . . . . . . . . . . . . . 58 Cut sheet paper jammed in printer. . . . . . . . . . . . 58 Continuous forms jammed in printer. . . . . . . . . . . 60 Responding to alarm conditions . . . . . . . . . . . . . . . . 62 Responding to general problems. . . . . . . . . . . . . . . . 62
Cleaning your printer . . . . . . . . . . . . . . . . . . . . . . . . 68
Printer exterior. . . . . . . . . . . . . . . . . . . . . . . . . . . . 68 Printer interior . . . . . . . . . . . . . . . . . . . . . . . . . . . . 68
Consumables and accessories. . . . . . . . . . . . . . . . . . 70
Consumables . . . . . . . . . . . . . . . . . . . . . . . . . . . . . 70 Changing a ribbon cartridge . . . . . . . . . . . . . . . . 70 Consumable order information. . . . . . . . . . . . . . . 73
Specifications . . . . . . . . . . . . . . . . . . . . . . . . . . . . . . 74
ML1120 . . . . . . . . . . . . . . . . . . . . . . . . . . . . . . . . . 74 ML1190 . . . . . . . . . . . . . . . . . . . . . . . . . . . . . . . . . 77
Index. . . . . . . . . . . . . . . . . . . . . . . . . . . . . . . . . . . . . 80 Oki Printing Solutions contact details. . . . . . . . . . . . 81
ML1120/ML1190 User’s Guide – Preface > 4

NOTES, CAUTIONS AND WARNINGS.
NOTE
A note provides additional information to supplement the main text.
CAUTION!
A caution provides additional information which, if ignored, may result in equipment malfunction or damage.
WARNING!
A warning provides additional information which, if ignored, may result in a risk of personal injury.
ML1120/ML1190 User’s Guide – Notes, cautions and warnings. > 5

INTRODUCTION
Congratulations on purchasing this Oki Printing Solutions printer!
The ML1120 (9-pin) and ML1190 (24-pin) are designed to provide highly reliable letter quality printing and high resolution graphics for the desktop/office printing environment. Both models combine state-of-the-art serial impact dot matrix printing technology with advanced materials and superior construction to provide high performance and versatility in a desktop sized unit. Careful attention to ergonomics and application needs provides user friendly operation for operators of varying technical capabilities.
ABOUT THIS GUIDE
NOTE
Images used in this manual may include optional features that your printer does not have installed.
This manual is your user’s guide (check the web site, www.okiprintingsolutions.com, for the most up-to-date version) for your printer and forms part of the overall user support listed below:
>Installation Safety booklet: to provide information for safe use of the printer.
This is a paper document that is packaged with the printer and should be read before setting up your printer.
>Set-up guide: to describe how to unpack, connect and turn on your printer.
This is a paper document that is packaged with the printer.
>This User’s Guide: to help you to become familiar with your printer and make the best use of its many features. Also included are guidelines for troubleshooting and maintenance to ensure that it performs at its best. Additionally, information is provided for adding optional accessories as your printing needs evolve.
This is an electronic document stored on the manuals CD.
ML1120/ML1190 User’s Guide – Introduction > 6
>Technical Reference Guide: to provide detailed technical information for programmers and more technical users.
This is an electronic document available on the web site www.okiprintingsolutions.com.
>Installation Guides: accompany consumable items and optional accessories to describe how to install them.
These are paper documents that are packaged with the consumables and optional accessories.
>On-line Help: on-line information accessible from the printer driver and utility software.
ON-LINE USAGE
This guide is intended to be read on screen using an Adobe Acrobat Reader. Use the navigation and viewing tools provided in Acrobat.
You can access specific information in two ways:
>In the list of bookmarks down the left hand side of your screen, click on the topic of interest to jump to the required topic. (If the bookmarks are not available, use the “Contents” on page 3.)
>In the list of bookmarks, click on Index to jump to the Index. (If the bookmarks are not available, use the “Contents” on page 3.) Find the term of interest in the alphabetically arranged index and click on the associated page number to jump to the page containing the term.
PRINTING PAGES
The whole manual, individual pages, or sections may be printed. The procedure is:
1.From the toolbar, select File > Print (or press the Ctrl + P keys).
ML1120/ML1190 User’s Guide – Introduction > 7
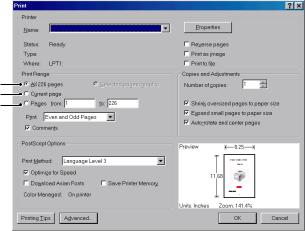
2.Choose which pages you wish to print:
(a)[All pages], (1), for the entire manual.
(b)[Current page], (2), for the page at which you are looking.
1
2
3
(c)[Pages from] and [to], (3), for the range of pages you specify by entering their page numbers.
3.Click on OK.
ML1120/ML1190 User’s Guide – Introduction > 8
GETTING STARTED
WARNING!
If you have not already done so, familiarise yourself with the content of the Installation Safety booklet supplied with your printer.
RETAINING PACKING MATERIALS
After setting up your printer according to the instructions in the Set-up Guide, retain your packing materials and container in case you ever need to ship or transport your printer.
IDENTIFYING COMPONENT PARTS
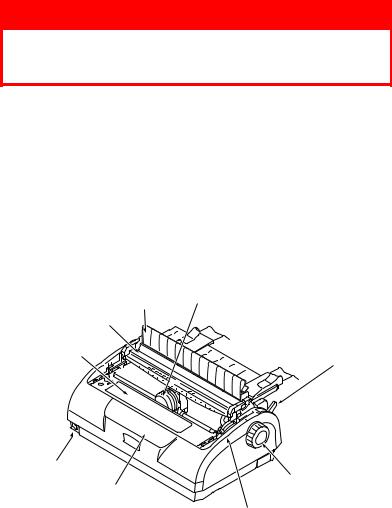
The main parts of your printer are identified and briefly explained below.
FRONT VIEW
9 1
8
7
2
6
3
5
4
1.Print Head: prints the characters on the paper.
2.Paper Type Lever: set according to the type of paper used
– cut sheet or continuous forms.
ML1120/ML1190 User’s Guide – Getting started > 9
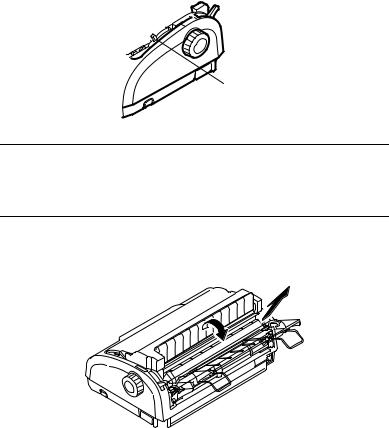
3.Platen Knob: turn to move or eject the paper.
4.Paper Thickness Lever: set according to the thickness of the paper. There is also a setting to facilitate ribbon replacement.
5.Control Panel: contains button switches and indicators (described in detail later) that allow you to operate the printer.
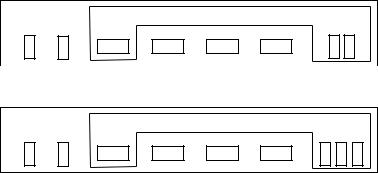
ML1120
|
|
FONT |
PITCH |
SPEED |
|
SEL ALARM |
SEL |
LF/FF |
LOAD/EJECT |
TEAR |
STATUS |
ML1190
|
|
FONT |
PITCH |
SPEED |
|
SEL ALARM |
SEL |
LF/FF |
LOAD/EJECT |
TEAR |
STATUS |
6.Power Switch: to turn the printer power ON/OFF.
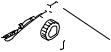
7.Ribbon Cartridge: holds the printer ribbon.
8.Pull Up Roller Assembly: aids paper exit.
9.Pull Up Guide: prevents paper skew.
ML1120/ML1190 User’s Guide – Getting started > 10
REAR VIEW
4  1
1
3 |
5 |
|
2
1.Input Tray: insert cut sheet paper for use by the printer (one sheet at a time).
2.Power connector: connect to printer power cable.
3.Paper Guides: can be adjusted as required to locate the left edge of cut sheet paper.
4.Pin Tractor: to load and feed continuous forms.
5.Rear Cover.
6
8
7
6.Serial connector: connect to serial interface cable.
7.USB connector: connect to USB interface cable.
8.Parallel connector: connect to parallel interface connector.
ML1120/ML1190 User’s Guide – Getting started > 11
LOCATING YOUR PRINTER
>Select a firm, solid, level surface on which to site your printer.
>Allow enough space around your printer (e.g. at least 60 cm from any wall) for easy access to the Platen Knob and the various paper feed paths.
>Make sure a grounded power outlet is available nearby.
POWERING ON YOUR PRINTER
1.Ensure that your printer Power Switch is set to OFF.
ML1120/ML1190 User’s Guide – Getting started > 12
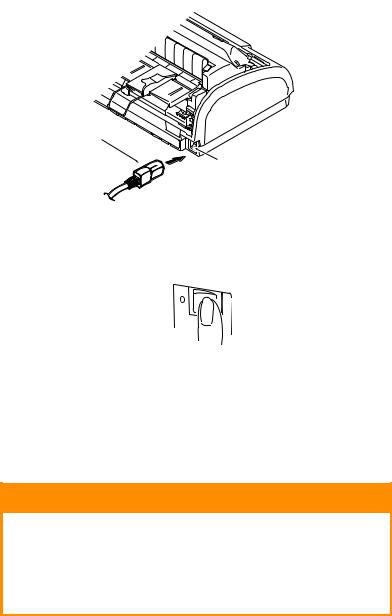
2.Connect the power cable (1) to the power connector (2) on the printer.
1
2
3.Connect the power cable to a 220/240 V AC power outlet and switch on the outlet power.
4.Turn the printer Power Switch to ON.
5.Check that the SEL and STATUS indicators on the control panel illuminate.
PRODUCING A TEST PRINT
To check that your printer is operational, produce a test print on a sheet of 80 gsm A4 paper (for example) as follows:
CAUTION!
Allow at least 5 seconds between turning the printer ON after turning it OFF. A shorter time interval between turning ON/OFF operations may cause printer power failure.
Do not turn the printer OFF while it is printing as this may result in damage to the print head.
ML1120/ML1190 User’s Guide – Getting started > 13

1.Turn the printer Power Switch to OFF.
2.Set the Paper Type Lever to cut sheet.
3.Remove the Access Cover and set the Paper Thickness Lever to position 1.
4.Press and hold the LF/FF and the LOAD/EJECT buttons and turn the Power Switch to ON. The ALARM indicator should be illuminated to indicate that there is no paper in the printer.
5.With the long side of the paper against the paper guide, insert the paper carefully into the printer. The printer will automatically grip the paper and start the test print.
NOTE
If required, you can pause the test print by pressing the SEL button and then resume the test print by again pressing the SEL button.
6.When the test print has completed, the paper is automatically ejected.
NOTE
If you want to stop the test print for any reason, press the SEL button followed by the LOAD/EJECT button to eject the paper. Turn the printer Power Switch to OFF.
ML1120/ML1190 User’s Guide – Getting started > 14

CONNECTING TO A COMPUTER
In this section you will interconnect your printer and computer, install the printer driver in your computer and print a test page.
INTERFACES
Your printer is equipped with three data interfaces:
CAUTION!
Do not use more than one of the following data interface methods to connect to your PC.
>Parallel: for direct connection to a PC. This port requires a bi-directional (IEEE 1284 compliant) parallel cable.
>Serial: for direct connection to a PC. This port requires a bi-directional RS232C serial interface cable.
>USB: for connection to a PC running Windows 98 or above. This port requires a shielded cable less than 5m long conforming to USB version 2.0.
NOTE
Interface cables are not supplied with your printer.
INTERCONNECTION
1.Ensure that both printer and computer are turned OFF.
2.Connect the required interface cable, serial (1), USB (2), or parallel (3), to the printer and then to the computer.
ML1120/ML1190 User’s Guide – Connecting to a computer > 15

Break off the tabs (4) to allow the cables to sit neatly underneath the printer.
1
4
2

 3
3
3.Turn ON the printer.
4.Turn ON the computer.
INSTALLING THE PRINTER DRIVER
Insert the Drivers CD into your computer and follow the onscreen instructions to install the printer driver for use with your printer.
PRINTING A TEST PAGE
As an example, using Windows XP:
1.Use Start > Printers and Faxes to show the Printers and Faxes window.
2.Highlight the driver for your printer.
3.Use File > Properties to show the Properties window.
4.On the General tab, click the Print Test Page button.
5.Ensure that a test page has printed, verifying your printer – computer setup.
ML1120/ML1190 User’s Guide – Connecting to a computer > 16
PRINTING FROM A COMPUTER
When printing to your printer from, for example, a Windows application on your computer, make your printing selections from the driver windows that appear on screen. These driver windows have been designed to be easy to use and intuitive while supplementary on-line help is available by clicking each window Help button.
ML1120/ML1190 User’s Guide – Printing from a computer > 17

PAPER HANDLING
This section describes how to use cut sheet paper and continuous forms in your printer.
LOADING CUT SHEET PAPER
1.Ensure that the printer is switched ON.
NOTE
If there are any continuous forms in the printer, eject them as described in “Removing continuous forms” on page 36.
2.Ensure that the Pin Tractor covers are closed to avoid the possibility of paper jams.
3.Ensure the Paper Type Lever (1) is set to Cut Sheet. 
 1
1
ML1120/ML1190 User’s Guide – Paper handling > 18
4.Set the left paper margin by adjusting the Paper Guide
(1). Position the edge of the Paper Guide (1) at the tip of the Printed Line Marker arrow (2) on the Paper Tray.
1
2
5.Remove the Access Cover and set the Paper Thickness Lever (1) to suit the paper. See “Setting the Paper Thickness lever” on page 38.
1
CAUTION!
If the Paper Thickness Lever setting does not match the paper being used, paper feeding and printing may not work properly.
6.With the printing side facing downwards and the left edge aligned with the Paper Guide (1), carefully insert the
ML1120/ML1190 User’s Guide – Paper handling > 19
paper on the Input Tray (2) into the printer until it is gripped.
1
2
NOTE
Ensure that the paper is accurately aligned along the Paper Guide to avoid the possibility of skew printing.
When printing an envelope, do not fold up the flap. A flap aligned along the Paper Guide can lead to skew printing.
EJECTING CUT SHEET PAPER
When the printer reaches the end of the cut sheet page it automatically ejects the page. If required, add another sheet for the printer to continue printing from where it left off.
To eject a cut sheet left in the printer, carry out the following:
1.Press the SEL button to put the printer off-line.
2.Press the LOAD/EJECT button and the paper is ejected to the Paper Tray.
NOTE
Paper longer than A4 length (297 mm) may overlap and possibly fall off the Paper Tray.
ML1120/ML1190 User’s Guide – Paper handling > 20
LOADING CONTINUOUS FORMS
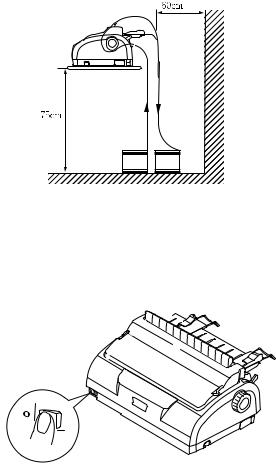
SETTING UP CONTINUOUS FORMS
To avoid paper feeding problems, carry out the following:
1.Check your printer is on a surface approximately 75 cm above the floor.
2.Position the continuous forms supply directly below the printer, no more than 3 cm left or right of the printer paper path.
3.Ensure the rear of the printer is close to and parallel with the edge of the surface and at least 60 cm from any wall.
FEEDING CONTINUOUS FORMS (REAR FEED)
1.Ensure that the printer is turned ON.
NOTE
If there is a cut sheet in the printer, eject it as described in “Ejecting cut sheet paper” on page 20.
2.Set the Paper Type Lever to Continuous Forms 
ML1120/ML1190 User’s Guide – Paper handling > 21
3.Remove the Access Cover and set the Paper Thickness Lever (1) to suit the paper. See “Setting the Paper Thickness lever” on page 38.
1
NOTE
If the Paper Thickness Lever setting does not match the paper being used, paper feeding and printing may not work properly.
4.Remove the Input Tray and Rear Cover together by gripping the Input Tray at both sides and pulling it up and away from the printer.
ML1120/ML1190 User’s Guide – Paper handling > 22
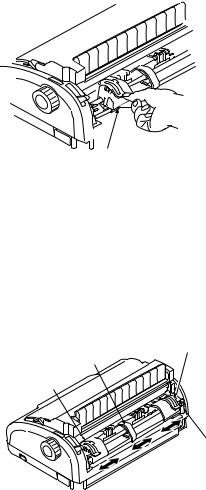
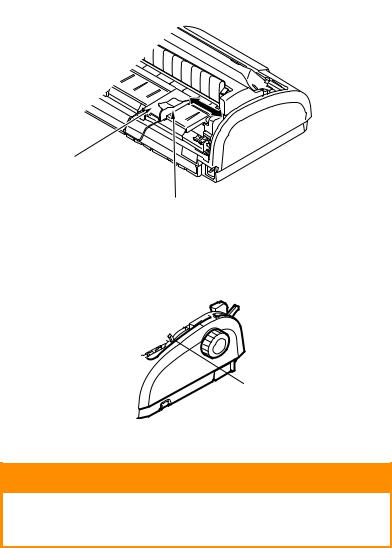
5.Lift the locking lever (1) of the left Pin Tractor and slide the Pin Tractor as required to adjust the paper position.
1
Press the locking lever back down to lock the Pin Tractor in the desired position.
6.Lift the locking lever (1) of the right Pin Tractor and slide the Pin Tractor to the required position to accommodate the width of the continuous forms to be used. Move the rear paper guide (2) to midway between the left (3) and right (4) Pin Tractors.
4
2
3
1
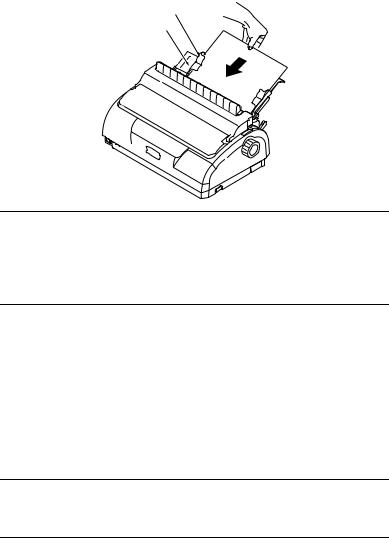
7.Open the left and right Pin Tractor covers and feed the continuous forms in the direction of the arrows, locating the sprocket holes in the forms onto the sprocket pins.
ML1120/ML1190 User’s Guide – Paper handling > 23
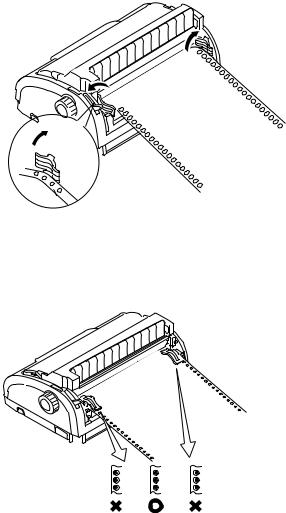
Ensure that the forms are properly aligned on the sprocket pins, then close the Pin Tractor covers.
8.Adjust the right Pin Tractor to accommodate the width of the continuous forms, taking care that the forms are held neither too loosely nor too tightly between the Pin Tractors. Press the locking lever down to lock the right Pin Tractor in the desired position.
9.Replace the Input Tray and Rear Cover by fitting the Rear Cover into the grooves at the back of the printer and
ML1120/ML1190 User’s Guide – Paper handling > 24
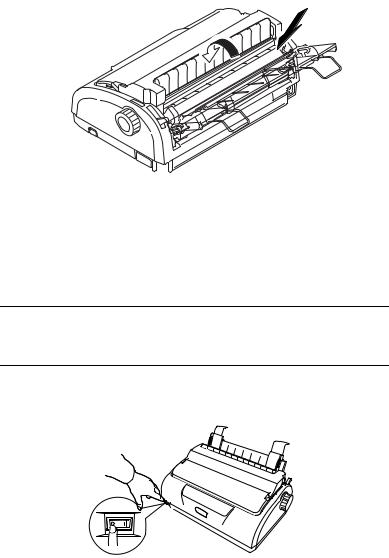
pushing gently forward until the Input Tray clips into place.
10.Replace the Access Cover.
11.Press the LOAD/EJECT button. The continuous forms will be taken into the printer and positioned at the first line print position.
FEEDING CONTINUOUS FORMS (BOTTOM FEED)
NOTE
If there is a cut sheet in the printer, eject it as described in “Ejecting cut sheet paper” on page 20.
Moving tractor assembly
1.Ensure that the printer is switched OFF.
2.Disconnect the power cord.
ML1120/ML1190 User’s Guide – Paper handling > 25
Loading...