


Installation Instructions, Second Paper Tray (500 Sheet)
Directives d' installation, Deuxième bac à papier (500 feuilles)
Instrucciones de Instalación, Segunda Bandeja de Papel (500 hojas)
Instruções de instalação, Segunda bandeja para papel (500 folhas)
English . . . . . . . . . . . . . . . . . . . . . . . . . . . . . . . . . . . . . . . . . . . . . . . . . . . . . . . . . . . . . . . . . . . . . . . . . . . . . . . 1
Français . . . . . . . . . . . . . . . . . . . . . . . . . . . . . . . . . . . . . . . . . . . . . . . . . . . . . . . . . . . . . . . . . . . . . . . . . . . . . . 3
Español . . . . . . . . . . . . . . . . . . . . . . . . . . . . . . . . . . . . . . . . . . . . . . . . . . . . . . . . . . . . . . . . . . . . . . . . . . . . . . . 5
Português . . . . . . . . . . . . . . . . . . . . . . . . . . . . . . . . . . . . . . . . . . . . . . . . . . . . . . . . . . . . . . . . . . . . . . . . . . . . . 7
Install the Tray
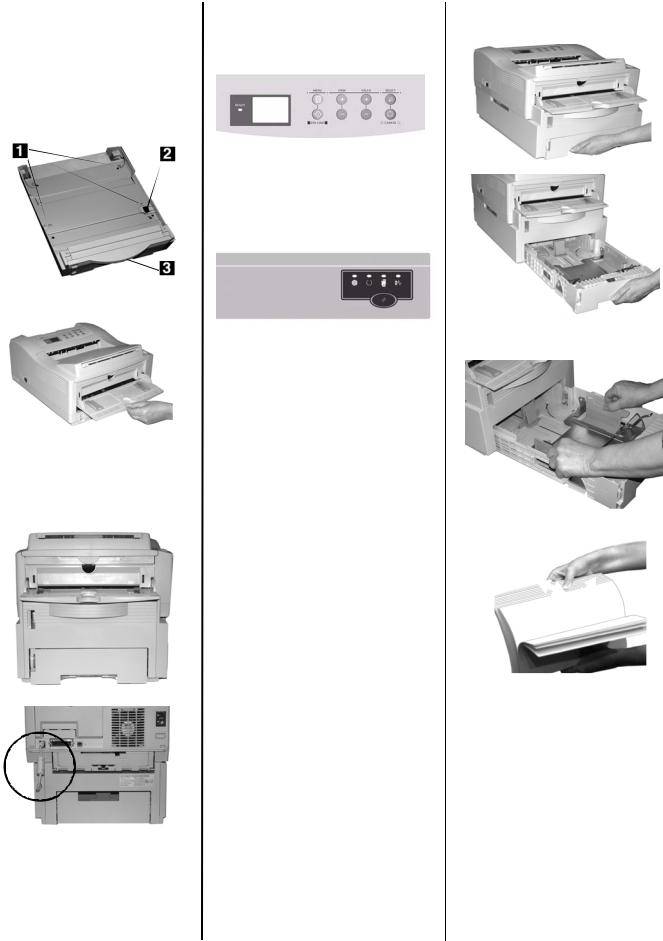
1.Unpack the tray and remove the shipping materials.
2.Turn off the printer and unplug the power cord.
3.Remove the interface cable.
4.Note the location of the pins (1), connector (2) and tray opening (3).
5.Pull down the printer’s manual feed tray.
6.Lower the printer onto the auxiliary tray, aligning the holes/plug on the bottom of the printer on the pins/connector on the tray. You should feel the printer seating and locking in place.
7. Attach the connection cable.
8.Reattach the interface cable.
9.Plug in the power cord and turn on the printer.
Verify installation
Models with Operator Panel
a.Press the Menu button one or more times until INFO. MENU appears on the display.
b.Press SELECT twice.
The MenuMap prints.
Models with Control Button
a.Press the Control Button to take the printer off-line.
b.Press and hold down the control button for at least 2 seconds, but less than 5 seconds.
The MenuMap prints.
10.Look for TRAY2 on the first page of the MenuMap under the MEDIA MENU listing. If it isn’t there, check to be sure that the connection between the printer and Tray 2 is secure, then reprint and recheck the MenuMap.
11.Check the MEDIA MENU settings shown on the MenuMap and make any needed changes for
•TRAY2 PAPERSIZE
•TRAY2 MEDIATYPE
•TRAY2 MEDIAWEIGHT
to match the print media you will normally use in Tray 2. (If you need help with this, see “Operator Panels” in your on-line User’s Guide.
Load Paper
1. Pull out the tray.
1

2.Position the paper guides in the tray.
3. Fan the paper.
4.Lift the paper bar (1) and load paper (up to 500 sheets 20-lb. US Bond). Keep the stack below the full line (2).
5.Lower the paper bar and push the tray back into the printer.
Note: To install paper in Tray 1:
a.Open the Tray 2 front panel.
b.Slide Tray 1 out.
AUTOFEED
To set the printer to switch to Tray 2 when Tray 1 is empty:
Printers with Operator Panel
Set AUTOTRAY on in the Print Menu.
Printer with online Status Monitor
Go to the Paper tab in the Status Monitor. Select Auto Tray Switch.
Activate the Tray in the Printer Driver
Windows®
PCL Driver
1.Click
Start → Settings → Printers [Printers and Faxes for XP].
The Printers (Printers and Faxes) dialog box opens.
2.Right click the Oki printer icon, then click Properties.
3.Click the Device Option(s) tab.
4.For Available Tray, select Lower Cassette.
5.Click OK. Close the Printers (Printers and Faxes) dialog box.
PostScript Emulation Driver
Printers with Postscript option installed
1.Click
Start → Settings → Printers [Printers and Faxes for XP].
The Printers (Printers and Faxes) dialog box opens.
2.Right click the Postscript emulation printer icon, then click Properties.
3.Next:
•Windows XP, 2000 and NT 4.0: click the Device Settings tab.
•Windows Me and 98: click the Device Options tab.
4.Next:
•Windows XP, 2000, NT 4.0 and Me: under Installable Options, click Available Tray and select 2.
•Windows 98: under Change setting for Available Tray, select 2 (1 Optional Tray).
5.Click OK. Close the Printers (Printers and Faxes) dialog box.
Macintosh®
PostScript Emulation Driver
Printers with PostScript option installed
OS 8.x and 9.x
1.Activate Chooser from the Apple menu.
2.Select LaserWriter 8.
3.Click Printer → Setup.
4.Click Configure.
5.Change the Available Tray setting to 2 (1 Optional Tray).
6.Click OK twice.
7.Close Chooser.
OS X.1
No activation is required.
OS X.2
1.Activate Print Center from Local Hard Drive → Applications →
→Print Center.Utilities
2.Highlight the printer name. Select from the menu Printers → Show Info.
3.Click the Available Tray drop-down menu and select 2 (1 Optional Tray).
4.Click Apply Changes. Exit to the desktop.
2
Installation du bac
1.Déballez le bac et retirez les matériaux d'emballage.
2.Arrêtez l'imprimante et débranchez le cordon d'alimentation.
3.Retirez le câble d'interface.
4.Notez l’emplacement des tiges (1), connecteur (2) et de l'orifice du bac (3).
5.Abaissez le bac d'alimentation manuelle de l'imprimante.
6.Posez l'imprimante sur le bac auxiliaire en alignant les trous et la fiche sous l'imprimante avec les goujons et le connecteur du bac. Vous devriez sentir l'imprimante s'engager et s'enclencher.
7. Branchez le câble de connexion.
8.Rebranchez le câble d'interface.
9.Branchez le cordon d'alimentation et allumez l'imprimante.
Vérification de l’installation
Modèles avec un panneau de commande
a.Appuyez sur une fois ou plus, jusqu'à ce que INFO. MENU s'affiche.
b.Appuyez deux fois sur SELECT.
La Menu Map s'imprime.
Modèles avec un bouton de commande
a.Appuyez sur le bouton de commande pour mettre l'imprimante hors ligne.
b.Tenez le bouton enfoncé au moins 2 secondes, mais moins de 5. La Menu Map s'imprime.
10.Cherchez TRAY2 [BAC 2] sur la première page de MenuMap sous MEDIA MENU [MENU DES SUPPORTS]. S'il ne s'y trouve pas, vérifiez la connexion entre l'imprimante et le bac 2, puis réimprimez et vérifiez MenuMap à nouveau..
11.Vérifiez les paramètres MEDIA MENU [MENU DES SUPPORTS] figurant dans MenuMap et apportez les modifications nécessaires à
• TRAY2 PAPERSIZE (BAC 2
FORMAT)
•TRAY2 MEDIATYPE (TYPE PAPIER BAC 2)
•TRAY2 MEDIAWEIGHT (GRAM. BAC 2)
pour correspondre au support d'impression que vous utiliserez normalement dans le Bac 2. Si vous avez besoin d'aide, consultez " Panneau de commande " dans le guide de l'utilisateur en ligne.
3
Chargez le papier
1. Tirez le bac.
2.Positionnez les guides-papier dans le bac.
3. Aérez le papier.
(Suite au verso)
 Loading...