


 Loading...
PREFACE
Every effort has been made to ensure that the information in this document is complete, accurate, and up-to-date. The manufacturer assumes no responsibility for the results of errors beyond its control. The manufacturer also cannot guarantee that changes in software and equipment made by other manufacturers and referred to in this guide will not affect the applicability of the information in it. Mention of software products manufactured by other companies does not necessarily constitute endorsement by the manufacturer.
While all reasonable efforts have been made to make this document as accurate and helpful as possible, we make no warranty of any kind, expressed or implied, as to the accuracy or completeness of the information contained herein.
The most up-to-date drivers and manuals are available from: www.okiprintingsolutions.com
07108301 Iss.02; Copyright © 2011 Oki Europe Ltd. All rights reserved. Oki is a registered trademark of Oki Electric Industry Company, Ltd. Oki Printing Solutions is a trademark of Oki Data Corporation.
Hewlett-Packard, HP, and LaserJet are registered trademarks of Hewlett-Packard Company.
Windows is a registered trademark of Microsoft Corporation.
ENERGY STAR is a trademark of the United States Environmental Protection Agency. Apple, Macintosh, Mac and Mac OS are registered trademarks of Apple Inc.
Other product names and brand names are registered trademarks or trademarks of their proprietors.
As an ENERGY STAR Program Participant, the manufacturer has determined that this product meets the ENERGY STAR guidelines for energy efficiency.
This product complies with the requirements of the Council Directives 2004/ 108/EC (EMC), 2006/95/EC (LVD),1999/5/EC (R&TTE) and 2009/125/EC (EuP), as amended where applicable, on the approximation of the laws of the member states relating to Electromagnetic Compatibility, Low Voltage, Radio & Telecommunications Terminal Equipment and Energy Using Products.
The following cables were used to evaluate this product to achieve EMC directive 2004/108/EC compliance and configurations other than this may affect that compliance.
CABLE TYPE |
LENGTH |
CORE |
SHIELD |
|
(METRE) |
|
|
|
|
|
|
Power |
1.8 |
8 |
8 |
|
|
|
|
USB |
5 |
8 |
9 |
|
|
|
|
Parallel |
1.8 |
8 |
9 |
|
|
|
|
LAN |
15 |
8 |
8 |
|
|
|
|
Preface > 2

EMERGENCY FIRST AID
Take care with toner powder:
If swallowed, give small amounts of cold water and seek medical attention. DO NOT attempt to induce vomiting.
If inhaled, move the person to an open area for fresh air. Seek medical attention.
If it gets into the eyes, flush with large amounts of water for at least 15 minutes keeping eyelids open. Seek medical attention.
Spillages should be treated with cold water and soap to help reduce risk of staining skin or clothing.
MANUFACTURER
Oki Data Corporation, 4-11-22 Shibaura, Minato-ku, Tokyo 108-8551,
Japan
IMPORTER TO THE EU/AUTHORISED REPRESENTATIVE
Oki Europe Limited (trading as OKI Printing Solutions) Blays House
Wick Road Egham
Surrey TW20 0HJ
United Kingdom
For all sales, support and general enquiries contact your local distributor.
ENVIRONMENTAL INFORMATION
Emergency First Aid > 3
CONTENTS
Preface . . . . . . . . . . . . . . . . . . . . . . . . . . . . . . . . . . . . . . . . . . . . . . . . . . .2 Emergency First Aid . . . . . . . . . . . . . . . . . . . . . . . . . . . . . . . . . . . . . . . . .3 Manufacturer. . . . . . . . . . . . . . . . . . . . . . . . . . . . . . . . . . . . . . . . . . . . . . .3 Importer to the EU/authorised representative. . . . . . . . . . . . . . . . . . . . .3 Environmental information . . . . . . . . . . . . . . . . . . . . . . . . . . . . . . . . . . . .3 Contents . . . . . . . . . . . . . . . . . . . . . . . . . . . . . . . . . . . . . . . . . . . . . . . . . .4 Notes, Cautions and Warnings . . . . . . . . . . . . . . . . . . . . . . . . . . . . . . . . .6
Introduction . . . . . . . . . . . . . . . . . . . . . . . . . . . . . . . . . . . . . . . . . . . . . . .7
Printer features . . . . . . . . . . . . . . . . . . . . . . . . . . . . . . . . . . . . . . . . . . . 7 Using your printer . . . . . . . . . . . . . . . . . . . . . . . . . . . . . . . . . . . . . . . . . 7
About this manual . . . . . . . . . . . . . . . . . . . . . . . . . . . . . . . . . . . . . . . . . . .8
Online usage. . . . . . . . . . . . . . . . . . . . . . . . . . . . . . . . . . . . . . . . . . . . . 8 Printing Pages. . . . . . . . . . . . . . . . . . . . . . . . . . . . . . . . . . . . . . . . . . . . 8 Abbreviations used . . . . . . . . . . . . . . . . . . . . . . . . . . . . . . . . . . . . . . . . 9
Printer components. . . . . . . . . . . . . . . . . . . . . . . . . . . . . . . . . . . . . . . . .10
Operator panels. . . . . . . . . . . . . . . . . . . . . . . . . . . . . . . . . . . . . . . . . . . .12
B411d, B411dn . . . . . . . . . . . . . . . . . . . . . . . . . . . . . . . . . . . . . . . . . . .12 Operator panel . . . . . . . . . . . . . . . . . . . . . . . . . . . . . . . . . . . . . . . . .12 LED indicators. . . . . . . . . . . . . . . . . . . . . . . . . . . . . . . . . . . . . . . . . .12 LCD . . . . . . . . . . . . . . . . . . . . . . . . . . . . . . . . . . . . . . . . . . . . . . . . .13 Online button . . . . . . . . . . . . . . . . . . . . . . . . . . . . . . . . . . . . . . . . . .13 Changing language . . . . . . . . . . . . . . . . . . . . . . . . . . . . . . . . . . . . . .14 Configuration tool . . . . . . . . . . . . . . . . . . . . . . . . . . . . . . . . . . . . . . .14 Menu functions . . . . . . . . . . . . . . . . . . . . . . . . . . . . . . . . . . . . . . . . .15 Printing menu settings . . . . . . . . . . . . . . . . . . . . . . . . . . . . . . . . . . . .21
B431d, B431dn . . . . . . . . . . . . . . . . . . . . . . . . . . . . . . . . . . . . . . . . . . .22 Operator panel . . . . . . . . . . . . . . . . . . . . . . . . . . . . . . . . . . . . . . . . .22 Panel elements . . . . . . . . . . . . . . . . . . . . . . . . . . . . . . . . . . . . . . . . .22 Menu functions . . . . . . . . . . . . . . . . . . . . . . . . . . . . . . . . . . . . . . . . .24 Printing menu settings . . . . . . . . . . . . . . . . . . . . . . . . . . . . . . . . . . . .29
Paper recommendations . . . . . . . . . . . . . . . . . . . . . . . . . . . . . . . . . . . . .30
Paper and envelope types . . . . . . . . . . . . . . . . . . . . . . . . . . . . . . . . . . .30 Transparencies and adhesive labels . . . . . . . . . . . . . . . . . . . . . . . . . . . . .30 Postcards . . . . . . . . . . . . . . . . . . . . . . . . . . . . . . . . . . . . . . . . . . . . . . .31 Installing paper. . . . . . . . . . . . . . . . . . . . . . . . . . . . . . . . . . . . . . . . . . .31 Paper Tray . . . . . . . . . . . . . . . . . . . . . . . . . . . . . . . . . . . . . . . . . . . .31 Multi purpose tray and manual feed tray . . . . . . . . . . . . . . . . . . . . . . .33 Paper feed, size and media setting . . . . . . . . . . . . . . . . . . . . . . . . . . . . .34 B411d, B411dn . . . . . . . . . . . . . . . . . . . . . . . . . . . . . . . . . . . . . . . . .34 B431d, B431dn . . . . . . . . . . . . . . . . . . . . . . . . . . . . . . . . . . . . . . . . .35
Interfaces . . . . . . . . . . . . . . . . . . . . . . . . . . . . . . . . . . . . . . . . . . . . . . . .37
Printer drivers . . . . . . . . . . . . . . . . . . . . . . . . . . . . . . . . . . . . . . . . . . . . .38
Windows operating systems . . . . . . . . . . . . . . . . . . . . . . . . . . . . . . . . . .38 Installed options . . . . . . . . . . . . . . . . . . . . . . . . . . . . . . . . . . . . . . . .38 Macintosh operating systems . . . . . . . . . . . . . . . . . . . . . . . . . . . . . . . . .38 Installed options . . . . . . . . . . . . . . . . . . . . . . . . . . . . . . . . . . . . . . . .38 Choosing a Mac driver . . . . . . . . . . . . . . . . . . . . . . . . . . . . . . . . . . . .38
Operation . . . . . . . . . . . . . . . . . . . . . . . . . . . . . . . . . . . . . . . . . . . . . . . .39
Printer settings in Windows . . . . . . . . . . . . . . . . . . . . . . . . . . . . . . . . . .39 Printing preferences in Windows applications . . . . . . . . . . . . . . . . . . . .39 PCL emulation. . . . . . . . . . . . . . . . . . . . . . . . . . . . . . . . . . . . . . . . . .40
Contents > 4
PS emulation . . . . . . . . . . . . . . . . . . . . . . . . . . . . . . . . . . . . . . . . . .43 Setting from Windows control panel . . . . . . . . . . . . . . . . . . . . . . . . . .45 Printer settings in Macintosh. . . . . . . . . . . . . . . . . . . . . . . . . . . . . . . . . .48
2-sided printing . . . . . . . . . . . . . . . . . . . . . . . . . . . . . . . . . . . . . . . |
. . . .49 |
Auto duplex printing . . . . . . . . . . . . . . . . . . . . . . . . . . . . . . . . . . . |
. . . .49 |
Manual duplex printing using the paper tray (Windows only) . . . . . . . . |
. . .49 |
Manual duplex printing using the Manual Feed Tray (B411d, B411dn) |
. . . .51 |
Overlays and Macros (Windows only). . . . . . . . . . . . . . . . . . . . . . . . . . .53
What are overlays and macros? . . . . . . . . . . . . . . . . . . . . . . . . . . . . . . .53 Creating PostScript overlays . . . . . . . . . . . . . . . . . . . . . . . . . . . . . . . . . .53 Creating the overlay image. . . . . . . . . . . . . . . . . . . . . . . . . . . . . . . . .53 Create and download the project. . . . . . . . . . . . . . . . . . . . . . . . . . . . .54 Test printing the overlay . . . . . . . . . . . . . . . . . . . . . . . . . . . . . . . . . .54 Defining overlays . . . . . . . . . . . . . . . . . . . . . . . . . . . . . . . . . . . . . . .54 Printing with PostScript overlays . . . . . . . . . . . . . . . . . . . . . . . . . . . . . . .55 Creating PCL Overlays . . . . . . . . . . . . . . . . . . . . . . . . . . . . . . . . . . . . . .56 Creating the overlay image. . . . . . . . . . . . . . . . . . . . . . . . . . . . . . . . .56 Create and download macros . . . . . . . . . . . . . . . . . . . . . . . . . . . . . . .56 Test printing the macro . . . . . . . . . . . . . . . . . . . . . . . . . . . . . . . . . . .57 Defining overlays . . . . . . . . . . . . . . . . . . . . . . . . . . . . . . . . . . . . . . .57 Printing with PCL overlays . . . . . . . . . . . . . . . . . . . . . . . . . . . . . . . . . . .58
Consumables and maintenance. . . . . . . . . . . . . . . . . . . . . . . . . . . . . . . .59
When to replace the toner cartridge . . . . . . . . . . . . . . . . . . . . . . . . . . . .59 Replacing the toner cartridge . . . . . . . . . . . . . . . . . . . . . . . . . . . . . . . . .59 When to replace the image drum . . . . . . . . . . . . . . . . . . . . . . . . . . . . . .62 Replacing the image drum.. . . . . . . . . . . . . . . . . . . . . . . . . . . . . . . . . . .62 Cleaning. . . . . . . . . . . . . . . . . . . . . . . . . . . . . . . . . . . . . . . . . . . . . . . .64
...the unit casing . . . . . . . . . . . . . . . . . . . . . . . . . . . . . . . . . . . . . . . .64
...the paper feed rollers . . . . . . . . . . . . . . . . . . . . . . . . . . . . . . . . . . .64
...the LED head . . . . . . . . . . . . . . . . . . . . . . . . . . . . . . . . . . . . . . . . .66
Troubleshooting . . . . . . . . . . . . . . . . . . . . . . . . . . . . . . . . . . . . . . . . . . .67
Status and error messages. . . . . . . . . . . . . . . . . . . . . . . . . . . . . . . . . . .67 Paper jams . . . . . . . . . . . . . . . . . . . . . . . . . . . . . . . . . . . . . . . . . . . . . .67 Input jam . . . . . . . . . . . . . . . . . . . . . . . . . . . . . . . . . . . . . . . . . . . . . . .68 Feed jam or exit jam . . . . . . . . . . . . . . . . . . . . . . . . . . . . . . . . . . . . . . .68 Print quality problems . . . . . . . . . . . . . . . . . . . . . . . . . . . . . . . . . . . . . .73 Paper feed problems . . . . . . . . . . . . . . . . . . . . . . . . . . . . . . . . . . . . . . .74 Software problems . . . . . . . . . . . . . . . . . . . . . . . . . . . . . . . . . . . . . . . .75 Hardware problems . . . . . . . . . . . . . . . . . . . . . . . . . . . . . . . . . . . . . . . .75
Installing options . . . . . . . . . . . . . . . . . . . . . . . . . . . . . . . . . . . . . . . . . .76
Installation procedure . . . . . . . . . . . . . . . . . . . . . . . . . . . . . . . . . . . . . .76 Setting the driver device options . . . . . . . . . . . . . . . . . . . . . . . . . . . . . . .76 Windows . . . . . . . . . . . . . . . . . . . . . . . . . . . . . . . . . . . . . . . . . . . . .76 MAC OS X. . . . . . . . . . . . . . . . . . . . . . . . . . . . . . . . . . . . . . . . . . . . .77
Specifications . . . . . . . . . . . . . . . . . . . . . . . . . . . . . . . . . . . . . . . . . . . . .78
General . . . . . . . . . . . . . . . . . . . . . . . . . . . . . . . . . . . . . . . . . . . . . . . .78 Paper and tray information . . . . . . . . . . . . . . . . . . . . . . . . . . . . . . . . . . .79 Notes/symbols/terms. . . . . . . . . . . . . . . . . . . . . . . . . . . . . . . . . . . . .81
Index. . . . . . . . . . . . . . . . . . . . . . . . . . . . . . . . . . . . . . . . . . . . . . . . . . . .83 Oki contact details. . . . . . . . . . . . . . . . . . . . . . . . . . . . . . . . . . . . . . . . . .84
Contents > 5

NOTES, CAUTIONS AND WARNINGS
NOTE
A note provides additional information to supplement the main text.
CAUTION!
A caution provides additional information which, if ignored, may result in equipment malfunction or damage.
WARNING!
A warning provides additional information which, if ignored, may result in a risk of personal injury.
For the protection of your product, and in order to ensure that you benefit from its full functionality, this model has been designed to operate only with genuine original toner cartridges. Any other toner cartridge may not operate at all, even if it is described as “compatible”, and if it does work, your product's performance and print quality may be degraded.
Specifications subject to change without notice. All trademarks acknowledged.
Notes, Cautions and Warnings > 6
INTRODUCTION
Congratulations on purchasing this monochrome page printer.
Your new printer is designed with a range of advanced features to give you crisp black and white pages at high speed on a wide range of print media.
For your information, a summary of the main features of your printer is given below.
PRINTER FEATURES
>Four different models to choose from: B411d, B411dn, B431d, B431dn
(d denotes Duplex included and n denotes Network Interface Card included).
>Memory: 64MB.
>Resolution: 1200 x 600 dpi for B411d, B411dn; 1200 x 1200 dpi for B431d, B431dn.
>Paper handling: 250 sheets (80g/m²).
>Emulation: standard Printer Control Language PCL5e, PCLXL, Epson FX, IBM ProPrinter and PostScript3 for B431d, B431dn.
>Barcodes: embedded for SIDM emulations.
>Flash DIMM: 1.28MB for B411d, B411dn and 4.6MB for B431d, B431dn to allow the storage of additional fonts or bar codes.
>USB 2.0 High speed and Parallel interfaces.
>10/100 BASE-TX Network: standard for B411dn, B431dn, lets you share this valuable resource among users on your office network.
>Multi Purpose tray for B431d, B431dn: to extend the range of media your printer can accommodate (capacity 100 sheets (64g/m²) or 10 envelopes), and can also use as manual duplex.
>Manual Feed tray for B411d, B411dn: to feed single sheets, heavy paper stocks, envelopes, other special media and can also use as manual duplex for B411d, B411dn.
>Auto Duplex: standard feature in all models.
>“Ask Oki” – a user-friendly function that gives a direct link from your printer driver screen (but not illustrated in this guide) to a dedicated web site specific to the exact model you are using. This is where you’ll find all the advice, assistance and support you could need to help you get the best possible results from your Oki printer.
Additionally, the following optional features are also available:
>64, 128, 256MB RAM DIMM: to extend the main memory of your printer and speed up the processing of large files.
>Second paper tray: to increase your printer’s paper handling capacity by 530 sheets (80g/m²).
USING YOUR PRINTER
To help you get the most from your printer, the manufacturer has provided a variety of supporting materials. A summary of these materials and their purposes is given in the following chapter.
Introduction > 7
ABOUT THIS MANUAL
This manual is the user’s guide (check the Oki Printing Solutions website, www.okiprintingsolutions.com, for the most up-to-date version) for your printer and forms part of the overall user support listed below:
>Quick Set-up Guide: to describe how to unpack, connect and power up your printer.
>Installation Safety booklet: provides information for safe use of your product. This is a paper document that is packaged with the product.
>This User’s Guide: to help you to operate your printer and make the best use of its many features. Also included are guidelines for troubleshooting and maintenance to ensure that it performs at its best. Additionally, information is provided for adding optional accessories as your printing needs evolve.
>Network Guide: helps you become familiar with the functionality of the built in network interface card.
>Installation Guides: accompany consumable items and optional accessories to describe how to install them.
>Online Help: online information associated with the printer driver and Status Monitor software.
This manual has been written using more than one printer as a model and the illustrations/ screenshots reflect this. What you see will be appropriate to the model you are using.
ONLINE USAGE
This manual is intended to be read on screen using an Adobe Acrobat Reader. Use the navigation and viewing tools provided in Acrobat.
You can access specific information in two ways:
>In the list of bookmarks down the left hand side of your screen, click on the topic of interest to jump to the required topic. (If the bookmarks are not available, use the Table of Contents.)
>In the list of bookmarks click on Index to jump to the Index. (If the bookmarks are not available, use the Table of Contents.) Find the term of interest in the alphabetically arranged index and click on the associated page number to jump to the page containing the subject.
PRINTING PAGES
The whole manual, Individual pages, or sections may be printed. The procedure is:
1.From the toolbar, select File > Print (or press the Ctrl + P keys).
About this manual > 8
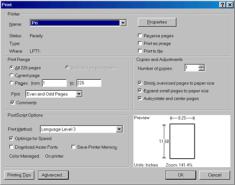
2.Choose which pages you wish to print:
(a)All pages, for the entire manual.
(b)Current page for the page at which you are looking.
(c)Pages from and to for the range of pages you specify by entering their page numbers.
3.Click OK.
ABBREVIATIONS USED
The following abbreviations are used in this manual:
ABBREVIATION |
MEANING |
|
|
Ctrl |
Control |
|
|
dpi |
dots per inch |
|
|
DIMM |
Dual In-line Memory Module |
|
|
d |
duplex |
|
|
n |
network card installed |
|
|
LED |
Light Emitting Diode |
|
|
NIC |
Network Interface Card |
|
|
PCL |
Printer Control Language |
|
|
PS |
PostScript (emulation) |
|
|
PSE |
PostScript Emulation |
|
|
RAM |
Random Access Memory |
|
|
About this manual > 9

PRINTER COMPONENTS
Apart from the Operator panels, which are described in the next chapter, the B411d, B411dn, B431d, B431dn printers look similar from the outside. The important components are identified in the representations below. For illustration purposes the B431dn model is shown.
32
|
|
10 9 |
13 |
|
4 |
|
|
|
|
11 |
|
5 |
|
12 |
|
6
1
7
8
1.Operator panel
2.Output Stacker (150 sheets, face down)
3.Output Stacker extension
4.Top cover release button
5.Multi Purpose Tray (only for B431d, B431dn; 100 sheets)(shown in open position)
6.Multi Purpose Tray extension
7.Paper Tray 250 sheets
8.ON/OFF switch
9.LED array
10.Fuser unit
11.Toner cartridge
12.Image drum
13.Top cover
Printer components > 10
|
|
22 |
|
|
21 |
|
|
20 |
14 |
|
19 |
|
|
|
|
15 |
18 |
|
|
|
|
|
17 |
|
|
16 |
14.Cooling fan
15.Memory panel (to upgrade your printer’s memory RAM DIMM)
16.Power cable connection
17.Parallel interface connection
18.LAN interface connection (only for B411dn, B431dn)
19.USB interface connection
20.Paper Tray extension
21.Rear Face Up Tray extension
22.Rear Face Up Tray
Printer components > 11
OPERATOR PANELS
This chapter describes the function of the operator panel on your printer. It is useful to describe the Configuration Tool at this point as it provides the B411d, B411dn, the equivalent of the menu control panel on the B431d, B431dn (See “Printer drivers” on page 38 for installation of the Configuration Tool.)
B411D, B411DN
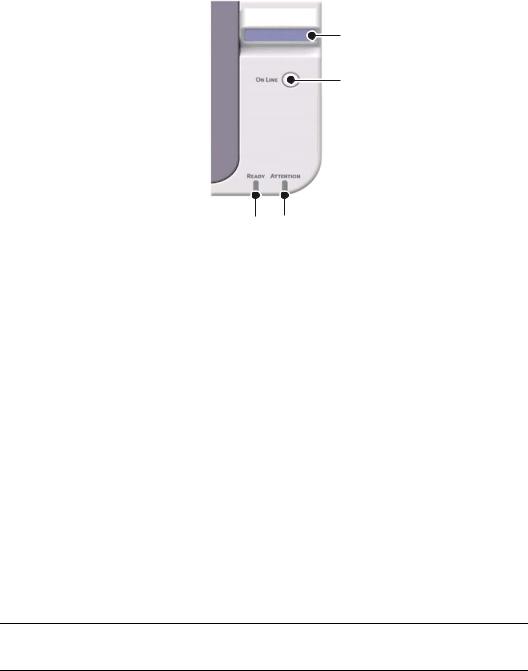
OPERATOR PANEL
The B411d, B411dn operator panel consists of 2 indicating LEDs, an LCD (3) and an Online
(4) button. The LEDs indicate Ready (1) and Attention (2).
3
4
12
LED INDICATORS
The LED indicators show the status of the printer and have three operating conditions as follows:
>Indicator off
>Indicator on
>Flash
Both LED indicators come on momentarily when power is switched on using the main power switch.
Ready LED (green)
>Indicator on - the printer is on-line and ready to receive data.
>Indicator off - the printer is off-line and cannot receive data.
Attention LED (red)
>Indicator on - this indicates a warning, (e.g. low toner).
>Indicator off - this indicates normal condition.
The meaning of the indicator LEDs when they flash (x) is summarised as follows:
NOTE
The table below is also applicable for the B431d, B431dn models.
Operator panels > 12

FLASH TYPE |
READY LED (1) |
ATTENTION LED (2) |
MEANING |
|
|
|
|
Flash |
x |
|
The printer is receiving |
|
|
|
and processing data |
|
|
|
during printing or the |
|
|
|
printer is resetting. |
|
|
|
|
|
|
x |
There is a printing error, |
|
|
|
for example, a problem |
|
|
|
with paper, the cover is |
|
|
|
open or the paper tray is |
|
|
|
empty while a job is |
|
|
|
processing. |
|
|
|
|
|
x |
x |
There is a minor error |
|
|
|
with the printer, for |
|
|
|
example, toner is low |
|
|
|
and the image drum |
|
|
|
needs to be changed. |
|
|
|
|
LCD
The LCD (3) has two rows of up to 16 alphanumeric digits, displaying print status and error messages.
ONLINE BUTTON
The primary functions of the Online button (4) are activated by pressing the switch momentarily and releasing. The primary functions are as follows:
>Turning the printer off-line.
>Turning the printer on-line (ready).
>Resuming printing after page overflow.
>Interrupting data processing when the printer is receiving and processing data.
>Resuming data processing.
The secondary functions of the Online button are activated after turning the printer off line, then pressing and holding the switch for four seconds before releasing. The secondary functions are as follows:
>Printing the demo and menu pages.
NOTE
Demo and menu pages can also be printed using the printer’s Configuration Tool. See “Printing menu settings” on page 21.
>Printing any data held in the buffer after printing has been cancelled.
>Resetting the printer and clearing the buffer after printing has been cancelled.
NOTE
To reset the printer to the default settings of the manufacturer, the Online button is pressed and held down (press for more than 2 sec and less than 5 sec) while the printer is switched on with the main power switch. The LED indicators blink when the printer has reset to the default settings.
Operator panels > 13

CHANGING LANGUAGE
The default language used by your printer for display messages and for report printing is English. If required, this can be changed to:
German |
Danish |
French |
Dutch |
Italian |
Turkish |
Spanish |
Portuguese |
Swedish |
Polish |
Russian |
Greek |
Finnish |
Czech |
Hungarian |
Norwegian |
NOTE
1.The Operator Panel Language Setup Wizard will run automatically when you install the printer driver. Follow the instructions provided by this utility to set your chosen language.
2.The list above is neither conclusive nor exhaustive.
CONFIGURATION TOOL
Installation of the Configuration Tool can be found on the Drivers/Utilities DVD under the Utilities folder. Follow the on-screen instructions to complete the Configuration Tool installation. This Configuration Tool is used to control and change the various printer settings.
Using the Configuration Tool
Viewing or changing the printer settings are carried out as follows:
Click on Start > All Programs > Okidata > Configuration Tool and select the Configuration Tool.
Operator panels > 14
MENU FUNCTIONS
The Configuration Tool allows you to view and change the printer’s internal settings. You can think of this as the software equivalent of the LCD operator panel.
In the Configuration Tool, click the Device Setting tab. The settings are grouped into categories or “User Menu” such as Information Menu or Print Menu.
Some of these settings are similar to those found in your printer driver or application software. The settings that you can change using this software act as the printer’s defaults. These can be overridden by the settings in your printer driver or application.
For example, if you have set the number of copies in the Print Menu settings to one, this will be overridden if you select three copies of your document in the printer driver.
Information menu
This menu provides a quick method of listing various items stored within the printer.
ITEM |
ACTION |
|
|
PRINT MENU MAP |
EXECUTE |
|
|
NETWORK |
EXECUTE |
B411dn only |
|
|
|
DEMO1 |
EXECUTE |
|
|
PRINT FILE LIST |
EXECUTE |
|
|
PRINT PCL FONT |
EXECUTE |
|
|
PRINT PPR FONT |
EXECUTE |
|
|
PRINT FX FONT |
EXECUTE |
|
|
PRINT ERROR LOG |
EXECUTE |
|
|
USAGE REPORT |
EXECUTE |
|
|
Operator panels > 15
Print menu
This menu provides adjustment of various print job related functions.
ITEM |
DEFAULT |
|
|
COPIES |
1 |
|
|
DUPLEX |
OFF |
|
|
DUPLEX LAST PAGE |
SKIP BLANK PAGE |
|
|
MANUAL |
OFF |
|
|
PAPER FEED |
TRAY1 |
|
|
AUTO TRAY SWITCH |
ON |
|
|
TRAY SEQUENCE |
DOWN |
|
|
MEDIA CHECK |
ENABLE |
|
|
RESOLUTION |
600DPI |
|
|
TONER SAVE MODE |
DISABLE |
|
|
ORIENTATION |
PORTRAIT |
|
|
LINES PER PAGE |
64 LINES |
|
|
EDIT SIZE |
CASSETTE SIZE |
|
|
Media menu
This menu provides adjustment to suit a wide range of print media.
ITEM |
DEFAULT |
|
|
TRAY1 PAPERSIZE |
A4 |
|
|
TRAY1 MEDIATYPE |
PLAIN |
|
|
TRAY1 MEDIAWEIGHT |
MEDIUM |
|
|
TRAY2 PAPERSIZE |
A4 |
When Tray2 is installed |
|
|
|
TRAY2 MEDIATYPE |
PLAIN |
When Tray2 is installed |
|
|
|
TRAY2 MEDIAWEIGHT |
MEDIUM |
When Tray2 is installed |
|
|
|
MN PAPERSIZE |
A4 |
|
|
MN MEDIATYPE |
PLAIN |
|
|
MN MEDIAWEIGHT |
MEDIUM |
|
|
UNIT OF MEASURE |
MILLIMETER |
|
|
X DIMENSION |
210 MILLIMETER |
|
|
Y DIMENSION |
297 MILLIMETER |
|
|
Operator panels > 16
System configuration menu
This menu adjusts general printer settings to suit the way you prefer to work.
ITEM |
DEFAULT |
|
|
POW SAVE TIME |
1 MIN |
|
|
PERSONALITY |
AUTO EMULATION |
|
|
CLRABLE WARNING |
ONLINE |
|
|
AUTO CONTINUE |
ON |
|
|
MANUAL TIMEOUT |
60 SEC |
|
|
TIMEOUT INJOB |
40 SEC |
|
|
TIMEOUT LOCAL |
40 SEC |
|
|
TIMEOUT NET |
90 SEC |
B411dn only |
|
|
|
LOW TONER |
CONTINUE |
|
|
JAM RECOVERY |
ON |
|
|
ERROR REPORT |
OFF |
|
|
PCL Emulation
This menu controls the printer’s PCL emulation.
ITEM |
DEFAULT |
|
|
FONT SOURCE |
RESIDENT |
|
|
FONT NO. |
I0 |
|
|
FONT PITCH |
10.00 CPI |
|
|
SYMBOL SET |
PC-8 |
|
|
A4 PRINT WIDTH |
78 COLUMN |
|
|
WHITE PAGE SKIP |
OFF |
|
|
CR FUNCTION |
CR |
|
|
LF FUNCTION |
LF |
|
|
PRINT MARGIN |
NORMAL |
|
|
PEN WIDTH ADJUST |
ON |
|
|
TRAY ID# |
|
|
|
PCL MNID |
2 |
|
|
PCL T0ID |
4 |
|
|
PCL T1ID |
1 |
|
|
PCL T2ID |
5 |
When Tray2 is installed |
|
|
|
Operator panels > 17
PPR Emulation
This menu controls the printer’s PPR emulation.
ITEM |
DEFAULT |
|
|
CHARACTER PITCH |
10 CPI |
|
|
FONT CONDENSE |
12CPI TO 20CPI |
|
|
CHARACTER SET |
SET-2 |
|
|
SYMBOL SET |
IBM-437 |
|
|
LETTER O STYLE |
DISABLE |
|
|
ZERO CHARACTER |
NORMAL |
|
|
LINE PITCH |
6 LPI |
|
|
WHITE PAGE SKIP |
OFF |
|
|
CR FUNCTION |
CR |
|
|
LF FUNCTION |
LF |
|
|
LINE LENGTH |
80 COLUMN |
|
|
FORM LENGTH |
11.7 INCH |
|
|
TOF POSITION |
0.0 INCH |
|
|
LEFT MARGIN |
0.0 INCH |
|
|
FIT TO LETTER |
DISABLE |
|
|
TEXT HEIGHT |
SAME |
|
|
FX Emulation
This menu controls the printer’s FX emulation.
ITEM |
DEFAULT |
|
|
CHARACTER PITCH |
10 CPI |
|
|
CHARACTER SET |
SET-2 |
|
|
SYMBOL SET |
IBM-437 |
|
|
LETTER O STYLE |
DISABLE |
|
|
ZERO CHARACTER |
NORMAL |
|
|
LINE PITCH |
6 LPI |
|
|
WHITE PAGE SKIP |
OFF |
|
|
CR FUNCTION |
CR |
|
|
LINE LENGTH |
80 COLUMN |
|
|
FORM LENGTH |
11.7 INCH |
|
|
TOF POSITION |
0.0 INCH |
|
|
LEFT MARGIN |
0.0 INCH |
|
|
FIT TO LETTER |
DISABLE |
|
|
TEXT HEIGHT |
SAME |
|
|
Operator panels > 18

Parallel menu
This menu controls the operation of the printer’s parallel data interface.
ITEM |
DEFAULT |
|
|
PARALLEL |
ENABLE |
|
|
BI-DIRECTION |
ENABLE |
|
|
ECP |
ENABLE |
|
|
ACK WIDTH |
NARROW |
|
|
ACK/BUSY TIMING |
ACK IN BUSY |
|
|
I-PRIME |
3 MICRO SEC |
|
|
USB menu
This menu controls the operation of the printer’s USB data interface.
ITEM |
DEFAULT |
|
|
USB |
ENABLE |
|
|
SOFT RESET |
ENABLE |
|
|
SPEED |
480 Mbps |
|
|
SERIAL NUMBER |
ENABLE |
|
|
Network menu
This menu controls the operation of the printer’s 10Base-T/100Base-TX network interface.
NOTE
This is applicable only to the B411dn model.
ITEM |
DEFAULT |
|
|
TCP/IP |
ENABLE |
|
|
IP VERSION |
IPv4 |
|
|
NETBEUI |
DISABLE |
|
|
NETBIOS OVER TCP |
ENABLE |
|
|
NETWARE |
ENABLE |
|
|
ETHERTALK |
ENABLE |
|
|
FRAMETYPE |
AUTO |
|
|
IP ADDRESS SET |
AUTO |
|
|
IP ADDRESS |
xxx.xxx.xxx.xxx |
|
|
SUBNET MASK |
xxx.xxx.xxx.xxx |
|
|
GATEWAY ADDRESS |
xxx.xxx.xxx.xxx |
|
|
WEB |
ENABLE |
|
|
TELNET |
DISABLE |
|
|
FTP |
DISABLE |
|
|
Operator panels > 19

ITEM |
DEFAULT |
|
|
SNMP |
ENABLE |
|
|
NETWORK SCALE |
NORMAL |
|
|
HUB LINK SETTING |
AUTO NEGOTIATE |
|
|
FACTORY DEFAULTS |
EXECUTE |
|
|
Maintenance menu
This menu provides access to various printer maintenance functions.
|
ITEM |
DEFAULT |
|
|
|
|
|
|
MENU RESET |
EXECUTE |
|
|
|
|
|
|
SAVE MENU |
EXECUTE |
|
|
|
|
|
|
RESTORE MENU |
EXECUTE |
|
|
|
|
|
|
POWER SAVE |
ENABLE |
|
|
|
|
|
|
PAPER BLACK SET |
0 |
|
|
|
|
|
|
DARKNESS |
0 |
|
|
|
|
|
|
SMR SETTING |
0 |
|
|
|
|
|
|
BG SETTING |
0 |
|
|
|
|
|
|
|
|
|
NOTE
RESTORE MENU is displayed only when SAVE MENU is executed.
Usage menu
This menu is for information only, and provides an indication of total usage of the printer and the expected life left in its consumable items. This is particularly useful if you do not have a full set of replacement consumables to hand and you need to know how soon you will need them.
ITEM |
DEFAULT |
REMARKS |
|
|
|
TRAY1 PAGE COUNT |
nnnnnn |
An indication of the number of pages |
|
|
printed from Tray1. |
|
|
|
TRAY2 PAGE COUNT |
nnnnnn |
An indication of the number of pages |
|
|
printed from Tray2. (When Tray2 is |
|
|
installed.) |
|
|
|
MN PAGE COUNT |
nnnnnn |
An indication of the number of pages |
|
|
printed from the Manual Feed Tray. |
|
|
|
DRUM LIFE |
REMAINING% |
An indication of the remaining drum |
|
|
life. |
|
|
|
TONER (n.nK) |
REMAINING% |
An indication of how much toner is left |
|
|
in the cartridge. |
|
|
|
Operator panels > 20
PRINTING MENU SETTINGS
The menu settings can be printed as a menu map as follows.
Using the Online button
1.Press the Online button to take the printer off-line.
2.Press and hold down the Online button for at least four seconds, but less than seven seconds.
3.The printer prints a list of the menu settings and a demo print page. See “Online button” on page 13.
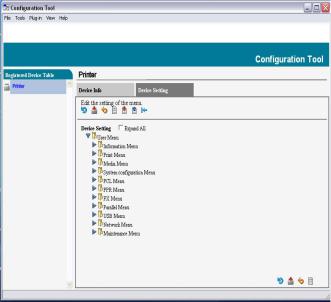
Using the Configuration Tool
1.Select Start > All Programs > Okidata > Configuration Tool > Configuration Tool.
The Configuration Tool page is displayed.
2.Select this printer displayed under the Registered Device table.
3.Click Device Setting tab.
4.Click Menu Setting. You can check Expand All menu items or click User Menu.
5.Expand the Information Menu.
6.To print a demo page or Menu Map, select either Demo1 or Print Menu Map and click Execute.
Operator panels > 21
B431D, B431DN
|
1 |
3 |
2 |
|
|
4 |
|
5 |
|
6 |
|
78
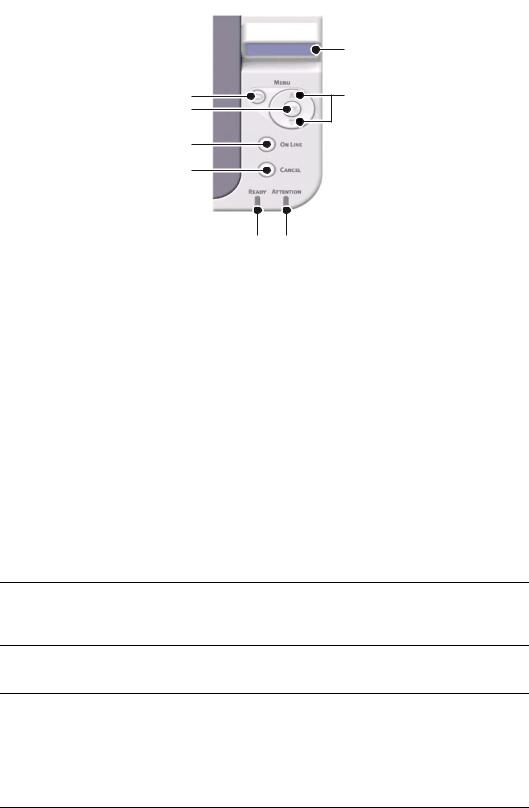
OPERATOR PANEL
The B431d, B431dn operator panel consists of a menu driven control panel, an LCD display and two LED indicators.
PANEL ELEMENTS
1.Liquid crystal display. (LCD) panel. Two rows of up to 16 alphanumeric digits displaying print status, menu items in menu mode and error messages.
2.Menu Scroll Buttons. Press briefly to enter the MENU mode. Press briefly again to select the next menu. Press for more than 2 seconds to scroll through the different menus.
3.Back button. Press briefly to return to the previous higher level menu item or exit the menu when in MENU mode. In the ONLINE or OFFLINE mode/MENU mode: when pressed for 4 seconds, the printer starts to shutdown.
4.OK button. In the ONLINE or OFFLINE mode: press this briefly to enter the MENU mode. In the MENU mode: press this briefly to select the menu or setting indicated on the LCD. When pressed for 2 seconds or longer, it reverts to the previous menu item.
NOTE
When pressed with DATA displayed (press and hold for five seconds), it forces the printer to print out the remaining data in the printer.
5.Online button. Press to switch between ONLINE and OFFLINE status. Press to exit the menu and displays ONLINE, when in the MENU mode.
NOTE
When pressed in Menu mode, the Online button returns the printer to ONLINE status. Also when there is an error indicating wrong paper size, pressing the Online button forces the printer to print.
When manually feeding paper, pressing the Online button will start the printing.
Operator panels > 22

6.Cancel button. When printing press to cancel a print job (press the button for 2 sec or less). Press to exit the MENU mode and go ONLINE, when in the MENU mode.
NOTE
When there is an error, and there are print jobs in queue, pressing the Cancel button deletes the first job in the queue.
7.Ready indicator (green). ON indicates ready to receive data. FLASHING indicates processing data. OFF indicates Offline.
8.Attention indicator (red). ON indicates a warning (e.g. low toner). FLASHING indicates an error, (e.g. toner empty). OFF indicates normal condition.
Operator panels > 23
MENU FUNCTIONS
The Printer Menu allows you to view and change the printer’s internal settings.
The settings are grouped into categories or “menus” such as Information Menu or Print Menu.
Some of these settings are similar to those found in your printer driver or application software. The settings that you can change using this software act as the printer’s defaults. These can be overridden by the settings in your printer driver or application.
For example, if you have set the number of copies in the Printer Menu settings to one, this will be overridden if you select three copies of your document in the printer driver.
Factory default settings are shown in the following tables.
Information menu
This menu provides a quick method of listing various items stored within the printer.
ITEM |
ACTION |
|
|
PRINT MENU MAP |
EXECUTE |
|
|
NETWORK |
EXECUTE |
B431dn only |
|
|
|
DEMO 1 |
EXECUTE |
|
|
PRINT FILE LIST |
EXECUTE |
|
|
PRINT PSE FONT |
EXECUTE |
|
|
PRINT PCL FONT |
EXECUTE |
|
|
PRINT PPR FONT |
EXECUTE |
|
|
PRINT FX FONT |
EXECUTE |
|
|
PRINT ERROR LOG |
EXECUTE |
|
|
USAGE REPORT |
EXECUTE |
|
|
Shutdown menu
This menu shuts down the printer.
ITEM |
ACTION |
|
|
SHUTDOWN START |
EXECUTE |
|
|
Print menu
This menu provides adjustment of various print job related functions.
ITEM |
DEFAULT |
|
|
COPIES |
1 |
|
|
DUPLEX |
OFF |
|
|
DUPLEX LAST PAGE |
SKIP BLANK PAGE |
|
|
PAPER FEED |
TRAY1 |
|
|
AUTO TRAY SWITCH |
ON |
|
|
TRAY SEQUENCE |
DOWN |
|
|
Operator panels > 24
ITEM |
DEFAULT |
|
|
MP TRAY USAGE |
DO NOT USE |
|
|
MEDIA CHECK |
ENABLE |
|
|
RESOLUTION |
600DPI |
|
|
TONER SAVE MODE |
DISABLE |
|
|
ORIENTATION |
PORTRAIT |
|
|
LINES PER PAGE |
64 LINES |
|
|
EDIT SIZE |
CASSETTE SIZE |
|
|
Media Menu
This menu provides adjustment to suit a wide range of print media.
ITEM |
DEFAULT |
|
|
TRAY 1 PAPERSIZE |
A4 |
|
|
TRAY 1 MEDIATYPE |
PLAIN |
|
|
TRAY 1 MEDIAWEIGHT |
MEDIUM |
|
|
TRAY2 PAPERSIZE |
A4 |
When tray 2 is installed. |
|
|
|
TRAY2 MEDIATYPE |
PLAIN |
When tray 2 is installed. |
|
|
|
TRAY2 MEDIAWEIGHT |
MEDIUM |
When tray 2 is installed. |
|
|
|
MPT PAPERSIZE |
A4 |
|
|
MPT MEDIATYPE |
PLAIN |
|
|
MPT MEDIAWEIGHT |
MEDIUM |
|
|
UNIT OF MEASURE |
MILLIMETER |
|
|
X DIMENSION |
210 MILLIMETER |
|
|
Y DIMENSION |
297 MILLIMETER |
|
|
System configuration menu
This menu adjusts general printer settings to suit the way you prefer to work.
ITEM |
DEFAULT |
|
|
POW SAVE TIME |
1 MIN |
|
|
PERSONALITY |
AUTO EMULATION |
|
|
PARA PS-PROTOCOL |
ASCII |
|
|
NET PS-PROTOCOL |
RAW |
B431dn only |
|
|
|
USB PS-PROTOCOL |
RAW |
|
|
CLRABLE WARNING |
ONLINE |
|
|
AUTO CONTINUE |
OFF |
|
|
Operator panels > 25
ITEM |
DEFAULT |
|
|
MANUAL TIMEOUT |
60 SEC |
|
|
TIMEOUT INJOB |
40 SEC |
|
|
TIMEOUT LOCAL |
40 SEC |
|
|
TIMEOUT NET |
90 SEC |
B431dn only |
|
|
|
LOW TONER |
CONTINUE |
|
|
JAM RECOVERY |
ON |
|
|
ERROR REPORT |
OFF |
|
|
START UP |
OFF |
|
|
PCL Emulation
This menu controls the printer’s PCL emulation.
ITEM |
DEFAULT |
|
|
FONT SOURCE |
RESIDENT |
|
|
FONT NO. |
I0 |
|
|
FONT PITCH |
10.00 CPI |
|
|
SYMBOL SET |
PC-8 |
|
|
A4 PRINT WIDTH |
78 COLUMN |
|
|
WHITE PAGE SKIP |
OFF |
|
|
CR FUNCTION |
CR |
|
|
LF FUNCTION |
LF |
|
|
PRINT MARGIN |
NORMAL |
|
|
PEN WIDTH ADJUST |
ON |
|
|
TRAY ID# |
|
|
|
PCL T0ID |
4 |
|
|
PCL T1ID |
1 |
|
|
PCL T2ID |
5 |
When tray 2 is installed. |
|
|
|
PPR Emulation
This menu controls the printer’s PPR emulation.
ITEM |
DEFAULT |
|
|
|
|
CHARACTER PITCH |
10 |
CPI |
|
|
|
FONT CONDENSE |
12 |
CPI to 20 CPI |
|
|
|
CHARACTER SET |
SET-2 |
|
|
|
|
SYMBOL SET |
IBM-437 |
|
|
|
|
LETTER O STYLE |
DISABLE |
|
|
|
|
ZERO CHARACTER |
NORMAL |
|
|
|
|
Operator panels > 26
Loading...