


FISH450 TRICOLOR

FISHFINDER
NAVMAN
Installation and
Operation
Manual
www.navman.com
FISH450 TFISH450 T
FISH450 TFISH450 T
FISH450 T
ricolorricolor
ricolorricolor
ricolor
®
English .............3
Français ......... 28
Español ..........54
Português ...... 80

3
FISH450 Tricolor FISHFINDER Installation and Operation Manual
NAVMAN
Contents
It is vital to the performance of the FISH450 Tricolor that the transducer is installed in the
best location. Please follow instructions on transducer installation very carefully.
Important
1 Introduction ................................................................................................. 4
2 Getting started ............................................................................................ 5
3 Operation ..................................................................................................... 6
3-1 Alarms ........................................................................................................................ 6
3-2 Fish History and Zoom screens.................................................................................. 7
3-3 Sonar screen ............................................................................................................ 10
3-4 Fuel screen ............................................................................................................... 11
3-5 Data screen .............................................................................................................. 11
4 Setup .......................................................................................................... 12
4-1 Alarms
Low Fuel, Too Shallow, Too Deep, Fish Alarm, Temp Value, Temp Rate, Low Battery .............................................. 13
4-2 Fuel
Tank Full, Tank Size, Set Remaining, Clear Used, Units, Num Engines, Fuel Cal, Flow Filter .................................. 14
4-3 Depth
Units, Keel Offset ......................................................................................................................................................... 15
4-4 Temperature
Units, Temp Cal ........................................................................................................................................................... 15
4-5 Speed and Logs
Units, Speed Cal, Log Cal, Log select (Trip/Total), Zero Trip Log, Zero All Logs ....................................................... 15
4-6 Display
Fish Symb, Speed, Temp, Display Cal, Red Cal, Blue Cal ......................................................................................... 16
4-7 Key Beep .................................................................................................................. 17
4-8 Language .................................................................................................................. 17
4-9 Resetting to factory defaults .....................................................................................17
4-10 Simulate mode ........................................................................................................ 17
5 Installation ................................................................................................. 18
5-1 What comes with your FISH450 Tricolor .................................................................. 18
5-2 Options and accessories .......................................................................................... 18
5-3 Mounting the Aquaducer .......................................................................................... 19
5-4 Other depth and speed/temperature transducers .................................................... 20
5-5 Fuel transducers .......................................................................................................20
5-6 Mounting the FISH450 Tricolor display unit ............................................................. 20
5-7 Wiring connection ..................................................................................................... 21
5-8 Auto Power wiring option .......................................................................................... 21
Appendix A - Specifications ....................................................................... 22
Appendix B - Troubleshooting.................................................................... 23
Appendix C - Glossary ................................................................................ 25
Appendix D - Conditions of sale & warranty ............................................. 26
Appendix E - How to contact us ................................................................. 26
Appendix F - Quick reference ..................................................................... 27

4
FISH450 Tricolor FISHFINDER Installation and Operation Manual
NAVMAN
1 Introduction
Congratulations on choosing the NAVMAN FISH450 Tricolor fishfinder. For maximum benefit, please
read this manual carefully before installation and use. Special terms are explained in Appendix C.
The NAVMAN FISH450 Tricolor
The FISH450 Tricolor is an ultrasonic fishfinder with powerful software and a three colour display. As well
as detecting fish the unit measures water depth, boat speed, water temperature and battery voltage and
has two distance logs (trip and total with one displayed at a time). With an optional fuel kit the FISH450
Tricolor is also a sophisticated yet easy to use fuel computer.
How the NAVMAN FISH450 Tricolor finds fish and determines the depth
An installed FISH450 Tricolor has two parts:
- a transducer attached to the hull
- the display unit.
The transducer generates an ultrasonic (sound) pulse, which travels down
towards the bottom. When the sound pulse meets an object, such as a
fish or the bottom, some of the pulse is reflected back up towards the boat
and is received by the transducer. The depth of an object can be calculated
by measuring the time between sending the pulse and receiving its echo.
The display unit analyses the reflections from each pulse, removes
unwanted reflections (from bubbles and other noise) and displays what is
in the water under the boat. The display shows three colours: Blue for the
strongest reflections, Red for medium and Green for the weakest reflections
(see section 3 - 2). These colours help users better interpret what is in the water.
There are several reasons the returned echo strength can vary. Larger fish usually return stronger echos, as
do fish in the centre of the beam where the pulse is stronger. Reasons for weak echos include the fish or
object being in deep water or turbid water, or in the edge of the beam where the pulse is weaker.
The unit will detect the bottom down to 1000 feet (300 metres), depending on the clarity of the water and
measures depths to an accuracy of 2%.
Assisting with navigation
The FISH450 Tricolor can be used to find fish, to locate features on the bottom such as reefs or wrecks
and to help recognise favourite fishing spots from the profile of the bottom. Use the FISH450 Tricolor to
assist navigation by following the depth contours marked on charts.
IMPORTANT NOTE ON USE - While the FISH450 Tricolor can be used as an aid to navigation, its
accuracy can be influenced by many factors, including the location of the transducer. It is the user’s
responsibility to ensure the unit is installed and used correctly.
How to find fish
Underwater features like reefs, wrecks and rocky outcrops attract fish. Use the FISH450 Tricolor to find
these features, then look for fish by passing over the feature slowly several times using the Zoom screen
(See section 3-1). Where there is a current, the fish will often be found downstream of the feature.
For deep sea fishing, a rapid change in temperature may indicate the edge of a warm or cold current. The temperature
difference may form a barrier which fish tend not to swim through. Search for fish either side of the barrier.
Cleaning and maintenance
The FISH450 Tricolor should be cleaned with a damp cloth or mild detergent. Avoid abrasive cleaners
and petrol or other solvents.
Always cover or remove the stern mounted Aquaducer when repainting the hull. If painting over a through
hull transducer with antifouling then use only one coat of paint. When repainting the transducer remove
previous coats by lightly sanding.
Temperature warning
Do not expose the unit to temperatures exceeding 50°C (122°F) or the LCD may not be useable until it cools down.
Never leave the unit exposed to high temperatures even for a few minutes. (e.g. on the dashboard of a car).
5
FISH450 Tricolor FISHFINDER Installation and Operation Manual
NAVMAN
2 Getting started
Power connection
Power is supplied through the black connector. The
connectors are bayonet type, push the plug into
the socket then turn the collar to lock. Make sure
the collar is secure for a water tight connection.
Transducer connection
If the transducer (blue connector) is not connected
when the unit is turned on, the message “No
transducer detected. Enter simulation mode? Yes/
No” will appear. Press the Cursor Left
or Right
key to switch between Yes and No. (More
information on the simulation mode can be found
in the Setup - Simulation section 4-10) When you
have selected your choice, press the Menu key
to exit and the startup sequence will continue.
(Note: If the transducer was not intentionally
disconnected, turn the unit off and refer to the
section on Troubleshooting in Appendix B.)
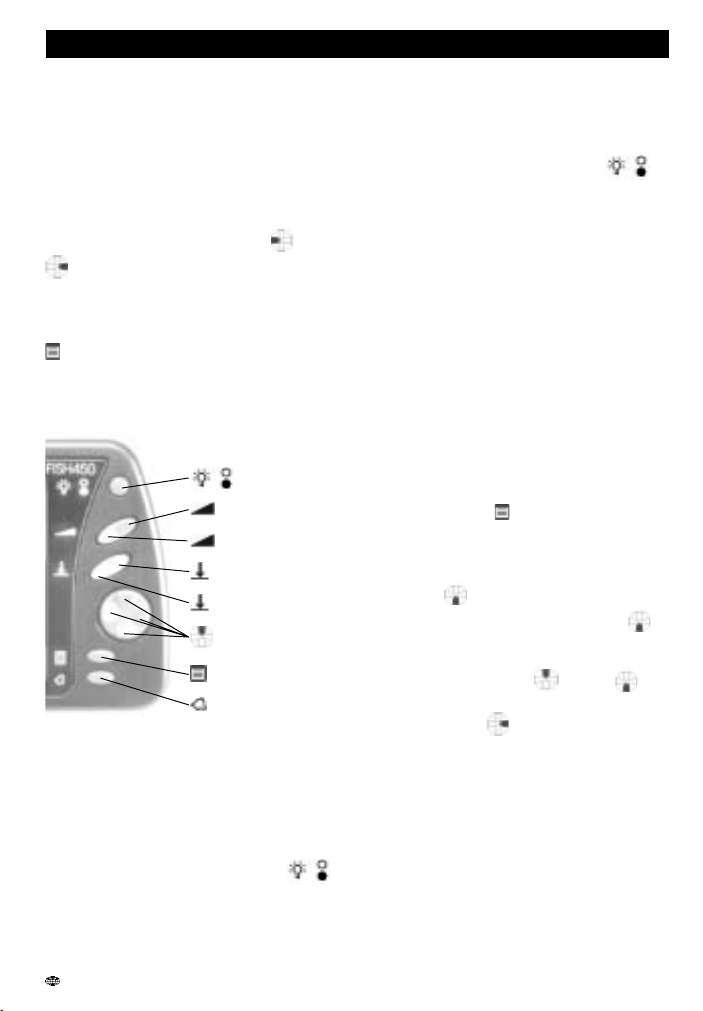
Names of keys
Definition of Press and Hold
PRESS means to push the key for less than 1
second.
HOLD means to push and hold the key down for
at least 1 second.
Power on
To turn the unit on press the Power key.
Note: if the Auto Power wire is connected (See
the Installation - Auto Power section 5-8), then the
unit will turn on automatically when the boat’s
power is turned on.
A title screen briefly appears which displays basic
Backlight / Power
Increase Gain
Decrease Gain
Decrease Range
Increase Range
Cursor
Menu
Alarm
product information, including the software version.
The FISH450 Tricolor will then display the screen
from the following list that was last used: Fish
History, Zoom, Sonar, Fuel or Data.
Power off
To turn the unit off, hold the Power key .
A countdown box will appear. Continue holding
down the Power key for 3 seconds until the unit
turns off.
Note: if the Auto Power wire is connected (See
Installation - Auto Power section 5-7) then the unit
will turn off only when the boat’s power turns off.
Changing the level of backlighting
Pressing the Backlight / Power key activates the
backlight function. A bar which indicates the
backlight level appears at the bottom of the
screen. Each additional press increases the
backlight intensity from the current level until level
6 is reached. The next press steps to level 0 (off).
The bar disappears 2 seconds after the last press
of the Backlight / Power key.
Language selection
To check which language is currently selected,
press the Menu key
to display the Main Menu.
Follow these steps to change the language:
1 Power off the unit.
2 While the unit is off, hold down the Cursor
Down
key.
3 Keep holding down the Cursor Down
key and power on the unit.
4 The screen displays a list of languages.
Press the Cursor Up
or Down key
to highlight a language, then press the
Cursor Right
key to select it. The
FISH450 Tricolor will continue the startup
sequence.
6
FISH450 Tricolor FISHFINDER Installation and Operation Manual
NAVMAN
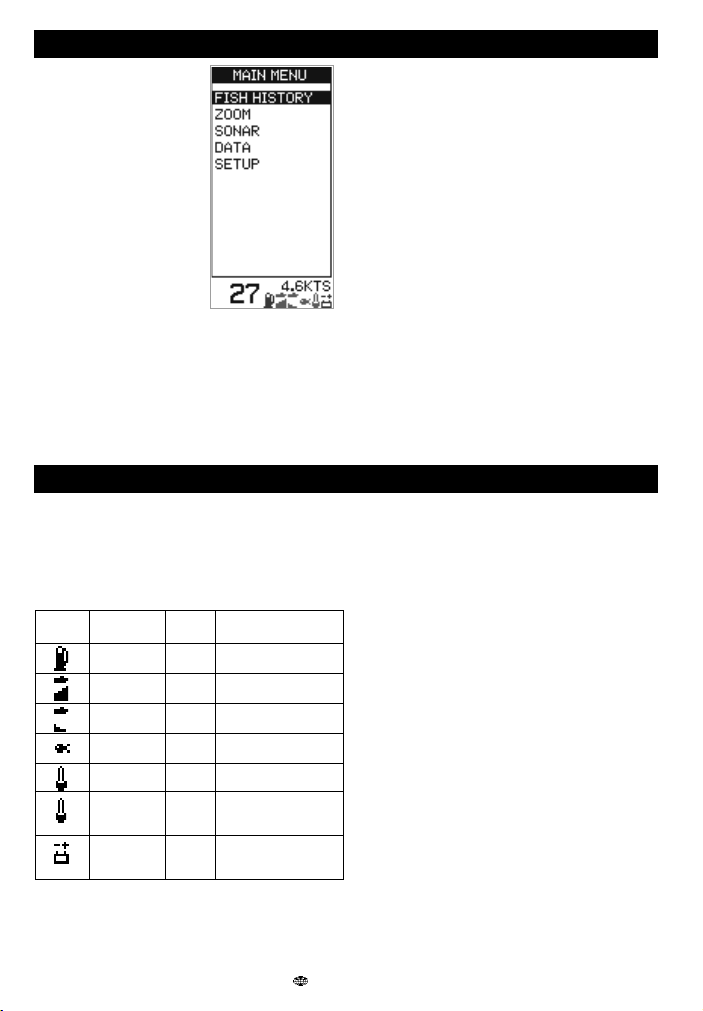
Main Menu screen
The FISH450 Tricolor is
menu driven. Press the
Menu key one or more times
until the Main Menu screen
appears. Press the Cursor
Up or Down key to highlight
an option, then press the
Cursor Right key to select it.
The FISH450 Tricolor has five
main screens and a Setup
menu which are summarised
below and fully explained in
the following sections.
Fish History screen (see section 3-2)
Displays echos received over time, with the
most recent events on the right of the screen.
Use this screen when travelling, to find reefs,
wrecks and fish.
Zoom screen (see section 3-2)
This is like the Fish History screen except that
the display of the water is split into two parts.
3 Operation
On the right is the Full Range Section and to
the left is the Zoom Section. Use this screen
for taking a closer look at underwater
features.
Sonar screen (see section 3-3)
Displays the strength and depth of the echos
returned from each ultrasonic pulse. This
screen can also be used for manually setting
the gain and colouration for the Fish History
and Zoom screens.
Fuel screen (see section 3-4)
Displays fuel consumption, fuel used, fuel
remaining, fuel economy, boat speed and
water depth. Fuel Screen will be displayed on
the Main Menu only if the Fuel option has
been enabled (see Setup - Fuel section 4-2).
Data screen (see section 3-5)
Displays water temperature, depth, battery
voltage and boat speed.
Setup menu (see section 4)
The Setup menu allows customising of the
FISH450 Tricolor to individual preferences.
Alarms can be set to suit individual preferences.
Green symbols, visible at the bottom of the screen,
indicate enabled alarms.
Access the Alarms menu by a single press of the
Alarm key (provided the beeper is not active) or
through the Setup screen.
When an alarm condition is met the following
occurs:
• The beeper will sound.
•The Alarms menu will be displayed on the
screen with the activated alarm(s) flashing.
• Each activated alarm’s symbol will flash red.
Pressing the Alarm key will acknowledge the alarm,
stop the beeping, and remove the Alarms menu.
This does not disable the alarm. The symbol will
continue to flash red until the alarm condition is no
longer present.
Note: The Fish Alarm gives three short beeps only.
Alarm automatically re-enables
For Low Fuel, Too Shallow, Too Deep, and Low
Battery, the alarm is re-enabled when the value
moves back outside the alarm condition.
With Temp Value, the alarm is re-enabled when
the temperature is more than 0.25°C / 0.45°F
above or below the trigger value.
With Temp Rate, the alarm is re-enabled when the
rate of change of temperature falls below the trigger
value by more than 0.1°C per minute / 0.2°F per
minute.
External beeper
An external beeper may be installed when a louder
secondary alarm indication is required. This can
be positioned anywhere on the boat. For
installation details see the Installation - Wiring
(section 5-7).
3-1 Alarms
Symbol Alarm Beeper Alarm condition
Name cycle is met when:
Low 1/2 sec the fuel level is less than
Fuel the alarm trigger value.
Too 1/5 sec the depth is less than
Shallow the alarm trigger value.
Too 1/2 sec the depth is greater than
Deep the alarm trigger value.
Fish 3 short an echo matches the
Alarm beeps profile of a fish.
Temp 1/2 sec the temperature equals
Value the alarm trigger value.
Temp 1/2 sec the rate of change of
Rate temperature equals
the alarm trigger value.
Low 1/2 sec the battery voltage is
Battery less than the alarm
trigger value.
7
FISH450 Tricolor FISHFINDER Installation and Operation Manual
NAVMAN
Fish detection
The FISH450 Tricolor analyses all received echos
and recognises the characteristic patterns returned
by fish. These echos are displayed on the screen
as a fish symbol. The default setting is for an
associated depth to be shown with fish symbols.
Advanced users sometimes prefer to turn off the
fish symbol feature and interpret the echo patterns
themselves. The following is an example with fish
symbols turned off:
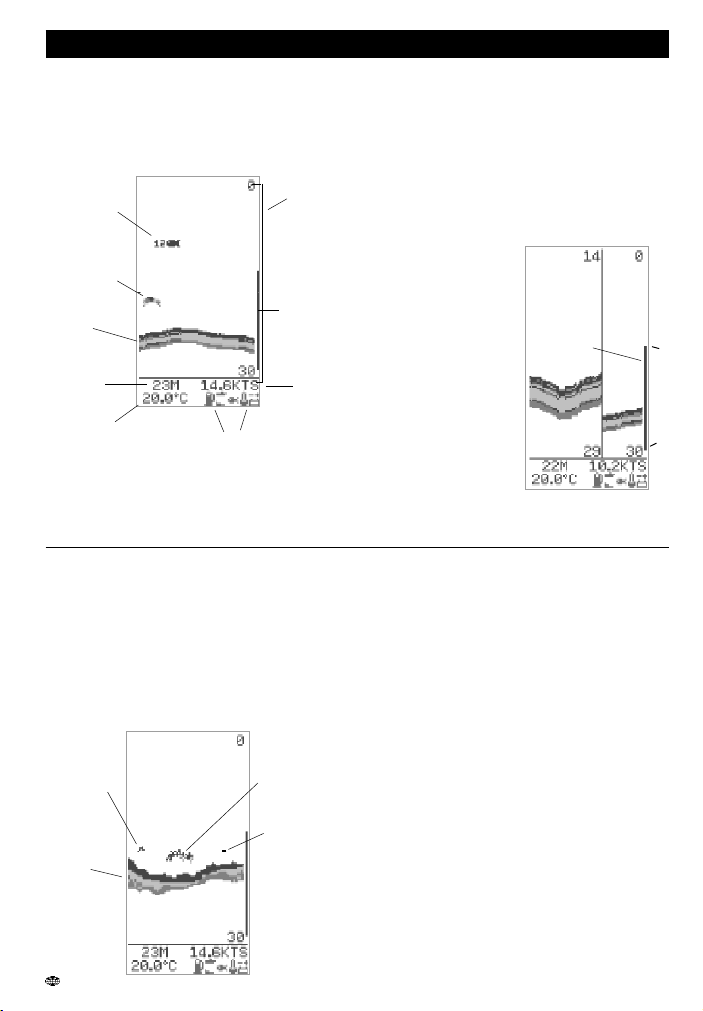
Fish History screen
The Fish History screen displays the most recent
signals on the right of the screen, and the oldest
signals on the left. Vertically, this screen always
displays between the surface and the selected depth
range. This screen is often used to find fishing spots.
Selected
range
e.g. 0-30 m
3-2 Fish History and Zoom Screens
Zoom screen
The Zoom screen is used to view greater detail in
an area of interest (e.g. fish close to the bottom).
The right portion is the Full Range Section and
the left is the Zoom Section.
The Zoom Bar, located on the very right of the
screen, determines the depth range of the Zoom
Section and the amount of magnification:
The Full Range Section illustrated is 0 to 30 m and
the Zoom Bar is between 14 and 29m. Therefore
the area between 14 and
29m is enlarged in the
Zoom Section.
To set the depth of the
Zoom Section, move the
Zoom Bar up or down by
pressing the Cursor Up
or Down key. To make
the Zoom Bar smaller (to
increase magnification),
press the Cursor Left
key. To make the Zoom
Bar bigger (to decrease
magnification), press the
Cursor Right key.
The Zoom Bar can be adjusted in the Fish History
screen before switching to the Zoom screen.
Zoom
Section
Depth of
Bottom
Water Surface
Temperature
Speed
Alarm symbols, see the
Alarms section 3-1.
Bottom
Fish symbol,
with depth
Object (e.g.
seaweed)
Zoom Bar
Zoom Bar
Full
Range
Section
14
29
Note 1: This screen can be customised. (see Setup
- Display section 4-6)
Note 2: The Depth of Bottom can be adjusted for
Keel Offset. (see Setup - Depth section 4-3)
Single fish
Large
school of
fish
Small
school of
fish
Bottom
Strength of returned echos
The three colours indicate differences in the
strength of the returned echo: blue is the strongest,
red is medium strength and green is the weakest.
There are several reasons why the strength of the
returned echo varies:
• The size of the fish, school of fish or other
object.
• The depth of the fish or object.
• The location of the fish or object. The area
covered by the ultrasonic beam is
approximately cone-shaped and strongest in
the centre.
• The clarity of water. Particles or air in the
water reduce the strength of the returned
echo.
• The composition or density of the object. Soft
mud produces weaker echos than rock.
Planing hulls at speed produce air bubbles and
turbulent water that bombard the transducer. The
resulting ultrasonic noise may be picked up by the
transducer and obscure the real echos.
8
FISH450 Tricolor FISHFINDER Installation and Operation Manual
NAVMAN
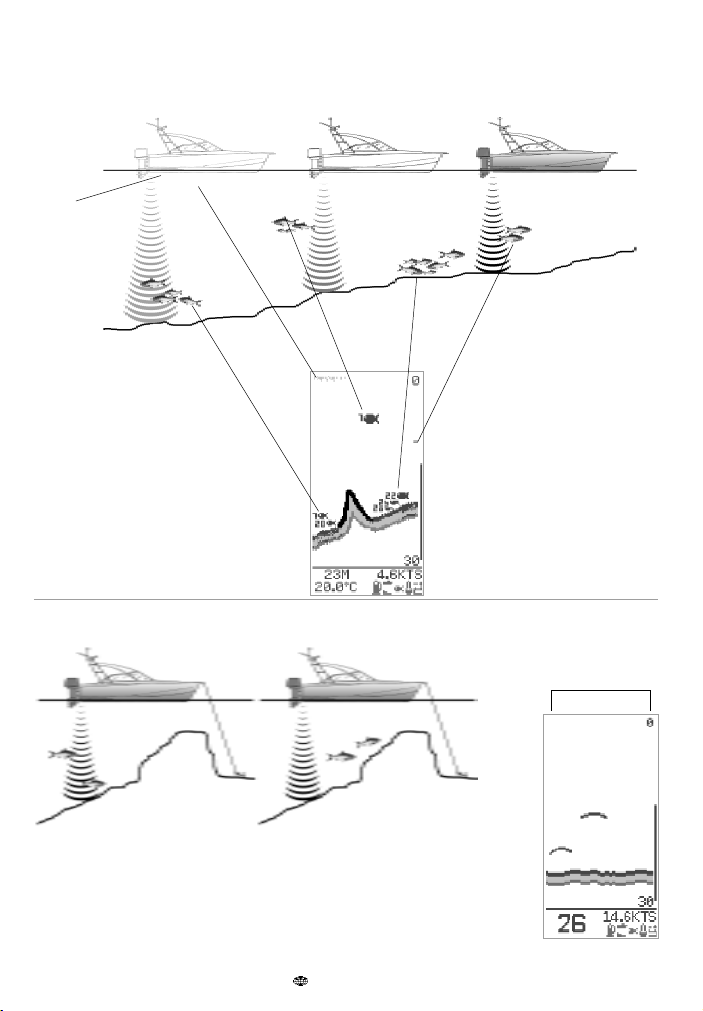
1 minute ago
30 seconds ago
Now
When the fish symbol feature is
enabled, any echo returned that
fits the profile of a fish is
displayed on the screen with a
fish symbol. To interpret and use
this function, see Setup - Display
section 4-6.
Note: times indicated are for illustration only.
Air in water (e.g.
from wake)
1 minute ago Now
Time
The FISH450 Tricolor like most fishfinders displays the
most recent events on the right of the screen.
Moving boat
Stationary boat
When a boat is stationary, all bottom echos will come from the same small area of
bottom. This will produce a flat bottom trace on the screen as shown on the right.
The appearance of the Fish History and Zoom screens can be
changed to suit individual preferences. This screen has the
depth reading in larger text as a result of the temperature
reading being disabled (see Setup - Display section 4-6).

9
FISH450 Tricolor FISHFINDER Installation and Operation Manual
NAVMAN
Range
Range is the depth of water displayed vertically.
The FISH450 Tricolor has two range modes, Auto
Range and Manual Range:
• In Auto Range, the unit adjusts the depth
range so that the bottom is shown in the
lower part of the screen. The use of Auto
Range is recommended.
• In Manual Range, the range can be set by
pressing the Increase Range or Decrease
Range key.
To switch between Auto Range and Manual Range
hold the Increase Range or Decrease Range key
down until the dialogue box “Auto Range” or
“Manual Range” briefly appears.
Manual Range is useful to prevent the screen
redrawing when there are rapid changes in depth.
(E.g. looking at the sea floor surrounding a pinnacle.)
Gain
Gain controls the amount of detail displayed on
the screen. The FISH450 Tricolor has two gain
modes, Auto Gain and Manual Gain.
• In Auto Gain, the gain is automatically
adjusted. The use of Auto Gain is
recommended.
• Manual Gain can be set between 1 and 9, low
values may not show enough detail, while too
high a setting may clutter the screen. When in
Manual Gain the gain symbol
appears
followed by the gain level.
To switch between Auto Gain and Manual Gain,
hold the Increase Gain or Decrease Gain key down
until the dialogue box “Auto Gain” or “Manual Gain”
briefly appears.
See the Sonar screen section 3-3 for more
information.
Bottom Lock
Bottom Lock fixes the Zoom Bar to the bottom, so
the bottom is always displayed in the Zoom
Section, regardless of changes in depth.
To turn Bottom Lock on, move the Zoom Bar down
until it touches the bottom and the dialogue box
“Bottom Lock On” briefly appears. To turn Bottom
Lock off press the Cursor Up key.
Should the bottom rise to meet the Zoom Bar when
bottom lock is off, the Zoom Bar will temporarily track
the bottom. This condition will cease when the depth
exceeds the original depth of the Zoom Bar.
Shadows
Shadows are areas where the ultrasonic beam cannot ‘see’. These
include hollows on the bottom or beside rocks and ledges where the
strong echo returned off the rock obscures the weaker echo of the fish.
When looking for small objects including fish, users should consider that
there are places where fishfinders cannot ‘see’.
These fish will be hidden in the bottom echo.
Shadow - where objects are hidden in the bottom echo.

10
FISH450 Tricolor FISHFINDER Installation and Operation Manual
NAVMAN
The Sonar screen displays the depth and strength
of the echos returned from each ultrasonic pulse.
This raw signal is enhanced by the Colouration
and Gain settings and then displayed on the Fish
History or Zoom screen as a single vertical row of
dots.
The key to interpreting the Sonar screen is to look
at the strength (stronger echos project further to
the left) and the depth (distance down the screen)
of the echos.
Changing the colour thresholds
The Colouration Bar determines which level
(strength) of echos will be displayed in blue, red
or green on the Fish History and Zoom screens.
To display the colouration bar, press the Cursor
Left or Right key.
• Increase the blue part of the colouration bar
by pressing the Cursor Right key if there are
too few blue (strong) echos being displayed.
• Decrease the blue part of the colouration bar
by pressing the Cursor Left key if there are
too many blue echos
being displayed.
The red and green
portions of the bar graph
share the remaining area
equally.
The bar will automatically
turn off when left for four
seconds.
Manual Gain adjustment
The Sonar screen displays all echos returned. If
the Manual Gain value is high, the Fish History or
Zoom screens may become cluttered with too
many weak echos. Use Manual Gain to adjust
the level of received echos that are displayed.
Holding the Increase Gain or Decrease Gain key
for one second or longer switches between Auto
Gain and Manual Gain. A dialogue box will
display “Auto Gain” or “Manual Gain”.
See the Fish History screen section 3-2 for more
information on Manual Gain adjustment.
3-3 Sonar screen
Unwanted weak signals
or ‘Noise’ (e.g. Bubbles)
Signals to the right of the
colouration bar are not
displayed on the Fish
History or Zoom screens.
Press the Increase Gain
key to move the edge of
the colouration bar to
the right and display
more detail. Press the
Decrease Gain key for
less detail.
This symbol and number (1 to 9) are
only displayed when in Manual Gain.
Small strong echo
(e.g. fish).
These usually flash
on and off as the
ultrasonic pulse
strikes the fish.
Large strong signal
(bottom).
Medium sized weak
signal (e.g. school of
small fish).
Strength
Depth
Blue
Red
Green
Increase the blue area by pressing
the Cursor Right key or decrease by
pressing the Cursor Left key
Not displayed
11
FISH450 Tricolor FISHFINDER Installation and Operation Manual
NAVMAN
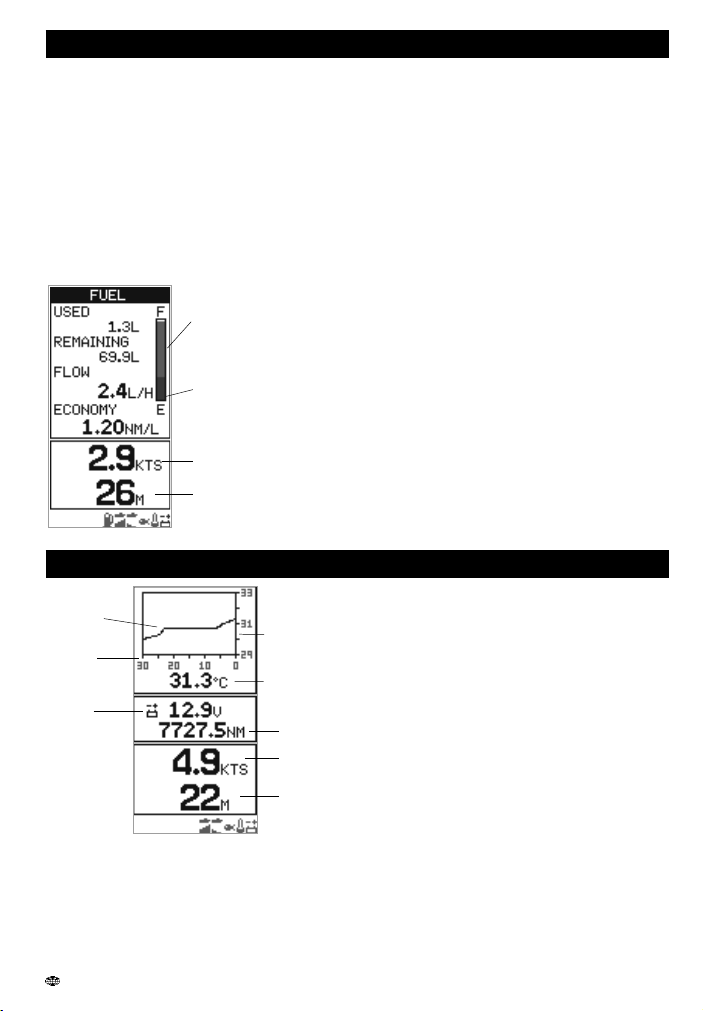
Fuel screen
The FISH450 Tricolor is also a petrol fuel computer.
To use these fuel features, first purchase and install
the optional single or twin engine fuel kit.
If Fuel does not appear on the Main Menu screen
it must be enabled in the Setup - Fuel screen. To
enable all fuel functions, change Num Engines to
1 (single engine) or 2 (twin engine) as appropriate.
(see Setup - Fuel section 4 - 2)
Setup the tank size and select the fuel unit (L,
USGAL, IMPGAL) to be used as outlined in the
Setup - Fuel section.
3-4 Fuel screen
Used is the total fuel used in litres or gallons since
it was last cleared. This can be reset to 0 by the
Clear Used command in the Setup - Fuel menu
(see section 4-2).
Remaining is the amount of fuel remaining in the
fuel tank(s) displayed in litres or gallons.
Flow (fuel consumption) is shown in litres or
gallons per hour. For twin engine installations, the
fuel flow for each engine is shown separately. This
is useful for checking that both engines are under
the same load.
Economy is the distance travelled per unit of fuel
used. The FISH450 Tricolor uses boat speed and
fuel consumption for this calculation. The Economy
units are set by the units selected for speed and
fuel (e.g. NM/L, NM/G, MI/L, MPG, KM/L, KM/G).
Adjust the throttle and trim for the best Economy.
The bigger the number the better the economy.
CAUTION: Fuel economy can change drastically
depending on boat loading and sea conditions.
Always carry adequate fuel for the journey plus a
sufficient reserve.
Speed is the current speed of the boat.
Depth is the current depth of the bottom.
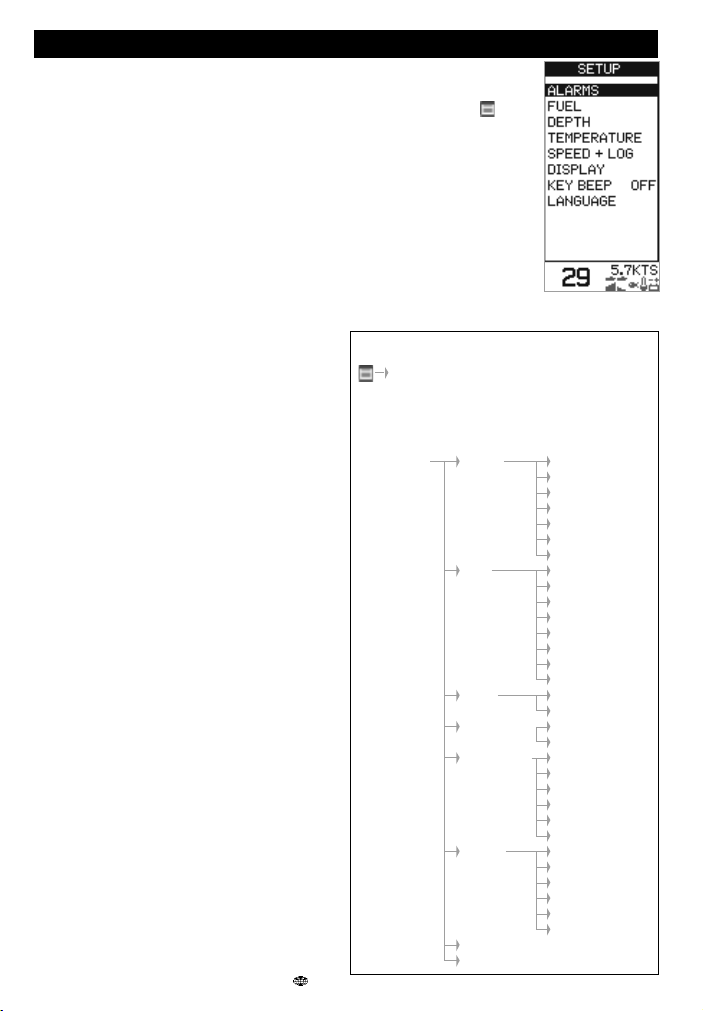
Temperature
Current water
Temperature
Minutes
Battery
voltage
(or through-hull speed transducer) and measures
the water temperature at that point. An alarm for a
specific temperature or rate of change of temperature
may be enabled in Setup - Alarms section 4-1.
Battery
The battery voltage is displayed numerically.
Monitoring this helps prevent the battery running
flat without warning, particularly when using
electronic devices while the battery is not charging.
The battery voltage may provide an early warning
of battery or alternator failure. The battery voltage
will increase after the motor has started if the
alternator is charging correctly.
Log
One of two distance logs can be displayed: Trip
Log or Total Log. Both logs are stored in NAVMAN's
NVM (non volatile memory) when the unit is
switched off. To change the which log displayed see
section 4-6. The Trip log must be reset manually as
most users will want to start and stop during a trip.
Speed is the current speed of the boat.
Depth is the current depth of the bottom.
3-5 Data screen
Green indicates
fuel remaining
Red indicates the Low
Fuel alarm setting.
Temperature
Graph
Speed
Depth
Speed
Depth
Temperature
A graph displays the last 30 minutes of water
temperature and is updated every 30 seconds. The
current water temperature is displayed numerically
and is updated every second.
The temperature sensor is located in the Aquaducer,
Log
12
FISH450 Tricolor FISHFINDER Installation and Operation Manual
NAVMAN
Alarms Low Fuel
Too Shallow
Too Deep
Fish Alarm
Temperature Value
Temperature Rate
Low Battery
Fuel Tank Full
Tank Size
Set Remaining
Clear Used
Units
Num Engines
Fuel Calibrate
Flow Filter
Depth Units
Keel offset
Temperature Units
Temperature Cal
Speed & Log Units
Speed Calibrate
Log Cal
Log (Trip/Total)
Zero Trip Log
Zero all logs
Display Fish Symbol
Speed
Temperature
Display Calibrate
Red Calibrate
Blue Calibrate
Key Beep
Language
The FISH450 Tricolor is menu driven.
The Setup menu allows the FISH450 Tricolor to be
customised to each user’s individual preferences.
Alarms menu (see section 4-1) is used to:
Enable or disable alarms and set the trigger
value for each alarm. Pressing the Alarm
key from anywhere will enter the Alarm
menu, provided the beeper is not active (in
which case pressing the Alarm key silences
the beeper).
Fuel setup (see section 4-2) is used to:
Set the Tank Size, adjust the fuel remaining
value (Remaining), set the fuel remaining
value equal to tank size (Tank Full), clear the
fuel log (Clear Used), set the fuel units
(Units) (L, USGAL, IMPGAL), set the number
of engines (Num Engines), calibrate the fuel
transducer (Fuel Calibration) and adjust the
flow averaging period (Flow Filter).
Depth setup (see section 4-3) is used to:
Set the depth measurement units (M, FA,
FT) and adjust Keel Offset.
Temperature setup (see section 4-4) is
used to:
Set the Temperature measurement units
(°C, °F) and calibrate the temperature.
Speed and Log setup (see section 4-5) are
used to:
Set the boat speed units (MPH KPH KTS),
calibrate the speed, reset the Trip Log and
reset all logs.
Display setup (see section 4-6) is used to:
Enable or disable the display of fish symbols
(Fish Symb), speed (Speed) and
temperature (Temp) on the Fish History,
Zoom and Sonar screens. Switch between
Trip Log and Total Log displayed on the Data
screen. Calibrate the display colours (Display
Cal, Red Cal, Blue Cal).
Key Beep (see section 4-7) is used to:
Enable or disable a single beep which
audibly confirms that a key has been
pressed.
Language setup (see section 4-8) is used to:
Set the language to one of the following:
English, French, German, Spanish, Italian,
Dutch, Swedish or Portuguese.
4 Setup
Menu structure of Setup
Main Menu
Fish History
Zoom
Sonar
Fuel
Data
Setup
Menu operation
To display the Setup screen,
press the Menu key
one or
more times until the Main Menu
screen appears. Press the
Cursor Up or Down key to
highlight Setup, then press the
Cursor Right key to select it.
Press the Cursor Up or Down
key to highlight an option, then
press the Cursor Right key to
select it.
Exit any Setup menu item by
pressing the Menu key. This will
display the screen one step closer to the Main Menu.

13
FISH450 Tricolor FISHFINDER Installation and Operation Manual
NAVMAN
For more information on alarms see Operation -
Alarms (section 3-1).
Access the Alarms menu by
a single press of the Alarm
key (provided the beeper is
not active) or through the
Setup menu screen.
Selecting items and
changing values
Press the Cursor Up or
Down key to highlight an
alarm, then press the Cursor
Right key to select it.
An alarm screen has a
trigger value and an On / Off
value. Press the Cursor Up
or Down key to switch
between them.
The highlighted value may
be changed using the Cursor
Left and Right key. Press the
Menu key to save and exit
once both values have been
set.
The alarm value is retained
even when the alarm is
disabled.
External beeper
An external beeper may
be installed when a louder
secondary alarm
indication is required. This can be positioned
anywhere on the boat. For installation details
see Installation - Wiring (section 6-6).
4-1 Alarms
Symbol Alarm Beeper Alarm condition
Name cycle is met when:
Low 1/2 sec the fuel level is less than
Fuel the alarm trigger value.
To o 1/5 sec the depth is less than
Shallow the alarm trigger value.
To o 1/2 sec the depth is greater than
Deep the alarm trigger value.
Fish 3 short an echo matches the
Alarm beeps profile of a fish.
Temp 1/2 sec the temperature equals
Value the alarm trigger value.
Temp 1/2 sec the rate of change of
Rate temperature equals
the alarm trigger value.
Low 1/2 sec the battery voltage is less
Battery than the alarm trigger value.

14
FISH450 Tricolor FISHFINDER Installation and Operation Manual
NAVMAN
To use these fuel features first purchase and install
the optional single or twin engine fuel kit.
Access the Fuel menu through the Setup menu
screen.
Selecting items and
changing values
Press the Cursor Up or
Down key to highlight an
option, then press the
Cursor Right key to select
it.
Once an option on the Fuel
menu has been selected,
its value may be changed.
Press the Cursor Left and
Right key to change the
value, then press the Menu
key to save and exit.
When either Units or Num Engines is highlighted,
pressing the Cursor Right key will cycle through
the available values.
Tank Full
Select Yes to set fuel remaining (Remaining) equal
to the tank capacity. IMPORTANT: Do this each
time the fuel tank is refilled or the low fuel alarm
will be meaningless! When partially filling the fuel
tank use Set Remaining.
Tank Size
Enters the capacity of the fuel tank into the unit for
use with the Tank Full option. It is best to measure
the fuel tank size by draining, then filling with fuel
in the usual manner and using the fuel dispenser’s
meter to measure the amount. Be aware of air
pockets, particularly in underfloor tanks.
Set Remaining
Changes the fuel remaining value. Use this feature
when not filling the fuel tank to capacity, or when
syphoning fuel out.
Clear Used
Resets the fuel used (Used) value to 0.0. Use this
to start re-measuring the amount of fuel used.
Units
Sets the units of fuel to L (Litres), USGAL (US
Gallons) or IMPGAL (Imperial Gallons)
Num Engines
Sets the number of engines to 1, 2 or 0. If 0 is
selected the fuel features are turned off and Fuel
no longer appears on the main menu.
4-2 Fuel
Fuel Cal
Calibrating the fuel usage can increase the
accuracy of fuel measurements from +/- 10% to
better than +/- 2%. For twin engine installations
calibration of each transducer is required.
Calibrating the fuel transducer requires accurate
measurement of the fuel used (Used). This is easiest
with a small portable tank. It should be noted that
due to air pockets, it is very difficult to fill underfloor
tanks to the same level twice. At least 15 litres should
be used to ensure an accurate calibration. (The
more fuel used, the more accurate the calibration
will be.) Each transducer in a twin engine installation
must be calibrated separately. This may be done at
the same time with two portable tanks, or at different
times using one tank at a time.
The procedure is as follows:
1) Reset the fuel used amount on the FISH450
Tricolor to 0.0 by selecting Clear Used in the
Setup - Fuel menu, then selecting Yes .
2) Connect the measurement tank(s) to the
engine(s) via the fuel transducer(s).
3) Run the engine(s) at normal cruising speed
until at least 15 litres is indicated (30 for twin
engines).
4) Check the actual amount of fuel used per
engine. The easiest way to do this is to refill
the tank(s) to the original level(s) and record
the value(s) shown on the fuel dispenser.
5) Select Fuel Cal on the fuel menu. The amount
of fuel that the FISH450 Tricolor has recorded
will be displayed. Use the Cursor Left or Right
key to change this to the actual fuel amount
used. Press the Menu key when the value is
set. (Repeat for the other engine in a twin
engine installation).
Flow Filter
Sets the period over which the fuel flow is
averaged. Averaging can be set from 1 to 255
seconds.
Normally engines do not draw fuel from the tank
at a steady rate. They draw fuel at a high rate for a
few seconds until the carburettor bowl or fuel
injection reservoir is full, then draw no fuel for a
few seconds. If the true flow rate were displayed,
it would be too erratic to read.
Usually a value of 10-15 seconds will give a
satisfactory result for carburettor engines. Fuel
injected engines may require a larger value.
This setting affects the flow rate (Flow) and
Economy displays. It does not affect the fuel used
(Used) measurement.
15
FISH450 Tricolor FISHFINDER Installation and Operation Manual
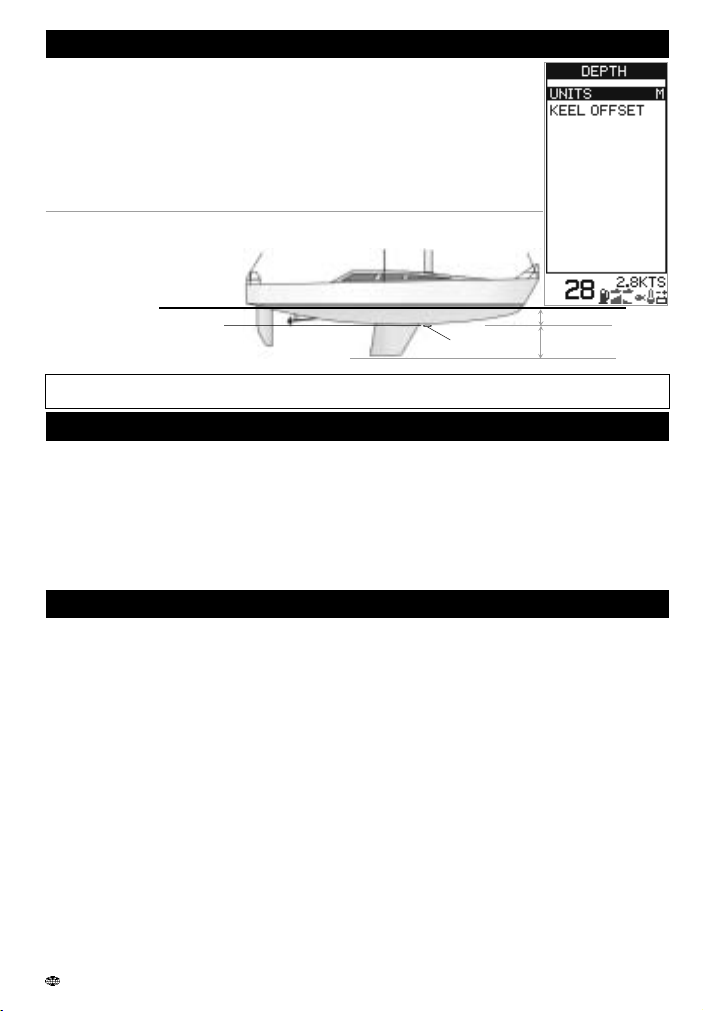
NAVMAN
Use Keel Offset either when the transducer is located below the water surface but
Water surface
Depth of transducer
Enter positive values to display depth as measured from a point above the transducer (e.g. Water surface).
Enter negative values to display depth as measured from a point below the transducer (e.g. keel).
Negative value
Transducer
Note: Boat illustrated uses a through hull transducer
location of the depth transducer
and the point the displayed depth
is measured from.
Press the Cursor Up or Down key
to highlight Keel Offset, then press
the Cursor Right key to select it.
Press the Cursor Left and Right
key to change the value, then press
the Menu key to save and exit.
Access the Depth menu through the Setup
menu screen.
Units
Pressing the Cursor Right key when Units
is highlighted cycles through the options: M
(metres) FT (feet) or FA (fathoms).
Keel Offset
Keel Offset is the distance between the
4-3 Depth
4-4 Temperature
4-5 Speed and Log
Access the Temperature menu through the Setup
menu screen.
Units
Press the Cursor Right key when Units is highlighted
to switch between °C (Celsius) and °F (Fahrenheit).
Temp Cal
The temperature readout may be calibrated.
Calibration requires accurate measurement of the
water temperature at the same point as the Aquaducer
(or through hull speed/temperature transducer).
Press the Cursor Up or Down key to highlight Temp
Cal, then press the Cursor Right key to select it.
This will display the FISH450 Tricolor’s temperature
measurement. Press the Cursor Left and Right key
to change the value to the actual water temperature,
then press the Menu key to save and exit.
Access the Speed and Log menu through the
Setup menu screen.
Units
Pressing the Cursor Right key when Units is
highlighted will cycle through the options: KTS (knots),
MPH (miles per hour) or KPH (kilometres per hour).
Speed Cal
To calibrate speed, an accurate measurement of
the boat’s speed is required.
Obtain the speed either from a timed run over a
known distance, or from another instrument (e.g.
GPS, DGPS or calibrated speedometer). The
calibrated instrument may be on board or on
another boat travelling alongside.
Notes for accurate calibration:
• GPS speeds are only accurate enough when
above 20 knots, DGPS when above 5 knots. Best
results are achieved in calm conditions where
there is minimal current (best at high or low tide).
• Paddlewheel devices are generally accurate
enough when between 6 and 20 knots.
Continue travelling at the same speed and calibrate
the speed as follows:
Press the Cursor Up or Down key to highlight Speed
Cal, then press the Cursor Right key to select it.
This will display the FISH450 Tricolor’s uncalibrated
speed measurement. Press the Cursor Left and
Right key to change this to the actual speed, then
press the Menu key to save and exit.
Log (Select)
Selects which log is displayed on the Data screen,
both the Total and Trip logs are always kept in the
FISH450 Tricolor but only the selected log is displayed.
Speed Cal
Speed may also be calibrated using Log Cal.
Log Cal
The log may also be calibrated using Speed Cal.
The Trip Log is used to perform a log calibration. First
zero the trip log (see below) then travel a known distance
in a straight line, stop at the destination and perform
calibration as soon as practical. Best results are
a display of total water depth is
required, or when depth of water
below the boat’s keel is required.
Positive value
16
FISH450 Tricolor FISHFINDER Installation and Operation Manual
NAVMAN
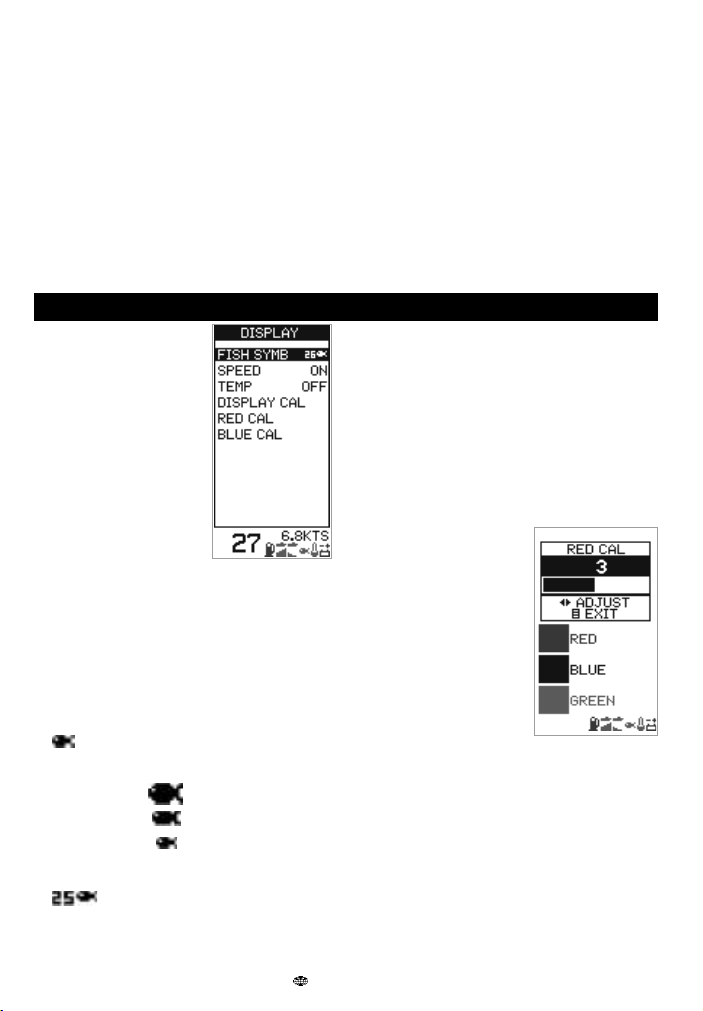
Access the Display menu
through the Setup menu
screen.
Selecting items and
changing values
Press the Cursor Up or Down
key to highlight an option.
If Fish Symb, Speed or Temp
is highlighted, pressing the
Cursor Right key will cycle
through the available values.
If Display Cal, Red Cal or
Blue Cal is highlighted, then
pressing the Cursor Right
key will select it. Once one of these options has
been selected, its value may be changed. Press
the Cursor Left and Right key to change the value,
then press the Menu key to save and exit.
Fish Symb
This controls how echos that match the profile of
a fish are displayed on the Fish History and Zoom
screens:
Off Displays echos as dots on the screen.
Displays any echos returned that
match the profile of a fish as a fish
symbol in one of three sizes:
Strongest echo
Average echo
Weakest echo
Echos which are not recognised as fish
are displayed as dots on the screen.
Displays any echos returned that
match the profile of a fish as a fish
symbol in one of three sizes as
above. The depth of the fish is shown
to the left of the symbol. Echos which
4-6 Display
achieved in calm conditions where there is minimal tide
(best at high or low tide). Tidal effects may be negated
by making the trip twice, once in both directions.
To perform the log calibration:
Press the Cursor Up or Down to highlight Log Cal,
then press Cursor Right to select it. This will display
the FISH450 Tricolor’s uncalibrated Trip Log. Press
the Cursor Left or Right key to change the value to
the known distance, then press the Menu key to save
and exit. The Total Log value will not be changed by
the calibration, the Trip Log will return to zero.
Zero Trip Log
Resetting the Trip Log will return the trip log value
to zero. The trip log is stored in the Non-volatile
memory so it retains the distance value if the unit
is switched of during a trip. Therefore, it needs to
be reset manually each trip.
Press the Cursor Up or Down key to highlight Zero
Trip Log, then press the cursor right key to select it.
The message “Zero Trip Log?” will appear. Use the
cursor left and right to switch between yes and no,
then press the menu key to zero trip log and exit.
Zero All Logs
Resetting both logs will return both the trip log and
the total log values to zero.
Press the Cursor Up or Down key to highlight Zero All
Logs, then press the cursor right key to select it. The
message “Zero All Logs?” will appear. Use the Cursor
Left and Right to switch between Yes and No, then
press the Menu key to reset all logs and exit.
are not recognised as fish are
displayed as dots on the screen.
Speed
This turns on or off the display of speed on the
Fish History, Zoom and Sonar screens.
Temp
This turns on or off the display of temperature on
the Fish History, Zoom and Sonar screens.
Disabling the temperature display increases the
size of the depth displayed in the Fish History,
Zoom and Sonar screens.
Colour calibration
Use colour calibration to
optimise the colours of the
unit’s display for differing
light conditions.
Display Cal
This changes the balance
of red, blue and green.
Red Cal
This changes red only.
Blue Cal
This changes blue only.
Users are advised to experiment with these
values to determine the settings that best suit
their individual preferences. It is essential that
adjustments are made while viewing from
directly in front of the screen.
Trip Log and Total Log
To switch between the Trip Log and the Total Log
press cursor down to highlight Trip Log or Total Log.
Press cursor left or right to change the log displayed,
then press the menu key to save and exit.
Backlighting
The backlight intensity may be enabled then
adjusted to suit individual preferences. See Getting
Started (section 2).

17
FISH450 Tricolor FISHFINDER Installation and Operation Manual
NAVMAN
The Key Beep function is located on the Setup menu.
It allows the user to activate an audible beep each
time a key is pressed.
Pressing the Cursor Right key when the word Key
Beep is highlighted switches between On and Off.
4-9 Resetting to factory defaults
4-7 Key Beep
GENERAL
Auto Gain ................................ON
Auto Range ..............................ON
Manual Gain ...............................5
Bottom Lock ..........................OFF
Key Beep ...............................OFF
UNITS
Temperature .............................°C
Depth ..................................Metres
Speed ....................................KTS
Fuel ......................................Litres
ALARMS
Shallow Alarm .......................OFF
Shallow Alarm Value ............3.0 m
Deep Alarm ...........................OFF
Deep Alarm Value .............20.0 m
Fish Alarm .............................OFF
Fuel Alarm .............................OFF
Fuel Alarm Value ..............20 litres
Temp. Change Alarm ............OFF
Temp. Change Alm Val. ......2.0 °C
Temp. Alarm .......................OFF
Temp. Alarm Value ........25.5 °C
Low Battery Alarm ...............ON
Battery Alarm Value ...11.5 Volts
DISPLAY
Fish Symbol ...................
Speed Display .....................ON
Temperature Display ..........OFF
Display Cal ..............................9
Red Cal ...................................3
Blue Cal ...................................3
Backlight ..................................6
FUEL
Tank Size ......................70 litres
Num Engines ...........................0
Flow Filter .....................10 secs
OTHER
Keel Offset .......................0.0 m
Logs ............................ Trip Log
Language ..................ENGLISH
All settings may be reset to the
manufacturer’s defaults
settings. (See right.)
IMPORTANT: Resetting to
factory defaults will erase all
settings you have made except
fuel used (Used) and fuel
remaining (Remaining).
To enter the Default Set
screen, first power off.
Hold the Cursor Left key down
and power on while continuing
to hold it down.
The message “RESET TO
FACTORY DEFAULTS?” will
appear.
Use the Cursor Left and Right
key to switch between Yes and
No, then press the Menu key
to continue the power on
sequence.
An internal simulator allows users to familiarise
themselves with operating the FISH450 Tricolor
off the water. When in Simulate mode the word
“Simulate” flashes on the bottom of the screen.
When in Simulate the unit generates data so that
all the main screens appear operational. Any
changes made to the backlighting, alarms and
display setup are saved, but the fuel log (Used)
and fuel remaining (Remaining) are not affected.
To turn the Simulate mode on, power the unit off,
disconnect the blue transducer plug at the rear of
unit, then power the unit on.
To turn the Simulate mode off, power the unit off;
reconnect the blue transducer plug at the rear of
unit, then power the unit on.
4-10 Simulate
4-8 Language
Access the Language
screen through the Setup
menu.
To select a language, press
the Cursor Up or Down key
to highlight it, then press
the Menu key to save and
exit.

18
FISH450 Tricolor FISHFINDER Installation and Operation Manual
NAVMAN
Standard configuration
• FISH 450 Tricolor unit
• Power cable (2m)
• Bracket (mount, bracket, three locking knobs,
plus four screws for attachment)
• Warranty Registration Card
• This Manual
• Transom mounted Aquaducer (Depth/speed/
temperature) - 8m cable included
• Bracket, wedges and three screws for the
Aquaducer.
5-1 What comes with your FISH450 Tricolor
Optional fuel kit
• Single engine fuel kit (petrol only)
- Fuel transducer - 8m cable included
- Power/Fuel cable - 2m
(replaces standard power cable)
5-2 Options and accessories
Optional through hull transducers
• Through hull transducers (replaces Transom
mounted Aquaducer)
- Through hull Speed/Temperature transducer
- Through hull Depth transducer
• Twin engine fuel kit (petrol only)
- Two fuel transducers - 8m cables included
- Power/Fuel cable - 2m
(replaces standard power cable)
- Twin engine fuel adapter (“T” junction)
Other options and accessories
• Extension cable
- 4m Aquaducer extension cable
• Flush mounting kit
• Replacement paddle wheel
• Dust and sun cover
5 Installation
Correct installation is critical to the performance of the unit. There are two components to install, the
FISH450 Tricolor and the transducer. The transducer which comes standard with the FISH450 Tricolor is
called an Aquaducer and includes three elements: speed, temperature and ultrasonic sounder.
It is vital to read the entire installation section of this manual and the documentation that comes with your
transducers before attempting installation.
Repeater for Depth, Speed,
Water Temperature, Battery
Voltage. Please consult your
NAVMAN dealer for more
information.
Depth Repeater
19
FISH450 Tricolor FISHFINDER Installation and Operation Manual
NAVMAN
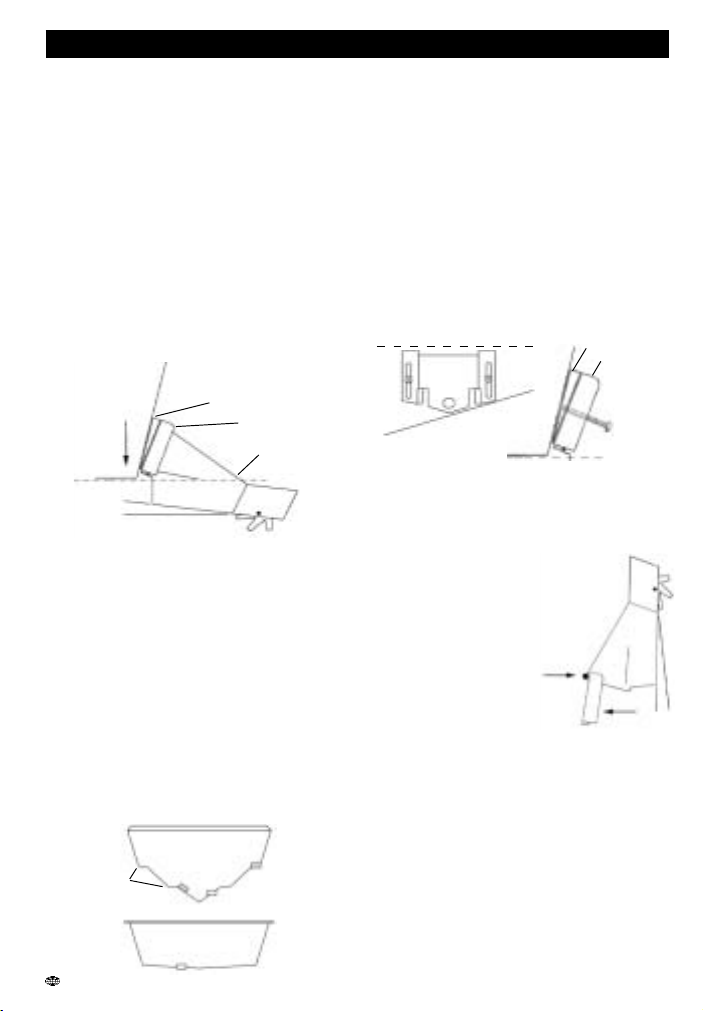
The location and angle of the Aquaducer are the
most critical parts of the installation. If the location
and angle are not correct, the Aquaducer can’t
perform at its designed potential.
Transom mount Aquaducer
IMPORTANT - the Aquaducer cable cannot be cut
or shortened.
The Aquaducer can be installed on any outboard or
stern-drive powered boat. Inboard powered boats must
be fitted with a through-hull transducer as the propeller
wash interferes with the operation of transom mounted
transducers. The transom mount Aquaducer has a
safety “kick up” mounting bracket which will normally
prevent damage to the Aquaducer should it impact
the bottom or floating debris in the water.
Final position of Aquaducer:
Location
Select a position for the Aquaducer that will:
• allow the Aquaducer a smooth flow of water
over its surface at all times.
• ensure a mount as deep in the water as
possible.
• be clear of any interference from the trailer
when launching or retrieving the boat.
• be away from planing strakes or other
projections from the hull that may cause
aerated water to flow over the face of the
transducer.
• be away from the propeller.
• be at least 150 mm (6") away from the keel
of the boat.
Mounting
• IMPORTANT - place the Aquaducer against
the transom and check that the bottom
surface is angled approximately 5° forward
in order to minimise the generation of
bubbles through cavitation. If necessary, use
one or more of the three wedges provided
(one 4° and two 8°) to achieve this angle.
• Position the bracket and selected wedge(s)
as low as possible without any part
protruding below the hull. Mark the screw
hole centres on the transom through the
centre of the bracket slots. Mark them so that
when the screws are tightened the screw
heads sit flat on the surface of the bracket.
• Drill the two screw holes using a 3 mm drill
bit. Make sure the holes are angled so that
when the screws are tightened the screw
heads sit flat on the surface of the bracket.
• Insert the Aquaducer into the
bracket. Use the stainless screws
provided to attach the bracket and
wedge(s) to the transom. Ensure
again that the top of the bracket
is horizontal and that the
bracket is as low as
possible without
protruding below the
hull. Fill holes with a
sealing compound before
inserting screws. Tighten the two screws.
• Drill a hole and insert the third screw in the
middle of the bracket.
• Finally push the Aquaducer down so it
‘clicks’ into place.
• Once in place test the Aquaducer is
connected by turning the unit on. If the
Aquaducer is not connected then the
message “No transducer detected. Enter
simulation mode? Yes/No” will appear. (see
Simulate Mode section 4-10). Please see the
section on Troubleshooting Appendix B.
5-3 Mounting the Aquaducer
Poor Angle
Good Location
Good Location and Angle
Poor Location
Position Aquaducer
as low as possible
5°
Wedge(s)
Bracket
Planing Strakes
Aquaducer
Wedge(s)
Bracket
Position the bracket
as low as possible
Horizontal
Mark with
screw or
sharp object.

20
FISH450 Tricolor FISHFINDER Installation and Operation Manual
NAVMAN
Mounting the bracket
1. Select a position where the display head will
be:
• At least 300mm away from the compass.
• At least 300mm away from any radio
transmitter.
• At least 1.2 metres away from the VHF
antenna.
• Easy to read by the helmsman and crew
while underway. Colours are best when
viewed from directly in front of the unit.
• Protected from physical damage during
rough sea passages.
• Easy to access the 12 volt power source.
• Convenient to route the transducer cables.
2. Remove the round base from the centre of the
bracket.
3. Affix the round base using the 4 stainless screws
provided.
4. Orientate the bracket on the round base and
screw down the central locking knob.
Note: There is also a flush mount kit available.
Please consult your NAVMAN dealer.
Mounting the FISH450 Tricolor
1. Attach cables.
2. Slide mounting screws into the slots on the
mounting bracket. The rubber washers go between
the body of the fishfinder and the mounting bracket.
Removing the FISH450 Tricolor
You may remove your fishfinder after each use for
protection against the environment or security
reasons.
If you do remove the FISH450 Tricolor, ensure that
the plugs left in the boat are not exposed to the
elements. Keep the unit in a dry clean place.
5-6 Mounting the FISH450 Tricolor display unit
Correct transducer installation is critical to the
performance of the unit. Most transducers come
with instruction. It is important to carefully read and
follow the instructions provided.
NAVMAN through-hull transducers and speed/
5-4 Other depth and speed / temperature transducers
5-5 Fuel transducers
Fuel transducers
A single or twin engine fuel kit can be purchased
separately. It is supplied with the “NAVMAN Fuel
flow transducer installation instructions”. This
transducer is for use with petrol engines only.
A fuel filter must be placed on the fuel line between
the transducer and the fuel tank.
When the installation is complete, please follow the
instructions in Setup Fuel section 4-2.
Note: Before the fuel features can be used they
must be enabled by setting Num Engines to either
1 or 2.
temperature transducers are available for the
FISH450 Tricolor. These are separate transducers
which require separate mounting.
Please consult your NAVMAN dealer when
attempting to install other transducers.
21
FISH450 Tricolor FISHFINDER Installation and Operation Manual
NAVMAN
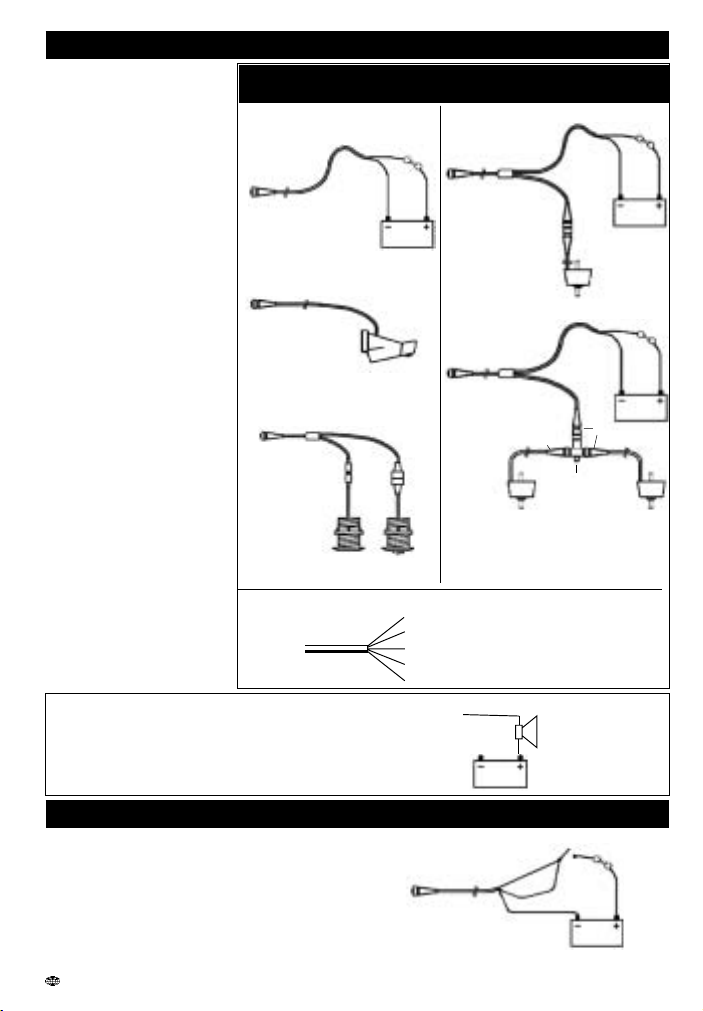
Standard power connection
8 pin Black
8 pin Blue
Depth/Speed/Temperature
Standard Transom Mount
Aquaducer
8 pin Blue
Speed and
Temperature
Depth
Through-Hull Transducers
option
Single engine fuel option
8 pin Black
Red
Black
Fuel Transducer
Twin engine fuel option
Fuel Transducer
Port
Fuel Transducer
Starboard
8 pin Black
8 pin Black
Yellow
Black
To have the FISH450 Tricolor turn on automatically
when the boat’s power is switched on, connect both
the yellow and red wires to the boat’s power switch.
Use this in conjunction with the fuel option to ensure
that the FISH450 Tricolor is turned on and
measuring fuel flow whenever the engine is
running. The Backlight / Power key will no longer
be able to be used to turn the unit off.
Warning: The FISH450 Tricolor must be run off a 12 volt battery
and must not be run off a circuit without a battery.
Switch
8 pin White
8 pin White
8 pin White
RCA
4 pin
The FISH450 Tricolor uses a
colour coded connector
system:
Black connector = Power
Blue connector = Aquaducer
White connector = Fuel
The connectors are bayonet
type, push the plugs into the
sockets then turn the collars to
lock. Make sure the collars are
secure for water tight connection.
Important
• The connection to the
battery must be made via a
fuse (1 amp) or circuit
breaker.
• If possible, route the
transducer cables away
from other wiring on the
boat. Electrical noise from
engine wiring, bilge pumps,
and other equipment can
affect the unit.
• Connect the red wire of the
two-core power cable to
the positive supply and the
black wire to the electrical
ground.
• The shortest and most
direct connection to the
boat’s battery helps to
minimise voltage drop.
• If the Auto Power option is
not used, connect the
yellow Auto Power wire to
the black ground wire.
cable 8m
cable 0.4m
Power fuel cable 2m
cable 2m
cable 8m
cable 8m
Power fuel cable 2m
Twin engine
fuel adaptor
5-8 Auto Power wiring connection
5-7 Wiring connection
Power cable colour codes
Black = Ground (Battery negative terminal)
Yellow = Auto Power +12 volt (in)
Red = +12 volt (in)
Green = external buzzer
White = NMEA (out)
External beeper
A 12 volt external beeper with a built in
drive circuit may be connected. The
maximum current draw is 250mA.
Green wire of
power cable
External
beeper
Connect beeper to positive
cable 8m
Red
fuse
Red
Black
Red
Black
fuse
fuse
fuse
22
FISH450 Tricolor FISHFINDER Installation and Operation Manual
NAVMAN
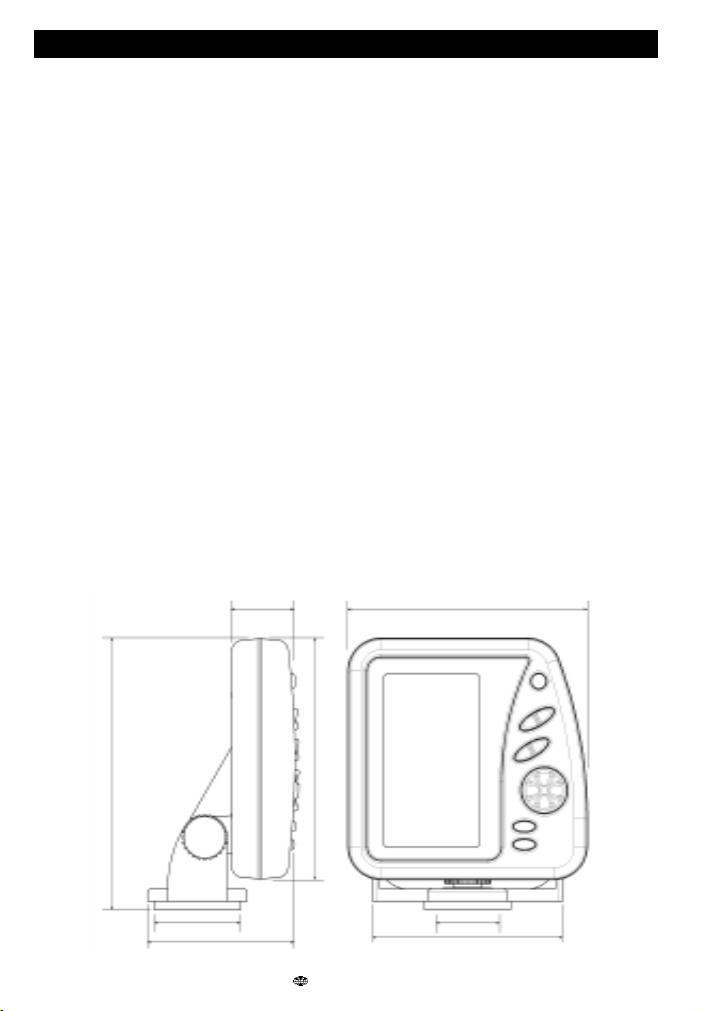
81.5 (3.2")
149.0 (5.9")
133.0 (5.2")
132.0 (5.2")
35.0 (1.4")
35.0 (1.4")
32.0 (1.3")
Depth range
• 0.6 m (2 ft ) to 300 m (1000 ft)
Display type
• 3 Colour LCD
• Screen resolution 160 high x 80 wide (pixels)
• White multi-level back lighting
Supply voltage
• 10 to 16.5 V dc
Supply current
• 180 mA max (full backlighting)
Operating temperature
• 0 to 50°C (32 to 122°F)
Maximum transducer cable length
• 12 m (39 ft)
Supplied transducer cable length
• 8 m (26 ft)
Typical depth acquisition time from startup
• 2 seconds at 30 metres
Depth accuracy
• Better than 2%
Transducer frequency
• 200 kHz
Transducer power
• 400 Watts nominal @ 13.8V DC (During
Burst)
Receiver sensitivity
• Better than 20 micro volts RMS
• Dynamic range 4.0 million to 1 (120dB)
Temperature measurement range
• 0-37.7°C (32-99.9°F) Resolution 0.1 units
Speed range
• 1-50 kn (mph, kph)
Speed resolution
• 0.0 to 19.9, 20 to 50
Log range
• 0.0 to 99999.9 units
Log resolution
• 0.1 units
Environment rating
• Immersion in 1 metre of water for 30 mins.
(IP67)
Communications
• NMEA 0183 (Ver 2.0) 4800 Baud
NMEA output
NMEA (0183 format) is a standard for interfacing
marine electronic devices. The FISH450 Tricolor
can output the following data:
• DBT (Depth Below Transducer)
• DPT (Depth and Keel offset)
• TDK (Depth Talon Technology - proprietary)
• TKV (Speed Talon Technology - proprietary)
• VHW (Speed)
• MTW (Water temperature)
• XDR (Battery voltage and fuel flow)
Appendix A - Specifications

23
FISH450 Tricolor FISHFINDER Installation and Operation Manual
NAVMAN
Appendix B - Troubleshooting
This troubleshooting guide is written with the
assumption that the user has read and understood
the relevant sections in this manual.
It is possible in many cases to solve difficulties
without having to send the unit back to the
manufacturer for repair. Please follow this
troubleshooting section before contacting the
nearest NAVMAN dealer.
There are no user serviceable parts. Specialised
methods and testing equipment is required to
ensure that the unit is reassembled correctly and
is waterproof. Users who service the FISH450
Tricolor themselves will void the warranty (see
appendix D.
Repairs to the FISH450 Tricolor may only be
carried out by a service centre approved by Talon
Technology. If it is found that the unit must be
sent into a service centre for repair, it is essential
to send in the transducer(s) at the same time.
More information can be found on our website:
www.navman.com.
1. The fishfinder won’t turn on:
a) The FISH450 Tricolor is designed to operate
on 12 volt battery systems, where the voltage
may vary from 10 to 16.5 volts. If an excessive
voltage is supplied to the unit, a resettable fuse
will be tripped, turning the unit off.
b) Check the power cable connector at the back
of the unit is securely plugged in and the collar
is locked in place. The collar must be secure
for water tight connection.
c) Measure the battery voltage. If the voltage is
less than 10 volts:
- the battery terminals or wiring on the
terminals may be corroded.
- the battery may not be charging correctly or
may need replacing.
d) Inspect the power cable from end to end for
damage such as cuts, breaks or squashed
sections.
e) Make certain the power cable’s red wire connects
to the positive battery terminal and the black wire
to the negative battery terminal or ground. (If
wired for Auto Power, then ensure the red and
yellow wires are connected to the boat’s power
switch. Also check the boat’s power switch circuit.
See Auto Power section 5-8.)
f) Check for corrosion on the power cable
connector and clean or replace if required.
g) Check fuses that are placed in line with the
power cable. A fuse can be blown despite
appearing to be good. Test the fuse or replace
it with a fuse known to be good.
2. The fishfinder operates erratically:
a) Check the Aquaducer does not have debris (eg
weed, plastic bag etc.) caught around it.
b) The Aquaducer may have been damaged during
launching, running aground or while underway
with debris etc. If the Aquaducer has been
impacted, it may have been kicked up on the
bracket. If it has not been physically damaged,
push it back down so it ‘clicks’ into place.
c) When in water less than 2 feet (0.6m) the bottom
and depth readings may become inconsistent and
erratic. This depth is measured from the transducer
and does not allow for any Keel Offset setting.
d) Manual Gain may be set too low, which may cause
weak bottom echo, or no fish signals. If you have
the Auto Gain disabled try increasing the gain.
e) Ensure the bottom surface of the Aquaducer is
angled approximately 5° forward and as low as
possible in order to minimise the generation of
bubbles through cavitation. See Mounting the
Aquaducer section 5-3.
f) Check the transducer and power cable
connectors at the back of the unit are securely
plugged in and the collar is locked in place. The
collar must be secure for water tight connection.
g) Inspect the transducer and power cables from
end to end for damage such as cuts, breaks or
squashed sections.
h) Ensure there is not another fishfinder or depth
sounder turned on, which may interfere with the
FISH450 Tricolor.
i) Electrical noise from the boat’s engine or an
accessory may be interfering with the transducer(s)
and/or the FISH450 Tricolor. This may cause the
unit to automatically decrease the gain unless using
Manual Gain. The unit thus eliminates weaker
signals such as fish or even the bottom from the
display. This may be checked by switching off other
instruments, accessories (e.g. fridges) and the
motor until the offending device is located. To stop
problems from electrical noise, try:
- Rerouting the power and transducer
cable(s) away from the boat’s other
electrical wiring.
- routing the unit’s power cable directly to the
battery instead of through a fuse block or
ignition switch.
3. Bottom is not displayed:
a) If in Manual Range and the depth reading is
displayed, check that the depth is not greater
than the range selected. (see section 3-2)
b) The depth may be outside the fishfinder’s range.

24
FISH450 Tricolor FISHFINDER Installation and Operation Manual
NAVMAN
While in Auto Range, the unit will flash the last
depth displayed, then display “--.-” to indicate
that there is no bottom detected. A display of
the bottom should reappear when it is shallower
than 300m (1000 ft).
4. Bottom echo disappears or erratic digital
reading while your boat is moving:
a) Ensure the bottom surface of the Aquaducer is
angled approximately 5° forward and as low as
possible in order to minimise the generation of
bubbles through cavitation. See Mounting the
Aquaducer section 5-3.
b) The transducer may be in turbulent water. Air
bubbles in the water disrupt the echos returned,
interfering with the FISH450 Tricolor’s ability to
find the bottom or other targets. This often
happens when you reverse the boat. The
transducer must be mounted in a smooth flow of
water in order for the unit to work at all boat speeds.
c) Electrical noise from the boat’s motor can
interfere with the FISH450 Tricolor. Try some
suppression spark plugs.
5. Fuel Used and/or Remaining amount(s)
seem incorrect:
a) Running the engine without the FISH450 Tricolor
turned on will result in the fuel used (Used) not
being recorded. This means that the fuel remaining
(Remaining) value will read higher than what is
actually in the tank. Installing the unit in the Auto
Power configuration will solve this problem, as the
unit is powered on and off automatically when the
vessel’s power is switched on and off.
b) Incorrect readings may be caused by fuel surging
back and forward through the transducer in rough
seas. Try installing a one way valve between the
fuel transducer(s) and the fuel tank.
c) Fuel Remaining must be set to the amount of
fuel on board after every refuelling.
d) Air pockets when filling the tank may have
caused the tank to not fill completely.
e) Calibrate the fuel transducer after 100 litres have
been run through - so the turbine shaft beds
into the bearings correctly.
f) Fuel transducers wear out over time and should
be replaced every 5000 litres of fuel.
g) Also check all other fuel problems listed in the
troubleshooting guide.
6. No/low fuel flow (Flow) indicated:
a) Check the fuel cable connectors are securely
plugged in and the collar is locked in place. The
collar must be secure for water tight connection.
b) The fuel transducer(s) must be installed after a
fuel filter or they may clog. To clear a clogged
fuel transducer(s) remove the transducer(s) from
the line and gently blow through the tranducer(s)
in the opposite direction to the fuel flow.
c) Inspect the fuel cable(s) from end to end for
damage such as cuts, breaks or squashed
sections.
d) Check that the fuel filter(s) in the line are clean.
e) Ensure that the fuel flow transducer(s) has not
been exposed to excessive heat or vibration.
7. Only one flow rate value shown for a twin
engine installation:
a) In the Setup Fuel menu Num Engines must be
set to 2.
8. Erratic fuel flow readings:
a) The mounting position of the fuel flow transducer
must not be too close to the fuel pump(s) and
not subject to excess vibration.
b) Check for air leaks in the fuel hose(s) or fuel
pick-up(s) in the tank(s).
c) The filtering level (averaging) has not been set
to suit the engine(s). In the Setup Fuel menu,
increase the Flow Filter value until a steady flow
rate is indicated. Check the fuel flow (Flow)
readings are not zero.
9. No fuel economy reading:
a) For the FISH450 Tricolor to be able to calculate
an economy reading, the boat must be
displaying a speed greater than zero.
b) Check the paddlewheel on the Aquaducer is
spinning freely. Check that the two magnets in
the paddlewheel are in place.
10. Over temperature warning message
displayed:
a) Error message. “Warning: Temperature exceeding
70°C. Reduce temperature to improve colour
clarity.” Press the Alarm key to acknowledge
message and reduce the temperature of the unit.
11. If the unit beeps when turned on but
nothing is displayed:
a) The unit may be operating, but the display’s
calibration settings (Red Cal, Blue Cal, Display
Cal. See section 4-6) may have been set too high
or low. Reset the display defaults so the unit
displays normally. While the unit is off, hold the
Cursor Right key and while holding it, hold the
Power On key. See section 4-9 for default values.
12. The unit is setup in such a way that the
user is not sure what to adjust to get it
operating normally:
a) The units factory defaults can be restored to
reset the unit a known configuration. See
Resetting to factory defaults section 4-9.
13. The wrong language is displayed:
a) See Getting Started section 2 on how to change
the language without using the menu system.
b) See Setup Language section 4-8.

25
FISH450 Tricolor FISHFINDER Installation and Operation Manual
NAVMAN
Appendix C - Glossary
Aquaducer is the name of NAVMAN’s transducer
which comes standard with the FISH450 Tricolor.
It combines temperature, speed and an ultrasonic
sensors to form a compact transom mounted
transducer solution.
Bottom Lock is a feature of the FISH450 Tricolor
for the Zoom screen which adjusts the Zoom Bar
so the bottom is always displayed at the bottom of
the screen regardless of changes in depth. See
Fish History and Zoom Screens section 3-2.
Depth Sounder - A device for measuring the depth
using ultrasonics. The FISH450 Tricolor is a depth
sounder as well as a fishfinder.
DGPS - Differential Global Positioning System. A
very accurate satellite and land beacon
navigational tool. See your NAVMAN dealer for
more information.
Gain (sensitivity) is the amount of detail (or level
of echo returned) the fishfinder displays on the
screen.
GPS - Global Positioning System. A satellite
navigational tool. See your NAVMAN dealer for
more information.
Keel Offset is the difference between the depth
of the transducer, and the depth displayed.
Main Screens include Fish History, Zoom, Sonar,
Fuel and Data.
NMEA - National Marine Electronics Association
NMEA 0183 - A standard for interfacing marine
electronic devices.
NVM (Non Volatile Memory) stores the settings
and data in your FISH450 Tricolor. This data is
stored while the unit is turned off so the data is
retained when you switch it on.
Range is the depth of water displayed.
Repeater - a display that repeats information from
a primary instrument (eg a FISH450 Tricolor).
NMEA output for data that can be repeated is listed
in the Specifications - Appendix A.
Sensitivity - see gain
Sonar - A system for detecting underwater objects
using ultrasonics.
Sounder - Another name for a depth sounder.
Strakes are the ridges that run from bow to stern.
Often called planing strakes.
Turbid, turbidity - used to describe water which
is has a high amount of noise and is difficult to
‘see’ through. This can be caused by air in water
(e.g. from another boats wake) or muddy water.
Ultrasonic - Sounds which are above the range
of the human ear.

26
FISH450 Tricolor FISHFINDER Installation and Operation Manual
NAVMAN
Appendix D - Conditions of Sale & Warranty
IMPORTANT: Some of the following terms and conditions vary from country to country. Please check
with your NAVMAN dealer from whom you purchased your product.
NAVMAN
®
NAVMAN is a registered trademark of Talon Research and
Development Company Limited. All rights reserved.
Designers and manufacturers of GPS, communication and marine products.
A. Conditions of Sale
Except to the extent otherwise required by the laws
of the country in which the accompanying product
(“the product”) is sold the manufacturer of the
product Talon Research & Development Co.
Limited (“Talon Technology”) - has no liability in
respect of the product beyond the warranty
hereunder provided. Where liability may not be
excluded but may be limited to repair or
replacement or the supply of equivalent goods or
for the payment of the cost of replacing the goods
or of acquiring equivalent goods, liability is so
limited.
B. Manufacturers warranty
Warranty Period - 1 year from the date of purchase.
Extent of warranty - Subject to the following
conditions Talon Technology will rectify any defect
occurring in the product of which notice in writing
is received by Talon Technology or its approved
distributor within the Warranty Period.
Conditions:
1) Repairs may only be carried out by a Service
Centre approved by Talon Technology.
2) Repairs as above will be carried out at no
cost to the owner subject to these conditions.
3) The cost of returning the goods to an
approved dealer shall be met by the owner.
4) Warranty does not extend to accessories or
defects or injuries caused or resulting from
causes not attributable to faulty parts or the
manufacturer of the product including, but
not limited to, defect or injuries caused by or
resulting from misuse, abuse, neglect,
accidental damage, incorrect installation,
water damage, use of consumables other
than those approved by Talon Technology or
any alterations to the product not approved
by Talon Technology.
5) No warranty claim accepted without sales
documentation.
6) Talon Technology may, at its discretion,
replace the product instead of repairing it.
C. Acceptance of Conditions of
Sale
In consideration of this warranty the purchaser
accepts the limitations of liability as set out in the
conditions of sale.
Manufacturers:
Talon Technology Limited.
PO Box 68155 Newton, Auckland, New Zealand.
Tel: (64) 9 480 3129 Fax: (64) 9 480 3176
e-mail: sales@talon.co.nz
Distributors:
Europe:
PLASTIMO INTERNATIONAL
15, rue Ingenieur Verriere, B.P.435
56325 LORIENT CEDEX -FRANCE
Tel: (33) 02 97873636 Fax: (33) 02 97873649
e-mail: plastimo.france@wanadoo.fr
Australia
Talon Technology Australia PTY. Ltd.
2/340 Darling Street, Balmain NSW 2041, Australia
Tel: (61) 2 9818 8382 Fax:(61) 2 9818 8386
Toll free fax 1300 303 105
e-mail: talonaus@msn.com.au
New Zealand
Absolute Marine Ltd. Unit B, 138 Harris Road,
East Tamaki, Auckland, New Zealand
Tel: (64) 9 273 9273 Fax: (64) 9 273 9099
e-mail: navman@absolutemarine.co.nz
Appendix E - How to contact us
More information is available on-line at our website www.navman.com
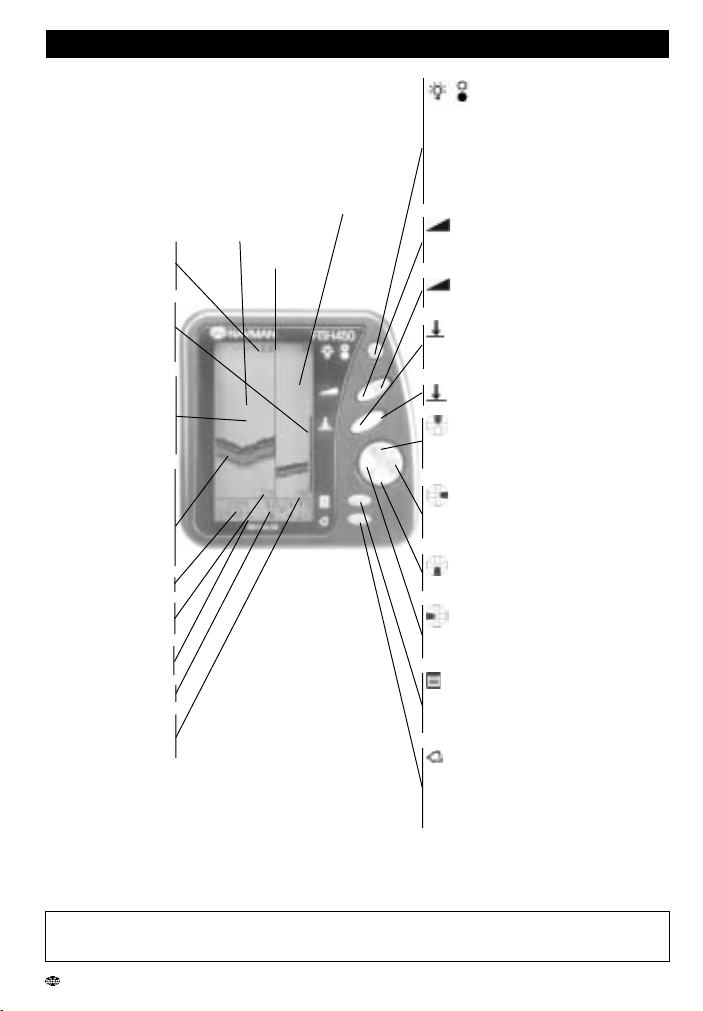
27
FISH450 Tricolor FISHFINDER Installation and Operation Manual
NAVMAN
Current depth of
water at the top of
the Zoom Section.
Zoom Bar indicates
which area (Range)
is magnified to form
the Zoom Section.
Echo of fish or
object in the water.
Blue echos are the
strongest, green the
weakest.
History of echos of
the bottom with the
most recent data on
the right. Blue echos
are the strongest,
green the weakest.
Current water depth.
Depth at the bottom
of the Zoom Section.
Surface water
temperature.
Boat speed.
Depth at the bottom
of the Full Range
Section.
An example of the Zoom screen is shown below.
The Full Range Section displays the water depth
(Range) between 0 to 30 metres. The Zoom Section
displays a range of depth between 14 and 29 metres.
Keys may have different uses in other screens.
Press the Backlight / Power key to turn
the unit on. When on, hold for 3 secs to turn the
power off
(Note 1)
or press (1 sec. or less) to
activate the backlight function. A further single
press steps the backlight level from 0 to 6 then
to 0 again. A bar indicating the backlight level
appears at the bottom of the screen.
Holding for 1 sec switches between
Auto and Manual Gain. When using Manual
Gain a press decreases the gain (sensitivity).
As above but a press increases the
gain (sensitivity).
Holding for 1 sec switches between
Auto and Manual Range. When using
Manual Range a press increases the range.
As above but a press decreases the range.
Press to move the Zoom Bar up, or if
Bottom Lock is on, a press turns Bottom
Lock off.
Press to increase the length of the
Zoom Bar. This increases the range of the
Zoom Section.
Press to move the Zoom Bar down, or
hold to turn the Bottom Lock on.
Press to decrease the length of the
Zoom Bar, which decreases the range of
the Zoom Section.
Press to go to the Main Menu screen. A
press when in the menu structure takes
you one level closer to the Main Menu
screen.
Enters the Alarms setup menu; or when
an alarm is sounding a press of this key
acknowledges then turns the beeper off.
The alarm remains enabled and will sound
again when the condition is next met.
Note 2
Note 1: The Power on & Power off functions of this key are disabled if wired for the ‘auto power option’. (see
Installation - Auto Power section 5-8)
Note 2: Refer to the Setup - Alarms section for more information.
Divider line.
Appendix F - Quick reference
Zoom Section
Full Range Section

28
SONDEUR DE PECHE FISH450 Tricolor Notice d'installation et d'utilisation
NAVMAN
Sommaire
Pour optimiser les performances de votre FISH450 Tricolor, il est indispensable de
choisir l’emplacement le plus adéquat pour le capteur. Nous vous recommandons de
suivre attentivement les instructions d’installation du capteur.
1 Introduction ............................................................................................... 29
2 Mise en route ............................................................................................. 30
3 Fonctionnement ........................................................................................ 31
3-1 Alarmes ....................................................................................................................31
3-2 Ecrans Historique et Zoom .......................................................................................32
3-3 Ecran Sonar .............................................................................................................. 35
3-4 Ecran Essence ......................................................................................................... 35
3-5 Ecran Données .........................................................................................................36
4 Paramétrages ............................................................................................ 37
4-1 Alarmes
Alr. Essence, Haute, Basse, Alrm Poisson, Valeur Temp, Variat.Temp, Alim.Faible .................................................. 38
4-2 Fonctions Essence
Faire Plein, Taille Réserv, Cal Restant, Conso à zéro, Unités, Nbr Moteurs, Cal.Essence, Filtre Débit ................... 39
4-3 Profondeur
Unités, Offset de Quille ............................................................................................................................................... 40
4-4 Température
Unités, Cal.Temp ......................................................................................................................................................... 40
4-5 Vitesse & Loch
Unités, Cal.Vitesse, Cal.Loch, Select Loch (Journ./Total), Journ.à zéro, Total à zéro) .............................................. 40
4-6 Ecran
Symb poisson, Vitesse, Temp, Cal.Ecran, Cal.Rouge, Cal.Bleu, Rétro éclairage ..................................................... 41
4-7 Bip d’activation des touches .....................................................................................42
4-8 Langue ...................................................................................................................... 42
4-9 Retour aux Paramètres par défaut ........................................................................... 43
4-10 Mode Simulation .....................................................................................................43
5 Installation ................................................................................................. 44
5-1 Eléments livrés avec votre FISH450 Tricolor ........................................................... 44
5-2 Options et accessoires ............................................................................................. 44
5-3 Installation de l’Aquaducer ....................................................................................... 45
5-4 Autres sondes et capteurs de vitesse/température .................................................. 46
5-5 Capteurs essence .................................................................................................... 46
5-6 Installation du FISH450 Tricolor ............................................................................... 46
5-7 Câblage .................................................................................................................... 47
5-8 Câblage pour mise en route automatique ................................................................ 47
Appendice A - Caractéristiques techniques .............................................. 48
Appendice B - En cas de problème ............................................................ 49
Appendice C - Lexique ................................................................................ 51
Appendice D - Conditions de vente et de garantie ................................... 52
Appendice E - Comment nous contacter ................................................... 52
Appendice F - Guide d’utilisation rapide ................................................... 53
Important

29
SONDEUR DE PECHE FISH450 Tricolor Notice d'installation et d'utilisation
NAVMAN
1 Introduction
Nous vous remercions d’avoir choisi ce sondeur de pêche FISH450 Tricolor NAVMAN. Pour un
fonctionnement optimal, nous vous recommandons de lire attentivement ce mode d’emploi avant d’installer
et d’utiliser votre sondeur. En appendice C, un lexique définit les termes spécifiques.
Le FISH450 Tricolor NAVMAN
Le FISH450 Tricolor est un sondeur à ultrasons composé d’un logiciel performant et d’un écran 3 couleurs.
Ce sondeur détecte les poissons et mesure la profondeur et la température de l’eau, la vitesse du bateau
et la tension électrique à l’entrée de l’appareil. Il possède un loch journalier et un loch totalisateur (affichage
d'une seule information à la fois). Connecté à un kit essence optionnel, le sondeur FISH450 Tricolor
devient alors une véritable centrale qui vous permet de gérer votre consommation d’essence.
Comment le sondeur FISH450 Tricolor NAVMAN détecte les
poissons et détermine la profondeur.
Le FISH450 Tricolor se compose :
- d’un capteur monté sur la coque - d’un appareil.
Le capteur émet un écho ultrason qui est envoyé vers le fond. Lorsque l’écho rencontre une
cible, tel qu’un poisson ou le fond, une partie de cet écho est renvoyée vers le bateau et est
reçue par le capteur. La profondeur de la cible est calculée en mesurant le temps écoulé entre l’envoi de l’écho
et sa réception par le capteur.
L’appareil analyse l’écho retourné, supprime tous les échos indésirables (bulles et autres parasites) et
affiche ce qui se trouve sous le bateau. Le sondeur utilise 3 couleurs d’affichage, le bleu pour les échos
les plus intenses, le rouge pour les échos moyens, le vert pour les échos de faible intensité (section 3-2).
Ces couleurs facilitent l’interprétation des informations affichées.
Plusieurs raisons peuvent expliquer la différence d’intensité des échos retournés. En général, plus le poisson est
gros, plus l’écho retourné est important. De plus, l’écho retourné par un poisson situé au centre du cône d’émission,
où l’écho émis est plus intense, retournera un écho plus intense. Un poisson situé en eaux profondes, dans des
turbulences ou sur les bords du cône d’émission, où l’écho émis est plus faible, retournera un écho plus faible.
Le sondeur peut détecter un fond jusqu’à 1000 pieds (300 mètres) selon la limpidité de l’eau, le type de
capteur, et mesurer la profondeur avec une précision jusqu’à 2%.
Aide à la navigation
Le FISH450 Tricolor permet de détecter des poissons, de localiser des cibles sur le fond comme des récifs ou
des épaves et de retrouver vos coins de pêche favoris grâce au profil du fond. En suivant les courbes de
profondeur de votre carte papier, vous pouvez utiliser le sondeur FISH450 Tricolor comme une aide à la navigation.
REMARQUE IMPORTANTE CONCERNANT L’UTILISATION DE VOTRE SONDEUR : si vous utilisez votre
sondeur de pêche FISH450 Tricolor comme une aide à la navigation, notez que sa précision dépend entre
autres de l’emplacement du capteur. L’utilisateur doit s’assurer que le capteur est monté et utilisé correctement.
Comment détecter des poissons
Les récifs, les épaves ou les rochers attirent les poissons. Avec le FISH450 Tricolor, repérez ce type de fond puis
recherchez des poissons sur l’écran zoom en passant doucement plusieurs fois au-dessus de cet emplacement
(section 3-1). S’il y a du courant, les poissons se trouvent généralement en aval de cet emplacement. Si vous
recherchez des poissons d’eaux profondes, un changement rapide de la température de l’eau peut indiquer que
vous vous trouvez au bord d’un courant chaud ou froid. La différence de température peut alors former une
barrière que le poisson ne franchira pas. Recherchez les poissons de l’autre côté de cette barrière.
Nettoyage et entretien
Vous pouvez nettoyer votre sondeur FISH450 Tricolor avec un chiffon humide ou imprégné de détergent doux.
N’utilisez pas d’abrasifs, d’essence ou autres solvants. Lorsque vous peignez la coque protégez ou ôtez toujours
l’Aquaducer monté à l’arrière. Si vous appliquez de l’antifouling sur un capteur passe-coque ne passez qu’une
seule couche. Si vous devez appliquer une autre couche ôtez les couches précédentes en sablant légèrement.
Remarque sur la température d’utilisation
Ne pas exposer l’appareil à une température de plus de 50°C (122°F) dans quel cas l’écran ne serait plus
opérationnel jusqu’à ce que la température baisse. Ne jamais exposer l’appareil à de hautes températures
même pendant quelques minutes (ex. sur le tableau de bord d’une voiture).
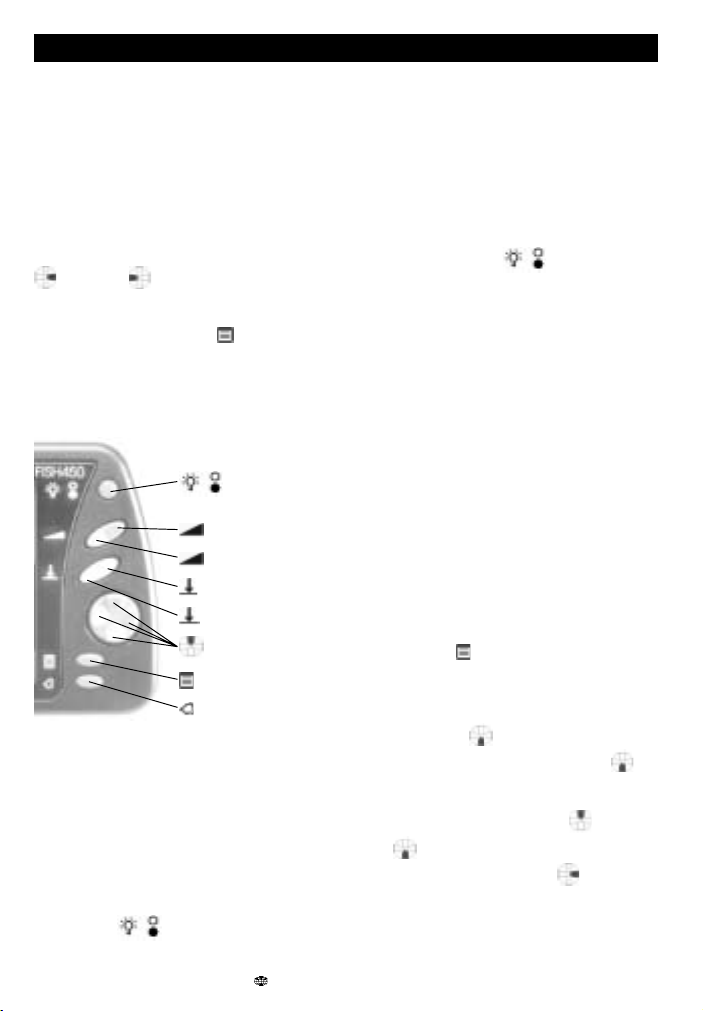
30
SONDEUR DE PECHE FISH450 Tricolor Notice d'installation et d'utilisation
NAVMAN
2 Mise en route
Connexion du câble d’alimentation
L’appareil est alimenté par la fiche noire. Les fiches
sont de type baïonnette. Branchez la fiche dans la
prise puis bloquez l’écrou. Assurez-vous que la
fiche est bloquée pour que la connexion soit
étanche.
Connexion du capteur
Si le capteur (fiche bleue) n’est pas branché,
lorsque vous allumez l’appareil le message suivant
s’affiche : «Aucun capteur connecté. Mise en
simulation ? Oui/Non». Appuyez sur le curseur droit
ou gauche pour choisir entre oui et non
(pour plus d’information sur le mode simulation,
voir la section 4-10) Une fois votre choix réalisé,
appuyez sur la touche Menu
pour quitter cet
écran et passer au mode de fonctionnement
normal. (Remarque : si le sondeur ne détecte pas
le capteur pourtant connecté, éteignez l’appareil
et consultez l’appendice B, En cas de problèmes).
Désignation des touches
Signification de Appuyer et Maintenir
enfoncé
APPUYEZ signifie que vous devez appuyer
brièvement sur la touche (pendant moins d’une
seconde).
MAINTENIR ENFONCE signifie que vous devez
appuyer sur la touche pendant plus d’une seconde.
Mise en route
Pour allumer l’appareil, appuyez sur la touche
Marche/Arrêt
.
Remarque : Si votre appareil est branché en mise
en route automatique (voir section 5-8 Installation
Rétro-éclairage/
Marche-Arrêt
Augmenter le gain
Diminuer le gain
Augmenter l’échelle
Diminuer l’échelle
Curseur
Menu
Alarme
– Mise en route automatique) alors il se met en
route automatiquement à l’allumage de
l’alimentation du bateau.
A la mise en route, les informations de base
comme la version du logiciel s’affichent. Puis le
FISH450 Tricolor affiche, parmi les écrans suivants
celui qui a été utilisé en dernier : Historique, Zoom,
Sonar, Essence ou Données.
Extinction
Pour éteindre l’appareil, maintenez la touche
marche/arrêt enfoncée
.
Un compte à rebours s’affiche. Maintenez la touche
enfoncée pendant 3 secondes jusqu’à ce que
l’appareil s’éteigne.
Remarque : Si votre appareil est branché en mise
en route automatique (voir section 5-8 Installation
– Mise en route automatique) alors l’appareil alors
l’appareil ne s’éteindra que lorsque l’alimentation
du bateau sera coupée.
Modifier le niveau de Rétro-
éclairage
En appuyant sur la touche Rétro-éclairage/Marche-
Arrêt, vous activez la fonction Rétro-éclairage. En bas
de l’écran une barre s’affiche indiquant le niveau de
rétro-éclairage. A chaque pression sur la touche Retro-
éclairage, l’intensité du Rétro-éclairage augmente d’un
niveau jusqu’au niveau maximum 6, puis passe à zéro
(Off). La barre disparaît deux secondes après la
dernière activation de la touche Retro-éclairage.
Choix de la langue
Pour vérifier quelle langue est utilisée, appuyez sur
la touche Menu
pour afficher le Menu Général.
Pour changez la langue, procédez comme suit :
1 Eteignez l’appareil.
2 Une fois l’appareil éteint, maintenez le
curseur bas
enfoncé.
3 Tout en appuyant sur le curseur bas
allumez l’appareil.
4 L’écran affiche une liste de langues.
Appuyez sur le curseur haut
ou bas
pour choisir une langue. Puis appuyez
sur la touche curseur droit
pour la
sélectionner. Le FISH450 Tricolor
poursuivra la séquence de démarrage.
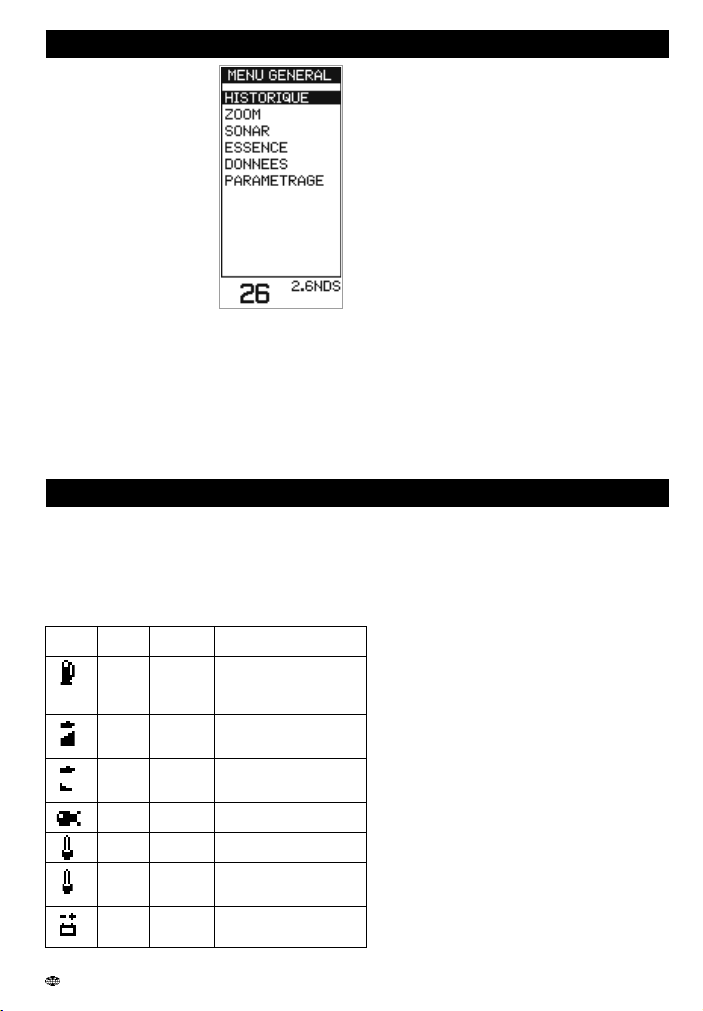
31
SONDEUR DE PECHE FISH450 Tricolor Notice d'installation et d'utilisation
NAVMAN
Symbole Nom de Fréquence Conditions de
l’alarme du bip déclenchement de l’alarme
Alr. 1/2 sec La quantité d’essence restant
Essence dans le réservoir est
inférieure au seuil de
l’alarme essence défini.
Haute 1/5 sec La profondeur est inférieure
à la valeur de profondeur
minimale définie.
Basse 1/2 sec La profondeur est supérieure
à la valeur de profondeur
max. définie.
Alrm 3 bips Un écho correspond au
Poisson courts profil d’un poisson.
Valeur 1/2 sec La température correspond
Temp à la valeur de l’alarme.
Variat. 1/2 sec Le taux de variation de la
Temp température correspond à
la valeur de l’alarme.
Alim. 1/2 sec La tension de la batterie est
Faible inférieure au seuil d’alarme
défini.
Ecran Menu Général
Le FISH450 Tricolor est
organisé en menus. Appuyez
sur la touche Menu jusqu’à ce
que le Menu Général s’affiche.
Pour vous déplacer dans les
différentes fonctions, appuyez
sur le curseur haut ou bas.
Pour sélectionner une fonction,
appuyez sur le curseur droit.
Le sondeur FISH450 Tricolore
dispose de 5 écrans
principaux plus un menu
Paramétrage décrits
brièvement ci-dessous et plus
en détails dans les chapitres suivants.
Ecran Historique (section 3.2)
Visualise tous les échos reçus de la droite vers la
gauche de l’écran. Ut ilisez cet écran lorsque vous
recherchez des récifs, des épaves et des poissons.
Ecran Zoom (section 3-2)
Reprend les informations de l’écran Historique
dans la fenêtre de droite et affiche sur la
gauche de l’écran une fenêtre zoom, dont
3 Fonctionnement
vous pouvez sélectionner l’échelle librement.
Cette fenêtre vous permet d’afficher une zone
définie avec plus de détails.
Ecran Sonar (section 3-3)
Affiche en temps réel l’intensité et la
profondeur des échos retournés pour chaque
écho émis. Cet écran peut également être
utilisé pour régler manuellement le gain et les
couleurs des écrans Historiques et Zoom.
Ecran Essence (section 3-4)
Affiche votre consommation d’essence par
heure, la quantité consommée, la quantité
restant dans le réservoir, votre économie, la
vitesse du bateau et la profondeur. La fonction
Essence n’apparaîtra dans le Menu Général que
si elle a été validée dans le menu Paramètres-
Essence. (voir section 4-2 Paramètres-Essence)
Ecran Données (section 3-5)
Affiche la température de l’eau, la profondeur, la
tension de la batterie et la vitesse du bateau.
Menu Paramètrage (voir section 4)
Le menu Paramétrage vous permet de
personnaliser différents paramètres et
fonctions de votre sondeur FISH450 Tricolor.
Vous pouvez personnaliser les caractéristiques
des alarmes. Les symboles représentant les
alarmes activées s’affichent en bas de l’écran.
Pour accéder au menu Alarmes, appuyez sur la touche
Alarmes (si l’alarme sonore n’est pas déclenchée) ou
allez dans le menu Alarme du menu Paramétrage.
Lorsque la condition de déclenchement d’une
alarme est remplie :
• Le buzzer émet une alarme sonore.
• Le symbole représentant chaque alarme
déclenchée clignote en rouge.
• Le symbole représentant chaque alarme
déclenchée clignote en rouge.
En appuyant sur la touche Alarme, l’alarme sonore s’arrête
mais l’alarme ne sera pas désactivée. Le symbole
continuera de clignoter en rouge jusqu’à ce que les
conditions de déclenchement de l’alarme disparaissent.
Remarque : L’alarme Poisson émet uniquement trois
bips courts.
Arrêt automatique des alarmes
Concernant les alarmes de niveau d’essence, Haute,
Basse et Alim.faible, l’alarme s’arrête lorsque la valeur de
l’information ne correspond plus aux conditions d’alarme.
En ce qui concerne l’alarme Valeur temp, l’alarme s’arrête
lorsque la température est supérieure ou inférieure de
0.25°C / 0.45 °F par rapport à la valeur d’alarme définie.
En ce qui concerne l’alarme Variat.temp, l’alarme
s’arrête lorsque le taux de variation de température
est inférieur 0.1°C par minute ou 0.2°F par rapport à
la valeur d’alarme définie.
Buzzer externe
Un buzzer externe peut être installé lorsqu’une alarme
extérieure plus puissante est nécessaire. Ce buzzer
peut être installé n’importe où sur le bateau. Voir la
section 5-7 Installation-Câblage.
3-1 Alarmes
 Loading...