


VHF 7110
D u a l |
S t a t i o n |
R a d i o |
Quick Start Guide
and Installation Supplement
w w w . n a v m a n . c o m
FCC Statement
Note:This equipment has been tested and found to comply with the limits for a Class B digital device, pursuant to Part 15 of the FCC Rules. These limits are designed to provide reasonable protection against harmful interference in a normal installation. This equipment generates, uses and can radiate radio frequency energy and, if not installed and used in accordance with the instructions, may cause harmful interference to radio communications. However, there is no guarantee that interference will not occur in a particular installation. If this equipment does cause harmful interference to radio or television reception, which can be determined by turning the equipment off and on, the user is encouraged to try to correct the interference by one or more of the following measures:
Reorient or relocate the receiving antenna.
Increase the separation between the equipment and receiver.
Connect the equipment into an output on a circuit different from that to which the receiver is connected.
Consult the dealer or an experienced technician for help.
A shielded cable must be used when connecting a peripheral to the serial ports.
Industry Canada
Operation is subject to the following two conditions: (1) this device may not cause interference, and (2) this device must accept any interference, including interference that may cause undesired operation of the device.

Navman VHF 7110 Quick Start Guide
It is the owner’s sole responsibility to install and use the instrument in such a manner that will not cause accidents, personal injury or property damage.
Navman New Zealand disclaims all liability for any use of this product in a way that may cause accidents, damage or that may violate the law.
Governing Language: This statement, any instruction manuals, user guides and other information relating to the product (Documentation) may be translated to, or has been translated from, another language (Translation). In the event of any conflict between any Translation of Documentation, the English language version of the Documentation will be the official version of the Documentation.
This manual represents the Navman VHF 7110 at the time of printing. Navman New Zealand reserves the right to make changes to specifications without notice.
Copyright © Navman New Zealand. All rights reserved. NAVMAN is a registered trademark of Navman New Zealand.
Please check out your model. There are slight variations in the keys and some features are not available on every model.
This manual relates to the following models:
•VHF 7110US
•VHF 7110EU
This Quick Start Guide and Installation Supplement for the VHF 7110 is to be used in conjunction with the Navman VHF 7100 Owner’s Manual.
For further information on these and other options, including radio setup and DSC options, troubleshooting, and channel charts, refer to the Navman VHF 7100 Owner’s Manual.
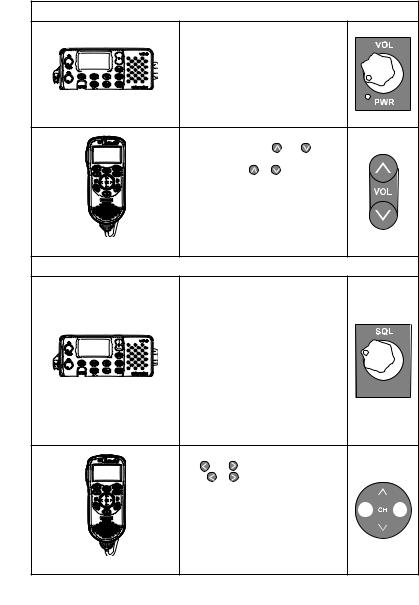
Volume and Power
•Turn the VOL knob clockwise to power on.
|
• Continue to turn until a |
|||
|
comfortable volume is reached on |
|||
|
the base speaker. |
|
||
Base Unit |
Note: this switch controls the power to |
|||
both the base unit and second station |
||||
|
||||
|
handset. |
|
|
|
|
You can adjust the volume on your |
|||
|
handset with the VOL |
and keys |
||
|
on the righthand side of the handset. |
|||
|
Hold down VOL |
or |
to rapidly |
|
|
increase or decrease the volume or |
|||
|
press quickly to step through the eight |
|||
|
(8) different volume levels. |
|||
|
This will not change the volume on the |
|||
|
base speaker. |
|
|
|
Handset |
|
|
|
|
Squelch
•Turn the SQL knob fully counterclockwise so that random noise is heard.
•Turn SQL slowly clockwise until the
|
|
random noise disappears. |
||
|
• |
Make another 1/4 turn clockwise |
||
|
|
for best reception in normal open |
||
|
|
sea conditions. |
||
Base Unit |
In areas of high noise (eg close to |
|||
|
large cities) reception may improve if |
|||
|
sensitivity is reduced. Try turning SQL |
|||
|
slowly clockwise or use the LOCAL |
|||
|
setting (see the Owner’s Manual). |
|||
|
You can also adjust the squelch with |
|||
|
the |
|
and |
keys on the handset. |
|
Press |
or |
to step through the eight |
|
|
(8) different squelch settings or hold |
|||
|
down to rapidly change the squelch. |
|||
|
The squelch setting on the base unit |
|||
|
will temporarily change to match. |
|||
|
When you put the handset back ON |
|||
|
hook, the base unit squelch setting |
|||
Handset |
takes precedence again. |
|||
|
|
|
|
|
4 |
NAVMAN |
VHF 7110 Quick Start Guide |
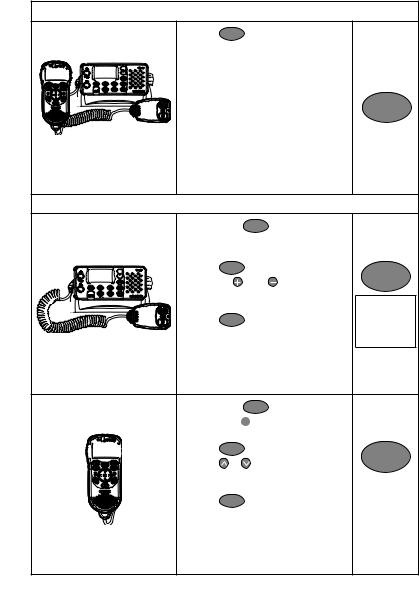
Select the Radio Setup OR DSC Call Menu
•Press CALLMENU on the base unit or handset to show the DSC Call Menu.
• Hold down on the base unit or handset to show the Radio Setup Menu.
CALL
MENU
Base Unit, Microphone and
Handset
Set Backlighting Levels
• Hold down CALLMENU .
•Use CH or CH
or CH to scroll through the menu listing to BACKLIGHT.
• |
Press |
ENT . |
CALL |
||
• |
Press CH |
or CH to select the |
MENU |
||
|
desired backlight level. |
|
|||
|
There are eight (8) levels. |
MENU SELECT |
|||
• |
Press |
ENT |
to store the setting. |
BUDDY LIST |
|
LOCAL/DIST |
|||||
|
|
|
|
||
Base Unit and Microphone |
|
|
|
>BACKLIGHT |
|
|
|
|
|
||
• Hold down CALLMENU .
•Press or
or to scroll through the
|
menu listing to BACKLIGHT. |
|
||
• |
Press |
ENT . |
|
CALL |
• |
Press |
or |
to select the desired |
MENU |
|
backlight level. |
|
||
|
There are eight (8) levels. |
MENU SELECT |
||
• |
Press |
ENT |
to store the setting. |
BUDDY LIST |
LOCAL/DIST |
||||
|
|
|
|
>BACKLIGHT |
|
|
|
|
|
Handset
5 |
NAVMAN |
VHF 7110 Quick Start Guide |

Set Contrast Levels
|
• |
Hold down |
CALLMENU . |
|
CALL |
|
|
• |
Use CH |
or CH |
to scroll through |
||
|
|
the menu listing to CONTRAST. |
MENU |
|||
|
• |
Press |
ENT . |
|
MENU SELECT |
|
|
• |
Press CH |
or CH |
to select the |
||
|
LOCAL/DIST |
|||||
|
|
desired contrast level. There are eight |
BACKLIGHT |
|||
|
|
>CONTRAST |
||||
Base Unit and Microphone |
|
(8) levels. |
|
|
|
|
|
|
|
|
|
|
|
|
• |
Press |
ENT |
to store the setting. |
|
|
|
• |
Hold down |
CALLMENU . |
|
CALL |
|
|
• |
Use |
or |
to scroll through the |
||
|
|
menu listing to CONTRAST. |
MENU |
|||
|
• |
Press |
ENT . |
|
MENU SELECT |
|
|
• |
Press |
or |
to select the desired |
||
|
LOCAL/DIST |
|||||
|
|
contrast level. |
|
BACKLIGHT |
||
|
|
There are eight (8) levels. |
>CONTRAST |
|||
Handset |
• |
Press |
ENT |
to store the setting. |
|
|
Entering menu data correcting errors
•Only four (4) menu items can be displayed on the LCD at any one time. Press CH or CH
or CH to scroll through the menu.
• |
Press ESC |
to return to the previous menu screen |
|
|
without saving changes OR press ENT to confirm |
||
|
changes. |
|
|
• |
Press CH |
or CH to step through the alphabet and |
|
|
numbers. Hold down to scroll rapidly to the desired |
||
Base Unit and Microphone |
item. |
|
|
To correct errors, press CH then select the |
|||
• |
|||
|
< backup character on the display. Then press ENT |
||
to backup one space at a time.
•Only four menu items can be displayed on the LCD
at any one time. Press or
or to scroll through the menu.
• |
Press |
ESC |
to return to the previous menu screen |
|
|
without saving changes OR press ENT |
to confirm |
||
|
changes. |
|
|
|
• |
Press |
or |
to step through the alphabet and |
|
|
numbers. Hold down to scroll rapidly to the desired |
|||
|
item. |
|
|
|
• |
To correct errors, press then select the < backup |
|||
Handset |
character on the display. Then press |
ENT to backup |
||
|
one space at a time. |
|
||
6 |
NAVMAN |
VHF 7110 Quick Start Guide |
 Loading...