


 Loading...
Miele KM 7404 FX, KM 7474 FL, KM 7464 FL, KM 7414 FX, KM 7414 FX Glas Operating instructions
...
Operating and installation
instructions
Induction hobs
To avoid the risk of accidents or damage to the appliance it is essential to read these instructions before it is installed and used for the first time.
en-GB |
M.-Nr. 11 184 720 |

Contents |
|
Warning and Safety instructions...................................................................... |
5 |
Caring for the environment .............................................................................. |
16 |
Guide to the appliance...................................................................................... |
17 |
Hob...................................................................................................................... |
17 |
KM 7404 FX, KM 7464 FR, KM 7464 FL ........................................................ |
17 |
KM 7414 FX, KM 7414 FX Glass, KM 7474 FR, KM 7474 FL ........................ |
18 |
KM 7465 FR, KM 7465 FL.............................................................................. |
19 |
Controls and display ........................................................................................... |
20 |
Cooking zones..................................................................................................... |
22 |
Before using for the first time .......................................................................... |
25 |
Cleaning the hob for the first time....................................................................... |
25 |
Switching on the hob for the first time ................................................................ |
25 |
Miele@home ........................................................................................................ |
26 |
Con@ctivity.......................................................................................................... |
29 |
Induction ............................................................................................................ |
32 |
How it works........................................................................................................ |
32 |
Pans..................................................................................................................... |
32 |
Power management ............................................................................................ |
34 |
Noises.................................................................................................................. |
35 |
Tips on saving energy ...................................................................................... |
36 |
Setting ranges.................................................................................................... |
37 |
Operation............................................................................................................ |
38 |
Using the appliance............................................................................................. |
38 |
Switching on the hob .......................................................................................... |
39 |
Setting the power level........................................................................................ |
39 |
Changing the power level.................................................................................... |
39 |
Switching off a cooking zone .............................................................................. |
39 |
Residual heat indicator........................................................................................ |
40 |
Power level setting - Extended setting range...................................................... |
40 |
PowerFlex cooking area ...................................................................................... |
41 |
Auto heat-up ....................................................................................................... |
42 |
Booster function.................................................................................................. |
43 |
Keeping warm ..................................................................................................... |
44 |
Timer................................................................................................................... |
45 |
Minute minder ..................................................................................................... |
45 |
Switching off a cooking zone automatically........................................................ |
46 |
2

|
Contents |
Additional functions .......................................................................................... |
47 |
Stop & Go............................................................................................................ |
47 |
Recall................................................................................................................... |
47 |
Demonstration mode........................................................................................... |
48 |
Displaying hob data............................................................................................. |
48 |
Safety features................................................................................................... |
49 |
System lock/safety lock ...................................................................................... |
49 |
Safety switch-off ................................................................................................. |
50 |
Overheating protection........................................................................................ |
51 |
Programming ..................................................................................................... |
52 |
Note for test institutes ...................................................................................... |
55 |
Cleaning and care ............................................................................................. |
56 |
Problem solving guide ...................................................................................... |
58 |
Optional accessories ........................................................................................ |
62 |
After sales service............................................................................................. |
63 |
Contact in the event of a fault ............................................................................. |
63 |
Data plate ............................................................................................................ |
63 |
Warranty .............................................................................................................. |
63 |
Installation.......................................................................................................... |
64 |
Safety instructions for installation ....................................................................... |
64 |
Safety distances.................................................................................................. |
65 |
Installation notes ................................................................................................. |
69 |
Surface-mounted installation ......................................................................... |
69 |
Flush-fit installation ........................................................................................ |
70 |
Installation dimensions – Surface-mounted........................................................ |
71 |
KM 7464 FR ................................................................................................... |
71 |
KM 7465 FR ................................................................................................... |
72 |
KM 7464 FL, KM 7465 FL .............................................................................. |
73 |
KM 7474 FR ................................................................................................... |
74 |
KM 7474 FL.................................................................................................... |
75 |
Surface-mounted installation .............................................................................. |
76 |
Installation dimensions – Flush-fit....................................................................... |
77 |
KM 7404 FX.................................................................................................... |
77 |
KM 7414 FX.................................................................................................... |
78 |
KM 7414 FX Glass.......................................................................................... |
79 |
KM 7464 FL, KM 7465 FL .............................................................................. |
80 |
KM 7474 FL.................................................................................................... |
81 |
3

Contents |
|
Flush-fit installation ............................................................................................. |
82 |
Electrical connection ........................................................................................... |
83 |
Product data sheets ......................................................................................... |
86 |
Conformity declaration ..................................................................................... |
89 |
4
Warning and Safety instructions
This hob complies with all relevant local and national safety requirements. Inappropriate use can, however, lead to personal injury and material damage.
Read the operating and installation instructions carefully before using the hob. They contain important information on safety, installation, use and maintenance. This prevents both personal injury and damage to the hob.
In accordance with standard IEC 60335-1, Miele expressly and strongly advises that you read and follow the instructions in the chapter on installing the hob as well as the safety instructions and warnings.
Miele cannot be held liable for injury or damage caused by noncompliance with these instructions.
Keep these instructions in a safe place and pass them on to any future owner.
5

Warning and Safety instructions
Correct application
This hob is intended for domestic use and use in other similar environments.
This hob is not intended for outdoor use.
It is intended for domestic use only to cook food and keep it warm. Any other use is not supported by the manufacturer and could be dangerous.
This hob is not intended for use by people with reduced physical, sensory or mental capabilities or lack of experience and knowledge, unless they have been given supervision and instruction concerning its use by a person responsible for their safety. They may only use the hob unsupervised if they have been shown how to use it in a safe way. They must be able to recognise and understand the dangers of misuse.
6

Warning and Safety instructions
Safety with children
Children under 8 years of age must be kept away from the hob unless they are constantly supervised.
Children over 8 years of age may use the hob without supervision if its operation has been clearly explained to them and they are able to use it safely. Children must be able to understand and recognise the possible dangers caused by incorrect operation.
Children must not be allowed to clean the hob unsupervised.
Please supervise children in the vicinity of the hob and do not let them play with it.
The hob gets hot when in use and remains hot for a while after being switched off. Keep children well away from the hob until it has cooled down and there is no danger of burning.
Danger of burning! Do not store anything which might arouse a child's interest in storage areas above or behind the hob. Otherwise they could be tempted into climbing onto the appliance with the risk of burning themselves.
Risk of burning and scalding. Place pots and pans on the cooking zone in such a way that children cannot pull them down and burn themselves.
Danger of suffocation! Whilst playing, children may become entangled in packaging material (such as plastic wrapping) or pull it over their head with the risk of suffocation. Keep packaging material away from children.
Activate the system lock to ensure that children cannot switch on the hob inadvertently. Use the safety lock when the hob is in use to prevent children from altering the settings selected.
7

Warning and Safety instructions
Technical safety
Unauthorised installation, maintenance and repairs can cause considerable danger for the user. Installation, maintenance and repairs must only be carried out by a Miele authorised technician.
Damage to the hob can compromise your safety. Check the hob for visible signs of damage. Do not use the hob if it is damaged.
Reliable and safe operation of this hob can only be assured if it has been connected to the mains electricity supply.
The hob must not be connected to the inverter of an autonomous power supply such as e.g. a solar power system. When the hob is switched on, power surges could result in a safety switch-off. This could damage the electronic module.
The electrical safety of this hob can only be guaranteed when correctly earthed. It is essential that this standard safety requirement is met. If in any doubt please have the electrical installation tested by a qualified electrician.
To avoid the risk of damage to the hob, make sure that the connection data on the data plate (voltage and frequency) match the mains electricity supply before connecting it to the mains.
Consult a qualified electrician if in doubt.
Do not connect the hob to the mains electrical supply by a multisocket adapter or extension lead. These are a fire hazard and do not guarantee the required safety of the appliance.
For safety reasons, this hob may only be used after it has been built in.
This hob must not be used in a non-stationary location (e.g. on a ship).
8

Warning and Safety instructions
Never open the casing of the hob.
Touching or tampering with electrical connections or components and mechanical parts is highly dangerous to the user and can cause operational faults.
While the hob is under warranty, repairs should only be undertaken by a Miele authorised service technician. Otherwise the warranty is invalidated.
Miele can only guarantee the safety of the appliance when genuine original Miele replacement parts are used. Faulty components must only be replaced by Miele spare parts.
The hob is not intended for use with an external timer switch or a remote control system.
The hob must be connected to the electricity supply by a qualified electrician (see “Installation – Electrical connection”).
If the mains connection cable is damaged, it must be replaced with a special mains connection cable by a qualified electrician (see “Electrical connection” in the “Installation” chapter).
The hob must be disconnected from the mains electricity supply during installation, maintenance and repair work. Ensure that power is not supplied to the appliance until after it has been installed or until any maintenance or repair work has been carried out.
Danger of electric shock. Do not use the hob if it is faulty, or if the ceramic surface is cracked, chipped or damaged in any way. Switch it off immediately. Disconnect the hob from the mains electricity supply. Contact Miele Service.
If the hob is installed behind a cabinet door, do not close the door while the hob is in use. Heat and moisture can build up behind the closed door. This can result in damage to the hob, the housing unit and the floor. Do not close the door until the residual heat indicators go out.
9

Warning and Safety instructions
In areas which may be subject to infestation by cockroaches or other vermin, pay particular attention to keeping the appliance and its surroundings clean at all times. Any damage caused by cockroaches or other vermin will not be covered by the warranty.
10
Warning and Safety instructions
Correct use
The hob gets hot when in use and remains hot for a while after being switched off. There is a danger of burning until the residual heat indicators go out.
Oil and fat can overheat and catch fire. Do not leave the hob unattended when cooking with oil and fat. If it does ignite do not attempt to put the flames out with water.
Disconnect the hob from the mains and use a suitable fire blanket, saucepan lid, damp towel or similar to smother the flames.
Do not leave the hob unattended whilst it is being used. It should be continually monitored whilst boiling and flash frying.
Flames could set the grease filters of a cooker hood on fire. Do not flambé under a cooker hood.
Spray canisters, aerosols and other inflammable substances can ignite when heated. Therefore do not store such items or substances in a drawer under the hob. Cutlery inserts must be heat-resistant.
Do not heat an empty pan.
Do not heat up food in closed containers e.g. tins or sealed jars on the hob, as pressure can build up in the container, causing it to explode.
Do not cover the hob, e.g. with a hob cover, a cloth or protective foil. The material could catch fire, shatter or melt if the hob is switched on by mistake or if residual heat is still present.
When the appliance is switched on either deliberately or by mistake, or when there is residual heat present, there is the risk of any metal items left on the hob heating up, with the danger of burning. Depending on the material, other items left on the hob could also melt or catch fire. Damp pan lids might adhere to the ceramic surface and be difficult to dislodge. Do not use the appliance as a resting place. Switch the cooking zones off after use.
11

Warning and Safety instructions
You could burn yourself on the hot hob. Protect your hands with heat-resistant pot holders or gloves when handling hot pots and pans. Do not let them get wet or damp, as this causes heat to transfer through the material more quickly with the risk of scalding or burning yourself.
When using an electrical appliance, e.g. a hand-held food blender, near the hob, ensure that the cable of the electrical appliance cannot come into contact with the hot hob. The insulation on the cable could become damaged.
Grains of salt, sugar and sand (e.g. from cleaning vegetables) can cause scratches if they get under pan bases. Make sure that the ceramic surface is clean before placing pans on it.
Even a light object can cause damage in certain circumstances. Do not drop anything on the ceramic surface.
Placing hot pans on the sensors and indicators could damage the electronics underneath. Do not place hot pans on the sensors or indicators.
Do not allow solid or liquid sugar, or pieces of plastic or aluminium foil to get onto the hob when it is hot, as they can damage the ceramic surface when it cools down. If this should occur, switch off the appliance and scrape off all the sugar, plastic or aluminium residues whilst still hot, using a shielded scraper blade suitable for use on glass. Wear oven gloves when doing this. Allow the ceramic surface to cool down and then clean it with a suitable ceramic hob cleaning agent.
Pans which boil dry can cause damage to the ceramic glass. Do not leave the hob unattended whilst it is being used.
Only use pots and pans with smooth bases. Rough bases will scratch the ceramic glass.
Lift pans into position on the hob. Sliding them into place can cause scuffs and scratches.
12

Warning and Safety instructions
Because induction heating works so quickly, the base of the pan could, under certain circumstances, heat up to the temperature at which oil or fat self-ignites within a very short time. Never leave the hob unattended during use!
Heat oil or fat for a maximum of one minute. Never use the Booster function to heat oil or fat.
For people fitted with a heart pacemaker: Please note that the area immediately surrounding the hob is electromagnetically charged. It is very unlikely to affect a pacemaker. However, if in any doubt, consult the manufacturer of the pacemaker or your doctor.
To prevent damage to items which are susceptible to electromagnetic fields, e.g. credit cards, digital storage devices, pocket calculators, etc, do not leave them in the immediate vicinity of the hob.
Metal utensils stored in a drawer under the hob can become hot if the appliance is used intensively for a long time.
The hob is fitted with a cooling fan. If a drawer is fitted directly underneath the hob, ensure that there is sufficient space between the drawer and its contents and the underside of the hob in order to ensure sufficient ventilation for the hob.
If a drawer is fitted directly underneath the hob, do not store any pointed or small items, paper, serviettes, etc. in the drawer. They could get in through the ventilation slots or be sucked into the casing by the fan and damage the fan or impair cooling.
Do not use two pans on a cooking zone or extended zone at the same time.
If the cookware only partially covers a cooking or extended zone, the handle could become very hot.
Always place cookware in the middle of a cooking or extended zone!
13

Warning and Safety instructions
The induction generators could be damaged or even destroyed if you use an induction adapter plate for cookware. Do not use induction adapter plates.
14

Warning and Safety instructions
Cleaning and care
Do not use a steam cleaning appliance to clean this hob. The steam could reach electrical components and cause a short circuit.
If the hob is built in over a pyrolytic oven, the hob should not be used whilst the pyrolytic process is being carried out, as this could trigger the overheating protection mechanism on the hob (see relevant section).
Miele will guarantee to supply functional spare parts for a minimum of 10 years and up to 15 years following the discontinuation of your hob.
15

Caring for the environment
Disposal of the packing
material
The packaging is designed to protect the appliance from damage during transportation. The packaging materials used are selected from materials which are environmentally friendly for disposal and should be recycled.
Recycling the packaging reduces the use of raw materials in the manufacturing process and also reduces the amount of waste in landfill sites.
Disposing of your old
appliance
Electrical and electronic appliances often contain valuable materials. They also contain specific materials, compounds and components, which were essential for their correct function and safety. These could be hazardous to human health and to the environment if disposed of with your domestic waste or if handled incorrectly. Please do not, therefore, dispose of your old appliance with your household waste.
Please dispose of it at your local community waste collection / recycling centre for electrical and electronic appliances, or contact your dealer or Miele for advice. You are also responsible for deleting any personal data that may be stored on the appliance being disposed of. Please ensure that your old appliance poses no risk to children while being stored prior to disposal.
16
Guide to the appliance
Hob
KM 7404 FX, KM 7464 FR, KM 7464 FL
a Cooking zone with TwinBooster b Cooking zone with TwinBooster
c PowerFlex cooking zone with TwinBooster d PowerFlex cooking zone with TwinBooster
cd can be combined to form a PowerFlex cooking area e Controls and indicators
17

Guide to the appliance
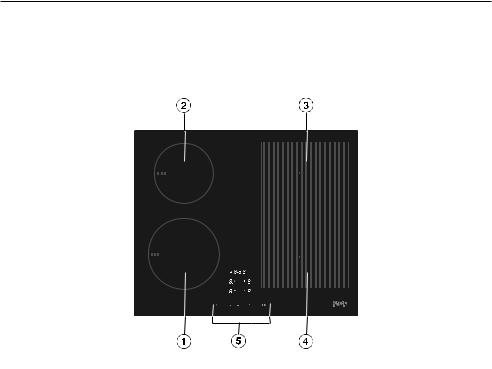
KM 7414 FX, KM 7414 FX Glass, KM 7474 FR, KM 7474 FL
a Cooking zone with TwinBooster b Cooking zone with TwinBooster
c PowerFlex cooking zone with TwinBooster d PowerFlex cooking zone with TwinBooster
cd can be combined to form a PowerFlex cooking area e Controls and indicators
18

Guide to the appliance
KM 7465 FR, KM 7465 FL
a PowerFlex cooking zone with TwinBooster b PowerFlex cooking zone with TwinBooster
ab can be combined to form a PowerFlex cooking area c PowerFlex cooking zone with TwinBooster
d PowerFlex cooking zone with TwinBooster
cd can be combined to form a PowerFlex cooking area e Controls and indicators
19
Guide to the appliance
Controls and display
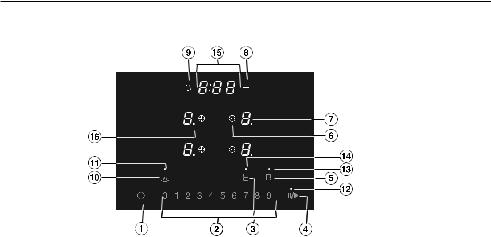
Sensor controls
a For switching the hob on and off
b Numerical keybank
-For setting the power level
-For setting the timer
c Switching PowerFlex cooking zones on together/separately
d Stop & Go
eTwinBooster
fSwitching off a cooking zone automatically
gCooking zone selection and display
Cooking zone ready for use
Keep-warm setting
to |
Power level |
TwinBooster level 1
TwinBooster level 2
No pan on cooking zone or pan unsuitable (see “Pans” in the “Induction” chapter)
Residual heat
Auto heat-up
h Set/change the time
i Minute minder
j Keeping warm function
20
Guide to the appliance
Displays/indicator lights
k Keeping warm function activated l Stop & Go activated
m Booster activated
n PowerFlex cooking area o Timer display
: to |
Time |
: |
|
|
System lock/safety lock activated |
|
Demonstration mode activated |
p Extended power level range setting
21
Guide to the appliance
Cooking zones
KM 7404 FX, KM 7464 FR, KM 7464 FL
Cooking |
Size in cm |
Max. rating |
3 |
Linked |
|
zone |
Ø1 |
2 |
in watts for 230 V |
cooking |
|
|
|
zone4 |
|||
|
|
|
|
|
|
|
14–19 |
– |
Normal |
1850 |
|
|
|
|
TwinBooster, level 1 |
2500 |
|
|
|
|
TwinBooster, level 2 |
3000 |
|
10–16 |
– |
Normal |
1400 |
||
|
|
|
TwinBooster, level 1 |
1700 |
|
|
|
|
TwinBooster, level 2 |
2200 |
|
15–23 |
19 x 23 |
Normal |
2100 |
||
|
|
|
TwinBooster, level 1 |
3000 |
|
|
|
|
TwinBooster, level 2 |
3650 |
|
15–23 |
19 x 23 |
Normal |
2100 |
||
|
|
|
TwinBooster, level 1 |
3000 |
|
+ |
|
|
TwinBooster, level 2 |
3650 |
|
22–23 |
23 x 39 |
Normal |
3400 |
- |
|
|
|
|
TwinBooster, level 1 |
4800 |
|
|
|
|
TwinBooster, level 2 |
7300 |
|
|
|
|
|
|
|
|
|
|
Total |
7300 |
|
|
|
|
|
|
|
1Cookware with a base diameter within the given range may be used.
2The given range corresponds to the maximum base surface of the cookware that may be used.
3The wattage quoted may vary depending on the size and material of the cookware used.
4The cooking zone is linked to this cooking zone electrically so that the rating can be increased; see “Operation – Power management”.
22

Guide to the appliance
KM 7414 FX, KM 7414 FX Glass, KM 7474 FR, KM 7474 FL
Cooking |
Size in cm |
Max. rating |
3 |
Linked |
|
zone |
Ø1 |
2 |
in watts for 230 V |
cooking |
|
|
|
zone4 |
|||
|
|
|
|
|
|
|
16–22 |
– |
Normal |
2300 |
|
|
|
|
TwinBooster, level 1 |
3000 |
|
|
|
|
TwinBooster, level 2 |
3650 |
|
10–16 |
– |
Normal |
1400 |
||
|
|
|
TwinBooster, level 1 |
1700 |
|
|
|
|
TwinBooster, level 2 |
2200 |
|
15–23 |
19 x 23 |
Normal |
2100 |
||
|
|
|
TwinBooster, level 1 |
3000 |
|
|
|
|
TwinBooster, level 2 |
3650 |
|
15–23 |
19 x 23 |
Normal |
2100 |
||
|
|
|
TwinBooster, level 1 |
3000 |
|
+ |
|
|
TwinBooster, level 2 |
3650 |
|
22–23 |
23 x 39 |
Normal |
3400 |
- |
|
|
|
|
TwinBooster, level 1 |
4800 |
|
|
|
|
TwinBooster, level 2 |
7300 |
|
|
|
|
|
|
|
|
|
|
Total |
7300 |
|
|
|
|
|
|
|
1Cookware with a base diameter within the given range may be used.
2The given range corresponds to the maximum base surface of the cookware that may be used.
3The wattage quoted may vary depending on the size and material of the cookware used.
4The cooking zone is linked to this cooking zone electrically so that the rating can be increased; see “Operation – Power management”.
23
Guide to the appliance
KM 7465 FR, KM 7465 FL
Cooking |
Size in cm |
Max. rating |
3 |
Linked |
|
zone |
Ø1 |
2 |
in watts for 230 V |
cooking |
|
|
|
zone4 |
|||
|
|
|
|
|
|
|
15–23 |
19 x 23 |
Normal |
2100 |
|
|
|
|
TwinBooster, level 1 |
3000 |
|
|
|
|
TwinBooster, level 2 |
3650 |
|
15–23 |
19 x 23 |
Normal |
2100 |
||
|
|
|
TwinBooster, level 1 |
3000 |
|
|
|
|
TwinBooster, level 2 |
3650 |
|
15–23 |
19 x 23 |
Normal |
2100 |
||
|
|
|
TwinBooster, level 1 |
3000 |
|
|
|
|
TwinBooster, level 2 |
3650 |
|
15–23 |
19 x 23 |
Normal |
2100 |
||
|
|
|
TwinBooster, level 1 |
3000 |
|
+ |
|
|
TwinBooster, level 2 |
3650 |
|
22–23 |
23 x 39 |
Normal |
3400 |
- |
|
+ |
|
|
TwinBooster, level 1 |
4800 |
|
|
|
|
TwinBooster, level 2 |
7300 |
|
|
|
|
|
|
|
|
|
|
Total |
7300 |
|
|
|
|
|
|
|
1Cookware with a base diameter within the given range may be used.
2The given range corresponds to the maximum base surface of the cookware that may be used.
3The wattage quoted may vary depending on the size and material of the cookware used.
4The cooking zone is linked to this cooking zone electrically so that the rating can be increased; see “Operation – Power management”.
24
Before using for the first time
Please stick the extra data plate for the appliance supplied with this documentation in the space provided in the “After sales service” section of this booklet.
Remove any protective wrapping and stickers.
Cleaning the hob for the first
time
Before using for the first time, clean the hob with a damp cloth only and then wipe dry.
Switching on the hob for the
first time
The metal components have a protective coating which may give off a slight smell when heated up for the first time. The induction coils may also give off a slight smell for the first few hours of operation. This smell will be less noticeable with each subsequent use before dissipating completely.
The smell and any vapours given off do not indicate a faulty connection or appliance and they are not hazardous to health.
Please note that the heating up time on induction hobs is very much shorter than on conventional hobs.
25

Before using for the first time
Miele@home
Prerequisite: home WiFi network
Your hob is equipped with an integrated WiFi module. The hob can be connected to your home WiFi network.
If your Miele cooker hood is also connected to the home WiFi network, you can control the cooker hood automatically with the Con@ctivity function. Further information can be found in the operating and installation instructions for your cooker hood.
Make sure that the signal of your WiFi network is sufficiently strong in the place where your hob is installed.
There are a number of ways of connecting your hob to your WiFi network.
The hob requires max. 2 W in networked standby.
Availability of the WiFi connection
The WiFi connection shares a frequency range with other appliances (including microwave ovens and remote control toys). This can give rise to sporadic or even complete connection failures. Therefore, the availability of featured functions cannot be guaranteed.
Miele@home availability
The ability to use the Miele app depends on the availability of the Miele@home service in your country.
The Miele@home service is not available in every country.
For information about availability, please visit www.miele.com.
Miele App
The Miele App is available to download free of charge from the Apple App Store® or from the Google Play Store™.
After installing the Miele app on a mobile device, you can do the following:
-Call up information on the operating status of your hob
-Call up information on the programme sequence of your hob
-Set up a Miele@home network with other WiFi-enabled Miele appliances
26
Before using for the first time
Setting up Miele@home
Connecting via the app
The Miele app can be used to connect to your network.
Install the Miele app on your mobile device.
To connect, you will need:
1.Your WiFi network password
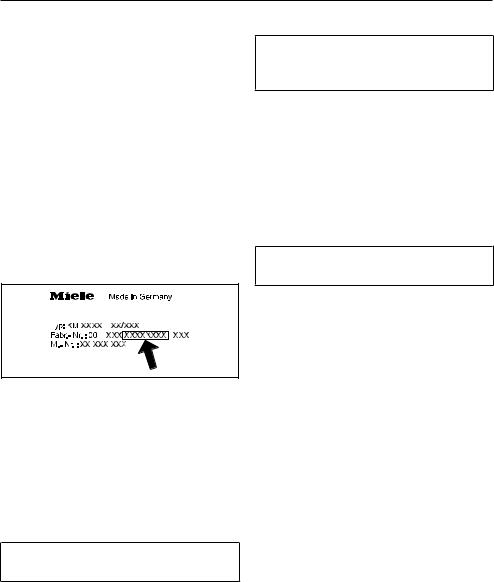
2.The password for your hob
The password for your hob consists of the last 9 digits of the serial number. This can be found on the appliance’s data plate.
Switch the hob on.
Start the Miele app.
Touch the 0 and 5 sensor controls at the same time for 6 seconds.
The seconds can be seen counting down in the timer display. After the time has elapsed, the code : is displayed in the timer display for 10 seconds.
You now have 10 minutes to configure the WiFi.
Follow the user navigation in the app.
Connecting via WPS
Prerequisite: you must have a WPS (WiFi protected setup) compatible router.
Switch the hob on.
Touch the 0 and 6 sensor controls at the same time for 6 seconds.
The seconds can be seen counting down in the timer display. After the time has elapsed, a progress light appears in the timer display during the connection attempt (for max. 120 seconds).
The WPS login is only active during these 120 seconds.
Activate the WPS function on your WiFi router.
If the connection was successful, the code : appears in the timer display. If the connection could not be established, the timer display will show the code :. You have probably not activated WPS on your router quickly enough. Repeat the steps above.
Tip: If your WiFi router does not support WPS, please connect via the Miele app.
27

Before using for the first time
Cancelling the process
Touch any sensor control.
Resetting settings
Resetting is not required when replacing the router.
Switch the hob on.
Touch the 0 and 9 sensor controls at the same time for 6 seconds.
The seconds can be seen counting down in the timer display. After the time has elapsed, the code : is displayed in the timer display for 10 s.
Reset the settings if you are disposing of your hob, selling it or putting a used hob into operation. This is the only way to ensure that all personal data has been removed and the previous owner will no longer be able to access the hob.
28
Loading...