


Operating and Installation
Instructions
Ceramic Cooktop
KM 5820
To prevent accidents and appliance damage,
read these instructions before
en - US, CA
installation or use. |
M.-Nr. 07 844 700 |
2

Contents
IMPORTANT SAFETY INSTRUCTIONS. . . . . . . . . . . . . . . . . . . . . . . . . . . . . . . . . 4
Description of the appliance . . . . . . . . . . . . . . . . . . . . . . . . . . . . . . . . . . . . . . . . . 9 Cooktop . . . . . . . . . . . . . . . . . . . . . . . . . . . . . . . . . . . . . . . . . . . . . . . . . . . . . . . . . . 9 Control panel . . . . . . . . . . . . . . . . . . . . . . . . . . . . . . . . . . . . . . . . . . . . . . . . . . . . . 10
Before using for the first time. . . . . . . . . . . . . . . . . . . . . . . . . . . . . . . . . . . . . . . 12 Clean the cooktop . . . . . . . . . . . . . . . . . . . . . . . . . . . . . . . . . . . . . . . . . . . . . . . . . 12 Heat the cooktop . . . . . . . . . . . . . . . . . . . . . . . . . . . . . . . . . . . . . . . . . . . . . . . . . . 12
How the burners operate. . . . . . . . . . . . . . . . . . . . . . . . . . . . . . . . . . . . . . . . . . . 13
Use . . . . . . . . . . . . . . . . . . . . . . . . . . . . . . . . . . . . . . . . . . . . . . . . . . . . . . . . . . . . 14 Turning ON . . . . . . . . . . . . . . . . . . . . . . . . . . . . . . . . . . . . . . . . . . . . . . . . . . . . . . 14 Power settings . . . . . . . . . . . . . . . . . . . . . . . . . . . . . . . . . . . . . . . . . . . . . . . . . . . . 15 Cooking with Auto-heat . . . . . . . . . . . . . . . . . . . . . . . . . . . . . . . . . . . . . . . . . . . . . 16 Variable burner . . . . . . . . . . . . . . . . . . . . . . . . . . . . . . . . . . . . . . . . . . . . . . . . . . . 17 Turning off and residual heat indicators . . . . . . . . . . . . . . . . . . . . . . . . . . . . . . . . 18
Selecting cookware . . . . . . . . . . . . . . . . . . . . . . . . . . . . . . . . . . . . . . . . . . . . . . . 19
Timer . . . . . . . . . . . . . . . . . . . . . . . . . . . . . . . . . . . . . . . . . . . . . . . . . . . . . . . . . . . 20 Setting the timer . . . . . . . . . . . . . . . . . . . . . . . . . . . . . . . . . . . . . . . . . . . . . . . . . . . 21 Turning a burner off automatically . . . . . . . . . . . . . . . . . . . . . . . . . . . . . . . . . . . . . 23 Using both timer functions at the same time . . . . . . . . . . . . . . . . . . . . . . . . . . . . . 24
Safety features . . . . . . . . . . . . . . . . . . . . . . . . . . . . . . . . . . . . . . . . . . . . . . . . . . . 25 Child safety lock / System lock . . . . . . . . . . . . . . . . . . . . . . . . . . . . . . . . . . . . . . . 25 Stop and Go. . . . . . . . . . . . . . . . . . . . . . . . . . . . . . . . . . . . . . . . . . . . . . . . . . . . . . 26 Safety shut-off . . . . . . . . . . . . . . . . . . . . . . . . . . . . . . . . . . . . . . . . . . . . . . . . . . . . 27 Overheat protection . . . . . . . . . . . . . . . . . . . . . . . . . . . . . . . . . . . . . . . . . . . . . . . . 28
Cleaning and Care . . . . . . . . . . . . . . . . . . . . . . . . . . . . . . . . . . . . . . . . . . . . . . . . 29
Programming . . . . . . . . . . . . . . . . . . . . . . . . . . . . . . . . . . . . . . . . . . . . . . . . . . . . 30
Frequently asked questions . . . . . . . . . . . . . . . . . . . . . . . . . . . . . . . . . . . . . . . . 33
Technical Service. . . . . . . . . . . . . . . . . . . . . . . . . . . . . . . . . . . . . . . . . . . . . . . . . 36
IMPORTANT INSTALLATION SAFETY INSTRUCTIONS . . . . . . . . . . . . . . . . . . 38
Installation . . . . . . . . . . . . . . . . . . . . . . . . . . . . . . . . . . . . . . . . . . . . . . . . . . . . . . 41 Sealing . . . . . . . . . . . . . . . . . . . . . . . . . . . . . . . . . . . . . . . . . . . . . . . . . . . . . . . . . . 42 Tiled surfaces . . . . . . . . . . . . . . . . . . . . . . . . . . . . . . . . . . . . . . . . . . . . . . . . . . . . 42
Installation dimensions . . . . . . . . . . . . . . . . . . . . . . . . . . . . . . . . . . . . . . . . . . . . 43
Installation . . . . . . . . . . . . . . . . . . . . . . . . . . . . . . . . . . . . . . . . . . . . . . . . . . . . . . 44
Electrical connection. . . . . . . . . . . . . . . . . . . . . . . . . . . . . . . . . . . . . . . . . . . . . . 47
Help protect our environment. . . . . . . . . . . . . . . . . . . . . . . . . . . . . . . . . . . . . . . 48
3
IMPORTANT SAFETY INSTRUCTIONS
WARNINGWhen using your appliance follow basic precautions, including the following:
Read all instructions before installation or use to prevent injury and appliance damage.
This appliance conforms to all uniform safety codes and regulations.
Keep these operating instructions in a safe place and pass them on to any future user.
SAVE THESE INSTRUCTIONS for a future user.
Correct usage
Only use the cooktop for residential cooking, and for the purposes described in this manual.
Other uses are not permitted and can be dangerous.
Persons who lack physical, sensory or mental abilities, or experience with the appliance should not use it without supervision or instruction by a responsible person.
Children
Use the safety lock to ensure that unsupervised children cannot turn on the cooktop or change the settings.
Children should not be left unattended in an area where the appliance is in use. Never allow children to sit or stand on any part of the appliance.
Caution: Do not store items of interest to children in cabinets above the appliance. Children climbing on the appliance to reach these items could be injured.
The appliance is hot during use and remains so for some time after being switched off. Keep children away from the appliance.
Keep all pots and pans out of the reach of children. Danger of burning or scalding.
Pot and pan handles should be turned inward and not extend over the countertop to reduce the risk of burns, ignition of flammable materials, and spills.
Ensure that any packing material is disposed of safely and kept out of the reach of children. Danger of suffocation!
4

IMPORTANT SAFETY INSTRUCTIONS
Technical safety
Installation, repair and maintenance work should be performed by a Miele authorized service technician. Work by unqualified persons could be dangerous and may void the warranty.
Be sure your appliance is properly installed and grounded by a qualified technician.
Before installing the cooktop, check for externally visible damage. Do not operate a damaged appliance.
To guarantee the electrical safety of this appliance, continuity must exist between the appliance and an effective grounding system. It is imperative that this basic safety requirement be met. If there is any doubt, have the electrical system of the house checked by a qualified electrician.
Before installation, make sure that the voltage and frequency listed on the rating label correspond with the household electrical supply. To prevent injury and appliance damage, these data must match. Consult a qualified electrician if in doubt.
Do not use an extension cord to connect this appliance to the electrical supply. Extension cords do not ensure the required safety of the appliance.
Install the appliance so that the power cord does not come into contact with any portion of the cooktop which may become hot during use.
Do not use the appliance until it has been properly installed in the countertop.
Before servicing, disconnect the appliance from the main power supply.
Do not operate any appliance with a damaged cord or plug, or if the appliance has been damaged in any manner. Contact Miele’s Technical Service Department.
Under no circumstances open the outer casing of the appliance.
While the appliance is under warranty repairs should only be performed by an authorized service technician. Otherwise the warranty is void.
In the event of any damage to the appliance, it must be turned off immediately and disconnected from the main power supply. Contact Miele’s Technical Service Department.
Do not use the appliance until it has been repaired. Ensure power is not supplied to the appliance until repair work is completed.
Defective components should be replaced by Miele original spare parts only. Only with these parts can the manufacturer guarantee the safety of the appliance.
Do not cook on a broken cooktop. Any breakages or cracks in the ceramic surface of the appliance are defects and must be treated as such. If the cooktop should break, cleaning solutions and spills may penetrate the broken cooktop and create a risk of electric shock. Do not use the appliance until it has been repaired.
5

IMPORTANT SAFETY INSTRUCTIONS
Safety
DO NOT TOUCH THE COOKING AREA OR THE VICINITY AROUND THE COOKING AREA - During operation, the cooking area and its surroundings will get hot and can cause burns. When the cooktop is shut off, the surface may remain hot enough to cause harm, even though the glow is not visible through the dark glass. During and after use, do not touch or let clothing or other flammable materials contact the cooking area or the vicinity around the cooking area until they have had sufficient time to cool. As long as the surface temperature is high enough to cause a burn, the Residual Heat Indicator will remain lit. Once sufficient time has passed the indicator will go out and the surface is safe to touch.
Protect your hands with oven mitts or potholders when using the appliance. Use only dry, heat resistant potholders. Moist or damp potholders used on hot surfaces can result in steam burns. Do not let the potholder touch the hot heating elements. Do not use towels or other bulky items near the appliance.
Do not heat unopened containers. Built-up pressure may cause the container to burst and result in injury.
Do not flambé under an exhaust hood. Flames could be drawn up into the hood by the suction and the grease filters may ignite.
Never use the appliance to heat a room. Due to the high temperatures radiated, objects left near the appliance could catch fire.
Do not store items on the appliance when not in use. Items could melt or catch fire from residual heat or if the appliance is turned on inadvertently. Always switch the cooking zone(s) off after use.
Never cover the burner with a cloth or protective oven foil. If inadvertently turned on or if there is residual heat, a fire could result.
Be aware of loose fitting or hanging garments when operating the appliance, they may present a fire hazard.
Never leave an appliance unattended at high settings or when cooking with oil or fat. Overheated oil could ignite. Always heat oil slowly, monitoring it as it heats.
Do not store aerosols, combustibles or any other easily flammable materials underneath or adjacent to the appliance.
Do not use water on grease fires. Smother or use a dry chemical or foam-type extinguisher on any fire or flame.
6

IMPORTANT SAFETY INSTRUCTIONS
Make certain that the power cords of small appliances do not come in contact with the appliance. The insulation of the cable could become damaged. Danger of electric shock!
To prevent damage to the cooktop do not use pots and pans with thin bases on the cooktop. Never heat an empty pan unless the pan manufacturer states that you can do so.
The control panel and/or the areas around the cooktop (the cooktop frames or surrounding (in the case of facet cooktops) may become hot due to the following factors: operating time, high output settings, large cook ware, and number of burners in operation.
Be careful not to drop anything on the ceramic surface of the cooktop. Even lightweight objects may cause damage.
Use the proper pan size. Select cookware with flat bottoms large enough to cover the heating element. Using undersized cookware will expose a portion of the heating element and may result in ignition of clothing or handles becoming hot. The proper size pot or pan will also improve efficiency.
Do not use pots or pans with pronounced edges or ridges on the ceramic cooktop. These could scratch the cooktop permanently. See "Selecting cookware" for more information. Grains of salt and sand can cause scratches. Make sure that the bases of any pots and pans are clean, free of any fat or oils and are dry.
Before using glass, glass/ceramic, ceramic, earthenware or other glazed cookware verify that they can be used on a cooking surface.
Do not use plastic or aluminum foil cookware. It melts at high temperatures. Fire hazard.
To prevent burns and breathing difficulty, allow the cooktop to cool before cleaning. Some cleaners may produce toxic fumes if applied to a hot surface.
Keep the cooktop clean. Grains of salt and sand can cause scratches.
When wiping spills on a hot cooktop with a wet sponge or cloth, be careful to avoid steam burns.
Do not let flammable materials,
i.e. cooking grease, accumulate on the appliance.
Do not use a steam cleaner to clean this appliance. Steam could penetrate electrical components and cause a short circuit.
Do not allow either solid or liquid sugar, pieces of plastic or foil to fall on the burners when they are hot. If these residues are allowed to cool on the ceramic surface pitting or even cracking may occur.
7

IMPORTANT SAFETY INSTRUCTIONS
Any spills should be removed as quickly as possible to prevent them from burning on and becoming difficult to remove.
Aluminum cookware or cookware with aluminum base can cause shiny metallic spots. These spots can be removed with ceramic glass or stainless steel cleaner (see "Cleaning and Care").
Never heat up an empty pot, unless the manufacturer explicitly allows this can be done! Failure to comply can result in a damaged cooktop.
NEVER set down hot pots or pans in the area of the control panel. This can damage the underlying electronics.
If the cooktop built in behind a cabinet door, it should only be operated with the door open.
Close the door only when the appliance is shut off and the Residual Heat indicators have gone out.
SAVE THESE INSTRUCTIONS
AND REVIEW THEM
PERIODICALLY
8

Description of the appliance
Cooktop
Three-zone variable burner
Two-zone variable burner
One-zone burner
Control panel
Burner |
Diameter |
Output in watts at |
||
|
inches |
|
cm |
208 / 240 V |
|
|
|||
|
|
|
||
|
|
|
|
|
Left |
5 11/16" |
|
14.5 |
1100 |
|
8 1/4" |
|
21 |
2150 |
|
10 5/8" |
|
27 |
3100 |
|
|
|
|
|
Right rear |
4 3/4" |
|
12 |
700 |
|
7 1/16" |
|
18 |
1800 |
|
|
|
|
|
Right front |
5 11/16" |
|
14.5 |
1200 |
|
|
|
|
|
|
|
|
|
Total:6100 |
|
|
|
|
|
9
Description of the appliance
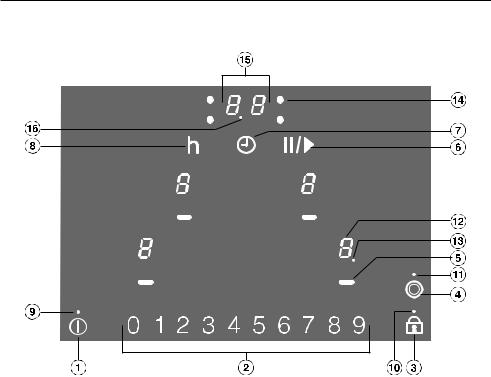
Control panel
10
Description of the appliance
Touch controls
Cooktop On/Off
Settings bar
-Setting the power level
-Setting the time
Child safety lock
Variable burner On/Off
Burner On/Off
Stop and Go
- Timer activation
-Switching between timer functions
-Selecting the shut-off time (see "Automatic burner shut-off")
Hour function
Indicator lights
Power-ON indicator
Child safety lock
Variable burner-On
Burner display
- |
= Burner is ready for use |
0= Burner is turned on
1to 9 = Power level
#= Residual heat
A = Auto-heat with extended range of power levels
Indicator light for auto-heat or extended range of power levels (see "Programming")
Timer display
Indicator light for burner selection, e.g. right rear burner
00 to 99 = Time in minutes 0.^ to 9^ = Time in hours
PS = Programming (see respective chapter)
F = Fault (see "Safety shut-off)
Indicator light for half-hours with a timer setting of more than 99 minutes
11

Before using for the first time
Clean the cooktop
Before using for the first time, clean the appliance with a damp cloth and dry with a soft cloth.
Do not use liquid dish soap to clean the cooktop, this may cause permanent blue discolorations.
Heat the cooktop
Only for facet cooktops:
A small gap between the cooktop and the work surface may be visible in the first days of operation. It will become smaller during use. Despite this small gap, the electrical safety of your appliance is always ensured.
Metal components of the appliance have a protective coating which may give off a slight odor the first time the appliance is heated.
The smell will dissipate after a short time and does not indicate a faulty connection or appliance defect.
12
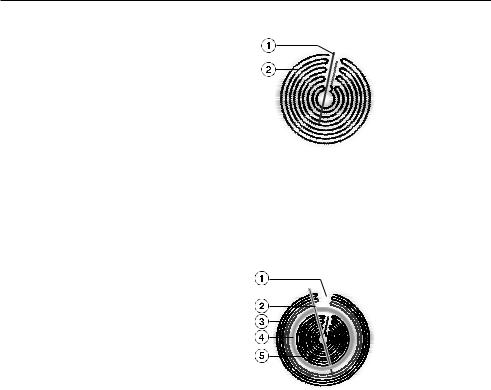
How the burners operate
One-zone burners use one heating strip; two-zone burners and grill zones have two heating strips. Depending on the model, the heating strips may be separated by a ring.
Each burner has overheating protection (internal temperature limiter) feature to prevent the ceramic glass from overheating (see "Overheat protection").
When a power level is set, the heat element turns on and the heating strip is visible through the ceramic glass.
The power setting determines how hot the burner will get, and is electronically regulated. This means that the burner will switch on and off as needed to maintain the selected power level.
One-zone burner
Overheat protection
Heating strip
Two-zone burner
Technical detail, not a defect
Overheat protection
Outer heating strip
Insulation
Inner heating strip
13

Use
Turning ON
The cooktop must be turned on before any of the burners can be used.
Do not leave the appliance unattended during operation!
To turn the cooktop On:
Touch the On/Off touch control .
The power-ON indicator will turn on and - will appear in all the burner displays. If no further entry is made, the cooktop will turn itself off after a few seconds for safety.
To turn a burner on and select a power level
Touch the On/Off touch control for the desired burner.
0 appears in the burner display.
Touch the desired power level number on the settings bar.
For a setting between two power levels (see "Power settings"), press the area between the numbers.
The power level setting will flash for a few seconds and then remain steady.
To change the power level
Touch the On/Off touch control for the desired burner.
The power level will flash in the burner display.
Touch the respective number on the settings bar to set the desired power level.
If only one burner is on, the power level can be changed without activation.
14

Use
Power settings
The cooktop is factory-programmed with 9 power levels. If you would like finer setting control, you can extend the power levels (see "Programming"). The intermediate levels will appear with a lighted dot next to the number.
Cooking process |
Power level* |
|
|
Standard |
Extended |
|
factory settings |
settings |
|
(9 power levels) |
(17 power levels) |
|
|
|
Melting butter, chocolate, etc. |
1 - 2 |
1 - 2. |
Dissolving gelatin |
|
|
Preparing yogurt |
|
|
|
|
|
Thickening sauces containing egg yolk and butter |
1 - 3 |
1 - 3. |
Warming small quantities of liquid |
|
|
Keeping food warm which sticks easily |
|
|
Cooking rice |
|
|
|
|
|
Warming liquid and half-set foods |
2 - 4 |
2 - 4. |
Thickening creams and sauces, e.g. zabaglione or |
|
|
Hollandaise sauce |
|
|
Making oatmeal |
|
|
Preparing omelets, lightly fried eggs |
|
|
|
|
|
Thawing frozen foods |
3 - 5 |
3 - 5. |
Steaming vegetables, fish |
|
|
Cooking pasta |
|
|
|
|
|
Boiling and cooking large quantities of food |
5 |
5. |
|
|
|
Gentle frying of fish, cutlets, sausages, fried eggs, etc. |
6 - 7 |
6 - 7. |
|
|
|
Frying pancakes, etc. |
7 - 8 |
7 - 8. |
|
|
|
Boiling large quantities of water |
8 - 9 |
8. - 9 |
Bringing to the boil |
|
|
|
|
|
* These settings are merely guidelines. A higher setting is required for deep pots, larger quantities or when cooking without a lid. For smaller quantities, select a lower setting.
15

Use
Cooking with Auto-heat
When Auto heat-up has been activated, the burner automatically turns on at the highest setting (heat-up boost) and then switches to the previously selected continued power level. The heat-up time depends on which continued power level has been chosen (see chart).
With higher continued power levels, only a relatively short heat-up time is required.
To activate Auto-heat
Touch the On/Off touch control for the desired burner.
The burner display flashes.
Touch and hold the desired continued power level number on the settings bar until a signal sounds and the Auto-heat indicator lights up.
After the heat-up time, the Auto-heat indicator will go out.
With the extended settings (see "Programming"), A flashes alternately with the continued power level until the heat-up time has finished.
Changing the continued power level deactivates Auto-heat.
To deactivate Auto heat-up
You can turn off the heat-up boost before the heat-up time has elapsed.
Touch the On/Off touch control for the desired burner.
The burner display flashes.
Touch and hold the set continued power level on the settings bar until the indicator light and A go out; or set a different power level.
Continued |
Heat-up time |
Power Level* |
(approx.) min:sec |
1 |
1 : 20 |
|
|
1. |
2 : 00 |
|
|
2 |
2 : 45 |
|
|
2. |
3 : 25 |
|
|
3 |
4 : 05 |
|
|
3. |
4 : 45 |
|
|
4 |
5 : 30 |
|
|
4. |
6 : 10 |
|
|
5 |
6 : 50 |
|
|
5. |
7 : 10 |
|
|
6 |
1 : 20 |
|
|
6. |
2 : 00 |
|
|
7 |
2 : 45 |
|
|
7. |
2 : 45 |
|
|
8 |
2 : 45 |
|
|
8. |
2 : 45 |
|
|
9 |
- |
|
|
*The continued power level marked with a dot are only available with the extended power level settings (see "Programming").
16
 Loading...