


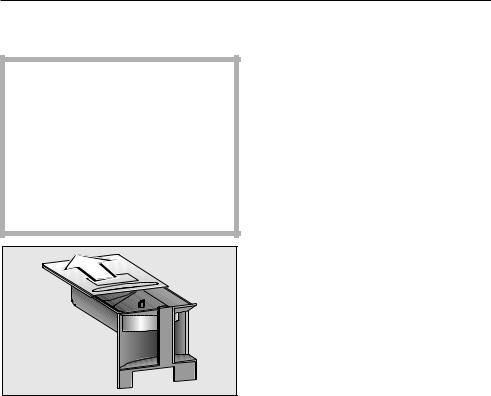
Operating and installation instructions
Built-in coffee machines
CVA 5060
CVA 5068
To avoid the risk of accidents |
en - GB |
or damage to the machine, |
|
it is essential to read these |
|
instructions before it is installed |
|
and used for the first time. |
M.-Nr. 09 248 830 |

Contents
Caring for the environment . . . . . . . . . . . . . . . . . . . . . . . . . . . . . . . . . . . . . . . . . . 5
Guide to the machine . . . . . . . . . . . . . . . . . . . . . . . . . . . . . . . . . . . . . . . . . . . . . . 6
Accessories supplied . . . . . . . . . . . . . . . . . . . . . . . . . . . . . . . . . . . . . . . . . . . . . . 8
Optional accessories . . . . . . . . . . . . . . . . . . . . . . . . . . . . . . . . . . . . . . . . . . . . . . . 9
Warning and Safety instructions . . . . . . . . . . . . . . . . . . . . . . . . . . . . . . . . . . . . 10
Using the coffee machine - first steps . . . . . . . . . . . . . . . . . . . . . . . . . . . . . . . . 15 Controls . . . . . . . . . . . . . . . . . . . . . . . . . . . . . . . . . . . . . . . . . . . . . . . . . . . . . . . . . 15 Display . . . . . . . . . . . . . . . . . . . . . . . . . . . . . . . . . . . . . . . . . . . . . . . . . . . . . . . . . . 15 Before using for the first time . . . . . . . . . . . . . . . . . . . . . . . . . . . . . . . . . . . . . . . . . 15 Switching on . . . . . . . . . . . . . . . . . . . . . . . . . . . . . . . . . . . . . . . . . . . . . . . . . . . 15 Switching off . . . . . . . . . . . . . . . . . . . . . . . . . . . . . . . . . . . . . . . . . . . . . . . . . . . 16
Filling the water and coffee bean containers . . . . . . . . . . . . . . . . . . . . . . . . . . 17 Filling the water container . . . . . . . . . . . . . . . . . . . . . . . . . . . . . . . . . . . . . . . . . . . 17 Filling the coffee bean container . . . . . . . . . . . . . . . . . . . . . . . . . . . . . . . . . . . . . . 18
Making drinks . . . . . . . . . . . . . . . . . . . . . . . . . . . . . . . . . . . . . . . . . . . . . . . . . . . . 19 Switching on . . . . . . . . . . . . . . . . . . . . . . . . . . . . . . . . . . . . . . . . . . . . . . . . . . . . . 19 Pre-warming cups . . . . . . . . . . . . . . . . . . . . . . . . . . . . . . . . . . . . . . . . . . . . . . . . . 19 Adjusting the height of the central spout . . . . . . . . . . . . . . . . . . . . . . . . . . . . . . . . 20 Preparing espresso and coffee from freshly ground beans . . . . . . . . . . . . . . . . . 20
Double portion . . . . . . . . . . . . . . . . . . . . . . . . . . . . . . . . . . . . . . . . . . . . . . . . . 21 Cancelling preparation . . . . . . . . . . . . . . . . . . . . . . . . . . . . . . . . . . . . . . . . . . . 21 Making espresso and coffee using ready ground coffee . . . . . . . . . . . . . . . . . . . 21 Adding ready ground coffee . . . . . . . . . . . . . . . . . . . . . . . . . . . . . . . . . . . . . . 21 To make a drink . . . . . . . . . . . . . . . . . . . . . . . . . . . . . . . . . . . . . . . . . . . . . . . . 22 Cancelling preparation . . . . . . . . . . . . . . . . . . . . . . . . . . . . . . . . . . . . . . . . . . . 22 Drinks with milk . . . . . . . . . . . . . . . . . . . . . . . . . . . . . . . . . . . . . . . . . . . . . . . . . . . 22 Stainless steel milk flask . . . . . . . . . . . . . . . . . . . . . . . . . . . . . . . . . . . . . . . . . . 22 Cappuccino, latte macchiato, hot milk, milk froth. . . . . . . . . . . . . . . . . . . . . . . 23 User profile drinks . . . . . . . . . . . . . . . . . . . . . . . . . . . . . . . . . . . . . . . . . . . . . . . . . 24 After use. . . . . . . . . . . . . . . . . . . . . . . . . . . . . . . . . . . . . . . . . . . . . . . . . . . . . . . . . 24
Setting the coffee grinder . . . . . . . . . . . . . . . . . . . . . . . . . . . . . . . . . . . . . . . . . . 25

Contents
Settings: Customising your machine . . . . . . . . . . . . . . . . . . . . . . . . . . . . . . . . 26 Settings menu . . . . . . . . . . . . . . . . . . . . . . . . . . . . . . . . . . . . . . . . . . . . . . . . . . . . 26 Selecting the language . . . . . . . . . . . . . . . . . . . . . . . . . . . . . . . . . . . . . . . . . . . . . 27 Setting the time of day . . . . . . . . . . . . . . . . . . . . . . . . . . . . . . . . . . . . . . . . . . . . . . 28 Setting the timer. . . . . . . . . . . . . . . . . . . . . . . . . . . . . . . . . . . . . . . . . . . . . . . . . . . 29 Coffee jug (making several cups one after the other) . . . . . . . . . . . . . . . . . . . . . . 31 Setting the amount of coffee . . . . . . . . . . . . . . . . . . . . . . . . . . . . . . . . . . . . . . . . . 31 Setting Pre-brewing . . . . . . . . . . . . . . . . . . . . . . . . . . . . . . . . . . . . . . . . . . . . . . . . 32 Setting the temperature . . . . . . . . . . . . . . . . . . . . . . . . . . . . . . . . . . . . . . . . . . . . . 32 Setting Automatic rinsing . . . . . . . . . . . . . . . . . . . . . . . . . . . . . . . . . . . . . . . . . . . . 33 Setting Eco mode . . . . . . . . . . . . . . . . . . . . . . . . . . . . . . . . . . . . . . . . . . . . . . . . . 33 Lighting: Setting the brightness . . . . . . . . . . . . . . . . . . . . . . . . . . . . . . . . . . . . . . . 34 Lighting: Setting the switch-off time. . . . . . . . . . . . . . . . . . . . . . . . . . . . . . . . . . . . 34 Info (showing the number of drinks) . . . . . . . . . . . . . . . . . . . . . . . . . . . . . . . . . . . 35 Safety (activating the System lock) . . . . . . . . . . . . . . . . . . . . . . . . . . . . . . . . . . . . 35
To activate or deactivate the system lock . . . . . . . . . . . . . . . . . . . . . . . . . . . . 35 To override the System lock . . . . . . . . . . . . . . . . . . . . . . . . . . . . . . . . . . . . . . . 36 Setting the water hardness . . . . . . . . . . . . . . . . . . . . . . . . . . . . . . . . . . . . . . . . . . 36 Setting the display . . . . . . . . . . . . . . . . . . . . . . . . . . . . . . . . . . . . . . . . . . . . . . . . . 37 Setting the volume (keypad tone, buzzer) . . . . . . . . . . . . . . . . . . . . . . . . . . . . . . . 38 Activating the plate warmer . . . . . . . . . . . . . . . . . . . . . . . . . . . . . . . . . . . . . . . . . . 38 Showroom programme . . . . . . . . . . . . . . . . . . . . . . . . . . . . . . . . . . . . . . . . . . . . . 39 Resetting the factory default settings . . . . . . . . . . . . . . . . . . . . . . . . . . . . . . . . . . 39 Miele|home. . . . . . . . . . . . . . . . . . . . . . . . . . . . . . . . . . . . . . . . . . . . . . . . . . . . . . 40
Programming the amount: setting the portion sizes . . . . . . . . . . . . . . . . . . . . 41 Programming the amount of espresso, coffee, hot milk and milk froth
via the OK sensor . . . . . . . . . . . . . . . . . . . . . . . . . . . . . . . . . . . . . . . . . . . . . . . . . . 41 Programming the proportions for cappuccino or latte macchiato
via the OK sensor . . . . . . . . . . . . . . . . . . . . . . . . . . . . . . . . . . . . . . . . . . . . . . . . . 42 Programming the amount for hot water via the Hot water sensor . . . . . . . . . . . . . 43 Programming the amount via "Settings". . . . . . . . . . . . . . . . . . . . . . . . . . . . . . . . . 43
Setting up User profiles . . . . . . . . . . . . . . . . . . . . . . . . . . . . . . . . . . . . . . . . . . . 44 Selecting a User profile . . . . . . . . . . . . . . . . . . . . . . . . . . . . . . . . . . . . . . . . . . . . . 44 Creating a User profile. . . . . . . . . . . . . . . . . . . . . . . . . . . . . . . . . . . . . . . . . . . . . . 45 Changing a User profile. . . . . . . . . . . . . . . . . . . . . . . . . . . . . . . . . . . . . . . . . . . . . 45 Deleting a User profile . . . . . . . . . . . . . . . . . . . . . . . . . . . . . . . . . . . . . . . . . . . . . . 46 Revert. . . . . . . . . . . . . . . . . . . . . . . . . . . . . . . . . . . . . . . . . . . . . . . . . . . . . . . . . . . 46

Contents
Cleaning and care . . . . . . . . . . . . . . . . . . . . . . . . . . . . . . . . . . . . . . . . . . . . . . . . 47 Quick guide . . . . . . . . . . . . . . . . . . . . . . . . . . . . . . . . . . . . . . . . . . . . . . . . . . . . . . 47 Rinse the system . . . . . . . . . . . . . . . . . . . . . . . . . . . . . . . . . . . . . . . . . . . . . . . . . . 49 Milk pipework . . . . . . . . . . . . . . . . . . . . . . . . . . . . . . . . . . . . . . . . . . . . . . . . . . . . . 49 Rinse milk pipework . . . . . . . . . . . . . . . . . . . . . . . . . . . . . . . . . . . . . . . . . . . . . 49 Clean milk pipework . . . . . . . . . . . . . . . . . . . . . . . . . . . . . . . . . . . . . . . . . . . . . 50 Clean milk pipework of any blockages. . . . . . . . . . . . . . . . . . . . . . . . . . . . . . . 51 Stainless steel milk flask with lid . . . . . . . . . . . . . . . . . . . . . . . . . . . . . . . . . . . . . . 53 Central spout . . . . . . . . . . . . . . . . . . . . . . . . . . . . . . . . . . . . . . . . . . . . . . . . . . . . . 54 Water container . . . . . . . . . . . . . . . . . . . . . . . . . . . . . . . . . . . . . . . . . . . . . . . . . . . 55 Waste container . . . . . . . . . . . . . . . . . . . . . . . . . . . . . . . . . . . . . . . . . . . . . . . . . . . 55 Drip tray . . . . . . . . . . . . . . . . . . . . . . . . . . . . . . . . . . . . . . . . . . . . . . . . . . . . . . . . 56 Drip tray cover . . . . . . . . . . . . . . . . . . . . . . . . . . . . . . . . . . . . . . . . . . . . . . . . . . . . 56 Coffee bean container . . . . . . . . . . . . . . . . . . . . . . . . . . . . . . . . . . . . . . . . . . . . . . 57 Central spout connector . . . . . . . . . . . . . . . . . . . . . . . . . . . . . . . . . . . . . . . . . . . . 57 Interior and machine door . . . . . . . . . . . . . . . . . . . . . . . . . . . . . . . . . . . . . . . . . . . 57 Brew unit . . . . . . . . . . . . . . . . . . . . . . . . . . . . . . . . . . . . . . . . . . . . . . . . . . . . . . . . 58 Degreasing the brew unit . . . . . . . . . . . . . . . . . . . . . . . . . . . . . . . . . . . . . . . . . 59 Machine front . . . . . . . . . . . . . . . . . . . . . . . . . . . . . . . . . . . . . . . . . . . . . . . . . . . . . 60
Descaling the machine . . . . . . . . . . . . . . . . . . . . . . . . . . . . . . . . . . . . . . . . . . . . 61 To run the descaling programme . . . . . . . . . . . . . . . . . . . . . . . . . . . . . . . . . . . . . 62
Problem solving guide . . . . . . . . . . . . . . . . . . . . . . . . . . . . . . . . . . . . . . . . . . . . 63
After Sales / Guarantee . . . . . . . . . . . . . . . . . . . . . . . . . . . . . . . . . . . . . . . . . . . . 71
Saving energy . . . . . . . . . . . . . . . . . . . . . . . . . . . . . . . . . . . . . . . . . . . . . . . . . . . 72
Electrical connection U.K., ZA, IRL . . . . . . . . . . . . . . . . . . . . . . . . . . . . . . . . . . 73
Installation . . . . . . . . . . . . . . . . . . . . . . . . . . . . . . . . . . . . . . . . . . . . . . . . . . . . . . 74 Building-in and combination options . . . . . . . . . . . . . . . . . . . . . . . . . . . . . . . . . . . 74 Ventilation . . . . . . . . . . . . . . . . . . . . . . . . . . . . . . . . . . . . . . . . . . . . . . . . . . . . . 75 Installation. . . . . . . . . . . . . . . . . . . . . . . . . . . . . . . . . . . . . . . . . . . . . . . . . . . . . 75 Adjusting the door hinges. . . . . . . . . . . . . . . . . . . . . . . . . . . . . . . . . . . . . . . . . 76

Caring for the environment
Disposal of the packing material
The transport and protective packing has been selected from materials which are environmentally friendly for disposal, and should be recycled.
Ensure that any plastic wrappings, bags, etc. are disposed of safely and kept out of the reach of babies and young children. Danger of suffocation.
Disposal of your old machine
Electrical and electronic machines often contain materials which, if handled or disposed of incorrectly, could be potentially hazardous to human health and to the environment. They are, however, essential for the correct functioning of your machine. Please do not therefore dispose of it with your household waste.
Please dispose of it at your local community waste collection/recycling centre, or contact your Dealer for advice. Ensure that it presents no danger to children while being stored for disposal.
5
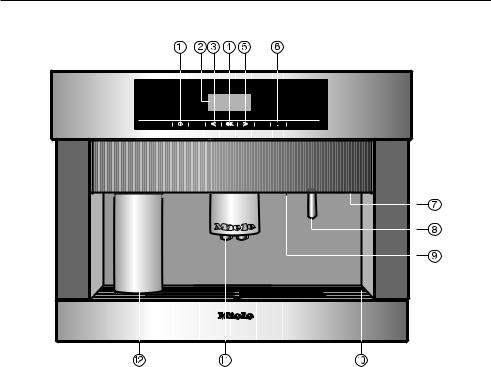
Guide to the machine
Exterior view
a On/Off sensor for switching the coffee machine on and off
b Display
c Left arrow, for scrolling through the various programme options
dOK sensor, for confirming the selection of a programme option and for saving a setting
e Right arrow, for scrolling through the various programme options
f Sensor for selecting hot water
g Door grip
h Hot water spout
i Lighting
j Drip tray cover
k Central spout, height-adjustable
l Stainless steel milk flask
6

Guide to the machine
Interior view
a Master switch
b Ground coffee chute cover c Ground coffee chute
d Slide control to select fineness of ground coffee e Coffee bean container
f Drip tray with grid for easier carrying g Water container
h Brew unit
i Waste container
j Central spout connector (connecting the brew unit and the central coffee spout) k Stainless steel milk flask
l Central spout connector cap
7
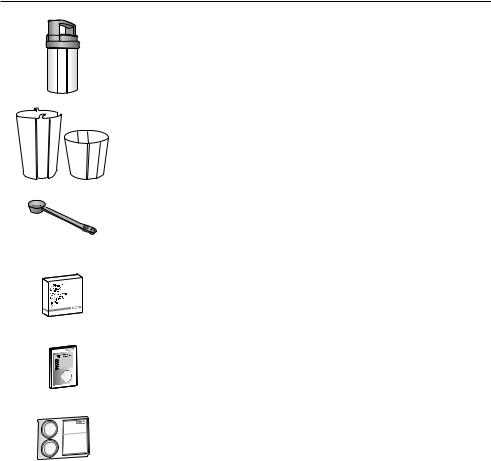
Accessories supplied
Stainless steel milk flask
For storing and keeping milk cold, with lid (with handle) and additional cap
(not suitable for cleaning in a dishwasher)
Containers
Large and small containers for cleaning and rinsing the milk pipework
Coffee spoon
For adding the correct amount of ground coffee
Cleaning agent for milk pipework
For daily cleaning of the milk pipework
Cleaning tablets
For degreasing the brew unit
Descaling tablets
For descaling the water pipework
Other accessories and spare parts
–Test strips for determining the water hardness level
–Air intake tube for placing on the central spout
–Silicone grease for lubricating the cap on the central spout connector
–Brush for cleaning the milk pipework
–Mains connection cable
–Central spout connector cap
8
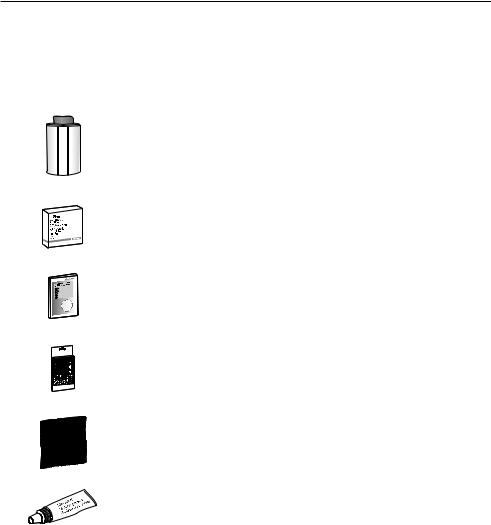
Optional accessories
Miele accessories and cleaning and conditioning products are available for your coffee machine.
These can be ordered via the internet at www.miele-shop.com, from the Miele Spare Parts Department or from your Miele Dealer.
Stainless steel milk flask with cap
For storing and keeping milk cold
(not suitable for cleaning in a dishwasher)
Cleaning agent for milk pipework
For daily cleaning of the milk pipework
Cleaning tablets
For degreasing the brew unit
Descaling tablets
For descaling the water pipework
E-Cloth (microfibre cloth)
Removes finger marks and light soiling
Silicone grease
For lubricating the cap on the central spout connector
Miele|home
With Miele|home, the coffee machine becomes a communication-enabled appliance which can be monitored or operated via a PC or mobile phone. For further information, please contact Miele.
9

Warning and Safety instructions
This coffee machine conforms with all relevant legal safety requirements. Improper use can, however, lead to personal injury and damage to property.
To avoid the risk of accidents and damage to the machine, please read these instructions carefully before using it for the first time. They contain important information on installation, safety, use and maintenance. Miele cannot be held liable for damage caused by non-compliance with these Warning and Safety instructions.
Keep these instructions in a safe place and ensure that new users are familiar with the content. Pass them on to any future owner.
Correct application
~his coffee machine is not designed for commercial use. It is intended for use in domestic households and similar working and residential environments. The appliance is not intended for outdoor use.
~It must be used as a domestic appliance and only for the preparation of espresso, cappuccino, latte macchiato etc.
~The appliance can only be used by people with reduced physical, sensory or mental capabilities, or lack of experience and knowledge, if they are supervised whilst using it, or have been shown how to use it in a safe way and understand the hazards involved.
10
Warning and Safety instructions
Safety with children
,Caution. The spouts present a danger of burning or scalding. Children's skin is very sensitive and reacts to hot temperatures.
Do not allow them to touch hot components of the coffee machine or to put their hands under the spouts.
~Place the coffee machine where it is out of the reach of children.
~Children under 8 years of age must be kept away from the machine unless they are constantly supervised.
~Children 8 years and older may use the appliance only if they have been shown how to use it in a safe way and understand the hazards involved.
~Children must not be allowed to clean or maintain the appliance unsupervised.
~The coffee machine is not a toy! To prevent the risk of injury do not allow children to play with it or its controls.
Remember that coffee and espresso are not suitable drinks for children.
~Danger of suffocation. Packaging, e.g. cling film, polystyrene and plastic wrappings, must be kept out of the reach of babies and children.
Technical safety
~Before setting up the machine, check it for any externally visible damage. Do not install or attempt to use a damaged machine. Danger of injury.
~To avoid the risk of damage to the machine, make sure that the rating on the data plate corresponds to the voltage and frequency of the household supply, before connecting the machine to the mains supply. Consult a qualified electrician if in any doubt.
~The electrical safety of this machine can only be guaranteed if correctly earthed. It is most important that this basic safety requirement is observed and tested regularly, and where there is any doubt the household wiring system should be inspected by a qualified electrician.
The manufacturer cannot be held liable for the consequences of an inadequate earthing system (e.g. electric shock).
~The machine must only be operated when built in, to ensure that all electrical components are shielded. Ensure power is not supplied to the machine until after installation, repair work or maintenance work has been carried out.
11

Warning and Safety instructions
~Do not connect the machine to the mains electricity supply by a multi-socket adapter or an extension lead.
These do not guarantee the required safety of the machine (e.g. danger of overheating).
~The second electrical connection socket on the back of the CVA 5060 coffee machine may only be used for connecting a Miele EGW 4000-14, EGW 4000-29 or EGW 5000-14 plate warmer. Connecting any other appliance would damage the machine.
~If the coffee machine is installed behind a furniture door, it must not be used with the door closed. Do not close the furniture door while the coffee machine is in use.
~Ensure that there is sufficient ventilation around the coffee machine. The ventilation gaps in the furniture housing unit and the gap between the top of the housing unit and the ceiling must be at least 200 cm². Otherwise condensation can build up and damage the machine or the housing unit.
~The coffee machine must not be used in a non-stationary location (e.g. on a ship).
~Installation, maintenance and repairs should only be carried out by a suitably qualified and competent person in accordance with local and national safety regulations. Repairs and other work by unqualified persons could be dangerous and the manufacturer will not be held liable.
~While the machine is under guarantee, repairs should only be undertaken by a service technician authorised by the manufacturer. Otherwise the guarantee will be invalidated.
~Faulty components must only be replaced by genuine Miele original spare parts. The manufacturer can only guarantee the safety of the machine when Miele replacement parts are used.
~The machine must be disconnected form the electricity supply during any repair work or cleanng.
~Never open the outer casing of the machine. Tampering with electrical connections or components and mechanical parts is highly dangerous to the user and can cause operational faults or electric shock.
~If the coffee machine is to be built in above another appliance, there must be a full-width, closed shelf between them (except when it is combined with a Miele built-in plate warming drawer).
~In areas which may be subject to infestation by cockroaches or other vermin, pay particular attention to keeping the machine and its surroundings in a clean condition at all times. Any damage which may be caused by cockroaches or other vermin will not be covered by the guarantee.
12

Warning and Safety instructions
Correct use
,Caution. The spouts present a danger of burning or scalding. The liquids and steam dispensed are very hot.
Please note:
–Keep well away from the area underneath the spouts when hot liquids and steam are being dispensed.
–Do not touch hot components.
–The spouts can spray hot liquid or steam.
–Water in the drip tray can be very hot. Take care when emptying it.
,Danger of injury. Do not touch the brew unit when the appliance is connected to the electrical supply.
,Never look directly at the lighting or use optical instruments to look at it.
Clean the coffee machine and the stainless steel milk flask thoroughly before using for the first time (See "Cleaning and care").
~Please note the following regarding water:
–Only use cold, fresh tap water to fill the water container. Warm or hot water or other liquids could damage the machine.
–Change the water every day to prevent a build-up of bacteria.
–Do not use mineral water. Mineral water will cause serious limescale deposits to build up in your machine and damage it.
~Do not use water from a reverse osmosis system in this machine. This would damage it.
~Never put anything other than roasted espresso/coffee beans in the coffee bean container. It must never be filled with ground coffee as this could damage the grinder.
~The ground coffee chute must never be filled with anything other than ground coffee or brew unit cleaning tablets. Otherwise the machine will be damaged.
~Do not use milk with additives. Sugar additives will adhere to the milk pipework and damage the machine.
~Sugar will damage the machine. Do not use coffee beans which have been treated with anything containing caramel, any kind of sugar or any other substances. Do not put drinks containing sugar, or instant coffee in the machine.
~Never place a drink with ignited alcohol under the central spout of the coffee machine. The flames could ignite plastic components and cause fire damage.
13

Warning and Safety instructions
~Hot water and steam could cause scalding. Be very careful when using these functions. Make sure you do not come into contact with steam or hot water. The machine must not be used for cleaning objects.
~Do not use a steam cleaner to clean this machine. Steam could reach electrical components and cause a short circuit.
~Clean the machine every day to prevent a build-up of bacteria. All parts except for the brew unit, coffee bean container, the stainless steel milk flask and lid, and the cover of the central spout are dishwasher safe.
~The machine should be descaled regularly, depending on the hardness of the water, with the descaling tablets supplied. The harder the water, the more often the machine must be descaled. The manufacturer cannot be held liable for damage arising from insufficient descaling.
~Only use the descaling tablets supplied by Miele and follow the instructions on the packet carefully. Use the exact proportions recommended. Otherwise the machine will be damaged.
~Depending on the natural oil content of the coffee used, the brew unit could become blocked. It is important therefore to clean the brew unit with a cleaning tablet after approx.
200 coffees. (A reminder will appear in the display).
~Used coffee grounds should be put with the organic rubbish or on the compost heap, but not emptied down the sink, as they could block it.
~Do not swing from or hang anything on the door when it is open as this could damage the machine.
~The machine is designed to be used in areas with an ambient temperature of +15 °C to +60 °C. Please do not use it anywhere with an ambient temperature outside this range.
For machines with a stainless steel front:
~Do not use sticky notes, transparent adhesive tape, masking tape or other types of adhesive on the stainless steel front. These damage the surface, causing it to lose its dirt repellent protective coating.
The surface of the stainless steel front is susceptible to scratching. Even magnets can cause scratching.
The manufacturer cannot be held liable for damage caused by non-compliance with these Warning and Safety instructions.
14

Using the coffee machine - first steps
The following notes should help you get to know your coffee machine before starting to use it.
Controls
This machine has sensor controls which react to touch. To operate the machine, you only need to touch the relevant sensor. There are five sensors:
sOn/Off sensor: For switching the machine on or off
< > Left/right arrows:
For scrolling through the various programme options
OK sensor: For confirming the selection of a programme option and for saving a setting
Hot water sensor
Display
Espresso
q r L n m C
The following symbols come up in the display in the main menu:
qEspresso
rCoffee
Cappuccino
Latte Macchiato
Hot milk
L Milk froth
nUser profile for up to 9 different users
GMaintenance programme for milk pipework, brew unit, descaling, rinsing
CSettings: Customising your machine
^The arrow sensors are used to select a programme option in the display. Touch the OK sensor when the option you want appears highlighted in the display.
Before using for the first time
The machine must be correctly installed and connected (see "Electrical connection" and "Installation") before it is used for the first time. It must then be cleaned (see "Cleaning and care").
Remove any protective foil from the front of the machine.
Switching on
^Touch the On/Off sensor s to switch on the machine.
When the machine is switched on for the first few times with the master switch, a welcome screen and some other messages will appear briefly. The welcome screen will be displayed each time the machine is switched on until 5 drinks have been prepared.
Míele
Willkommen
15

Using the coffee machine - first steps
When you use the machine for the very first time, you will be prompted to select a language.
^Use the right or left arrow until the language you want appears in the display.
^Touch the OK sensor.
The language you have chosen is now set.
The request to set the clock format will then appear.
^Use the arrows to select the clock format you want (12 h or 24 h), and then touch the OK sensor.
^Enter the time of day: First set the hour with the arrow sensors and then touch the OK sensor. Then set the minutes in the same way.
^Now decide when you want the time of day to be displayed, and press the OK sensor.
–"On": The display will always show the time of day (even when the machine is switched off).
–"On for 60 seconds": The display will show the time for 60 seconds, and then go dark after the machine is switched off.
–"Do not display": The display will only show the time of day when the machine is switched on, and will go dark as soon as it is switched off.
^Touch the OK sensor to confirm that your machine is communication enabled.
If everything has been entered correctly, Set up successful will appear in the display.
^Confirm this message by touching the OK sensor.
To get the best out of your coffee machine and to set it up for your specific
requirements, please continue to work through these operating instructions.
Switching off
^Touch the On/Off sensor s to switch off the machine.
16
Filling the water and coffee bean containers
The coffee machine must be cleaned thoroughly (see "Cleaning and care") before you fill it with water and coffee beans.
It is vital that you programme in the water hardness level of your water (see "Settings: Customising your machine - Setting the water hardness").
Filling the water container
The quality of the water plays an important part in the overall quality of the coffee.
The water container should therefore be emptied and filled with fresh tap water every day.
Hot water and other liquids could damage the machine. Only use cold, clean tap water and fill the machine every day. Do not on any account use mineral water. Mineral water will cause serious limescale deposits to build up in your machine and damage it.
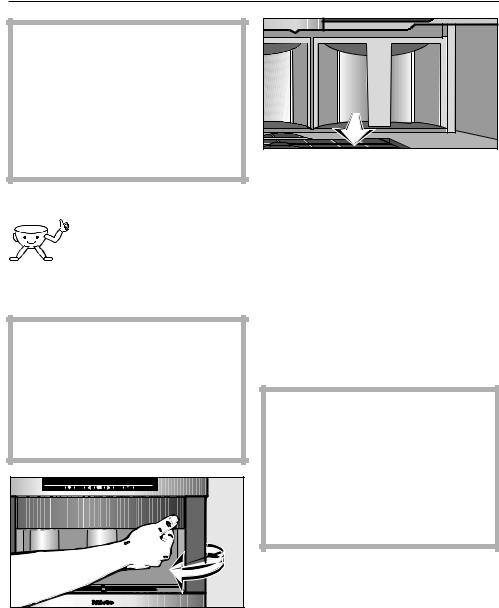
^ Open the machine door. |
^Pull the water container forwards to remove it.
^Remove the lid, and fill the water container with cold, clean tap water up to the "Max." mark.
A valve at the front of the water container will ensure that water cannot escape.
^Put the lid back on and replace the container in the machine, pushing it right to the back until it clicks into position.
The water container must click into position and sit in the machine correctly to ensure the valve is sealed. If you do not hear it click into position or the water container protrudes slightly or does not sit flat on the floor, check whether the surface that the water container sits on is dirty and clean it if necessary.
17
Filling the water and coffee bean containers
Filling the coffee bean container
Only put roasted espresso or coffee beans in the container. Anything else, including ground coffee, will damage the grinder.
Do not use coffee beans which have been treated with caramel, sugar or other substances. Do not put drinks containing sugar, or instant coffee in the machine. Sugar will damage the machine.
^Pull out the coffee bean container.
^Push back the lid and fill the container with roasted coffee beans.
^Slide the lid back into place,
^push the coffee bean container back into the machine and close the machine door.
18
Making drinks
Switching on
When you switch the coffee machine on it will start heating up and the pipework will be rinsed through. This cleans and pre-heats the pipework in preparation for making coffee.
^ Touch the On/Off sensor s.
The following message will then appear:
Heating phase
If the automatic Rinsing programme option has been set to "On" (factory default setting), the following will appear after the machine has heated up:
Rinsing
Water will run out of the central spout.
To prevent water from running into the drip tray, always place an empty cup
or the small cleaning container under the central spout before making the first drink.
The main menu will then appear in the display:
Espresso
q r L n m C
Pre-warming cups
The cups should always be pre-warmed to allow the flavour to develop and be retained. The aroma of espresso does not react well to cold. The smaller the volume of coffee/espresso and the thicker the cup, the more important it is to pre-warm the cup. Use a plate warming drawer if you have one. If not, you can warm them as follows:
^Place the cup to be warmed under the hot water spout.
^Touch the Hot water sensor.
^Run a little hot water into the cup to warm it.
^Touch the OK sensor to stop the flow of water.
^Leave the cup for about a minute until it is warm, then pour the water away.
19
Making drinks
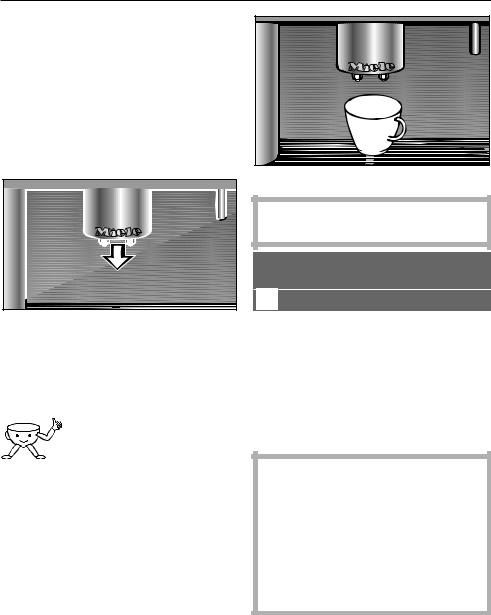
Adjusting the height of the central spout
The height of the central spout can be adjusted to suit the height of the cup so that the drink will not cool down as quickly as it would if the spout were further away from the cup. The crema will also be a better quality if the coffee does not have so far to go!
^Slowly pull the central spout downwards.
Preparing espresso and coffee from freshly ground beans
You can programme the size of portion dispensed for espresso and coffee
according to taste (see "Programming the amount: setting the portion sizes").
Espresso, coffee, double espresso and double coffee are all dispensed in the same way:
^ Place a cup under the central spout. |
The coffee is always dispensed simultaneously from both spouts.
Espresso
q r L n m C
^Select the type of coffee you want with the arrow sensors and touch the OK sensor once.
The machine will now grind the coffee beans, pre-brew the ground coffee (if the "Pre-brewing" option has been set to "On") and the coffee will then be dispensed from the coffee spouts.
Do not open the machine door during the brewing process. This will damage the machine.
To ensure that any coffee residues from the factory testing process are removed from the brewing system, please throw away the first two cups of coffee.
20
Making drinks
Double portion
If you want to dispense a double portion of coffee or espresso or to dispense two portions at the same time:
^touch the OK sensor a second time whilst "2 portions?" is in the display.
The two portions will be dispensed one after the other.
^To prepare two cups at the same time, place one cup under each jet.
Cancelling preparation
^Touch the OK sensor when "Stop" is showing in the display.
Preparation will be halted.
Making espresso and coffee using ready ground coffee
Adding ready ground coffee
If you want to make espresso or coffee using ready ground coffee, you can add ground coffee to the specially designed coffee chute.
^Pull the cover for the coffee chute right out of the machine and open up the lid (a) to the chute.
^Use the scoop supplied and place one level scoop of ground coffee into the coffee chute (b). Close the lid.
^Push the cover into the machine and close the machine door.
Make the coffee?
Yes
No
^Use the arrow sensor to highlight "Yes".
The display will change to the main menu and you can select the drink you want.
21

Making drinks
If you not added any ground coffee, you must select "No". Otherwise the machine will
assume that there is ground coffee in the chute, and only water will be dispensed the next time coffee is made!
To make a drink
^Place a cup under the central spout.
^Touch the OK sensor.
The machine will prepare espresso or coffee, which will then be dispensed from the central spout.
Do not open the machine door during the brewing process. This will damage the machine.
At the end of the process, the coffee machine will revert automatically to making coffee with coffee beans.
Cancelling preparation
^ Touch the OK sensor.
Preparation will be halted.
Only one portion can be prepared at a time when using ready ground coffee. This is because the machine will use all the ground coffee which has been added to the chute to prepare one coffee.
Drinks with milk
Stainless steel milk flask
If using animal milk, only use only pasteurised milk to avoid a build-up of bacteria.
The stainless steel milk flask is vacuum insulated to keep the milk cold for a period of time. With an ambient temperature of about 20 °C, milk at
6 °C can be stored for 11-12 hours and remain under 13 °C. (Milk that is warmer than 13 °C should not be used because it will not make good milk froth).
Milk cannot be stored for as long as 11-12 hours if there is a warming drawer underneath the coffee machine.
Do not fill the stainless steel milk flask to the rim. You need to leave a gap of at least 2 -3 cm below the rim.
It is important to keep the top of the flask and the seals clean (whilst filling it and carrying it). Any soiling can lead to a malfunction of the flask in the machine.
It is important to pre-heat the cup with hot water before making your drink.
22
Making drinks
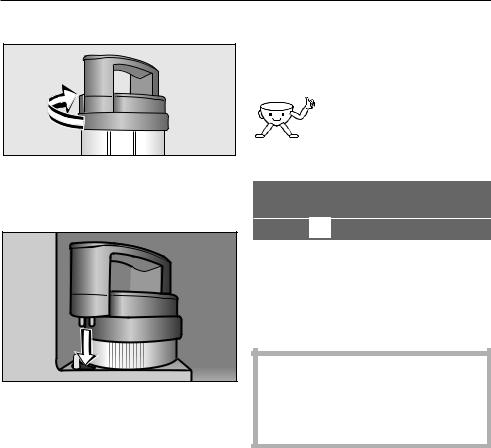
To make drinks with milk,
^place the lid on the stainless steel milk flask by twisting it anticlockwise until it locks into place.
^Open the machine door and hang the milk flask in the machine as illustrated, ensuring that the milk pipework is correctly engaged.
^Close the machine door.
Cappuccino, latte macchiato, hot milk, milk froth
^Place a suitable cup or glass under both jets.
For best results with latte macchiato, the glass should be placed beneath the jets
such that the espresso flows into the centre of the milk froth.
Cappuccino
q r L n m C
^Touch the right arrow sensor until the symbol for the drink you want is highlighted and then touch the OK sensor once.
^Touch the OK sensor again to stop dispensing.
You can then specify the proportions of coffee, milk froth and hot milk required for the drink (see "Programming the amount: setting the portion sizes").
23
Making drinks
User profile drinks
The User profile function is used to select the quantity of water and milk for your drink, as well as the fineness of the ground, temperature and pre-brewing to suit your taste and that of your guests (see "Setting up user profiles").
If you have set the machine up for a specific user profile you must first select the user profile required and then the type of drink.
User profile
q r L n m C
^Touch the right arrow to highlight the User profile symbol and then touch the OK sensor.
^Select "Select" with the arrow sensors and touch the OK sensor.
^Select the user profile you want with one of the arrow sensors and touch the OK sensor.
A large user profile symbol n will now appear in the display to show that a user
profile has been selected.
This function operates in the same way as a standard profile.
After use
If you have made a drink with milk, the following message appears in the display after two minutes:
i Start the rinsing programme
OK
^ Touch the OK sensor.
The milk pipework will now be rinsed.
Even if you do not confirm the message with "OK", the coffee machine will automatically rinse the milk pipework after a few minutes.
Before switching the machine off for any length of time, the pipework, brew system, spouts and milk pipework need to be cleaned (see "Cleaning and care: Rinse the system" and "Clean milk pipework").
24
 Loading...