


MPX 100  Dual Channel Processor
Stereo 44.1kHz S/PDIF Digital Output
User Guide
Unpacking and Inspection
After unpacking the unit, save all packing materials in case you ever need to re-ship. Thoroughly inspect the unit and packing materials for signs of damage. Report any shipment damage to the carrier at once; report equipment malfunction to your dealer.
Notice
This equipment generates and uses radio frequency energy and if not installed and used properly, that is, in strict accordance with the manufacturer's instructions, may cause interference to radio and television reception. It has been type tested and found to comply with the limits for a Class B computing device in accordance with the specifications in Subpart J of Part 15 of FCC Rules, which are designated to provide reasonable protection against such interference in a residential installation. However, there is no guarantee that interference will not occur in a particular installation. If this equipment does cause interference to radio or television reception, which can be determined by turning the equipment OFF and ON, the user is encouraged to try to correct the interference by one or more of the following measures: reorient the receiving antenna; relocate the computer with respect to the receiver; move the computer away from the receiver; plug the computer into a different outlet so that the computer and receiver are on different branch circuits. If necessary, the user should consult the dealer or an experienced radio/television technician for additional suggestions. The user may find the following booklet prepared by the Federal Communications Commission helpful: "How to identify and Resolve Radio/TV Interference Problems." This booklet is available from the U.S. Government Printing Office, Washington, DC 20402, Stock No. 004-000-00345-4.
Le présent appareil numérique n'émet pas de bruits radioélectriques dépassant les limites applicables aux appareils numériques de la class B prescrites dans le Règlement sur le brouillage radioélectrique édicté par le ministère des Communications du Canada.
Acknowledgement
All product names indicated by a Trade Mark are registered by their respective manufacturers.
|
Lexicon Inc. |
|
3 Oak Park |
|
Bedford MA 01730 USA |
Copyright ©1998, Lexicon Inc. |
Telephone 781-280-0300 |
All Rights Reserved. |
Fax 781-280-0490 |
Lexicon Part #070-11935 |
|

Getting Started ......................................................................... |
1 |
Introduction ............................................................................ |
1 |
Front Panel Overview ............................................................ |
2 |
Setting Audio Levels |
|
Rear Panel Connections ........................................................ |
4 |
Audio Connections • Headphones • Footswitch |
|
Basic Operation ........................................................................ |
7 |
Selecting Programs ............................................................... |
7 |
Single Programs • Dual Programs • User Programs |
|
Editing ................................................................................... |
9 |
Tap Tempo Functions: Varying the rhythm • Audio |
|
Tap • Setting Tempo via MIDI |
|
Bypass ................................................................................. |
11 |
Storing Programs ................................................................. |
12 |
System Mode .......................................................................... |
13 |
System Mode Parameters ................................................... |
14 |
Bypass • Patching • Program Load • Digital Output |
|
MIDI OUT/THRU • MIDI Pgm Change • MIDI Clock |
|
Receive • Tempo • MIDI Dumps |
|
Table of Contents |
|
Program Descriptions ............................................................ |
17 |
Single Programs .................................................................. |
18 |
Dual Programs ..................................................................... |
32 |
Special FX ........................................................................... |
41 |
User Programs .................................................................... |
42 |
Restoring Factory Defaults |
|
MIDI Operation ........................................................................ |
43 |
MPX 100 MIDI Behavior ........................................................... |
43 |
Assigning a MIDI Channel for Program Load ........................... |
44 |
Using Program Change Messages for Program Load |
|
Learning Continuous Controllers .............................................. |
46 |
Activating Bypass or Tap Functions with Program Change |
|
Messages ............................................................................ |
47 |
Clearing a Learned Assignment ............................................... |
48 |
MIDI Clock ................................................................................ |
49 |
MIDI Dumps ............................................................................. |
49 |
MIDI Implementation Chart ...................................................... |
50 |
Specifications ......................................................................... |
52 |

Getting Started
Introduction
Thank you for your purchase of the MPX 100 Dual Channel Processor.
The MPX 100 is a true stereo dualchannel processor with 24-bit internal processing, 20-bit A/D-D/A and S/PDIF digital output. Powered by a new version of Lexicon’s proprietary Lexichip™, the MPX 100 has 240 presets with classic reverb programs such as Ambience, Plate, Chamber and Inverse, as well as Tremolo, Rotary, Chorus, Flange, Pitch, Detune, 5.7 second Delay and Echo. Dual-channel processing gives you two independent effects in a variety of configurations: Dual Stereo (Parallel), Cascade, Mono Split and Dual Mono.
A front panel Adjust knob allows instant manipulation of each preset’s critical parameters and an Effects Lvl/Bal knob lets you control effect level or the balance of dual effect combinations. An easy Learn mode allows MIDI patching of front panel controls. In addition, tempo-controlled delays and modulation rates lock to Tap or MIDI clock, and Tap tempos can be controlled by audio input, the front panel Tap button, dual footswitch, external MIDI controller or MIDI Program Change.
Other features include dual 2-stage headroom indicators, a headphone output, a software-selectable MIDI OUT/THRU port, pushbutton or footswitch selection of dry or muted audio output and a 20Hz-20kHz ±1dB Frequency Response.
|
To make sure you get the most |
|
out of the MPX 100, be sure to |
1 |
read the manual. |
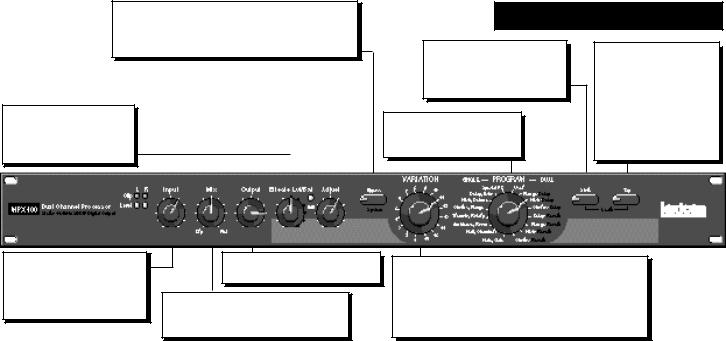
Bypass
Mutes or bypasses the signal depending on the setting of the System Bypass parameter. (Press for 2 seconds to access System Parameters.)
Effects Lvl/Bal
Sets the level of the Single effects and the balance of the Dual effects.
|
|
|
|
Adjust |
|
|
|
|
|
|
|
|
|
|
|
|
|
|
|
||
|
Edit LED |
|
|
Modifies |
the |
param- |
|
|||
|
|
|
eters of |
the |
current |
|
||||
|
Lights to indicate |
|
|
|
||||||
|
|
|
program. |
|
|
|
|
|
||
|
program is altered |
|
|
|
|
|
|
|
||
|
|
|
|
|
|
|
|
|
|
|
|
but not stored. |
|
|
|
|
|
|
|
|
|
|
|
|
|
|
|
|
|
|
|
|
|
|
|
|
|
|
|
|
|
|
|
|
|
|
|
|
|
|
|
|
|
|
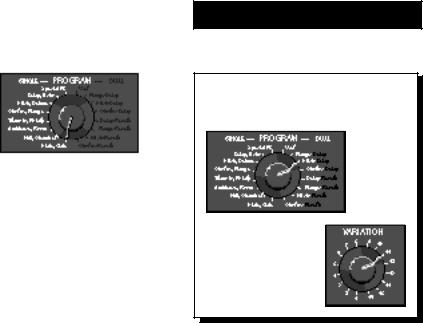
Front Panel Overview
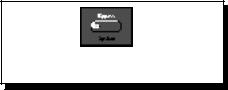
Store
Initiates store procedure. (When pressed with Tap, activates MIDI Learn.)
PROGRAM
Selects program banks (Single, Dual, or User).
TAP
Flashes for tempobased programs. Press twice to set a tempo. Hold to have input level determine tempo. (When pressed with Store activates MIDI Learn.)
Input
Sets the level of the incoming signal. LEDs indicate acceptable signal level (green), or clipping (red).
Output
Controls the analog output level.
Mix
Controls the proportion of processed
(wet) to unprocessed (dry) signals.
2
VARIATION
Selects program variations for the effect bank currently selected by the PROGRAM knob (8 variations for each Single effect and 16 variations for each Dual effect). When PROGRAM is set to User, selects one of 16 memory locations for user programs.
Setting Audio Levels
1.Start with INPUT set to 9:00 o'clock and OUTPUT all the way down (fully counterclockwise).
2.Set the instrument output or effects send being input to the MPX 100 to a nominal level and play, or send audio to the MPX 100. The Level LEDs* should light green.
If the Clip LEDs light red at this point, turn down the output of the instrument or effects send until the Clip LEDs remain off during the loudest passages.
3.While still sending audio to the MPX 100, gradually turn up the INPUT control until the Clip LEDs show red on only the loudest peaks.
4.Set the MIX control to Dry.
5.Turn OUTPUT to the desired level.
6.If the MPX 100 is using a console’s sends and returns, set the MIX control fully clockwise (100% wet). If you are using an instrument amplifier, start with MIX set halfway up.
* The Level LEDs are off when the incoming signal is low (more than 30dB below overload). The Clip LEDs light red when the signal approaches overload (-2.5dB). Acceptable signals will cause the Level LEDs to light green almost continuously, with the Clip LEDs flashing red on peaks.
3
As with any audio product, it is good practice to first power on all outboard gear, then the mixer, then any loudspeakers.
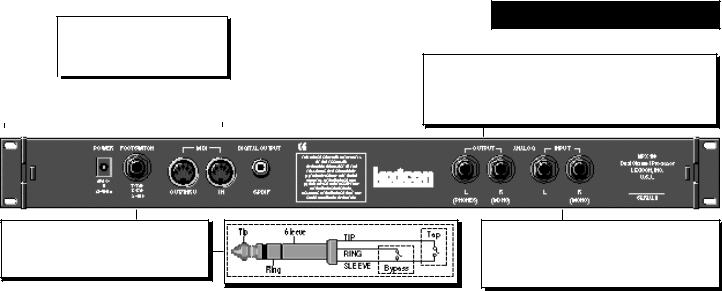
MIDI
Two 5-pin DIN MIDI connectors are provided for MIDI IN and software selectable MIDI OUT/THRU.
|
|
|
|
|
|
|
|
|
|
|
|
|
|
|
|
|
|
|
|
|
|
|
|
|
POWER |
|
|
|
DIGITAL OUTPUT |
||||||
|
Use Lexicon 9VAC power pack. |
|
|
|
RCA S/PDIF connector. |
||||||
|
|
|
|
|
|
|
|
|
|
|
|
|
|
|
|
|
|
|
|
|
|
|
|
|
|
|
|
|
|
|
|
|
|
|
|
FOOTSWITCH
1/4" TRS connector, for momentary contact footswitch, allows footswitch control of front panel Tap and Bypass functions.
Rear Panel Connections
OUPUT
Single-ended (unbalanced) stereo outputs provide +8dBu typical output level. Use the right output connector for mono output. If no connection is made at the right output, the left output can be used to drive headphones at modest volume.
INPUT
Single-ended (unbalanced) inputs accept levels as low as -30dBu. Input impedance is 500 kΩ. Use the right input for mono sources. Can be used as direct input for guitar.
4
Audio Connections
Audio connections to the MPX 100 are unbalanced and should be made with high quality shielded cables with 1/4" tip-sleeve phone plugs at the MPX 100 end.
The MPX 100 produces effects from either mono or stereo sources. With mono sources, the dry signal appears, along with audio effects, at both outputs. For instruments and sources with stereo outputs, use both inputs. We recommend using the outputs in stereo whenever stereo inputs are used, but if mono output is required, use the right output jack. The left and right signals are summed internally when only the right output is used.
Headphones
A stereo signal which is adequate to drive headphones is available at the left output (provided no connections are made through the right output). This feature is provided as a convenience for practice purposes, and is intended to provide only modest volume.
5
Footswitch
A footswitch connected via the rear-panel footswitch jack allows control of Tap and Bypass. A momentary footswitch can be wired to a tip-ring-sleeve connector. A stereo Y-connector allows two identical single switches to be used.
Power off the MPX 100 before plugging in the footswitch. (Otherwise, Bypass will be enabled.)
A dual-function footswitch with a set of labels to identify footswitch functionality (Tap and Bypass) is available from Lexicon dealers.

Connecting to a Balanced Console
6
The MPX 100 can be used as two independent Effects Processors with Dual Program Variations 11-16. Designate two auxiliary sends on your console and connect one to the left MPX 100 input, and the other to the right input. Refer to the Program Descriptions to take advantage of this configuration.
Dual Processor Setup with a Console
Selecting Programs
All of the programs on the MPX 100 are selected with the front panel PROGRAM and VARIATION knobs.
The PROGRAM knob selects Single or Dual program banks. The VARIATION knob selects different program versions.
The Single selections are arranged around the left side of the PROGRAM knob; the Dual selections and the User bank are arranged around the right side of the knob.
Single Programs
When a Single program is selected, turning the VARIATION knob to positions 1-8 will load eight versions of the first effect; positions 9-16 will load eight versions of the second effect.
For example, when Plate, Gate is selected, VARIATION 1-8 will load eight different Plate programs; VARIATION 9-16 will load eight different Gate programs.
When Special FX is selected, the VARIATION knob will load 16 different programs (one at each knob position).
7
Basic Operation
Use the PROGRAM knob to select the Single, Dual or User effect you want.
Turn VARATION to select one of 16 programs.
Dual Programs
When one of the Dual Programs is selected, the VARIATION knob will load 16 different programs, each containing two effects.
User Programs
When User is selected with the PROGRAM knob, VARIATION selects 16 memory locations available for storing your own programs.
(When shipped, User variations 1-16 contain duplicates of a selection of the fac- tory-installed programs.)
8
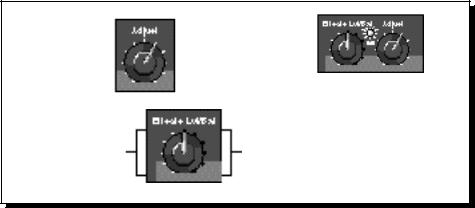
Editing
Editing MPX 100 programs is easy. We've arranged the critical parameters of each program under the front panel Adjust knob, so all you have to do is turn the knob to adjust the program to suit you.
You can also adjust the level of the Single programs, or the Effects Balance of the Dual programs with the Effects Lvl/Bal knob.
Changes made with either knob are recognized as edits, and will cause the front panel Edit LED to light to alert you to the fact that the program has been altered.
Use Adjust to edit the current program.
Turn Effects Lvl/Bal to adjust the level of a Single program...
The Edit LED will light to show that the program has been altered from its stored state.
...or the balance of the two effects in a Dual program
9
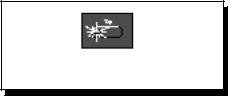
Tap Tempo Functions
Varying the Rhythm
The MPX 100 Tap Tempo feature allows you to set the delay times and modulation rates of tempo-based programs to the beat of the music.
To set the tempo from the front panel, simply press the Tap button twice in time with the music. That’s your tempo. No more dialing up what “could be” the delay time in milliseconds — just tap twice — the MPX 100 will figure out the time for you. When you want to change tempo, just tap twice again in the new rhythm.
The Tap LED will flash whenever a tempo-based preset is loaded.
Audio Tap
You can also use audio input to set the tempo of the MPX 100 delay times.
1.Press and hold the Tap button for two seconds. (The optional dual footswitch lets you press and hold Tap without taking your hands off your instrument. )
2.While holding down Tap, play 2 short notes in rhythm, then release the Tap button.
3.The MPX 100 automatically calculates the tempo from the space between your two notes.
For live performances this is a must — an easy way to set delay rates to follow your rhythm.
10
Many factory programs are stored with their own tempo rate. You can tap in a new tempo (and store your version in a User location) or set the MPX 100 to always recall the last tempo used and apply it to every program. (See System Mode.)
When you select Global Tempo from the MPX 100 System mode, the last tempo tapped in will be applied to all programs with tempo-controlled parameters. (You will know if a program is tempo-controllable because the Tap button LED will flash when the program is loaded.)
Setting Tempo via MIDI
When used in conjunction with theLearn feature, Tap can be set remotely from any MIDI device. MIDI controllers, such as Lexicon's MPX R1 Foot Controller, can be used to send Continuous Controller messages or Program Changes to the MPX 100 or you can send Continuous Controller or Program Change messages from the button and fader moves of many mixing consoles. The MPX 100 will Learn these messages and allow you to set tempo via MIDI.
The MPX 100 can also receive and utilize MIDI Clock. So, when used with a MIDI sequencer or drum machine, the MPX 100 automatically adjusts its internal tempo to match. (See MIDI Operation.)
Bypass
Pressing the front panel Bypass button will cause the MPX 100 to pass only dry, unprocessed audio, or to mute the inputs to the current effect.
Bypass can be set to mute or bypass effects.
A System Mode parameter determines which of these two options is in effect. (See System Mode.) Bypass functions can also be activated by footswitch or via MIDI.
11

Storing Programs
When you want to save a program, press Store. The Store LED will flash slowly to indicate that the MPX 100 store function is armed. (If you want to exit without saving the current program, press Store again.)
Turn the PROGRAM knob to User, then use VARIATION to select one of the 16 User locations.
Press Store again to save your program to the selected location (and overwrite the program previously stored there). The Store LED will flash rapidly while the store operation is completed. The store operation is complete when the LED stops flashing and turns off. The Edit LED will also turn off, as the current program is now your saved version.
Press Store.
Turn PROGRAM to User and use
VARIATION to select a User location.
The Store LED will flash slowly.
Press Store again.
The Store LED will flash rapidly while the store operation is completed.
12

System parameters and MIDI dumps are activated in System mode. To enter this mode, press and hold Bypass for approximately 2 seconds. The Bypass and Store LEDs will blink slowly to indicate you are in System mode.
The adjustable parameters available in this mode are shown in the chart on the following page.
Turn the VARIATION knob to select a parameter. Press Store to toggle the state of the parameter, or to execute a MIDI dump. The Edit LED will show the current state of each parameter.
System Mode
When you have finished editing parameters and are ready to resume normal operation, return the VARIATION knob to its prior setting, or you will load a new program based on its position when you exit System Mode. (The Tap LED will light when VARIATION matches its prior setting.)
To exit System Mode, Press Bypass. If you have changed any System parameters, the Store LED will flash rapidly.
13

Press and hold Bypass for 2 seconds...
...The Bypass and Store
LEDs will blink slowly to indicate you are in System mode.
Turn VARIATION to select a parameter.
System |
MIDI |
|
parameters |
||
Dumps |
||
|
|
|
System Mode Parameters |
|
|
|
Variation |
|
State when Edit LED is: |
|
|
Setting |
Parameter |
On |
Off |
|
1 |
Bypass |
Mute |
Bypass* |
|
2 |
Patching |
Disabled |
Enabled* |
|
3 |
Program Load |
Mute |
Bypass* |
|
4 |
Digital Output |
Dry |
Wet* |
Press Store to |
5 |
MIDI OUT/THRU |
Out* |
Thru |
toggle the |
6 |
MIDI Pgm Change |
Disabled |
Enabled* |
parameter state |
7 |
MIDI Clock Receive |
Disabled |
Enabled* |
(or to execute a |
8 |
Tempo |
Program* |
Global |
MIDI dump). |
MIDI Dumps (Press Store to Transmit) |
|
||
|
14 |
Dump User Programs |
|
|
|
15 |
Dump Current Program |
|
|
|
16 |
Dump System and Learned patches |
* Factory Default |
|
Turn VARIATION until the Tap LED goes on to find the last loaded program...then press Bypass to exit System Mode.
14
 Loading...