


Owner's Manual
LXP-5
Effects
Processing
Module

Owner's Manual
LXP-5
Effects
Processing
Module
Unpacking and Inspection
After unpacking the LXP-5, save all packing materials in case you ever need to ship the unit. Thoroughly inspect the LXP-5 and packing materials for signs of damage. Report any shipment damage to the carrier at once; report equipment malfunction to your dealer.
Notice
This equipment generates and uses radio frequency energy and if not installed and used properly, that is, in strict accordance with the manufacturer's instructions, may cause interference to radio and television reception. It has been type tested and found to comply with the limits for a Class A computing device in accordance with the specifications in Subpart J of Part 15 of FCC Rules, which are designated to provide reasonable protection against such interference in a residential installation. However, there is no guarantee that interference will not occur in a particular installation. If this equipment does cause interference to radio or television reception, which can be determined by turning the equipment OFF and ON, the user is encouraged to try to correct the interference by one or more of the following measures:
Reorient the receiving antenna
Relocate the computer with respect to the receiver Move the computer away from the receiver
Plug the computer into a different outlet so that the computer and receiver are on different branch circuits.
If necessary, the user should consult the dealer or an experienced radio/television technician for additional suggestions. The user may find the following booklet prepared by the Federal Communications Commission helpful:
"How to identify and Resolve Radio/TV Interference Problems."
This booklet is available from the U.S. Government Printing Office, Washington, DC 20402, Stock No. 004-000-00345-4.
|
Lexicon Inc. |
|
3 Oak Park |
Copyright 1989, 1995 |
Bedford, MA 01730USA |
Telephone 781-280-0300 |
|
All Rights Reserved. |
Fax 781-280-0490 |
Lexicon Part #070-07332 Rev 1 |
|

Table of Contents
Introduction |
|
1. Installing the LXP-5 |
|
Unpacking .......................................................................... |
1-1 |
Mounting ............................................................................ |
1-1 |
Power ................................................................................ |
1-1 |
Front Panel Controls .......................................................... |
1-2 |
Rear Panel Connectors ..................................................... |
1-3 |
Audio Connections ............................................................ |
1-4 |
2. Front Panel Operation |
|
Setting Audio Levels .......................................................... |
2-1 |
LED Signals ....................................................................... |
2-3 |
Selecting Preset Programs ................................................ |
2-4 |
User Memory ..................................................................... |
2-7 |
Creating Your Own Sounds ............................................. |
2-11 |
Storing and Recalling sounds .......................................... |
2-19 |
Footswitch Operation ....................................................... |
2-22 |
3.MIDI Operation |
|
Accessing Programs .......................................................... |
3-1 |
Patches and Dynamic MIDI .............................................. |
3-4 |
Creating Patches Using MIDI SysEx Data ...................... |
3-11 |
Assigning Switches as Control Sources .......................... |
3-12 |
4. MIDI Implementation Data |
|
Data/Event Requests ......................................................... |
4-1 |
Transmit/Receive Data ...................................................... |
4-2 |
Parameter Definitions ........................................................ |
4-6 |
Microcode Parameters ...................................................... |
4-9 |
Implementation Chart ...................................................... |
4-14 |
5. Specifications |
|
User Program Log Sheet
Introduction
Congratulations on your purchase of the LXP-5 Effects Processing Module! You are about to experience superb sound quality, a full range of pitch shifting, delay and reverb effects, fast intuitive editing of preset sounds, and an industry-leading MIDI implementation.
The LXP-5 offers a rich and distinctive palette of special effects, including 128 programs to get you started — 64 preset effects programs and an additional 64 programs stored in RAM user memory locations. Each program has up to five variable parameters that you can adjust for subtle or dramatic changes in the program’s sound, and you can store as many as 128 customized programs in user memory. All of the LXP-5 functions are accessible from the front panel, or via MIDI, providing truly world-class flexibility and control. From pitch shifting to stereo delays and flanging, the LXP-5 delivers superior performance. Whether you are a producer, engineer, or musician—whether you work on stage or in the studio—the LXP-5 will quickly become an indispensible part of your sound.
We’re confident you’ll find that the LXP-5’s unique combination of state-of- the-art sound and extraordinary versatility is exactly what you’re looking for. A Quick Reference card provides the basics of operation in a compact format to get you up and running as quickly as possible — but to make sure you don’t miss out on anything, we’d like you to read this manual. It provides a thorough explanation of both front panel and MIDI operation, program descriptions, and complete MIDI Implementation data — all the information you need to access the full power of the LXP-5.

Installing the LXP-5
1. Installing the LXP-5
Unpacking
After unpacking the LXP-5, save all packing materials in case you ever need to ship the unit. Thoroughly inspect the LXP-5 and packing materials for signs of damage. Report any shipment damage to the carrier at once. The following accessories are included with the LXP-5:
1.Quick Reference card
2.Owner's Manual
3.Power pack (USA Part # 470-07345)
4.Warranty card (USA only)
Mounting
The LXP-5 measures 8.5"W x 1.7"H x 9.5"d (215.9 x 43.2 x 241.3 mm). The optional rack mounting kit (A-LXP-R) handles one or two units in a single rack space. Whatever mounting method you use, make sure that the LXP- 5 is securely screwed into the rack adapter – "friction fit" or double-stick tape installations may allow units to loosen during transportation, resulting in damage.
The maximum ambient operating temperature is 35° C (95° F). Provide adequate ventilation if the LXP-5 is mounted in a closed rack with heatproducing equipment such as synthesizer modules, effects units, or power amplifiers. Avoid mounting the LXP-5 directly above power amplifiers.
Power
Connect the LXP-5 power pack to an appropriate AC wall socket, and the cable end to the LXP-5 power connector. The LXP-5 must be used only with the supplied power pack. Voltage requirements are printed on the power pack. The LXP-5 has no power switch – it can be left on all the time. To keep the power plug from working loose from the rear of the unit during transport, you may wish to apply a small amount of silicone sealer to the plug after inserting it.
1-1
LXP-5 Owner's Manual
LXP-5 Front Panel Controls
Input
Sets the audio input level.
Mix
Controls the ratio of dry (source) to wet (effect) signal present at the LXP-5 outputs. (Turn the control all the way to the left for 100% dry/ 0% wet.)
Output
Controls the signal level sent to the LXP-5 outputs.
Learn
This button is used to store and edit programs, to learn patches and, with an external MIDI device, to select MIDI channel.
Learn LED
Confirms that power is on, and blinks in red or green at different rates to indicate LXP-5 status.
exicon |
LXP-5 |
|
INPUT |
MIX |
OUTPUT |
PITCH |
PRESET |
USER |
|
|
SELECT |
LEARN |
||||
|
|
|
DELAY |
|
1 |
|
|
|
|
CHORUS |
|
2 |
|
|
|
|
MULTI |
|
3 |
|
|
|
|
|
A |
4 |
|
|
|
|
EDIT |
B |
5 |
|
|
|
|
|
C |
6 |
|
|
|
|
|
|
7 |
|
BYPASS |
8 |
Level Indicators
The left LED indicates signal present; the right flashes red when the signal is -3dB from peak overload.
Function and Select
Used for selection of factory presets, User memories, Bypass and three edit modes.
Adjust
Used to adjust program parameter(s), or to adjust the selected parameter in Edit Mode.
1-2
Installing the LXP-5
LXP-5 Rear Panel Connections
MIDI IN
Receives MIDI information from other MIDI equipment such as master keyboard controllers, MIDI foot controllers, sequencers and synthesizers.
Footswitch
Connector for toggle (Push on/push off) or momentary contact footswitch.
Outputs (L and R)
Single-ended (unbalanced) stereo outputs provide +4dBu nominal output level.
Dynamic MIDI® |
FOOTSWITCH |
POWER |
|
OUTPUTS |
|
INPUTS |
|
MIDI |
9V AC |
L |
R |
L |
R |
|
|
1.5A |
||||
|
|
|
|
|
|
|
IN |
OUT - THRU |
LEXICON LXP-5 |
THIS EQUIPMENT COMPLIES WITH THE REQUIREMENTS IN |
|||
|
ASSEMBLED IN HONG KONG |
PART 15 OF FCC RULES FOR A CLASS A COMPUTING DEVICE |
||||
|
|
|||||
|
|
|
|
|
|
|
|
|
MIDI THRU (OUT) |
|
Power |
|
|
Inputs (L and R) |
|
||
With the recessed slide |
Accepts power from |
Single-ended (unbal- |
||||||
switch set for MIDI |
the supplied power |
anced) inputs accept |
||||||
THRU, any MIDI data |
pack. |
levels from -25 to |
||||||
received is sent without |
|
|
|
+20dBu. Input imped- |
||||
change. The recessed |
|
|
|
ance is 50 kilohms in |
||||
slide switch can also be |
|
|
|
stereo, 25 kilohms in |
||||
set for MIDI OUT. |
|
|
|
mono. |
||||
1-3

LXP-5 Owner's Manual
Audio Connections
This section outlines several connection possibilities for the LXP-5. Because each sound system is unique, we recommend experimentation to arrive at the best configuration for your system. Always check connections for proper impedance, polarity, and levels.
Audio connections to the LXP-5 are unbalanced, and should be made with high quality shielded cables with 1/4" tip-sleeve phone jacks at the LXP-5 end. The connectors must be wired as shown below:
Sleeve - Shield/Ground
Tip - High 


If only 1/4" tip-ring-sleeve phone jacks are available, they must be wired as shown:
Sleeve - Shield/Ground
Tip - High 


Ring - Connect to Sleeve
Mono or stereo?
The LXP-5 produces wonderful stereo effects from either mono or stereo signal sources. For mono sources, use either of the two input connectors; the dry signal appears (along with the stereo effects) in mono at both output connectors. For instruments and sources with stereo outputs, use both inputs. We recommend using both LXP-5 outputs whenever possible but, if mono output is required, you can use just one of the two output connectors. When only one output is used, the left and right signals are summed internally .
Some of the examples on the following pages use stereo instruments and amplification systems, others use mono. Feel free to adapt the examples to your specific requirements.
1-4
Installing the LXP-5
Channel Input or  Effects Return (R)
Channel Input or
Effects Return (L)
Effects
Send
Input |
|
(L or R) |
L Output R Output |
exicon |
LXP-5 |
INPUT |
MIX |
OUTPUT |
PITCH |
PRESET |
USER |
LEARN |
|
SELECT |
|||||
|
|
|
DELAY |
|
1 |
|
|
|
|
CHORUS |
|
2 |
|
|
|
|
MULTI |
|
3 |
|
|
|
|
|
A |
4 |
|
|
|
|
EDIT |
B |
5 |
|
|
|
|
|
C |
6 |
|
|
|
|
|
|
7 |
|
|
|
|
|
BYPASS |
8 |
|
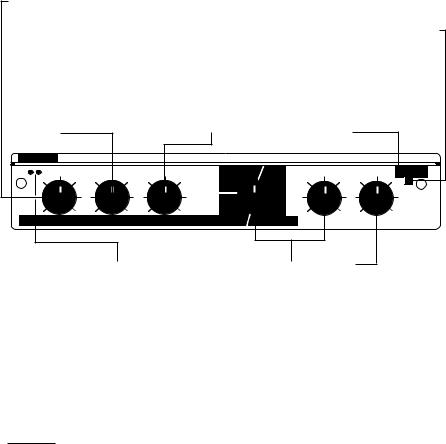
Connection to a mixing console's effects sends
If you will be using an LXP-5 as your primary effects unit, and your system includes a console with one or more auxiliary (effects) sends, connect the LXP-5 as shown above. In most applications, it is preferable to connect the LXP-5 outputs to two of the console's input channel strips, panned full left and right, rather than the effects returns. This allows the greatest flexibility in routing and equalization.
In this configuration the console controls are used to set the amount of effect heard— the LXP-5 front panel MIX control should be set fully clockwise for 100% wet.
1-5
LXP-5 Owner's Manual |
|
|
|
|
|
|
|
Channel Input |
|
||
|
|
(pan right) |
|
||
|
|
Channel Input |
|
||
|
|
(pan left) |
|
|
|
|
|
|
LXP-5 |
|
LXP-5 |
|
|
L Output |
|
R Output |
|
exicon |
|
|
|
|
LXP-5 |
INPUT |
MIX |
OUTPUT |
PRESET |
USER |
|
PITCH |
SELECT |
LEARN |
|||
|
|
|
DELAY |
1 |
|
|
|
|
CHORUS |
2 |
|
|
|
|
MULTI |
3 |
|
|
|
|
A |
4 |
|
|
|
|
EDIT B |
5 |
|
|
|
|
C |
6 |
|
|
|
|
|
7 |
|
|
|
|
BYPASS |
8 |
|
In |
|
|
In |
|
|
Synth |
|
|
Synth |
|
|
L Output |
|
|
R Output |
|
|
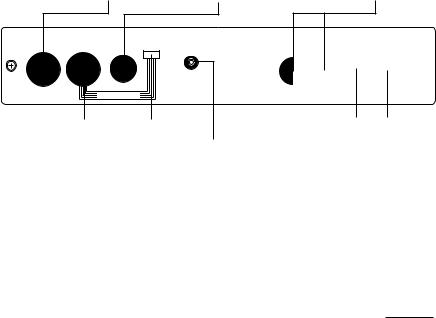
Connection between instrument and console
In some applications (such as when an LXP-5 is used for a single instrument) it may be desirable to patch the LXP-5 between the instrument and console. This makes it possible to keep the LXP-5 up on stage with other MIDI gear, rather than in the console effects rack, making MIDI control much easier.
In this configuration, the LXP-5 front panel MIX control is used to set the balance between wet and dry sound.
1-6
Installing the LXP-5
Guitar
Output
exicon |
LXP-5 |
INPUT |
MIX |
PRESET |
USER |
OUTPUT PITCH |
|
||
|
|
DELAY |
1 |
|
|
CHORUS |
2 |
LXP-5 Input |
|
MULTI |
3 |
|
|
7 |
|
|
|
A |
4 |
|
|
EDIT B |
5 |
|
|
C |
6 |
(L or R) |
|
BYPASS |
8 |
LXP-5 |
|
||
|
|
||
|
L Output |
|
|
SELECT |
LEARN |
LXP-5
R Output
|
|
|
|
|
|
|
|
Amp |
Amp |
|
|
|
|
|
|
|
|
|
|
|
|
|
|
||
|
|
|
|
|
|
|
|
L Input |
R Input |
|
|
|
|
|
|
|
|
|
|
|
|
|
|
|
|
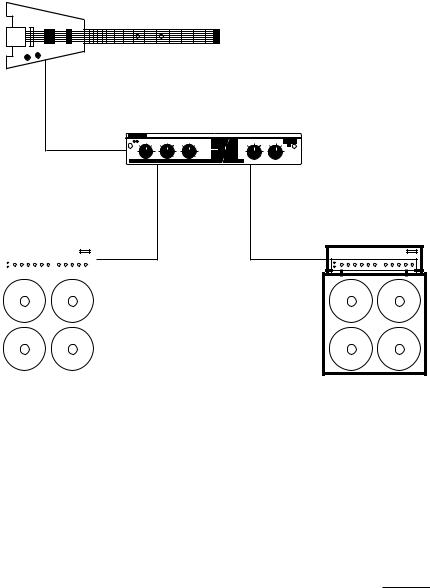
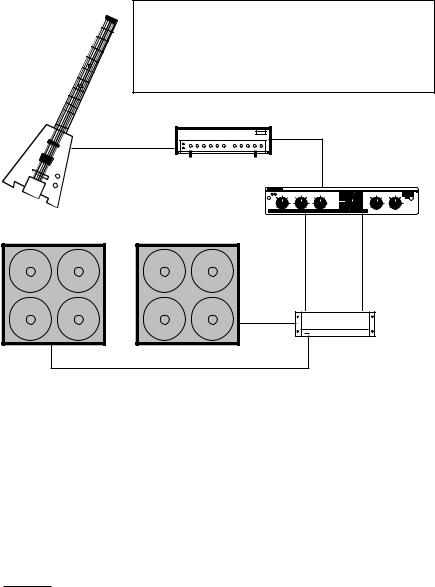
Connection between instrument and amplifier
For a very spacious guitar sound, connect the LXP-5 between a guitar and two amp and speaker stacks. The only problem with this setup is that if you use overdrive distortion created by the amplifier, changing settings on the LXP-5 also affects the quantity and quality of your distortion. If you use a separate distortion box, you can get around this problem by connecting it before the LXP-5. If you prefer amplifier-generated distortion, try the setup shown on the next page.
1-7
LXP-5 Owner's Manual
WARNING! Never connect speaker outputs from a guitar amp to the LXP-5. Doing so can cause serious damage which is not covered by the LXP-5 warranty. On some guitar amplifiers it is very easy to accidentally use a speaker output instead of a direct or effects output. BE CAREFUL!
Amp or
 Guitar Preamp Output Input
Direct or
Preamp output
LXP-5 Input (L or R)
exicon |
|
|
LXP-5 |
INPUT MIX |
PRESET |
USER |
|
OUTPUT PITCH |
SELECT |
LEARN |
|
|
DELAY |
1 |
|
|
CHORUS |
2 |
|
|
MULTI |
3 |
|
|
A |
4 |
|
|
EDIT B |
5 |
|
|
C |
6 |
|
|
|
7 |
|
|
BYPASS |
8 |
|
|
LXP-5 |
LXP-5 |
|
|
L Output |
R Output |
|
Amp |
|
Amp |
|
L Input |
|
R Input |
|
L and R Speaker Outputs from Power Amp
Connection between instrument preamp and power amplifier(s)
If you use overdrive distortion, it's usually better to create the overdrive before sending the signal to the LXP-5 to ensure that the effects don't change the quantity and quality of your distortion. In this setup, you need a guitar preamplifier or a guitar amp with a direct output. Feed this signal to either of the LXP-5 inputs, and then on to a stereo power amp or a pair of guitar amps. (A few guitar amplifiers become unhappy if they are operated without speakers connected. Consult the amp manufacturer for details.)
You can use the effects send and return connectors on a mono guitar amp to obtain similar results. Adjust the LXP-5 output level so that the amp produces the same output with the LXP-5 as it does without it.
1-8

Installing the LXP-5
Console
Inputs
Console
Inputs
LXP-5 Outputs |
|
|
LXP-5 Outputs |
(L and R) |
|
|
(L and R) |
exicon |
LXP-5 |
exicon |
LXP-5 |
INPUT |
|
|
PRESET |
USER |
|
INPUT |
MIX |
|
PRESET |
USER |
|
MIX |
OUTPUT |
PITCH |
SELECT |
LEARN |
OUTPUT |
PITCH |
SELECT |
LEARN |
|||
|
|
|
DELAY |
1 |
|
|
|
|
DELAY |
1 |
|
|
|
|
CHORUS |
2 |
|
|
|
|
CHORUS |
2 |
|
|
|
|
MULTI |
3 |
|
|
|
|
MULTI |
3 |
|
|
|
|
A |
4 |
|
|
|
|
A |
4 |
|
EDIT B |
5 |
EDIT B |
5 |
C |
6 |
C |
6 |
|
7 |
|
7 |
BYPASS |
8 |
BYPASS |
8 |
LXP-5 Inputs |
|
LXP-5 L Input |
|
(L and R) |
|
|
|
|
Drum machine's |
Drum machine's individual |
|
|
stereo outputs |
output for snare drum |
|
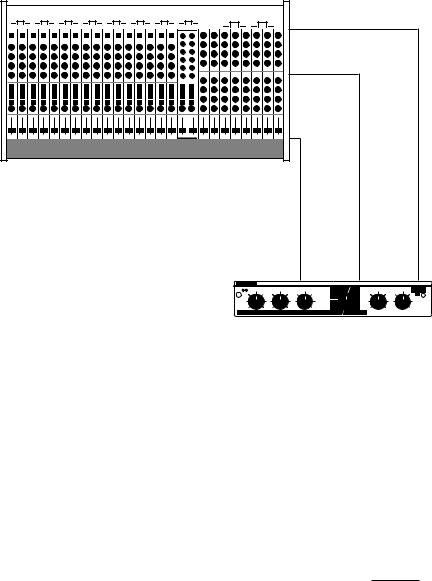
Connection between drum machine and console
Using two LXP-5 units between your drum machine and console can make your drum machine sound much more exciting, since it allows you to process the all-important snare drum separately from the rest of the mix. Make sure you remove the snare from the drum machine's main stereo mix.
1-9

LXP-5 Owner's Manual
1-10
Front Panel Operation
2. Front Panel Operation
Setting audio levels
The wide range of adjustment available with the LXP-5 INPUT and OUTPUT LEVEL controls allow it to be used with virtually any kind of equipment found in the studio or on the road.
To set audio levels:
1.Turn the LXP-5 INPUT and OUTPUT LEVEL controls all the way down (fully counterclockwise).
2.Set the instrument output, preamp output, or effects send that feeds the LXP-5 input(s) to a nominal level. With an instrument, this should be your loudest normal playing level; with a preamp output or console, adjust the output(s) or effects send(s) to produce the highest level possible with the least amount of noise. If the output you are using doesn't have a level control, don't worry about it!
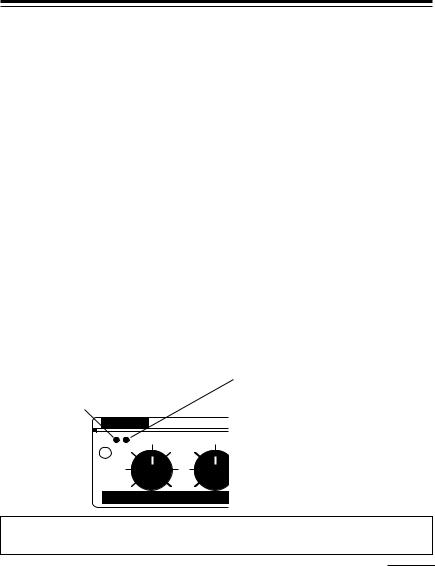
3.While sending audio to the LXP-5, gradually turn up the INPUT LEVEL control until the green SIGNAL PRESENT LED lights. Continue to advance INPUT LEVEL until the red PEAK LED just flashes on the loudest peaks. If it flashes continously, reduce INPUT LEVEL slightly.This ensures the best possible signal-to-noise ratio and dynamic range.
SIGNAL PRESENT LED should be lit
exicon
PEAK LED flashes on peaks; INPUT LEVEL should be set to the level where the PEAK LED flashes briefly on the loudest peaks only
INPUT |
MIX |
Note: If the PEAK LED flashes with no input present (i.e., during reverb delay line feedback, it indicates processor overload is occurring.
2-1

LXP-5 Owner's Manual
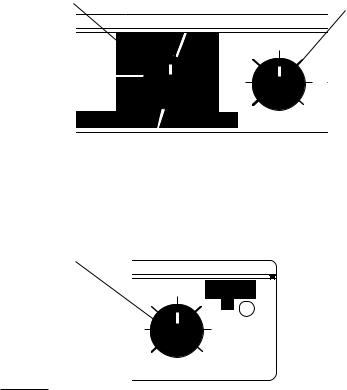
4.If the LXP-5 inputs are connected to a console effects send, and the outputs are connected to console channel strip inputs, set the console's input level trim and fader to a setting typically used for line level inputs. Then set the MIX control fully clockwise (100% effect) and gradually turn up the LXP-5 OUTPUT LEVEL control until the right amount of audio is present at the console.
n
MIX setting to use when
INPUT |
MIX |
OUTPUT |
the LXP-5 is patched to |
|
|
|
|
|
|
|
console effects send(s) |
5.If you are using an instrument amplifier or preamplifier, start with the LXP-5 MIX control straight up (50% effect). Gradually increase the OUTPUT LEVEL control until the audio level heard from the amplifier is approximately the same as when the LXP-5 is not connected.
The best setting for MIX depends on which program you are using, and to a great extent, your personal taste; feel free to experiment.
n
INPUT |
MIX |
OUTPUT |
When using an instrument |
|
|
|
|
|
|
|
amplifier or preamplifier, |
|
|
|
the ideal MIX setting is |
|
|
|
generally somewhere in |
|
|
|
this range |
2-2
Front Panel Operation
LED signals
The front panel LEARN indicator is a bicolor (red/green) LED that performs several functions:
Register Store: success or failure
The LEARN LED will blink at a 6 Hz rate for approximately 2 seconds — in green to indicate succesful register storage, red to indicate failure to store to a register.
MIDI Data Present
The LEARN LED will flicker (in whatever its current color) to indicate LXP- 5 recognition of incoming MIDI messages. System Common messages, non-LXP-5 SysEx messages and any message on channels other than the selected channel will not activate the LED.
Parameter Editing Status
When not receiving MIDI, or indicating storage success, the LED will tell you two things about the parameter editing status of the sound you are running:
1.Has the selected parameter been changed from the stored value?
If the selected parameter matches the stored value, the LED will be green. Otherwise it will be red.
2.Do the knobs correctly indicate the sound that is running?
If the knobs are accurate the LED will be steady. If the knobs are not accurate (for example, after loading a program or changing the selected parameter via MIDI), the LED will blink.
|
|
|
|
|
|
|
|
GREEN |
RED |
|
|
|
|
|
|
|
|
|
LED Steady |
Parameter Unchanged |
Parameter Changed |
|
|
|
|
Knobs Accurate |
Knobs Accurate |
|
|
|
|
|
|
|
|
|
LED Blinks |
Parameter Unchanged |
Parameter Changed |
|
|
|
|
Knobs Inaccurate |
Knobs Inaccurate |
|
|
|
|
|
|
|
|
|
|
|
|
|
|
2-3
LXP-5 Owner's Manual
Presets and User Programs
Selecting LXP-5 preset programs
Any one of 64 preset effects programs can be selected by turning the FUNCTION and SELECT knobs on the front panel. To select a preset, first turn FUNCTION to one of the four available preset types: PITCH, DELAY, CHORUS or MULTI(-effect). Then, turn SELECT to one of the 16 presets within the chosen type.
Use FUNCTION to select a |
Use SELECT to choose |
preset type. |
a specific preset. |
PRESET |
USER |
|
PITCH |
|
|
DELAY |
1 |
|
CHORUS |
2 |
|
MULTI |
3 |
|
A |
4 |
|
5 |
||
EDIT B |
||
C |
6 |
|
7 |
||
|
BYPASS |
8 |
|
SELECT |
Once a preset has been chosen, the sound can be modified with the ADJUST knob. Program parameters can be altered in Edit mode, described later in this chapter.
Use ADJUST to change the sound of the preset.
LXP-5
 LEARN
LEARN
2-4
|
|
|
|
|
Front Panel Operation |
||
LXP-5 Presets |
|
|
|
|
|
||
|
|
|
|
|
|
|
|
|
|
|
PITCH |
|
|||
|
|
|
|
|
|
|
|
|
SELECT |
|
PRESET |
|
ADJUST |
|
|
|
|
|
|
|
|||
|
Position |
# |
Name |
|
Parameters |
|
|
|
MIN |
1 |
Fourth Down |
|
Pitch Interval |
|
|
|
2 |
2 |
Fifth Up |
|
Pitch Interval |
|
|
|
3 |
3 |
Octave Down |
|
Pitch Interval |
|
|
|
4 |
4 |
Two Octaves Down |
|
LFO Rate |
|
|
|
5 |
5 |
Octave Up |
|
LFO Rate |
|
|
|
6 |
6 |
Tunnel Up |
|
Dly 2,3-crs,Rvb Bal,Pitch Adj |
|
|
|
7 |
7 |
Tunnel Down |
|
Dly 2,3-crs,Rvb Bal,Pitch Adj |
|
|
|
8 |
8 |
Glissando Up |
|
Dly 2,3-crs,Decay Time,Pitch Intrvl |
|
|
|
9 |
9 |
Glissando Down |
|
Dly 2,3-crs,Decay Time,Pitch Intrvl |
|
|
|
10 |
10 |
Diminished |
|
Dly 2,3-crs,Decay Time |
|
|
|
11 |
11 |
Suspended |
|
Dly 2,3-crs,Decay Time |
|
|
|
12 |
12 |
Low Octave |
|
Pitch Interval |
|
|
|
13 |
13 |
Mid Octave |
|
Pitch Interval |
|
|
|
14 |
14 |
High Octave |
|
Pitch Interval |
|
|
|
15 |
15 |
Semitune |
|
Pitch Adjust |
|
|
|
MAX |
16 |
Fine Tune |
|
Pitch Adjust |
|
|
|
|
|
|
|
|
|
|
|
|
|
DELAY |
|
|||
|
|
|
|
|
|
|
|
|
SELECT |
|
PRESET |
ADJUST |
|
||
|
|
|
|
|
|||
|
Position |
# |
Name |
Parameters |
|
||
|
MIN |
17 |
Echo Delay |
Dly 1,2-crs,Rvb Bal |
|
||
|
2 |
18 |
Stereo Delay |
Dly 1,2-crs,Rvb Bal,Fbk 1 |
|
||
|
3 |
19 |
Slap Echo |
Decay Time,Dly 2-crs,Fbk 1 |
|
||
|
4 |
20 |
Mid Slap |
Decay Time,Dly 1,2-crs,Fbk 1 |
|
||
|
5 |
21 |
Stereo Slap |
Decay Time,Dly 1,2-crs |
|
||
|
6 |
22 |
Diffuse Echo |
Decay Time,Dly 1,2-crs,Fbk 1 |
|
||
|
7 |
23 |
Image Delay |
Decay Time,Dly 1,2-crs,Fbk 1 |
|
||
|
8 |
24 |
Bounce Delay |
Dly 1,2-crs,Fbk 1 |
|
||
|
9 |
25 |
Bounce Loop |
Dly 1,2-crs,Fbk 1 |
|
||
|
10 |
26 |
Ambient Loop |
Dly 1-crs,Fbk 1 |
|
||
|
11 |
27 |
Echo Loop |
Dly 1-crs,Fbk 1 |
|
||
|
12 |
28 |
Filter Delay |
Dly 1-crs,Fbk 1 |
|
||
|
13 |
29 |
Robot 1 |
Dly 1-fin,Dly 2-crs,Fbk 1 |
|
||
|
14 |
30 |
Robot 2 |
Dly 1-fin,Dly 2-crs,Fbk 1 |
|
||
|
15 |
31 |
Short Delay |
Dly 1-crs |
|
||
|
MAX |
32 |
Long Delay |
Dly 1-crs |
|
||
|
|
|
|
|
|
|
|
|
|
|
|
|
2-5 |
||
LXP-5 Owner's Manual
CHORUS
|
SELECT |
|
PRESET |
|
ADJUST |
|
|
|
|
|
|
||
|
Position |
# |
Name |
|
Parameters |
|
|
MIN |
33 |
Chorus |
|
Pitch Adj,Dly 3-crs |
|
|
2 |
34 |
Ambient Image |
|
Dly 3-crs,Decay Time,Rvb Time |
|
|
3 |
35 |
Comb Ambience |
|
Dly 2,3-crs,LFO Rate |
|
|
4 |
36 |
Ambient Detune |
|
Dly 2,3-crs,LFO Rate |
|
|
5 |
37 |
Dry Detune |
|
Dly 2,3-crs,LFO Rate |
|
|
6 |
38 |
Slap Detune |
|
Dly 1,3-crs,LFO Rate |
|
|
7 |
39 |
Resonant Sweep |
|
Dly 1,3-crs,LFO Rate |
|
|
8 |
40 |
Diffuse Sweep |
|
Dly 1,3-crs,LFO Rate |
|
|
9 |
41 |
Slap Sweep |
|
Dly 1,3-crs,LFO Rate |
|
|
10 |
42 |
Echo Detune |
|
Dly 1,3-crs,LFO Rate |
|
|
11 |
43 |
Step Detune |
|
Dly 3-crs |
|
|
12 |
44 |
Roto Motion |
|
LFO Rate,Patch 3 (LFO to Dly 2-fin) |
|
|
13 |
45 |
Roto Slap |
|
LFO Rate,Patch 3 (LFO to Dly 2-fin) |
|
|
14 |
46 |
Slow Res. Sweep |
|
Rvb Bal,Patch 3 (LFO to Dly 2-fin) |
|
|
15 |
47 |
Slap Flange |
|
Rvb Bal,Patch 3 (LFO to Dly 2-fin) |
|
|
MAX |
48 |
Diffuse Flange |
|
LFO Rate,Patch 3 (LFO to Dly 2-fin) |
|
|
|
|
|
|
|
|
|
|
|
MULTI |
|
||
|
|
|
|
|
|
|
|
SELECT |
|
PRESET |
ADJUST |
|
|
|
|
|
|
|
||
|
Position |
# |
Name |
Parameters |
|
|
|
MIN |
49 |
Strange Room |
Dly 2-crs,Pitch Adj,Fbk 2 |
|
|
|
2 |
50 |
Down Room |
Pitch Adj,Fbk 2 |
|
|
|
3 |
51 |
Ambient Slap |
Dly 2-crs,Decay Time |
|
|
|
4 |
52 |
Slow Rise |
Dly 2-crs,Fbk 2,Hicut |
|
|
|
5 |
53 |
Slow Fall |
Dly 2-crs,Dly 3-fin,Fbk 2,Locut |
|
|
|
6 |
54 |
Octave Room |
Fbk 2,Hicut,Decay Time |
|
|
|
7 |
55 |
Zoom |
Fbk 2,Pitch Interval |
|
|
|
8 |
56 |
Bounce Fourth |
Dly 2-crs,Fbk 1,Bass Mult,Dcy Time |
|
|
|
9 |
57 |
Slap Room |
Dly 2-crs,Fbk 1,Bass Mult,Dcy Time |
|
|
|
10 |
58 |
Echo Room |
Dly 2-crs,Fbk1,Rvb Bal,Decay Time |
|
|
|
11 |
59 |
Dark Closet |
Treble Decay,Hicut,Decay Time |
|
|
|
12 |
60 |
Small Bright |
Decay Time |
|
|
|
13 |
61 |
Medium Bright |
Decay Time |
|
|
|
14 |
62 |
Medium Dark |
Decay Time |
|
|
|
15 |
63 |
Large Bright |
Dly 2-crs,Decay Time |
|
|
|
MAX |
64 |
Huge Room |
Dly 2-crs,Decay Time |
|
|
2-6
 Loading...