


MDV-24
2.1 DVD Home Cinema Centre
For information and support, www. lenco. eu

FOREWORD
THANKS
Thank you for purchasing this product!
Your choice of the product sufficiently displays your expertise in acoustic equipment. We are honored to provide you with more satisfactory products. To bring
the functionality of your device into full play, it is suggested that you try to find some time To read this user manual before connecting and operating your system, so that you can Grasp system connections and requirements in use, and get enhanced enjoyment and Pleasure in using the product from the very beginning.
IMPORTANT NOTICE
Please unpack carefully, and keep all the accessories in the same place. Please check any possibilities in shipping damage. If your devices are damaged or cannot be operated, please notify your local dealers immediately. If the device is shipped to your place directly, please contact the carrier as soon as possible. Only the consignee (individual or company to receive the devices) is entitled to claim indemnity to the carrier in the light of shipping damages. We recommend that you keep the original cartons and packing materials soundly for future shipping.
SPECIAL NOTE
1.Minimum distances around the apparatus for sufficient ventilation;
2.The ventilation should not be impeded by covering the ventilation openings with items, such as newspapers, table-clothes, curtains, etc;
3.No naked flame sources, such as lighted candles should not be placed on the apparatus;
4.Attention should be draw to the environmental aspects of battery disposal;
5.The use of apparatus in tropical and/or moderate climates;
6.Where the mains plug or an appliance coupler is used as the disconnect device, the disconnect device shall remain readily operable.
7.This unit is controlled by micro-computer; it may cause error displaying when this unit is posited in interferential place. In this case, please turn off the power exceed 10 seconds, and the unit will resume normal after turning on.
-1-
CONTENT
FOREWORD……………………………………………………………………………………..1 CONTENT………………………………………………………………………………………...2 FRONT PANEL...………………………………………………………………………………..3 BACK PANEL……………………………………………………………………………………4 REMOTE CONTROL……………………………………………………………………………5 CONNTECTION WITH TV……………………………………………………………………...6 CONNECTION WITH AMPLIFIER………………………………………………………….….7 SYSTEM CONNECTION…………………………………………………………………….….8 BASIC OPERATION……………………………………………………………………..…..9-16 DVD MENU SETUP…..…………………………………………………………………….17-21 SPECIFICATION…………………………………………………………………………….….22 TROUBLE SHOOTING…………………………………………………………………………23
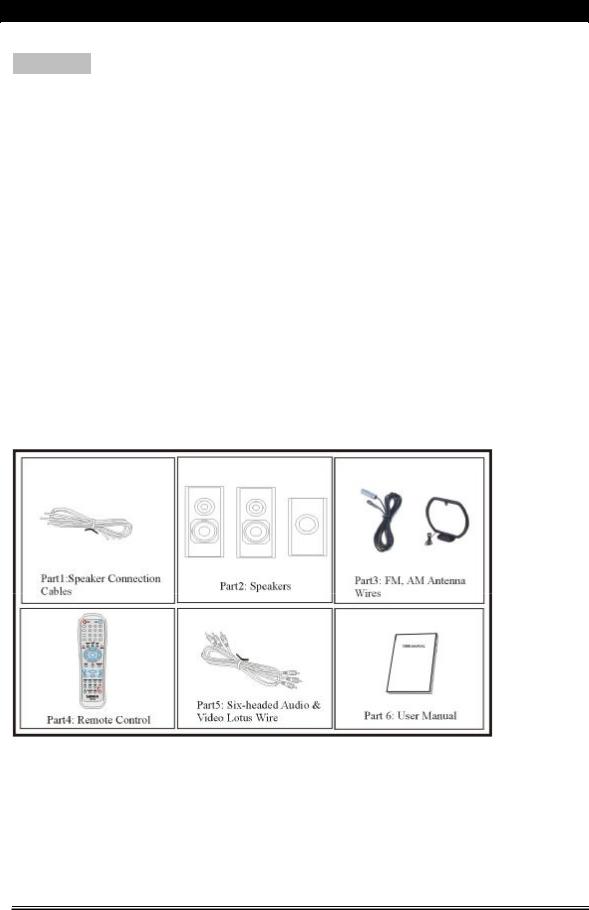
ACCESSORIES
-2-

FRONT PANEL
1.Disc tray
2.Previous/Channel-
3.Power
4.Next/Channel+
5.Remote control sensor
6.Display screen
7.Play/Enter
8.Stop/FM/AM
9.Open/Close
10.Volume up/down
11.Built-in USB, Multi-media card ports
-3-
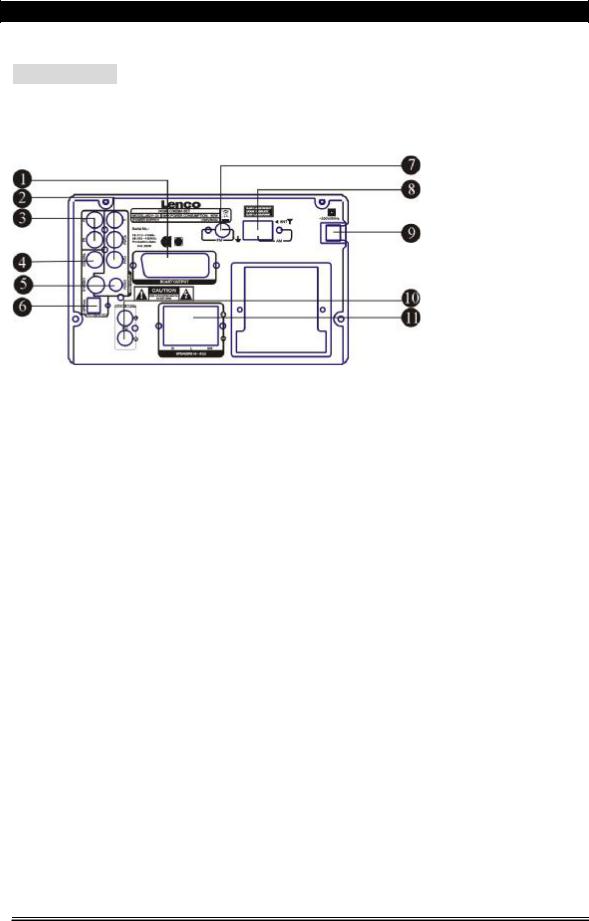
BACK PANEL
1.Scart output
2.Y, Pb/Cb, Pr/Cr component output
3.L/R front audio output
4.Coaxial output
5.S-video and Video outputs
6.Optical fiber output
7.FM antenna interface
8.AM antenna interface
9.Power supply input
10.L/R audio input
11.2.1 speaker output
-4-

REMOTE CONTROL
NOTE:
1.Place the batteries in the remote control and turn on the player, put the emitter against the sensor of player for remote control.
2.The distance of remote control should not exceed 7 meters, or else, it will be invalid.
3.If the sensor or remote control emitter is stuck with foreign matters, it may result in the malfunction in signal reception or not at all.
4.The remote control function may be affected under the strong interference signals, such as power
supply and other strong high-frequency signals.
REMARK: Remote Control Battery Type: Size: AAA Standard Voltage: 1.5V
-5-
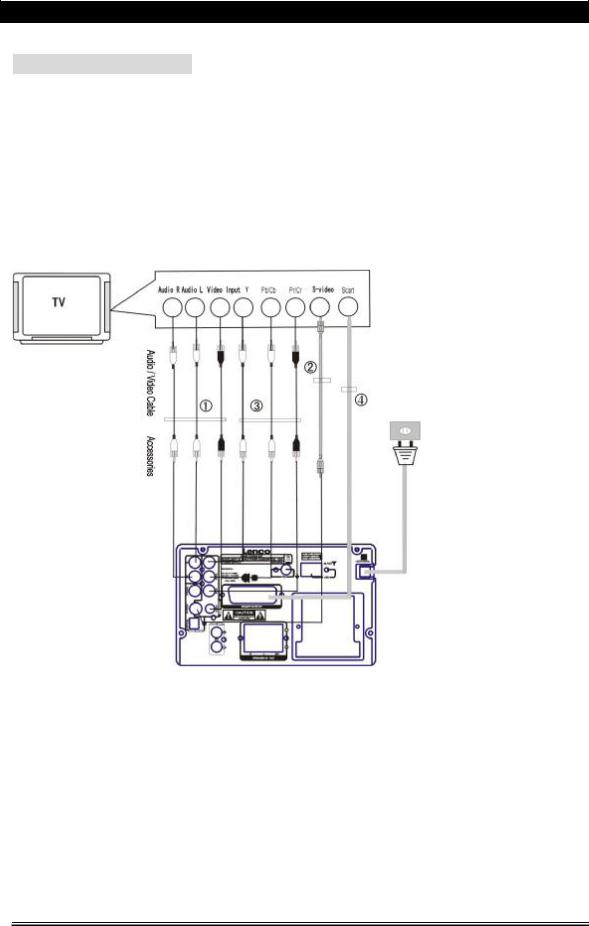
CONNECTION WITH TV
1.If your TV-set has AV terminal, connect this unit to TV-set with A/V cables, and set TV-set to be AV status after confirming the connection is correct. (Figure 1)
2.If your TV-set has S-Video terminal, please use the S-Video connection cable to connect the player and TV-set, to obtain a higher quality image. (Figure 2)
3.If your TV-set has chromatics output terminal, please use three connection cables to connect the player and TV-set, to obtain a more vivid image. (Figure 3)
4.This unit has an output interface for SCART output, which can directly be connected with TV-set. (Figure 4)
Note:
1.Please turn off the both player and TV before they are connected to the power line from the socket.
2.You may adjust the corresponding system according to your TV system while watching various discs.
3.If there are multiple connections between video player and TV, please select one and unplug others so as not to affect the quality of images and sound.
4.Do not switch on /off or press power switch frequently, switching on and off each time must have an interval of 3 seconds.
5.Do not connect the digital optical or coaxial output jack of this player with the analogue signal input terminal for reception.
-6-
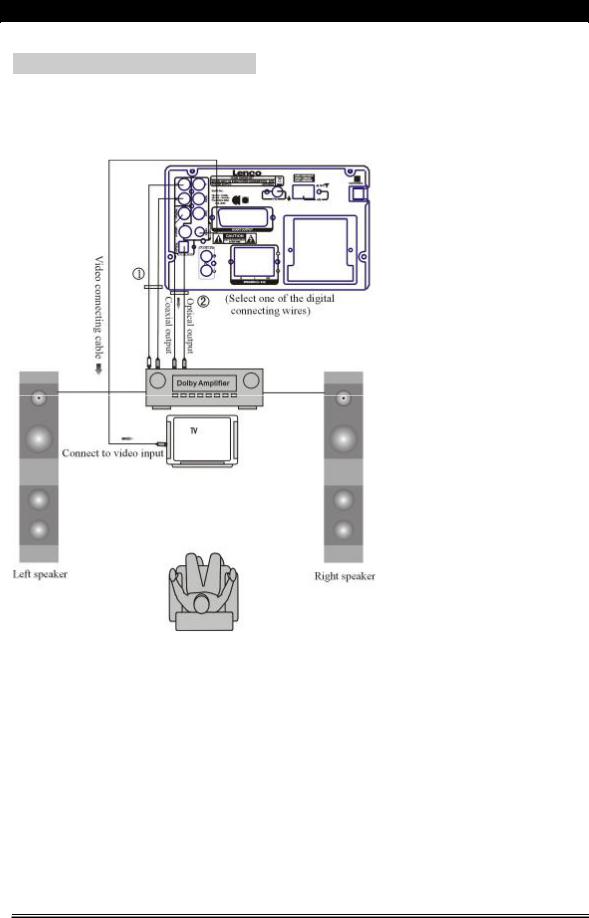
CONNECTION WITH AMPLIFIER
Setup of Digital Audio Output
Connect the optical or coaxial output jack to the amplifier. While in of play or stop mode, press the setup button on the remote control to open the system setup page, switch to audio setup page by pressing the directional buttons, then move the cursor to Audio Out, select SPDIF/RAW or SPDIF/PCM, press Play/Enter button to finish. Press setup button again to exit the setup.
-7-
 Loading...