


Internet Radio with FM
CR-2003
User Manual
www.lenco.com

Table of Contents
Before Started 


 3
3
Safety Precautions 


 3
3
Network Requirements 


 3
3
Appearance and Key Descriptions |
5 |
Getting Started 


 10
10
About Music Streaming 


 16
16
UPnP 


 16
16
DLNA Function


 18
18
CR-2003 Functions 


 22 Overview


 22 Main Menu


 23 Configuration


 23 My mediaU


 37 Internet Radio


 38 Local Radio


 41 Media Center


 42 FM
42 FM 


 43 Information Center


 44 AUX IN


 45 LINE OUT


 46
46
Remote control via APP


 46
46
Troubleshooting 


 47
47
Specifications 


 49
49

1.Before Started
1.1Network Requirement
Before using the CR-2003, the following requirements are needed:
A broadband connection in combination with a wired/wireless access point, router or similar network device.
The network device needs to support WiFi (802.11b/g/n) wireless connection.
A PC or smart phone with a network ready. This network has to be the same one as the CR-2003 equipped with.
1.2Safety Precautions
Do not drop the CR-2003 and do not expose it to liquid, moisture or humidity. These might lead to damage to the device.
If the CR-2003 is moved from a cold environment into a warmer one, do let it adapt to the new temperature before operate the device. Otherwise, it might lead to condensation and cause malfunctions in the device.
Do not use the CR-2003 in the dust environment as dust can damage the interior electronic components and lead to malfunctions in the device.
Protect the CR-2003 from strong vibrations and place it on stable surfaces.
Do not attempt to disassembly the CR-2003.
Only use the power adaptor delivered with the CR-2003.
The socket outlet should be installed near the CR-2003 and should be easily accessible.
Never touch the power adaptor with wet hands and never pull on the power cable when pulling the plug out of the power socket.
Make sure the electrical voltage specified on the CR-
3

2003 and its power plug is corresponding to the voltage of the power socket. Incorrect voltage will destroy the device.
If the CR-2003 is not using for a long period of time, disconnect it from the power supply by unplugging the power plug. This is to avoid the risk of fire.
It is not recommended to listening the CR-2003 with headphone via LINE OUT, because power output is too high and sound will be distorted.
Always power off the CR-2003 when cleaning it.
Never use any harsh or strong solvents to clean the CR-
2003 since these may damage the surface of the device. Dry, soft cloth is appropriate, however, if the CR-2003 is extremely dirty, it may be wiped off with a slightly moist cloth. Make sure the device is dried off after cleaning.
When you are necessary to ship the CR-2003, store it in its original package. Save the package for this purpose.
4
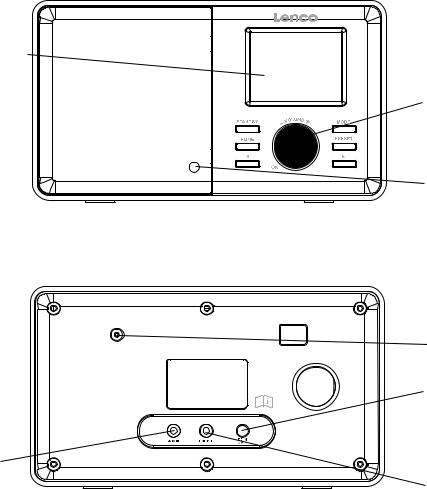
2.Appearance and Key
Descriptions |
Front View |
1 |
2 |
3 |
Back View
7
4
5
6
5

No. |
Description |
Functions |
|
|
|
1 |
2.4" TFT Screen |
Display |
|
|
|
|
Buttons and Reel |
Control panel |
|
-Standby |
-Switch on/off |
|
-Mode |
-Switch between audio |
2 |
-Home |
sources |
|
-Preset |
-Go to main menu |
|
-Save station |
|
|
- |
|
|
- |
-Left cursor button |
|
-Volume+ OK dial |
-Right cursor button |
|
|
-Adjust volume; Cursor |
|
|
up/down; Confirm |
|
|
selection |
|
|
|
3 |
Infrared receiver |
Reception of remote control |
|
|
|
4 |
DC IN 9V 1A |
Connection socket for mains |
|
|
adapter |
|
|
|
5 |
Aux in |
3.5 mm audio in socket |
|
|
|
6 |
Line out |
3.5mm audio out socket |
|
|
|
7 |
Antenna |
FM Reception |
|
|
|
6

Remote Control
7
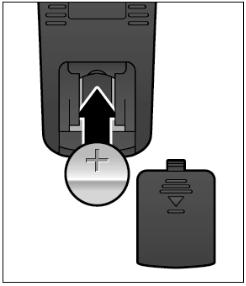
Remember to pull out the clear plastic tab from the battery compartment before using the remote.
To remove the battery from the remote, use your thumb to pull out the battery tray.
Replace it with a CR2025 type 3V battery, taking care to insert it with the positive
(+) side up.
Caution: Risk of explosion of battery is replaced by an incorrect type.
Dispose of used batteries according to the instructions
8

Symbols on the display
Connection is being established, device functioning
No wireless connection
Wireless connection established
Search
VHF radio function selected
VHF radio reception: Mono
VHF radio reception: Stereo
AUX function selected
Speaker off
Alarm on
Internet radio station saved as favorite
FM radio station saved
9

3.Getting Started
The packaging box contains the following items:
CR-2003 Internet Radio
Remote Control
Power adaptor
User Manual
Get the network ready
For wireless LAN (WLAN) network connection: Check if WLAN LINK/ACT light of the wired/wireless access point or router is illuminated. Consult the user guide of that for any questions.
Note: WiFi allows data transfer over short distances within 20 meters without the need of cabling between the devices. Any walls or ceilings may reduce the strength of the WiFi connectivity.
Therefore try to locate the CR-2003 and/or the access point within the distance mentioned above, and avoid any obstacles between two devices.
Connect the power adaptor to the back of the CR-2003
and plug into power socket.
10
When it is the first time running the device, the system will
ask you to set Language and Network Configurations.
11

Select Yes to establish connection to the network
Select Yes(WPS) (only for WPS routers). Then press the WPS butto on your router.
Select No if you would prefer to listen to a terrestrial station or to use the speaker with an external playback device.
If you answer “Yes”, the display goes to scanning for
Wireless Network and shortly afterwards a list of available wireless networks will appear.
12
The number of bars in the wireless symbol in front of the network name (SSID) shows the relative signal strength of the network. The key symbol indicates that the network is password-protected.
If the device does not find any wireless networks, No wireless Networks Found appears on the display. Change your location, if necessary, and check your WLAN router.
You can find the SSID of your Access Point in the configuration of the Access Point (router).
Select your network and confirm with OK. If your WLAN is password-protected, you will be prompted to enter your password.
Enter the password using the number and letter buttons of the remote control or enter it directly on the device.
Note the use of upper and lower case when entering the password.
You can rotate reel to choose the code. If it is accidentally pressed  to move a redundant entry, press
  to correct.
With Remote control:
The cursor indicates the current entry space.
Press the corresponding number button repeatedly: 0 0 (delete entry)
1 1 (space) @ ! “ # $ % & ‘ ( ) * + , - . / : ; < = > ? [ \ ] ^ _ ` { | } ~
2 2 A B C a b c
3 3 D E F d e f
4 4 G H I g h i
55 J K L j k l
6 6 M N O m n o
7P Q R S p q r s
13

8 T U V t u v
9 W X Y Z w x y z
Alternatively, you can enter the numbers and letter using only the cursor buttons:
Go to previous entry space, entry can beoverwritten
Go to next entry space, the last entry is saved
 /
/ Select number/letter
OK Confirm entire entry
It may take a few seconds to establish the connection to the network.
Once the connection is established, the main menu appears with the main menu items:
- Internet Radio : Access to worldwide radio stations
14
-Media Centre : Access to your UPnP devices via
software with streaming capability
-FM : Terrestrial VHF radio stations, WLAN not necessary
-Information Center: Access to weather, financial and system information
-AUX : Access to all devices connected via the AUX IN socket
-Configuration : various system settings, alarm
-Local Radio : Access to radio stations in a particular region (e.g. only German stations)
-My mediaU : Access to an online media library. This menu item only appears if the function has already been enabled under Configuration > Manage my mediaU.
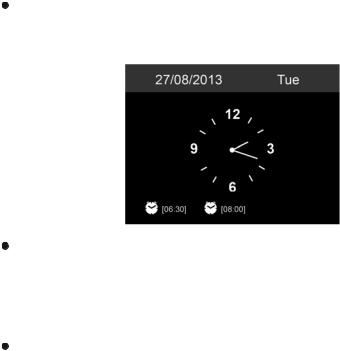
Press 
 to enter standby mode. The time, date and any active alarm times display on the screen.
If you have setup a network connection, and use CR-2003 again within the network, CR-2003 will automatically make the connection. In case you desire to change the network, enter configuration to setup the corresponding connection.
Use the letter keys to input numbers/letters.
Once you are on the letter you want, press  to move to the next entry. When you are at the end the input, press
15

OK to confirm. You may press  to move to previous entry.
Press  /
/ or rotate the volume reel to adjust the volume. Rotate the volume reel or press
  until volume level becomes 0, or direct press
  to mute the sound.
4.About Music streaming
Lenco CR-2003 is the default device name for DLNA, and you may rename it as you like. (See section 5.3)
The information below is the introduction of how to setup up media streaming from PC or other media server. Study the own instruction of the software or apps you use to enjoy music streaming if necessary.
Make sure the music files are in the format of MP3, WMA, WAV or AAC for music streaming to CR-2003.
Refer to section 5.7 for the details of the control on CR-2003 for music streaming playback.
4.1UPnP
To enjoy the streaming music from PC, the following steps
are to be done on the PC:
-Connect the PC to the network.
-Ensure the CR-2003 is powered on and connected to the same network.
-Open the UPnP platform Windows Media Player (11 or later). Alternatively, other platforms or server such as
Windows Media Connection may be used.
Below set up example is under Windows XP and Windows
Medio Player 11 version.
16
 Loading...