Lenco L-82 User Manual [en, de, fr, es]
L-82
INSTRUCTION MANUAL
For information and support, www.lenco.eu
1
CONTENTS |
|
Assembly------------------------------------------------------- |
3 |
Description----------------------------------------------------- |
4~5 |
Mains Connection---------------------------------------------- |
6 |
Amplifier Connection----------------------------------------- |
6 |
Specification---------------------------------------------------- |
6 |
2
ASSEMBLY
Drive belt:
The belt and turntable platter have been installed properly at factory, but the belt may be loose during transportation. If so, the following procedures will be taken for belt installation by yourself.
A.Remove the rubber mat from the turntable platter and the E ring from the turntable shaft, then release the turntable platter from the shaft
B.Put the drive belt on the inner rim of the turntable platter and pull it through the hole
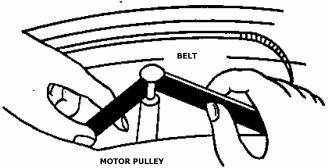
C.Hold the belt with your fingers and place the belt onto the motor pulley as shown in the drawing.
D. Clip the E ring on the shaft and place the rubber mat onto the turntable platter.
Caution:
1.Make sure that the drive belt is not twisted or distorted.
2.Avoid oil. Oil splashes will make the belt slippery.
Auto Return Reset:
Always do the reset for Auto Return once you move this product. The mechanism of Auto Return will rotate irregularly when moving and it will cause the malfunction of Auto Return. The following steps will reset the mechanism to normal.
1.Place a record on the platter and play it.
2.Manually lever the tone arm and place it to the blank part of the end of the record.
3.The mechanism of Auto Return function will be adjusted properly and the tone arm will automatically return to the arm rest.
3
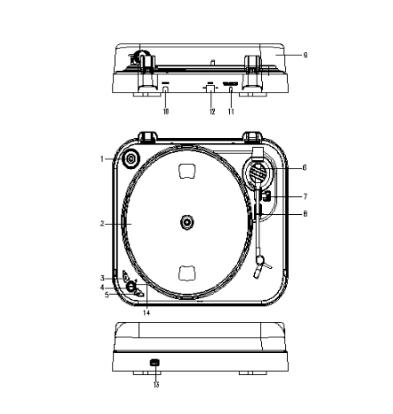
DESCRIPTION
4
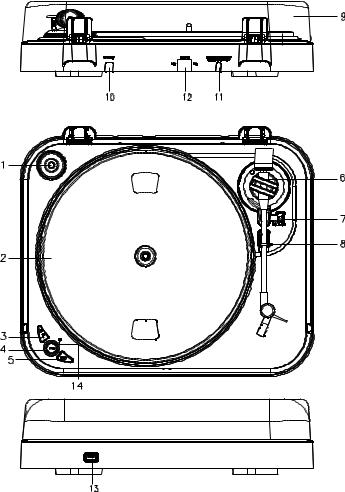
1.Adaptor:
Use this adaptor when playing 45 RPM records.
2.Platter:
Place a record here to play.
3.33/45 RPM Switch:
Switch 33 or 45 rpm for playing a record at a correct speed.
4.REC:
Press it to enter into record mode.
5.SPLIT
For stopping the current recording, forming a record file manually and then going on recording the next track.
6.Pick-up Set
7.Pick-up Arm Lift Stick:
To raise up and down the Pick-up Arm and cue at a proper place of a vinyl.
8.Pick-up Arm Lock:
Use this to lock the Pick-up Arm in place when not in use.
9.Dust Cover:
Use this to protect the turntable from exposure to dust. The cover may be opened or removed during use, but should remain closed when the turntable is not in use.
10.RCA Line Out Cable
Connect the RCA line out to a mixer or an amplifier in your sound system.
11.Power Cord
Connect this cord to an AC outlet of the proper voltage.
12.Power Switch:
For turning the power on or off through this switch. Please press this button to re-start your device when operation was interrupted.
13.USB Port Input:
Plug in a USB Pen Drive for recording the music from a record.
*The design is only for USB Flash Drive. To prevent the power supply is not sufficient and overheated of the circuit(IC), always get the external power supply if using a hard drive.
14. LED
USB Record Operation and LED Signal Indication
1.USB storage device is not plugged. -> LED light is off
2. USB storage device is plugged in -> LED flashes
3.When the system is ready to record. -> LED light is on
4.Press REC button to start recording. -> LED blinks slowly.
5.Press SPLIT button to create new file in the recording.
6.Press REC button again to stop recording. -> LED is flashing for a short time, then LED light is stably on again.
Note: Do not remove the USB storage device if the LED is flashing.
5

MAINS CONNECTION
Ensure that the mains voltage of your home corresponds to the operating voltage of the unit. Your unit is ready to be connected to a correct voltage of your location.
AMPLIFIER CONNECTION
Connect RCA line out cable (10) to the AUX input on your amplifier:
Red plug into R channel input.
White plug into L channel input.
-Place the record of your choice on the turntable. If it is a 45 rpm, do not forget to place the adaptor (1) on the record spindle.
-Choose the desired playing speed:
33 rpm -> button unlocked
45 rpm-> button locked.
-Release the pick-up arm clip.
-Place the cartridge vertically over the first track of the record, the turntable starts turning.
-When the record is over, the pick-up arm returns to its rest , the turntable stops turning
Take care that the pick-up lift stick is in forward-turned (lift down), close pick-up arm lock to secure pick-up arm.
TECHNICAL SPECIFICATION
Power Supply: 230V, 50Hz
Power Consumption: <10W
Wow & Flutter: 0.25%
Distortion: 3%~4%
S/N: 50 dB
Audio Output Voltage: 500mV ±200mV
USB: 5V/500 Ma
6
1.Do not covering the ventilation.
2.No naked flame sources, such as lighted candles, should be placed on the apparatus.
3.No objects filled with liquids, such as vases, shall be placed on the apparatus.
4.The apparatus shall not be exposed to dripping or splashing.
5.The mains plug is used as the disconnect device, the disconnect devices shall remain readily operable.
6.No replaceable parts inside, repair work should be carried out by manufacturer or authorized agent.
7
L-82
BEDIENUNGSANLEITUNG
Zur Information und Unterstützung, www.lenco.eu
INHALT |
|
Zusammenbau------------------------------------------------------- |
3 |
Beschreibung----------------------------------------------------- |
4 ~ 5 |
Netzanschluss-------------------------------------------------------- |
6 |
Anschluss eines Verstärkers--------------------------------------- |
6 |
Technische Daten----------------------------------------------------- |
6 |

ZUSAMMENBAU
Antriebsriemen:
Der Antriebsriemen und der Plattenteller wurden werksseitig ordnungsgemäß installiert. Es kann allerdings vorkommen, dass der Riemen sich während des Transports löst. Wenn dies der Fall ist, können Sie ihn auf folgende Weise selbst wieder anbringen.
A.Nehmen Sie die Gummimatte vom Plattenteller und die E-Ring von der Welle Plattentellers. Danach können Sie den Plattenteller von der Welle herunternehmen.
B.Setzen Sie den Antriebsriemen auf den inneren Rand des Plattentellers und ziehen Sie es durch das Loch.
C.Halten Sie den Riemen mit den Fingern fest und setzen Sie ihn auf die Antriebsrolle, wie in der Abbildung dargestellt.
Belt Antriebsriemen
Motor Pulley |
Antriebsrolle |
D. Befestigen Sie den E-Ring auf der Welle und setzen Sie die Gummimatte zurück auf den Plattenteller.
Warnung:
1.Stellen Sie sicher, dass der Antriebsriemen nicht verdreht oder verzogen wird.
2.Vermeiden Sie Öl. Ölspritzer führen dazu, dass der Riemen nicht mehr richtig greift.
Reset der Auto-Return-Funktion:
Führen Sie immer einen Reset der Auto-Return-Funktion durch, wenn Sie das Gerät an einen anderen Ort bewegt haben. Der Auto-Return-Mechanismus dreht sich nach Bewegungen unregelmäßig und führt zu Fehlfunktionen. Befolgen Sie die folgenden Schritte, um den Mechanismus zum Normalzustand zurückzusetzen.
1.Legen Sie eine Schallplatte auf den Plattenteller und starten Sie die Wiedergabe.
2.Heben Sie den Tonarm an und setzen Sie ihn auf den leeren Abschnitt am Ende der Schallplatte.
3.Der Auto-Return-Mechanismus wird dann korrekt eingestellt und der Tonarm geht automatisch zum Tonarmhalter.
BESCHREIBUNG
1. Adapter:
Benutzen Sie diesen Adapter zum Abpielen von 45-RPM-Schallplatten.
2. Plattenteller:
Legen Sie hier Ihre Schallplatten zur Wiedergabe auf.
3. 33/45-RPM-Schalter:
Schalten Sie die Geschwindigkeit entsprechend der von Ihnen verwendeten Schallplatte auf 33 oder 45 U/Min.
4. REC:
Betätigen Sie die Taste, um in den Aufnahmemodus zu wechseln.
5. SPLIT
Zum Stoppen der aktuellen Aufnahme. Die Aufnahmedatei wird gespeichert und eine neue Datei wird für die Aufnahme des nächsten Titels geöffnet.
6.Tonarm-Mechanismus
7.Tonarmheber:
Zum Heben oder Senken des Tonarms und Aufsetzen auf die gewünschte Stelle der Schallplatte.
8. Tonarmsperre:
Hiermit können Sie den Tonarm an einer Stelle fixieren, wenn er nicht benutzt wird.
9. Staubschutz:
Benutzen Sie den Staubschutz, um den Plattenteller vor Staubeinwirkung zu schützen. Der Staubschutz kann während der Benutzung geöffnet oder vollkommen entfernt werden, sollte aber bei Nicht-Benutzung geschlossen bleiben.
10. Cinch-Line-Out-Kabel
Verbinden Sie den Cinch-Line-Out-Anschluss mit einem Mischpult oder Verstärker Ihres Audiosystems.
11. Netzkabel
Schließen Sie dieses Kabel an eine Steckdose mit geeigneter Spannung an.
12. Ein/Aus-Schalter:
Schalten Sie die Stromversorgung mithilfe dieses Schalter ein bzw. aus. Betätigen Sie diese Taste, um das Gerät neu zu starten, wenn der Betrieb unterbrochen wurde.
13. USB-Anschluss:
Schließen Sie hier ein USB-Speichermedium zur Aufnahme der Schallplattenmusik an.
*Es können lediglich USB-FlashSpeichermedien mit dem Gerät verwendet werden. Um zu verhindern, dass die Stromversorgung unzureichend ist und die Schaltkreise des Geräts überhitzen, benutzen Sie bei Festplatten immer eine externe Stromversorgung.
 Loading...