


L-90X
Version: 1.0
Model L-90X
User Manual
Wooden turntable with USB connection and
built-in pre amplifier
Gebruiksaanwijzing
Houten platenspeler met USB-poort en
ingebouwde voorversterker
Bedienungsanleitung
Holz-Plattenspieler mit USB-Anschluss und
integriertem Vorverstärker
Mode d'emploi
Platine en bois avec connexion USB et
préamplificateur intégré
Manual del usuario
Tocadiscos de madera con conexión USB y
preamplificador integrado

Version: 1.0
Index
English ..................................................................................................................................................... 3
Nederlands ............................................................................................................................................ 23
Deutsch ................................................................................................................................................. 44
Français ................................................................................................................................................. 66
Español .................................................................................................................................................. 87

3
English
L-90X
CAUTION:
Usage of controls or adjustments or performance of procedures other than those specified herein
may result in hazardous radiation exposure.
This unit should not be adjusted or repaired by anyone except qualified service personnel.
PRECAUTIONS BEFORE USE
KEEP THESE INSTRUCTIONS IN MIND:
1. Do not use this device near water.
2. Clean only with a slightly damp cloth.
3. Do not cover or block any ventilation openings. When placing the device on a shelf, leave
5 cm (2”) free space around the whole device.
4. Install in accordance with the supplied user manual.
5. * Don’t step on or pinch the power adaptor. Be very careful, particularly near the plugs and the
cable’s exit point. Do not place heavy items on the power adaptor, which may damage it. Keep
the entire device out of children’s reach! When playing with the power cable, they can
seriously injure themselves.
6. * Unplug this device during lightning storms or when unused for a long period.
7. Keep the device away from heat sources such as radiators, heaters, stoves, candles and other
heat-generating products or naked flame.
8. Avoid using the device near strong magnetic fields.
9. Electrostatic discharge can disturb normal usage of this device. If so, simply reset and restart
the device following the instruction manual. During file transmission, please handle with care
and operate in a static-free environment.
10. Warning! Never insert an object into the product through the vents or openings. High voltage
flows through the product and inserting an object can cause electric shock and/or short circuit
internal parts. For the same reason, do not spill water or liquid on the product.
11. Do not use in wet or moist areas such as bathrooms, steamy kitchens or near swimming pools.
12. Do not use this device when condensation may occur.
13. Although this device is manufactured with the utmost care and checked several times before
leaving the factory, it is still possible that problems may occur, as with all electrical appliances.
If you notice smoke, an excessive build-up of heat or any other unexpected phenomena, you
should disconnect the plug from the main power socket immediately.
14. This device must operate on a power source as specified on the specification label. If you are
not sure of the type of power supply used in your home, consult your dealer or local power
company.
15. * The socket outlet must be installed near the equipment and must be easily accessible.
16. * Do not overload ac outlets or extension cords. Overloading can cause fire or electric shock.
17. * Devices with class 1 construction should be connected to a main socket outlet with a
protective earthed connection.
18. * Devices with class 2 construction do not require a earthed connection.
19. Keep away from rodents. Rodents enjoy biting on power cords.
20. * Always hold the plug when pulling it out of the main supply socket. Do not pull the power
cord. This can cause a short circuit.
21. Avoid placing the device on any surfaces that may be subject to vibrations or shocks.
22. To clean the device, use a soft dry cloth. Do not use solvents or petrol based fluids. To remove
severe stains, you may use a damp cloth with dilute detergent.
23. The supplier is not responsible for damage or lost data caused by malfunction, misuse,
modification of the device or battery replacement.
24. Do not interrupt the connection when the device is formatting or transferring files. Otherwise,
data may be corrupted or lost.
25. If the unit has USB playback function, the usb memory stick should be plugged into the unit
directly. Don’t use an usb extension cable because it can cause interference resulting in failing
of data.

4
26. The apparatus shall not be exposed to dripping or splashing and make sure that no objects
filled with liquids, such as vases, are placed on or near the apparatus.
27. * To completely disconnect the power input, the mains plug of the apparatus shall be
disconnected from the mains, as the disconnect device is the mains plug of apparatus.
28. If the unit works with battery, Battery shall not be exposed to excessive heat such as sunshine,
fire or the like.
29. Attention should be drawn to the environmental aspects of battery disposal.
30. The apparatus can only be used in moderate extremely cold or climates warm environments
should be avoided.
31. The rating label has been marked on the bottom or back panel of the apparatus.
32. This device is not intended for use by people (including children) with physical, sensory or
mental disabilities, or a lack of experience and knowledge, unless they’re under supervision or
have received instructions about the correct use of the device by the person who is responsible
for their safety.
33. This product is intended for non professional use only and not for commercial or industrial use.
34. Make sure the unit is adjusted to a stable position. Damage caused by using this product in an
unstable position or by failure to follow any other warning or precaution contained within this
user manual will not be covered by warranty.
35. Never remove the casing of this apparatus.
36. Never place this apparatus on other electrical equipment.
37. Do not use or store this product in a place where it is subject to direct sunlight, heat, excessive
dust or vibration.
38. Do not allow children access to plastic bags.
39. Only use attachments/accessories specified by the manufacturer.
40. Refer all servicing to qualified service personnel. Servicing is required when the apparatus has
been damaged in any way, such as the power supply cord or the plug, when liquid has been
spilled or objects have fallen into the apparatus, when the apparatus has been exposed to rain
or moisture, does not operate normally, or has been dropped.
41. * Do not use a damaged power cord or plug or a loose outlet. Doing so may result in fire or
electric shock.
42. Prolonged exposure to loud sounds from personal music players may lead to temporary or
permanent hearing loss.
INSTALLATION
• Unpack all parts and remove protective material.
• * Do not connect the unit to the mains before checking the mains voltage and before all other
connections have been made.
* Those instruction are related only to products using power cable or AC power adaptor.
5
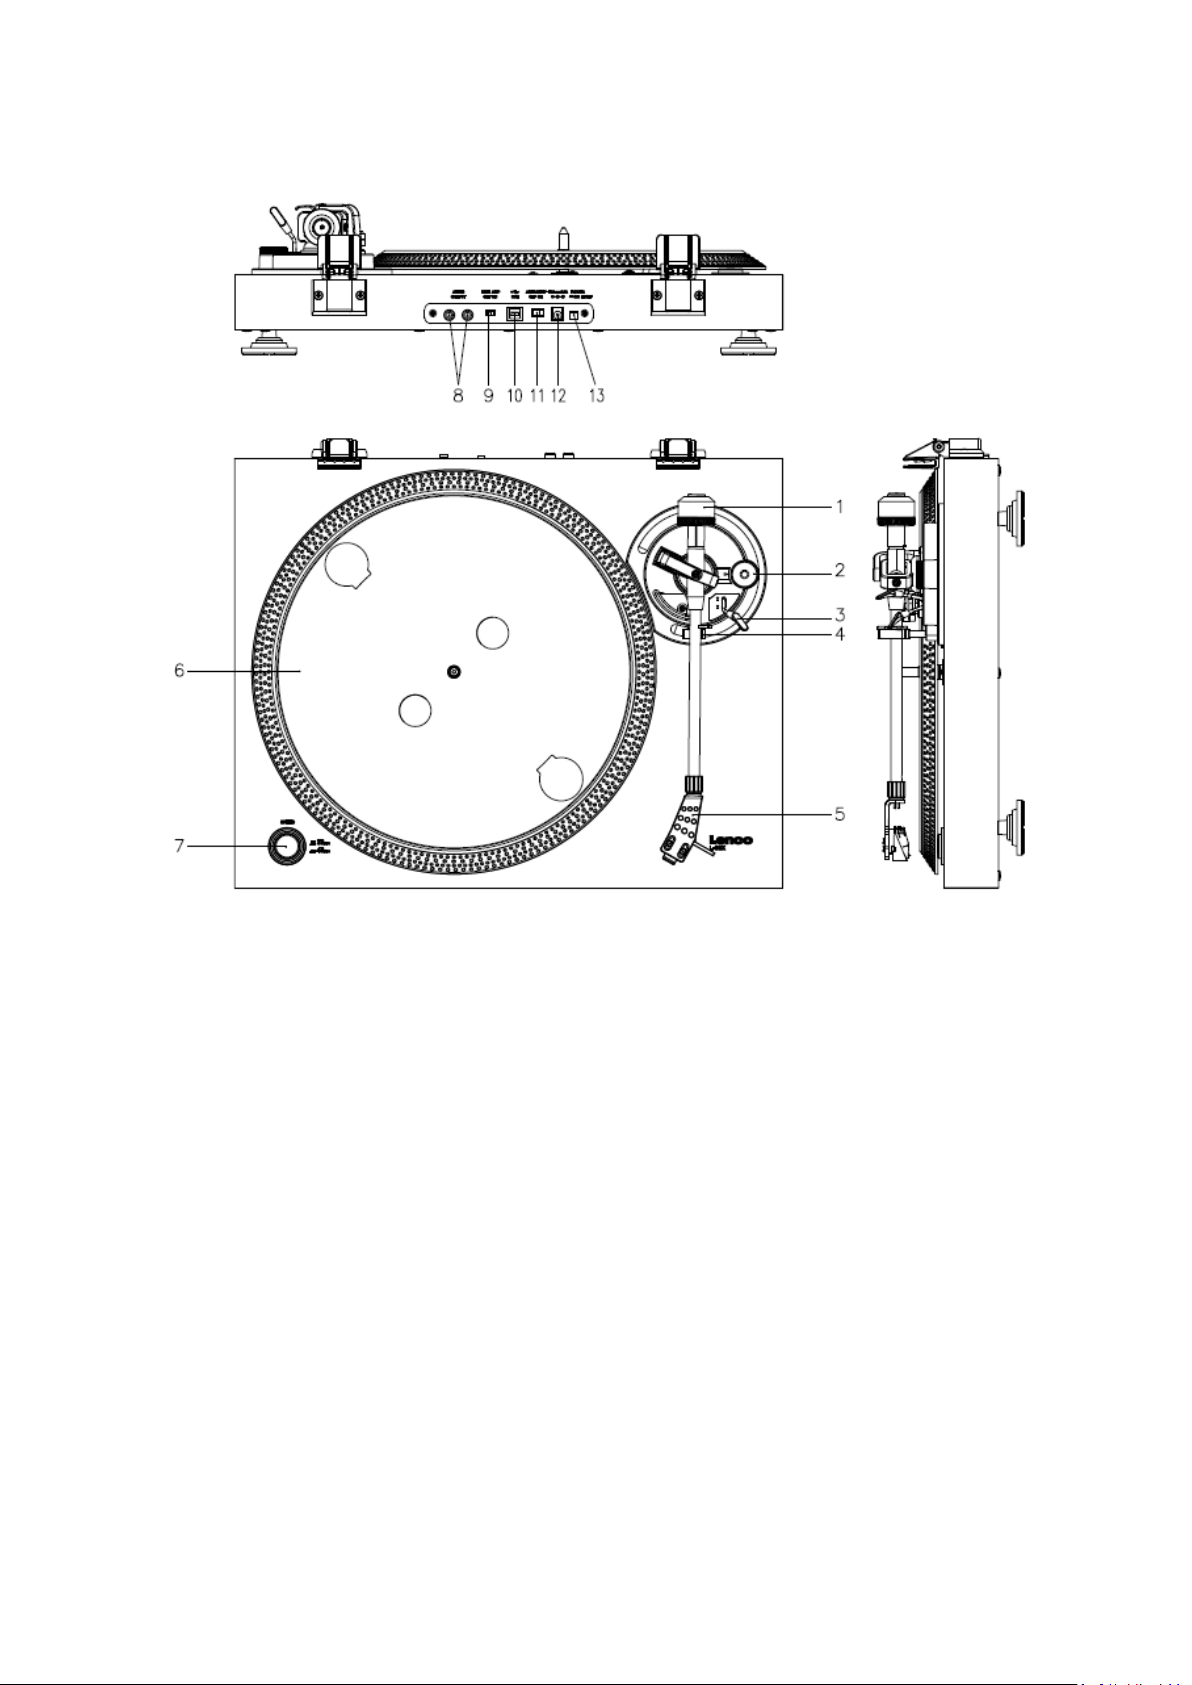
1. DESCRIPTION OF THE UNIT
1. Counterweight, use the counterweight to balance the tone arm.
2. Anti-Skating control: sets the anti-skating. Use anti-skating to prevent the cartridge from
swinging in towards the centre.
3. Tone arm lever: lowers or raises the tone arm.
4. Tone arm lock: locks the tone arm if the turntable is not in use.
5. Head shell: holds the removable stylus. When the turntable is not in use, it is recommendable
to place the removable protection cover on the stylus.
6. Platter: this is where you place your record, before playing it.
7. 33/45 RPM switch: sets the playing speed.
8. Phono socket: audio output to an amplifier.
9. Pre-Amp On/Off Switch: switches the pre-amp to on or off.
10. USB port: connects the turntable to your computer.
11. Auto stop switch: this function is for 33 RPM records only. After the record is finished, the
platter automatically stops rotating.
12. DC in socket
13. Power On/Off switch: switches the power On/off. To save power, please power off the unit
once don’t use/operate the equipment.
Important note: This turntable has a built-in amplifier to avoid damage to the turntable or to
your audio-system. Do not connect this turntable to your audio-system by using the phone-input
as this input is amplified as well.
6
2. Getting started
Keep the turntable out of direct sunlight. When the turntable is not in use, place it on a sturdy
platform of which the surface should be flat and steady, so the turntable cannot fall. Make sure the
turntable is stored in such a manner that no object can fall on it, as pressure will damage or break
the turntable. Prevent insertion of small objects into the ventilation slots, or openings in the cabinet
at all time.
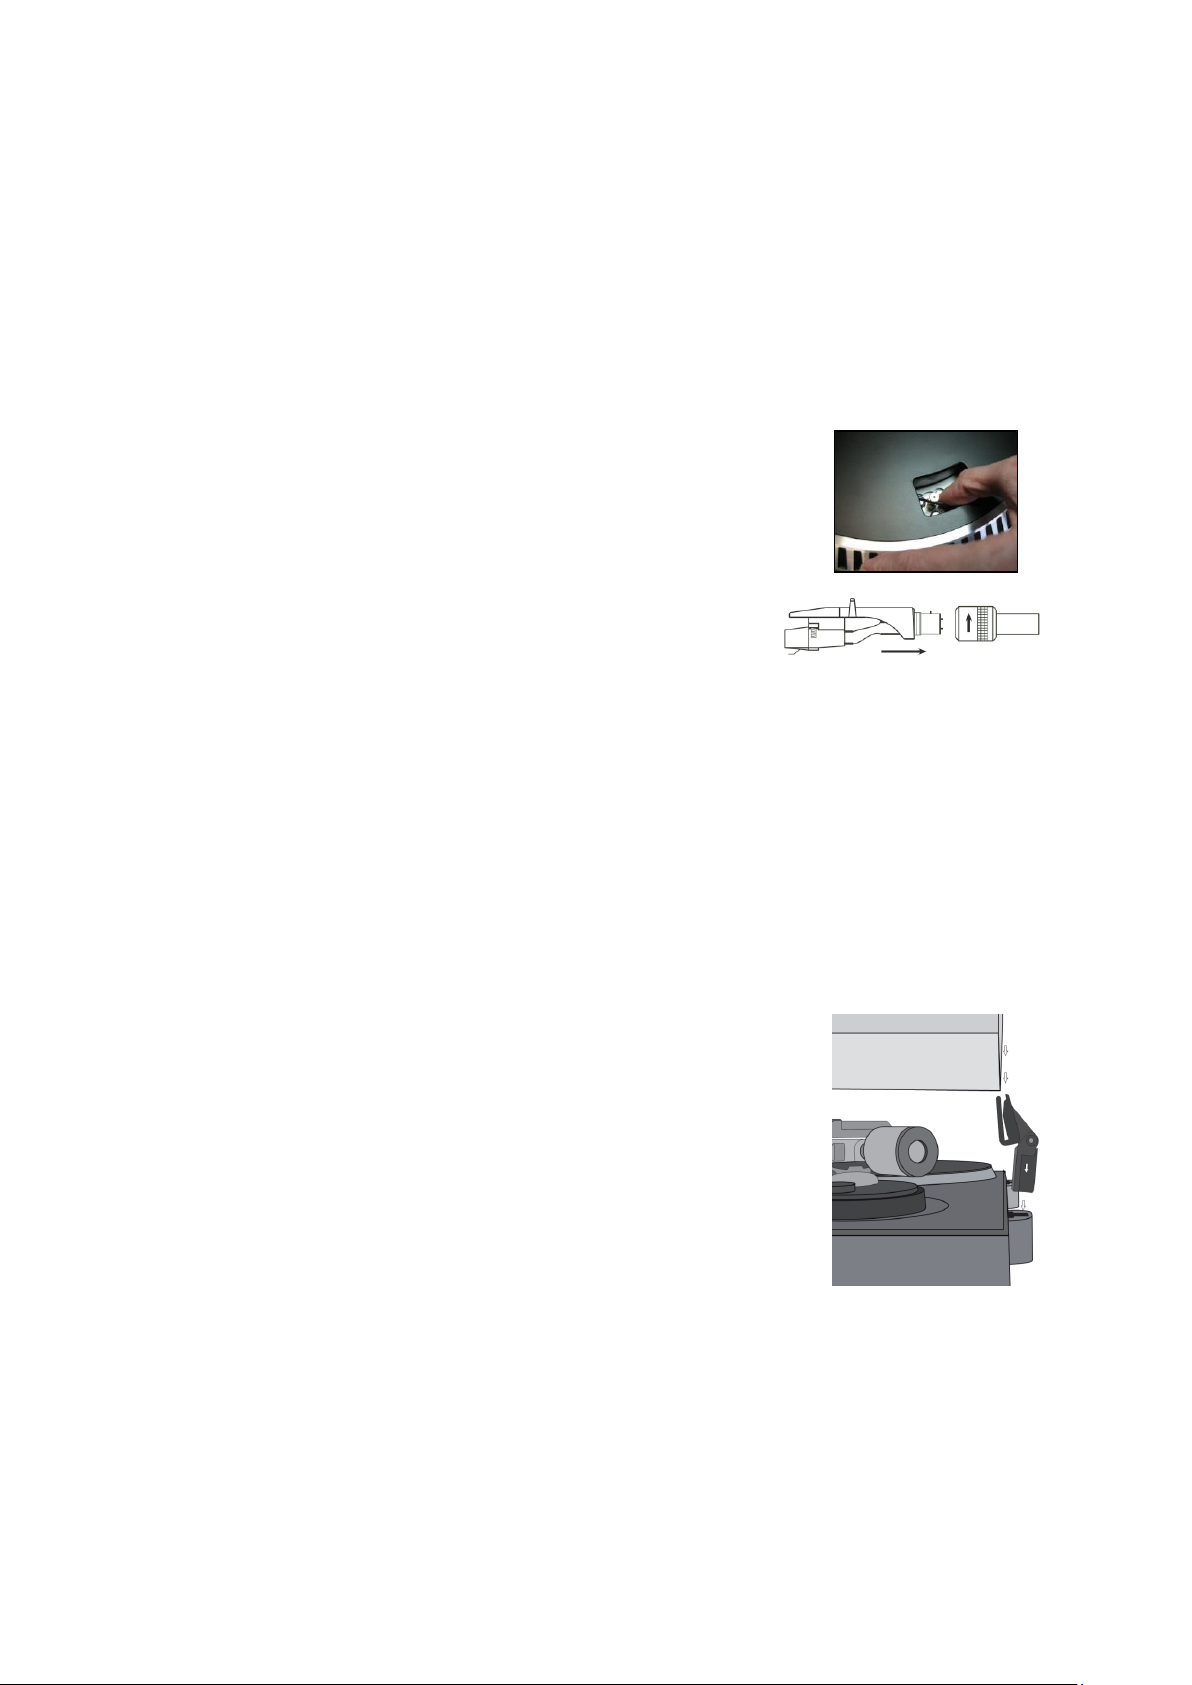
Installation of the turntable
1. Open the box and unpack all parts.
2. Put the platter on the turntable and mount the belt. The belt is on
the downside of the platter.
3. Install the cartridge by placing it on the tone arm and turn the tone
arm’s anti-skate corkscrew until the cartridge is fixed.
4. Mount and set the counterweight.
Screw the counterweight on the tone arm.
Unlock the tone arm.
Remove the protective cover of the stylus. Make sure you do not touch the stylus, nor that
the stylus touches anything.
Lift the tone arm from the armrest and lower the armrest.
Move the counterweight carefully a little either to the left or to the right until the tone arm
is in balance and floats horizontally.
Bring the tone arm back to the armrest and lock the armrest in such a manner that the tone
arm cannot move during installation.
Move the black plastic part of the counterweight to 0. The 0 should be in line with the red
line on the tone arm. Be careful that you do not move the metal part.
Turn the metal part to the left to increase the needle pressure. Lenco recommends to set
the needle pressure to 3.
5. Set the anti-skating. Lenco recommends that the anti-skating should
about half the needle pressure, for the best result try different
settings yourself.
6. Please allign numbering the hinges and mount the dust cover.
7. Connect the power adaptor to the wall outlet.
8. Connect the line out cables to a mixer or HiFi system.
Important note: This turntable has a built-in amplifier to avoid
damage on the turntable or your audio-system. Do not connect this
turntable to your audio-system by using the phone-input because this
input is also amplified.
7
3. MAINTENANCE
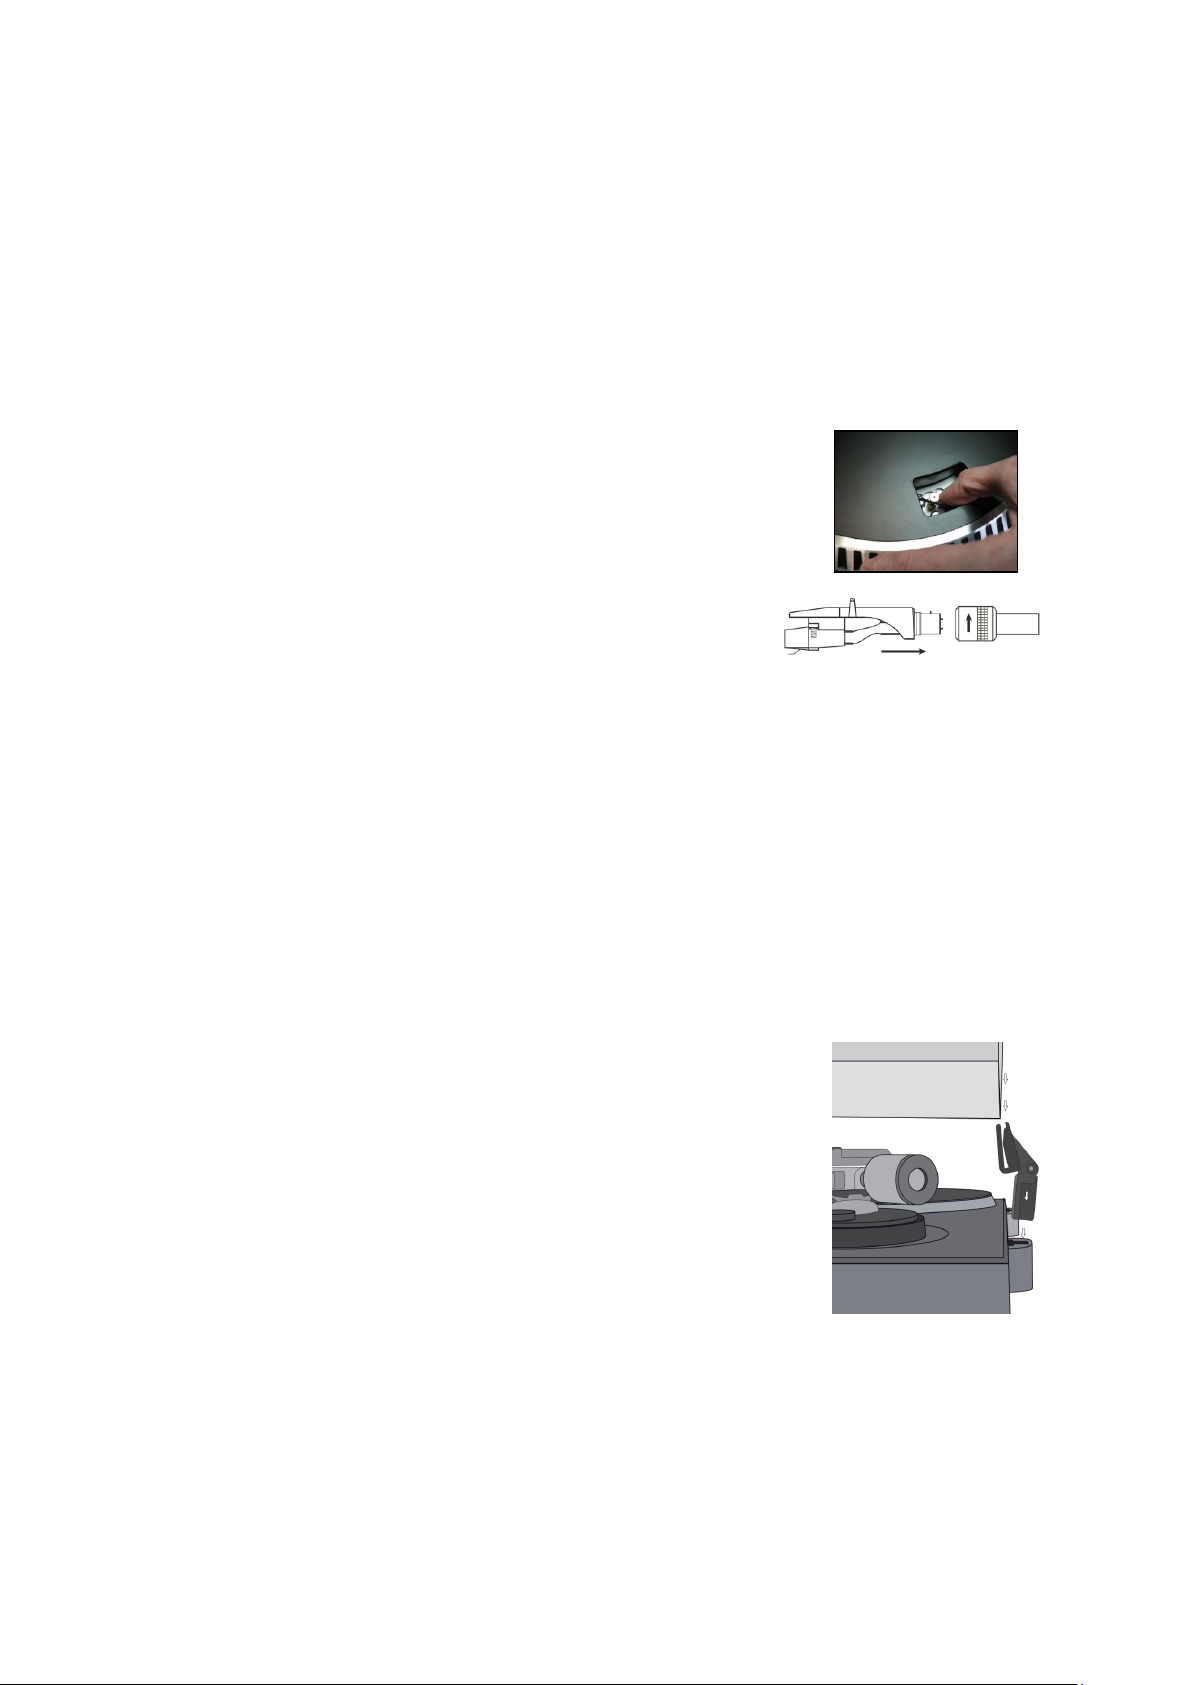
TO REPLACE THE STYLUS (FIG A):
- Secure the tone arm in place using the tone arm lock.
- Pull the orange stylus unit forward in the directoin of the
arrow and remove it.
- Put in the new stylus following the reverse procedure.
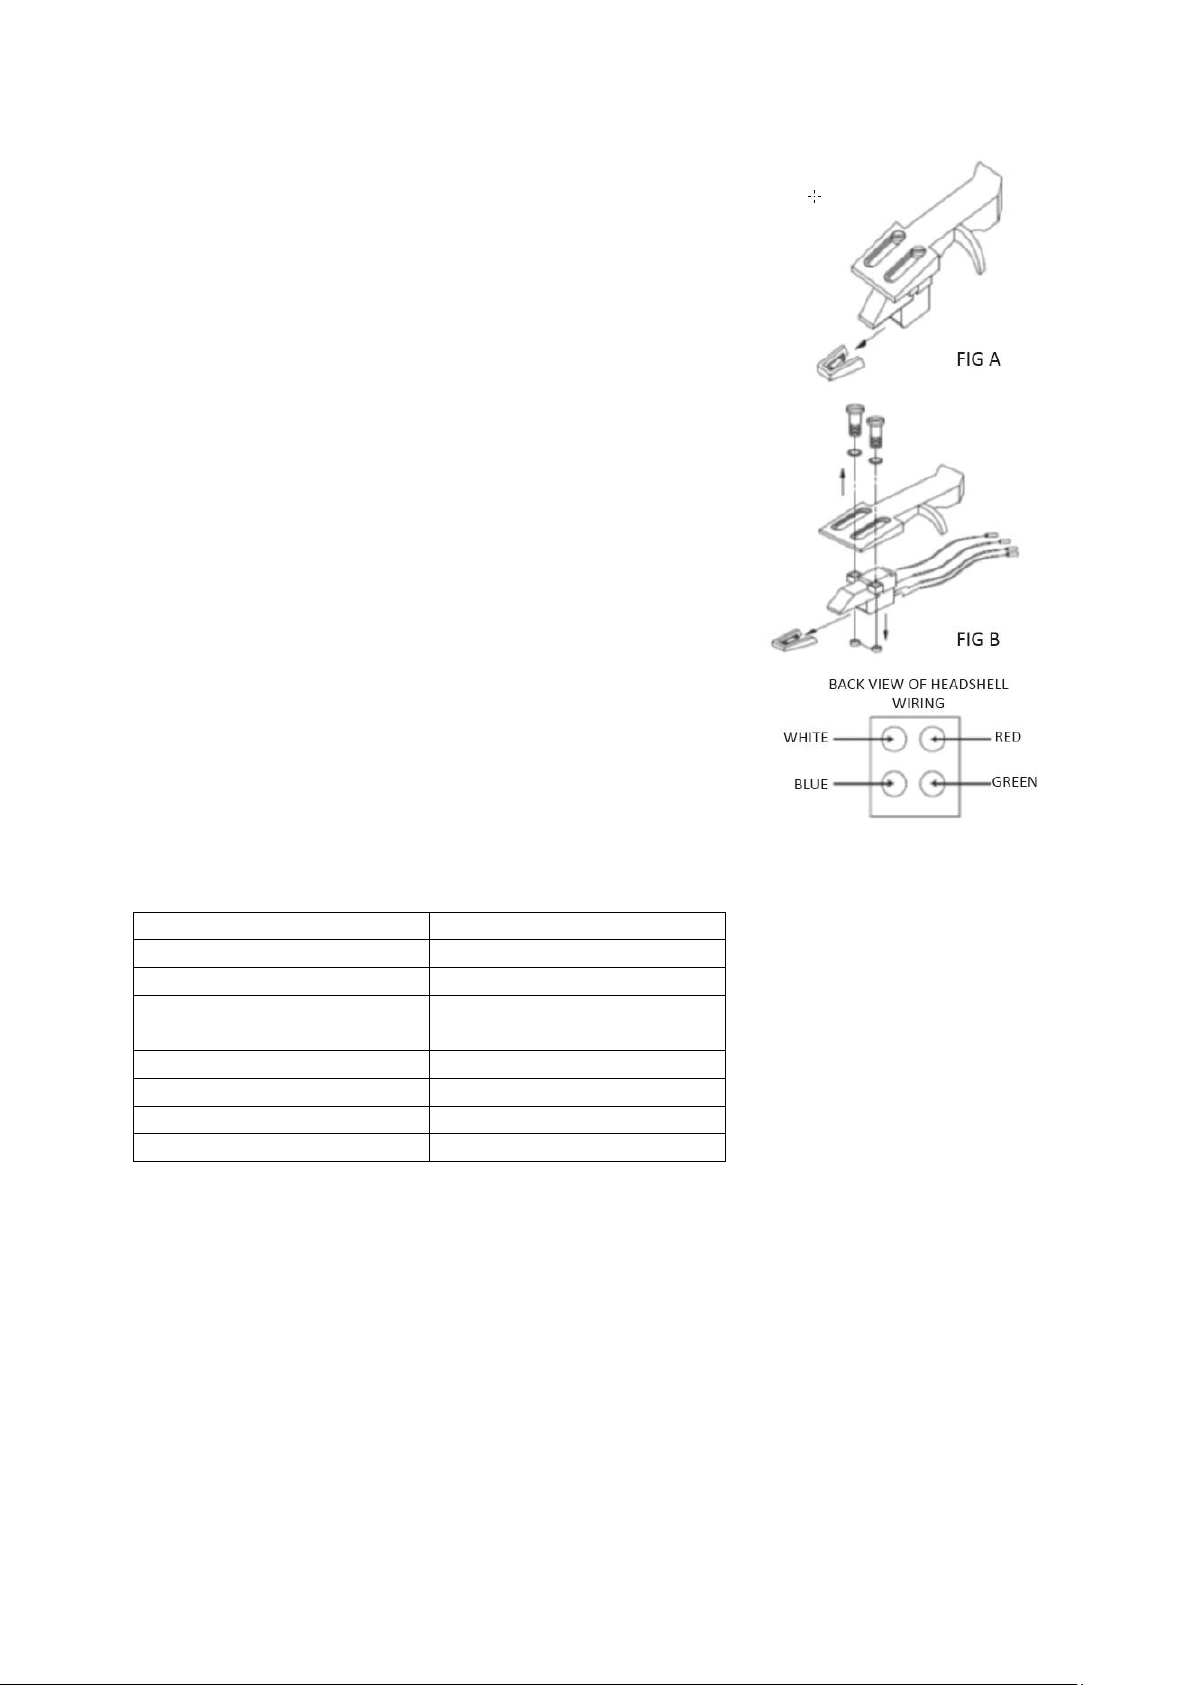
TO DISASSEMBLE THE CARTRIDGE (FIG B):
- Secure the tone arm in place using the tone arm lock
- Remove the stylus (see section above).
- Release the screws, nuts and washer and then the
headshell and cartridge can be disassembled.
- Disconnect the four link wires at the level of the pick up
head.
TO INSTALL A NEW CARTRIDGE
- Connect the four colored wires as shown in figure B.
- Push the cartridge up into the headshell.
- Reinstall the stylus.
EN
EN
FIG A
FIG A
FIG B
FIG B
BACK VIEW OF HEADSHELL
WIRING
BACK VIEW OF HEADSHELL
WIRING
WHITE
WHITE
BLUE
BLUE
RED
RED
GREEN
GREEN
IMPORTANT RECOMMENDATIONS
We advise you to clean your records using an impregnated rag with an antistatic product for
maximum enjoyment of your records and also to make them last.
We would also point out that for the same reason your stylus should be replaced periodically
(approximately every 250 hours).
Dust the stylus from time to time using a very soft brush dipped in alcohol (brushing from the back
to the front of the cartridge).
Basic operation

8
Playing records
Switch the main power switch on the backside of the turntable to the "on" position. Open the dust
cover and place the record on the platter. If you play a single, do not forget to place the single puck
first.
Set the correct RPM speed
Remove the needle protection cover from the stylus
Unlock the tone arm on the armrest
Bring the tone arm to the record, the platter now starts rotating
Carefully place the tone arm on the record. Do not forget to lower the arm lever
If you want to interrupt a record during playing, raise the arm lever. Alternatively, return it to the
armrest to stop the record playing. When a record has come to its end, the platter stops rotating*.
* Auto-stop should be on.
Connect the turntable to a computer for the first time
As this turntable is plug-and-play, no drivers are needed.
Before you connect the turntable to a computer, unplug it from your mixer or
Hi-Fi system.
The included software is a third party application and therefore Lenco does not
handle any questions or problems regarding the software.
1. Switch the computer on
2. Connect the turntable to an AC wall outlet
3. Place the main power switch on the back side of the turntable in the "on" position
4. If the computer is booted, connect the turntable. The computer will now install the drivers.
5. After the drivers are installed, you must now install the Audacity software.
For windows users; download the newest software via http://www.audacityteam.org
For MAC users; download the newest software via http://www.audacityteam.org
Important: Make sure that your computer recognizes the turntable as a recording device. Especially
Windows has the tendency to set the turntable default as a playing device. If the turntable is set as
playing device, Audacity cannot record your records.
9
4. AUDACITY QUICK GUIDE (PC editing program)
For encoding your records to MP3, please download the software from below link and follow the
instructions.
www.audacityteam.org
Before Starting the Audacity software
Make sure that your USB turntable is plugged into the computer and both the computer and the
turntable are plugged in and on.
To Install Software (PC)
1. Plug in your Turntables powersupply to an AC outlet and connect the USB Port of the
Turntable to the USB port on your computer.
2. Turn on the power switch of your turntable.
3. The Windows system will detect a new device and indicate that it is available for use.
To Install Software (MAC)
Follow the instruction from audacity website.
Software Configuration
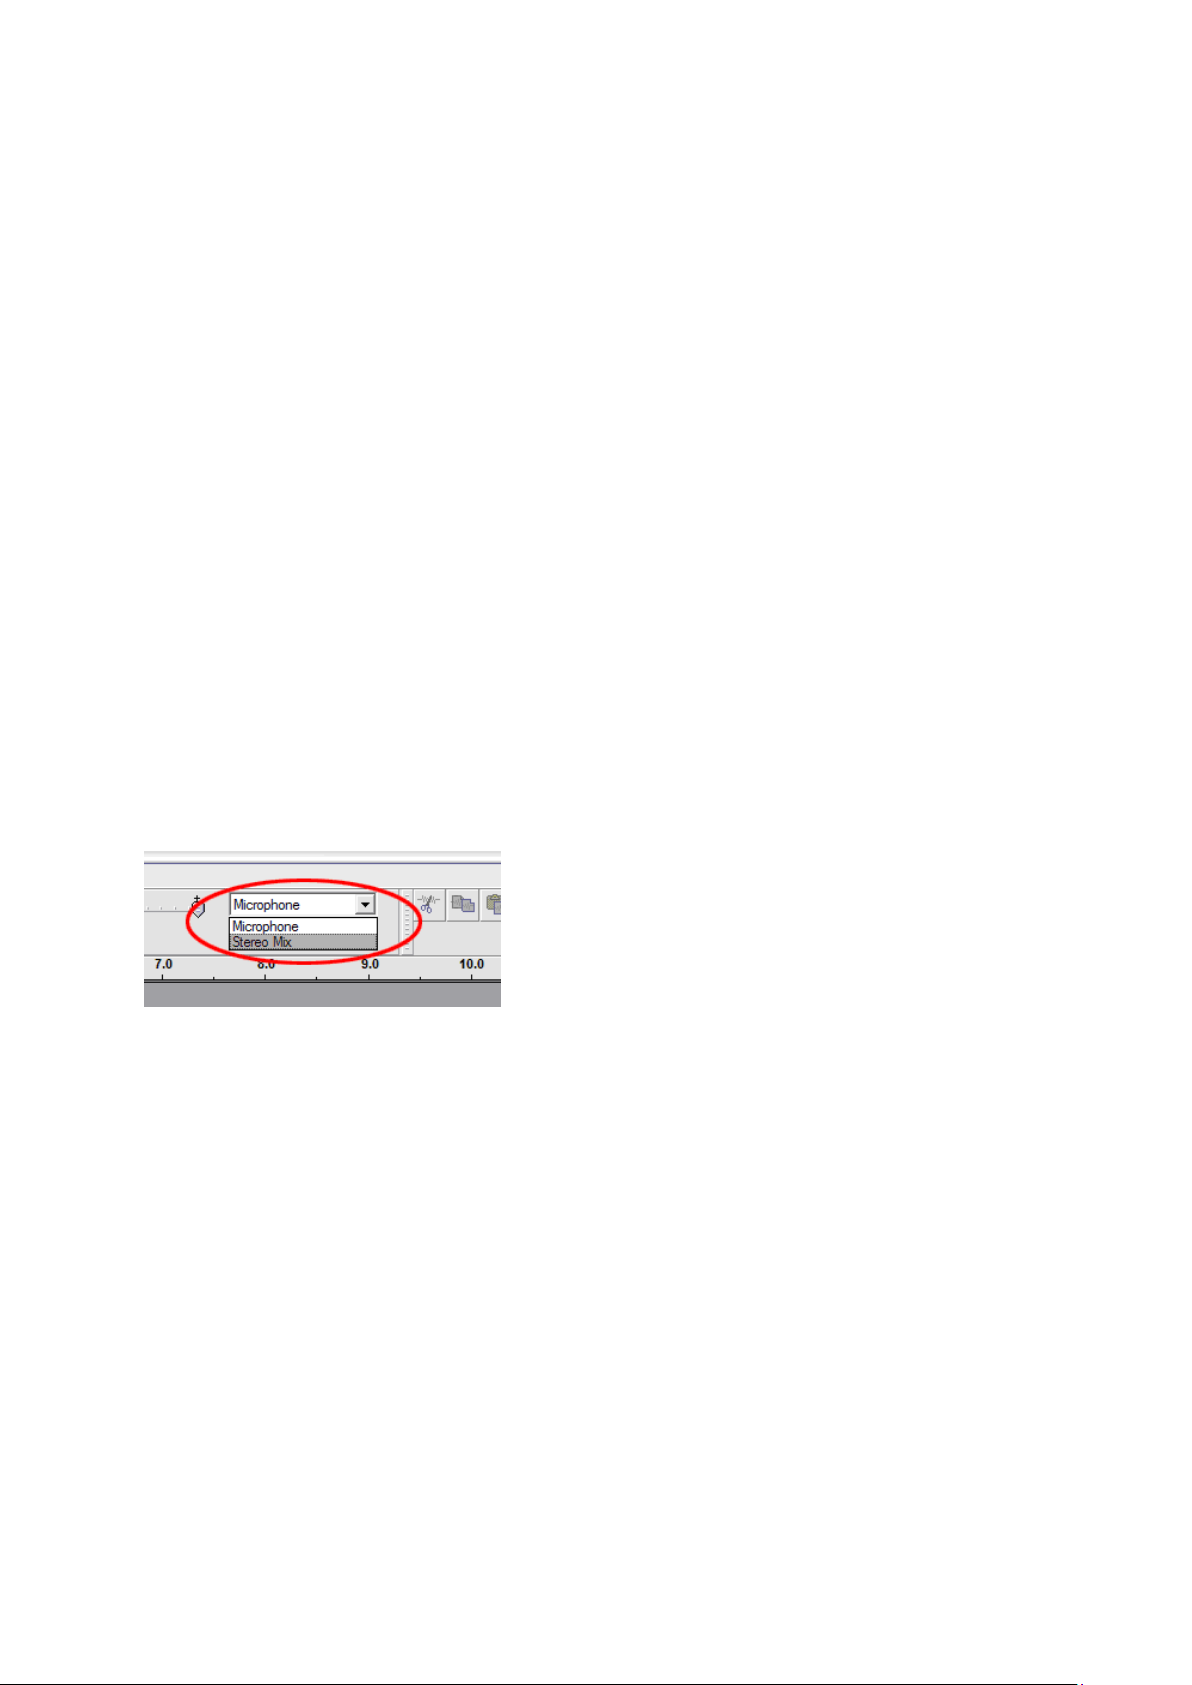
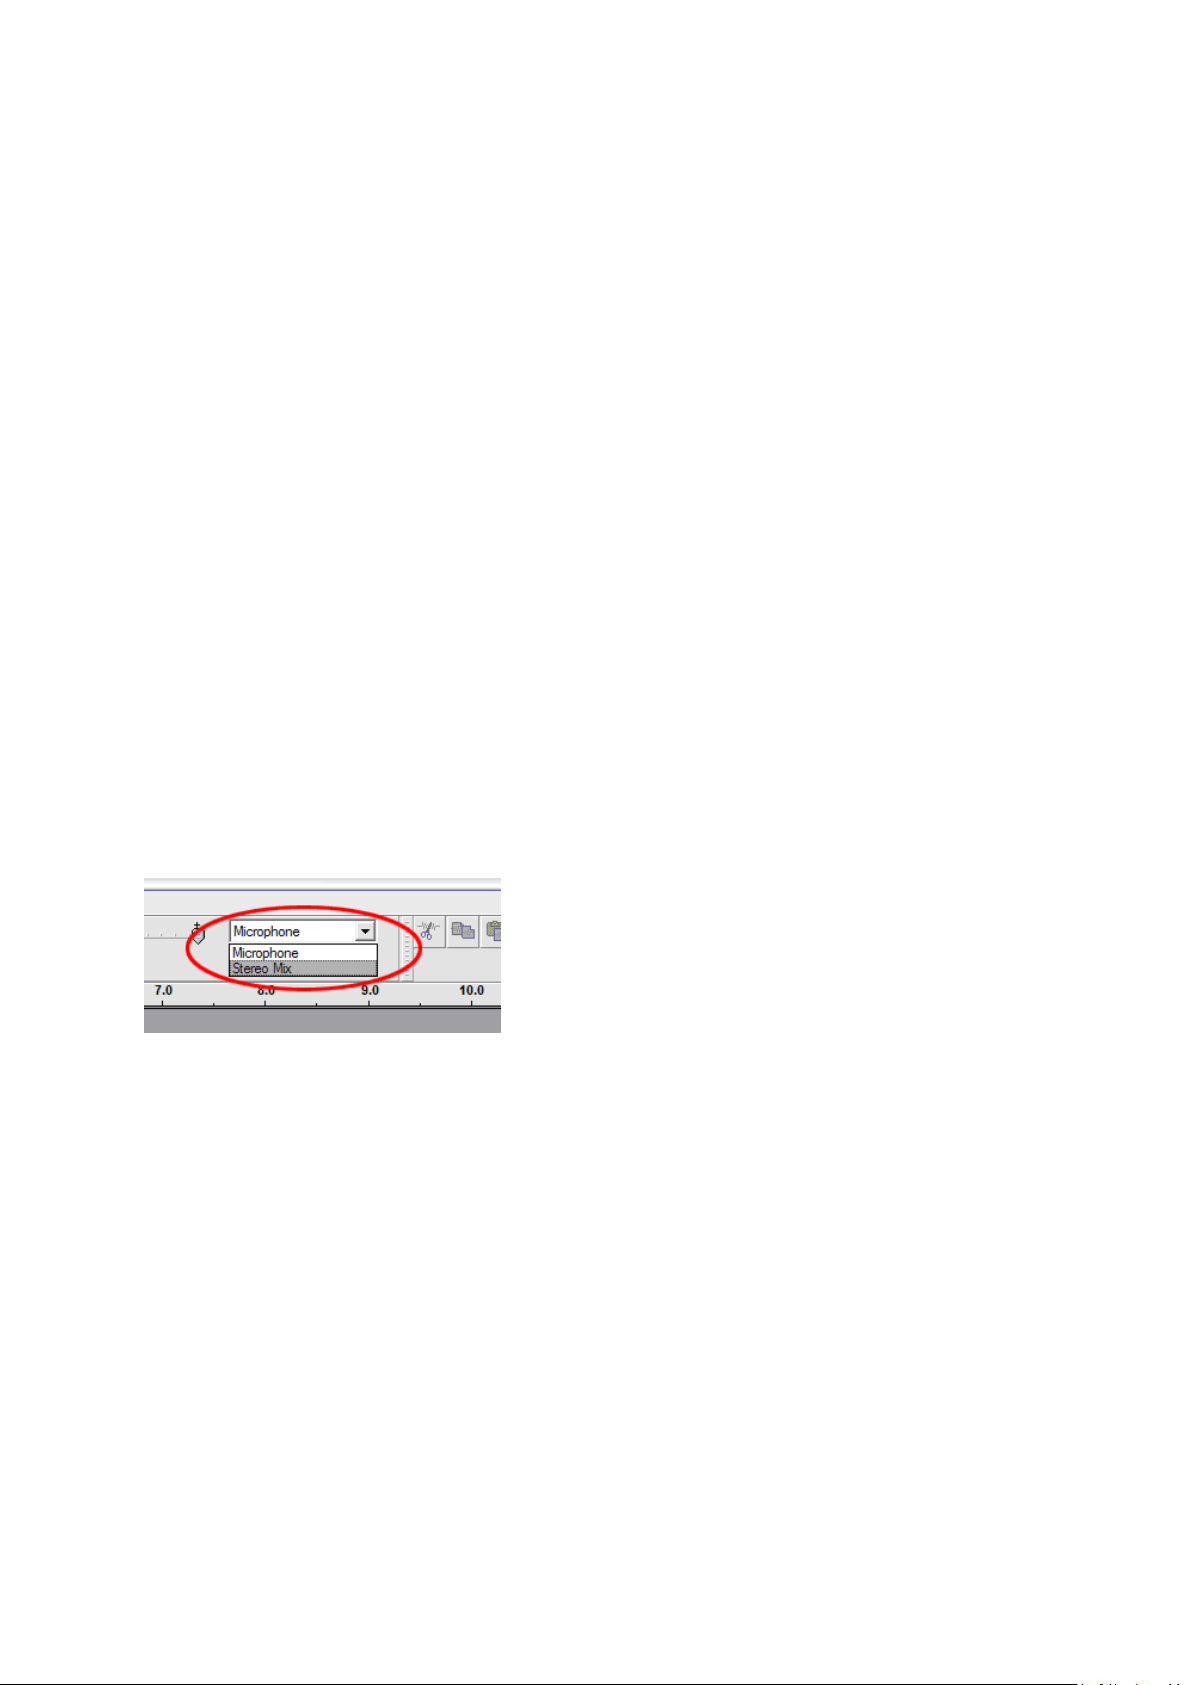
1. Click on Microphone in the drop down menu and select "Stereo Mix"
Figure 1: Select Stereo Mix
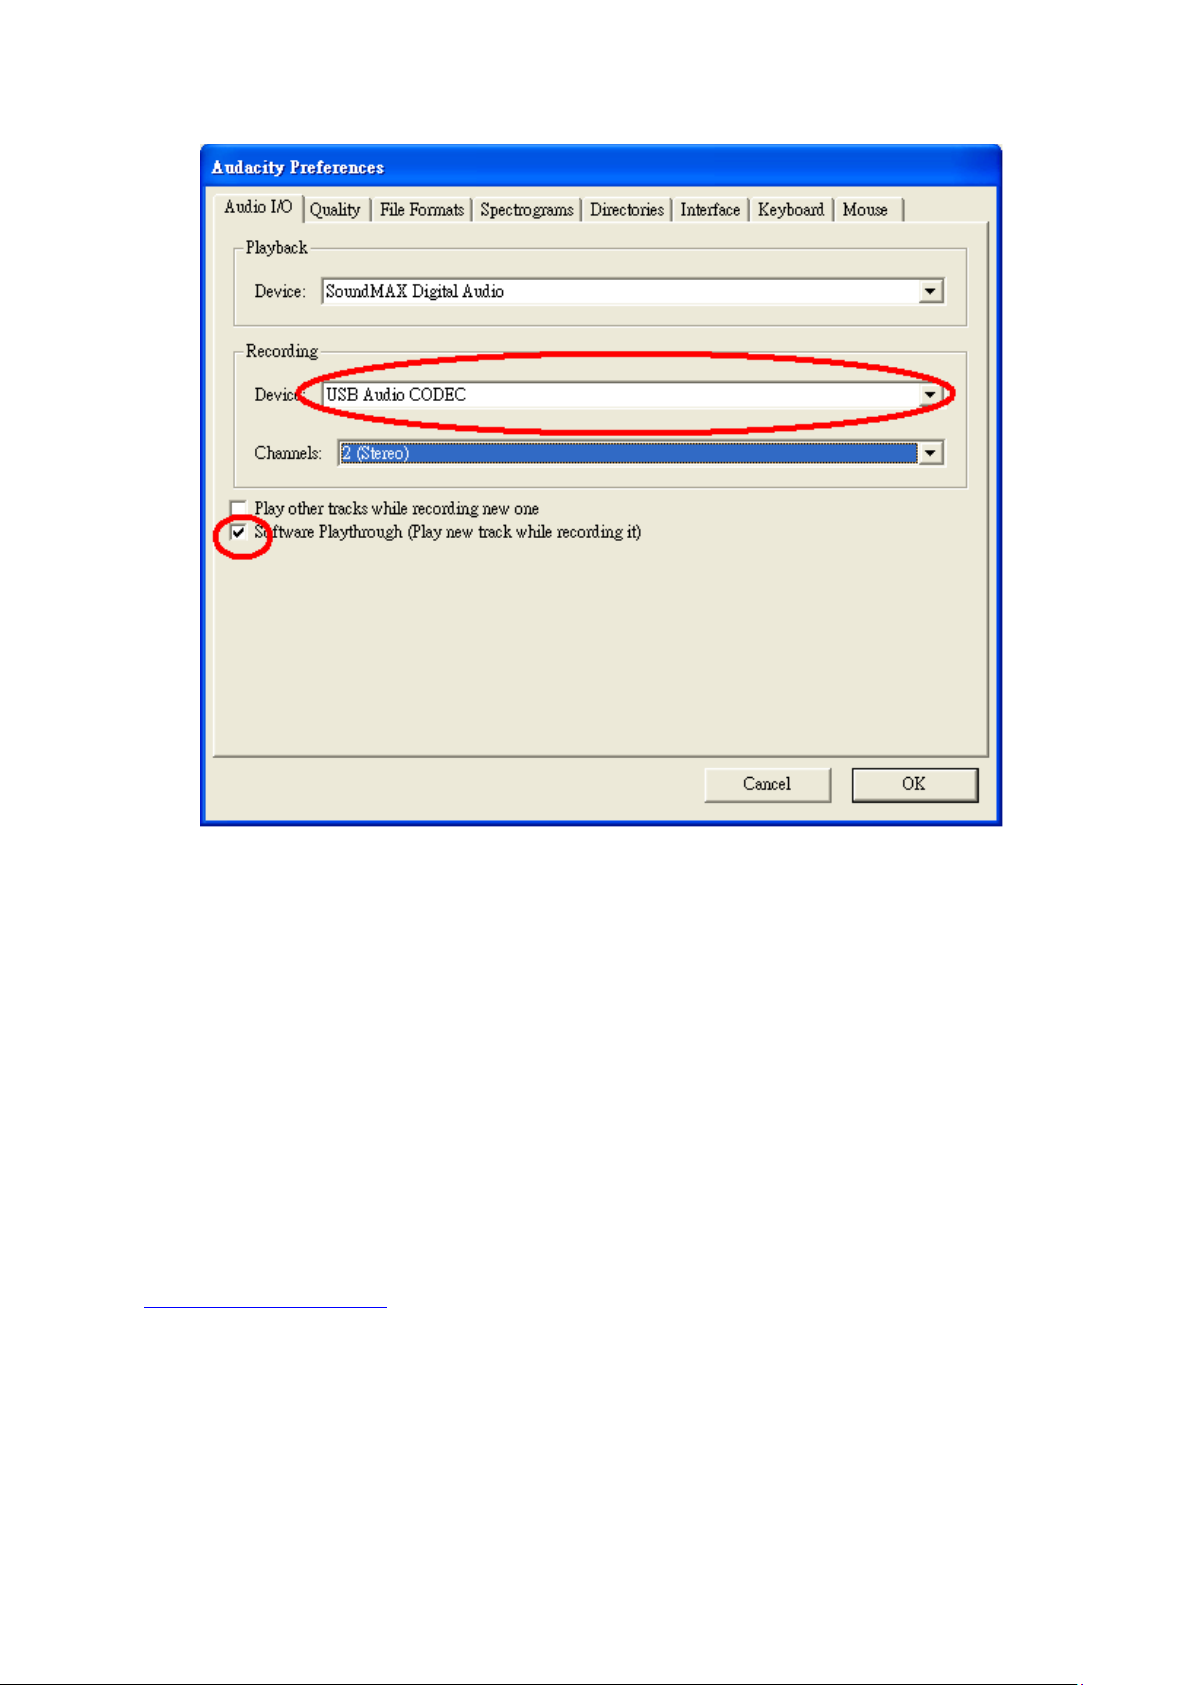
2. Select the "Edit" menu and then "Preferences"
Select the USB audio device under the "Recording" selection as shown. Select "Software
Playthrough" to hear the audio while recording.
Note: The USB Turntable may show up with a different name in the Windows system. This may
depend on your computer model and operating system. 99% of the time it will contain "USB" in the
Name.
10
Figure 2: Select USB Audio Device from Preferences
After the above settings are completed, you are ready for recording.
If you are still having difficulties in finding the USB Turntable, try to check your system settings or
control panel to adjust the audio input settings from the sound control panel.
Note:
i. The attached Audacity software is for reference only. Please download the latest version from
the following website:
http://www.audacityteam.org
ii. Please check the following website and download the trial software for more sound editing
software.
http://www.bias-inc.com/
11
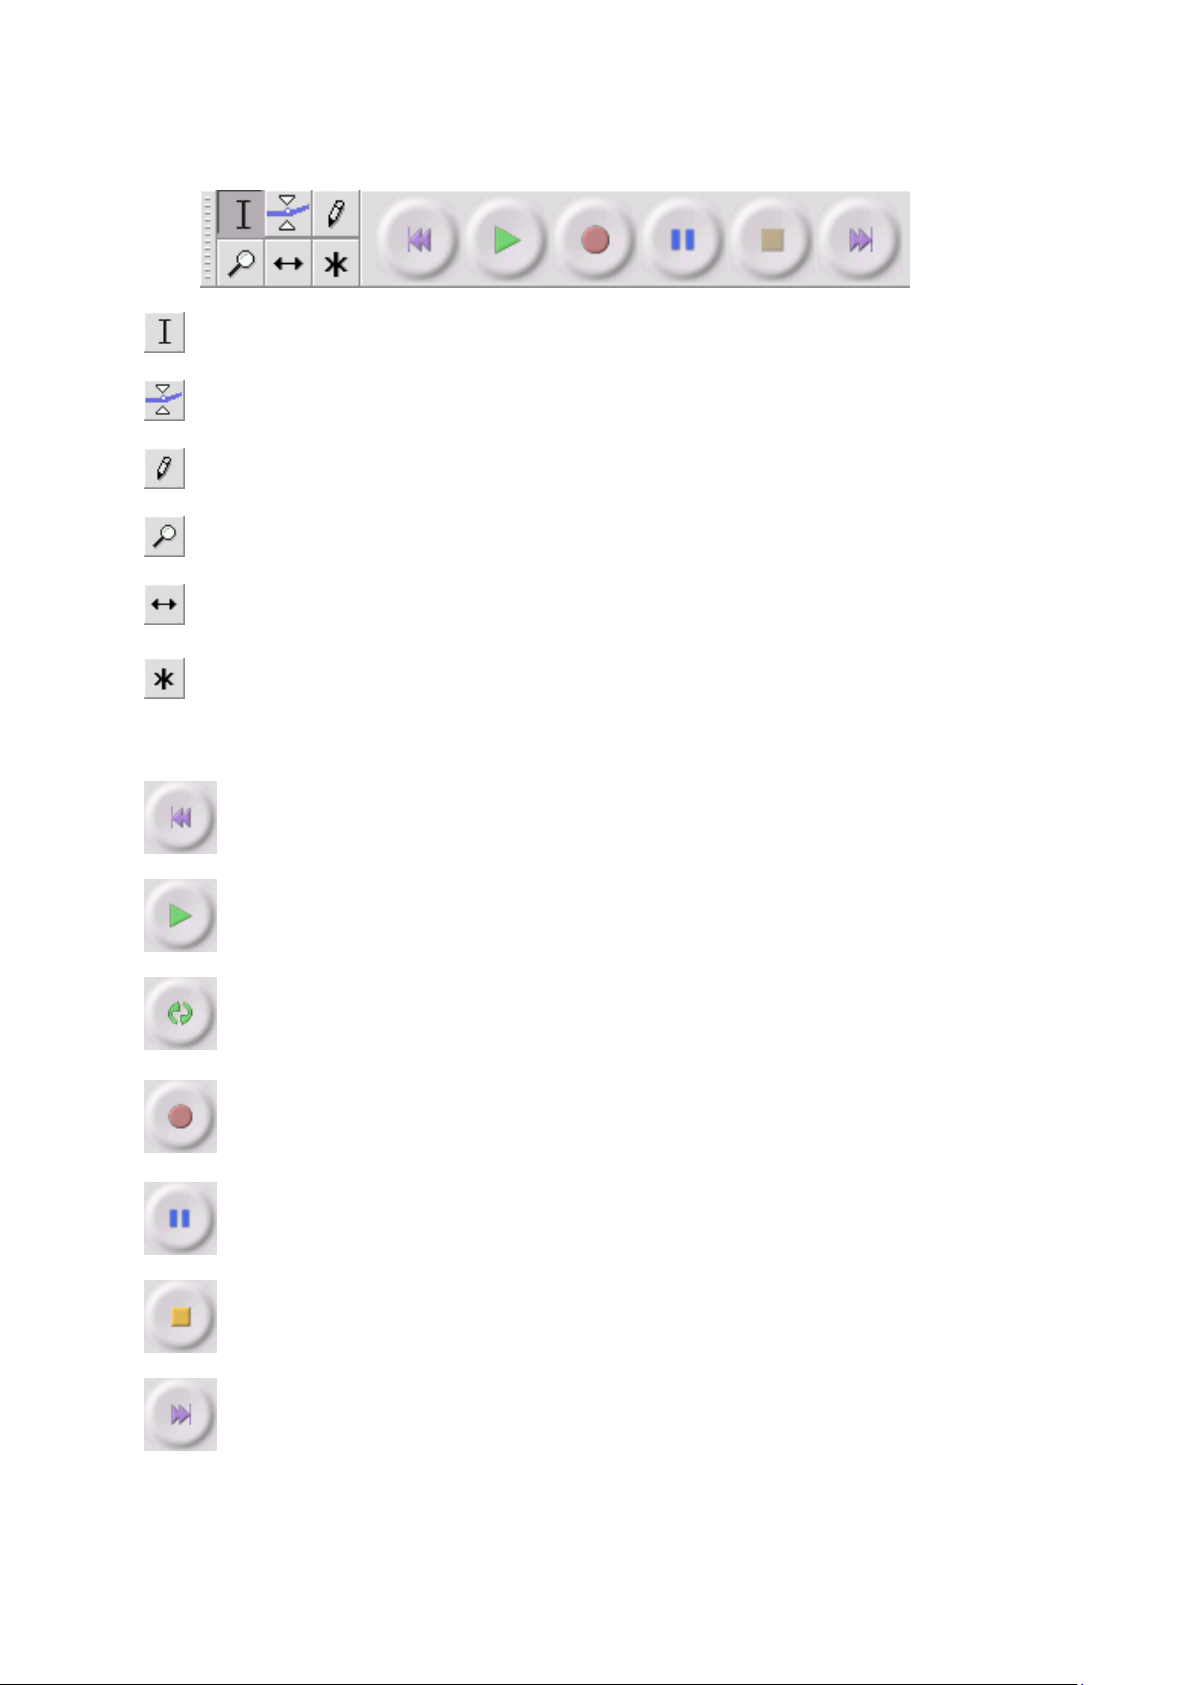
Toolbars
Selection tool - for selecting the range of audio you want to edit or listen to.
Envelope tool - for changing the volume over time.
Draw tool - for modifying individual samples.
Zoom tool - for zooming in and out.
Time shift tool - for sliding tracks left or right.
Multi tool - lets you access all of these tools at once depending on the location of the mouse
and the keys you are holding down.
Audio Control Buttons
Skip to Start - moves the cursor to time 0. If you press Play at this point, your project will
play from the beginning.
Play - starts playing audio at the cursor position. If some audio is selected, only the
selection is played.
Loop - if you hold down the Shift key, the Play button changes to a Loop button, which lets
you keep playing the selection over and over again.
Record - starts recording audio at the project sample rate (the sample rate in the lower-
left corner of the window). The new track will begin at the current cursor position, so click
the "Skip to Start" button first if you want the track to begin at time 0.
Pause - temporarily stops playback or recording until you press pause again.
Stop - stops recording or playing. You must do this before applying effects, saving or
exporting.
Skip to End - moves the cursor to the end of the last track.
12
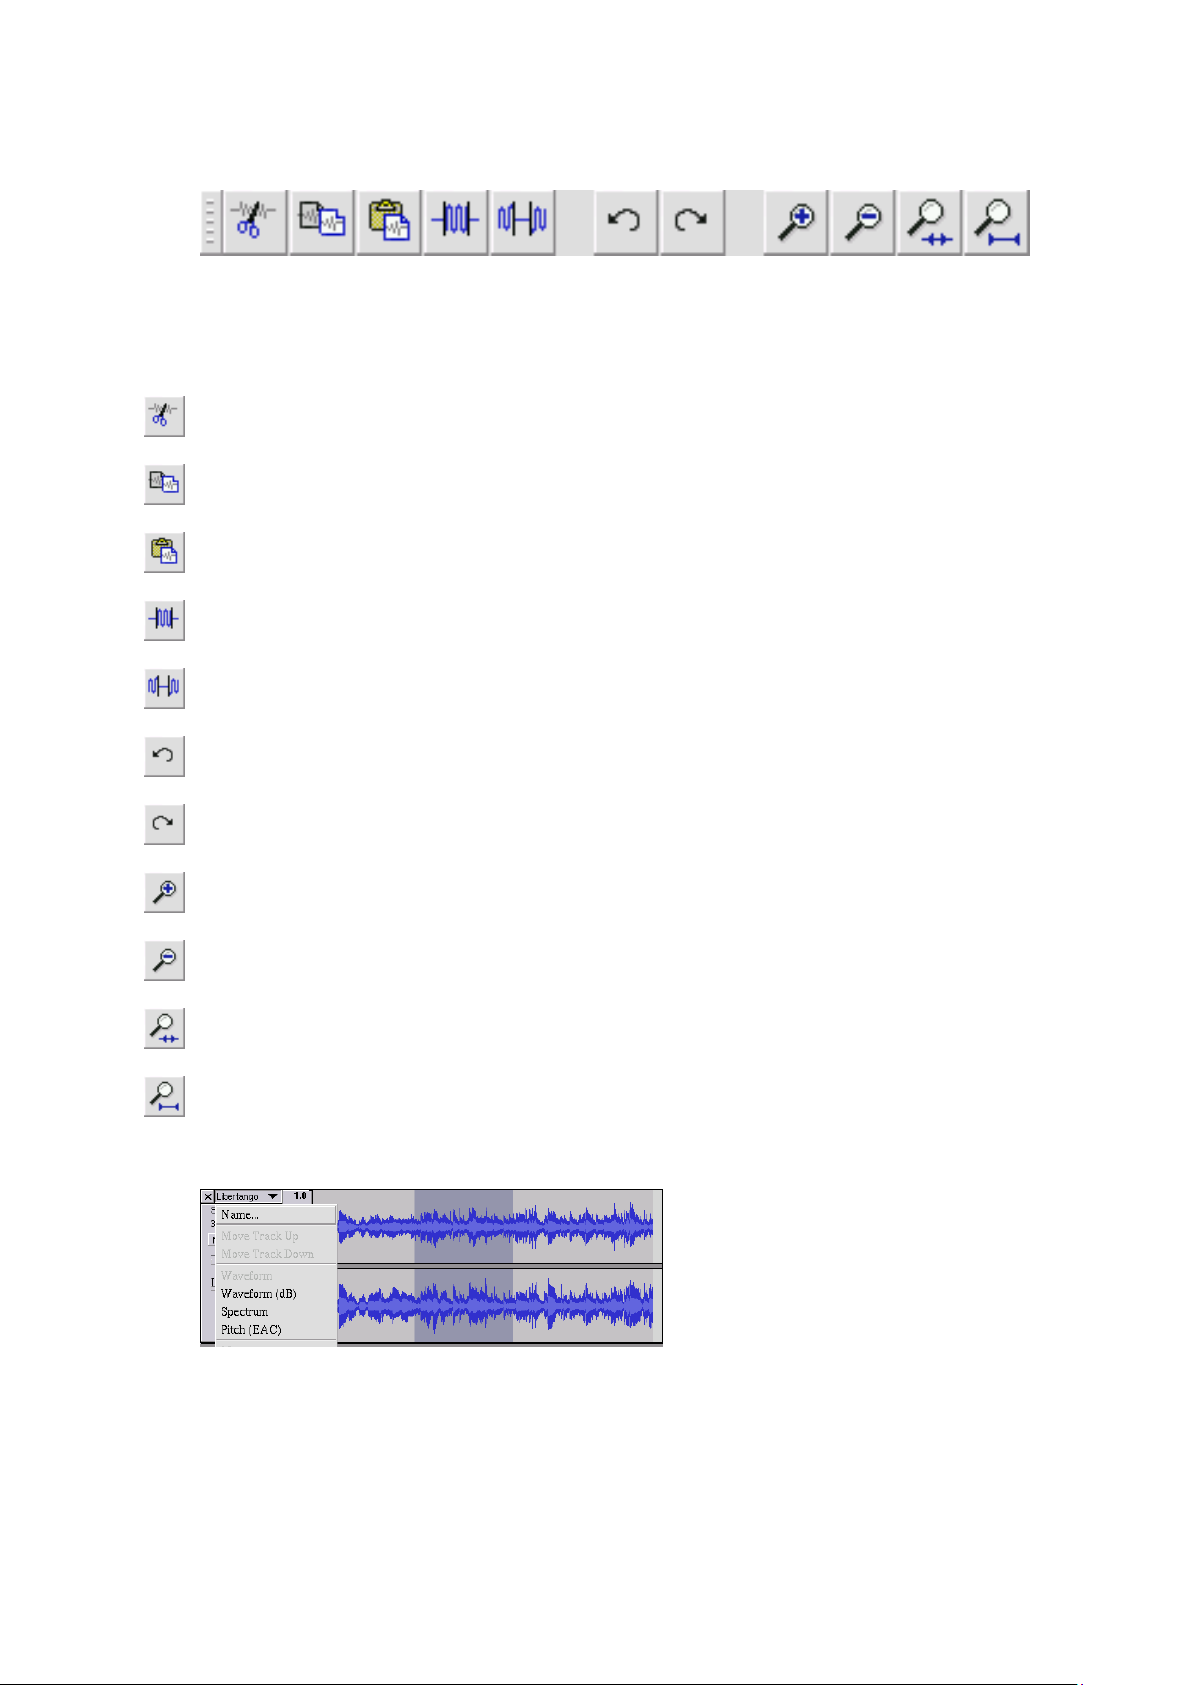
Edit Toolbar
All of the buttons on this toolbar perform actions - and with a couple of exceptions, they're all just
shortcuts of existing menu items to save you time. Holding the mouse over a tool will show a
"tooltip" in case you forget which one is which.
Cut
Copy
Paste
Trim away the audio outside the selection
Silence the selected audio
Undo
Redo (repeat last command).
Zoom In
Zoom Out
Fit selection in window - zooms until the selection just fits inside the window.
Fit project in window - zooms until all of the audio just fits inside the window.
Track Pop-Down Menu
The Track Pop-Down Menu appears when you click in a track's title. This lets you access a few special
commands that apply to individual tracks.
Name... - lets you change the name of the track.

13
Move Track Up - exchange places with the track above this one.
Move Track Down - exchange places with the track below this one.
Waveform - sets the display to Waveform - this is the default way of visualizing audio.
Waveform (dB) - similar to Waveform, but on a logarithmic scale, measured in decibels (dB).
Spectrum - displays the track as a spectrogram, showing the amount of energy in different
frequency bands.
Pitch (EAC) - highlights the contour of the fundamental frequency (musical pitch) of the audio, using
the Enhanced Autocorrelation (EAC) algorithm.
Mono - makes this track a mono track, meaning it is played out of just one speaker, or played out of
the left and right speakers equally.
Left Channel - makes this track come out of only the left speaker.
Right Channel - makes this track come out of only the right speaker.
Make Stereo Track - if there is another track below this one, it joins them to make a single stereo
track, with the top track representing the left speaker, and the bottom track representing the right
speaker. When tracks are joined into a stereo pair, all edits automatically apply to both the left and
right channel.
Split Stereo Track - if the selected track is a stereo track (a pair of left and right tracks joined
together as a single track), this operation splits them into two separate tracks that you can modify
and edit independently.
Set Sample Format - this determines the quality of the audio data and the amount of space it takes
up. 16-bit is the quality used by audio CDs and is the minimum quality that Audacity uses internally
(8-bit audio files are automatically converted when you open them). 24-bit is used in higher-end
audio hardware. 32-bit float is the highest quality that Audacity supports, and it is recommended
that you use 32-bit float unless you have a slow computer or are running out of disk space.
Set Rate - sets the number of samples per second of the track. 44100 Hz is used by audio CDs. Tracks
can have different sample rates in Audacity; they are automatically resampled to the project sample
rate (in the lower-left corner of the window).
[MENU]
File Menu
New - creates a new empty window
Open... - opens an audio file or an Audacity project in a new window (unless the current window is
empty). To add audio files to an existing project window, use one of the Import commands in the
Project menu.

14
Close - closes the current window, asking you if you want to save changes. On Windows and Unix,
closing the last window will quit Audacity, unless you modify this behavior in the Interface Preferences.
Save Project - saves everything in the window into an Audacity-specific format so that you can save
and quickly continue your work later. An Audacity project consists of a project file, ending in ".aup",
and a project data folder, ending in "_data". For example, if you name your project "Composition",
then Audacity will create a file called "Composition.aup" and a folder called Composition_data.
Audacity project files are not meant to be shared with other programs - use one of the Export
commands (below) when you are finished editing a file.
Save Project As... - same as Save Project (above), but lets you save a project as a new name.
Recent Files ... - brings up a list of files you have recently opened in audacity to be re-opened quickly.
Export As WAV... - exports all of the audio in your project as a WAV file, an industry-standard format
for uncompressed audio. You can change the standard file format used for exporting from Audacity
by opening the File Format Preferences. Note that exporting will automatically mix and resample if
you have more than one track, or varying sample rates. See also File Formats.
Export Selection As WAV... - same as above, but only exports the current selection.
Export as MP3... - exports all of the audio as an MP3 file. MP3 files are compressed and therefore
take up much less disk space, but they lose some audio quality. Another compressed alternative is
Ogg Vorbis (below). You can set the quality of MP3 compression in the File Format Preferences. See
also MP3 Exporting.
Export Selection As MP3... - same as above, but only exports the current selection.
Export as Ogg Vorbis... - exports all of the audio as an Ogg Vorbis file. Ogg Vorbis files are
compressed and therefore take up much less disk space, but they lose some audio quality. Ogg
Vorbis files tend to take up a little less disk space than MP3 for similar compression quality, and Ogg
Vorbis is free from patents and licensing restrictions, but Ogg Vorbis files are not as widespread. You
can set the quality of Ogg compression in the File Format Preferences.
Export Selection As Ogg Vorbis... - same as above, but only exports the current selection.
Export Labels... - if you have a Label Track in your project, this lets you export the labels as a text file.
You can import labels in the same text format using the "Import Labels..." command in the Project
Menu.
Export Multiple... - lets you split your project into multiple files all in one step. You can either split
them vertically (one new file per track), or horizontally (using labels in a Label Track to indicate the
breaks between exported files.
Page Setup - configure how Audacity will print out the track waveforms using the Print option, and
what printer to use.
Print - Print out the main window view from audacity showing the tracks and waveforms.
Exit (Quit) - closes all windows and exits Audacity, prompting you to save any unsaved changes first.
15
Edit Menu
Undo - This will undo the last editing operation you performed to your project. Audacity supports
full unlimited undo - meaning you can undo every editing operation back to when you opened the
window.
Redo - This will redo any editing operations that were just undone. After you perform a new editing
operation, you can no longer redo the operations that were undone.
Cut - Removes the selected audio data and places it on the clipboard. Only one "thing" can be on the
clipboard at a time, but it may contain multiple tracks.
Copy - Copies the selected audio data to the clipboard without removing it from the project.
Paste - Inserts whatever is on the clipboard at the position of the selection or cursor in the project,
replacing whatever audio data is currently selected, if any.
Trim - Removes everything to the left and right of the selection.
Delete - Removes the audio data that is currently selected without copying it to the clipboard.
Silence - Erases the audio data currently selected, replacing it with silence instead of removing it.
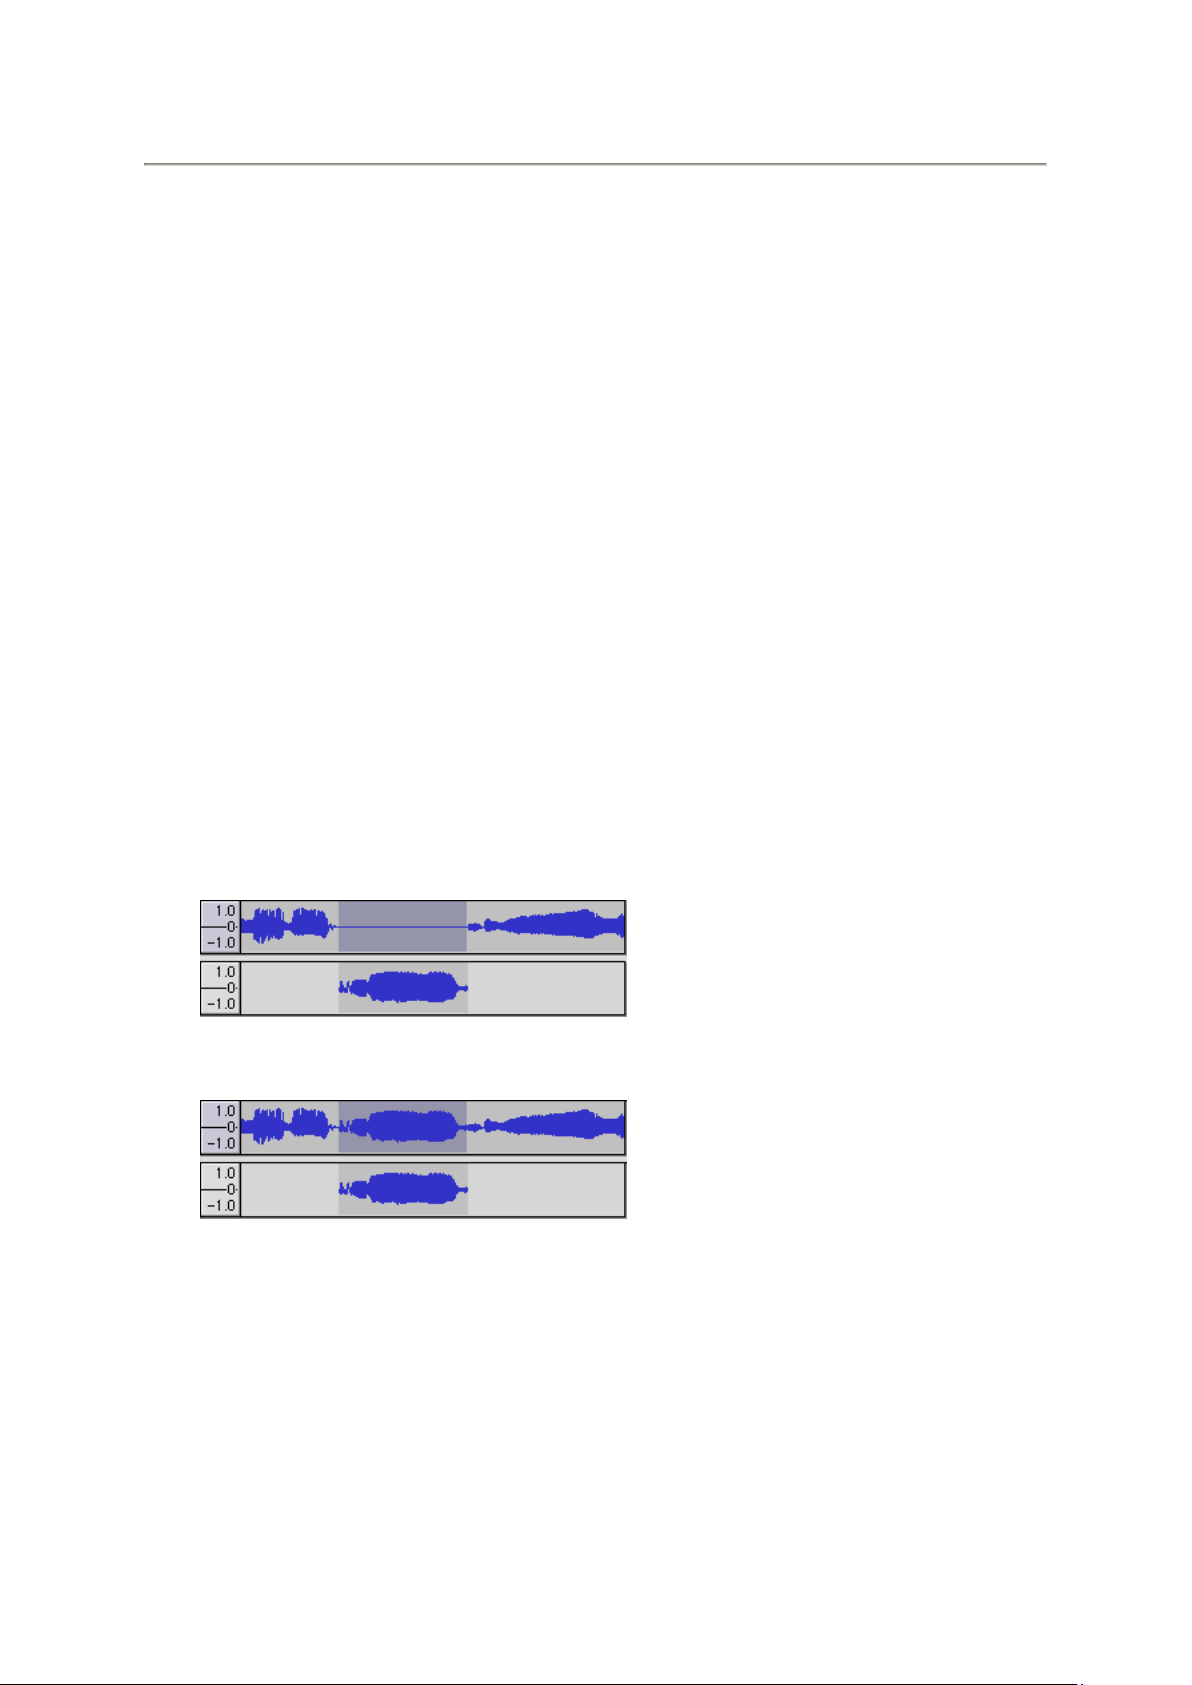
Split - Moves the selected region into its own track or tracks, replacing the affected portion of the
original track with silence. See the figure below:
Duplicate - Makes a copy of all or part of a track or set of tracks into new tracks. See the figure below:
Select ... > All - Selects all of the audio in all of the tracks in the project.
Select ... > Start to Cursor - Selects from the beginning of the selected tracks to the cursor position.
Select ... > Cursor to End - Selects from the cursor position to the end of the selected tracks.
Find Zero Crossings - Modifies the selection slightly so that both the left and right edge of the
selection appear on a positive-slope zero crossing. This makes it easier to cut and paste audio
without resulting in an audible clicking sound.

16
Selection Save - Remembers the current selection (or cursor position), allowing you to restore it later.
Selection Restore - Restores the cursor position to the last position saved by "Selection Save".
Move Cursor ... > to Track Start - Moves the cursor to the start of the current track.
Move Cursor ... > to Track End - Move the cursor to the end of the currently selected track.
Move Cursor ... > to Selection Start - Moves the cursor to the start of the current selection.
Move Cursor ... > to Selection End - Moves the cursor to the end of the current selection.
Snap-To ... > Snap On - Enable Snap-To mode. When Snap-To mode is enabled, the selection will be
constrained to the nearest interval on the time scale, by default the nearest second. So if you click
and drag from 4.2 seconds to 9.8 seconds, it will result in a selection from 4 seconds to 10 seconds,
exactly. You can change the units that are snapped to using the "Set Selection Format" option in the
View Menu.
Snap-To ... > Snap Off - Turns Snap-To mode off letting you select arbitrary ranges of time
Preferences... - opens the Preferences dialog.
View Menu
Zoom In - Zooms in on the horizontal axis of the audio, displaying more detail about less time. You
can also use the zoom tool to zoom in on a particular part of the window.
Zoom Normal - Zooms to the default view, which displays about one inch per second.
Zoom Out - Zooms out, displaying less detail about more time.
Fit in Window - Zooms out until the entire project just fits in the window.
Fit Vertically - Resizes all of the tracks vertically so they all fit inside of the window (if possible).
Zoom to Selection - Zooms in or out so that the selection fills the window.
Set Selection Format - lets you choose the formatting that is displayed at the bottom of the window
indicating the current selection time. Options include film, video, and audio CD frames, seconds +
samples, or pure time. If you turn on Snap-To mode in the Edit Menu, the selection will snap to the
frames or other quantization you have selected in this menu.
History... - Brings up the history window. It shows all the actions you have performed during the
current session, including importing. The right-hand column shows the amount of hard disk space your
operations used. You can jump back and forth between editing steps quite easily by simply clicking on
the entries in the window, the same as selecting Undo or Redo many times in a row. You can also
discard Undo history to save disk space. The history window can be kept open while you work.

17
Float Control Toolbar - moves the Control Toolbar out of the window and into its own floating
window, so you can position it wherever you want. The menu item changes to Dock Control Toolbar,
which you can use to put the toolbar back into the main window.
Float Edit Toolbar - moves the Edit Toolbar out of the window and into its own floating window, so
you can position it wherever you want. The menu item changes to Dock Edit Toolbar, which you can
use to put the toolbar back into the main window.
Float Meter Toolbar - does the same thing for audacity's VU meters which you use to set recording
levels and adjust playback.
Float Mixer Toolbar - moves the Mixer Toolbar out of the window and into its own floating window
as above.
Project Menu
Import Audio... - This command is used to import audio from a standard audio format into your
project. Use this command if you already have a couple of tracks and you want to add another track
to the same project, maybe to mix them together. You cannot use this option to import Audacity
Projects. The only way to combine two Audacity Projects is to open them in separate windows, then
copy and paste the tracks.
Import Labels... - This command takes a text file which contains time codes and labels, and turns
them into a Label Track.
Import MIDI... - This menu command imports MIDI files and puts them into a MIDI Track. Audacity
can display MIDI files, but cannot play, edit, or save them yet.
Import Raw Data... - This menu command allows you to open a file in virtually any uncompressed
format. When you select the file, Audacity will analyze it and try to guess its format. It will guess
correctly about 90% of the time, so you can try just pressing "OK" and listening to the result. If it is
not correct, however, you can use the options in the dialog to try some other possible encodings. At
the beginning of your imported track(s), you may notice a little bit of noise. This is probably the file's
header, which Audacity was not able to parse. Just zoom in and select the noise with the Selection
Tool, and then choose Delete from the Edit Menu.
Edit ID3 Tags... - Opens a dialog allowing you to edit the ID3 tags associated with a project, for MP3
exporting.
Quick Mix - This command mixes all of the selected tracks together. If you are mixing stereo tracks,
or mixing tracks that are marked as Left or Right channel, the result will be a stereo track (two
channels), otherwise the result will be mono. Your tracks are implicitly mixed whenever you hit the
Play button and whenever you export. This command offers a way to do it permanently and save the
results to disk, saving on playback resources.
Note that if you try to mix two very loud tracks together, you may get clipping (it will sound like pops,
clicks, and noise). To avoid this, drag the gain slider on the tracks down to reduce their volume
before mixing.

18
New Audio Track - This creates a new empty Audio Track. This command is rarely needed, since
importing, recording, and mixing automatically create new tracks as needed. But you can use this to
cut or copy data from an existing track and paste it into a blank track. If that track was at a non-default
rate then you may need to use Set Rate from the Track Pop-Down menu to set the correct sample rate.
New Stereo Track - same as above, but creates a stereo track. You can also create a stereo track by
joining two tracks using the track pop-down menu.
New Label Track - This creates a new Label Track, which can be very useful for textual annotation.
New Time Track - This creates a new Time Track, which is used to vary the speed of playback over time.
Remove Tracks - This command removes the selected track or tracks from the project. Even if only
part of a track is selected, the entire track is removed. You can also delete a track by clicking the X in
its upper-left corner. To cut out only part of the audio in a track, use Delete or Silence.
Align Tracks... - All the Align functions work on whole tracks or groups of tracks, not on selections,
even if they span across multiple tracks. They all operate by time-shifting tracks (moving them left or
right), making it easier to synchronize tracks or get rid of silence at the beginning. The cursor or
selection stays in the same place unless you use "Align and move cursor..." below:
Align and move cursor... - same as the functions above, except that the cursor or selection is moved
along with the tracks. That allows you to shift the tracks without losing your relative place.
Add Label at Selection - This menu item lets you create a new label at the current selection. You can
title the label by typing with the keyboard and then hitting "Enter" when you're done.
Add Label at Playback Position - This menu item lets you create a new label at the current location
where you are playing or recording. Do this if you want to mark a certain passage while you're
listening to it. You can title the label by typing with the keyboard and then hitting "Enter" or
"Return" when you're done. Only available whilst audacity is playing.
Generate Menu
If you choose an item from the Generate menu when there are no tracks in a project, a new track is
created. Otherwise, the current track is used. If a track is selected and the cursor is placed in a single
place in the track audio is inserted at the cursor position. The default duration is 30 seconds. The
audio created will replace the any selection, otherwise it is inserted into the track, shifting up later
parts of the track.
Silence - inserts silence
Tone... - you can create a Sine wave, Square wave, or Sawtooth wave.
White Noise - inserts random audio samples, which sounds like pure static.
Any items which appear after these three built-ins are VST, Ladspa, or Nyquist plug-ins. It is
possible for a poorly written plug-in to crash Audacity, so always save your work before using
a plug-in. Note that any effect that doesn't take any audio as input will automatically be
placed in the Generate menu.

19
Effect Menu
The items in this menu only work when you have audio selected. Audacity does not have any real-time
effects; you must select the audio, apply the effect, and then listen to the results. Most effects have a
Preview button. Clicking on this button plays up to three seconds of audio, allowing you to hear what it
will sound like after the effect is applied. This is useful for fine-tuning the effect parameters.
Repeat Last Effect - selecting this command is a shortcut to applying the most recent effect with the
same settings. This is a convenient way to quickly apply the same effect to many different parts of a
file.
Amplify - changes the volume of the selected audio. If you click the "Allow clipping" checkbox, it will
let you amplify so much that the audio ends up beyond the range of the waveform, and is clipped
(distorted). The default value when you open the effect is to amplify so that the loudest part of the
selection is as loud as possible without distortion.
Bass Boost - enhances the bass frequencies in the audio.
Change Pitch - changes the pitch/frequency of the selected audio without changing the tempo.
When you open the dialog, the starting frequency is set to Audacity's best guess as to the frequency
of the selection. This works well for recordings of singing or musical instruments without background
noise. You can specify the pitch change in one of four different ways: musical note, semitones,
frequency, or percent change.
Change Speed - changes the speed of the audio by resampling. Making the speed higher will also
increase the pitch, and vice versa. This will change the length of the selection.
Change Tempo - changes the tempo (speed) of the audio without changing the pitch. This will
change the length of the selection.
Compressor - compresses the dynamic range of the selection so that the loud parts are softer while
keeping the volume of the soft parts the same. You can optionally normalize the recording
afterwards, resulting in the entire piece having higher perceived volume.
Echo - very simple effect that repeats the selection with a decay, sounding like a series of echoes.
This effect does not change the length of the selection, so you may want to add silence to the end of
the track before applying it (using the Generate Menu).
Equalization - Boost or reduce arbitrary frequencies. You can select one of a number of different
curves designed to equalize the sound of some popular record manufacturers, or draw your own
curve.
Fade In - fades the selection in linearly
Fade Out - fades the selection out linearly
FFT Filter - similar to Equalization, lets you enhance or reduce arbitrary frequencies. The curve here
uses a linear scale for frequency.

20
Invert - Flips the waveform vertically, the same as a phase inversion in the analogue domain.
Noise Removal - This effect lets you clean up noise from a recording. First, select a small piece of
audio that is silent except for the noise, select "Noise Removal", and click on the "Get Noise Profile"
button. Then select all of the audio you want filtered select "Noise Removal" again, and click the
"Remove Noise" button. You can experiment with the slider to try to remove more or less noise. It is
normal for Noise Removal to result in some distortion. It works best when the audio signal is much
louder than the noise.
Normalize - allows you to correct for DC offset (a vertical displacement of the track) and/or amplify
such that the maximum amplitude is a fixed amount, -3 dB. It's useful to normalize all of your tracks
before mixing. If you have a lot of tracks, you may then need to use the track gain sliders to turn
some down.
Nyquist Prompt - for advanced users only. Allows you to express arbitrary transformations using a
powerful functional programming language. See the Nyquist section of the Audacity website for
more information.
Phaser - the name "Phaser" comes from "Phase Shifter", because it works by combining phase-
shifted signals with the original signal. The movement of the phase-shifted signals is controlled using
a Low Frequency Oscillator (LFO).
Repeat - repeats the selection a certain number of times. This operation is quite fast and space-
efficient, so it is practical to use it to create nearly-infinite loops.
Reverse - This effect reverses the selected audio temporally; after the effect the end of the audio
will be heard first and the beginning last.
Wahwah - uses a moving bandpass filter to create its sound. A low frequency oscillator (LFO) is used to
control the movement of the filter throughout the frequency spectrum. Adjusts the phase of the left
and right channels when given a stereo selection, so that the effect seems to travel across the speakers.
Plugins 1 to 15 ... etc. These submenus contain any VST, Ladspa, or Nyquist plug-ins loaded by
audacity. It is possible for a poorly written plug-in to crash Audacity, so always save your work
before using a plug-in effect.
Analyze Menu
Plot Spectrum - To use this feature, first select a region of audio from a single track, then select "Plot
Spectrum". It opens up a window that displays the Power Spectrum of the audio over that region,
calculated using the Fast Fourier Transform. The graph represents how much energy is in each
frequency. As you move the mouse over the display, it shows you the nearest peak frequency. This
window can also display other common functions that are calculated using the Fast Fourier
Transform, including three versions of the Autocorrelation function. The Enhanced Autocorrelation
function is very good at identifying the pitch of a note.
The Analyze menu is intended for effects and plug-in effects that do not modify the audio, but
simply open a dialog with some descriptive information. Audacity also supports Analyze commands
that create annotations in a Label Track.

21
Help Menu
About Audacity - displays the version number and credits. If you compiled Audacity yourself, check
here to verify which optional modules were successfully compiled in.
Specifications
TURNTABLE
L-90X
Type
Belt drive
Drive motor
DC motor
Speed
33rpm, 45rpm
Wow and flutter
< 0.25% W (RMS)
Turntable platter
332mm
Cartridge
Type
Dual-moving-magnet type stereo phone cartridge
Stylus
0.6 mil
Optimum tracking force
3~4 grams
Output
2.5mV+-3dB at 1kHz
Frequency response
0+-3dB at 10kHz
GENERAL
ADAPTOR
AC 100-240V, 50-60HZ
PRODUCT
DC 12V
Audio output (Line Out)
500mV
Power consumption
6W (max.)
Dimension
450(W) X 140(H) X 352(D)
Net weight
5.62 kgs
* There’s no standby mode, to save the energy, please turn off the apparatus if not using it.
5. Guarantee
Lenco offers service and warranty in accordance with the European law, which means that in case of
repairs (both during and after the warranty period) you should contact your local dealer.
Important note: It is not possible to send products that need repairs to Lenco directly.
Important note: If this unit is opened or accessed by a non-official service center in any way, the
warranty expires.
This device is not suitable for professional use. In case of professional use, all warranty obligations of
the manufacturer will be voided.

22
6. Disclaimer
Updates to Firmware and/or hardware components are made regularly. Therefore some of the
instruction, specifications and pictures in this documentation may differ slightly from your particular
situation. All items described in this guide for illustration purposes only and may not apply to
particular situation. No legal right or entitlements may be obtained from the description made in
this manual.
7. Disposal of the Old Device
This symbol indicates that the relevant electrical product or battery should not be
disposed of as general household waste in Europe. To ensure the correct waste
treatment of the product and battery, please dispose them in accordance to any
applicable local laws of requirement for disposal of electrical equipment or
batteries. In so doing, you will help to conserve natural resources and improve
standards of environmental protection in treatment and disposal of electrical
waste (Waste Electrical and Electronic Equipment Directive).
8. CE Marking
Products with the CE marking comply with the EMC Directive (2014/30/EU) and
the Low Voltage Directive (2014/35/EU) issued by the Commission of the European
Community.
9. Service
For more information and helpdesk support, please visit www.lenco.com
Lenco Benelux BV, Thermiekstraat 1a, 6361 HB, The Netherlands.

23
Nederlands
L-90X
LET OP:
Gebruik van bedieningen of afstellingen of uitvoer van procedures anders dan gespecificeerd in deze
documentatie kan leiden tot blootstelling aan schadelijke straling.
Dit apparaat dient uitsluitend te worden aangepast of gerepareerd door gekwalificeerd
onderhoudspersoneel.
VOORZORGSMAATREGELEN VOOR GEBRUIK
ONTHOUD DE VOLGENDE INSTRUCTIES:
1. Gebruik dit apparaat niet in de buurt van water.
2. Reinig het uitsluitend met een licht vochtige doek.
3. Bedek of blokkeer de ventilatie-openingen niet. Wanneer u het apparaat op een schap plaatst,
dient u 5 cm (2”) vrije ruimte rondom het gehele apparaat te behouden.
4. Installeer het product volgens de meegeleverde gebruikershandleiding.
5. *Nooit op de stroomadapter stappen of deze indrukken. Wees voornamelijk voorzichtig in de
buurt van de stekkers en het punt waar de kabel uit het apparaat komt. Plaats geen zware
voorwerpen op de stroomadapter, om beschadiging ervan te voorkomen. Houd het gehele
apparaat buiten bereik van kinderen! Wanneer kinderen met de voedingskabel spelen, kunnen
zij ernstig letsel oplopen.
6. *Haal de stekker uit het stopcontact tijdens onweer of wanneer u deze langere tijd niet
gebruikt.
7. Houd het apparaat uit de buurt van hittebronnen, zoals radiatoren, verwarmingen, kachels,
kaarsen en andere hittegenererende producten of naakte vlam.
8. Gebruik dit apparaat niet in de buurt van krachtige magnetische velden.
9. Elektrostatische ontlading kan normaal gebruik van dit apparaat verstoren. U hoeft het
apparaat in dit geval slechts te resetten en opnieuw op te starten volgens de
gebruikershandleiding. Wees voorzichtig tijdens bestandsoverdracht en doe dat in een
omgeving zonder statische verstoringen.
10. Waarschuwing! Steek nooit een voorwerp via de ventilatie- of andere openingen in het
product. Er is hoogspanning in het product aanwezig en als u er een object insteekt, kan dat
een elektrische schok veroorzaken en/of kortsluiting in de interne onderdelen. Mors om
dezelfde reden geen water of vloeistof op het product.
11. Gebruik het toestel niet in vochtige ruimtes, zoals badkamers, stomende keukens of in de buurt
van zwembaden.
12. Gebruik dit apparaat niet wanneer condensatie kan optreden.
13. Alhoewel dit apparaat met grote zorg gefabriceerd en verschillende keren geïnspecteerd is
voordat het de fabriek verlaat, is het nog steeds mogelijk dat er problemen optreden, zoals met
alle elektrische apparaten. Als u rook, een overmatige hitteontwikkeling of enig ander
onverwacht verschijnsel opmerkt, moet u onmiddellijk de stekker van het netsnoer uit het
stopcontact halen.
14. Dit apparaat moet aangedreven worden door een voedingsbron, zoals aangegeven op het
specificatieplaatje. Als u twijfelt over het type voeding dat gebruikt wordt in uw huis, raadpleeg
dan a.u.b. uw dealer of plaatselijk energiebedrijf.
15. *Het stopcontact moet in de buurt van de apparatuur zijn geïnstalleerd en eenvoudig te
bereiken zijn.
16. *Overbelast stopcontacten of verlengsnoeren niet. Overbelasting kan brand of een elektrische
schok veroorzaken.
17. *Apparaten met een Klasse 1 structuur dienen te worden aangesloten op een stopcontact met
een beschermende aardverbinding.
18. *Apparaten met een Klasse 2 structuur vereisen geen aardverbinding.
19. Houd ze uit de buurt van knaagdieren. Knaagdieren knauwen graag aan voedingskabels.
20. *Houd altijd de stekker vast wanneer u deze uit het stopcontact trekt. Trek nooit aan de
voedingskabel. Dit kan tot een kortsluiting leiden.

24
21. Vermijd om het toestel te plaatsen op een ondergrond die blootgesteld kan worden aan
trillingen of schokken.
22. Gebruik een zacht, droog doekje om het apparaat te reinigen. Gebruik geen oplosmiddelen of
op benzine gebaseerde vloeistoffen. U kunt een vochtig doekje met verdund
schoonmaakmiddel gebruiken om hardnekkige vlekken te verwijderen.
23. De leverancier is niet verantwoordelijk voor schade of verloren gegevens veroorzaakt door
storing, misbruik, modificatie van het apparaat of batterijvervanging.
24. Onderbreek nooit de verbinding wanneer het apparaat formatteert of bestanden overdraagt.
De gegevens kunnen anders corrupt of verloren raken.
25. Indien het apparaat een USB-afspeelfunctie heeft, moet de USB-geheugenstick rechtstreeks op
het apparaat worden aangesloten. Gebruik geen USB-verlengkabel, omdat die kan leiden tot
storingen met foutieve gegevens als gevolg.
26. Het apparaat mag niet worden blootgesteld aan druppels of spatten en zorg ervoor dat er geen
met vloeistof gevulde voorwerpen, zoals vazen, op of nabij het apparaat zijn geplaatst.
27. *Om de verbinding met de stroomaansluiting volledig te verbreken, moet de stekker van het
apparaat uit het stopcontact worden gehaald, omdat de stekker van het apparaat de
hoofdschakelaar is.
28. Indien het apparaat op batterijen kan werken, dan mogen de batterijen niet aan overmatige
hitte, zoals zonlicht, open vuur e.d. worden blootgesteld.
29. Aandacht voor het milieu is nodig bij het verwijderen van de batterijen.
30. Het apparaat kan alleen worden gebruikt in gematigde klimaten. Extreem koude of warme
omgevingen moeten worden vermeden.
31. Het nominale specificatielabel is te vinden op het paneel aan de onder- of achterkant van het
apparaat.
32. Dit apparaat is niet bestemd voor gebruik door mensen (inclusief kinderen) met fysieke,
zintuiglijke of geestelijke gebreken of gebrek aan kennis en ervaring, tenzij zij onder toezicht
staan of instructies hebben over het juiste gebruik van het apparaat hebben gekregen van de
persoon die verantwoordelijk is voor hun veiligheid.
33. Dit product is alleen voor niet-professioneel gebruik bedoeld en niet voor commercieel of
industrieel gebruik.
34. Verzeker u ervan dat het apparaat in een stabiele positie staat opgesteld. Schade, veroorzaakt
door het gebruik van dit product in een onstabiele positie, of door het niet naleven van
waarschuwingen of voorzorgsmaatregelen genoemd in deze handleiding, valt niet onder de
garantie.
35. Verwijder nooit de behuizing van dit apparaat.
36. Plaats dit apparaat nooit op andere elektrische apparatuur.
37. Dit product niet gebruiken of opslaan op plaatsen waar het wordt blootgesteld aan direct
zonlicht, hitte, buitensporig veel stof of trillingen.
38. Geef kinderen geen gelegenheid in aanraking met plastic zakken te komen.
39. Gebruik uitsluitend uitbreidingen/accessoires gespecificeerd door de fabrikant.
40. Laat alle reparaties over aan gekwalificeerd onderhoudspersoneel. Onderhoud is vereist als het
toestel hoe dan ook is beschadigd, zoals bijvoorbeeld het netsnoer of de stekker, wanneer er
vloeistof of een voorwerp in het apparaat is terechtgekomen, wanneer het apparaat is
blootgesteld aan regen of vocht, als het niet normaal werkt of is gevallen.
41. *Gebruik nooit een beschadigde voedingskabel of stekker of een los stopcontact. Dit vormt
namelijk een risico op brand of elektrische schokken.
42. Langdurige blootstelling aan luid geluid van persoonlijke muziekspelers kan leiden tot tijdelijke
of permanente gehoorbeschadiging.
INSTALLATIE
• Pak alle onderdelen uit en verwijder de beschermende materialen.
• *Sluit het apparaat niet aan op het stopcontact, voordat u de netspanning hebt gecontroleerd
en voordat alle andere aansluitingen zijn gemaakt.
* deze instructies zijn enkel van toepassing voor producten met een voedingskabel of een AC
voedingsadapter.

25
1. BESCHRIJVING VAN HET APPARAAT
1. Tegengewicht: gebruik het tegengewicht om de toonarm te balanceren.
2. Anti-skatingmechanisme: stelt de anti-skatewaarde in. Gebruik het anti-skatingmechanisme om
te voorkomen dat het pick-upelement richting het midden zwaait.
3. Toonarmhendel: om de toonarm neer te laten of op te heffen.
4. Toonarmvergrendeling: vergrendelt de toonarm wanneer de platenspeler niet wordt gebruikt.
5. Naaldkop: houder voor de afneembare naald. Wanneer de platenspeler niet wordt gebruikt,
dan is het raadzaam de afneembare beschermcover op de naald te plaatsen.
6. Plateau: dit is waar u de plaat legt om vervolgens af te spelen.
7. 33/45 TPM-schakelaar: stelt de afspeelsnelheid in.
8. Phono-aansluiting: audio-uitgang naar een versterker.
9. Aan-/uitschakelaar voorversterker: schakelt de voorversterker in of uit.
10. USB-poort: om de platenspeler aan te sluiten op uw computer.
11. Automatische stopschakelaar: deze functie is alleen bestemd voor 33 TPM platen. Wanneer het
einde van een plaat is bereikt, dan zal het draaiplateau automatisch stoppen met draaien.
12. DC-ingang
13. Aan/Uit-schakelaar: schakelt het apparaat in/uit. Om energie te besparen, schakel het apparaat
a.u.b. uit wanneer u deze niet gebruikt.
Belangrijke opmerking: Deze platenspeler is voorzien van een ingebouwde versterker om
beschadiging aan de platenspeler of aan uw audiosysteem te voorkomen. Sluit deze
platenspeler niet aan op uw audiosysteem met gebruik van de phone-ingang, omdat deze
ingang ook wordt versterkt.
26
2. Hoe te beginnen
Houd de platenspeler uit direct zonlicht. Wanneer de platenspeler niet wordt gebruikt, plaats deze
dan op een stevig platform waarvan de oppervlakte vlak en stabiel is, zodat de platenspeler niet kan
vallen. Berg de platenspeler zodanig op dat er geen voorwerpen op kunnen vallen, omdat druk de
platenspeler zal beschadigen of breken. Steek geen kleine voorwerpen in de ventilatieopeningen of
de openingen in de behuizing.
De platenspeler installeren
1. Open de doos en pak alle onderdelen uit.
2. Plaats het draaiplateau op de platenspeler en monteer de riem. De
riem zit onder het draaiplateau.
3. Installeer het patroon door deze op de toonarm te plaatsen en draai
de kurkentrekker van het anti-skatingmechanisme totdat het
patroon vast zit.
4. Monteer en stel het tegengewicht in.
Schroef het tegengewicht op de toonarm.
Ontgrendel de toonarm.
Verwijder de beschermcover van de naald. Zorg ervoor de naald niet aan te raken en laat
de naald zelf niets aanraken.
Hef de toonarm op uit de armsteun en laat de armsteun zakken.
Beweeg het tegengewicht voorzichtig een beetje naar links of rechts totdat de toonarm is
gebalanceerd en horizontaal zweeft.
Beweeg de toonarm terug naar de armsteun en vergrendel de armsteun zodanig dat de
toonarm tijdens de installatie niet kan bewegen.
Beweeg het zwarte plastic deel van het tegengewicht naar 0. De 0 dient te zijn afgesteld op
de rode lijn op de toonarm. Zorg ervoor het metalen deel niet te bewegen.
Draai het metalen deel naar links om de naalddruk te verhogen. Lenco raadt u aan de
naalddruk op 3 in te stellen.
5. De anti-skatewaarde instelllen. Lenco raadt een anti-skatewaarde in
van ongeveer de helft van de naalddruk; probeer verschillende
instelling uit totdat u het beste resultaat krijgt.
6. Stem de nummers van de scharnieren a.u.b. correct af en monteer de
stofkap.
7. Sluit de stroomadapter aan op het stopcontact.
8. Sluit de kabels van de lijnuitgang aan op een mixer of HiFi-systeem.
Belangrijke opmerking: Deze platenspeler is voorzien van een
ingebouwde versterker om beschadiging aan de platenspeler of aan
uw audiosysteem te voorkomen. Sluit deze platenspeler niet aan op uw audiosysteem met
gebruik van de phone-ingang, omdat deze ingang ook wordt versterkt.

27
3. ONDERHOUD
HET VERVANGEN VAN DE NAALD (FIG. A):
- Zet de toonarm vast d.m.v. de toonarmvergrendeling.
- Trek de oranje naaldhouder in de richting van de pijl naar
voren en verwijder deze.
- Installeer de nieuwe naald in omgekeerde volgorde.
HET DEMONTEREN VAN DE CARTRIDGE (FIG. B):
- Zet de toonarm vast d.m.v. de toonarmvergrendeling
- Verwijder de naald (zie paragraaf hierboven).
- Maak de schroeven, moeren en dichtringen los en de
naaldkop en het patroon kunnen vervolgens worden
gedemonteerd.
- Koppel de vier draadjes los bij de naaldkop.
EEN NIEUW PATROON INSTALLEREN
- Sluit de vier gekleurde draadjes aan zoals afgebeeld in
figuur B.
- Druk het patroon de naaldkop in.
- Installeer vervolgens de naald weer.
EN
NL
FIG A
FIG. A
FIG B
FIG. B
BACK VIEW OF HEADSHELL WIRING
ACHTERAANZICHT VAN NAALDKOPBEDRADING
WHITE
WIT
BLUE
BLAUW
RED
ROOD
GREEN
GROEN
BELANGRIJKE AANBEVELINGEN
Om maximaal van uw platen te genieten en deze lange tijd te kunnen gebruiken, adviseren wij u uw
platen te reinigen met een geïmpregneerde doek met een antistatisch product.
Wij wijzen u er om dezelfde redenen op dat ook uw naald regelmatig dient te worden vervangen
(ca. elke 250 uur).
Stof de naald van tijd tot tijd af met een zeer fijn borsteltje en een klein beetje alcohol (borstel van
achter naar voren over het patroon).

28
Algemene bediening
Platen afspelen
Stel de hoofdschakelaar op de achterzijde van de platenspeler in op de stand "aan". Open de stofkap
en leg de plaat op het draaiplateau. Als u een single wilt afspelen, vergeet dan niet eerst de single-
adapter te plaatsen.
Stel de correcte TPM-snelheid in
Verwijder de beschermcover van de naald
Ontgrendel de toonarm op de armsteun
Beweeg de toonarm naar de plaat en het plateau zal vervolgens beginnen te draaien
Plaats de toonarm voorzichtig op de plaat. Vergeet niet het armhendel te laten zakken
Als u een plaat tijdens het afspelen wilt onderbreken, hef dan het armhendel op. U kunt deze ook
terugkeren naar de armsteun om het afspelen van de plaat te stoppen. Wanneer het einde van een
plaat is bereikt, dan zal het plateau stoppen met draaien*.
* De automatische stopfunctie dient te zijn ingeschakeld.
De platenspeler voor het eerst aansluiten op een computer
Er zijn geen drivers vereist omdat deze platenspeler een plug&play apparaat is.
Voordat u de platenspeler aansluit op een computer, koppel deze eerst los van
uw mixer of HiFi-systeem.
De meegeleverde software is een applicatie van derden en Lenco behandelt
daarom geen vragen of problemen m.b.t. de software.
1. Schakel de computer in
2. Sluit de platenspeler aan op een AC-stopcontact
3. Stel de hoofdschakelaar op de achterzijde van de platenspeler in op de stand "aan".
4. Sluit de platenspeler aan wanneer de computer is opgestart. De computer zal nu de drivers
installeren.
5. U moet de Audacity software installeren nadat de drivers zijn geïnstalleerd.
Voor Windows gebruikers; download de meest recente software via
http://www.audacityteam.org
Voor MAC gebruikers; download de meest recente software via
http://www.audacityteam.org
Belangrijk: Controleer of uw computer de platenspeler herkent als een opname-apparaat.
Voornamelijk Windows heeft de neiging de platenspeler standaard in te stellen als een
afspeelapparaat. Als de platenspeler is ingesteld als een afspeelapparaat, dan kan Audacity uw
platen niet opnemen.
29
4. KORTE HANDLEIDING AUDACITY (PC-bewerkingsprogramma)
Voor de codering van uw platen naar MP3-formaat, download a.u.b. de software via de link
hieronder en volg de instructies.
www.audacityteam.org
Voordat u de Audacity software start
Zorg ervoor dat uw USB-draaitafel op de computer is aangesloten en dat zowel de computer als de
platenspeler op het elektriciteitsnet zijn aangesloten en aan staan.
De software installeren (PC)
1. Sluit uw platenspeler aan op een AC-stopcontact en sluit de USB-poort van de platenspeler
aan op uw computer.
2. Schakel de platenspeler in.
3. Het Windows-systeem zal een nieuw apparaat detecteren en aangeven dat het beschikbaar
is om te gebruiken.
De software installeren (MAC)
Volg de instructies van de Audacity website.
Softwareconfiguratie
1. Klik op Microphone (microfoon) in het submenu en selecteer “Stereo Mix”
Figuur 1: Selecteer “Stereo Mix”
2. Selecteer het menu “Edit” (bewerken) en vervolgens “Preferences” (voorkeur)
Selecteer het USB-audioapparaat onder de selectie “Recording” (opname) zoals afgebeeld. Selecteer
“Software Playthrough” (software doorspelen) om tijdens de opname audio te horen.
Opmerking: De USB-platenspeler kan onder een andere naam verschijnen in het Windows systeem.
Dit is afhankelijk van uw computermodel en besturingssysteem. Het zal 99% van de tijd “USB” in de
naam bevatten.

30
Figuur 2: Selecteer “USB Audio Device” (USB-audioapparaat) onder “Preferences” (voorkeur)
Nadat de bovenstaande instellingen zijn voltooid, bent u klaar voor de opname.
Als u nog steeds problemen hebt met het vinden van de USB-platenspeler, probeer dan uw
systeeminstellingen te controleren of de audio-ingangsinstellingen via het geluidspaneel aan te
passen.
Opmerking:
i. De meegeleverde Audacity software dient slechts ter referentie. Download a.u.b. de nieuwste
versie op de volgende website:
http://www.audacityteam.org
ii. Controleer a.u.b. de volgende website en download de proefsoftware voor meer software voor
geluidsbewerking.
http://www.bias-inc.com/
 Loading...