


40" Full High Definition LED TV
User Manual
www.lenco.com

CONTENTS
|
Important Safety Instructions |
4 |
|
|
|
|
|
|
|
|
Safety Information |
5 |
|
|
|
|
|
|
|
|
Preparation |
6 |
|
|
|
What is Included |
6 |
|
|
|
Front View |
7 |
|
|
|
Rear View |
8 |
|
|
|
Installing the Base Stand |
9 |
|
|
|
Removing the Stand for Wall-Mounting |
9 |
|
|
|
Remote Control |
10 |
|
|
|
|
|
|
|
|
Connecting External Devices |
11 |
|
|
|
|
|
|
|
|
Getting Started |
12 |
|
|
|
Initial set up |
12 |
|
|
|
General operation |
12 |
|
|
|
|
|
|
|
|
Basic Features |
13 |
|
|
|
|
|
|
|
How to Navigate menus-Selecting Source 13
Electronic Programme Guide (EPG) (DTV
Mode)
Teletext (ATV Mode)
Digital Teletext (DTV Mode)
Time Shift Function (DTV Mode)
Recording DTV Programme onto a USB
Storage Device
Timer Programming
Play Recorded Programme
Picture Management(ATV/DTV Mode)
Sound Management
Channel Management (ATV / DTV Mode)
Lock System management
Setup management
|
|
Entertainment |
29 |
|
|
|
Viewing Photo |
29 |
|
|
|
Listening to Music |
30 |
|
|
|
Viewing Movies |
30 |
|
|
|
My Text |
31 |
|
|
|
|
|
|
|
|
|
2 |
|
|
|
|
|
|
|
|
|
|
|
|
|
|
|
|
|
|
|
|
|
EN 3
IMPORTANT SAFETY INSTRUCTIONS
– All the safety and operating instructions should be read before this product is
operated.
–The safety and operating instructions should be retained for future reference.
–All warnings on the appliance and in the operating instructions should be adhered to.
–All operating and use instructions should be followed.
–The appliance should not be used near water or moisture – for
example, in a wet basement or near a swimming pool.
one wider than the other. A grounding plug has two blades and a third grounding prong. The wide blade
electrician for replacement of the obsolete outlet.
particularly at the plugs, convenience receptacles,
and at the point where they exit from the apparatus.
sold with the apparatus. When a cart or rack is used, use caution when moving the cart/ apparatus combination to avoid injury from tip-over.
any way, such as the power supply cord or plug is damaged, liquid has been spilled, or objects have fallen into the apparatus, or the apparatus has been exposed to rain or moisture, does not operate normally, or has been dropped.
 To reduce the risk of fire or electric shock, do not expose this apparatus to rain or such as vases should not be placed on the apparatus.
The wall socket plug is used as disconnect device, the disconnect device shall remain
readily operable.
To prevent injury, this apparatus must be securely attached to the floor/wall in accordance with the installation instruction.
alert the user to the presence of non-insulated “dangerous voltage” within the product’s sk of electric shock.
ed personnel.
triangle is intended to alert the user to the presence of important operating and maintenance instructions in the literature accompanying the appliance.
This equipment is a Class II or double insulated electrical appliance. It has been designed in such a way that it does not require a safety connection to electrical earth.
This product contains electrical or electronic materials. The presence of these materials may, if not disposed of properly, have potential adverse effects on the environment and human health.
Presence of this label on the product means it should not be disposed of as unsorted waste and must be collected separately. As a consumer, you are responsible for ensuring that this product is disposed of properly.
HDMI:
or registered trademarks of HDMI Licensing LLC.
EN 4

SAFETY INFORMATION
Electrical Safety
! |
|
|
|
|||||||||||||||
|
|
|
|
|
|
|
|
|
|
|
|
|
|
|
|
|
||
|
! |
! |
|
|
|
" |
|
|
||||||||||
|
|
|
|
|
|
|
|
|
|
|
|
|
|
|
|
|
||
|
# ! |
|
|
|
|
|
||||||||||||
|
# ! |
|
|
|
|
|
|
|||||||||||
|
$ ! " |
|
|
|
|
|
|
|||||||||||
# |
|
! |
% |
|
|
|||||||||||||
|
|
" |
|
! |
|
|
|
|
|
|
|
|
|
|
||||
# |
|
|
|
|
# & |
|
|
|||||||||||
|
|
" |
|
|
|
|
|
|
|
|
|
|||||||
|
' |
|
|
" |
|
|
|
|||||||||||
|
% |
|||||||||||||||||
|
|
|
! |
|
|
" |
|
|
|
|
|
|||||||
# ! |
|
! |
|
|
* ! ! |
|
||||||||||||
|
! + ; < |
|||||||||||||||||
|
! |
|
|
|
|
|
|
|
|
|
|
|
|
|
||||
! " ! |
|
|
|
|
||||||||||||||
|
% |
|
|
|
|
|
|
|
|
|||||||||
|
# " % < |
|
|
|
|
|
|
|
|
|||||||||
Physical Safety
|
# " ! " ! = |
|
||||||||||||
|
>?++@ |
|
|
|
|
|
|
|
|
|
||||
|
# " |
|
|
|
" |
|
||||||||
|
|
|
|
|
|
|
|
|
|
|
|
|
|
|
|
|
|
# ! J |
|
|
|||||||||
# |
|
! |
|
|
||||||||||
|
> < |
@ |
|
|
|
|
|
|
|
|||||
# |
|
K * O K |
||||||||||||
|
O |
|||||||||||||
|
! Q ! |
|||||||||||||
|
< |
|
|
|||||||||||
|
' " |
|
|
|
|
|||||||||
X |
|
|
||||||||||||
|
Y |
! < ! Z ! |
|
|||||||||||
|
|
|
|
|||||||||||
|
|
|
|
|
|
|
|
|
|
|
|
|
||
|
Z |
! |
|
|
[ ! \ |
|
||||||||
|
|
|
% \ |
|
|
|||||||||
|
O |
|
! |
! |
|
|
|
|
||||||
PREPARATION
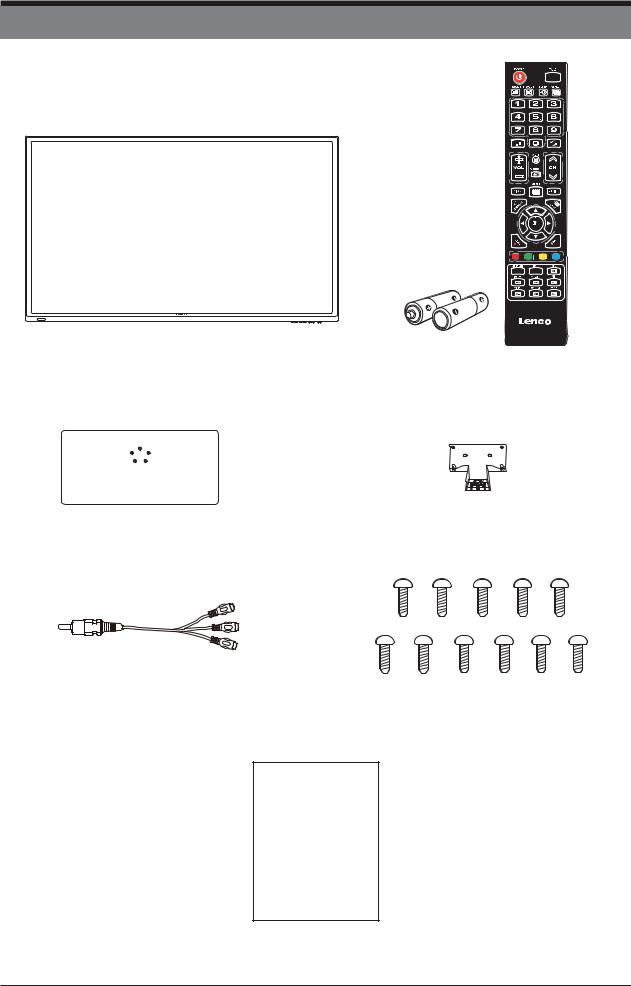
 What is Included
TV Set |
Remote Control with Batteries |
Base Stand |
Stand Support |
Mini YPbPr connection cable |
Eleven Screws |
Quick
Start Guide
Quick Start Guide
EN 6
PREPARATION
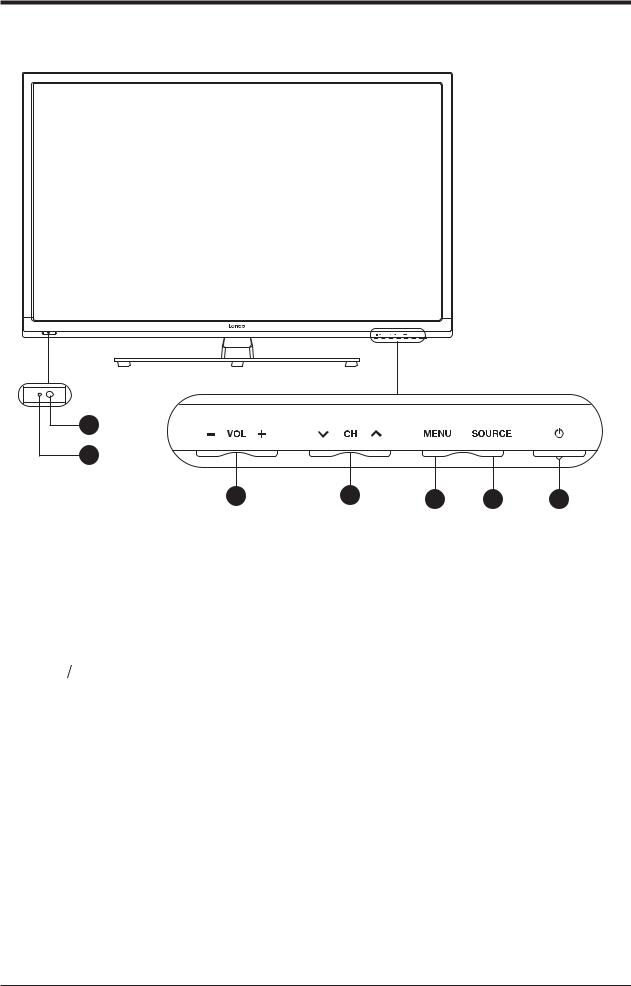
 Front View
1
2
3 |
4 |
5 |
6 |
7 |
1.IR (Infrared Receiver)
Receive IR signals from the remote control.
2.POWER Indicator
Illuminates blue when the TV is turned on. Illuminates red when the TV is in standby mode.
3.VOL +/-
Press to adjust the volume.
4.CH
Press to select a channel.
5.MENU
Display the OSD (on screen display) menu.
6.SOURCE
Press to select among different input signal sources.
7.POWER
Switch the TV between On/Standby mode.
EN 7
PREPARATION
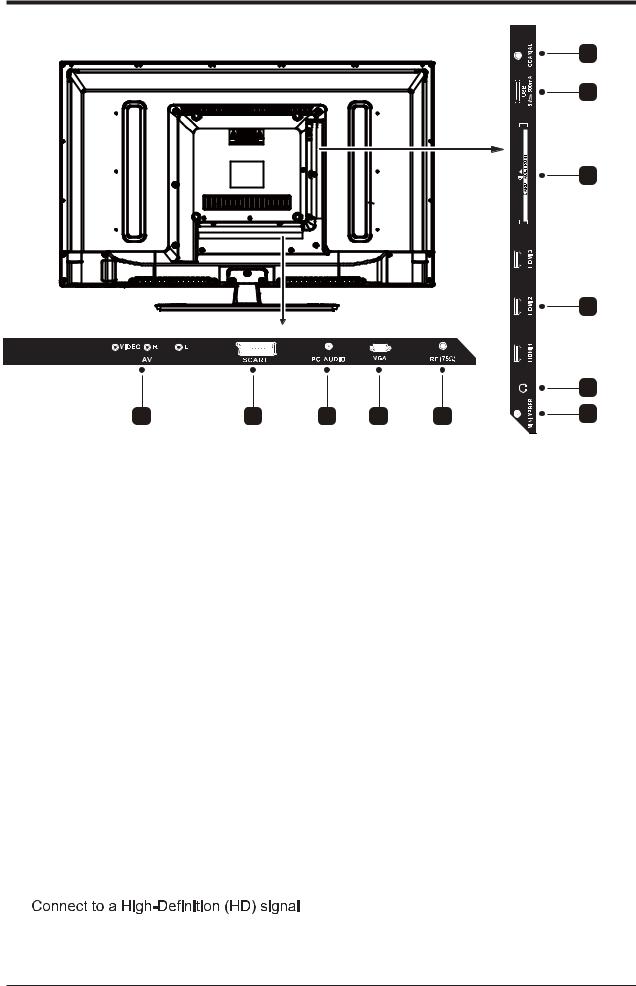
 Rear View
11
10
9
8
|
|
|
|
|
7 |
1 |
2 |
3 |
4 |
5 |
6 |
1.AV Input
Connect to the composite VIDEO and AUDIO (L/R) output sockets on external video devices.
2.SCART Socket
Inputs or outputs for external devices.
3.PC AUDIO Input
Connect to a computer audio output.
4.VGA Input
Connect to a computer or other devices with a VGA interface.
5.RF(` {) Input
| >` { $}~X$}@" Y} %
6.MINI YPBPR
Connect to AV devices with component (Y/P /Pr) video and audio output sockets. COMPONENT&VIDEO share with AUDIO IN(L/R).
7.Headphone Socket
| $
8.HDMI Inputs
9.CI Slot
Used to insert a CI card. A CI card allows you to view all the channels that you
10.USB Port
Connect to a USB storage device to play compat audio and photo files. (USB mode).
11.COAXIAL Digital Audio Output
Connect to the audio socket on the digital audio system.
output device.
EN 8
PREPARATION
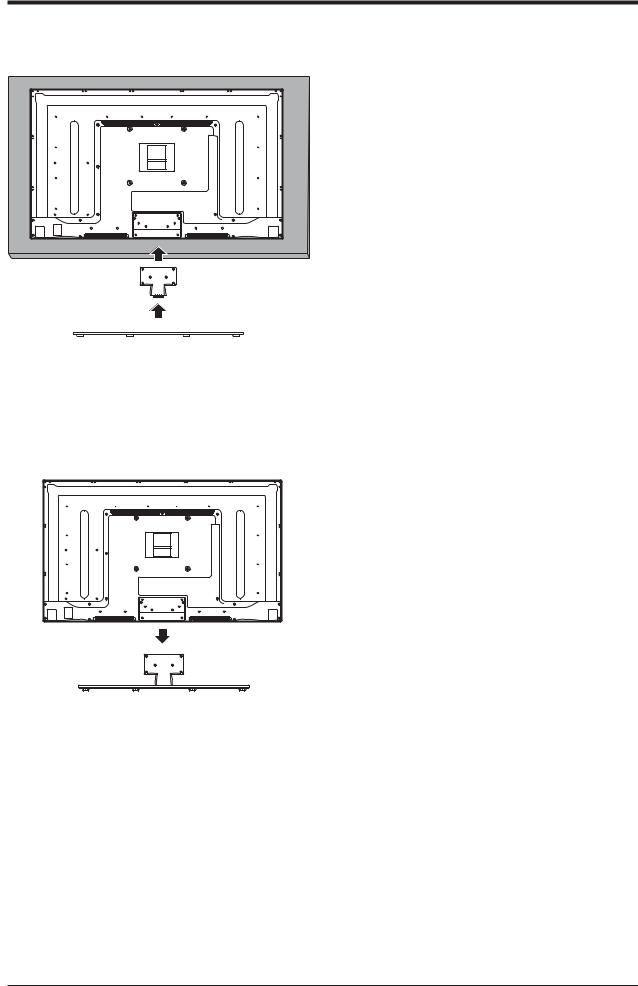
 Installing the Base Stand
1. Lay the TV face-down on a flat, cushioned surface to avoid damaging or scratching.
2. Fix the stand support to the TV using the 6 pcs provided screws.
3. Fix the base stand to the TV using the 5 pcs provided screws.
 Removing the Stand for Wall-Mounting
1. Lay the TV face-down on a flat, cushioned surface to avoid damaging or scratching.
2. Untighten the 6 pcs screws holding the stand assembly and remove them.
3. Attach the wall-mount bracket to the TV using the mounting holes on the back of the TV. Mount this TV according to the instructions included in the wall-mount bracket.
WARNING: This apparatus is intended to be supported by UL Listed wall mount bracket.
EN 9

'Y 'OYO Q&
 Remote Control
ۥ
 Loading...