


Model: TDV-1000BK
User manual Portable DVD player/tablet with 10” touchscreen Gebruikershandleiding voor draagbare dvd-speler/tablet met 10 inch touchscreen Bedienungsanleitung für tragbaren DVD-Player/ tragbares Tablet mit 10" Touchscreen Mode d’emploi - Tablette/lecteur de DVD portatif avec écran tactile de 10 pouces Manual de usuario de reproductor DVD portátil/tablet con pantalla táctil de 10”
Index |
|
English ...................................................................................................................................................... |
3 |
Nederlands.............................................................................................................................................. |
23 |
Deutsch................................................................................................................................................... |
43 |
Français .................................................................................................................................................. |
64 |
Español ................................................................................................................................................... |
84 |
2
English |
TDV-900 |
|
|
SAFETY WARNING
Before operating the unit, please read this manual thoroughly.
Placement
•Do not place the product on an unstable cart, stand, tripod, bracket, table or shelf.
•Do not expose the product to direct sunlight and other sources of heat.
•Do not handle liquids near or on the product.
•Do not put the product near appliances that create magnetic fields.
•Do not put heavy objects on top the product.
•Do not use a microwave to dry the product.
•Do not let the product fall.
Power Supply
•Check that products operating voltage is identical with the local 5V/2.0A power adaptor.
•Please unplug power supply and aerial plug when the weather is thunder storm or lightning.
•Please unplug power supply when there is nobody at home or didn’t use over a long period of time.
•Please keep power cord from physical or mechanical damage.
•Please use original power supply.
•Fever after charging or long - time use is a normal phenomenon.
Temperature
•Do not place the product near or over a radiator or a heater register.
•If your product is suddenly moved from a cold to a warm place, unplug the power cord for at least two hours so that moisture that may have formed inside the unit can dry completely.
Humidity
•Do not expose machine to rain, damp or place near water.
•Ensure the indoor drying, cool.
Ventilation
•Please use dry soft cloth to clean the product. Do not use alcohol to clean the product.
Battery
•Please do not unplug the battery by yourself.
•Please do not charge the product for too long time.
3
Storage
•To avoid damage to your Micro SD card/USB storage, please use setting/storage/SD Card (USB storage) unmount storage before unplugging your Micro SD card or USB storage.
Warning:
Power supply adaptor (For EU only)
Manufacturer: Shenzhen Mass Power Electronics Limited
Model number: NBS12E050200HE
Use only the power supply listed in the user instructions.
4
Features
Browse the Web.
Visit your favorite websites
Check your e-mail
Keep in touch with friends and family
Watch YouTube™ videos
Browse the world’s most popular video-sharing community
Read your favorite books
Download thousands of books.
Discover thousands of apps for Android™
Games, applications, and more with play store (need for customer installed).
Connect to the Internet wirelessly
High-speed Wi-Fi 802.11 a/b/g/n networking
Enjoy in the comfort of your living room
Enjoy your media library anywhere
Portable powerhouse plays popular music, video, and photo formats microSD memory card reader Increase your storage capacity (up to 32 GB supported)
Automatic orientation detection
Read any way you want; the display adjusts automatically!
Intergrated DVD player
Compatible with DVD, DVD±RW, VCD, CD, CD-R/RW, MP3
5
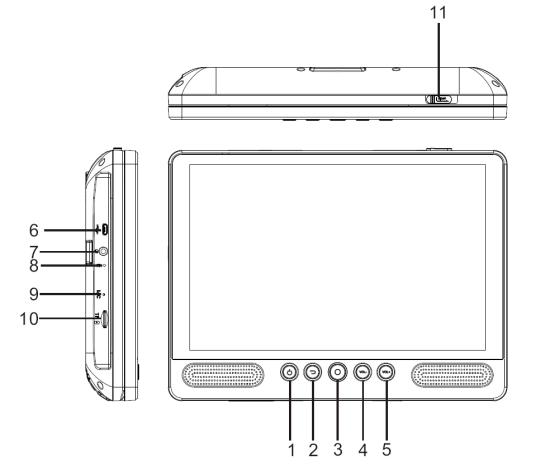
Unit at a Glance
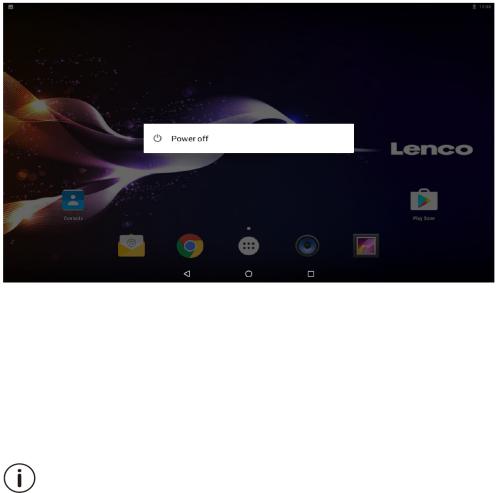
1.POWER
Press to turn the unit on or off, or to turn the screen on or off.
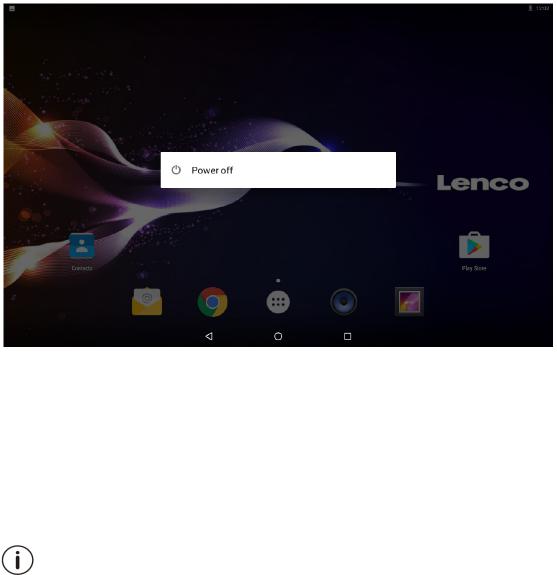
a.To turn the unit on, press and hold the power button.
b.To turn the unit off, press and hold the power button to access the Power Off menu, then you can tap “Power off” to turn off the unit.
When in DVD mode, power button is unavailable to be used. pls return to the Tablet interface for powering off.
2.Return
Press this button return to the previous page.
3.Home
4.VOL-
Decreases the volume.
5.VOL+
Increase the volume.
6
6.USB HOST
Connect to a USB device or a computer to transfer data (e.g. music, videos, photos, files).
7.Headphone
Audio output connection for headphones.
8.RESET
Re-start and reset the unit
9.MIC
10.TF CARD
Insert external TF memory cards here.
11. OPEN Switch
Open the disc tray
7
Getting Started
Turning the Tablet on or off
To turn the tablet on:
Press and hold the Power key until the LCD screen turns on. Wait until the home screen appears; the tablet is now ready for use.
To turn the tablet off:
1. Press and hold the Power key until the Device Options menu appears.
2. Touch ok the screen to turn off the tablet.
Turning the Screen On or off (Standby)
When the tablet is on, you can turn off the screen to conserve battery power. Simply press the Power key once to turn the screen off. Press the Power key again to turn the screen back on.
To conserve battery power, the screen can be set to turn off automatically when the tablet is not in use (between 1 minute and 30 minutes).
This Screen timeout option can be found in the Display menu.
8
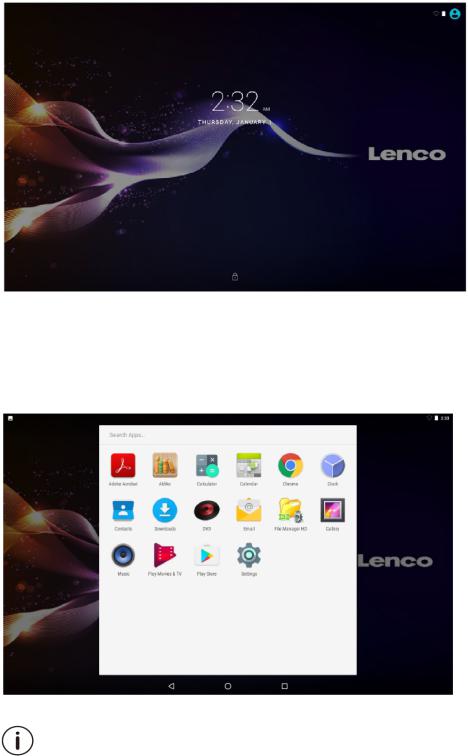
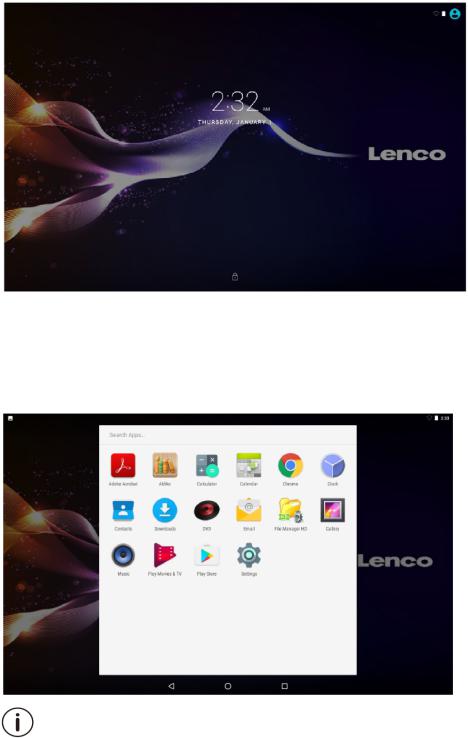
Getting Started Unlocking the Screen
When the screen turns off, you will have to unlock the screen, when you turn it back on. To unlock the screen, swipe up the lock icon.
About Applications
To open an application, touch the application icon on the home screen or in the Launcher where you can tap the icon right up on the home screen to get in..
Launcher screen:
The screen shown above is for illustrative purposes only. Reserves the right to modify and improve the final list of applications available on the tablet.
9

About Applications Preinstalled Applications
Some applications have been installed on your tablet for your convenience. These applications include:
Browse the web.
Perform simple mathematical operations.
Check your e-mail.
Play music.
Access the Settings menu to adjust the tablet’s options.
Access DVD mode
Preinstalled Applications Installing Applications
You can also download an install additional applications from the device’s applications marketplace, the web browser, or other sources.
The tablet must be set to allow installation of applications from non-Market sources. The Unknown sources option can be set in the Application settings menu.
10
Language setting
Open the Settings app into the language settings, select the language you want
Date and time settings
Open the settings app into the time setting, select the desired time and format you want
11
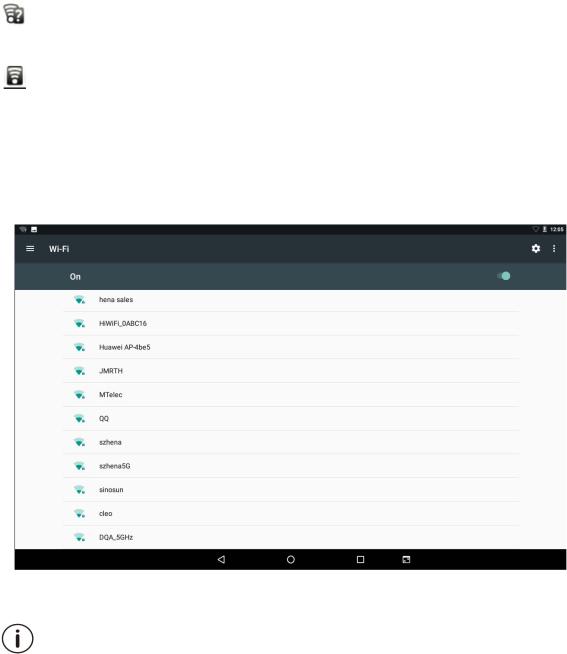
Connect to a Wi-Fi network
The Notification bar displays icons that indicate your tablet’s Wi-Fi status.
Notification that an open Wi-Fi network is in range.
Connected to a Wi-Fi network (waves indicate connection strength).
[no icon] There are no Wi-Fi networks in range, or the Wi-Fi radio is off. 1. Turn on the Wi-Fi radio if it is not already on. To turn on Wi-Fi:
a.Go to the Home screen: Press the Home key.
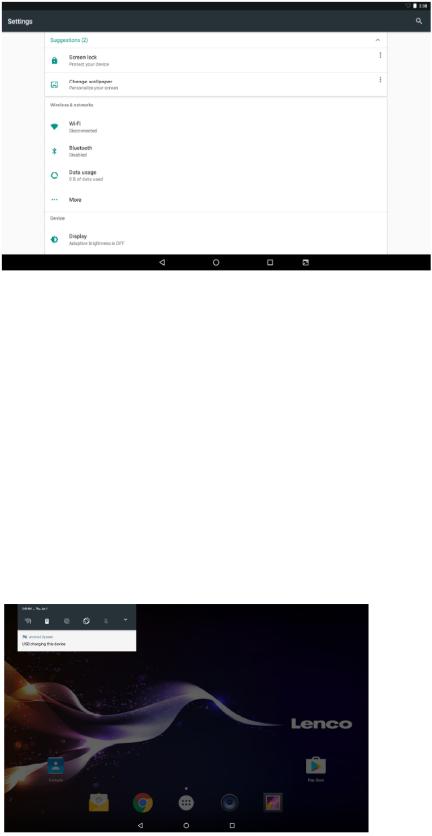
b.Open the Settings menu: tap the icon right up on the home screen to get into the launcher, then touch Settings icon.
c.Open the Wireless & networks menu: Slide the icon to ON status.
When Wi-Fi is on, the tablet will look for and display a list of available Wi-Fi networks.
If a network that you have connected to previously is found, the tablet will connect to it. If you don’t see your network in the list, you can force the tablet to re-scan. To scan for networks, tap the Menu key, and then touch Scan.
12
Connect to a Wi-Fi network
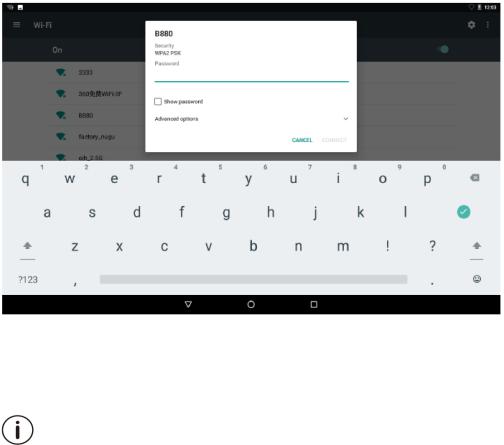
2. Select an available Wi-Fi network to connect to:
In the same Wi-Fi settings menu above, touch a network in the list.
If the network is open, the tablet will prompt you to confirm connection to the network. Touch Connect to confirm.
If the network is secured (as indicated by a Lock icon), the tablet will prompt you to enter a password or other credentials. Touch the Wireless password box to show the on-screen keyboard and then use it to enter the password. Touch Connect to confirm.
When you have successfully connected to a Wi-Fi network, the Notifications bar at the top of the screen will show a Wi-Fi signal indicator.
To learn about how to add a Wi-Fi network when it is not in range or when the router is set to obscure the network name (SSID); or to configure advanced Wi-Fi options, please refer to the manual.
13
Note:
Reset function is only valid when the product in charging status.so pls connect the power adaptor when you want to Reset.
Optional Connections Connecting to a Computer
Connect the tablet to a computer to transfer files.
1. Connect your tablet to the computer.
With the included USB cable: Plug the small end of the cable into the USB 2.0 high speed connector of the tablet. Plug the large end of the cable into an available USB 2.0 high speed port on the computer.
2.When your tablet is connected, slide down the USB icon and then touch icon USB connected.
14
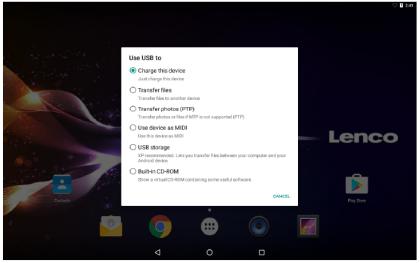
3. Mount the storage.
Touch “Media device (MTP)” to mount the tablet’s built-in storage. When it is mounted, you can copy files to or from your tablet.
Charging
Just charge this device.
File transfers
Transfer files to windows or Mac (MTP)
Photo transfer (PTP)
Transfer photos or files if MTP is not supported.
MIDI
Use device for MIDI input.
USB Storage
XP recommended. Lets you transfer files between your computer and your Android device.
GO TO Factory mode
You can go to factory mode to reset the tablet when you forgot the password.
Power off the tablet, then pressing POWER and VOL+ button for a few seconds until it shows a menu with 3 options in English language. One option in this menu isRecovery Mode.
Selecting the Recovery Mode, then a second menu appears with 12 options. After selecting Wipe all data / factory reset a third menu appears.
Selecting yesdelete all user data, then the tablet starts to wiping and formatting data. After that the device will return to the menu with 12 options.
15

DVD mode
Slide the OPEN switch to open the disc cover. Load the disc to the disc tray. Close the disc cover.
Press the “ ” to enter home screen, then tap DVD icon
  to playback the disc. During disc playback, 1--18 icons will appear.
16

1.Exit
Exit the DVD APP.
2.
Go to previous chapter/track to the beginning.
3.
Press  BUTTON allow skipping back at 5-level speed (X2->X4->X8->X16->X32->PLAY), press PLAY button return to normal playback.
4.
Play or pause the disc playback.
5.
Press  BUTTON allow skipping ahead at 5-level speed (X2->X4->X8->X16->X32->PLAY), press PLAY button return to normal playback.
6.
Go to next chapter/track.
7.■ Stop
Stop playing a disc.
8.VOL-
Decreases the volume.
9.VOL+
Increase the volume.
10.OK/Up/Down/Left/Right
11.0-9 NUM KEY
12.REPEAT
Press REPEAT during playback to select a desired repeat mode. DVD: you can play select repeat chapter/title/all.
CD/VCD: you can select repeat track/all.
Mp3: you can select repeat shuffle/single/repeat one/repeat folder/folder.
13. MENU
Return to DVD root menu (DVD) Return to VCD PBC menu. (VCD)
17
14. TITLE
Return to DVD title menu
15. Subtitle
Select a subtitle language programmed on a DVD (if available)
16. Audio
Select one of the audio sound tracks on a DVD
(if more than one is available) or select the audio output mode on a CD.
17. DISPLAY
To display the playtime and status information.
18
18. ZOOM
DVD/VCD: Use ZOOM to enlarge or shrink the video image.
1.Press ZOOM during playback or still playback to activate the Zoom function. The square frame appears briefly in the right bottom of the picture.
2.Each press of the ZOOM button changes the TV screen in the following sequence: 2xsize→3xsize→4xsize→1/2siz→1/3 size→1/4size→normal size
JPEG: Use ZOOM to enlarge or shrink the picture.
1.Press 'ZOOM'.
2.Used “ ” to enlarge, or “
 ” to shorten the picture.
Use the ▲▼◄► button to move through the zoomed picture.
19. ANGLE
DVD: Press ANGLE will change the view angle, on DVDs that support this feature.
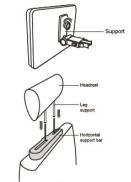
Mounting the DVD in a Car
Use the supplied mounting kit to install the DVD players on the back of the vehicle’s headrests.
1.Align the angled support’s bolt to the screw hole on the back of the DVD unit. Turn the bolt clockwise and secure the support.
2.The headrest off its leg supports. Align the horizontal support with the headrest leg slots and ensure the horizontal support rests securely on the top of the car seat. Reach the headrest.
19
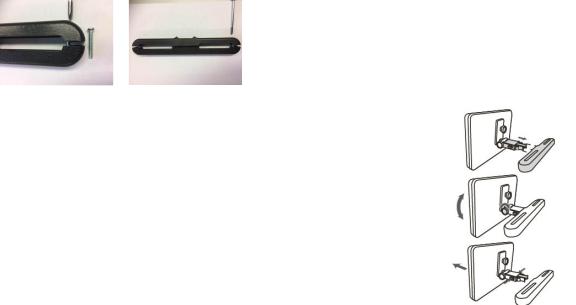
Remark: If the legs of the headrest are too thick for the opening of the horizontal support bar of the bracket, please unscrew the 4 screws of the support bar of the bracket to adjust the opening. In case the screws are too short, use the longer screws (provided in the giftbox).
3.Grip the DVD firmly with both hands and slot the angled support firmly into the support bar. It will click. Ensure the entire unit is secure.
4.Adjust the angle of the DVD unit, then secure by tightening the bolt on the right.
5.To remove the DVD from the horizontal support bar, support the DVD unit with one hand. With the other hand, firmly squeeze the release buttons either side of the angled support and pull.
•This unit should never be used by the vehicle’s driver or left unsecured in the vehicle while driving.
•If this unit is being used in your vehicle, be sure that it is secured or held safely, and does not obstruct any safety device, including air bags or seat belts.
•All passengers should wear seat belts when using this unit in a moving vehicle.
•If in doubt, please contact your vehicle manufacturer for further advice.
20
Specifications
Tablet:
Processor |
MTK8163 Quad core 1.3GHz |
RAM |
1GB DDR3 |
Storage |
16GB flash built-in; micro SD card slot (max.32GB |
|
supported) |
Display |
10” IPS LCD (800X1280), Capacitive touch screen |
Wi-Fi Networking |
IEEE 802.11 b/g/n/a |
GPS |
YES |
Audio Output |
3.5mm headphone |
PC Interface |
USB 2.0 high speed |
Additional Features |
Built-in microphone 2x1.5W speaker |
Decoding Format |
JPG, PNG, GIF, BMP, 3PG, MP4, AVI, MOV, MKV, MP3, WAV |
|
AAC M4A, AMR, APE, FLAC, MID, OGG |
Operating System |
Android™ 7.0 |
Power |
Mains adapter output: 5V 2.0A Rechargeable Li-poly |
|
battery |
Playback Time(hours) |
Up to 5 hours music, 2 hours video, 3 hours web browsing |
DVD: |
|
Disc format |
DVD, DVD-R/+R, DVD-RW/+RW CD, MP3, CD-R/-RW, |
|
VCD/SVCD, JPEG |
Video System |
PAL |
Operation Time |
about 2.5 Hours fully charged |
Battery Capacity |
4000 mAh/3.7V |
Features and specifications are subject to change without prior notice.
21

Guarantee
Lenco offers service and warranty in accordance with the European law, which means that in case of repairs (both during and after the warranty period) you should contact your local dealer.
Important note: It is not possible to send products that need repairs to Lenco directly. Important note: If this unit is opened or accessed by a non-official service center in any way, the warranty expires.
This device is not suitable for professional use. In case of professional use, all warranty obligations of the manufacturer will be voided.
Disclaimer
Updates to Firmware and/or hardware components are made regularly. Therefore some of the instruction, specifications and pictures in this documentation may differ slightly from your particular situation. All items described in this guide for illustration purposes only and may not apply to particular situation. No legal right or entitlements may be obtained from the description made in this manual.
Disposal of the Old Device
This symbol indicates that the relevant electrical product or battery should not be disposed of as general household waste in Europe. To ensure the correct waste treatment of the product and battery, please dispose them in accordance to any applicable local laws of requirement for disposal of electrical equipment or batteries. In so doing, you will help to conserve natural resources and improve standards of environmental protection in treatment and disposal of electrical waste (Waste Electrical and Electronic Equipment Directive).
Service
For more information and helpdesk support, please visit www.lenco.com Lenco Benelux BV; Thermiekstraat la, 6361 HB, The Netherlands.
22
Nederlands |
TDV-900 |
|
|
VEILIGHEIDSWAARSCHUWING
Gelieve deze handleiding aandachtig door te lezen voordat u het apparaat gebruikt.
Plaatsing
•Plaats het product niet op een onstabiel oppervlak, standaard, statief, beugel, tafel of plank.
•Stel niet het product bloot aan direct zonlicht of andere warmtebronnen.
•Gebruik geen vloeistoffen in de buurt van of op het product.
•Plaats het product niet in de buurt van apparaten die magnetische velden creëren.
•Plaats geen zware voorwerpen boven op het product.
•Gebruik geen magnetron om het product te drogen.
•Laat het product niet vallen.
Stroomvoorziening
•Controleer of de bedrijfsspanning van het product overeenkomt met de plaatselijke 5 V/2,0 A-voedingsadapter.
•Gelieve de stekker van het apparaat uit het stopcontact te halen en de antenne los te koppelen bij onweer of bliksem.
•Gelieve de stekker van het apparaat uit het stopcontact te halen wanneer er niemand thuis is of wanneer het apparaat voor lange tijd niet wordt gebruikt.
•Gelieve ervoor te zorgen dat de stroomkabel niet wordt beschadigd.
•Gelieve de originele stroomvoorziening te gebruiken.
•Het apparaat kan warm worden wanneer het lange tijd wordt gebruik of opgeladen, dit is een normaal verschijnsel.
Temperatuur
•Plaats het product in de buurt van of boven een radiator of een warmtebron.
•Gelieve de stroomkabel gedurende minstens twee uur uit het apparaat te halen wanneer u het van een koude naar een warme omgeving verplaatst opdat eventueel vocht dat zich in het apparaat gevormd kan hebben volledig kan drogen.
Vochtigheid
•Stell het apparaat niet bloot aan regen, of een vochtige of klamme omgeving.
•Zorg ervoor dat de ruimte droog en koel is.
Ventilatie
•Gebruik een droge, zachte doek om het product te reinigen. Gebruik geen alcohol om het product te reinigen.
Batterij
•Gelieve de batterij niet zelf los te koppelen.
23
•Gelieve het product niet te lang op te laden.
Opslag
•Gelieve, om beschadiging van de Micro SD-kaart/USB-opslag te voorkomen, de instelling/opslag/SD-kaart (USB-opslag) ontkoppelen te gebruiken voordat u de MicroSD-kaart of USB-opslag ontkoppelt.
Waarschuwing:
Voedingsadapter (alleen voor EU)
Fabrikant: Shenzhen Mass Power Electronics Limited Modelnummer: NBS12E050200HE
Gebruik uitsluitend het voedingsapparaat dat in de gebruiksaanwijzingen staat vermeld.
24
Kenmerken
Surf op het internet.
Bezoek uw favoriete websites
Lees uw e-mail
Blijf in contact met vrienden en familie
Bekijk YouTube™-video's
Blader door 's werelds meest populaire video-uitwisselingsproject
Lees uw favoriete boeken
Download duizenden boeken.
Ontdek duizenden apps voor Android™
Games, apps, en meer met Play Store (door de klant te installeren).
Maak draadloos verbinding met het internet
High-speed wifi 802.11 a/b/g/n netwerken
Geniet in het comfort van uw woonkamer
Gebruik uw mediabibliotheek overal
Draagbare krachtpatser die populaire muziek-, video-, en fotoformaten afspeelt. MicroSD-geheugenkaartlezer verhoogt uw opslagcapaciteit (ondersteunt tot 32 GB)
Automatische positiedetectie
Lees op elke gewenste manier; het scherm past zich automatisch aan!
Geïntegreerde dvd-speler
Compatibel met DVD, DVD±RW, VCD, CD, CD-R/RW, MP3
25

Overzicht van het apparaat
1.AAN/UIT
Indrukken om het apparaat aan of uit te zetten, of het scherm inof uit te schakelen.
a.Houd de aan/uit-toets ingedrukt om het apparaat aan te zetten.
b.Houd de aan/uit-toets ingedrukt om het apparaat uit te zetten. Hierdoor komt u in het uitschakelmenu, waar u op “Power off” (Uitschakelen) kunt drukken om het apparaat uit te zetten.
Wanneer u zich in dvd-modus bevindt, is de aan/uit-toets niet beschikbaar. Gelieve naar de tablet-interface terug te keren om het apparaat uit te zetten.
2.Terug
Druk op deze toets om terug te keren naar de vorige pagina.
3.Home
4.VOL-
Verlaag het volume.
5.VOL+
Verhoog het volume.
26
6.USB-HOST
Maak verbinding met een USB-apparaat of een computer om gegevens over te dragen (bijvoorbeeld muziek, video's, foto's en bestanden).
7.Hoofdtelefoon
Audio-uitgang voor een hoofdtelefoon.
8.RESET
Het apparaat herstarten en resetten
9.MIC
10.TF-KAART
Voeg hier een externe TF-geheugenkaart in.
11. OPEN-schakelaar
Open de schijflade
27
Aan de slag
De tablet inof uitschakelen
De tablet inschakelen:
Houd de aan/uit-toets ingedrukt totdat het lcd-scherm wordt ingeschakeld. Wacht tot het startscherm verschijnt; de tablet is nu klaar voor gebruik.
De tablet uitschakelen:
1. Houd de aan/uit-toets ingedrukt totdat het menu Apparaatopties verschijnt.
2. Raak het scherm aan om de tablet uit te schakelen.
Het scherm inof uitschakelen (Stand-by)
Wanneer de tablet is ingeschakeld, kunt u het scherm uitschakelen om energie te besparen. Druk gewoon één keer op de aan/uit-toets om het scherm uit te schakelen. Druk nogmaals op de aan/uit-toets om het scherm weer in te schakelen.
Om energie te besparen, kan het scherm worden ingesteld om automatisch uitgeschakeld te worden wanneer de tablet niet wordt gebruikt (van 1 minuut tot 30 minuten).
Deze time-outoptie voor het scherm kan worden gevonden in het Weergavemenu.
28
Aan de slag
Het scherm ontgrendelen
Wanneer het scherm wordt uitgeschakeld, moet u het scherm ontgrendelen wanneer u het weer inschakelt. Veeg van het slotpictogram omhoog om het scherm te ontgrendelen.
Over apps
Raak het pictogram van een app op het startscherm of in de Launcher aan om de app te openen.
Launcher-scherm:
Het bovenstaande scherm is alleen bedoeld voor illustratieve doeleinden. Wij behouden ons het recht voor om de definitieve lijst van applicaties op de tablet te wijzigen en te verbeteren.
29

Over apps Voorgeïnstalleerde apps
Sommige apps werden voor uw gemak vooraf geïnstalleerd op uw tablet. Deze apps zijn bedoeld voor:
Surfen op het internet.
Eenvoudige wiskundige bewerkingen.
Het lezen van uw e-mail.
Muziek afspelen.
Toegang tot het menu Instellingen om de opties van de tablet aan te passen.
Toegang tot dvd-modus
Voorgeïnstalleerde apps Apps installeren
U kunt ook bijkomende apps downloaden en installeren uit de app-winkel, de webbrowser, of andere bronnen.
De tablet moet worden ingesteld om de installatie van apps toe te laten uit andere bronnen. De optie Onbekende bronnen kan worden ingesteld in het menu Instellingen.
30
 Loading...