


DR-05 BT
Retro Radio with Bluetooth® and DAB+
User's Guide
w w w.lenco.com
|
Content |
Warning .................................................................................................. |
1 |
Panels .................................................................................................... |
4 |
Remote................................................................................................................control |
6 |
Basic operation ...................................................................................... |
8 |
DAB operation ....................................................................................... |
9 |
FM operation ........................................................................................ |
11 |
Bluetooth operation ............................................................................. |
12 |
Aux in /USB operation ......................................................................... |
13 |
Trouble shooting /Specification ........................................................... |
14 |
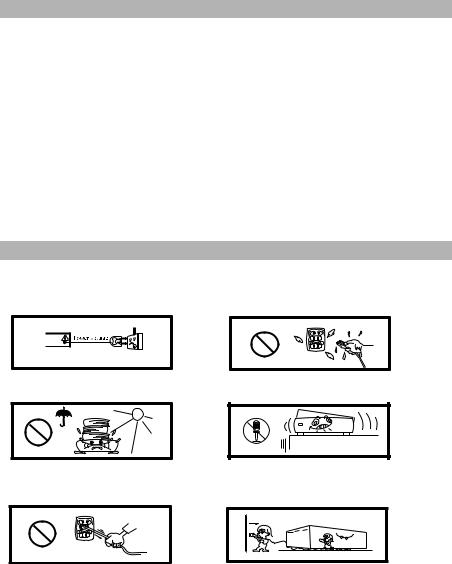
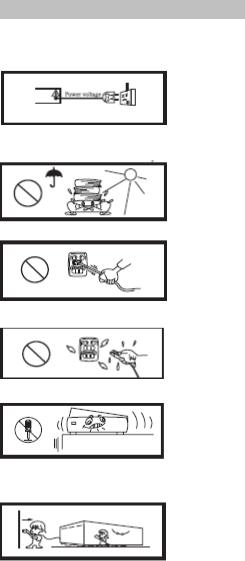
Important safety instructions
Please read and understand all the warnings provided below, as well as and those marked
on the unit. This unit has been designed and manufactured to assure personal safety.
Only use power source that is specified
in the User Manual or on the system.
Avoid placing the unit in direct
or sunshine or near a heat source.
Do not bend or pull the power cable
excessively, and do not apply pressure
to it by standing on it.
Keep the unit and power plug
away from water.
Never open the cover and avoid dropping
anything into the unit, such as coins,
hairpins and needles for example.
Unplug the unit from the main power
outlet when you do not use it for a long
time.
1
Warnings
1.Read these Instructions - All the safety and operating instructions should be read before this product is operated.
2.Keep these Instructions - The safety and operating instructions should be retained for future reference.
3.Heed all Warnings-All warnings on the appliance and in the operating instructions should be adhered to.
4.Follow all instructions - All operating and use instructions should be followed.
5.Do not use this apparatus near waterThe appliance should not be used near water or moisture - for example, in a wet basement or near a swimming pool, and the like.
6.Clean only with a damp cloth.
7.Do not block any of the ventilation openings.
Install in accordance with the manufacturer ’s instructions.
8.Do not install near any heat sources such as radiators, heat Registers, stoves, or other apparatus (including amplifiers)that produce heat.
9.Do not defeat the safety purpose of the polarized or grounding -type plug. A polarized plug has two blades with one wider than the other. A grounding prong. The wide blade or the third prong are provided for your safety. When the provided plug does not fit into your outlet, consult an electrician for replacement of the obsolete outlet.
10.Protect the power cord from being walked on or pinched particularly at plugs, convenience receptacles, and the point where they exit from the apparatus.
11.Only use attachments/accessories specified by the manufacturer.
12.Use only with a cart, stand, tripod, bracket, or table specified by the manufacturer,
or sold with the apparatus. When a cart is used, use caution when moving the cart/ apparatus combination to avoid injury from tip-over.
13.Unplug the apparatus during lightning storms or when unused for long time.
14.Refer all serving to qualified service personnel. Servicing is required when the apparatus has been damaged in any way, such as power-supply cord or plug is damaged, liquid has been spilled or objects have fallen into the
apparatus, the apparatus has been exposed to rain or moisture.
15.Please keep the unit in a good ventilation environment.
16.These servicing instructions are for use by qualified service personnel only. To reduce the risk of electric shock, do not perform any servicing other than that contained in the operating instructions unless you are qualified to do so.
17.The MAINS PLUG is used as disconnect device, the disconnect device shall remain readily operable.
18.This equipment is a Class II or double insulated electrical appliance. It has been
 designed in such a way that it does not require a safety connection to electrical earth.
19. |
|
|
|
-This lightning flash with arrowhead symbol within an equilateral |
|
|
|
|
triangle is intended to alert the user to the presence of non- |
|
|
|
|
insulated dangerous voltage within the product’s enclosure that |
|
|
|
|
|
|
may be of sufficient magnitude to constitute a risk of electric shock. |
|||
-To reduce the risk of electric shock, do not remove cover (or back) as there is no userserviceable parts inside. Refer servicing to qualified personnel.
-The exclamation point within an equilateral triangle is intended to alert the user accompanying the appliance.
2
20.Invisible laser radiation when open and interlocks defeated. Avoid exposure to
beam of laser.
21.The batteries in remote control shall not be exposed or excessive heat such as fire, sunshine or the like.
22.The apparatus shall not be exposed to dripping or slashing and that no objects filled with liquids, such as vases, shall be placed on the apparatus.
23.To reduce the risk of fire or electric shock, do not expose this apparatus to rain or moisture.
24.
 Correct disposal of this product. This marking indicates that this product should

 not be disposed with other household wastes throughout the EU. To prevent
possible harm to the environment or human health from uncontrolled waste disposal, recycle it responsibly to promote the sustainable reuse of material resources. To return your used device, please use the return and collection systems or contact the retailer where the product was purchased. They can take this product for environmental safe recycling.
To achieve the utmost in enjoyment and performance, and in order to become familiar with its features, please read this manual carefully before attempting to operate this products, this will assure you years of trouble fress performance and listening pleasure.
Caution:
To reduce the risk of electric shock, do not dismantle the product and do not expose the apparatus to rain or moisture, No user-serviceable parts in side. Refer servicing to qualified personnel only.
Explanation of Graphical Symbols:
The lightning flash within an equilateral triangle is intended to alert you to the presence of uninsulated dangerous voltage with the product’s
enclosure that may be of sufficient magnitude to constitute an electric shock to a person or persons.
The exclamation point within an equilateral triangle is intended to alert you to the presence of important operating and maintenance (servicing) instructions in the literature accompanying the product.
ERP II note
Energy related products-This product complies with the European Commission on the Eco-design Directive and its implementing Regulations. 15 minutes (approx.) later without any input (except in FM mode), the system will automatically enter standby mode. Follow up the instruction manual to assume the function operation.
3
|
|
Description of parts |
|
|
||||||
Front View |
|
|
|
|
|
|
9 |
10 |
||
|
|
|
|
|
|
|
|
|||
|
VOL |
|
|
|
|
|
TUNER / ENTER/ BT PAIR |
SOURCE |
INFO/MENU/ |
|
|
|
|
|
|
|
|
|
|||
|
STANDBY TREBLE BASS |
|
|
|
|
|
|
|
|
|
|
|
|
|
|
|
|
|
PRESET/ |
SCAN/ |
|
|
|
|
|
|
|
|
|
|||
|
|
|
|
|
|
|
|
|
|
|
|
|
|
|
|
|
|
||||
|
|
|
|
|
|
|
||||
|
|
8 |
12 |
11 |
||||||
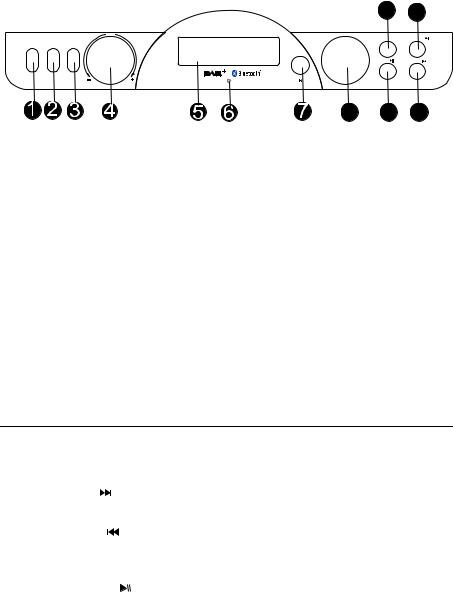
No. |
Components |
Description |
|
|
||||||
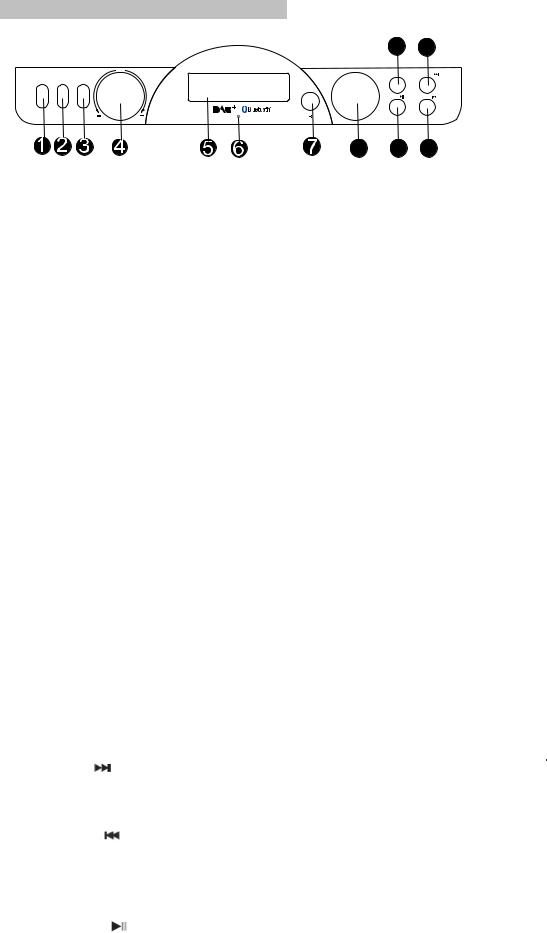
1 |
Standby |
Tap this button up or down to turn the unit on, or to |
|
|||||||
|
the standby mode. |
|
|
|||||||
2 |
|
Tap up or down to enter the treble setting interface and use |
||||||||
Treble |
the volume knob within 3 seconds to adjust the treble level |
|||||||||
|
|
to get a vivid sound effect. |
|
|
||||||
3 |
|
Tap up or down to enter the bass setting interface and use |
||||||||
Bass |
the volume knob within 3 seconds to adjust the bass level |
|||||||||
|
to get a vivid sound effect. |
|
|
|||||||
|
|
|
|
|||||||
4 |
Volume knob |
Adjust the volume to a comfortable level. |
|
|
||||||
|
|
|
|
|||||||
5 |
Display screen |
Display source frequency, and playback information. |
|
|||||||
6 |
Bluetooth indicator |
Indicates the mode status. |
|
|
||||||
7 |
Remote control sensor |
Point the remote control to this sensor. |
|
|
||||||
|
|
In DAB mode, rotate to skip to next or previous stations. |
||||||||
|
|
In FM mode, tune the frequency up or down by steps of 0.05MHz. |
||||||||
|
Tuner knob/ Enter |
In menu status, press ENTER to confirm selection. |
|
|||||||
8 |
When the buzzer alarm goes on, press ENTER to stop the alarm. |
|||||||||
/ BT Pair |
||||||||||
or rotate the Tuner knob to enter the nap mode,the alarm will go |
||||||||||
|
||||||||||
|
|
on 5 minutes later. |
|
|
||||||
|
|
If you want to disconnect the paired devices, press BT PAIR |
||||||||
|
|
button to disconnect and the unit enters the BT pairing status. |
||||||||
|
|
Then use the phone device to make connection |
|
|||||||
9 |
|
|
|
|
|
|
|
. |
|
|
Source |
Press repeatedly to select the source you want: FM, USB, |
|||||||||
|
BLUETOOTH(BT), AUX IN, DAB. |
|
|
|||||||
|
|
|
|
|||||||
10 |
Menu/Information |
In DAB or FM mode, long press to enter the setting menu. |
||||||||
In DAB mode, press briefly to cycle through the station information. |
||||||||||
|
Next |
In BT mode, press Next button to skip to next track. |
|
|||||||
|
In standby mode, press to enter the time and alarm setting. |
|||||||||
|
|
|||||||||
|
|
In FM mode, press repeatedly to cycle through the radio information. |
||||||||
|
|
|
|
|
||||||
11 |
Previous |
In BT mode, press to skip to previous track. |
|
|
||||||
|
Scan |
In FM mode,press to scan the available stations. |
|
|
||||||
|
|
|
||||||||
|
Preset |
In radio mode, use Preset button to store favorite stations. |
||||||||
|
In BT mode, press to pause the playback, press again |
|
||||||||
12 |
Play/Pause |
|
||||||||
to resume playing. |
|
|
||||||||
|
|
|
||||||||
4

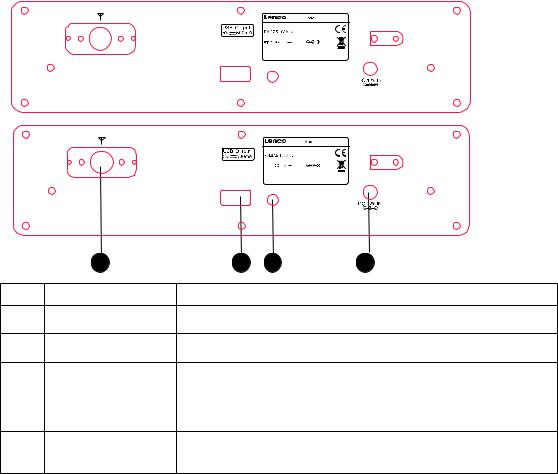
Rear panel
|
|
|
|
DR-05 BT Black |
|
|
|
Retro Radio Bluetooth® and DAB+ |
|
|
|
|
Channel Block:DAB+(band lll) 5A-13F |
|
|
|
|
12 |
1.67A |
|
|
|
Power Consumption: 20W |
|
|
|
|
Production Date: |
|
|
|
|
Made in China |
|
|
|
|
S/N: |
|
|
|
USB |
AUX IN |
|
|
|
|
|
DR-05 BT White |
|
|
|
Retro Radio Bluetooth® and DAB+ |
|
|
|
|
Channel Block:DAB+(band lll) 5A-13F |
|
|
|
|
12 |
1.67A |
|
|
|
Power Consumption: 20W |
|
|
|
|
Production Date: |
|
|
|
|
Made in China |
|
|
|
|
S/N: |
|
|
|
USB |
AUX IN |
|
|
12 |
13 |
14 |
15 |
No. |
Components |
Description |
|
|
13 |
FM antenna |
Extend the FM antenna to get a good radio reception. |
||
14 |
USB port |
This port also charges the USB device if it’s in |
||
low batteries level. |
|
|||
|
|
Use the AUX IN 3.5mm audio cable to connect with the |
||
15 |
Aux in socket |
extra music devices (DVD player, computer, phones, etc). |
||
|
|
In this AUX IN mode, the unit works as a loudspeaker, you |
||
|
|
can only control the volume of the unit. |
||
16 |
Power supply socket |
Insert the adaptor into the power socket and power on the unit. |
||
5
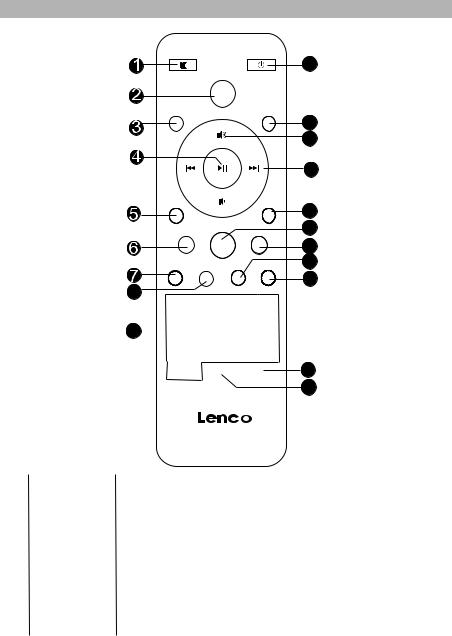
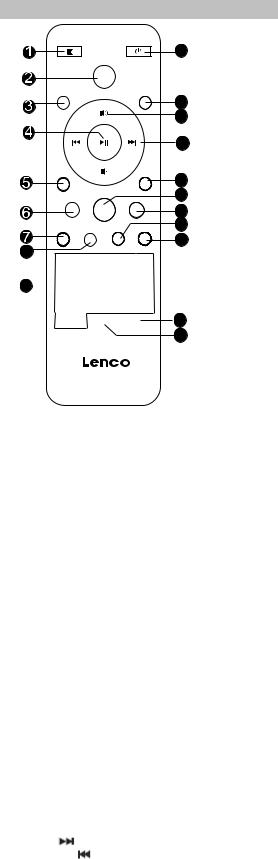
Description of remote control
MUTE |
STANDBY |
|
10 |
|
SOURCE |
MENU |
INFO |
11
12
13
8
9
PRESET |
|
|
STOP |
TREBLE |
|
ID3 |
BASS |
|
|
||
SNOOZE/DIM |
SLEEP |
ALARM |
BT PAIR |
|
1 |
|
2 |
|
3 |
|
|
|
|
|
|
|
|
|
|
|
|
4 |
|
5 |
|
6 |
|
|
|
|
|
|
|
|
|
|
|
|
|
|
|
|
|
|
7 |
|
8 |
|
9 |
|
|
|
|
|
|
|
|
|
|
|
0 |
|
MO/ST |
|
RANDOM |
|
|
DR-05 BT
14
15
16
17
18
19
20
No. |
Buttons |
Description |
|
|
|
|
|
1 |
Mute |
Press to mute the sound. |
|
|
|
|
|
2 |
Source |
Press repeatedly to select the source you want: FM, USB, |
|
BLUETOOTH(BT), AUX IN, DAB. |
|||
|
|
||
3 |
Menu |
Press to enter the setting menu. |
|
|
|
When the buzzer alarm goes on, press to stop the alarm. |
|
4 |
Play/Pause |
In BT mode, press to pause the playback, press again to resume. |
|
|
|
In FM mode,press to scan the stations. |
|
|
|
|
|
5 |
Preset |
In FM or DAB mode, use Preset button to save favorite stations. |
|
|
|
|
6
No. |
Buttons |
Description |
|
|
|
|
|
|
|
|
|
|
|
||||||
6 |
Treble |
Press Treble button and use the Volume+/- button to adjust the treble. |
|
||||||
|
|
|
|
|
|
||||
7 |
Snooze |
If the alarm is set to buzzer mode, when the alarm goes on, |
|
press Snooze to |
|
||||
|
enter the nap mode, the alarm will go on again 5 minutes later. |
|
|||||||
|
|
|
|||||||
|
Dim |
Press to select 3 kinds of brightness of the display screen. |
|
||||||
8 |
Sleep |
Press to set the sleep time: sleep off/10/15/30/45/60/90/120 minutes. |
|
||||||
When the time out, the unit will enter sleep mode automatically. |
|
||||||||
|
|
|
|||||||
9 |
Number buttons |
In DAB or FM mode, long press the number buttons 0-9 to save 10 |
|
||||||
|
|
stations directly. To save more, please refer to operations on Page 9. |
|
||||||
10 |
Standby |
Press to turn on the unit; or turn to standby mode. |
|
|
|
||||
|
|
|
|
||||||
11 |
Information |
In FM or DAB mode, press to check the information of the stations. |
|
||||||
|
|
|
|
|
|
||||
12 |
Volume+/- |
Press to adjust the volume to a comfortable level. |
|
|
|
||||
|
|
In BT mode, press to skip to next or previous track/song. |
|
||||||
13 |
Next/Previous |
In FM mode, press to tune the frequency up or down by steps of |
|
||||||
|
|
0.05MHz; long press to skip to the next or previous available frequency. |
|
||||||
|
|
|
|
|
|
|
|||
14 |
Stop |
Press to stop playback, press |
to re-start. |
|
|
|
|||
|
|
|
|
||||||
15 |
Bass |
Press Bass button and use Volume+/- buttons to adjust the bass. |
|
||||||
16 |
ID3 |
While playing MP3 tracks, press to display information |
|
||||||
of current track: album, artist, etc. |
|
|
|
|
|
||||
|
|
|
|
|
|
|
|||
|
|
|
|
||||||
|
|
In standby status, press to enter time setting interface, it show Time Auto Update, |
|
||||||
|
|
choose On to update the time automatically when it receives DAB station or FM |
|
||||||
|
|
RDS signal. |
|
|
|
|
|
|
|
|
|
In standby status, press to set the time and alarm 1, alarm 2. |
|
|
|||||
|
|
Press once to enter Time setting status, press twice to enter Alarm 1 |
|
||||||
17 |
Alarm |
setting status. Press the third time to enter Alarm 2 setting status. |
|
||||||
In Time or Alarm |
setting status, use |
or |
to select contents, then |
|
|||||
|
|
|
|||||||
|
|
press |
to confirm, and the system automatically skip to the next setting status. |
|
|||||
|
|
When in time setting interface, the screen display the YYYY/MM/DD. |
|
||||||
|
|
Use the |
/ |
to select the digits of the date, then press |
|
and then |
|
||
|
|
select the 24/12 hour, next to set the Hour/Minute, press |
to finish. |
|
|||||
|
|
When in alarm setting interface, the words “0:00" flash, press |
or |
|
|||||
|
|
to select the digits of the alarm time, press |
to confirm. Then select |
|
|||||
|
|
the alarm options: Daily, Weekdays, Weekends, Once. Next to select |
|
||||||
|
|
the alarm mode: Buzzer mode, FM mode, USB mode,DAB mode. At last to set |
|
||||||
|
|
Alarm volume level. When finish setting Alarm 1, you can set Alarm 2. |
|
||||||
|
|
To cancel the alarm, press ALARM button, then select OFF to cancel. |
|
||||||
18 |
BT Pair |
Press to activate the BT function of the unit to pairing status if |
|
||||||
|
|
unpaired. In paired status, press to disconnect the devices. |
|
||||||
19 |
Random |
Press to play tracks in a random order, press again to |
|
||||||
|
cancel. |
|
|
|
|
|
|
|
|
20 |
MO/ST |
In radio mode, press to switch stereo on if there’s strong reception. |
|
||||||
|
|
If the reception is weak, you can not turn stereo on. |
|
||||||
7
Basic operation
Before you start setting your unit, there are some steps must keep in mind to make setting operations more smooth and correctly.
IMPORTANT OPERATION STEPS:
1.Press and hold the MENU/INFO button on the front panel or press the MENU button on remote control to enter setting menu.
2.Rotate the TUNER KNOB on the front panel or press 
 or
or 
 button on remote control to cycle though the menu contents.
3.Press ENTER (TUNER KNOB) on the front panel or press 

 button on the remote control to confirm the selections.
4.If the selections is not the required one, press MENU/INFO button on the front panel to go back to the previous menu contents (but it is not available in the process of SETTING TIME).
To set the time
1.In standby mode, press Alarm button on remote control to set the time, the screen displays: (Or press NEXT button on the front panel in standby mode.)
Time Auto Update
OFF / ON
2.Rotate the TUNER KNOB or press 
 or
or 
 on remote control to select contents:
OFF or ON.
<A> If you choose ON, then pres  on RC to update the time automatically when there is DAB station reception or FM RDS signal.
<B> If you choose OFF, then press  to enters the interface of manual setting, the screen displays:
2013-01-01
0:00
3.Rotate the TUNER KNOB or press 
 o
o 
 on RC to select the time numbers,then press
 on RC to confirm.
Each time you finish one item setting, the unit will auto-skip to the next item setting.
4.When you have finished the time, press the ALARM button repeatedly to enter Alarm 1 or Alarm 2 setting.
When you have finished setting the time/date, the words on screen stops flashing. And now you can make other operations to get a more enjoyable entertainment.
8
DAB operation
Enter DAB mode
Press SOURCE button to switch to DAB mode. The unit starts scanning when turning on DAB mode, the screen displays a slide bar indicating the progress of scanning, and the amount of the stations it found. Once finished scanning, the unit plays the first station.
Select stations
1.Rotate the TUNER KNOB or press 
 or
or 
 on RC t o skip to next or previous stations.
2.Press ENTER or 
 on remote control to activate the station.
Station Scan
Press and hold the MENU/INFO button on the front panel or press MENU button on the remote control to enter the setting menu, rotate the TUNER KNOB or press 
 /
/ 
 on remote control to select <Full Scan> or <Manual tune>, press ENTER to confirm.
1.If you choose <Full Scan>, it’ll start scanning and search all DAB channels.
2.If you choose <Manual tune>, press the ENTER to cycle through all the channels, which are numbered from 5A to 13F.
3.Briefly press ENTER can activate the selected stations.
Store station presets
It is possible to store up to 20 of your favorite stations. This will enable you to access your favorite stations quickly & easily.
1.To store a preset, you must first be listening to the station that you would like to save.
2.Long press PRESET button until the screen displays:
Preset Store
<1: (Empty)>
3.Rotate the TUNER KNOB or press 
 or
or
 on remote control to select the number you want to store.
4.To confirm preset, press ENTER on the front panel or 
 on remote control, the screen displays: <Preset X stored>.
Note: If any stations have been preset before, the screen will show the station name, e.g.<BBC Radio4 >.
5. Press the PRESET button to recall a preset, the screen displays:
Preset Recall
<1: (Empty)>
Example:
If you are listening to BBC World which you want to preset in NO.5 station.
a)Tune to the station BBC World you want to store as preset.
b)Long press the PRESET button until the <Preset Store> appears.
c)Rotate the TUNER KNOB to select 5, press ENTER button, now <Preset 5 stored>.
9
INFO mode
Each time you press the INFO button on remote control or MENU/INFO button on the front panel, the screen will cycle through the following information:
1.RSSI reception
2.Music style— such as <Rock music>
3.Station name — such as <BBC National DAB>
4.Frequency — such as <5A 174.928MHz>
5.Signal error: 25
6.Bit rate — such as <128Kbps/DAB>
7.DLS information
Enter setting menu
Press and hold the MENU/INFO button on the front panel or MENU button on remote control to enter setting menu, rotate TUNER KNOB to scroll down the menu contents:
<Full scan>→<Manual tune>→<DRC>→<Prune> →<System>
DRC (Dynamic range control)
This causes the radio to reduce the dynamic range of the audio signal. The purpose of this is to adapt the dynamic range of the audio signal to listened in a noisy environment. Note: This function is not always available in many DAB stations.
Steps as below:
1.Press and hold MENU/INFO button on the front panel or MENU button on remote control, rotate TUNER KNOB to find <DRC> setting.
2.Press ENTER button to enter menu contents and choose DRC Off, DRC High or DRC Low.
3.Press ENTER to confirm the setting.
Prune stations
When the radio has performed a scan in several locations you may find there are some stored stations that you can no longer receive. This function automatically removes then from the stored station list.
Steps as below:
1.Press and hold MENU/INFO button, rotate TUNER KNOB to find <Prune> setting.
2.Press ENTER button to enter menu contents and choose YES or NO.
3.Press ENTER to confirm the setting.
System settings
Press and hold MENU/INFO button, rotate TUNER KNOB to find <System> , press
ENTER button to enter setting menu. Rotate TUNER KNOB to scroll down the menu contents: <Language> ,<Factory reset> and <SW version>.
Language
To select the languages of the unit in this section:
1.Press and hold MENU/INFO button, rotate TUNER KNOB to find <System> setting.
2.Press ENTER button to enter menu contents and find <Language> setting.
3.Press ENTER to choose from <English>, <French>, <Deutsch>, <Nederlands> and <Espanol> .
4.Select one of the languages above, and press ENTER button to confirm.
10

Factory reset
To reset the unit in this section:
1.Press and hold MENU/INFO button, rotate TUNER KNOB to find <System> setting.
2.Press ENTER button to enter menu contents and find <Factory reset> setting.
3.Press ENTER to reset this unit.
SW Version
To check the SW version of the unit in this section:
1.Press and hold MENU/INFO button, rotate TUNER KNOB to find <System> setting.
2.Press ENTER button to enter menu contents and find <SW Version> setting.
3.Press ENTER to see the SW version of this unit.
FM operation
1. Enter FM mode
Press the SOURCE button to enter the FM mode. (Frequency: 87.5-108.0MHz) Press MO/ST button on remote control to turn stereo on, if the reception is weak, it can not turn stereo on.
2. Select stations
Briefly press rotate the TUNER KONB to tune the radio up or down by frequency step
0.05MHz.
Press 
 or
or 
 button on remote control to skip to the next or previous station. Press NUMBER buttons on remote control to select the stations directly.
3.Store station presets
The steps are the same as in DAB mode, please refer to STORE STATION PRESETS of DAB.
4. FM RDS information
Each time you press INFO button, the display will cycle through the follow contents:
<Program type>, <Station name>, <Stereo/mono>, <Radio text>, <Frequency>.
The display information is provided by the radio broadcasting stations. Some stations may not provide.
5. Scan/Audio settings
a)Scan setting
(1)Press and hold MENU/INFO button, rotate TUNER KNOB to find <Scan setting>.
(2)Press ENTER to enter menu contents <Strong stations only>,<All stations>.
(3)Press ENTER button to confirm.
b)Audio setting
(1)Press and hold MENU/INFO button, rotate TUNER KNOB to find <Audio setting>.
(2)Press ENTER to enter menu contents <Forced mono>,<Stereo allowed>.
(3)Press ENTER button to confirm.
11

Bluetooth operation
This unit has included Bluetoth function. So we can enjoy the music with your bluetooth device like mobile phone, etc.
Pair Operation
1.Press the SOURCE button to enter Bluetooth mode. The indicator light flashes blue.
2.Turn on the bluetooth function on your device (e.g. mobile phone).
3.Place your device in bluetooth search mode and enter the bluetooth searched list.
4.Select LENCO DR-05 BT from the list of found devices.
5.Select OK or YES to pair the unit with your bluetooth device.
6.If prompted, enter 0000 for passkey (for some devices).
7.When successfully paired with your device, the bluetooth indicator lights steadily.
Playback operation
1.Press 

 button to play or pause the playback.
2.Press 
 or
or 
 button to skip to the previous or next track/song.
3.Press VOL+/- buttons to control the volume level.
4.If you want to disconnect the paired devices, press BT PAIR button to disconnect and the unit enters the BT pairing status. Then use the phone device to make connection.
To disconnect and pair with another device
a)Turn off the bluetooth function on your device to disconnect. Then the unit will enter bluetooth pairing status automatically.
b)In this paired status, follow the steps 2-5 of PAIR OPERATION section to pair with the other device.
Phone call while playing music
1.When playing music through a phone, and a call is coming, music stops automatically.
2.When the call ends, it depends on the setting of your phone whether the current track will resume playback or not.
Important notice:
1.Some devices, such as an iphone, connect immediately after pairing, some may take long to connect.
2.The unit can only be connected and playing content from one device at a time.
3.To connect to a different paired device, you have to turn off bluetooth or unpair from the currently paired device and manually connect to the other device
4.When devices are paired, converting modes and turning again to Bluetooth mode, the unit will auto-connect with the last paired device. (Bluetooth function on the other
device is always on.)
5.For certain smartphone not auto-connect, user need to go to BT inside smartphone and select LENCO DR-05 BT to make connection.
12

Aux in operation
You can connect an external device with the unit to play music as a speaker.
1.Connect the external audio player’s audio output with AUX IN socket on the rear panel of the unit.
2.Press SOURCE button to enter AUX IN mode.
3.Start playback on the external device.
4.Adjust the volume by the unit.
5.Turn off both devices before disconnecting them.
Note:
The unit cannot be controlled by buttons on it. You can just use the VOL+/- buttons to adjust the volume level. If you cannot hear any sound from the speaker, check the volume on the external device.
USB operation
USB port can be used to charge the phone/USB music devices. When insert an USB device, the system will charge the device if the battery power is low in the phone/USB device.
13

Specifications
Power source |
DC12V |
Power consumption |
20W |
Standby power consumption |
<1W |
FM frequency |
87.5-108.0MHz |
FM/DAB presets |
20 |
Bluetooth range |
33 ft. (10m) |
Bluetooth version |
CSR V2.1+EDR |
Input jacks |
USB/3.5mm Aux in |
Operation condition |
5°-35°/level status |
Trouble shooting
For you convenience, we have list some methods to solve some common problems you may encounter when you use the system. If the problem occurs repeatedly, contact the nearest maintenance center.
Problems |
Causes |
Solutions |
|
|
|
|
|
|
Power plug is not fully inserted |
Check the connection and |
|
Power supply doesn’t work. |
into the power socket. |
full insert the power plug |
|
|
|
into the power socket. |
|
|
|
|
|
|
Weak signal reception; |
Adjust the radio reception |
|
No sound from the speaker. |
Volume is not turned up; |
position; |
|
No pairing with Bluetooth |
Turn up the volume; |
||
|
device. |
Pair the Bluetooth device. |
|
|
|
|
|
|
This may occur if the audio |
The radio will try to retune |
|
|
broadcaster changes the label |
||
The screen is blank. |
performance a scan. |
||
of a service or remote a label |
|||
|
while tuning the stations. |
|
|
|
|
|
|
The sound is weak or of |
Other devices such as TV may |
Move the unit away from |
|
poor quality; I can hear a |
interfere the radio reception; |
other device and try to re- |
|
burbling noise on some |
The radio reception is too weak. |
position the unit to get a |
|
stations. |
|
strong radio signal. |
|
|
|
|
14

Service and support
For information: www.lenco.com
For support: http://lencosupport.zendesk.com
Lenco helpdesk: |
|
|
Germany |
0900-1520530 |
(Local charges) |
The Netherlands |
0900-23553626 |
(Local charges + 1ct p/min) |
Belgium |
02-6200115 |
(Local charges) |
France |
03-81484280 |
(Local charges) |
The helpdesk is accessible from Monday till Friday from 9 AM till 6 PM.
When contacting Lenco, you will always be asked for the model and serial number of your product. The serial number can be found on the back of the device. Please write down the serial number below:
Model: DR-05 BT
Serial number:
Lenco offers service and warranty in accordance to European law, which means that in case of repairs (both during and after the warranty period) you should contact your local dealer.
Important note: It is not possible to send products that need repairs to Lenco directly.
Important note: If this unit is opened or accessed by a non-official service center in any way, the warranty expires.
This device is not suitable for professional use. In case of professional use, all warranty obligations of the manufacturer will be voided.
Notice, statements and information
Lenco is not liable for printing errors in the manual.
The specifications and external appearance of the set are subject to change without prior notice.
Declaration of Conformity
Products with the CE marking comply with the EMC Directive (2004/108/EC) and the Low Voltage Directive (2006/95/EC) issued by the Commission of the European Community.
Hereby, STL Group BV, Ankerkade 20 NL 5928 PL Venlo, declares that this product is in compliance with the essential requirements and other relevant provisions of Directive 1999/5/EC.
The declaration of conformity may be consulted at https://lencosupport.zendesk.com/forums/22413161-CE-Documents
15

This product operates at 2400 - 2483.5 MHz and is designated only to be used inside a normal household environment. This product is suited for this purpose within all EU counties.
This symbol indicates that the relevant electrical product or battery should not be disposed of as general household waste in Europe. To ensure the correct waste treatment of the product and battery, please dispose them in accordance to any applicable local laws of requirement for disposal of electrical equipment or batteries. In so doing, you will help to conserve natural resources and improve standards of environmental protection in treatment and disposal of electrical waste (Waste Electrical and Electronic Equipment Directive).
®All rights reserved
16

DR-05 BT
Retro-Radio mit Bluetooth® und DAB+
Benutzerhandbuch
w w w.lenco.com
Inhalt |
|
Warnhinweise ........................................................................................................................ |
2 |
Bedienelemente ..................................................................................................................... |
4 |
Fernbedienung........................................................................................................................ |
6 |
Grundlegende Bedienung ...................................................................................................... |
8 |
DAB-Betrieb ........................................................................................................................... |
9 |
UKW-Betrieb.......................................................................................................................... |
12 |
Bluetooth-Betrieb .................................................................................................................. |
13 |
AUX/USB-Betrieb ................................................................................................................. |
14 |
Fehlersuche / Technische Daten .......................................................................................... |
15 |
Wichtige Sicherheitshinweise
Bitte lesen und verstehen Sie alle weiter unten sowie auf dem Gerät angegebenen Warnhinweise. Dieses Gerät wurde so konzipiert und gefertigt, dass die Sicherheit von Personen gewährleistet werden kann.
Benutzen Sie nur eine Stromversorgung, die den Angaben in der Bedienungsanleitung oder auf dem Gerät entspricht
Vermeiden Sie es, direkte Sonnenstrahlung oder die Nähe von Wärmequellen.
Biegen oder ziehen Sie nicht am Netzkabel übermäßig und treten Sie nicht darauf.
Halten Sie das Gerät und den Netzstecker fern von Wasser.
Öffnen Sie niemals das Gehäuse und achten Sie darauf, dass keine Fremdgegenstände, wie z. B. Münzen, Nadeln etc., in das Gerät gelangen.
Ziehen Sie den Netzstecker aus der Steckdose heraus, wenn Sie das Gerät über einen längeren Zeitraum nicht verwenden.
1

Um ein Höchstmaß an Freude und Leistung von dem Produkt zu erhalten, und um sich mit allen Funktionen vertraut zu machen, lesen Sie sich bitte diese Anleitung sorgfältig durch, bevor Sie das Gerät in Betrieb nehmen. Dadurch wird gewährleistet, dass Sie Jahre störungsfreier Leistung und Hörgenuss genießen können.
ACHTUNG
STROMSCHLAGGEFAHR
NICHT ÖFFNEN!
Achtung:
Um das Risiko eines Stromschlags zu verringern, zerlegen das Produkt nicht und setzen Sie es niemals Regen oder Feuchtigkeit aus. Im Inneren des Geräts sind keine Teile vorhanden die vom Benutzer gewartet werden können. Überlassen Sie Wartungsarbeiten immer qualifiziertem Fachpersonal.
Bedeutung der Symbole:
Das Dreieckszeichen mit Blitzsymbol verweist auf gefährliche Spannungen im Gerätegehäuse, die so hoch sein können, dass sie für Personen eine Gefahr von Stromschlägen bilden.
Das Dreieckszeichen mit Ausrufungszeichen verweist auf wichtige Funktionsund Wartungshinweise (Reparatur) in der dem Gerät beigelegten Bedienungsanleitung.
Warnhinweise
1.Alle Sicherheitsund Bedienungshinweise müssen vor der Inbetriebnahme des Geräts durchgelesen werden.
2.Anleitung aufbewahren - Die Sicherheitshinweise und die Bedienungsanleitung müssen für den späteren Gebrauch aufbewahrt werden.
3.Warnhinweise beachten - Alle Warnungen auf dem Gerät und in der Bedienungsanleitung müssen beachtet werden.
4.Befolgen Sie die Anweisungen - Alle Bedienungsanweisungen müssen befolgt werden.
5.Benutzen Sie dieses Gerät nicht in der Nähe von Wasser - Das Gerät darf nicht in der Nähe von Wasser oder Feuchtigkeit verwendet werden - zum Beispiel, in einem feuchten Keller oder in der Nähe eines Schwimmbeckens.
6.Nur mit einem leicht angefeuchteten Tuch reinigen.
7.Blockieren Sie keine der Lüftungsöffnungen.
Stellen Sie das Gerät entsprechend den Anweisungen des Herstellers auf.
8.Stellen Sie das Gerät nicht in der Nähe von Hitzequellen, wie z. B. Heizungen, Herden oder anderen Geräten die Hitze produzieren (z. B. Verstärker) auf.
9.Wenn Ihr Gerät über einen polarisierten oder geerdeten Stecker verfügt, machen Sie auf keinen Fall diese Sicherheitsfunktion unbrauchbar. Ein polarisierter Stecker hat zwei Flügel, bei denen einer breiter als der andere ist. Ein Erdungsflügel. Der breite und der Erdungsflügel sind eingebaute Sicherheitsvorrichtungen. Wenn der Netzstecker Ihres Geräts nicht in Ihre Steckdose passt, wenden Sie sich bitte an einen ausgebildeten Elektriker.
10.Schützen Sie das Netzkabel vor Druckeinwirkung, insbesondere am Stecker, Steckdosen oder am Ausgangspunkts des Geräts.
11.Verwenden Sie lediglich vom Hersteller angegebenes Zubehör.
12.Das Gerät darf nur dann mit Wagen, Gestellen, Stativen, Halterungen oder Tischen verwendet werden, wenn diese vom Hersteller entsprechend angegeben wurden oder zusammen mit dem Gerät verkauft wurden. Wenn ein Wagen benutzt wird, muss darauf geachtet werden, dass das Gerät nicht zusammen mit dem Wagen umkippt und Verletzungen verursacht.
13.Ziehen Sie bei Gewittern oder bei längerer Nichtbenutzung den Netzstecker aus der Steckdose.
14.Wenden Sie sich im Wartungsfall nur an ausgebildetes Wartungspersonal. Das Gerät sollte in Wartung gegeben werden, nachdem es in irgendeiner Weise
2
beschädigt wurde, wie z.B. bei Beschädigung des Netzkabels, nachdem Flüssigkeit über das Gerät gegossen wurde oder Gegenstände in das Gerät gelangt sind, oder Regen bzw. Feuchtigkeit ausgesetzt wurde.
15.Bitte stellen Sie das Gerät an einem gut belüfteten Ort auf.
16.Die enthaltenen Wartungsanweisungen sind nur für ausgebildetes Fachpersonal gedacht. Um das Risiko eines Stromschlags zu verringern, führen Sie keine Reparaturen eigenhändig aus, es sei denn, sie sind in der Bedienungsanleitung angegeben, und Sie sind dafür qualifiziert.
17.Der NETZSTECKER dient dazu das Gerät vom Strom zu trennen und muss deshalb jederzeit leicht zugänglich bleiben.
18.Dieses Gerät ist ein Gerät der Klasse II bzw. ein doppelt isoliertes Elektrogerät. Es wurde in einer solchen Weise konzipiert, dass eine Sicherheitsverbindung zur elektrischen Erde nicht erforderlich ist.
19.-Das Dreieckszeichen mit Blitzsymbol verweist auf gefährliche Spannungen im Gerätegehäuse, die so hoch sein können, dass sie eine Gefahr von Stromschlägen bilden.
- Um das Risiko eines Stromschlags zu vermeiden, entfernen Sie nicht die Abdeckung (oder Rückseite). Im Inneren des Geräts befinden sich keine vom Anwender zu wartenden Teile. Wenden Sie sich bei Bedarf an entsprechend ausgebildetes Wartungspersonal.
- Das Dreieckszeichen mit Ausrufungszeichen verweist auf wichtige Funktionsund Wartungshinweise in der dem Gerät beigelegten Bedienungsanleitung.
20.Unsichtbare Laserstrahlung bei Öffnung des Geräts oder entsichertem Gehäuseverschluss. Vermeiden Sie Kontakt mit dem Laserstrahl.
21.Die Batterien dürfen niemals starker Hitze, wie z. B. Sonnenlicht, Feuer o. ä. ausgesetzt werden.
22.Dieses Gerät darf keinen Wassertropfen und -spritzern ausgesetzt werden. Gegenstände, die mit Flüssigkeiten gefüllt sind, sollten nicht auf das Gerät gestellt werden.
23.Um Feuer und elektrischen Schlägen vorzubeugen, vermeiden Sie es das Gerät Regen oder Feuchtigkeit auszusetzen.
24.Sachgemäße Entsorgung dieses Produkts: Dieses Zeichen gibt an, dass
dieses Produkt in der gesamten EU nicht mit dem Hausmüll entsorgt werden darf. Um mögliche Schäden für die Umwelt oder die menschliche Gesundheit durch unkontrollierte Abfallentsorgung zu vermeiden, ist es wichtig verantwortungsbewusst zu recyceln, um eine nachhaltige Wiederverwertung von Rohstoffressourcen zu fördern . Geben Sie Altgeräte bei Sammelstellen ab oder wenden Sie sich an den Händler bei dem das Gerät gekauft wurde. Dort wird das Gerät dann auf umweltverträgliche Weise entsorgt..
ERP II-Hinweis
Energieverbrauch - Dieses Produkt entspricht der Richtlinie für ökologisches Design der Europäischen Kommission und ihren Durchführungsverordnungen. Nach ca.15 Minuten ohne jegliche Eingabe (außer im Radiomodus), geht das System automatisch in den Bereitschaftsmodus. Gehen Sie entsprechend den Angaben in der Bedienungsanleitung vor, um den Betrieb wieder aufzunehmen.
3
Beschreibung der Bedienelemente
Vorderansicht
|
|
|
|
|
|
|
|
|
|
|
9 |
10 |
|
|
|
VOL |
|
|
|
|
|
|
TUNER / ENTER/ BT PAIR |
|
|
||
|
|
|
|
|
|
|
|
|
|
|
SOURCE |
INFO/MENU/ |
|
|
|
STANDBY TREBLE BASS |
|
|
|
|
|
|
|
|
|
|
|
|
|
|
|
|
|
|
|
|
|
|
PRESET/ |
SCAN/ |
|
|
|
|
|
|
|
|
|
|
|
|
|||
|
|
|
|
|
|
|
|
|
|
|
|
|
|
|
|
|
|
|
|
|
|
|
|
||||
|
|
|
|
|
|
|
|
|
|
||||
|
|
|
|
8 |
12 |
11 |
|
||||||
Nr |
Bedienelement |
|
Beschreibung |
|
|
|
|||||||
1 |
Bereitschaft |
Betätigen Sie diese Taste, Halten Sie die Taste gedrückt, um das |
|||||||||||
|
|
|
|
||||||||||
|
|
|
|
Gerät in den Bereitschaftsmodus zu versetzen. |
|||||||||
|
|
|
|
|
|
|
|
|
|
|
|
||
2 |
Höhen |
Benutzen Sie die Tasten OBEN oder UNTEN, um die |
|||||||||||
|
|
|
|
Höheneinstellung aufzurufen und verwenden Sie den Lautstärkeregler |
|||||||||
|
|
|
|
innerhalb von 3 Sekunden zum Einstellen der Höhen, um einen |
|||||||||
|
|
|
|
lebendigen Klangeffekt zu erhalten. |
|
|
|||||||
|
|
|
|
|
|
|
|
|
|
|
|
||
3 |
Bässe |
Benutzen Sie Tasten OBEN und UNTEN, um die Tiefeneinstellung |
|||||||||||
|
|
|
|
aufzurufen und verwenden Sie dann den Lautstärkeregler innerhalb |
|||||||||
|
|
|
|
von 3 Sekunden, um die Bässe einzustellen und einen lebendigen |
|||||||||
|
|
|
|
Klangeffekt zu erhalten. |
|
|
|
||||||
4 |
Lautstärkeregler |
Stellen Sie die Lautstärke auf ein angemessenes Maß. |
|||||||||||
5 |
Bildschirm |
Anzeige der Eingangsfrequenz und Informationen |
|||||||||||
|
|
|
|
zur Wiedergabe. |
|
|
|
||||||
6 |
Bluetooth-Anzeige |
Zeigt den Status an. |
|
|
|
||||||||
7 |
Fernbedienungssensor |
Richten Sie die Fernbedienun |
g auf diesen Sensor. |
||||||||||
8 |
|
|
Betätigen Sie die Taste im DAB-Modus, um zum nächsten oder |
||||||||||
|
|
|
|
vorigen Sender zu springen. |
|
|
|
||||||
|
|
|
|
Betätigen Sie die Taste im UKW-Modus zum Einstellen der |
|||||||||
|
|
Frequenz / Eingabe / |
Frequenz nach oben oder unten in 0,05-MHz-Schritten. |
||||||||||
|
|
|
|
Betätigen Sie im Menü ENTER, um die Auswahl zu bestätigen. |
|||||||||
|
|
|
|
Wenn der buzzer Alarm geht, drücken Sie ENTER, um den Alarm zu |
|||||||||
|
|
|
|
stoppen oder drehen Sie den Regler, um den Tuner-Modus zu gelangen |
|||||||||
|
|
|
|
Nickerchen, wird der Alarm auf 5 Minuten spater gehen. |
|||||||||
|
|
Bluetooth-Verbindung |
Wenn Sie bereits verbundene Geräte trennen möchten, betätigen |
||||||||||
|
|
Sie die BT PAIR-Taste. Benutzen Sie dann Ihr Mobilgerät, um die |
|||||||||||
|
|
|
|
||||||||||
|
|
|
|
Verbindung wiederherzustellen to stop playing, press to play from |
|||||||||
|
|
|
|
beginning. |
|
|
|
||||||
|
9 |
Eingangssignal |
|
Benutzen Sie diese Taste, um das Eingangssignal zu wählen: UKW, |
|||||||||
|
|
||||||||||||
|
|
USB, Bluetooth (BT), AUX, DAB. |
|
|
|
||||||||
|
|
|
|
|
|
|
|||||||
|
|
|
|
|
|
|
|
|
|
|
|
||
|
|
Menü/ |
|
Halten Sie diese Taste im DABoder UKW-Modus gedrückt, um das |
|||||||||
|
|
|
Menü aufzurufen.Betätigen Sie die Taste im DAB-Modus, um durch |
||||||||||
|
10 |
Informationen |
|
||||||||||
|
|
Informationen zum Sender zu gehen. |
|
|
|||||||||
|
|
|
|
Betätigen Sie diese Taste im UKW-Modus wiederholt, um durch die |
|||||||||
|
|
Vor |
|
Rundfunkinformationen zu blättern. |
|
|
|
||||||
|
|
|
Im Standby-Modus, drücken Sie NEXT-Taste, um Uhrzeit und |
||||||||||
|
|
|
|
Weckzeit Einstellung. |
|
|
|
||||||
|
|
|
|
|
|
|
|||||||
|
|
|
|
In BT Modus drücken, um zum n?chsten Titel zu springen. |
|||||||||
|
|
|
|
|
|
|
|
|
|
|
|
||
|
11 |
Zurück |
|
In BT-Modus drücken, um zum vorherigen Titel zu springen. |
|||||||||
|
|
Im UKW-Modus drücken, um die Stationen zu scannen. |
|||||||||||
|
Suchen |
|
|||||||||||
|
|
|
|
|
|
|
|
|
|
|
|
|
|
|
|
Senderspeicher |
|
Betätigen Sie diese Taste im Radiomodus als Senderspeichertaste, |
|||||||||
|
|
|
um Ihre Lieblingssender zu speichern. |
|
|
||||||||
|
12 |
|
|
|
|
||||||||
|
Wiedergabe / Pause |
|
Betätigen Sie die Taste im Bluetooth-Modus, um die Wiedergabe |
||||||||||
|
|
|
|
vorübergehend anzuhalten. Betätigen Sie die |
|
|
|||||||
|
|
|
|
Taste erneut, um die Wiedergabe fortzusetzen. |
|||||||||
|
|
|
|
4 |
|
|
|
|
|
||||
Rückseitenansicht
|
|
|
|
DR-05 BT Black |
|
|
|
Retro Radio Bluetooth® and DAB+ |
|
|
|
|
Channel Block:DAB+(band lll) 5A-13F |
|
|
|
|
12 |
1.67A |
|
|
|
Power Consumption: 20W |
|
|
|
|
Production Date: |
|
|
|
|
Made in China |
|
|
|
|
S/N: |
|
|
|
USB |
AUX IN |
|
|
|
|
|
DR-05 BT White |
|
|
|
Retro Radio Bluetooth® and DAB+ |
|
|
|
|
Channel Block:DAB+(band lll) 5A-13F |
|
|
|
|
12 |
1.67A |
|
|
|
Power Consumption: 20W |
|
|
|
|
Production Date: |
|
|
|
|
Made in China |
|
|
|
|
S/N: |
|
|
|
USB |
AUX IN |
|
|
12 |
13 |
14 |
15 |
Nr. |
Bedienelemente |
Beschreibung |
|
|
13 |
UKW-Antenne |
Ziehen Sie die UKW-Antenne für einen optimalen |
||
14 |
|
Radioempfang vollständig heraus. |
||
USB-Anschluss |
Dieser Anschluss lädt auch Ihr USB-Gerät auf, wenn es über |
|||
15 |
|
einen geringen Batteriestand verfügt. |
||
Aux-Eingang |
Mit dem 3,5-mm-AUX-Audiokabel können Sie externe |
|||
|
|
Audiogeräte (DVD-Player, Computer, Telefone etc.) |
||
|
|
anschließen. |
|
|
|
|
Im AUX-Modus funktioniert das Gerät als Lautsprecher, und Sie |
||
16 |
Stromanschluss |
können nur die Lautstärke des Geräts verändern. |
||
Stecken Sie den Netzadapter in eine Steckdose und schalten Sie das |
||||
|
|
Gerät ein. |
|
|
5
Beschreibung der Fernbedienung
8
9
MUTE |
STANDBY |
|
SOURCE |
MENU |
INFO |
PRESET |
|
|
STOP |
TREBLE |
|
ID3 |
BASS |
|
|
||
SNOOZE/DIM |
SLEEP |
ALARM |
BT PAIR |
|
1 |
|
2 |
|
3 |
|
|
|
|
|
|
|
|
|
|
|
|
4 |
|
5 |
|
6 |
|
|
|
|
|
|
|
|
|
|
|
|
|
|
|
|
|
|
7 |
|
8 |
|
9 |
|
|
|
|
|
|
|
|
|
|
|
0 |
|
MO/ST |
|
RANDOM |
|
|
10
11
12
13
14
15
16
17
18
19
20
DR-05 BT
Nr. |
Tasten |
|
Beschreibung |
||
1 |
|
Ton aus |
|
Betätigen Sie diese Taste, um den Ton auszuschalten. |
|
2 |
|
Eingangssignal |
|
Benutzen Sie diese Taste, um das Eingangssignal zu wählen: |
|
|
|
|
|
UKW, USB, Bluetooth (BT), AUX. |
|
3 |
|
Menü |
|
Benutzen Sie diese Taste, um das Einstellungsmenü aufzurufen. |
|
|
|
|
|||
|
|
||||
|
|
|
|
|
|
4 |
|
Wiedergabe / Pause |
|
Betätigen Sie die Taste im Bluetooth-Modus, um die Wiedergabe |
|
|
|
|
|
vorübergehend anzuhalten. Betätigen Sie die Taste erneut, um |
|
|
|
|
|
die Wiedergabe fortzusetzen. |
|
|
|
|
|
In FM mode, press to scan the stations. |
|
|
|
|
|
Wenn der Alarm geht, drücken, um den Alarm zu stoppen. |
|
5 |
|
Senderspeicher |
|
Benutzen Sie diese Taste im UKWoder DAB-Modus, um Ihre |
|
|
|
||||
|
|
|
|
Lieblingssender zu speichern. |
|
6 |
|
Höhen |
|
Betätigen Sie die TREBLE-Taste und verwenden Sie dann die |
|
|
|
|
|
Tasten VOLUME +/-, um die Höhen einzustellen |
|
7 |
|
Schlummerfunktion |
/ |
Wenn der Alarm aktiviert wird, können Sie die SNOOZE-Taste |
|
|
|
(nur in Summer-Modus) |
|
betätige, um den Alarm vorübergehend zu stoppen. |
|
|
|
Dimmer |
|
In allen Betriebsarten können Sie diese Taste benutzen, um die |
|
|
|
|
Bildschirmhelligkeit auf eine von 3 Stufen einzustellen. |
||
8 |
|
Einschlafmodus |
|
Benutzen Sie diese Taste, um den Einschlafmodus einzustellen: |
|
|
|
|
|
Aus / 10 / 15 / 30 / 45 / 60 / 90 / 120 Minuten. |
|
|
|
|
|
Wenn die Zeit abgelaufen ist, wird das Gerät automatisch |
|
|
|
|
|
ausgeschaltet. |
|
9 |
|
Zifferntasten |
|
Verwenden Sie die Zifferntasten zur Auswahl von Titeln und Sendern. |
|
|
|
|
|
|
|
10 |
|
Bereitschaft |
|
Betätigen Sie diese Taste, um das Gerät einzuschalten bzw. |
|
|
|
|
|
wieder in den Bereitschaftsmodus zu schalten. |
|
11 |
|
Informationen |
|
Betätigen Sie diese Taste im UKWoder DAB-Modus, um |
|
|
|
|
|
Senderinformationen einzusehen. |
|
12 |
|
Lautstärke +/- |
|
Benutzen Sie diese Tasten, um die Lautstärke auf ein |
|
|
|
|
|
angenehmes Niveau zu stellen. |
|
13 |
|
Vor |
|
Halten Sie die Tasten gedrückt, um den Schnellvorlauf bzw. |
|
|
|
Zurück |
|
Schnellrücklauf durch den aktuellen Titel zu starten. |
|
|
|
|
|
Betätigen Sie die Tasten im Bluetooth-Modus, um zum nächsten |
|
|
|
|
|
bzw. vorigen Titel zu springen. |
|
|
|
|
|
Betätigen Sie diese Tasten im UKW-Modus, um die Frequenz |
|
|
|
|
|
Schritten von 0,05 MHz zu verändern. Halten Sie eine der |
|
|
|
|
|
Tasten gedrückt, um zur nächsten bzw. vorigen verfügbaren |
|
|
|
|
|
Frequenz zu springen. |
|
6
14 |
Stopp |
Benutzen Sie diese Taste um die Wiedergabe zu beenden. Betätigen |
||||||
|
|
Sie die Taste |
, um die Wiedergabe vom Anfang des aktuellen Titels |
|||||
|
|
erneut zu starten. |
|
|
|
|
||
|
|
|
||||||
15 |
Bässe |
Betätigen Sie die BASS-Taste und verwenden Sie die Tasten VOLUME |
||||||
|
|
+/-, um die Bässe einzustellen. |
|
|
|
|||
|
|
|
||||||
16 |
ID3 |
Betätigen Sie diese Taste während der Wiedergabe von MP3-Titel, um |
||||||
|
|
Informationen zum aktuellen Titel anzuzeigen: Album, Interpret etc. |
||||||
|
|
|
|
|
|
|
|
|
17 |
Alarm |
Betätigen Sie diese Taste im Bereitschaftsmodus, um die Uhrzeit |
||||||
|
|
|||||||
|
|
einzustellen. Es erscheint dann "Time Auto Update" in der |
||||||
|
|
DAB-Modus und FM RDS automatisch einzustellen. |
||||||
|
|
Betätigen Sie diese Taste im Bereitschaftsmodus, um die Uhrzeit |
||||||
|
|
und Alarm 1, Alarm 2 einzustellen. |
|
|
||||
|
|
Betätigen Sie die Taste einmal, um die Uhrzeit einzustellen. |
||||||
|
|
Betätigen Sie die Taste ein zweites Mal, um Alarm 1 |
||||||
|
|
einzustellen. Betätigen Sie sie ein drittes Mal, um Alarm 2 |
||||||
|
|
einzustellen. |
|
|
|
|
|
|
|
|
Sobald Sie sich im Einstellungmodus befinden können Sie die |
||||||
|
|
Tasten |
|
und |
benutzen, um Inhalte zu wählen und dann |
|||
|
|
mit |
bestätigen. Das System geht dann automatisch zur |
|||||
|
|
nächsten Einstellung. |
|
|
|
|||
|
|
Im Einstellungsmodus wird das Datum im Format JJJJ/MM/TT |
||||||
|
|
angezeigt. |
|
|
|
|
|
|
|
|
Verwenden Sie die Tasten |
, um das Datum einzustellen |
|||||
|
|
und betätigen Sie |
. Sie können dann den |
|
||||
|
|
24/12-Stundenmodus einstellen. Danach können Sie die |
||||||
|
|
Stunden / Minuten einstellen. Betätigen Sie |
, um Ihre |
|||||
|
|
Einstellung zu bestätigen und zu beenden. |
|
|||||
|
|
Zur Einstellung des Alarms erscheint "0:00" blinkend in der |
||||||
|
|
Anzeige. Benutzen Sie die Tasten |
und |
, um die Weckzeit |
||||
|
|
einzustellen. Betätigen Sie |
| zur Bestätigung.Wählen Sie |
|||||
|
|
dann die Alarmoption: Täglich, Wochentage, Wochenenden, |
||||||
|
|
einmalig. Danach können Sie den Alarmmodus wählen: Summer, |
||||||
|
|
FM, USB,DAB. Zuletzt können Sie die Alarmlautstärke einstellen. |
||||||
|
|
Wenn Sie mit der Einstellung des Weckalarms 1 fertig sind, |
||||||
|
|
können Sie mit der Einstellung des Weckalarms 2 fortfahren. Um |
||||||
|
|
den Einstellungsmodus zu beenden, betätigen Sie die |
||||||
|
|
ALARM-Taste und wählen Sie OFF. |
|
|
||||
18 |
Bluetooth-Verbindung |
Betätigen Sie diese Taste, um die Bluetooth-Funktion des |
||||||
|
|
Geräts zu aktivieren |
|
|
|
|
||
|
|
Benutzen Sie die Taste im Verbindungsmodus, um die Geräte wieder |
||||||
|
|
zu trennen. |
|
|
|
|
|
|
19 |
Zufallswiedergabe |
Betätigen Sie diese Taste um die Titel in zufälliger Reihenfolge |
||||||
|
|
abzuspielen. Betätigen Sie die Taste erneut, um die Zufallswiedergabe |
||||||
|
|
abzubrechen. |
|
|
|
|
|
|
|
|
|
||||||
20 |
MO/ST |
Betätigen Sie diese Taste im Radiomodus, um Stereo einzuschalten, |
||||||
|
|
wenn ein genügend starkes Signal vorhanden ist. |
|
|||||
|
|
Wenn der Empfang zu schwach ist, können Sie nicht auf Stereo |
||||||
|
|
schalten. |
|
|
|
|
|
|
|
|
|
|
|
|
|
|
|
7

Grundlegende Bedienung
Bevor Sie mit der Einstellung Ihres Geräts beginnen, sind bestimmte Schritte erforderlich, um den Vorgang so einfach und problemlos wie möglich zu halten.
WICHTIG BEDIENSCHRITTE:
1.Halten Sie die MENU/INFO-Taste auf der Gerätevorderseite gedrückt oder betätigen Sie die MENU-Taste auf der Fernbedienung, um das Einstellungsmenü aufzurufen.
2.Drehen Sie am FREQUENZDREHKNOPF auf der Gerätevorderseite oder benutzen Sie die Tasten  und
und  auf der Fernbedienung zur Menüauswahl.
3.Betätigen Sie ENTER (FREQUENZDREHKNOPF) auf der Gerätevorderseite oder betätigen Sie die Taste  auf der Fernbedienung, um die Auswahl zu bestätigen.
4.Wenn die Auswahl inkorrekt ist, können Sie die MENU/INFO-Taste auf der Gerätevorderseite betätigen, um zurück zum vorigen Menüinhalt zu gelangen (diese Funktion ist nicht bei der Uhrzeiteinstellung verfügbar).
Einstellen der Uhrzeit
1. Betätigen Sie im Bereitschaftsmodus die ALARM-Taste auf der Fernbedienung, um die Uhrzeit einzustellen. Es erscheint die folgende Bildschirmanzeige:
Time Auto Update
OFF / ON
2. Drehen Sie am FREQUENZDREHKNOPF oder benutzen Sie die Tasten  und
und  auf der Fernbedienung zur Auswahl von:
OFF oder ON.
<A> Wenn Sie ON wählen, betätigen Sie  , um zu bestätigen, dass das Gerät überTIME AUTO UPDATE eingestellt wird.
<B> Wenn Sie OFF wählen, betätigen Sie  und das Gerät geht zur manuellen Einstellung über. In der Anzeige erscheint:
2013-01-01
0:00
3. Drehen Sie am FREQUENZDREHKNOPF oder benutzen Sie die Tasten  und
und  , um die
Uhrzeit einzugeben. Betätigen Sie die Taste  zur Bestätigung.
Mit jedem fertig eingestelltem Element, geht das Gerät zum nächsten.
4. Wenn Sie mit der Uhrzeiteinstellung fertig sind, drücken Sie auf ALARM, um den Alarm 1 und Alarm 2 über.
Wenn Sie mit der Einstellung von Uhrzeit / Datum fertig sind, hört die Anzeige auf zu blinken.
Sie können dann weitere Einstellungen vornehmen, um das Gerät Ihren Wünschen anzupassen.
8

DAB-Betrieb
Aufrufen des DAB-Modus
Betätigen Sie die SOURCE-Taste, um in den DAB-Modus zu wechseln. Das Gerät beginnt damit eine Sendersuche zu starten, wenn Sie den DAB-Modus einschalten. In der Anzeige erscheint ein Fortschrittsbalken und die Anzahl gefundener Sender. Sobald der Suchvorgang abgeschlossen ist, startet das Gerät die Wiedergabe des ersten Senders.
Senderauswahl
1.Drehen Sie am FREQUENZDREHKNOPF oder benutzen Sie die Tasten  und
und  , um zum nächsten oder vorigen Sender zu springen.
2.Betätigen Sie ENTER oder  auf der Fernbedienung, um den Sender aufzurufen.
Sendersuche
Halten Sie die MENU/INFO-Taste auf der Gerätevorderseite gedrückt oder betätigen Sie die MENU-Taste auf der Fernbedienung, um das Einstellungsmenü aufzurufen. Drehen Sie dann am FREQUENZDREHKNOPF oder benutzen Sie die Tasten  auf der Fernbedienung zur Auswahl von <Full Scan> / <Manual tune>. Betätigen Sie ENTER zur Bestätigung.
1.Wenn Sie <Full Scan> wählen, startet das Gerät eine Sendersuche durch alle DAB-Kanäle.
2.Wenn Sie <Manual tune> wählen, betätigen Sie ENTER zur Auswahl eines Kanals 5A bis 13F.
3.Mit ENTER können dann den gewünschten Sender wählen.
Speichern von Sendern
Sie können bis zu 20 Ihrer Lieblingssender im Senderspeicher ablegen. Dies ermöglicht es Ihnen auf Ihre Lieblingssender schnell und einfach zuzugreifen.
Lange drücken Sie die Zifferntasten 0-9 nur sparen 10 Stationen nur, mehr zu sparen, entnehmen Sie bitte den unten Operationen.
1.Um einen Sender zu speichern, müssen Sie zuerst auf den Sender, den Sie speichern möchten, zugreifen.
2.Halten Sie die PRESET-Taste solange gedrückt, bis folgende Anzeige erscheint:
Preset Store
<1: (Empty)>
3.Drehen Sie am FREQUENZDREHKNOPF oder benutzen Sie die Tasten  und
und  auf der Fernbedienung zur Auswahl der Speicherplatznummer, unter der Sie den Sender speichern möchten.
4.Zur Bestätigung des Senders betätigen Sie ENTER auf der Gerätevorderseite oder  auf der Fernbedienung. Auf dem Bildschirm erscheint die Meldung: <Preset X stored>.
Hinweis: Senderspeicher, die bereits belegt sind, werden auf die folgende Weise angezeigt: z. B. <BBC Radio4 3>.
5.Betätigen Sie die PRESET-Taste, um einen gespeicherten Sender aufzurufen. In der Anzeige erscheint:
Preset Recall
<1: (Empty)>
9
Beispiel:
Sie hören BBC World und Sie wollen diesen Sender auf dem Senderspeicher 5 speichern.
a)Stellen Sie den Sender BBC World ein, den Sie speichern wollen.
b)Halten Sie die PRESET-Taste solange gedrückt, bis <Preset Store> erscheint.
c)Drehen Sie am FREQUENZDREHKNOPF, um 5 auszuwählen. Betätigen Sie die ENTER-Taste und <PRESET 5 stored> erscheint.
INFO-Modus
Jedes Mal, wenn Sie die INFO-Taste auf der Fernbedienung oder die MENU/INFO-Taste auf der Gerätevorderseite betätigen, zeigt der Bildschirm nacheinander die folgenden Informationen an:
1.RSSI Signalstärke
2.Musikstil - wie z. B. <Rock>
3.Sendername - wie z. B. <BBC National DAB>
4.Frequenz - wie z. B. <5A 174.928MHz>
5.Signalfehler: 25
6.Bitrate - wie z. B. <128Kbps/DAB>
7.DLS
Aufrufen des Einstellungsmenüs
Halten Sie die MENU/INFO-Taste auf der Gerätevorderseite oder die MENU-Taste auf der Fernbedienung gedrückt, um das Einstellungsmenü aufzurufen. Drehen Sie am
FREQUENZDREHKNOPF zur Menüauswahl: <Full Scan> → <Manual tune> → <DRC> → <Prune> → <System>
Dynamikbereichsteuerung (DRC)
Mit dieser Funktion kann der Dynamikbereich des Audiosignals reduziert werden. Der Zweck davon ist es, den Dynamischbereich des Audiosignals auf eine laute Umgebung anzupassen. Hinweis: Diese Funktion steht nicht bei vielen DAB-Sendern zur Verfügung.
Gehen Sie wie folgt vor:
1.Halten Sie die MENU/INFO-Taste auf der Gerätevorderseite oder die MENU-Taste auf der Fernbedienung gedrückt. Drehen Sie dann am FREQUENZDREHKNOPF zur Auswahl von
<DRC>.
2.Betätigen Sie die ENTER-Taste zur Anzeige des Menüinhalts und wählen Sie DRC Off, DRC High oder DRC Low.
3.Betätigen Sie ENTER, um die Einstellung zu bestätigen.
Nichtaktive Sender
Wenn das Radio eine Sendersuche an verschiedenen Standorten durchgeführt hat, werden Sie feststellen, dass bestimmte gespeicherte Sender nicht mehr empfangen werden können. Diese Funktion entfernt diese Sender automatisch aus der Senderliste.
Gehen Sie wie folgt vor:
1. Halten Sie die MENU/INFO-Taste gedrückt und drehen Sie am FREQUENZDREHKNOPF
10
 Loading...