


|
Instruction |
|
L-69 |
Anleitung |
|
Instrucciones |
||
|
||
|
Mode d’emploi |
|
|
Instructies |
STOP |
|
USB |
REC |
|
|
SD
UP
33
 DOWN
DOWN
45
REC
|
|
MODE |
ID3/PROG |
|
SKIP- |
F |
UP |
|
|
UP- |
|
PLAY/PAUSE |
|
SKIP- |
|
DN |
|
STOP/SD |
|
|
Direct encoding turntable Plattenspieler mit Direktaufnahmefunktion Giradiscos de codificación directa Tourne-disque à encodage direct
Direct encoding draaitafel
For information and supports: www.lenco.eu
Zur Information und Unterstützung, www.lenco.eu
Para obtener información y apoyo, www.lenco.eu
Pour information & support technique, www.lenco.eu
Voor informatie en ondersteuning, www.lenco.eu

CAUTION:
Usage of controls or adjustments or performance of procedures other than those specified herein may resulte in hazardous radiation exposure.
This unit should not be adjusted or repaired by anyone except qualified service personnel.
PRECAUTIONS FOR USE
Installation
•Unpack all parts and remove protective material.
•Do not connect the unit to the mains before checking the mains voltage and before all other connections have been made.
•Do not cover any vents and make sure that there is a space of several centimeters around the unit for ventilation.
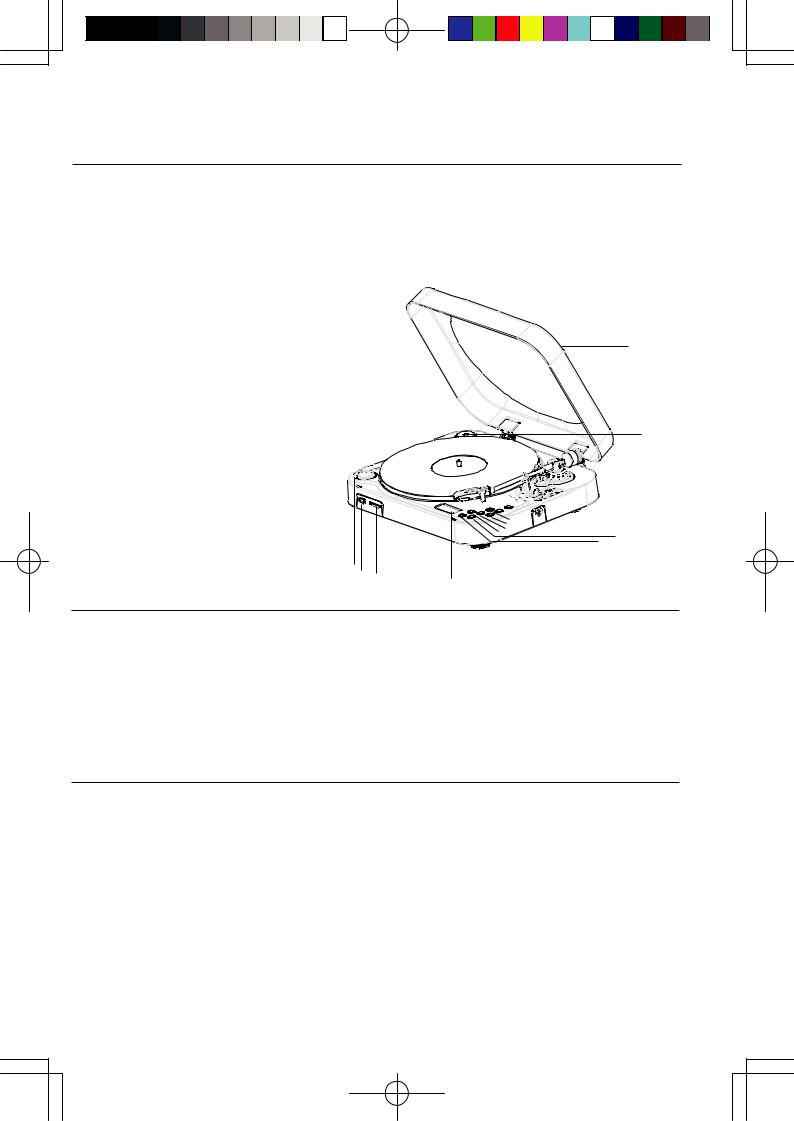
LOCATION OF CONTROLS
1)Dust cover
2)Spindle adaptor
3)AC cord
4)Audio cable
5)Pick-up holder
6)UP/DOWN selector
7)33/45 rpm speed selector
8)REC button
9)SKIP - UP button
10)OFF/USB/PH selector
11)MODE button
12)SKIP - DN button
13)F - UP button
14)ID3/PROG button
15)STOP/SD button
16)PLAY/PAUSE button
17)LCD display
18)SD slot
19)USB slot
20)STOP button
 STOP
STOP
USB |
REC |
|
|
|
SD |
20
19 18
17
1
2
|
|
|
|
|
|
|
|
|
|
|
|
|
|
|
|
3 |
|||
|
|
|
|
|
|
|
|
|
|
|
|
|
|
|
|
||||
|
|
|
|
|
|
|
|
|
|
|
|
|
|
|
|
4 |
|||
|
|
|
|
|
|
|
|
|
|
|
|
|
|
|
|
||||
|
|
|
|
|
|
|
|
|
|
|
|
|
|
|
|
5 |
6 |
||
|
|
|
|
|
|
|
|
|
|
|
|
|
|
|
|
||||
|
|
|
|
|
|
|
|
|
|
|
|
|
|
|
|
|
|
||
|
|
|
|
|
|
|
|
|
|
|
|
|
|
|
7 |
||||
|
|
|
|
|
|
|
|
|
|
|
|
|
|
|
|
|
|||
|
|
|
|
|
|
|
|
|
|
|
8 |
|
|
|
|
||||
|
|
|
|
|
|
|
|
|
|
|
|
|
|
|
|
|
|
||
|
|
|
|
|
|
|
|
|
|
9 |
|
|
|
|
|
|
10 |
||
|
|
|
|
|
|
|
|
|
|
|
|
|
|
|
|
||||
|
|
|
|
|
|
|
|
|
|
|
|
|
11 |
|
|
|
|||
|
|
|
|
|
|
|
|
|
|
|
|
|
|
|
|
|
|
||
|
|
|
|
|
|
|
|
|
|
|
|
|
12 |
|
|
|
|
|
|
|
|
|
|
|
|
|
|
|
|
|
13 |
|
|
|
|
|
|
||
|
|
|
|
|
|
|
|
|
14 |
|
|
|
|
|
|
|
|||
15
16
CONNECTION
Audio connection
The record player has an inbuilt preamplifier and can therefore be connected directly to the Line In / Aux input on a hi-fi system.
•Connect the audio cable(4) to the Line In / Aux input on your hi-fi system (red plug = right channel; white plug = left channel).
Mains connection
1.Connect the power cord to AC outlet
2.switch the OFF/USB/PH Selector to “ PH “ function. if ”PHONO” is displayed on the LCD display, it’s mean the power supply is normal. now your system is ready to play the music.
PHONO
NOTED:
-remove the stylus protector.
-be sure that the tone arm is being detached from the tone arm rest before operating and re-secured again afterwards.
1.Slide the OFF/USB/PH selector(13) to “PH” function, “PHONO” is displayed on the LCD display
2.Set the 33/45 rpm speed selector(7) to the proper position depending on the record to be played.
3.Place the record on the platter (use the spindle adaptor if required).
4.Slide the UP/DOWN selector(6) to “UP” position
5.Lift the tone arm from the rest and slowly move it to the record side. the platter will start to rotate.
6.Place the tone arm to the desired position of the record, Slide the UP/DOWN selector(6) to “DOWN” position
7.Adjust the volume to the desired level on your hi-fi system.
8.At the end of record, the platter will automatically stop rotating, the tone arm will automatically return to the rest.
9.To stop manually, press the STOP Button(20) directly, or lift the tone arm from the record and return it to the rest
E - 1
PHONO ENCODING
1.Insert the USB flash disk or SD card into appropriate slot(18)/(19).
2.Slide the OFF/USB/PH selector(13) to “PH” function, “PHONO” is displayed on the LCD display
3.select and playback at phono for the track which will be assigned to the encoded sounds on the USB flash disk or SD card.
4.Press once the “REC” button(10), the LCD display shows “USB” flashing/ “CARD” flashing. The encoding will starting after 10 seconds and shows “PHONO” with flashing words “USB” / “CARD” lower left corner of the LCD display.
NOTED: Press twice the “REC” button(10) directly, the encoding will starting immediately. 5. To stop encoding, press “STOP/SD” button(15).
Re-mark: Do not interrupt during the phono recording process until completed. Otherwise,recording function cannot be performed.
PLAYBACK OF MP3/WMA SONGS VIA USB FLASH DISK OR SD CARD STORAGE MEDIA
1.Insert the USB flash disk or SD card into appropriate slot(18)/(19).
2.Slide the OFF/USB/PH selector(13) to “USB” function, the unit will automatically read the total folders and the number of the total tracks.
3.Playback will start by pressing “PLAY/PAUSE” button(16). playback starts with the first track, the LCD display shows the current track number and the song “WMA” or “MP3” format .
4.To interrupt playback, press “PLAY/PAUSE” button(16). the time elapsed indicator will flash.
5.To resume playback, press the “PLAY/PAUSE” button(16) again.
6.To stop playback, press stop by using the “STOP/SD” button(15).
TRACK SKIP
“SKIP - DN” button(14) - press once to return to the beginning of the current track. press again quickly to back up
|
|
|
|
|
|
|
another track. |
|
|
|
|
|
|||
“SKIP - UP” button(12) - press once to skip to the next track. press again to move forward another track. |
|||||||||||||||
“F - UP” button(9) |
|
- allow you to switch between the folder while the playback, hold either “SKIP - DN”(14) or |
|||||||||||||
|
|
|
|
|
|
|
“SKIP - UP”(12) button to audibly search the current track in the desired direction. |
||||||||
ID3 Tag Support |
|
- allowing you to conveniently view the artist name and the title of the track currently being played. |
|||||||||||||
|
|
|
|
|
|
|
To enable ID3 functions by press the “ID3/PROG” button(8) during the playback mode, |
||||||||
|
|
|
|
|
|
|
the “ID3 ON” is displayed on the LCD display. |
||||||||
|
|
|
|
|
|
|
To cancel ID3 functions by press the |
“ID3/PROG” button(8) again. |
|||||||
REPEAT/INTRO/RANDOM MODE |
|
|
|
|
|
||||||||||
(1) REPEAT 1 |
|
|
|
(2) REPEAT ALL TRACKS |
|
|
|
(3) REPEAT 1 FOLDER |
|
||||||
|
|
|
|
|
|
||||||||||
|
|
|
|
|
|
|
|
|
|
|
|
|
|
|
|
|
|
|
|
|
|
|
|
|
|
|
|
|
|
|
|
|
|
|
|
|
|
|
|
|
|
|
|
|
|
|
|
|
|
|
|
|
|
|
|
|
|
|
|
|
|
|
|
(6) OFF MODE |
(5) RANDOM |
(4) INTRO PLAY |
PLAY MODE |
INDICATOR ON LCD DISPLAY |
|
REPEAT SINGLE TRACK |
|
|
REPEAT ALL TRACKS |
|
ALL |
RELEAT SINGLE FOLDER |
|
|
INTRO PLAY MODE |
|
INTRO |
RANDON MODE |
|
RANDOM |
OFF MODE |
|
------------------- |
REPEAT PLAY
1.When the playback, if you desire to repeat the same track only, press the “MODE” button(11) on the unit .
2.To repeat all disc, press the “MODE” button(11) twice and the “ALL” display will light up.
3. To repeat folder, press the “MODE” button(11) thrice and the “ |
”display will light up. |
4.To cancel repeat play, press the “STOP/SD” button(15) or press the “MODE” button(11) repeatedly until the repeat indicator disappears.
INTRO PLAY
Introduce all songs by playing 10 seconds of each track.
1.Either in stop or playback mode, press the “MODE” button(11) four times, the “INTRO” indicator will light up..
2.To cancel intro play, press the “STOP/SD” button(15) or press the “MODE” button(11) repeatedly until the intro indicator disappears.
RANDOM PLAY
1.Either in stop or playback mode press the “MODE” button(11) five times, the “RANDOM” indicator will light up.
2.In the stop mode, press the “PLAY/PAUSE” button(16) to start playing. the tracks will be played randomly.
3.To cancel random play, press the “STOP/SD” button(15) once again until the “RANDOM” indicator disappears.
E - 2
PROGRAM PLAY
Allow you to program up to 32 tracks to play in any order, including repeating tracks.
1.When the playback is stopped, press the “ID3/PROG” button(8), the “PROG” indicator will flash.
2.Select a desired track by pressing “SKIP - DN”(14) or “SKIP - UP”(12) button. or by pressing “F - UP” button(9) to switch between the folder.
3.Press the “ID3/PROG” button(8) to store the track into memory.
4.Repeat the steps 3 and 4 for additional tracks into the memory if necessary.
5.To play the programmed of desired tracked, press the “PLAY/PAUSE” button(16).
6.To cancel the program memory, press “STOP/SD” button(15) until the “PROG” indicator disappears.
Model: L-69
Mains Voltage: 220 / 240 v ~ 50hz
Power Consumption: 14 w max.
Outputs: Audio output (cinch)
WARNING
To prevent fire or shock hazard, do not expose this appliance to rain or moisture.
Mains plug is used as the disconnect device and it shall remain readily operable. To be completely disconnected the power input, the mains plug of the apparatus shall be disconnected from the mains completely.
Dripping warning : " The product shall not be exposed to dripping or splashing and that no objects filled with liquids, such as vases, shall be placed on the product."
Ventilation warning : " The normal ventilation of the product shall not be impeded for intended use."
-minimum distance 50mm around the apparatus for sufficient ventilations;
-no naked flame sources such as lighted candles should be placed on the apparatus;
-attention should be drawn to the envirnmental aspects of battery disposal;
-the use of apparatus in moderate climates
The marking is located at the bottom of the apparatus.
Mains plug is used as the disconnect device and it shall remain readily operable. To be completely disconnected the power input, the mains plug of the apparatus shall be disconnected from the mains completely. The mains plug should not be obstructed OR should be easily accessed during intended use.
The apparatus shall not be exposed to dripping or splashing and that no objects filled with liquids, such as vases, shall be placed on apparatus.
IF AT ANY TIME IN THE FUTURE YOU SHOULD NEED TO DISPOSE OF THIS PRODUCT PLEASE NOTE THAT: WASTE ELECTRICAL PRODUCTS SHOULD NOT BE DISPOSED OF WITH HOUSEHOLD WASTE. PLEASE RECYCLE WHERE FACILITIES EXIST. CHECK WITH YOUR LOCAL AUTHORITY OR RETAILER FOR RECYCLING ADVICE. (WASTE ELECTRICAL AND ELECTRONIC EQUIPMENT DIRECTIVE)
E - 3
ACHTUNG:
Die Verwendung von Bedienungsweisen, die nicht in dieser Anleitung beschrieben werden, kann zudem zur Aussetzung von gefährlicher Strahlung führen.
Dieses Gerät sollte nur durch ausgebildetes Fachpersonal justiert oder repariert werden.
VORSICHTSMASSNAHMEN ZUR BENUTZUNG
Aufstellung
•Nehmen Sie sämtliche Teile aus der Verpackung heraus und entfernen Sie sämtliche Schutzmaterialien.
•Schließen Sie das Gerät nicht an den Strom an, bevor Sie die Netzspannung überprüft habe und alle anderen
Verbindungen fertiggestellt wurden
•Bedecken Sie keine der Ventilationsöffnungen und vergewissern Sie sich, dass um das Gerät herum mehrere Zentimeter
Platz zur Belüftung bleiben.
BEDIENELEMENTE
1)Staubschutz
2)Plattenadapter
3)Netzkabel
4)Audiokabel
5)Tonarmhalter
6)Tonarmsteuerung HOCH/RUNTER
7)33/45 Rpm Geschwindigkeitsregler
8)Aufnahme (REC)
9)Suchen hoch (SKIP UP)
10)OFF/USB/PH-Auswahlschalter
11)Modustaste
12)Suchen runter (SKIP DN)
13)F - UP-Taste
14)ID3/PROG-Taste
15)STOP/SD-Taste
16)PLAY/PAUSE-Taste
17)LCD-Display
18)SD-Kartenslot
19)USB-Port
20)STOP-Taste
 STOP
STOP
USB |
REC |
|
|
|
SD |
20
19 18
17
1
2
|
|
|
|
|
|
|
|
|
|
|
|
|
|
|
|
3 |
|||
|
|
|
|
|
|
|
|
|
|
|
|
|
|
|
|
||||
|
|
|
|
|
|
|
|
|
|
|
|
|
|
|
|
4 |
|||
|
|
|
|
|
|
|
|
|
|
|
|
|
|
|
|
||||
|
|
|
|
|
|
|
|
|
|
|
|
|
|
|
|
5 |
6 |
||
|
|
|
|
|
|
|
|
|
|
|
|
|
|
|
|
||||
|
|
|
|
|
|
|
|
|
|
|
|
|
|
|
|
|
|
||
|
|
|
|
|
|
|
|
|
|
|
|
|
|
|
7 |
||||
|
|
|
|
|
|
|
|
|
|
|
|
|
|
|
|
|
|||
|
|
|
|
|
|
|
|
|
|
|
8 |
|
|
|
|
||||
|
|
|
|
|
|
|
|
|
|
|
|
|
|
|
|
|
|
||
|
|
|
|
|
|
|
|
|
|
9 |
|
|
|
|
|
|
10 |
||
|
|
|
|
|
|
|
|
|
|
|
|
|
|
|
|
||||
|
|
|
|
|
|
|
|
|
|
|
|
|
11 |
|
|
|
|||
|
|
|
|
|
|
|
|
|
|
|
|
|
|
|
|
|
|
||
|
|
|
|
|
|
|
|
|
|
|
13 |
|
12 |
|
|
|
|
|
|
|
|
|
|
|
|
|
|
|
14 |
|
|
|
|
|
|
|
|||
15
16
ANSCHLUSS
Audioanschluss
Der Plattenspieler verfügt über einen eingebauten Vorverstärker und kann deshalb direkt an den Line-In/Aux-Eingang eines HiFi-System angeschlossen werden.
• Schließen Sie das Audiokabel (4) an den Line-In/Aux-Eingang Ihres HiFi-Systems an (roter Stecker = rechter Kanal; weißer Stecker = linker Kanal).
Netzanschluss
1.Schließen Sie das Netzkabel an einer Steckdose an.
2.Stellen Sie den OFF/USB/PH-Schalter auf die PH-Funktion. Wenn die „PHONO“ in der Anzeige erscheint, bedeutet das, dass die Stromversorgung einwandfrei ist. Ihr System ist dann bereit zur Musikwiedergabe.
PHONO
ANMERKUNGEN:
-Entfernen Sie die Nadelschutzkappe.
-Vergewissern Sie sich, dass der Tonarm nicht am Tonarmhalter befestigt ist, bevor Sie den Schallplattenspieler benutzen. Nach der Benutzung sollte der Tonarm wieder am Tonarmhalter verankert werden.
1.Stellen Sie den OFF/USB/PH-Schalter (13) auf die PH-Funktion. In der LCD-Anzeige erscheint „PHONO“.
2.Stellen Sie den Geschwindigkeitsschalter (7) in die von Ihnen benötigte Position.
3.Legen Sie die Schallplatte auf den Plattenteller (benutzen Sie den Plattenadapter falls nötig).
4.Stellen Sie die Tonarmsteuerung (6) auf „UP“.
5.Heben Sie den Tonarm vom Tonarmhalter herunter und bewegen Sie ihn vorsichtig zum Rand der Schallplatte. Der Plattenteller beginnt sich zu drehen.
6.Bewegen Sie den Tonarm auf die gewünschte Position der Schallplatte. Stellen Sie die Tonarmsteuerung (6) auf „DOWN“.
7.Stellen Sie die Lautstärke Ihres HiFi-Systems auf ein angenehmes Maß.
8.Ist die Platte am Ende angelangt wird der Tonarm automatisch in seine Ruheposition zurückgeführt und der Plattenteller hört auf sich zu drehen.
9.Um den Plattenspieler zu stoppen, betätigen Sie die direkt STOP-Taste (20) oder heben Sie den Tonarm von der Platte herunter und setzen Sie ihn vorsichtig zurück auf den Tonarmhalter.
DE - 1
 Loading...