


L-90
WOODEN TURNTABLE WITH USB CONNECTION AND BUILT-IN PRE AMPLIFIER
User Manual
www.lenco.com
V1.0
Table of content |
|
|
What is in the box? ..................................................................................................... |
|
3 |
Exploring the turntable................................................................................................ |
|
4 |
Getting started ............................................................................................................ |
|
5 |
Where to install........................................................................................................ |
|
5 |
Installation of the turntable ...................................................................................... |
|
5 |
Basic operation........................................................................................................... |
|
6 |
Playing records........................................................................................................ |
|
6 |
Connect the turntable to a computer for the first time |
.............................................. 6 |
|
Software Configuration (Windows XP, Vista, MAC) ................................................ |
6 |
|
Software Installation & Configuration (Windows 7).................................................. |
7 |
|
Digitalizing records ................................................................................................ |
|
10 |
The Audacity guide ................................................................................................... |
|
10 |
Maintenance ............................................................................................................. |
|
21 |
How to replace the stylus ...................................................................................... |
|
22 |
How to disassemble the cartridge ......................................................................... |
|
22 |
How to install a new cartridge................................................................................ |
|
22 |
Recommendations from Lenco.............................................................................. |
|
23 |
Trouble shooting....................................................................................................... |
|
23 |
Specifications ........................................................................................................... |
|
24 |
Spare parts list.......................................................................................................... |
|
24 |
Safety instructions .................................................................................................... |
|
25 |
Declaration of Conformity ................................... |
Fout! Bladwijzer niet gedefinieerd. |
|
Do not distribute copyright-protected material .......................................................... |
|
27 |
Disclaimer................................................................................................................. |
|
27 |
Service and support............................................ |
Fout! Bladwijzer niet gedefinieerd. |
|
End of life............................................................ |
Fout! Bladwijzer niet gedefinieerd. |
|
2

Dear customer,
Thank you for buying this Lenco product. Quality and usability is our top priority. In order to let you fully enjoy this turntable, we have manufactured this product using high quality standards, materials, components, and care.
Please read all safety instructions and national restrictions, before you use this turntable.
Note:
This user manual was printed prior to the development of this product. When operability or other functions needed improvement, priority went to the product specification itself, and not to this manual.
In such instances, the instruction manual may not entirely match all the functions of the actual product. Therefore, the actual product and packaging, as well as the name and illustration, may differ from the manual. The screen shown as an example in this manual may differ from the actual screen display.
Lenco is not liable for any consequential damage.
What is in the box?
This turntable has been assembled with the utmost care. If, however, an accessory is missing, please contact your local dealer immediately.
Check the supplied accessories: |
|
1 x Turntable |
2 x hinge |
1 x Cartridge |
1 x USB Cable |
1 x Platter inclusive belt |
1 x Single puck |
1 x Rubber plate |
|
1 x Dust cover |
1 x Quick Guide |
|
3 |

Exploring the turntable
1.Counterweight, use the counterweight to balance the tone arm.
2.Anti-Skating control: sets the anti-skating. Use anti-skating to prevent the cartridge from swinging in towards the centre.
3.Tone arm lever: lowers or raises the tone arm.
4.Tone arm lock: locks the tone arm if the turntable is not in use.
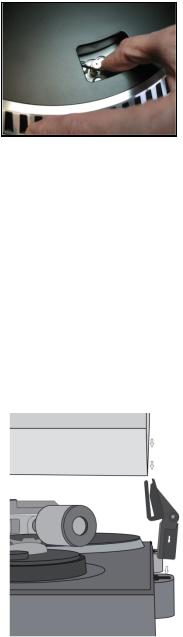
5.Head shell: holds the removable stylus. When the turntable is not in use, it is recommendable to place the removable protection cover on the stylus.
6.Platter: this is where you place your record, before playing it.
7.33/45 RPM switch: sets the playing speed.
8.Power cord: connects the turntable to an AC wall outlet.
9.Main power switch: switches the power on or off.
10.Auto stop switch: this function is for 33 RPM records only. After the record is finished, the platter automatically stops rotating.
11.USB port: connects the turntable to your computer.
12.Line out: connects the turntable to a mixer or an audio system
Important note: This turntable has a built-in amplifier to avoid damage to the turntable or to your audio-system. Do not connect this turntable to your audio-system by using the phone-input as this input is amplified as well.
Getting started
Where to install
Keep the turntable out of direct sunlight. When the turntable is not in use, place it on a sturdy platform of which the surface should be flat and steady, so the turntable cannot fall. Make sure the turntable is stored in such a manner that no object can fall on it, as pressure will damage or break the turntable. Prevent insertion of small objects into the ventilation slots, or openings in the cabinet at all time.
Installation of the turntable
1.Open the box and unpack all parts.
2.Put the platter on the turntable and mount the belt. The belt is on the downside of the platter.
3.Install the cartridge by placing it on the tone arm and turn the tone arm’s anti-skate corkscrew until the cartridge is fixed.
4.Mount and set the counterweight.
Screw the counterweight on the tone arm.
Unlock the tone arm.
Remove the protective cover of the stylus. Make sure you do not touch the stylus, nor that the stylus touches anything.
Lift the tone arm from the armrest and lower the armrest.
Move the counterweight carefully a little either to the left or to the right until the tone arm is in balance and floats horizontally.
Bring the tone arm back to the armrest and lock the armrest in such a manner that the tone arm cannot move during installation.
Move the black plastic part of the counterweight to 0. The 0 should be in line with the red line on the tone arm. Be careful that you do not move the metal part.
Turn the metal part to the left to increase the needle pressure. Lenco recommends to set the needle pressure to 2,5.
5.Set the anti-skating. Lenco recommends that the anti-skating should about half the needle pressure, for the best result try different settings yourself.
6.Place the hinges and mount the dust cover.
7.Connect the AC cable to the wall outlet.
8.Connect the line out cables to a mixer or HiFi
system.
Important note: This turntable has a built-in amplifier to avoid damage on the turntable or your audio-system. Do not connect this turntable to your audio-system by using the phone-input because this input is also amplified.
5

Basic operation
Playing records
Switch the main power switch on the backside of the turntable to the “on” position. Open the dust cover and place the record on the platter. If you play a single, do not forget to place the single puck first.
Set the correct RPM speed
Remove the needle protection cover from the stylus
Unlock the tone arm on the armrest
Bring the tone arm to the record, the platter now starts rotating
Carefully place the tone arm on the record. Do not forget to lower the arm lever
If you want to interrupt a record during playing, raise the arm lever. Alternatively, return it to the armrest to stop the record playing. When a record has come to its end, the platter stops rotating*.
*Auto-stop should be on.
Connect the turntable to a computer for the first time
As this turntable is plug-and-play, no drivers are needed.
Before you connect the turntable to a computer, unplug it from your mixer or Hi-Fi system.
The included software is a third party application and therefore Lenco does not handle any questions or problems regarding the
software.
1.Switch the computer on
2.Connect the turntable to an AC wall outlet
3.Place the main power switch on the back side of the turntable in the “on” position
4.If the computer is booted, connect the turntable. The computer will now install the drivers.
5.After the drivers are installed, you must now install the Audacity software.
For windows users; insert the CD or download the newest software via http://audacity.sourceforge.net
For MAC users; download the newest software via http://audacity.sourceforge.net
Important: Make sure that your computer recognizes the turntable as a recording device. Especially Windows has the tendency to set the turntable default as a playing device. If the turntable is set as playing device, Audacity cannot record your records.
Software Configuration (Windows XP, Vista, MAC)
1.Connect the turntable to the computer.
Note: Before connecting the turntable to the PC, disconnect the turntable from your audio-system.
2.Start the Audacity software
3.Click on Microphone in the drop down menu and select “Stereo Mix”
6
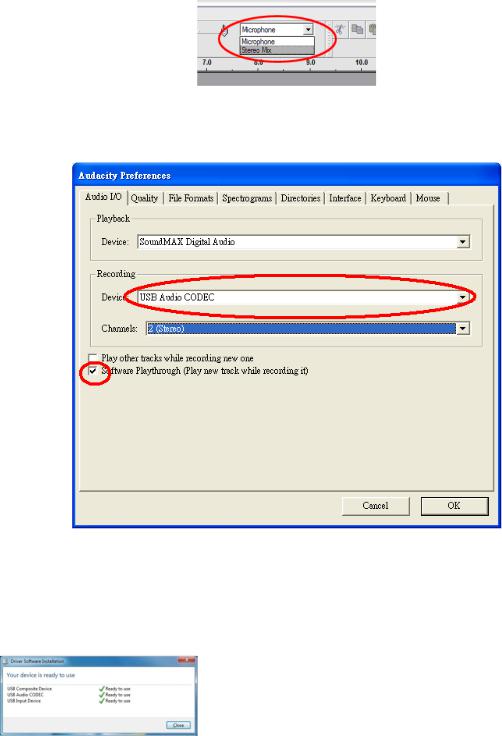
Select the “Edit” menu and then “Preferences”
4.Select the USB audio device under the “Recording” selection as shown in the example below.
5.Select “Software Playthrough” to listen to the audio while recording.
6.Press “okay” to save your settings.
7.The software is now ready to start recording.
Software Installation & Configuration (Windows 7)
1.Connect the turntable to the AC power outlet.
2.Connect the turntable to a USB socket on your computer. Wait for several seconds until the pop-up screen appears, as shown in the example below.
3.Click on “close”.
7
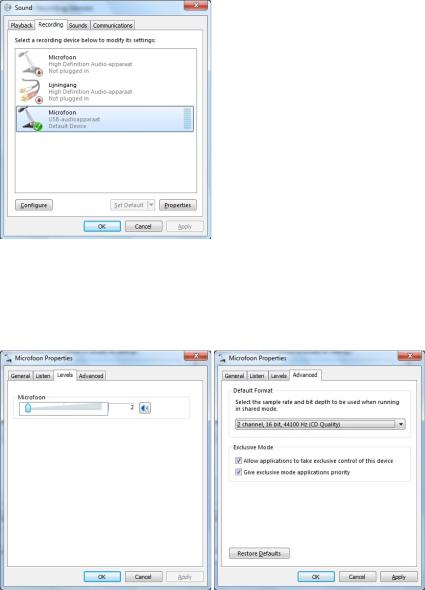
4.Click with the right mouse-button on the speaker icon (taskbar) and select “recording”. The screen as shown in the example below appears.
5.Click on “microphone USB audio device”.
6.Click on “properties”.
7.Go to the Tab "levels" and move the volume slider down to level 2 as shown in example below.
8.Go to the tab “advanced” and select in the pull-down menu: “2 channel, 16 bit, 44100 Hz (Cd-Quality)”.
9.Click consecutively on “apply”, “OK” and once again on “OK” (now all programs are closed).
10.Insert the Audacity software CD into the disk drive, or download new software, free of charge, via http://audacity.sourceforge.net/.
11.Follow the installation instructions as described in the instruction manual.
12.Run the Audacity software.
8
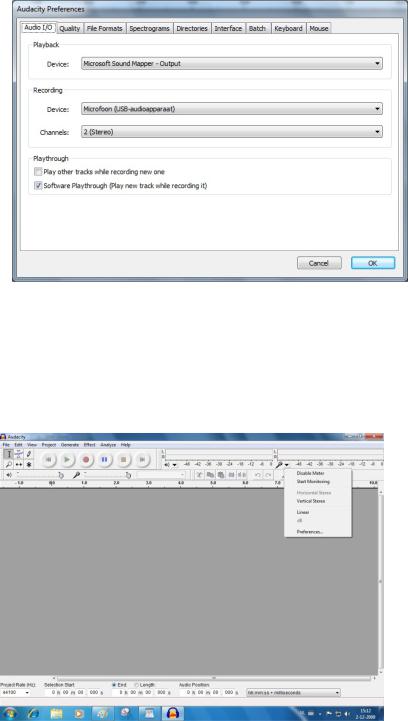
13.Go to the taskbar and click on "edit" and then on "preferences". The screen as shown in the example below appears.
14.Go to the “recording device” pull-down menu and select the option “microphone” (USB-audio device).
15.Go to the “channels” pull-down menu and select option 2 (stereo)
16.Mark the selection box “software play through” (play new track while recording it)”.
17.Click on “OK”.
18.Go to the “microphone” icon in the pull-down menu and select “start monitoring”, as shown in the picture below.
The software is now set and you can start digitalizing your records.
9
 Loading...