


Model
DIR-110
USER MANUAL Internet Radio
HANDLEIDING Internetradio
BEDIENUNGSANLEITUNG Internetradio
MODE D’EMPLOI Radio internet
MANUAL DEL USUARIO Radio por Internet
Version: 1.0
Index: |
|
English .................................................................................................................................................... |
3 |
Nederlands........................................................................................................................................... |
18 |
Deutsch ................................................................................................................................................ |
34 |
Français ................................................................................................................................................ |
50 |
Español ................................................................................................................................................. |
66 |
Version: 1.0
English |
DIR-110 |
|
|
1. Safety Precautions
Do not use this device near water. Clean only with a slightly damp cloth.
Do not cover or block any ventilation openings. When placing the device on a shelf, leave 5 cm (2”) free space around the whole device.
Install in accordance with the supplied user manual.
Don’t step on or pinch the power adaptor. Be very careful, particularly near the plugs and the cable’s exit point. Do not place heavy items on the power adaptor, which may damage it. Keep the entire device out of children’s reach! When playing with the power cable, they can seriously injure themselves.
Unplug this device during lightning storms or when unused for a long period.
Keep the device away from heat sources such as radiators, heaters, stoves, candles and other heat-generating products.
Avoid using the device near strong magnetic fields.
Electrostatic discharge can disturb normal usage of this device. If so, simply reset and restart the device following the instruction manual. During file transmission, please handle with care and operate in a static-free environment.
Warning! Never insert an object into the product through the vents or openings. High voltage flows through the product and inserting an object can cause electric shock and/or short circuit internal parts. For the same reason, do not spill water or liquid on the product.
Do not use in wet or moist areas such as bathrooms, steamy kitchens or near swimming pools. Do not use this device when condensation may occur.
Although this device is manufactured with the utmost care and checked several times before leaving the factory, it is still possible that problems may occur, as with all electrical appliances. If you notice smoke, an excessive build-up of heat or any other unexpected phenomena, you should disconnect the plug from the main power socket immediately.
This device must be well ventilated at all time!
This device must operate on a power source as specified on the specification label. If you are not sure of the type of power supply used in your home, consult your dealer or local power company.
The socket outlet must be installed near the equipment and must be easily accessible.
Do not overload ac outlets or extension cords. Overloading can cause fire or electric shock. Keep away from rodents. Rodents enjoy biting on power cords.
Always hold the plug when pulling it out of the main supply socket. Do not pull the power cord. This can cause a short circuit.
Avoid placing the device on any surfaces that may be subject to vibrations or shocks. To protect the device during a thunderstorm, unplug the ac power adaptor.
When the device is not in use for long periods, unplug the ac power adaptor for safety reasons. To clean the device, use a soft dry cloth. Do not use solvents or petrol based fluids. To remove severe stains, you may use a damp cloth with dilute detergent.
The supplier is not responsible for damage or lost data caused by malfunction, misuse, modification of the device or battery replacement.
The apparatus shall not be exposed to dripping or splashing and make sure that no objects filled with liquids, such as vases, are placed on or near the apparatus.
To completely disconnect the power input, the mains plug of the apparatus shall be disconnected from the mains, as the disconnect device is the mains plug of apparatus.
The mains plug of the apparatus should not be obstructed or should be easily accessed during intended use.
Battery shall not be exposed to excessive heat such as sunshine, fire or the like.
The ventilation should not be impeded by covering the ventilation openings with items such as newspapers, table-cloths, curtains etc.
No naked flame sources such as lighted candles should be placed on the apparatus. Attention should be drawn to the environmental aspects of battery disposal.
3

The apparatus can only be used in moderate extremely cold or climates warm environments should be avoided.
The rating label has been marked on the bottom panel of the apparatus.
This device is not intended for use by people (including children) with physical, sensory or mental disabilities, or a lack of experience and knowledge, unless they’re under supervision or have received instructions about the correct use of the device by the person who is responsible for their safety.
This product is intended for household use only and not for commercial or industrial use. Make sure the unit is adjusted to a stable position. Damage caused by using this product in an unstable position or by failure to follow any other warning or precaution contained within this user manual will not be covered by warranty.
Never remove the casing of this apparatus.
Never place this apparatus on other electrical equipment.
Do not use or store this product in a place where it is subject to direct sunlight, heat, excessive dust or vibration.
Do not clean this product with water or other liquids. Do not block or cover the slots and holes in the product.
Do not push foreign objects into the slots or holes in the product. Do not allow children access to plastic bags.
Please check that the voltage on the type plate of your appliance corresponds with your house electricity supply (type plate is located on the back of the unit).
Protect the power cord from being walked on or pinched, particularly at plugs, convenience receptacles, and the point where they exit from the apparatus.
Only use attachments/accessories specified by the manufacturer.
Refer all servicing to qualified service personnel. Servicing is required when the apparatus has been damaged in any way, such as the power supply cord or the plug, when liquid has been spilled or objects have fallen into the apparatus, when the apparatus has been exposed to rain or moisture, does not operate normally, or has been dropped.
Do not use a damaged power cord or plug or a loose outlet. Doing so may result in fire or electric shock.
Warning: prolonged exposure to loud sounds from personal music players may lead to temporary or permanent hearing loss.
To reduce the risk of electric shock, do not remove screws. The device does not contain any user-serviceable parts. Please leave all maintenance work to qualified personnel.
It is not recommended to use headphone with the device via 3.5mm Audio Out socket. In case of using the headphones, be reminded that excessive sound pressure or volumes from headphones or earphones can lead to damage to the hearing. Always adjust the volume to a pleasant, not too loud level. If you have adjusted the volume of the headphones to be too high and use that for an extended period, it can damage the listener’s hearing.
Where the mains plug is used as the disconnect device, the disconnect device shall remain readily operable.
The cell batteries shall not be exposed to excessive heat such as sunshine, fire or the like.
4

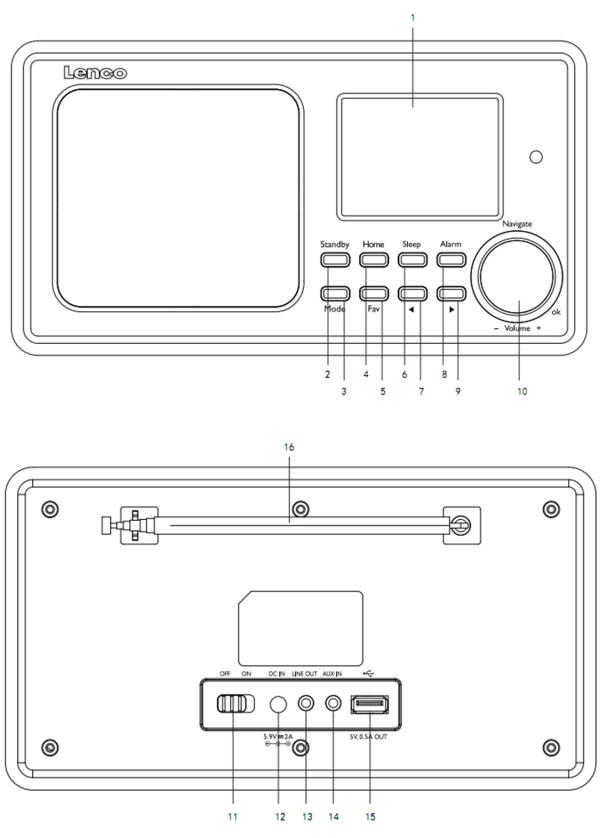
2. Product Overview
5
1.Display
2.Standby
3.Mode
4.Home
5.Fav
6.Sleep
7.Left
8.Alarm
9.Right
10. |
Vol/Nav/Ok: Rotate=Vol/Scroll Press=Select |
11. |
Power on/off |
12. |
DC-IN |
13. |
Line-out (3.5mm) |
14. |
Aux-in (3.5mm) |
15. |
USB Socket |
16. |
Antenna |
6
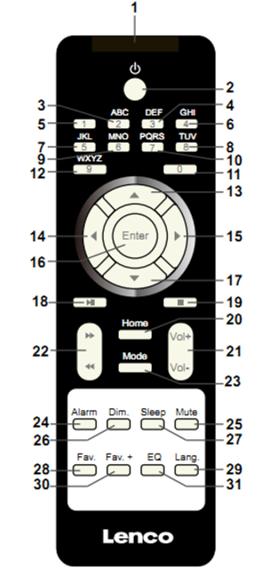
Remote Control
1.Remote Transmitter
2.Standby button
3-12. Input letters and numbers
13.Up Cursor button
14.Left cursor button
15.Right cursor button
16.Enter button
17.Down cursor button
18.Play/Pause button
19.Stop button
20.Home button
7
21.Vol+/-
22.Go back/forward one track
23.Mode selection button
24.Alarm setting button
25.Mute button
26.Dimmer button
27.Sleep button
28.Fav button
29.Language selection button
30.Fav+ button
31.EQ set tone
3. INITIAL USE
Before operation, please make sure that the VOLTAGE mentioned on the power supply is same as the voltage of your local area.
Use the supplied mains adaptor to connect the device to a household mains socket.
Switch the device on with the power switch on the rear.
When it is the first time running the device, the system will ask you to set Language and Network Configurations. You may setup the network connection immediately, or set it later. Use Navigate to select the desired option. Press Navigate/OK to confirm.
Press Standby button when unit is power on, unit will go to standby mode. Press again will make it On again.
8
4. Network configuration
1. Normal network configration
Select “Yes” for the normal Wireless Network Configuration: The select the required AP by turning “Navigate” and confirm it by pressing “Navigate/OK”.
Enter WEP or WPA code to connect the WiFi network by select the correct character turning the “Navigate/OK” button.
Press  button to select the next character.
In this condition, press  button you can turn left and delete the left chracters at the same time:
When the password is complete please press “Navigate/OK” button to confirm.
Note: Below characters are available for the radio:
Numbers (from 0-9)
English letters (from A to Z and from a to z)
Other charcters (DEL, @, Blank, !, ”, #, $, %, &, *, ’, + and (,)
2. WPS PBC network configuration
Select “Yes WPS” when you would like set up with Wireless Network (WPS PBC) feature: If you are using a router with WPS button, you may set up the network connection simple via WPS function. Enter it and go to press the WPS button on your router within 120 seconds.
The connection between the router and the Radio will then be configured automatically.
Select “No” when you do not want to install the network at the moment.
3. No network configuration
Pls select “NO” when you do not like to congigure the network connection at the moment.
Press “Standby” for standby. When the actual date and time is shown the network is configuration is well done. Date and time, as well as alarms-if activated-will still are shown on the display when in standby mode.
9
5. INTERNET RADIO
Switch on “Standby” and rotate Navigate to scroll through the main menu. Press OK (to enter sub menus or confirm settings)
Press  to return to the previous menu.
After the connection of any station is succeeded, station information’s will be shown: infomation content can be changed with  or
or  button.
My Favorites
List of my favorite preset stations. It supports 250 favorite entries including stations and folder. During the station playing screen, press and hold Fav on the device or “Fav. +” on the remote control to save the station as my favorite. You may replace the previous saved station to the new one.
If the Selected station have been saved, you cannot save it again. The saved stations are showed under this menu. You may also press Fav to enter the saved station list. You may enter the number key on the remote control to recall the saved station.
Under the preset station list, move to your station, press OK from unit or Enter from remote control to listen.
Enter its submenu with  button, Shift Up/Down along the list, Rename, Play, or Use as Alarm Sound (if you chose internet as alarm sound in alarm configuration).
Radio Station/Music
Station are categorized into Global Top 20, Genre and Country/Location (Australia, Canada, United Kingdom, USA). Enter to continue the subcategories and choose the station to listen.
For each station, pressOK from unit or Enter from remote control to play directly.
Press  to enter its submenu. When you choose Auto Scan, it becomes the playback of marquee of each station in the subcategory. Each station plays 30 seconds until all have played or you press “Select” to stop the marquee listening. Press
  button to view the display information of the playing station.
Local Radio:
Stations are categorized to the country/location which the unit is operated.
History:
List of the ten recently listened stations.
Service:
Search radio station-Enter your keyword to search radio station from the list.
Add new radio by adding IP address, the added stations will be stored in My Favorite.
Note that the maximum character of the station name is 250.
6. Media Center
Select the USB/UPnP mode or playlist mode with Navigate/OK or with the Mode button.
10
UPnP
If you have set up shared media, you should see the shared media from UPnP.
If you have more than one computer sharing media, the alternatives are listed.
Select the shared media you want to play.
Use Play/Pause (18), Next/Prev (22) and Stop (19). Press Right cursor button (15) to view the display information of the playing track.
Note: The radio can only read the track with the file name less than40charaters. the characters should be in European Language. If you encounter failure of reading the track under UPnP mode, youmay try to rename the file. However, if the track is still unable to play, you can try converting the file to different formats.
USB:
From this point on, menus are generated from the folders on the USB device. It can support WMA/MP3/AAC/AAC+/FLAC/WAV format. FLAC can support 16Bit/8K~48K Sample Rate, 64Kbps.
Brows folders with the NAV wheel or direction keys (13/14/15/17) on the remote control.
The display shows folder and file names (not necessarily track names).
Once you have found a track you want to play, press the navigate wheel on the device or press Enter on the remote control.
Note: The USB port does not support data transfer with a computer.
My Playlist:
You can create a playlist of favourious music from UPnP. When you playing the music, press and hold OK from unit or Enter from remote control to save it into My Playlist.
Clear My Playlist
Pls select this option for clearing the playlist. Pls confirm the questions.
7. My media U
Display and playback your own mediaU station list on the mediaU server. Set your account first. Toactivate your own station list, follow the steps below:
Access http://www.mediayou.net/. Join my mediaU membership. Login to the website;
Enter the wireless MAC addresss of Radio to the mediaU website. This information can be obtained in information Center > System information > Wireless Info;
When successfully configured, you are able to save and view your own mediaU station playlist(s). Usename and password are not required to enter to the Radio.
If there are different accounts stored in Radio, you can choose the one you currently use under Configuration menu. On the website, you may save stations to Favorite Station, set Favorite Location/Genre and My Local City, or add stations manually. The stations can be viewed from My Media mode on the Radio.
11
8. Information Center
Weather
There are weather information and forecasts for 2000 cities.
Select the country and then the city for the weather details.
Press  /
/ to see the weather forecasts.
The device is able to display the weather information on the standby mode. On the weather information page, press Select to set the city to displaying on the standby mode. Then turn on the weather display.
Financial Info
View the stock index
System Infomation
View details of units and of connect network. The information includes MAC address which you are required to fill in when registration of “my mediaU” membership.
9. CONFIGURATION
Time Display |
Analog/digital |
My MediaU |
When it is enabled, My mediaU will exist on the main menu. If various |
|
mediaU accounts exist in the Radio, Select the default login account in here. |
Network |
Wireless Network Configuration: Enable/disable WiFinetwork. When you |
|
enable the WiFi network, the system will automatically select the required |
|
AP. Enter WEP or WPA code to connect the WiFi. |
|
Wireless Network (WPS PBC): If you are using a router with WPS/QSS |
|
button, you may set up the network connection simple via WPS function. |
|
Enter it and go to press the WPS/QSS button on your router within |
|
120 seconds. The connection between the router and Music Link will then |
|
be configured automatically. |
|
Manual Configuration: You can choose DHPC (which IP assigned |
|
automatically) or manually input IP address for wireless network |
|
connection. When you select manual setting for wired connection, the |
|
following have to be entered: SSID (nameof access point), IP Address, |
|
subnet mask, default gateway, preferred DNS server, alternate DNS server. |
|
Check Network When Power On: Enable/disable WiFinetwork. When you |
|
enable the WiFinetwork, the system will automatically search the available |
|
AP. Select required AP. |
Date & Time |
Setup the date and time |
|
Set time format display as 12 Hour or 24 Hour |
|
Set date format (YYYY/MM/DD-DD/MM/YYYY-MM/DD/YYYY) |
|
Daylight SavingTime (DST) |
|
ON |
|
Tips: On the model of “ON”, the time will be one hour More than the actual |
|
time. |
12
OFF
Tips: On the model of “OFF”, the time will be same as the actual time. If it was on the model of the “Daylight Saving Time (DST) and you choose “OFF”, the time will be deducted one hour, that’s to say, the time will be same as the actual time.
Alarm |
There are three independent alarms-2 alarms of absolute time setting |
|
(Alarm 1 and Alarm 2) and 1 alarm for relative time setting (Alarm NAP). |
|
Press Alarm on the remote control to enter this menu directly. |
|
Note that the alarm source is from the preset Internet radio if Alarm Sound |
|
is set to be Internet Radio. It can only set one same IR station for Alarm 1 |
|
and Alarm 2. When the alarm is reached the unit connects to the Internet if |
|
the set network is available. Therefore there may be some delay from the |
|
alarm to the radio play. If no network is connection can be established |
|
within one minute, the alarm will change to Melody automatically. |
|
When Alarm “NAP” is set, it alarms once in 5/10/20/30/60/90/120 minutes |
|
depending on which one you have set. |
|
Choose Alarm Volume to configure the volume of the alarms. |
Timer |
Countdown timer (max. 100min) |
Language |
English/Deutsch/Espanol/Francais/Portugese/Nederlands/Italiano/Pyccknn/ |
|
Svenska/Norske/Dansk/Magyar/Cesky/Slovensky/Polski/Turkce/Suomi |
Dimmer |
Turn on/Backlight level |
Display |
color/monochrome |
Power Mgmt |
Configure to go to standby mode automatically during in the menu or/and |
|
without Wifisignal. Choose the power management timer (5/15/30mins) to |
|
set the duration of the radio to switch standby mode automatically when |
|
you are not controlling it. Choose Turn off to ignore the power management |
|
function. |
Sleep Timer |
Turn off or set the sleep timer of 15/30/60/90/120/150/180 minutes. Once |
|
the time is set, there will be a bed icon with remaining minutes at the top |
|
right corner and the device will turn to standby then. Press Sleep on the |
|
remote control for the shortcut of this function. |
Buffer |
Configure the buffer time of the music playback, 2/4/8 seconds. |
Weather |
Activate/deactivate the weather forecast for the standby display. Choose |
|
your preferred temperature unit (°F or °C) and then proceed entering your |
|
location. When activated, the weather forecast is shown in turns with the |
|
clock display on the standby screen (each 10 secs). |
Local Radio Setup |
There is a shortcut Local Radio under Internet Radio so that you can easily |
|
go to the station list of your location. You may Manual Setup your location, |
|
or let the system Auto Detect your current location. The system detects the |
|
location according to the IP address of your connected network. Press Local |
|
Station to enter this local radio list directly. |
Playback Setup |
Select the playback mode of media center-Off (no repeat or shuffle), |
|
Repeat all, Repeat one, or Shuffle. |
Device |
Default device name for DLNA is “AirMusic”. You may rename it for DLNA |
|
setup on th PC or mobile. QR code for downlode and install “AirMusic” |
|
control App. |
Equalizer |
Default equalizer is Normal, you may change to Flat, Jazz, Rock, |
|
Soundtracks, Classical, Pop, or News. Press EQ on the remote control to |
|
swap among the EQ mode for shortcut. |
13
Resume When |
The system is default to resume internet radio playback if you were |
Power On |
listening to internet radio or media center before switch off the unit. If turn |
|
this setting off, the system will remain in the main menu when switching on |
|
the unit. |
Software Update |
Update software. If there is an updated software version on the server, the |
|
system will notify you. Before starting a software upgrade, ensure that the |
|
unit is plugged into a stable mains power connection. Disconnecting power |
|
during a software update may permanently damage the unit. |
Reset to Default |
Restore the default settings. After the DIR-100 is reset, the system will |
|
move to language is elected. |
10. DLNA/UPnP
You may change the default DLNA name as you like. Theinformationbelow is the introductionofhowtosetup media streaming from PC or other media server. Study the own instruction of the software or apps you use to enjoy music streaming if necessary. Make sure the music files are in the format of MP3, WHA, WAV or AAC for music streaming to the radio.
UPnP
Connect the PC to the network.
Ensure the Radio is powered on and connected to the same network.
Open the UPnP platform Windows Media Player (11 or later). Alternatively, other platforms or serversuch as Windows Media Connection may be used.
Allow to share your media to Radio.
Add the audio files and folders you want to share with radio to the media library.
You may also enjoy the streaming music from other music server, such as smart phone (Android platform)
Connect the mobile to the network
Search and install media sharing apps from Google Play.
Add the audio files from your mobile you want to share.
After setup the shared server, choose the music and control playback on the Radio.
DLNA
Besides UPnP, Radio supports DLNA function, you share the music files from PC or Android mobile, and you use your PC, Android mobile or iPhone/iPad to control music playback on the Radio. (It is not required to control each playback on the Radio.)
The PC system requirement for DLNA is Windows 7 and Windows Media Player 12. Setup as below: First, share the media on your PC to Radio.
Control Panel > Network and Internet > Network and Sharing Center > Change Advanced Sharing > Media streaming options
14
Open Windows Media Player to enable Allow remote control of my Player.
Right click any music in the library and choose Play to Radio.
There will be a window for controlling music playback on Radio.
You may search and install any free or commercial DLNA apps from Google Play or Apple Store if you are using Android mobile, tablet or iPhone/iPad. It is suggested to use bubble UPnP, Twonky Beam on Android mobile, tablet or Twonky Beam on iPhone/iPad. Some apps may not support streaming music from iPhone/iPod but iPhone/iPod could still be used to control streaming music from other servers.
Procedures for playing shared music on the app are as follows:
Select Radio as the player. Some apps may allow to play the music to multi players at the same time.
Select music server and choose the music. Some app can create a playlist if you choose several music.
Please note: When using DLNA music streaming function on theInternetRadio, youcan only control the volume and standby via the unit. It is restricted to control the other functions. StopDLNA on PC, mobile or tabletbefore you resume Internet radio’s own control.
11. AUX (Line input)
Aux in mode plays audio from an external source such as an MP3 player. To play audio with Aux in mode:
Turn the volume low on both the Radio and if adjustable, the audio source device.
Connect the external audio source to the AUX IN 3.5mm stereo socket.
Either press MODE until the display, shows AUX IN or select AUX in under Main menu.
Adjust the volume of the Radio (and, ifnecessary, the audio source device) as required.
12. FM operation
With your radio on, press the Mode button to select FM mode or press  /
/ button to select FM mode in the menu.
Press the  /
/ button to manually tune to specific frequencies by 0.05MHz per step.
The radio also includes the scan feature of FM, allowing you to automatically tune to FMstations.
Press and holdthe  button to automatically search for the next available radio station. When a station with good signal is found, it will be automatically played.
You can search for stations in the opposite direction by pressing and holding the  button.
Press the Navigate/OKrotary knob, it can automatically scan fully and store the 20 stations (the max).
Storing stations as presets
Radio can store 20 stations as presets in FM mode. To store a preset:
Tune to the station you like, press and hold the Fav button, then using the  /
/ button or rotate the Navigate/OKrotary knobto select desired preset number, then press Vol/Nav/Okrotary knob to store the station.
15
Playing stations saved as presets
To play a preset station:
Select the band FM of the station by pressing the Mode button or press  /
/ button to select FM mode in the menu.
Press the Fav button to recall the preset station, then using the  /
/ button or rotate the Navigate/OKrotary knobto browse through your presets and press the Navigate/OKrotary knob to confirm.
13. Technical Specifications
Network |
802.11b/g/n (WLAN) Encryption: WEP, WPA, WPA 2 (PSK), WPS |
Streaming |
UPnP, DLNA |
Supported filetypes |
WMA, MP3, OGG |
Connections |
DC, USB (charging 5V 0.5A), 3.5mm AUX-IN, 3.5mm Line-Out |
Input |
100-240V~50/60 Hz, 0.15A max |
Output |
5.9V/2A |
Batteries in remote control |
2 x AAA (non included) |
Power consumption |
5W |
Power consumption (standby) |
<1W |
Operating Temperature |
0°C-35°C |
Operating position |
Horizontal |
Power supply adaptor: (For EU only)
Manufacturer: Shenzhen Adition Audio Science & TechnologyCo, Ltd
Model Number: AD120592000EU
Use only original AC adaptor
Use only the power supply listed in the user instructions.
Dim. unit |
235 x 116 x 130 mm (WxDxH) |
Weight |
1kg |
14. Guarantee
Lenco offers service and warranty in accordance with the European law, which means that in case of repairs (both during and after the warranty period) you should contact your local dealer.
Important note: It is not possible to send products that need repairs to Lencodirectly. Important note: If this unit is opened or accessed by a non-official service center in any way, the warranty expires. This device is not suitable for professional use. In case of professional use, all warranty obligations of the manufacturer will be voided.
15. Disclaimer
Updates to Firmware and/or hardware components are made regularly. Therefore some of the instruction, specifications and pictures in this documentation may differ slightly from your particular situation. All items described in this guide for illustration purposes only and may not apply to particular situation. No legal right or entitlements may be obtained from the description made in this manual.
16
16. Disposal of the Old Device
This symbol indicates that the relevant electrical product or battery should not be disposed of as general household waste in Europe. To ensure the correct waste treatment of the product and battery, please dispose them in accordance to any applicable local laws of requirement for disposal of electrical equipment or batteries. In so doing, you will help to conserve natural resources and improve standards of environmental protection in treatment and disposal of electrical waste (Waste Electrical and Electronic Equipment Directive).
17. Service
For more information and helpdesk support, please visit www.lenco.com
Lenco Benelux BV, Thermiekstraat1a, 6361 HB, Nuth, The Netherlands.
17
Nederlands |
DIR-110 |
|
|
1. Veiligheidsvoorschriften
Gebruik dit apparaat niet in de buurt van water. Reinig het uitsluitend met een licht vochtige doek.
Bedek of blokkeer de ventilatie-openingen niet. Wanneer u het apparaat op een schap plaatst, dient u 5 cm (2”) vrije ruimte rondom het gehele apparaat te behouden.
Installeer het product volgens de meegeleverde gebruikershandleiding.
Nooit op de stroomadapter stappen of deze indrukken. Wees voornamelijk voorzichtig in de buurt van de stekkers en het punt waar de kabel uit het apparaat komt. Plaats geen zware voorwerpen op de stroomadapter, om beschadiging ervan te voorkomen. Houd het gehele apparaat buiten bereik van kinderen! Wanneer kinderen met de voedingskabel spelen, kunnen zij ernstig letsel oplopen.
Haal de stekker uit het stopcontact tijdens onweer of wanneer u deze langere tijd niet gebruikt. Houd het apparaat uit de buurt van hittebronnen, zoals radiateurs, verwarmingen, kachels, kaarsen en andere hittegenererende producten.
Gebruik dit apparaat niet in de buurt van krachtige magnetische velden. Elektrostatische ontlading kan normaal gebruik van dit apparaat verstoren. U hoeft het apparaat in dit geval slechts te resetten en opnieuw op te starten volgens de gebruikershandleiding. Wees voorzichtig tijdens bestandsoverdracht en doe dat in een omgeving zonder statische verstoringen.
Waarschuwing! Steek nooit een voorwerp via de ventilatieof andere openingen in het product. Er is hoogspanning in het product aanwezig en als u er een object insteekt, kan dat een elektrische schok veroorzaken en/of kortsluiting in de interne onderdelen. Mors om dezelfde reden geen water of vloeistof op het product.
Gebruik het toestel niet in vochtige ruimtes, zoals badkamers, stomende keukens of in de buurt van zwembaden.
Gebruik dit apparaat niet wanneer condensatie kan optreden.
Alhoewel dit apparaat met grote zorg gefabriceerd en verschillende keren geïnspecteerd is voordat het de fabriek verlaat, is het nog steeds mogelijk dat er problemen optreden, zoals met alle elektrische apparaten. Als u rook, een overmatige hitteontwikkeling of enig ander onverwacht verschijnsel opmerkt, moet u onmiddellijk de stekker van het netsnoer uit het stopcontact halen.
Dit apparaat moet te allen tijde goed worden geventileerd!
Dit apparaat moet aangedreven worden door een voedingsbron, zoals aangegeven op het specificatieplaatje. Als u twijfelt over het type voeding dat gebruikt wordt in uw huis, raadpleeg dan a.u.b. uw dealer of plaatselijk energiebedrijf.
Het stopcontact moet in de buurt van de apparatuur zijn geïnstalleerd en eenvoudig te bereiken zijn.
Overbelast stopcontacten of verlengsnoeren niet. Overbelasting kan brand of een elektrische schok veroorzaken.
Houd ze uit de buurt van knaagdieren. Knaagdieren knauwen graag aan voedingskabels. Houd altijd de stekker vast wanneer u deze uit het stopcontact trekt. Trek nooit aan de voedingskabel. Dit kan tot een kortsluiting leiden.
Vermijd om het toestel te plaatsen op een ondergrond die blootgesteld kan worden aan trillingen of schokken.
Om het apparaat tijdens onweer te beschermen, haalt u de netvoedingadapter uit het stopcontact.
Wanneer het apparaat voor een lange periode niet in gebruik is, haalt u de netvoedingadapter om veiligheidsredenen uit het stopcontact.
Gebruik een zacht, droog doekje om het apparaat te reinigen. Gebruik geen oplosmiddelen of op benzine gebaseerde vloeistoffen. U kunt een vochtig doekje met verdund schoonmaakmiddel gebruiken om hardnekkige vlekken te verwijderen.
De leverancier is niet verantwoordelijk voor schade of verloren gegevens veroorzaakt door storing, misbruik, modificatie van het apparaat of batterijvervanging.
18

Het apparaat mag niet worden blootgesteld aan druppels of spatten en zorg ervoor dat er geen met vloeistof gevulde voorwerpen, zoals vazen, op of nabij het apparaat zijn geplaatst.
Om de verbinding met de stroomaansluiting volledig te verbreken, moet de stekker van het apparaat uit het stopcontact worden gehaald, omdat de stekker van het apparaat de hoofdschakelaar is.
De stekker van het apparaat mag niet worden belemmerd en moet tijdens gebruik eenvoudig toegankelijk worden gehouden.
Batterijen mogen niet aan overmatige hitte, zoals zonlicht, open vuur e.d. worden blootgesteld. De ventilatie mag niet worden gehinderd door het bedekken van de ventilatieopeningen met voorwerpen zoals kranten, tafelkleden, gordijnen etc.
Plaats geen bronnen met een open vlam, zoals brandende kaarsen, op het apparaat. Aandacht voor het milieu is nodig bij het verwijderen van de batterijen.
Het apparaat kan alleen worden gebruikt in gematigde klimaten. Extreem koude of warme omgevingen moeten worden vermeden.
Het nominale specificatielabel is te vinden op het paneel aan de onderkant van het apparaat. Dit apparaat is niet bestemd voor gebruik door mensen (inclusief kinderen) met fysieke, zintuiglijke of geestelijke gebreken of gebrek aan kennis en ervaring, tenzij zij onder toezicht staan of instructies hebben over het juiste gebruik van het apparaat hebben gekregen van de persoon die verantwoordelijk is voor hun veiligheid.
Dit product is alleen voor huishoudelijk gebruik bedoeld en niet voor commercieel of industrieel gebruik.
Verzeker u ervan dat het apparaat in een stabiele positie staat opgesteld. Schade, veroorzaakt door het gebruik van dit product in een onstabiele positie, of door het niet naleven van waarschuwingen of voorzorgsmaatregelen genoemd in deze handleiding, valt niet onder de garantie.
Verwijder nooit de behuizing van dit apparaat.
Plaats dit apparaat nooit op andere elektrische apparatuur.
Dit product niet gebruiken of opslaan op plaatsen waar het wordt blootgesteld aan direct zonlicht, hitte, buitensporig veel stof of trillingen.
Reinig dit product niet met water of andere vloeistoffen. Bedek of blokkeer de gleuven en de gaten in het product niet.
Stop geen vreemde voorwerpen in de gleuven of gaten van het product. Geef kinderen geen gelegenheid in aanraking met plastic zakken te komen.
Controleer of de spanning op het specificatieplaatje van uw apparaat overeenkomt met het lichtnet in uw huis (specificatieplaatje is te vinden op de achterzijde van het apparaat). Zorg ervoor dat niemand op de voedingskabel kan gaan staan of dat de kabel kan worden
ingedrukt, voornamelijk bij stekkers, stopcontacten en het punt waar kabels uit het apparaat komen.
Gebruik uitsluitend uitbreidingen/accessoires gespecificeerd door de fabrikant.
Laat alle reparaties over aan gekwalificeerd onderhoudspersoneel. Onderhoud is vereist als het toestel hoe dan ook is beschadigd, zoals bijvoorbeeld het netsnoer of de stekker, wanneer er vloeistof of een voorwerp in het apparaat is terechtgekomen, wanneer het apparaat is blootgesteld aan regen of vocht, als het niet normaal werkt of is gevallen.
Gebruik nooit een beschadigde voedingskabel of stekker of een los stopcontact. Dit vormt namelijk een risico op brand of elektrische schokken.
Waarschuwing: Langdurige blootstelling aan luid geluid van persoonlijke muziekspelers kan leiden tot tijdelijke of permanente gehoorbeschadiging.
Verwijder de schroeven niet om het risico van een elektrische schok te verminderen. Het apparaat bevat geen onderdelen die door de gebruiker kunnen worden onderhouden. Laat al het onderhoud over aan gekwalificeerd personeel.
Wij raden u niet aan een koptelefoon via de 3,5 mm audio-uitgang op het apparaat aan te sluiten. In het geval van het gebruik van een koptelefoon, herinneren wij u eraan dat overmatige geluidsdruk of volume van de hoofdtelefoon of oortelefoon kan leiden tot gehoorschade. Zet het volume altijd op een aangenaam, niet te luid niveau. Als u het volume van de koptelefoon te hoog hebt ingesteld en u gebruikt dat voor een langere periode, dan kan dat uw gehoor beschadigen.
De stekker wordt gebruikt als schakelaar en moet gemakkelijk bereikbaar blijven.
Batterijen mogen niet aan overmatige hitte, zoals zonlicht, open vuur e.d., worden blootgesteld.
19
2. Productoverzicht
20
1.Scherm
2.Stand-by
3.Modus
4.Home
5.Fav
6.Slapen
7.Links
8.Alarm
9.Rechts
10.Vol/Nav/Ok: Draaien=Vol/Scroll Indrukken=Selecteren
11.In-/uitschakelen
12.Voedingsingang
13.Lijnuitgang (3,5mm)
14.Aux-ingang (3,5mm)
15.USB-aansluiting
16.Antenne
21

Afstandsbediening
1.Afstandszender
2.Stand-by-knop
3-12. Letters en cijfers invoeren
13.Cursor omhoog-knop
14.Cursor naar links-knop
15.Rechter cursortoets
16.Bevestig knop
17.Cursor omlaag-knop
18.Afspelen/Pauzeren-toets
19.Stop-toets
20.Home-toets
22
21.Vol+/-
22.Ga één track terug/vooruit
23.Toets voor modusselectie
24.Toets voor alarminstelling
25.Demptoets
26.Dimmertoets
27.Slaap-knop
28.Favorietentoets
29.Toets voor taalselectie
30.Fav+ toets
31.EQ Voor het instellen van de toon
3. AANVANKELIJK GEBRUIK
Controleer a.u.b. voorafgaand aan gebruik dat de SPANNING aangegeven op de voedingsbron hetzelfde is als uw plaatselijke spanningstoevoer.
Gebruik de meegeleverde netadapter om het apparaat aan te sluiten op een huishoudelijk stopcontact.
Schakel het apparaat in met de aan-/uitschakelaar op de achterzijde.
Als de radio voor de eerste keer aangaat, zal het systeem u vragen de Language (Taal) en de Network Configurations (Netwerkinstellingen) in te stellen. U kunt de netwerkverbinding onmiddellijk instellen of op een later tijdstip. Gebruik Navigate om de gewenste optie te selecteren. Druk op Navigate/OK om te bevestigen.
Druk op de toets Standby wanneer het apparaat is ingeschakeld om deze op stand-by te schakelen. Druk nogmaals in om het apparaat weer in te schakelen.
23
4. Netwerkconfiguratie
1. Normale netwerkconfiguratie
Selecteer “Yes” (Ja) voor de normale draadloze netwerkconfiguratie: Draai vervolgens “Navigate” om het vereiste toegangspunt te selecteren en druk ter bevestiging op “Navigate/OK”.
Voer de WEPof WPA-code in om verbinding te maken met het WiFi-netwerk door de toets “Navigate/OK” te draaien en de juiste karakters te selecteren.
Druk op de toets  om het volgende karakter te selecteren.
U kunt in deze modus ook op de toets  drukken om het vorige karakter te selecteren en deze gelijkertijd te wissen:
Wanneer het wachtwoord volledig is ingevoerd, druk a.u.b. ter bevestiging op de toets “Navigate/OK”.
Opmerking: De volgende karakters zijn beschikbaar voor deze radio:
Cijfers (van 0-9)
Engelse letters (van A tot Z en van a tot z)
Overige karakters (DEL, @, Blanco, !, ”, #, $, %, &, *, ’, + en (,)
2. WPS PBC network configuration (WPS PBC netwerkconfiguratie)
Selecteer “Yes WPS” (Ja WPS) wanneer u de draadloze netwerkfunctie (WPS PBC) wilt instellen: Als u gebruik maakt van een router met een WPS-knop, kunt u de netwerkverbinding eenvoudig instellen via de WPS-functie. Stel het in door binnen 120 seconden op de WPS-knop te drukken.
De verbinding tussen de router en radio zal vervolgens automatisch worden geconfigureerd.
Selecteer “No” (Nee) wanneer u op dit moment geen netwerk wilt configureren.
3. No network configuration (Geen netwerkconfiguratie)
Selecteer “No” (Nee) wanneer u op dit moment geen netwerk wilt configureren.
Druk op “Standby” voor stand-by. De netwerkconfiguratie is geslaagd zodra de actuele tijd en datim worden weergegeven. De datum, tijd en alarmen (indien geactiveerd) zullen ook in stand-by op de display worden weergegeven.
24
5. INTERNETRADIO
Schakel in met “Standby” en draai Navigate om het hoofdmenu te doorlopen. Druk op OK (om submenu’s te openen of instellingen te bevestigen).
Druk op  om terug te keren naar het vorige menu.
Nadat de verbinding met enigerlei station is geslaagd, zal de informatie van dat station worden weergegeven: Gebruik de toets  of
of  om de informatie te doorlopen.
Mijn favorieten
Lijst van mijn favoriete voorkeurstations. De radio ondersteunt 250 favoriete voorkeuren, inclusief stations en mappen. Houd tijdens het scherm voor stationweergave “Fav” op het apparaat of or “Fav.+” op de afstandsbediening ingedrukt om het station als Mijn Favoriet op te slaan. U kunt het vorige opgeslagen station vervangen door de nieuwe.
Als het geselecteerde station is opgeslagen, kunt u het niet opnieuw opslaan. De opgeslagen stations worden getoond in dit menu. U kunt ook op Fav drukken om de lijst met opgeslagen stations te openen. U kunt de cijfertoetsen op de afstandsbediening gebruiken om een opgeslagen station te herroepen.
Wanneer de lijst met opgeslagen stations is geopend, kunt u naar het gewenste station bewegen en op OK op het apparaat of op Enter op de afstandsbediening drukken om naar dat station te luisteren.
Gebruik de toets  om het submenu van het station te openen en doorlop de lijst voor de opties Rename (Hernoemen), Play (Afspelen) of Use as Alarm Sound (Als alarmgeluid gebruiken) (als u internet als alarmgeluid hebt gekozen in de alarmconfiguratie).
Radio Station/Music (Radiostation/Muziek)
Stations zijn ingedeeld op Global Top 20, Genre en Country/Location (Land/Locatie) (Australië, Canada, Verenigd Koninkrijk, V.S.). Kies er een om de subcategorieën te openen en kies de zender om naar te luisteren.
Voor elk station, druk op OK op het apparaat of op Enter op de afstandsbediening om direct af te spelen.
Druk op  om het submenu te openen. Wanneer u kiest voor Auto Scan (Automatisch zoeken), wordt elk station in de subcategorie geselecteerd weergegeven. Elk station speelt 30 seconden af, totdat zij allemaal hebben gespeeld, of u drukt op OK om het zoeken in het geselecteerde te stoppen. Druk op de toets
  om de scherminformatie van het afspelende station weer te geven.
Local Radio (Lokale radio):
Stations zijn ingedeeld op het land/de locatie waar het apparaat wordt gebruikt.
History (Geschiedenis):
Lijst van de tien laatst beluisterde stations.
Service:
Naar een radiostation zoeken, voer een trefwoord in om naar een radiostation in de lijst te zoeken.
25
 Loading...