


 ®
®


 ®
®
WIRELESS LIGHTING
SPECIFICATION GUIDE
Legrand, North America
60 Woodlawn Street West Hartford, CT 06110
1.877.BY.LEGRAND (295.3472) www.legrand.us
570 Applewood Crescent Vaughan, Ontario L4K 4B4 905.738.9195 www.legrand.ca
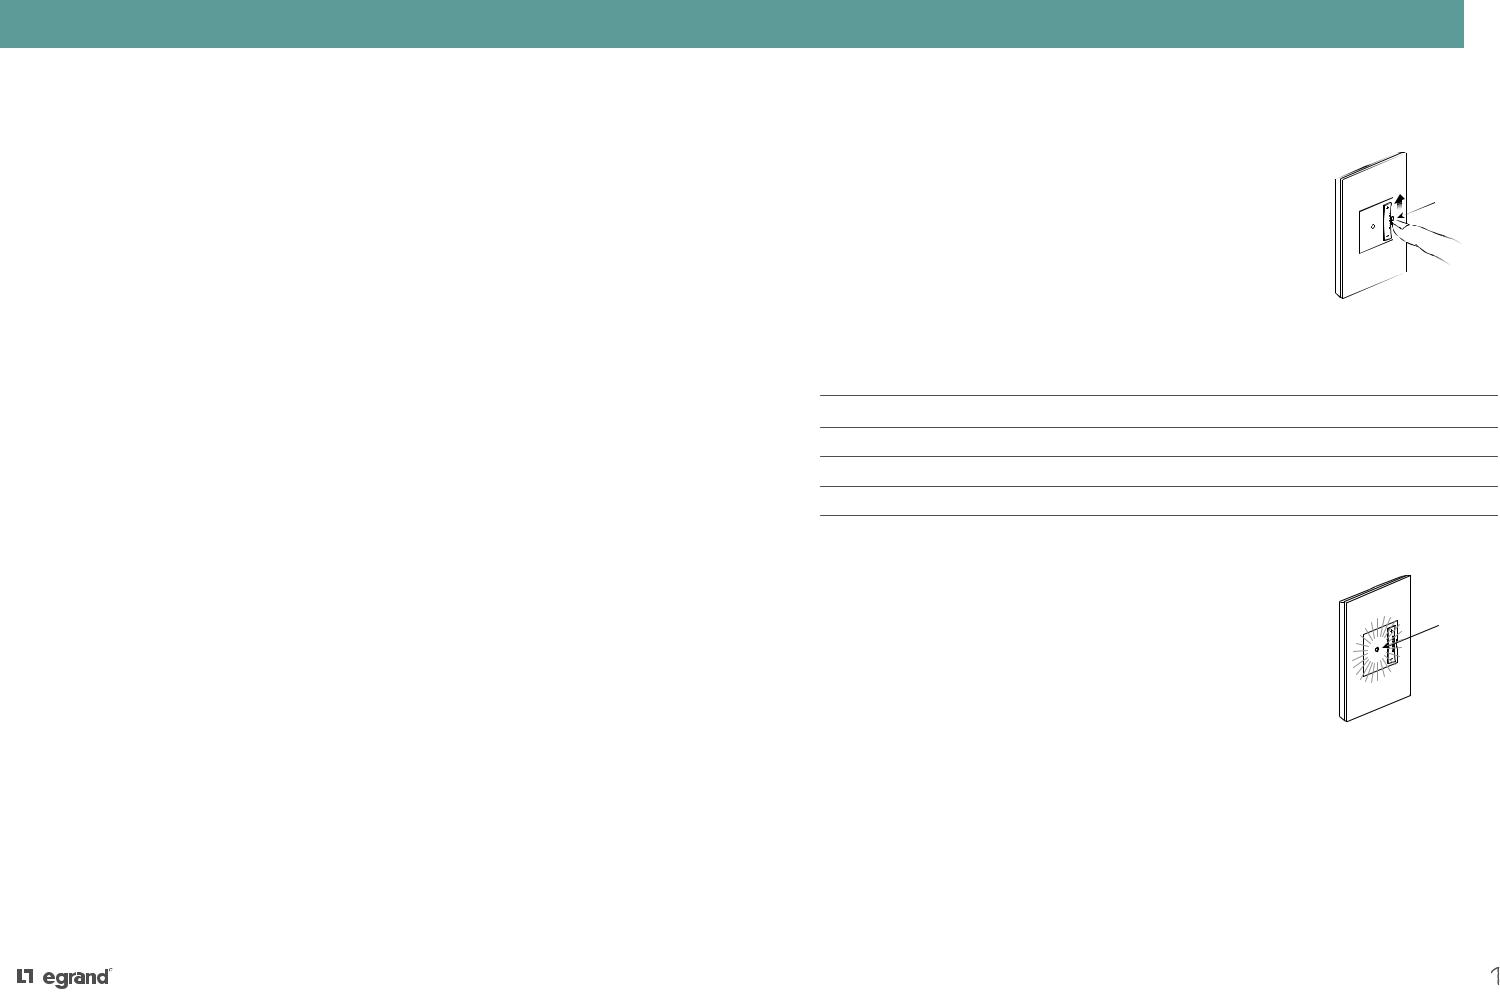
TABLE OF CONTENTS
Table of Contents
|
|
System Introduction |
2-3 |
|
|
Configuring the System |
4-9 |
|
|
Setting a House ID |
4 |
|
|
Creating Groups |
5-6 |
|
|
Setting up Remote Controls |
7-9 |
|
|
Custom Settings |
10-11 |
|
|
Expanding the System and Interfacing |
12-16 |
|
|
with Other Programs |
|
|
|
Operating the System |
17-20 |
|
|
Designing a System |
21 |
|
|
Product Overview |
22-25 |
|
|
Specifications |
26-28 |
|
|
Frequently Asked Questions |
29-30 |
|
|
|
|
|
|
|
|
|
|
|
|
|
|
|
|
SAFETY CONSIDERATIONS
Safety Considerations
Lamp Replacement |
|
It is a safety requirement that lighting loads be electrically isolated for relamping. To |
|
do this, use the air-gap switch to the right of the adorne device as shown and move the |
Airgap Switch |
switch upwards. When the LED goes out, the load is safely isolated for relamping. To |
|
restore normal operation, move the switch back to the down position. |
|
Dimmer Derating
For multi-gang installations, use pliers to break off the specified heat sink fins.
De-rate the maximum load according to the following table.
|
Rated Load |
2-Gang Installation |
3-Gang Installation |
Incandescent/Halogen |
700W |
600W/600W |
600W/500W/600W |
MLV |
700VA |
600VA/600VA |
600VA/500VA/600VA |
EFL |
5.5A |
5.5A/5.5A |
5A/5A/5A |
ELV |
700W |
600W/600W |
600W/500W/600W |
Overload Protection |
|
adorne Wireless Lighting dimmers and switches feature overload and short-circuit |
|
protection. In the event of an overload condition, the device will stop working, and the |
Flashing Red |
status LED will be rapidly flashing red at 2 Hz. Set the dimmer to off, disconnect loads |
|
in excess of the dimmer’s rating, and try again. |
|
1
INTRODUCTION
adorne Whole-House Wireless
System range:
•More than 100 feet (up to 300 feet with use of repeater MRR2-G)
•Supports up to 100 loads
The Whole-House system provides unrivaled convenience, security, and energy-savings for both remodel projects and new construction. The ability to set scenes allows you to create the perfect lighting environment in multiple rooms or the entire house, all at the touch of a single button.
Convenience
•Coordinated control of lights, lamps, ceiling fans, and small appliances
•One-touch scene selection
•Easy grouping of dimmers and switches for flexible control
•Smart phone, tablet, and computer control options to give you access to your home’s lighting from anywhere in the world
Security and Safety
•Control as many lights in the home as desired from anywhere in the home or with your smart phone
•One-touch whole-house on/off
•Welcome home scenes that illuminate pathways and garages for a safe arrival
•Timed events make the home look occupied, even when you are away
•Easily integrates with alarm and fire systems*
•Turns off fans in the event of a fire*
SOFTAP |
TOUCH |
Switch
Dimmer
Incandescent/Halogen
CFL/LED
Fluorescent
Forward-Phase Electronic Low Voltage
Reverse-Phase Electronic Low Voltage
Magnetic Low Voltage
*Requires integration of RS232 to RF Interface device (MR232).
INTRODUCTION
adorne Wireless Lighting Control Design
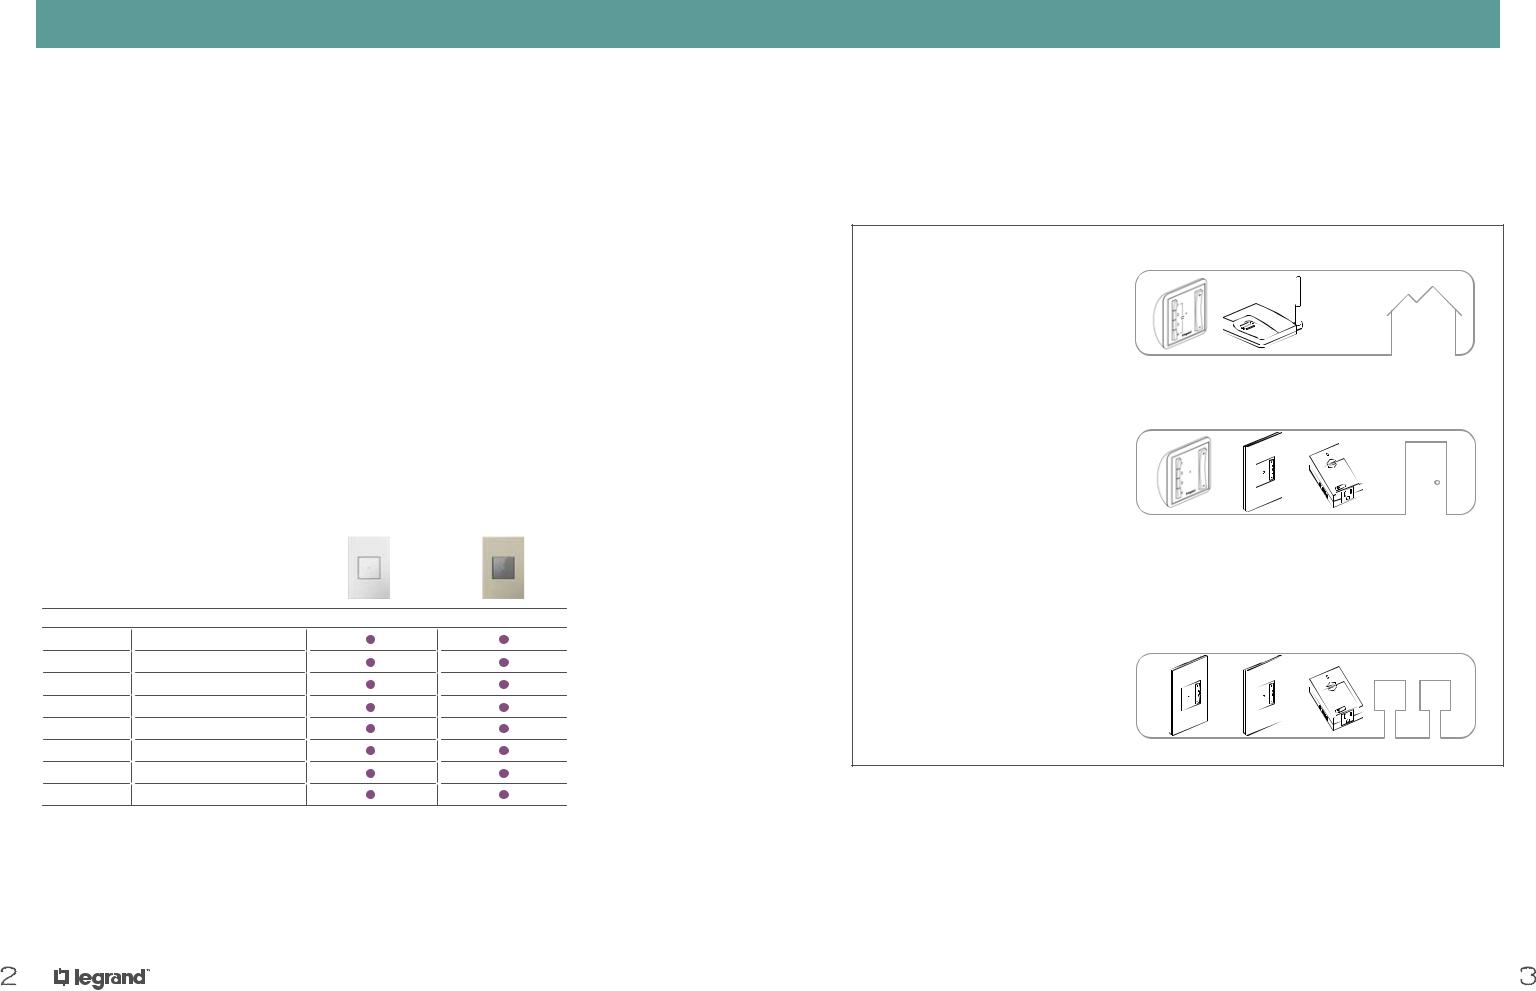
adorne Wireless Lighting System’s unique hierarchal structure provides three levels of control for unprecedented convenience and flexibility.
HOUSE
A HOUSE may contain practically any number of adorne Wireless Lighting devices, GROUPS and/or ROOMS.
Whole-House Remote Controls and
Repeaters are HOUSE level devices.
ROOM
A ROOM may contain one or more Room Remote Controls to operate a combination of any number of adorne Wireless Lighting devices and/or GROUPS.
Room remote controls, master switches & dimmers, and plug-in modules can operate a combination of any number of adorne Wireless Lighting devices and/or GROUPS.
GROUP
GROUP any number of master switches & dimmers, plug-in modules, and remote switches & dimmers into an “intelligent” three-way or four-way switch circuit.
2 |
3 |
SETTING A HOUSE ID
Configuring an adorne Wireless Lighting System
In order to function, adorne Wireless Lighting devices have to be “bound” together into a simple wireless network. This is very easy to do, but it helps to understand how and why it works.
1.All adorne Wireless Lighting devices must obtain a unique House ID to prevent interference with neighboring systems.
2.In addition, adorne Wireless Lighting devices may be bound together in GROUPS, usually one or more remote switches & dimmers with a master switch, dimmer, or plug-in module.
3.All adorne Wireless Lighting devices and GROUPS in a room may be bound together with one or more Room Remote Control(s) to provide simple control of multiple recorded lighting scenes.
Every programming process in an adorne Wireless Lighting system consists of placing the devices into a “learn” or “program” mode by pressing and holding the on/off button. Once this has been done, any
configuration, from establishing a House ID to creating GROUPS, is accomplished by pressing the buttons on the faces of the devices.
Programming Example: Setting a unique HOUSE ID in a new installation
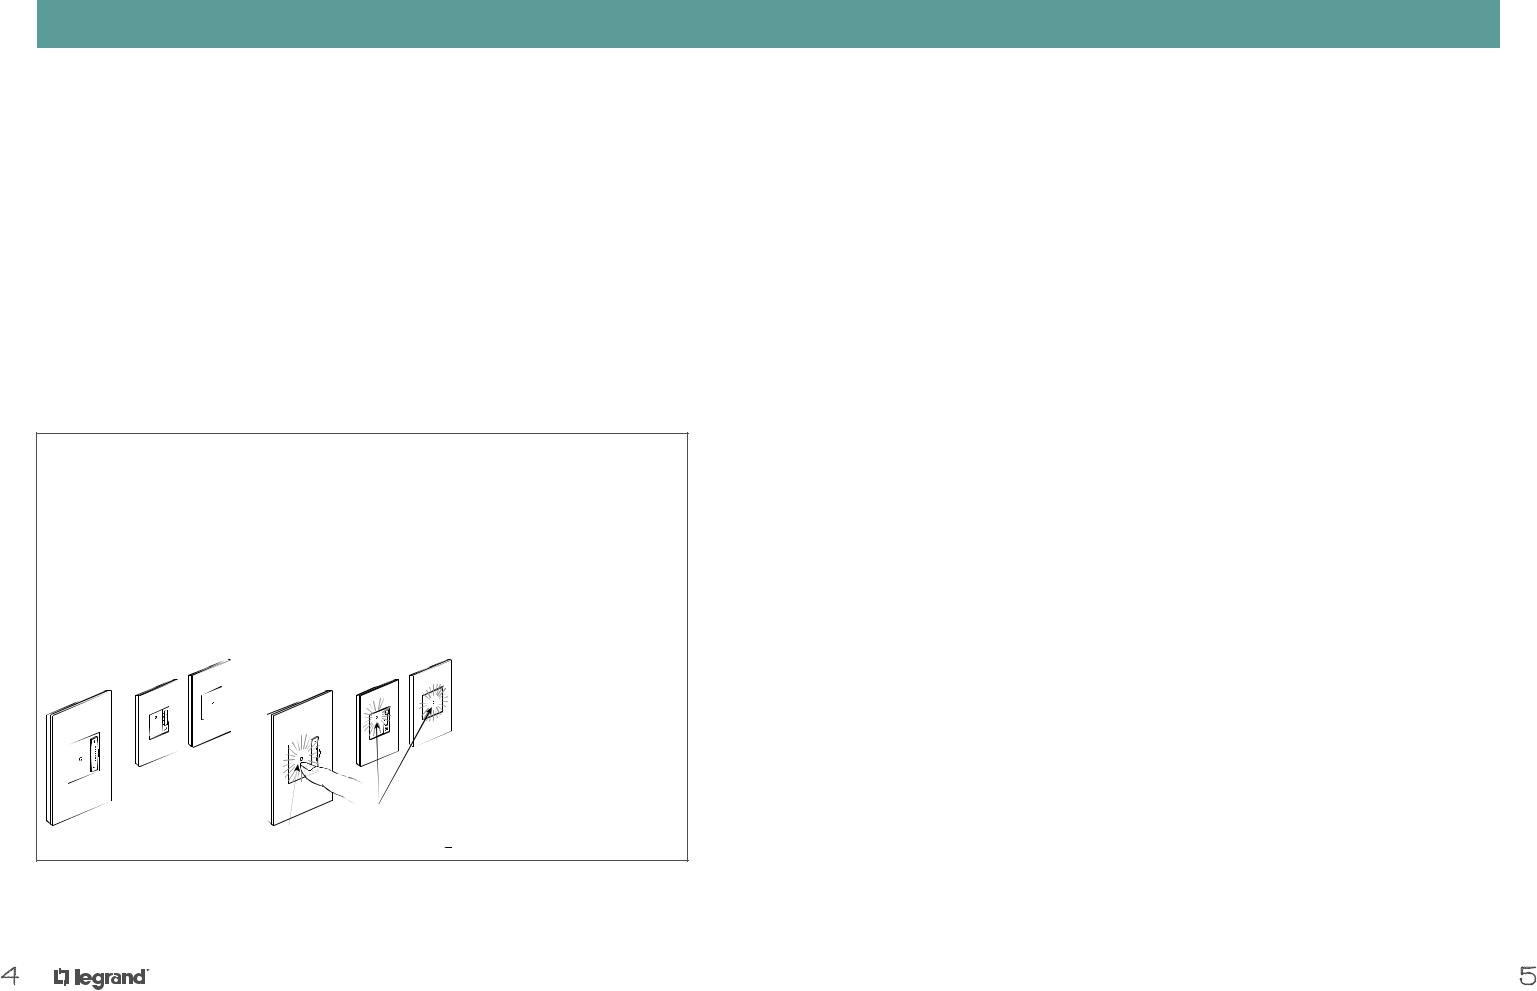
1.First make sure all status LEDs on all devices are solid AMBER.
2.Press the on/off button of any switch or dimmer for five seconds. Its status LED will flash AMBER, and all other devices’ status LEDs will flash GREEN.
3.Press the on/off button of the same switch or dimmer that is flashing amber for another five seconds. All status LEDs will flash GREEN for two seconds and then turn solid WHITE.
1 |
2 |
3 |
Glowing Amber |
Flashing Green |
Solid White |
|
Flashing Amber |
Flashing Green |
Find step-by-step how-to videos at www.adornemyhome.com/install.
4
CREATING GROUPS
GROUP Level Control
A GROUP is two or more devices bound together so that each device controls itself and other devices in the same way. For example, double-tapping the on/off button will turn all devices on.
A GROUP usually comprises a master switch or dimmer with one or more remote switches and dimmers. GROUPs may also contain multiple master switches or dimmers, such as in a large area lit by several ceiling downlights.
ROOM and HOUSE level devices (i.e., remote controls and repeaters) cannot be included in GROUPs.
Like all adorne Wireless Lighting system elements, all GROUP members must first be bound to the same house ID. GROUPS may be included in ROOMS, but they may also stand alone. adorne Wireless Lighting GROUPS are commonly used as a substitute for a four-way circuit with multiple control points, particularly in retrofits where adding wiring may be an issue.
Please note that when a GROUP is bound into a ROOM, it is not necessary to also bind each GROUP member into the ROOM; one in, all in is the rule.
All three GROUPED devices provide seamless dimming control from three locations.
Note that each device may be fed from a different circuit
– even a different phase. adorne Wireless Lighting’s RF communications are independent of AC wiring.
Plug-in lamp modules are often placed behind furniture. GROUPing them with a remote dimmer or switch provides control where you want it. Coordinate control of non-dimmable loads (such as kinetic sculptures and fountains) using Plug-in Appliance Modules.
Any number of Plug-in Lamp or Appliance Modules may be GROUPED in this way to provided control of several devices around the room from a single remote switch or dimmer.
5

CREATING GROUPS
GROUP Level Control
Creating a New Group
1.Ensure all potential group members’ status LEDs are solid WHITE.
2.Press and hold the on/off button of one device that you want to include in the GROUP until the LED flashes AMBER.
3.For each device that you would like to add to the GROUP, press and hold the on/off button for five seconds until the LED turns from GREEN to AMBER.
4.Repeat for all devices that you wish to add to the GROUP.
5.Press and hold the first item’s on/off button for five seconds and release.
6.All device LEDs should return to a solid WHITE.
Adding or Removing a Device from a Group
1.Ensure all potential group members’ status LEDs are solid WHITE.
2.Press and hold one device’s on/off button until the LED flashes AMBER.
3.All GROUP members’ LEDS should now be flashing AMBER, while un-included devices’ LEDs should flash GREEN.
4.Press and hold any item’s on/off button to include it in the GROUP (if it is flashing GREEN) or to remove it from the GROUP (if it is flashing AMBER).
5.Press and hold the first item’s on/off button for five seconds and release.
6.All devices should flash GREEN for two seconds and then turn a solid WHITE.
Find step-by-step how-to videos at www.adornemyhome.com/install.
6
SETTING UP REMOTE CONTROLS
Setting Up Remote Controls
A ROOM is a number of adorne Wireless Lighting devices (expect HOUSE level devices or repeaters) bound together under the control of one or more remote controls. Room remote controls allow users to set, modify, and recall up to four lighting scenes. They also enable ROOM on/off and proportionally lower or raise overall room brightness. Any number of room remote controls may be used.
Scenes
A ROOM scene is a configuration of light level information for every adorne Wireless Lighting device bound to the ROOM. ROOM scenes have a default fade time of two seconds. Scene information is stored in the device connected to the load (master dimmers or switches), NOT in the room remote control.
Location
Typically, users place room remote controls on their included cradles at room entrances. They may also wish to lift the room remote control off its cradle for portability.
Setting up a Remote Control
1.Ensure all status LEDs are solid WHITE.
2.Press and hold the +/- paddle on the remote control for five seconds and release. The LED should be flashing AMBER.
3.All device LEDs should now be flashing GREEN, unless they have already been bound to the remote control.
4.Press and hold any device’s on/off button to include it in the GROUP (if it is flashing GREEN) or to remove it from the GROUP (if it is flashing AMBER).
5.Please note - if you have bound one device from a GROUP to the remote, then all GROUP members will be bound to the remote.
6.Press and hold the remote’s +/- paddle for five seconds and release.
7.All devices should flash GREEN for two seconds and then turn a solid WHITE.
7
SETTING UP A WHOLE-HOUSE REMOTE CONTROL
HOUSE Level Control
With adorne Wireless Lighting, users can control their entire home with a single touch using HOUSE scenes. Other important HOUSE level functions include occupancy emulation and Panic mode.
House Remote Controls
House remote controls look like room remote controls but include a house icon on the face. Typically, users place house remote controls on their cradles inside exterior doorways and inside the doorway to the garage. They may also wish to lift the house remote control off its cradle for portability, for example at bedside in the master suite.
House Scenes
adorne Wireless Lighting supports up to four HOUSE scenes. Commonly used scenes include:
•Pathway lighting (e.g., from the master bedroom to the kitchen)
•Balanced whole HOUSE look for entertaining, including patio and landscape lighting
•HOUSE sleep scene at night, in which desired general lighting is off and low level pathway lighting is on
•HOUSE off scene when leaving, which can include occupancy emulation (see page 23)
•HOUSE arrival scene in which desired lighting throughout the house is on upon arrival
HOUSE scenes differ from ROOM scenes because:
•They may include any or all adorne Wireless Lighting devices and GROUPS in the house
•They may include a Repeater for occupancy emulation (page 23)
•Every device in the scene must be individually bound to that scene.
Devices may be toggled in and out of a HOUSE scene using a simple binding process.
Find step-by-step how-to videos at www.adornemyhome.com/install.
8
SETTING UP A WHOLE-HOUSE REMOTE CONTROL
HOUSE Level Control
Creating a New Scene
1.Adjust the light levels throughout the house (or room) to the desired settings for the scene.
2.Press and hold any of the four numbered buttons on the remote for five seconds and release.
3.The remote’s LED should flash GREEN for two seconds and then turn a solid WHITE.
Removing a Device from a Scene
1.Press and hold the +/- paddle on the remote for five seconds and release. The LED should be flashing AMBER.
2.All room or house members’ LEDs will now be flashing AMBER.
3.Press and release the desired scene button (1, 2, 3, or 4) on the remote.
4.Press and hold the on/off button on the device you would like
to remove. Release after five seconds. The LED should now be flashing GREEN.
5.Press and hold the +/- paddle on the remote for five seconds and release.
6.All LEDs should flash GREEN for two seconds and then turn a solid WHITE.
|
|
|
|
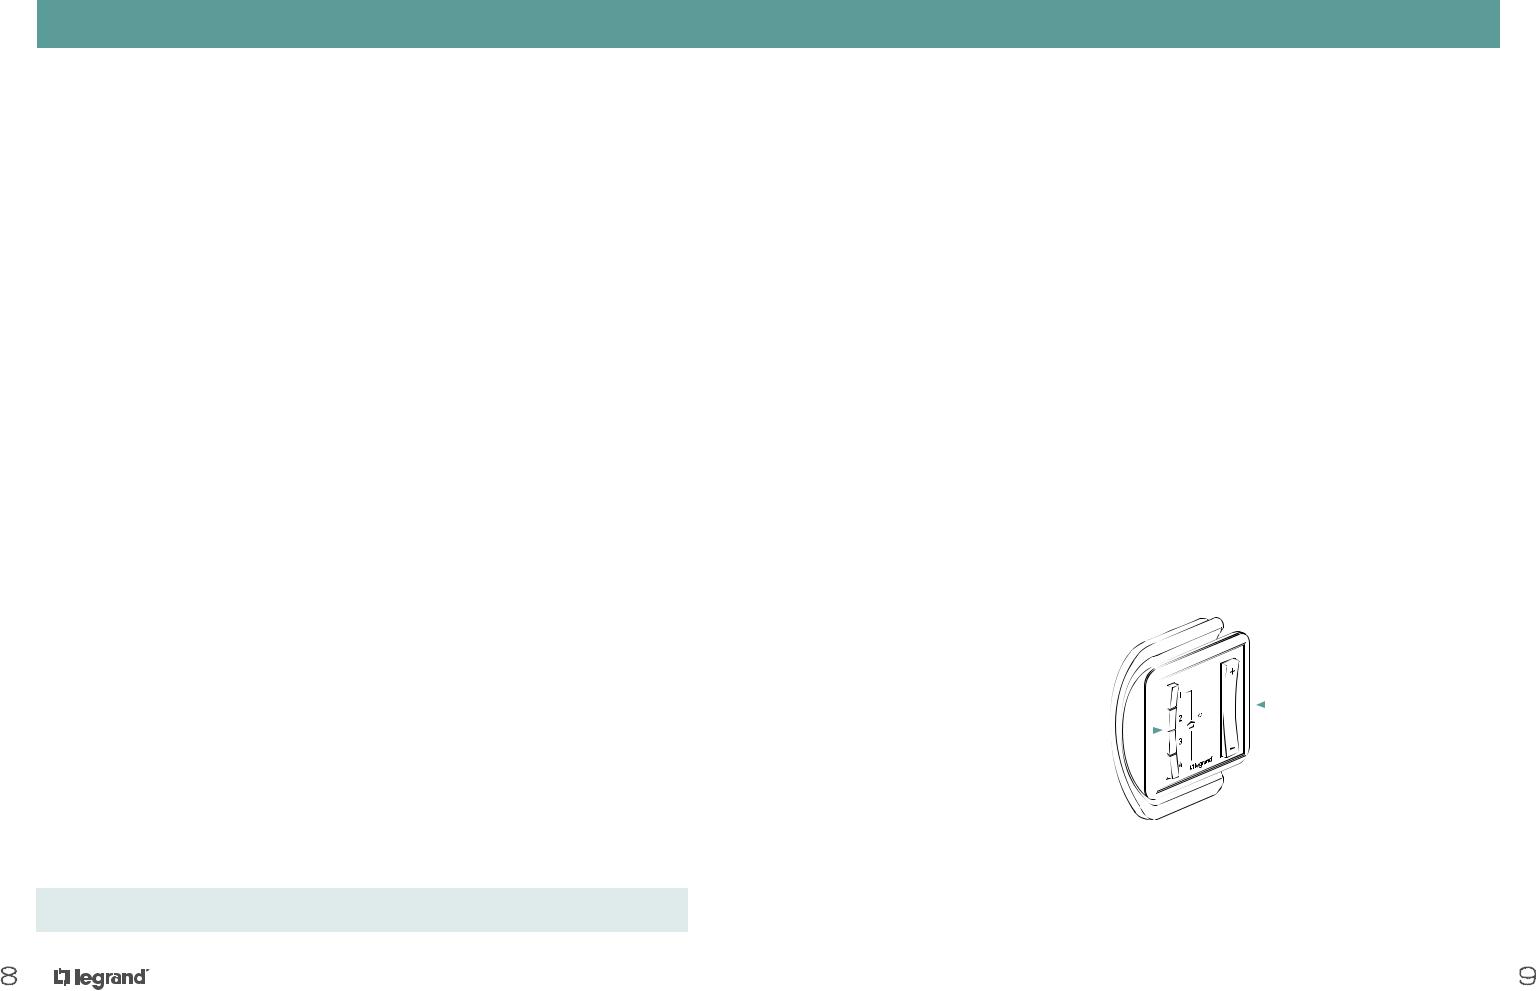
The paddle offers |
|
|
|
|
programmable house |
Four scene buttons may |
|
on (up) and house off |
||
|
||||
be set up to program and |
|
|
|
(down) functions. |
|
|
|||
recall up to four scenes. |
|
|
||
|
|
|
|
|
9
 Loading...