


 Loading...
OPERATION GUIDE
FS-C5150DN/FS-C5250DN

Introduction
Thank you for your purchase of FS-C5150DN/FS-C5250DN.
This Operation Guide is intended to help you operate the machine correctly, perform routine maintenance and take a simple troubleshooting action as necessary, so that you can always use the machine in good condition.
Please read this Operation Guide before you start using the machine, and keep it close to the machine for easy reference.
We recommend the use of our own brand supplies. We will not be liable for any damage caused by the use of third party supplies in this machine.
A label shown in the illustration assures that the supplies are our own brand.

Contents
|
Menu Map ............................................................................. |
iii |
|
Legal and Safety Information ............................................ |
vii |
1 |
Machine Parts |
|
|
Components at the Front of the Printer .................................... |
1-2 |
|
Internal Components .................................................................. |
1-2 |
|
Components at the Rear of the Printer ..................................... |
1-3 |
|
Operation Panel .......................................................................... |
1-4 |
2 |
Printing Operation |
|
|
Changing Network Interface Parameters ................................. |
2-2 |
|
Printing a Status Page ................................................................ |
2-3 |
|
COMMAND CENTER ................................................................... |
2-3 |
|
Installing the Printer Driver ........................................................ |
2-4 |
|
Printing from Application Software ........................................ |
2-10 |
|
Status Monitor ........................................................................... |
2-11 |
|
Uninstalling Software (Windows PC) ...................................... |
2-15 |
3 |
Handling Paper |
|
|
General Guidelines ..................................................................... |
3-2 |
|
Selecting the Right Paper .......................................................... |
3-4 |
|
Special Paper .............................................................................. |
3-8 |
|
Paper Type ................................................................................ |
3-13 |
|
Loading Paper ........................................................................... |
3-14 |
4 Using the Operation Panel |
|
|
|
General Information .................................................................... |
4-2 |
|
Understanding the Operation Panel ......................................... |
4-3 |
|
Keys ............................................................................................. |
4-6 |
|
Using the Menu Selection System ............................................ |
4-8 |
|
Setting a Mode Selection Menu ............................................... |
4-10 |
|
Report Print ............................................................................... |
4-11 |
|
USB Memory (USB memory selection) ................................... |
4-16 |
|
Custom Box (Using a Custom Box) ........................................ |
4-18 |
|
Job Box ...................................................................................... |
4-22 |
|
Counter (Viewing the counter value) ...................................... |
4-28 |
|
Paper Settings ........................................................................... |
4-29 |
|
Print Settings ............................................................................ |
4-37 |
|
Network (Network settings) ..................................................... |
4-46 |
|
Device Common (Selecting/Setting the common device) .... 4-52 |
|
|
Security ...................................................................................... |
4-62 |
|
Job Accounting (Job Accounting selection/setting) ............. |
4-70 |
|
Administrator (Administrator settings) .................................. |
4-76 |
|
Adjust/Maintenance (Adjust/Maintenance selection/setting) 4-79 |
|
|
Optional Functions ................................................................... |
4-89 |
5 |
Maintenance |
|
|
General Information .................................................................... |
5-2 |
|
Toner Container Replacement ................................................... |
5-2 |
|
Replacing the Waste Toner Box ................................................ |
5-6 |
|
Cleaning the Printer .................................................................... |
5-8 |
i

6 Troubleshooting
General Guidelines ..................................................................... |
6-2 |
Print Quality Problems ............................................................... |
6-3 |
Error Messages ........................................................................... |
6-6 |
Clearing Paper Jams ................................................................ |
6-11 |
Appendix
Interface ....................................................................................... |
A-2 |
USB Interface .............................................................................. |
A-2 |
Network Interface ........................................................................ |
A-3 |
About the Options ...................................................................... |
A-5 |
Expansion Memory Modules ..................................................... |
A-6 |
General Description of Options ................................................. |
A-8 |
Specifications ........................................................................... |
A-12 |
Glossary ............................................................... |
Glossary-1 |
Index ........................................................................... |
Index-1 |
ii

Menu Map
MENU Key
Report Print |
Print Menu Map (page 4-11) |
|
|
(page 4-11) |
|
|
|
Print Status Page (page 4-13) |
|
||
|
|
||
|
|
|
|
|
Print Fonts List (page 4-15) |
|
|
|
|
||
|
Print Hard Disk File List (page 4-15) |
||
|
|
||
|
Print RAM Disk File List (page 4-15) |
||
|
|
|
|
USB Memory |
Print File (page 4-16) |
|
|
(page 4-16) |
|
|
|
Copies (page 4-17) |
|
||
|
|
||
|
|
|
|
|
Paper Source (page 4-17) |
|
|
|
|
|
|
|
Remove Device (page 4-17) |
|
|
|
|
|
|
|
Print File List (page 4-17) |
|
|
|
|
|
|
Custom Box |
Select Box (page 4-18) |
|
Print All Files (page 4-19) |
(page 4-18) |
|
|
|
|
|
(Selects the data) (page 4-20) |
|
|
|
|
|
|
|
|
|
|
|
|
Delete All Files (page 4-21) |
|
|
|
|
|
|
|
Print File List (page 4-21) |
|
|
|
|
|
Print Box List (page 4-21) |
|
|
|
|
|
|
Job Box |
Quick Copy (page 4-23) |
|
|
(page 4-22) |
|
|
|
Private/Stored (page 4-25) |
|
||
|
|
||
|
|
|
|
|
Job Box Configuration |
|
Quick Copy (page 4-27) |
|
(page 4-26) |
|
|
|
|
Delete (page 4-27) |
|
|
|
|
|
|
|
|
|
Counter |
Printed Pages (page 4-28) |
|
|
(page 4-28) |
|
|
|
Color (page 4-28) |
|
||
|
|
||
|
|
|
|
|
Black & White (page 4-28) |
|
|
|
|
|
|
Paper |
MP Tray Size (page 4-29) |
|
|
Settings |
|
|
|
MP Tray Type (page 4-30) |
|
||
(page 4-29) |
|
||
|
|
|
|
Cassette 1 Size (page 4-31) |
|
||
|
|
||
|
|
|
|
|
Cassette 2 Size (page 4-31) |
|
|
|
|
|
|
|
Cassette 3 Size (page 4-31) |
|
|
|
|
|
|
|
Cassette 4 Size (page 4-31) |
|
|
|
|
|
|
|
Cassette 1 Type (page 4-33) |
|
|
|
|
|
|
|
Cassette 2 Type (page 4-33) |
|
|
|
|
|
|
|
Cassette 3 Type (page 4-33) |
|
|
|
|
|
|
|
Cassette 4 Type (page 4-33) |
|
|
|
|
|
|
|
Type Adjust (page 4-34) |
|
Paper Weight (page 4-35) |
|
|
|
|
|
|
|
Duplex Path (page 4-35) |
|
|
|
|
|
Reset Type Adjust (page 4-36) |
||
|
|
|
|
iii

Paper Source (page 4-37) |
|
||
Settings |
|
|
|
Paper Feed Mode (page 4-38) |
|
||
(page 4-37) |
|
||
|
|
|
|
Duplex (page 4-38) |
|
||
|
|
||
|
|
|
|
|
Override A4/LT (page 4-40) |
|
|
|
|
|
|
|
Emulation (page 4-40) |
|
|
|
|
|
|
|
|
|
Error Report (page 4-40) |
|
|
|
|
|
Color Mode (page 4-42) |
|
|
|
|
|
|
|
Print Quality (page 4-42) |
|
Gloss Mode (page 4-42) |
|
|
|
|
|
|
|
EcoPrint Mode (page 4-43) |
|
|
|
|
|
Page Set (page 4-43) |
|
Copies (page 4-43) |
|
|
|
|
|
|
|
Orientation (page 4-44) |
|
|
|
|
|
|
|
Wide A4 (page 4-44) |
|
|
|
|
|
|
|
XPS FitTo Page (page 4-44) |
|
|
|
|
|
|
|
TIFF/JPEG Size (page 4-45) |
|
|
|
|
Network |
TCP/IP (page 4-46) |
|
|
(page 4-46) |
|
|
|
|
|
DHCP (page 4-47) |
|
|
|
|
|
|
|
|
|
|
|
|
Auto-IP (page 4-47) |
|
|
|
|
|
|
|
IP Address (page 4-47) |
|
|
|
|
|
|
|
Subnet Mask (page 4-48) |
|
|
|
|
|
|
|
Gateway (page 4-49) |
|
|
|
|
|
|
|
Bonjour (page 4-49) |
|
|
|
|
|
TCP/IP (IPv6) (page 4-50) |
|
|
|
|
|
|
|
|
|
RA (Stateless) (page 4-50) |
|
|
|
|
|
|
|
DHCPv6 (page 4-50) |
|
|
|
|
iv

Device |
Message Language (page 4-52) |
||
Common |
|
|
|
Date Setting (page 4-52) |
Date (Year/Mon/Day) (page 4-53) |
||
(page 4-52) |
|||
|
|
||
|
Time (Hour:Min:Sec) (page 4-53) |
||
|
|
||
|
|
|
|
|
|
Date Format (page 4-53) |
|
|
|
|
|
|
Buzzer (page 4-54) |
Key Confirmation (page 4-54) |
|
|
|
|
|
|
|
Job End (page 4-54) |
|
|
|
|
|
|
|
Ready (page 4-54) |
|
|
|
|
|
|
|
Error (page 4-55) |
|
|
|
|
|
|
RAM Disk Mode (page 4-55) |
|
|
|
|
|
|
|
|
RAM Disk Size (page 4-56) |
|
|
|
|
|
|
Hard Disk (page 4-56) |
Format (page 4-57) |
|
|
|
|
|
|
Error Handling (page 4-57) |
Duplex (page 4-57) |
|
|
|
|
|
|
|
Paper Mismatch (page 4-58) |
|
|
|
|
|
|
|
MP Tray Empty (page 4-58) |
|
|
|
|
|
|
Timer (page 4-59) |
Form Feed Time Out (page 4-59) |
|
|
|
|
|
|
|
Sleep Timer (page 4-59) |
|
|
|
|
|
|
|
Auto Error Clear (page 4-60) |
|
|
|
|
|
|
|
Error Clear Timer (page 4-60) |
|
|
|
|
|
|
|
Auto Panel Reset (page 4-61) |
|
|
|
|
|
|
|
Panel Reset Timer (page 4-61) |
|
|
|
|
|
Security |
I/F Block (page 4-63) |
USB Host (page 4-63) |
|
(page 4-62) |
|
|
|
|
USB Device (page 4-63) |
||
|
|
||
|
|
|
|
|
|
Option I/F (page 4-64) |
|
|
|
|
|
|
NetWare (page 4-64) |
|
|
|
|
|
|
|
|
Frame Type (page 4-64) |
|
|
|
|
|
|
AppleTalk (page 4-65) |
|
|
|
|
|
|
|
IPP (page 4-65) |
|
|
|
|
|
|
|
SSL Server (page 4-66) |
|
|
|
|
|
|
|
|
DES (page 4-66) |
|
|
|
|
|
|
|
3DES (page 4-67) |
|
|
|
|
|
|
|
AES (page 4-67) |
|
|
|
|
|
|
|
IPP over SSL (page 4-67) |
|
|
|
|
|
|
|
HTTPS (page 4-68) |
|
|
|
|
|
|
IPSec (page 4-68) |
|
|
|
|
|
|
|
Security Level (page 4-69) |
|
|
|
|
|
|
|
Thin Print (page 4-69) |
|
|
|
|
|
|
|
|
ThinPrint over SSL (page 4-69) |
|
|
|
|
|
v

Job |
Job Accounting (page 4-71) |
|
|
Accounting |
|
|
|
Select Account (page 4-72) |
Counter (page 4-72) |
||
(page 4-70) |
|||
|
|
||
|
Color Counter (page 4-72) |
||
|
|
||
|
|
|
|
|
|
Restriction (page 4-73) |
|
|
|
|
|
|
|
Color Restriction (page 4-73) |
|
|
|
|
|
|
|
Maximum Output (page 4-73) |
|
|
|
|
|
|
|
Color Max. Output (page 4-74) |
|
|
|
|
|
|
|
Reset Counter (page 4-74) |
|
|
|
|
|
|
Add Account (page 4-74) |
|
|
|
|
|
|
|
Delete Account (page 4-75) |
|
|
|
|
||
|
Print Job Accounting List (page 4-75) |
||
|
|
|
|
Administrator |
Change ID (page 4-77) |
|
|
(page 4-76) |
|
|
|
Change Password (page 4-77) |
|||
|
|||
|
|
|
|
Adjust/ |
Color Calibration (page 4-79) |
|
|
Maintenance |
|
|
|
Registration Normal |
Print Registration Chart (page 4-80) |
||
(page 4-79) |
(page 4-79) |
|
|
Adjust Magenta (page 4-81) |
|||
|
|
||
|
|
|
|
|
|
Adjust Cyan (page 4-82) |
|
|
|
|
|
|
|
Adjust Yellow (page 4-82) |
|
|
|
|
|
|
Registration Details |
Print Registration Chart (page 4-83) |
|
|
(page 4-82) |
|
|
|
M 12345 3 (Adjust magenta) (page 4-84) |
||
|
|
||
|
|
|
|
|
|
C 12345 3 (Adjust Cyan) (page 4-85) |
|
|
|
|
|
|
|
Y 12345 3 (Adjust Yellow) (page 4-85) |
|
|
|
|
|
|
Restart Printer (page 4-86) |
|
|
|
|
|
|
|
Service (page 4-86) |
Print Status Page (page 4-86) |
|
|
|
|
|
|
|
Print Network Status Page (page 4-87) |
|
|
|
|
|
|
|
Print Test Page (page 4-87) |
|
|
|
|
|
|
|
Maintenance (page 4-87) |
|
|
|
|
|
|
|
DEV-CLN (page 4-88) |
|
|
|
|
|
|
|
LSU (page 4-88) |
|
|
|
|
|
|
|
Drum (page 4-88) |
|
|
|
|
|
|
|
Altitude Adj. (page 4-88) |
|
|
|
|
|
|
|
MC (page 4-89) |
|
|
|
|
|
Optional Functions (page 4-89) |
|
||
|
|
|
|
vi

Legal and Safety Information
CAUTION NO LIABILITY IS ASSUMED FOR ANY
DAMAGE CAUSED BY IMPROPER INSTALLATION.
Notice on Software
SOFTWARE USED WITH THIS PRINTER MUST SUPPORT THE PRINTER'S EMULATION MODE. The printer is factory-set to emulate the PCL.
Notice
The information in this guide is subject to change without notification. Additional pages may be inserted in future editions. The user is asked to excuse any technical inaccuracies or typographical errors in the present edition.
No responsibility is assumed if accidents occur while the user is following the instructions in this guide. No responsibility is assumed for defects in the printer's firmware (contents of its read-only memory).
This guide, any copyrightable subject matter sold or provided with or in connection with the sale of the page printer, are protected by copyright. All rights are reserved. Copying or other reproduction of all or part of this guide, any copyrightable subject matter without the prior written consent of Kyocera Mita Corporation is prohibited. Any copies made of all or part of this guide, any copyrightable subject must contain the same copyright notice as the material from which the copying is done.
Regarding Tradenames
PRESCRIBE is a registered trademark of Kyocera Corporation. KPDL is trademark of Kyocera Corporation.
Hewlett-Packard, PCL, and PJL are registered trademarks of HewlettPackard Company. Centronics is a trade name of Centronics Data Computer Inc. PostScript is a registered trademark of Adobe Systems Incorporated. Macintosh is a registered trademark of Apple Computer, Inc. Microsoft and Windows are registered trademarks of Microsoft Corporation. PowerPC is a trademark of International Business Machines Corporation. ENERGY STAR is a U.S. registered mark. ThinPrint is a trademark or registered trademark of ThinPrint GmbH in Germany and other countries. All other brand and product names are registered trademarks or trademarks of their respective companies.
This product contains UFST™ and MicroType® from Monotype Imaging Inc.
vii

License Agreements
Typeface Trademark Acknowledgement
All resident fonts in this printer are licensed from Monotype Imaging Inc.
Helvetica, Palatino and Times are registered trademarks of Linotype-Hell AG. ITC Avant Garde Gothic, ITC Bookman, ITC ZapfChancery and ITC Zapf Dingbats are registered trademarks of International Typeface Corporation.
Monotype Imaging License Agreement
1“Software” shall mean the digitally encoded, machine readable, scalable outline data as encoded in a special format as well as the UFST Software.
2You agree to accept a non-exclusive license to use the Software to reproduce and display weights, styles and versions of letters, numerals, characters and symbols (“Typefaces”) solely for your own customary business or personal purposes at the address stated on the registration card you return to Monotype Imaging. Under the terms of this License Agreement, you have the right to use the Fonts on up to three printers. If you need to have access to the fonts on more than three printers, you need to acquire a multi-user license agreement which can be obtained from Monotype Imaging. Monotype Imaging retains all rights, title and interest to the Software and Typefaces and no rights are granted to you other than a License to use the Software on the terms expressly set forth in this Agreement.
3To protect proprietary rights of Monotype Imaging, you agree to maintain the Software and other proprietary information concerning the Typefaces in strict confidence and to establish reasonable procedures regulating access to and use of the Software and Typefaces.
4You agree not to duplicate or copy the Software or Typefaces, except that you may make one backup copy. You agree that any such copy shall contain the same proprietary notices as those appearing on the original.
5This License shall continue until the last use of the Software and Typefaces, unless sooner terminated. This License may be terminated by Monotype Imaging if you fail to comply with the terms of this License and such failure is not remedied within thirty (30) days after notice from Monotype Imaging. When this License expires or is terminated, you shall either return to Monotype Imaging or destroy all copies of the Software and Typefaces and documentation as requested.
6You agree that you will not modify, alter, disassemble, decrypt, reverse engineer or decompile the Software.
7Monotype Imaging warrants that for ninety (90) days after delivery, the Software will perform in accordance with Monotype Imagingpublished specifications, and the diskette will be free from defects in material and workmanship. Monotype Imaging does not warrant that the Software is free from all bugs, errors and omissions.
8THE PARTIES AGREE THAT ALL OTHER WARRANTIES, EXPRESSED OR IMPLIED, INCLUDING WARRANTIES OF FITNESS FOR A PARTICULAR PURPOSE AND MERCHANTABILITY, ARE EXCLUDED.
viii
9Your exclusive remedy and the sole liability of Monotype Imaging in connection with the Software and Typefaces is repair or replacement of defective parts, upon their return to Monotype Imaging.
10IN NO EVENT WILL MONOTYPE IMAGING BE LIABLE FOR LOST PROFITS, LOST DATA, OR ANY OTHER INCIDENTAL OR CONSEQUENTIAL DAMAGES, OR ANY DAMAGES CAUSED BY ABUSE OR MISAPPLICATION OF THE SOFTWARE AND TYPEFACES.
11Massachusetts U.S.A. law governs this Agreement.
12You shall not sublicense, sell, lease, or otherwise transfer the Software and/or Typefaces without the prior written consent of Monotype Imaging.
13Use, duplication or disclosure by the Government is subject to restrictions as set forth in the Rights in Technical Data and Computer Software clause at FAR 252-227-7013, subdivision (b)(3)(ii) or subparagraph (c)(1)(ii), as appropriate. Further use, duplication or disclosure is subject to restrictions applicable to restricted rights software as set forth in FAR 52.227-19 (c)(2).
14YOU ACKNOWLEDGE THAT YOU HAVE READ THIS AGREEMENT, UNDERSTAND IT, AND AGREE TO BE BOUND BY ITS TERMS AND CONDITIONS. NEITHER PARTY SHALL BE BOUND BY ANY STATEMENT OR REPRESENTATION NOT CONTAINED IN THIS AGREEMENT. NO CHANGE IN THIS AGREEMENT IS EFFECTIVE UNLESS WRITTEN AND SIGNED BY PROPERLY AUTHORIZED REPRESENTATIVES OF EACH PARTY. BY OPENING THIS DISKETTE PACKAGE, YOU AGREE TO ACCEPT THE TERMS AND CONDITIONS OF THIS AGREEMENT.
GPL
Firmware of this machine is using in part the GPL applied codes (www.fsf.org/copyleft/gpl.html). Please access "http:// www.kyoceramita.com/gpl" for more information on how to make GPL applied codes available.
Open SSLeay License
Copyright © 1998-2006 The OpenSSL Project. All rights reserved.
Redistribution and use in source and binary forms, with or without modification, are permitted provided that the following conditions are met:
1Redistributions of source code must retain the above copyright notice, this list of conditions and the following disclaimer.
2Redistributions in binary form must reproduce the above copyright notice, this list of conditions and the following disclaimer in the documentation and/or other materials provided with the distribution.
3All advertising materials mentioning features or use of this software must display the following acknowledgment:
"This product includes software developed by the OpenSSL Project for use in the OpenSSL Toolkit. (http://www.openssl.org/)"
4The names "OpenSSL Toolkit" and "OpenSSL Project" must not be used to endorse or promote products derived from this software without prior written permission.
For written permission, please contact openssl-core@openssl.org.
5Products derived from this software may not be called "OpenSSL" nor may "OpenSSL" appear in their names without prior written permission of the OpenSSL Project.
ix

6Redistributions of any form whatsoever must retain the following acknowledgment: "This product includes software developed by the OpenSSL Project for use in the OpenSSL Toolkit (http:// www.openssl.org/)"
THIS SOFTWARE IS PROVIDED BY THE OpenSSL PROJECT "AS IS" AND ANY EXPRESSED OR IMPLIED WARRANTIES, INCLUDING, BUT NOT LIMITED TO, THE IMPLIED WARRANTIES OF MERCHANTABILITY AND FITNESS FOR A PARTICULAR PURPOSE ARE DISCLAIMED. IN NO EVENT SHALL THE OpenSSL PROJECT OR ITS CONTRIBUTORS BE LIABLE FOR ANY DIRECT, INDIRECT, INCIDENTAL, SPECIAL, EXEMPLARY, OR CONSEQUENTIAL DAMAGES (INCLUDING, BUT NOT LIMITED TO, PROCUREMENT OF SUBSTITUTE GOODS OR SERVICES; LOSS OF USE, DATA, OR PROFITS; OR BUSINESS INTERRUPTION) HOWEVER CAUSED AND ON ANY THEORY OF LIABILITY, WHETHER IN CONTRACT, STRICT LIABILITY, OR TORT (INCLUDING NEGLIGENCE OR OTHERWISE) ARISING IN ANY WAY OUT OF THE USE OF THIS SOFTWARE, EVEN IF ADVISED OF THE POSSIBILITY OF SUCH DAMAGE.
Original SSLeay License
Copyright © 1995-1998 Eric Young (eay@cryptsoft.com) All rights reserved.
This package is an SSL implementation written by Eric Young (eay@cryptsoft.com). The implementation was written so as to conform with Netscapes SSL.
This library is free for commercial and non-commercial use as long as the following conditions are aheared to. The following conditions apply to all code found in this distribution, be it the RC4, RSA, lhash, DES, etc., code; not just the SSL code. The SSL documentation included with this distribution is covered by the same copyright terms except that the holder is Tim Hudson (tjh@cryptsoft.com).
Copyright remains Eric Young's, and as such any Copyright notices in the code are not to be removed.
If this package is used in a product, Eric Young should be given attribution as the author of the parts of the library used.
This can be in the form of a textual message at program startup or in documentation (online or textual) provided with the package.
Redistribution and use in source and binary forms, with or without modification, are permitted provided that the following conditions are met:
1Redistributions of source code must retain the copyright notice, this list of conditions and the following disclaimer.
2Redistributions in binary form must reproduce the above copyright notice, this list of conditions and the following disclaimer in the documentation and/or other materials provided with the distribution.
3All advertising materials mentioning features or use of this software must display the following acknowledgement:
"This product includes cryptographic software written by Eric Young (eay@cryptsoft.com)"
The word 'cryptographic' can be left out if the rouines from the library being used are not cryptographic related :-).
x

4If you include any Windows specific code (or a derivative thereof) from the apps directory (application code) you must include an acknowledgement:
"This product includes software written by Tim Hudson (tjh@cryptsoft.com)"
THIS SOFTWARE IS PROVIDED BY ERIC YOUNG "AS IS" AND ANY EXPRESS OR IMPLIED WARRANTIES, INCLUDING, BUT NOT LIMITED TO, THE IMPLIED WARRANTIES OF MERCHANTABILITY AND FITNESS FOR A PARTICULAR PURPOSE ARE DISCLAIMED. IN NO EVENT SHALL THE AUTHOR OR CONTRIBUTORS BE LIABLE FOR ANY DIRECT, INDIRECT, INCIDENTAL, SPECIAL, EXEMPLARY, OR CONSEQUENTIAL DAMAGES (INCLUDING, BUT NOT LIMITED TO, PROCUREMENT OF SUBSTITUTE GOODS OR SERVICES; LOSS OF USE, DATA, OR PROFITS; OR BUSINESS INTERRUPTION) HOWEVER CAUSED AND ON ANY THEORY OF LIABILITY, WHETHER IN CONTRACT, STRICT LIABILITY, OR TORT (INCLUDING NEGLIGENCE OR OTHERWISE) ARISING IN ANY WAY OUT OF THE USE OF THIS SOFTWARE, EVEN IF ADVISED OF THE POSSIBILITY OF SUCH DAMAGE.
The licence and distribution terms for any publically available version or derivative of this code cannot be changed. i.e. this code cannot simply be copied and put under another distribution licence [including the GNU Public Licence.]
xi

Compliance and Conformity
This equipment has been tested and found to comply with the limits for a Class B digital device, pursuant to Part 15 of the FCC Rules. These limits are designed to provide reasonable protection against harmful interference in a residential installation. This equipment generates, uses and can radiate radio frequency energy and, if not installed and used in accordance with the instructions, may cause harmful interference to radio communications. However, there is no guarantee that interference will not occur in a particular installation. If this equipment does cause harmful interference to radio or television reception, which can be determined by turning the equipment off and on, the user is encouraged to try to correct the interference by one or more of the following measures:
•Reorient or relocate the receiving antenna.
•Increase the separation between the equipment and receiver.
•Connect the equipment into an outlet on a circuit different from that to which the receiver is connected.
•Consult the dealer or an experienced radio/TV technician for help.
•The use of a non-shielded interface cable with the referenced device is prohibited.
CAUTION — The changes or modifications not expressly approved by the party responsible for compliance could void the user’s authority to operate the equipment.
This device complies with Part 15 of FCC Rules and RSS-Gen of IC Rules.
Operation is subject to the following two conditions; (1) this device may not cause interference, and (2) this device must accept any interference, including interference that may cause undesired operation of the device.
* The above warning is valid only in the United States of America.
Interface connectors
IMPORTANT Be sure to power off the printer before connecting or disconnecting an interface cable. For protection against static electricity discharge to the printer's internal electronics through the interface connector(s), cover any interface connector that is not in use with the protective cap supplied.
 Note Use shielded interface cables.
xii

CDRH Regulations
The Center for Devices and Radiological Health (CDRH) of the U.S. Food and Drug Administration implemented regulations for laser products on August 2, 1976. These regulations apply to laser products manufactured after August 1, 1976. Compliance is mandatory for products marketed in the United States. A label indicating compliance with the CDRH regulations must be attached to laser products marketed in the United States.
Canadian Department of Communications Compliance Statement
This Class B digital apparatus complies with Canadian ICES-003.
Avis de conformité aux normes du ministère des Communications du Canada
Cet appareil numérique de la classe B est conforme à la norme NMB-003 du Canada.
xiii

Energy Saving Control Function
The device comes equipped with a Sleep Mode where printer functions remain in a waiting state but power consumption is still reduced to a minimum when there is no activity with the device within a set amount of time.
Sleep
The device automatically enters Sleep when 1 minute has passed since the device was last used. The amount of time of no activity that must pass before Sleep is activated may be lengthened. For more information, refer to Sleep Timer (Sleep timer timeout time) on page 4-59.
Automatic 2-Sided Print Function
This device includes 2-sided printing as a standard function. For example, by printing two 1-sided originals onto a single sheet of paper as a 2-sided print, it is possible to lower the amount of paper used. For more information, refer to Duplex (Duplex printing) on page 4-38.
Paper Recycling
This device supports the recycled paper which reduces the load on the environment. Your sales or service representative can provide information about recommended paper types.
Energy Star (ENERGY STAR®) Program
We have determined as a company participating in ENERGY STAR that this product has earned the ENERGY STAR.
xiv

Safety Conventions in This Guide
The sections of this guide and parts of the machine marked with symbols are safety warnings meant to protect the user, other individuals and surrounding objects, and ensure correct and safe usage of the machine. The symbols and their meanings are indicated below.
WARNING: Indicates that serious injury or even death may result from insufficient attention to or incorrect compliance with the related points.
CAUTION: Indicates that personal injury or mechanical damage may result from insufficient attention to or incorrect compliance with the related points.
Symbols
The Usymbol indicates that the related section includes safety warnings. Specific points of attention are indicated inside the symbol.
.... [General warning]
.... [Warning of danger of electrical shock]
.... [Warning of high temperature]
The  symbol indicates that the related section includes information on prohibited actions. Specifics of the prohibited action are indicated inside the symbol.
.... [Warning of prohibited action]
.... [Disassembly prohibited]
The z symbol indicates that the related section includes information on actions which must be performed. Specifics of the required action are indicated inside the symbol.
....
....
....
[Alert of required action]
[Remove the power plug from the outlet]
[Always connect the machine to an outlet with a ground connection]
Please contact your service representative to order a replacement if the safety warnings in this Operation Guide are illegible or if the guide itself is missing (fee required).
xv

Environment
The service environmental conditions are as follows:
•Temperature: 50 to 90.5 °F (10 to 32.5 °C)
•Humidity: 15 to 80 %
However, adverse environmental conditions may affect the image quality. Avoid the following locations when selecting a site for the machine.
•Avoid locations near a window or with exposure to direct sunlight.
•Avoid locations with vibrations.
•Avoid locations with drastic temperature fluctuations.
•Avoid locations with direct exposure to hot or cold air.
•Avoid poorly ventilated locations.
If the floor is delicate against casters, when this machine is moved after installation, the floor material may bedamaged.
During printing, some ozone is released, but the amount does not cause any ill effect to one’s health. If, however, the machine is used over a long period of time in a poorly ventilated room or when printing an extremely large number of copies, the smell may become unpleasant. To maintain the appropriate environment for print work, it is suggested that the room be properly ventilated.
Cautions for Toner Handling
•Do not incinerate toner and toner containers. Dangerous sparks may cause burn.
•Never open the toner container.
•Do not inhale the toner.
•If you get toner on your hands, do not rub your eyes or touch your mouth. Wash the toner from your hands.
•For the disposal of the old toner container, consult your service technician or dispose of the toner or toner containers in accordance with Federal, State and Local rules and regulations.
xvi

About the Operation Guide
This Operation Guide has the following chapters:
Chapter 1 - Machine Parts
Explains the names of parts.
Chapter 2 - Printing Operation
Explains how to print from your workstation.
Chapter 3 - Handling Paper
Explains how to choose, handle and load paper.
Chapter 4 - Using the Operation Panel
Explains how to use the operation panel to configure the printer.
Chapter 5 - Maintenance
Explains how to replace the toner container and how to care for your printer.
Chapter 6 - Troubleshooting
Explains how to handle printer problems that may occur, such as paper jams.
Appendix
Explains the available printer interfaces, the optional products and the printer's specifications.
Conventions
This manual uses the following conventions.
Convention |
Description |
Example |
||
|
|
|
|
|
Italic Typeface |
Used to emphasize a key word, |
To replace the toner container, refer to Toner |
||
|
phrase or reference to additional |
Container Replacement on page 5-2. |
||
|
information. |
|
|
|
|
|
|
|
|
Bold |
Used to denote buttons on the |
To start printing, click OK. |
||
|
software. |
|
|
|
|
|
|
|
|
Bracket Bold |
Used to denote operation panel |
Press [GO] to resume printing. |
||
|
keys. |
|
|
|
|
|
|
|
|
Note |
Used to provide additional or useful |
|
|
Note Check with your network |
|
information about a function or |
|
|
administrator for the network address |
|
feature. |
|
|
settings. |
|
|
|
||
|
|
|
|
|
Important |
Used to provide important |
IMPORTANT Ensure paper is not folded, |
||
|
information. |
curled, or damaged. |
||
|
|
|||
|
|
|
|
|
Caution |
Cautions are statements that |
CAUTION Do not pull the cassette out |
||
|
suggest mechanical damage as a |
when holding the front of the machine. |
||
|
result of an action. |
|||
|
|
|
|
|
|
|
|
|
|
Warning |
Used to alert users to the possibility |
WARNING High voltage is present in the |
||
|
of personal injury. |
charger section. |
||
|
|
|||
|
|
|
|
|
xvii

xviii
1 Machine Parts
This chapter provides explanations and illustrations for you to determine the parts and their functions. Try to be familiar with the names and functions of these parts for correct use and optimal performance.
This chapter contains explanations on the following topics:
Components at the Front of the Printer |
1-2 |
Internal Components |
1-2 |
Components at the Rear of the Printer |
1-3 |
Operation Panel |
1-4 |
1-1
Machine Parts
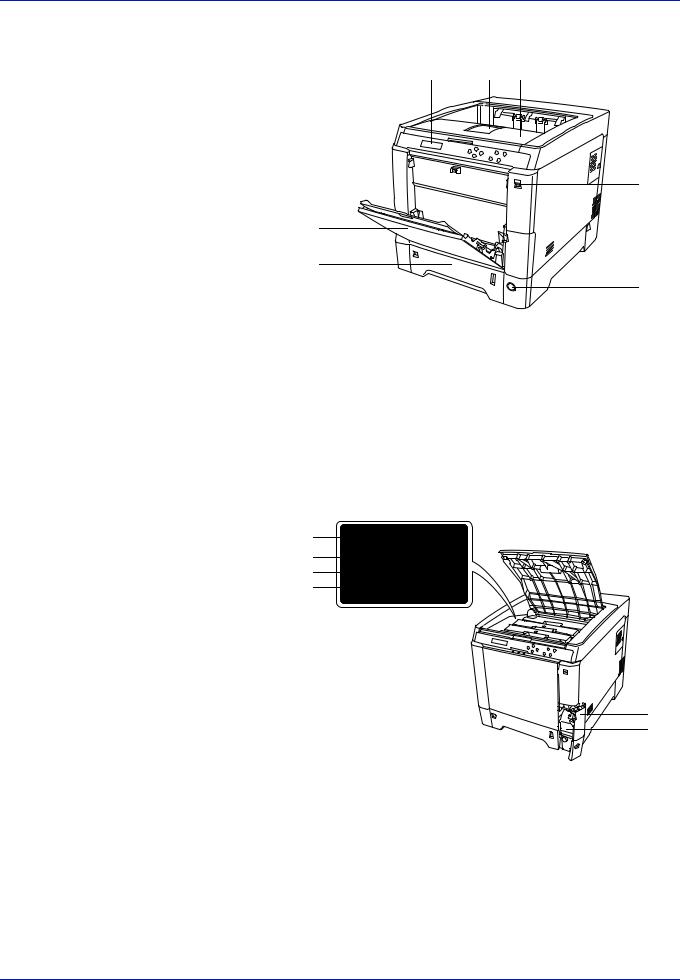
Components at the Front of the Printer
1 |
3 |
2 |
6
4
5
7
1Operation Panel
2Top Cover (Top Tray)
3Paper Stopper
4MP (Multi-Purpose) Tray
5Paper Cassette
6USB Memory Slot
7Power Switch
Internal Components
10
11
12
13
8
9
8Waste Toner Box Cover
9Waste Toner Box
10Black Toner Container (K)
11Magenta Toner Container (M)
12Cyan Toner Container (C)
13Yellow Toner Container (Y)
1-2

Machine Parts
14
15
16
14Paper Transfer Unit
15Paper Ramp
16Duplex Unit
Components at the Rear of the Printer
|
25 |
21 |
|
|
17 |
19 |
18 |
20 |
|
22 |
|
26
23
26
24
1 2
17Rear Cover
18Rear Cover Lever
19Network Indicators
20Network Interface Connector
21USB Interface Connector
22USB Memory Slot (FS-C5250DN only)
23Option Interface Slot
24Power Cord Connector
25Right Cover
26Carrying Handles
1-3

Machine Parts
Operation Panel
27 |
31 |
32 |
33 |
||
|
|
|
|
|
|
|
|
|
|
|
|
|
|
|
|
|
|
|
|
|
|
|
|
|
|
|
|
|
|
28 |
29 |
30 |
34 |
35 |
27Message Display
28Ready Indicator
29Data Indicator
30Attention Indicator
31Arrow Keys
32[MENU] Key
33[Cancel] Key
34[OK] Key
35[GO] Key
1-4

2 Printing Operation
This chapter contains explanations on the following topics:
Changing Network Interface Parameters |
2-2 |
Printing a Status Page |
2-3 |
COMMAND CENTER |
2-3 |
Installing the Printer Driver |
2-4 |
Printing from Application Software |
2-10 |
Status Monitor |
2-11 |
Uninstalling Software (Windows PC) |
2-15 |
2-1

Printing Operation
Changing Network Interface Parameters
This printer supports TCP/IP, TCP/IP (IPv6), NetWare, AppleTalk, IPP, SSL Server and the IPSec protocols and Security Level.
The table below shows the items required for each of the settings.
Configure the printer's network parameters as appropriate for your PC and your network environment.
For details of the procedure, refer to the Using the Operation Panel on page 4-1.
Note When COMMAND CENTER is used, network parameters and security settings can be conveniently changed and checked from your PC. For more information, refer to COMMAND CENTER on page 2-3.
Menu |
Submenu |
|
|
Setting |
|
|
|
|
|
Network |
TCP/IP Set. |
TCP/IP |
|
On/Off |
|
|
|
|
|
|
|
IPv4 |
DHCP |
On/Off |
|
|
Setting |
|
|
|
|
Auto-IP |
On/Off |
|
|
|
|
||
|
|
|
|
|
|
|
|
IP Address |
IP address |
|
|
|
|
|
|
|
|
Subnet Mask |
IP address |
|
|
|
|
|
|
|
|
Gateway |
IP address |
|
|
|
|
|
|
|
|
Bonjour |
On/Off |
|
|
|
|
|
|
|
IPv6 |
TCP/IP (IPv6) |
On/Off |
|
|
Setting |
|
|
|
|
RA (Stateless) |
On/Off |
|
|
|
|
||
|
|
|
|
|
|
|
|
DHCPv6 |
On/Off |
|
|
|
|
|
Security |
Network Security |
Netware |
|
Off/On |
|
|
|
|
Frame type |
|
|
|
|
|
|
|
AppleTalk |
|
On/Off |
|
|
|
|
|
|
|
IPP |
|
On/Off |
|
|
|
|
|
|
|
SSL |
SSL |
On/Off |
|
|
Setting |
|
|
|
|
IPP over SSL |
On/Off |
|
|
|
|
||
|
|
|
|
|
|
|
|
HTTPS |
On/Off |
|
|
|
|
|
|
|
IPSec |
|
On/Off |
|
|
|
|
|
|
|
Thin Print |
Thin Print |
On/Off |
|
|
Setting |
|
|
|
|
Thin Print over |
On/Off |
|
|
|
† |
||
|
|
SSL |
|
|
|
|
|
|
†.Thin Print is only supported in Europe (option).
Note After all network related settings have been done, turn the machine OFF and ON again. This is mandatory to make the settings effective!
2-2

Printing Operation
Printing a Status Page
After completing the network settings, print a status page. The status page allows you to confirm a range of information, including network addresses and network protocols.
To print a status page, select Print Status Page from the Report Print menu.
Refer to Report Print on page 4-11 for detailed information.
COMMAND CENTER
COMMAND CENTER is a tool that is accessed from a PC using a web browser to let you manage and configure settings for the print system. You can check the printer status and current settings, and change network and security settings.
Main Items in COMMAND CENTER
|
Main Items |
|
|
Basic |
• Device settings such as Time and Operation |
|
Panel Language settings. |
|
• Basic Network settings such as IP Address and |
|
DHCP settings. |
|
• Device Security settings such as Lock Operation |
|
Panel and Interface Block settings. |
|
• Network Security settings such as protocol |
|
restriction and certificate settings. |
|
Other settings |
|
|
Printer |
• Printing Function settings such as Default Printer |
|
Resolution and Copy Count settings. |
|
|
Jobs |
• Information on job status and job logs. |
|
|
Document Box |
• Document Box settings such as addition and |
|
deletion of a document box and deletion of |
|
documents in a document box. |
|
|
Advanced |
• Advanced settings for network protocols such as |
|
TCP/IP, and NetWare. |
|
• Management settings such as authentication and |
|
LDAP settings. |
|
• Advanced settings for network security such as |
|
SSL and IPSec. |
|
Other settings |
|
|
For details, refer to the Kyocera COMMAND CENTER Operation Guide.
2-3

Printing Operation
Installing the Printer Driver
Ensure the printer is plugged in and connected to the PC before installing the printer driver from the CD-ROM.The printer driver is necessary to print data created in an application.
For details on the printer driver, refer to the Printer Driver User Guide on the CD-ROM
Installing the Software in Windows
If you are connecting this printer to a Windows PC, follow the next steps to install the printer driver. The example shows you how to connect your printer to a Windows 7 PC.
Note In Windows 7/Vista/XP/2000 and Windows Server 2008/ 2003, you must be logged on with administrator privileges.
You can use either Express Mode or Custom Mode to install the software. Express Mode automatically detects connected printers and installs the required software. Use Custom Mode if you want to specify the printer port and select the software to be installed.
1Turn on the computer and start up Windows.
If the Welcome to the Found New Hardware Wizard dialog box displays, select Cancel.
2Insert the CD-ROM supplied with the printer into the optical drive of the PC. In Windows 7, Windows Server 2008 and Windows Vista, the user account management window appears. Click Yes (Allow).
The installation program launches and the main menu appears..
Note If the software install wizard does not launch automatically, open the CD-ROM window in Windows Explorer and double-click Setup.exe.
3Click View License Agreement and read the License Agreement. Click Accept.
4Click Install software.
The software install wizard starts up. Click Next.
From this point, the procedure differs depending on your version of Windows and your connection method. Proceed to the correct procedure for your connection type.
•Express Mode
•Custom Mode
2-4

Printing Operation
Express Mode
In Express Mode, the installer automatically detects the printer when it is turned on. Use Express Mode for standard connection methods.
1In the installation method selection window, select Express Mode. The print system detection window appears and the installer detects the connected printers. If the installer does not detect a print system, check that the print system is connected via USB or a network and that it is turned on. Return to the print system detection window and click Refresh.
For more information about how to install the driver, refer to Custom Installation in the Printer Driver User Guide on the CD-ROM.
2Select the print system to be installed and click Next.
Note In Windows 7 and Windows Vista with a USB connection, a driver installation will be made from the Microsoft Windows Update site if a certified driver is available and the system is connected to the web. We recommend you continue with the steps to install the KX Driver for an expanded feature set. In Windows, if the Found New Hardware Wizard dialog box appears during the installation process, click Cancel. If the Hardware Installation warning dialog box appears, click Continue Anyway.
3You can customize the print system name in the installation settings window. This will be the name displayed in the Printer window and in the printer lists displayed in applications. Specify whether to share the print system or set the print system as an existing printer and then click Next.
IMPORTANT Step 3 only appears if the print system is connected via a network. It does not appear if the print system is connected via a USB.
4A window appears in which you can check the settings. Check the settings carefully and then click Install.
Note If the Windows security window appears, click Install this driver software.
5A message appears saying that the Installation Completed. Click Finish to exit the printer installation wizard and return the CD-ROM main menu.
Note To use the Status Monitor, check Enable Status Monitor. For information on the Status Monitor, refer to Status Monitor on page 2-11.
If the device setup dialog box appears after you click Finish, you can specify the settings for items such as optional features installed in the print system. You can also specify the device settings after you exit
the installation. For details, refer to Device Settings in the Printer Driver User Guide on the CD-ROM.
2-5

Printing Operation
This completes the printer driver installation procedure. Follow the on-screen instructions to restart the system, if required.
Custom Mode
Use Custom Mode if you want to specify the printer port and select the software to be installed.
For example, if you do not want fonts installed on your computer to be overwritten, select Custom Mode and deselect the Fonts checkbox on the Utility tab of the Custom Install screen.
1 Select Custom Mode.
2Following the instructions in the install wizard window, select the software packages to be installed and the specify the port, etc.
For details, refer to Custom Installation in the Printer Driver User Guide on the CD-ROM.
Installation on a Macintosh
Note Before installing the software, check the following settings on the printer:
•Emulation (Setting the emulation) on page 4-40 is set to
KPDL or KPDL(Auto).
•Bonjour (Bonjour setting) on page 4-49 is set to On.
1Turn on the printer and the Macintosh.
2Insert the included CD-ROM (Product Library) into the CD-ROM drive.
3Double-click the CD-ROM icon.
4Double-click either OS X 10.2 and 10.3 Only, OS X 10.4 Only or OS X 10.5 or higher depending on your Mac OS version.
5Double-click Kyocera OS X x.x.
2-6
Loading...