


Table of Contents 

FS-1700/3700
User’s Manual
Kyocera Laser Printers

Introduction
Caution
NO LIABILITY IS ASSUMED FOR ANY DAMAGE CAUSED BY IMPROPER INSTALLATION.
SOFTWARE USED WITH THIS PRINTER MUST SUPPORT THE PRINTER’S EMULATION MODE. The printer is factory -set to emulate the HP LaserJet 4 Plus. The emulation mode can be changed by following the procedures described in Chapter 2 (on CD-ROM).
Notice on Software
SOFTWARE USED WITH THIS PRINTER MUST SUPPORT THE PRINTER’S NATIVE MODE OR ONE OF ITS EMULATION MODES.
Notice
The information in this manual is subject to change without notification. Additional pages may be inserted in future editions. The user is asked to excuse any technical inaccuracies or typographical errors in the present edition.
No responsibility is assumed if accidents occur while the user is following the instructions in this manual. No responsibility is assumed for defects in the printer’s firmware (contents of its read-only memory).
This manual, any copyrightable subject matter sold or provided with or in connection with the sale of the page printer, are protected by copyright. All rights are reserved. Copying or other reproduction of all or part of this manual, any copyrightable subject matter without the prior written consent of Kyocera Corporation is prohibited. Any copies made of all or part of this manual, any copyrightable subject must contain the same copyright notice as the material from which the copying is done.
Regarding Tradenames
PRESCRIBE is a registered trademark of Kyocera Corporation. PRESCRIBE II, KPDL, and KIR (Kyocera Image Refinement) are trademarks of Kyocera Corporation.
Diablo 630 is a product of Xerox Corporation. IBM Proprinter X24E is a product of International Business Machines Corporation. Epson LQ-850 is a product of Seiko Epson Corporation.
HP LaserJet 4 Plus is a product of Hewlett-Packard Company. Hewlett-Packard, PCL, and PJL are registered trademarks of Hewlett-Packard Company. Centronics is a trade name of Centronics Data Computer Corp. PostScript is a registered trademark of Adobe Systems Incorporated. Macintosh is a registered trademark of Apple computer, Inc. AppleTalk is a trademark of Apple Computer, Inc. Microsoft, Windows, and MS-DOS are registered trade-
marks of Microsoft Corporation. Adobe and Acrobat are trademarks of Adobe Systems Incorporated which may be registered in certain jurisdictions.
This Kyocera page printer uses PeerlessPrint5 to provide the HP LaserJet compatible PCL5 language emulation. PeerlessPrint5 is a trademark of The Peerless Group, Redondo Beach, CA 90278, U.S.A.
This Kyocera printer uses STAC LZS to provide the compression technology. STAC LZS is a product of Stac Electronics.
© Copyright 1996 by Kyocera Corporation. All rights reserved, Revision 1.1., December 1996
i

Introduction
Typeface Trademark Acknowledgement
All resident fonts in this printer are licensed from Bitstream Inc., Cambridge, Massachusetts, U.S.A.
Dutch801, Swiss742, Incised901, ZapfCalligraphic801, ZapfHumanist601, OriginalGaramond, and Chianti are trademarks of Bitstream Inc.
Centutry Schoolbook, Stymie, and Cooper-Black are trademarks of Kingsley-ATF Type Corporation.
ITC ZapfDingbats, ITC Souvenir, ITC Benguiat, and ITC Bookman are registered trademarks of International Typeface Corporation.
Revue is a trademark of Esselte Pendaflex Corporation in the U.S., Letraset Canada Ltd. in Canada, and Esselte Letraset Ltd. elsewhere.
Bitstream Sublicense Agreement
FONTWARE/TrueDoc developed by BITSTREAM INC. is provided as part of this Printer by KYOCERA CORPORATION under license. KYOCERA, as a Licensee of BITSTREAM, grants you, the Sublicensee, non-exclusive right to use FONTWARE/TrueDoc installed in this Printer, if you agree to and at all times comply with the following items:
1. Ownership
As the Sublicensee, you own the Printer in which FONTWARE/TrueDoc is originally installed, but BITSTREAM retains title to and ownership in the software program of FONTWARE/TrueDoc. The Sublicense is not a sale of the original software program of FONTWARE/TrueDoc or any portion or copy of it.
2. Copy Restrictions
FONTWARE/TrueDoc is copyrighted. Unauthorized copying of FONTWARE/TrueDoc even if modified, merged, or included with other software, is expressly forbidden. You may be held legally responsible for any copyright infringement.
3. Unauthorized Use
FONTWARE/TrueDoc may not be removed, disclosed and transferred to any third party for any length of time without the prior written consent of KYOCERA or BITSTREAM. Also, you may not modify, adapt, translate, reverse engineer, decompile, or create derivative works based on FONTWARE/TrueDoc.
4. Term
This agreement should remain in full force and effect forever thereby allowing the Sublicensee to use the FONTWARE/TrueDoc forever unless the Sublicensee violates the terms of paragraphs 2. or 3. above. In the event of such violation, this agreement will terminate automatically without notice from KYOCERA. Upon termination, you should destroy FONTWARE/TrueDoc and all copies of them, in part and in whole, including modified copies, if any.
ii

Introduction
FCC statement
This device complies with Part 15 of the FCC Rules. Operation is subject to the following two conditions: (1) This device may not cause harmful interference, and (2) this device must accept any interference received, including interference that may cause undesired operation.
This equipment has been tested and found to comply with the limits for a Class B digital device, pursuant to Part 15 of the FCC Rules. These limits are designed to provide reasonable protection against harmful interference in a residential installation. This equipment generates, uses, and can radiate radio frequency energy and, if not installed and used in accordance with the instructions, may cause harmful interference to radio communications. However, there is no guarantee that interference will not occur in a particular installation. If this equipment does cause harmful interference to radio or television reception, which can be determined by turning the equipment off and on, the user is encouraged to try to correct the interference by one or more of the following measures:
p Reorient or relocate the receiving antenna.
p Increase the separation between the equipment and receiver.
p Connect the equipment into an outlet on a circuit different from that to which the receiver is connected.
p Consult the dealer or an experienced radio/TV technician for help.
Changes or modifications not expressly approved by the manufacturer for compliance could void the user’s authority to operate the equipment.
Shielded circular cable should be used for interfacing with the computer.
Caution to user
Any modification without prior permission may cause harmful interference.
If any modification/change is introduced to this equipment without prior permission, Kyocera as the manufacturer cannot guarantee compliance with FCC rules.
To use equipment which does not comply with FCC rules is prohibited.
The printer may be optionally installed with the following units:
Conforming to the Class A limits
p HS-3E Bulk Paper Stacker
p PF-7E Bulk Paper Feeder
iii

Introduction
Conforming to the Class B limits
pDU-20 Duplexer
pEF-1 Envelope Feeder
pHS-20 Paper Handler/Stacker
pIB-3 AppleTalk Interface Board
pPF-20 Paper Feeder
pPF-20mini Paper Feeder
pPK-series KPDL Upgrade Kit
pSO-6 Sorter/Stacker
pST-20 Bulk Paper Stacker
Interface connectors
Important note on the interface connectors
Be sure to turn off printer power before connecting or disconnecting an interface cable to the printer. For protection against static discharge which may be applied to the printer’s internal electronics through the interface connector(s), keep any interface connector which is not in use capped using the protective cap supplied.
* Use shielded interface cable.
Safety information
Laser safety
This printer is certified as a Class 1 laser product under the U.S. Department of Health and Human Services (DHHS) Radiation Performance Standard according to Radiation Control for Health and Safety Act of 1968. This means that the printer does not produce hazardous laser radiation. Since radiation emitted inside the printer is completely confined within protective housings and external covers, the laser beam cannot escape from the printer during any phase of user operation.
iv
Introduction
Laser notice
This printer is certified in the U.S. to conform to the requirements of DHHS 21 CFR Subchapter for Class I (1) laser products, and elsewhere is certified as a Class I laser product conforming to the requirements of IEC 825.
Caution Use of controls or adjustments or performance of procedures other than those specified herein may result in hazardous radiation exposure.
(European/Asian
countries)
(U.S.A./Canada)
CDRH regulations
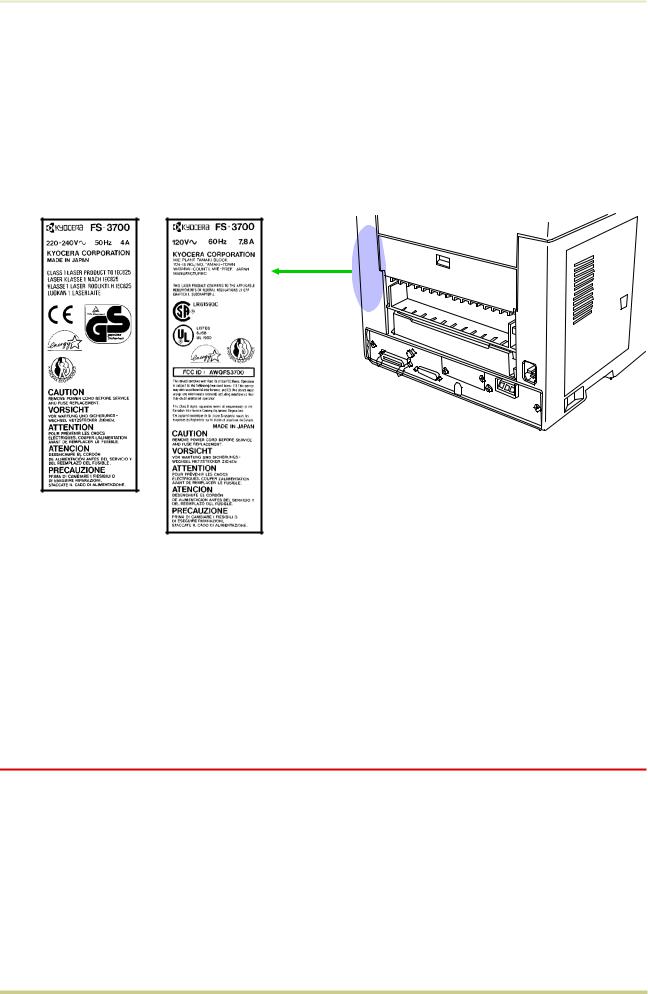
The Center of Devices and Radiological Health (CDRH) of the U.S. Food and Drug Administration implemented regulations for laser products on August 2, 1976. These regulations apply to laser products manufactured after August 1, 1976. Compliance is mandatory for products marketed in the United States. A label indicating compliance with the CDRH regulations must be attached to laser products marketed in the United States.
Ozone concentration
The printers generate ozone gas (O3 ) which may concentrate in the place of installation and cause an unpleasant smell. To minimize concentration of ozone gas to less than 0.1 ppm, we recommend you not to install the printer in a confined area where ventilation is blocked.
v

Introduction
IMPORTANT SAFEGUARDS
1.Read all of these instructions and save these instructions for later use.
2.Unplug this product from the wall outlet before cleaning.
3.Do not use this product near water.
4.Do not place this product on an unstable cart, stand, or table. The product may fall, causing serious damage to the product.
5.Slots and openings in the cabinet and the back are provided for ventilation to ensure reliable operation of the product and to protect it from overheating, these openings must not be blocked or covered. The openings should never be blocked by placing the product on a bed, sofa, rug, or other similar surface. This product should never be placed near or over a radiator or heat register. This product should not be placed in a built-in installation unless proper ventilation is provided.
6.This product is equipped with a 3-wire grounding type plug, a plug having a third (grounding) pin. This plug will only fit into a grounding-type power outlet. This is a safety feature. If you are unable to insert the plug into the outlet, contact your electrician to replace your obsolete outlet. Do not defeat the purpose of the grounding-type plug.
7.Do not allow anything to rest on the power cord. Do not locate this product where persons will walk on the cord.
8.If an extension cord is used with this product, make sure that the total of the ampere ratings on the products plugged into the extension cord do not exceed the extension cord ampere rating.
9.Never push objects of any kind into this product through cabinet slots as they may touch dangerous voltage points or short out parts that could result in a risk of fire or electric shock. Never spill liquid of any kind on the product.
10.Except as explained elsewhere in User’s Manual, do not attempt to service this product yourself. Removing covers may expose you to dangerous voltage points or other risks. Refer all servicing in those compartments to service personnel.
11.Unplug this product from the wall outlet and refer servicing to qualified service personnel under the following conditions:
A— When the power cord or plug is damaged or frayed. B— If liquid has been spilled into the product.
C— If the product has been exposed to rain or water.
D— If the product does not operate normally when the operating instructions are followed. Adjust only those controls that are covered by the operating instructions since improper adjustment of other controls may result in damage and will often require extensive work by a qualified technician to restore the product to normal operation.
E— If the product has been dropped or the cabinet has been damaged.
vi

Introduction
Canadian Department of Communications compliance statement
This Class B digital apparatus meets all requirements of the Canadian Interference-Causing Equipment Regulations.
Avis de conformité aux normes du ministère des Communications du Canada
Cet appareil numérique de la classe B respecte toutes les exigences du Règlement sur le matériel brouilleur du Canada.
ISO 7779
Maschinenlärminformationsverordnung 3. GSGV, 18.01.1991: Der höchste Schalldruckpegel beträgt 70 dB(A) oder weniger gemäß ISO 7779.
Disclaimer
We shall have no liability or responsibility to customers or any other person or entity with respect to any liability, loss or damage caused or alleged to be caused directly or indirectly by equipment sold or furnished by us, including but not limited to, any interruption of service, loss of business or anticipatory profits, or consequential damages resulting from the use or operation of the equipment or software.
Prolonged Non-Use and Moving the Printer
Prolonged Non-use
If you ever leave the printer unused for a long period of time, remove the power cord from the wall outlet.
We recommend you consult with your dealer about the additional actions you should take to avoid possible damages that may occur when the printer is used next time.
Moving the Printer
When you move the printer: p Move it gently.
p Keep it as level as possible, to avoid spilling toner inside the printer.
vii

Introduction
pIf you ship the printer, remove and ship the developer unit (and the waste toner bottle) separately. The printer is originally supplied with a shipping container specifically designed for the developer unit. Pack the developer unit in this container and the waste toner bottle in the plastic bag obtainable from a toner kit and ship them separate from the printer itself. Be sure to consult a serviceman before attempting long-distance transportation of the printer.
ENERGY STARSM
As an ENERGY STAR Partner, Kyocera Corporation has determined that this product meets the ENERGY STAR guidelines for energy efficiency.
The basic objective of the ENERGY STAR Program is to reduce environmental pollution by encouraging the manufacture and sale of equipment that uses energy more efficiently.
This printer is equipped with a sleep timer function that conforms with the standards of the ENERGY STAR Program. This function makes it possible to reduce the amount of electrical power consumed by the printer.
For maximum power savings, turn off the printer’s power supply when not using the printer for extended periods of time.
For details on the sleep timer function and printer power consumption, refer to the instruction manual provided with the printer.
Initial settings of the sleep timer function and power saved using the sleep timer function:
|
Initial sleep mode setting |
Power consumption in |
|
sleep mode |
|
|
|
|
FS-1700 |
30 minutes (30 minutes) |
19 W (30 W) |
FS-3700 |
30 minutes (60 minutes) |
20 W (45 W) |
|
( ): ENERGY STAR program guideline |
|
This product has been expressly developed and produced in the interest of protecting the environment over its entire product life and beyond.
Through the use of a new amorphous silicon drum and developer
Kyocera has created a revolutionary printing system that does not require the wasteful replacement and disposal of a cartridge.
viii

Introduction
Introduction
The Kyocera laser printer has many extremely desirable features. It was designed to make a contribution to a cleaner environment as well as to represent the latest generation of page printer technology.
Maintenance Features
Compact desig Thanks to the inboard paper cassette configuration, the printer requires no more space than the average computer.
Ultra long life modules The main modules for developing image and printing, such as the drum, developer, and the fuser, are specifically designed for extraordinarily long life and need no periodic replacement. The drum is made of amorphous silicon which is environmentally benign and is designed as a permanent component in the printer. The only maintenance regularly needed is to replenish the toner supply in the developer approximately every 10,000 pages and to clean some parts inside the printer.
Amorphous silicon drum Kyocera’s own unique ceramics technology has led to the development of an extremely hard and durable drum with extraordinarily long service life. Also, the drum has several excellent photoconductive properties, such as stability and reliability in varying temperatures, resistance to heat and solvent, etc., thus providing superb high resolution printing.
Print Engine Features
Superb print quality With 600 dots-per-inch, the printout is close to typeset quality. Also,
Kyocera Image Refinement (KIR) technology provides excellent sharpness and consistency.
High speed A4-size pages typically print at the rate of 18 (12 for model FS-1700) pages per minute. (Actual time required varies according to page complexity.)
Large paper capacity The printer accommodates a paper cassette with a capacity of approximately 250 sheets (75 g/m2 [20 lb./ream] basis weight, 0.1 mm thickness) and a multi
-purpose tray with a capacity of approximately 100 sheets (350 sheets in total).
Wide variety of print media In addition to standard paper, the printer prints on special media of a wide range of types and sizes, including recycled paper, envelopes, labels and OHP film.
ix
Introduction
Sleep mode (Ecopower) conserves energy during the printer’s idle periods.
Ecoprint mode extends toner yield by reducing the amount of toner used on the page.
Standard bi-directional parallel interface supports high-speed data exchange with the computer.
Software Features
Bitmapped and scalable typefaces In addition to its 79 internal bitmap fonts, the printer provides 45 fully-scalable resident typefaces that are equivalent to HPLJ fonts. The scalable typefaces can be used at any size desired up to 999.75 points, in 0.25-point increments.
A new printer control language, PRESCRIBE II, is provided with features including advanced graphics capabilities that allow you to print any conceivable outline shape or solid form. Also provided are a variety of special effects, such as patterned fills, gray-scale shading, a user-accessible print image model, and multiple page orientations and print directions within the same page.
PDF417 two-dimensional bar code The printer includes the capability that allows the user to implement the two-dimensional stacked bar code symbology, PDF417, or Portable Data File 417. This expanded functionality is achieved by using the PRESCRIBE II language commands.
Automatic rotation of fonts and graphics Images and scalable fonts are automatically rotated to match the page orientation.
A wide variety of internal symbol sets The printer supports most Hewlett-Packard Laser-
Jet 4 Plus compatible symbol sets for both bitmap and scalable fonts.
Display of printer messages in any of three language English, French, or German. As an option it is also possible to have the messages displayed in other languages. Please contact your Kyocera dealer.
Memory card slot for option fonts, macros, forms, etc. Data in the memory card can be selectively read from the printer’s control panel.
Simple Network Management Protocol (SNMP) compliance Offers network managers complete open system network management.
Kyocera PrintMonitor (KPM) Provides network wide management of the Kyocera FS family of laser printers. Please refer to the readme file located in the Kyocera Digital Library (included with the printer) for details.
x

Introduction
Options
The following options are available for the printer.
DU-20 |
Duplexer |
EF-1 |
Envelope Feeder |
HS-3E |
Bulk Paper Stacker |
HS-20 |
Paper Handler/Stacker |
IB-3 |
AppleTalk Interface Board |
PA-1 |
Paper Path Adaptor |
PA-20 |
Paper Path Adaptor |
PC-20 |
Paper Cassette for PF-20 (universal size; adjustable to A5 through Legal sizes) |
PC-21 |
Paper Cassette for the printer |
|
(available in A5, JIS B5, A4, Letter, or Letter/Legal size) |
PF-7E |
Bulk Paper Feeder |
PF-20 |
Paper Feeder (A5, JIS B5, A4, Letter, Legal) |
PF-20mini Paper Feeder (A5, JIS B5, A4, Letter) |
|
PK-series |
KPDL Upgrade Kit |
SO-6 |
Sorter/stacker |
ST-20 |
Bulk Paper Stacker |
Guide to the Manual
Unless specifically stated otherwise, information in this manual applies to printer models FS- 1700/FS-3700. The printer illustrations and printed samples used in this manual are of the FS3700.
Installation Manual
The Installation Manual guides you through the following topics:
pInstallation
pPrinter basic operation
CD-ROM (Kyocera Digital Library)
The CD-ROM supplied contains the printer User’s Manual, PRESCRIBE II Programming Manual, and PDF417 Two Dimensional Bar Code Implementation Manual. To gain access to these documents, insert the CD-ROM into the appropriate drive and follow the instructions on the insert accompanying the CD-ROM. To view these documents, you need the Adobe Acrobat software installed in your computer. For details, read the instructions on the CD-ROM package.
The User’s Manual guides you through topics concerning the operations and maintenance of the printer.
The PRESCRIBE II Programming Manual explains how to use the PRESCRIBE II commands in document files for formatting, and their parameters in detail for experienced users, using pictures and samples.
xi

Introduction
User’s Manual (on CD-ROM):
p Installation
p Printer operation
p Control panel operations p Fonts
p Maintenance and troubleshooting p Symbol sets
PRESCRIBE II Programming Manual (on CD-ROM):
p PRESCRIBE II command reference p Fonts
p Bar codes
p Printer permanent parameters p Emulation
PDF417 Two Dimensional Bar Code Implementation Manual (on CD-ROM):
p PDF417 overview
p PRESCRIBE II commands for PDF417
xii

Table of Contents
Table of Contents
Chapter 1 Installing the Printer . . . . . . . . . . . . . . . . . . . 1—1
1.1. Positioning the Printer. . . . . . . . . . . . . . . . . . . . . . . . . . . . . . . . 1
Clearance . . . . . . . . . . . . . . . . . . . . . . . . . . . . . . . . . . . . . . . . . . . . . . . . . . . . . . 1—1 Places to Avoid . . . . . . . . . . . . . . . . . . . . . . . . . . . . . . . . . . . . . . . . . . . . . . . . . . 1—1 Basic requirements . . . . . . . . . . . . . . . . . . . . . . . . . . . . . . . . . . . . . . . . . . . . . . . 1—2 Power Supply . . . . . . . . . . . . . . . . . . . . . . . . . . . . . . . . . . . . . . . . . . . . . . . . . . . . 1—3
1.2. Unpacking and Inspection . . . . . . . . . . . . . . . . . . . . . . . . . . . . . 3
List of shipped components . . . . . . . . . . . . . . . . . . . . . . . . . . . . . . . . . . . . . . . . 1—4
1.3. Names of Parts . . . . . . . . . . . . . . . . . . . . . . . . . . . . . . . . . . . . . 5
Front View . . . . . . . . . . . . . . . . . . . . . . . . . . . . . . . . . . . . . . . . . . . . . . . . . . . . . . 1—5
Interior View . . . . . . . . . . . . . . . . . . . . . . . . . . . . . . . . . . . . . . . . . . . . . . . . . . . . 1—6
Rear View . . . . . . . . . . . . . . . . . . . . . . . . . . . . . . . . . . . . . . . . . . . . . . . . . . . . . . . 1—6
1.4. Setting Up and Interfacing. . . . . . . . . . . . . . . . . . . . . . . . . . . . . 7
1—Open the Top Cover . . . . . . . . . . . . . . . . . . . . . . . . . . . . . . . . . . . . . . . . . . . . 1—8 2—Install the Toner Container. . . . . . . . . . . . . . . . . . . . . . . . . . . . . . . . . . . . . . . 1—8 3—Close the Top Cover . . . . . . . . . . . . . . . . . . . . . . . . . . . . . . . . . . . . . . . . . . . 1—9 4—Install the Waste Toner Bottle . . . . . . . . . . . . . . . . . . . . . . . . . . . . . . . . . . . . 1—9 5—Add Paper. . . . . . . . . . . . . . . . . . . . . . . . . . . . . . . . . . . . . . . . . . . . . . . . . . . 1—11 6—Open the Paper Stopper on the Face-down Output Tray. . . . . . . . . . . . . . . 1—12 7—Install the Face-up Output Tray (if required) . . . . . . . . . . . . . . . . . . . . . . . . 1—12 8—Connect the Printer to the Computer. . . . . . . . . . . . . . . . . . . . . . . . . . . . . . 1—13 9—Attach the Power Cord. . . . . . . . . . . . . . . . . . . . . . . . . . . . . . . . . . . . . . . . . 1—13 10—Print a Status Page . . . . . . . . . . . . . . . . . . . . . . . . . . . . . . . . . . . . . . . . . . . 1—14 11—Test the Interface with the Computer . . . . . . . . . . . . . . . . . . . . . . . . . . . . 1—14 12—Set the Emulation Mode . . . . . . . . . . . . . . . . . . . . . . . . . . . . . . . . . . . . . . 1—14 13—Install the Printer Driver . . . . . . . . . . . . . . . . . . . . . . . . . . . . . . . . . . . . . . . 1—15
1.5. Multi-Purpose Tray Feeding . . . . . . . . . . . . . . . . . . . . . . . . . . . 17
Selecting the Multi-Purpose Tray . . . . . . . . . . . . . . . . . . . . . . . . . . . . . . . . . . . . 1—17
1.6. Memory Card . . . . . . . . . . . . . . . . . . . . . . . . . . . . . . . . . . . . . 21
Handling Memory Cards . . . . . . . . . . . . . . . . . . . . . . . . . . . . . . . . . . . . . . . . . . 1—22
1.7. Memory Expansion Installation . . . . . . . . . . . . . . . . . . . . . . . . 23
Removing the Main Circuit Board . . . . . . . . . . . . . . . . . . . . . . . . . . . . . . . . . . . 1—23 SIMM to be used . . . . . . . . . . . . . . . . . . . . . . . . . . . . . . . . . . . . . . . . . . . . . . . . 1—25 Installing and Removing SIMMs. . . . . . . . . . . . . . . . . . . . . . . . . . . . . . . . . . . . . 1—26 Testing the Expansion Memory . . . . . . . . . . . . . . . . . . . . . . . . . . . . . . . . . . . . . 1—27
xiii

Table of Contents
Chapter 2 Operating the Laser Printer . . . . . . . . . . . . . 2—1
2.1. Control Panel . . . . . . . . . . . . . . . . . . . . . . . . . . . . . . . . . . . . . . 1
Message Display. . . . . . . . . . . . . . . . . . . . . . . . . . . . . . . . . . . . . . . . . . . . . . . . . . 2—2
Interface Indicator . . . . . . . . . . . . . . . . . . . . . . . . . . . . . . . . . . . . . . . . . . . . . . . . 2—2
Resolution Indicator . . . . . . . . . . . . . . . . . . . . . . . . . . . . . . . . . . . . . . . . . . . . . . . 2—2
Paper Size Indicator . . . . . . . . . . . . . . . . . . . . . . . . . . . . . . . . . . . . . . . . . . . . . . . 2—3
Copy Indicator . . . . . . . . . . . . . . . . . . . . . . . . . . . . . . . . . . . . . . . . . . . . . . . . . . . 2—3
Symbolic Indicators . . . . . . . . . . . . . . . . . . . . . . . . . . . . . . . . . . . . . . . . . . . . . . . 2—4
Control Keys . . . . . . . . . . . . . . . . . . . . . . . . . . . . . . . . . . . . . . . . . . . . . . . . . . . . . 2—5
2.2. Operating Procedures . . . . . . . . . . . . . . . . . . . . . . . . . . . . . . . . 6
Switching Power On . . . . . . . . . . . . . . . . . . . . . . . . . . . . . . . . . . . . . . . . . . . . . . 2—6
Stack Selection . . . . . . . . . . . . . . . . . . . . . . . . . . . . . . . . . . . . . . . . . . . . . . . . . . . 2—6
Feed Selection . . . . . . . . . . . . . . . . . . . . . . . . . . . . . . . . . . . . . . . . . . . . . . . . . . . 2—7
On-line/Off-line Setting . . . . . . . . . . . . . . . . . . . . . . . . . . . . . . . . . . . . . . . . . . . . 2—7
Abandoning a Printing Job . . . . . . . . . . . . . . . . . . . . . . . . . . . . . . . . . . . . . . . . . 2—7
Status Printout . . . . . . . . . . . . . . . . . . . . . . . . . . . . . . . . . . . . . . . . . . . . . . . . . . . 2—8
Form Feed . . . . . . . . . . . . . . . . . . . . . . . . . . . . . . . . . . . . . . . . . . . . . . . . . . . . . 2—11
2.3. Using the Mode Select Menu . . . . . . . . . . . . . . . . . . . . . . . . . . 12
Mode Select Menu . . . . . . . . . . . . . . . . . . . . . . . . . . . . . . . . . . . . . . . . . . . . . . . 2—12
2.4. Sleep (Ecopower) Mode . . . . . . . . . . . . . . . . . . . . . . . . . . . . . |
14 |
2.5. KIR Level . . . . . . . . . . . . . . . . . . . . . . . . . . . . . . . . . . . . . . . . |
15 |
2.6. Ecoprint mode . . . . . . . . . . . . . . . . . . . . . . . . . . . . . . . . . . . . |
2—16 |
2.7. Resource Protection . . . . . . . . . . . . . . . . . . . . . . . . . . . . . . . . |
2—17 |
2.8. Adjusting the Print Density . . . . . . . . . . . . . . . . . . . . . . . . . . . |
2—17 |
2.9. Setting the Audio Warning (Buzzer) . . . . . . . . . . . . . . . . . . . . . |
2—18 |
2.10. Operating a Memory Card . . . . . . . . . . . . . . . . . . . . . . . . . . . |
20 |
Hints on Writing Fonts to the Memory Card . . . . . . . . . . . . . . . . . . . . . . . . . . . |
2—20 |
Reading Fonts/Data from a Memory Card . . . . . . . . . . . . . . . . . . . . . . . . . . . . . |
2—20 |
Writing Data to a Memory Card . . . . . . . . . . . . . . . . . . . . . . . . . . . . . . . . . . . . |
2—21 |
Deleting Data from a Memory Card. . . . . . . . . . . . . . . . . . . . . . . . . . . . . . . . . . |
2—22 |
Formatting a Memory Card . . . . . . . . . . . . . . . . . . . . . . . . . . . . . . . . . . . . . . . . |
2—23 |
Printing a list of data names . . . . . . . . . . . . . . . . . . . . . . . . . . . . . . . . . . . . . . . |
2—24 |
xiv

Table of Contents
Chapter 3 Fonts . . . . . . . . . . . . . . . . . . . . . . . . . . . . . . . 3—1
3.1. Bitmap and Scalable Fonts. . . . . . . . . . . . . . . . . . . . . . . . . . . . . 1
Bitmap fonts . . . . . . . . . . . . . . . . . . . . . . . . . . . . . . . . . . . . . . . . . . . . . . . . . . . . 3—2 Scalable fonts. . . . . . . . . . . . . . . . . . . . . . . . . . . . . . . . . . . . . . . . . . . . . . . . . . . . 3—2
3.2. List of Fonts . . . . . . . . . . . . . . . . . . . . . . . . . . . . . . . . . . . . . . . 3
Bitmap Fonts . . . . . . . . . . . . . . . . . . . . . . . . . . . . . . . . . . . . . . . . . . . . . . . . . . . . 3—3
Scalable Fonts . . . . . . . . . . . . . . . . . . . . . . . . . . . . . . . . . . . . . . . . . . . . . . . . . . . 3—3
Option Fonts . . . . . . . . . . . . . . . . . . . . . . . . . . . . . . . . . . . . . . . . . . . . . . . . . . . . 3—3
3.3. Symbol set . . . . . . . . . . . . . . . . . . . . . . . . . . . . . . . . . . . . . . . 11
Chapter 4 Maintenance . . . . . . . . . . . . . . . . . . . . . . . . . 4—1
4.1. Toner Kit Replacement . . . . . . . . . . . . . . . . . . . . . . . . . . . . . . . |
1 |
Toner Kit to be Used . . . . . . . . . . . . . . . . . . . . . . . . . . . . . . . . . . . . . . . . . . . . . . 4—1 Supplying Toner . . . . . . . . . . . . . . . . . . . . . . . . . . . . . . . . . . . . . . . . . . . . . . . . . . 4—2 Replace the Waste Toner Bottle . . . . . . . . . . . . . . . . . . . . . . . . . . . . . . . . . . . . . . 4—4
4.2. Cleaning . . . . . . . . . . . . . . . . . . . . . . . . . . . . . . . . . . . . . . . . . . 6
Main Charger Unit . . . . . . . . . . . . . . . . . . . . . . . . . . . . . . . . . . . . . . . . . . . . . . . . 4—6
Paper Feed Unit . . . . . . . . . . . . . . . . . . . . . . . . . . . . . . . . . . . . . . . . . . . . . . . . . . 4—8
Chapter 5 Troubleshooting . . . . . . . . . . . . . . . . . . . . . . 5—1
5.1. General Guide. . . . . . . . . . . . . . . . . . . . . . . . . . . . . . . . . . . . . . 1
5.2. Power Problems . . . . . . . . . . . . . . . . . . . . . . . . . . . . . . . . . . . . 2
5.3. Interface Problems . . . . . . . . . . . . . . . . . . . . . . . . . . . . . . . . . . 2
5.4. Print Quality Problems. . . . . . . . . . . . . . . . . . . . . . . . . . . . . . . . 3
Completely blank printout . . . . . . . . . . . . . . . . . . . . . . . . . . . . . . . . . . . . . . . . . . 5—3 All-black printout . . . . . . . . . . . . . . . . . . . . . . . . . . . . . . . . . . . . . . . . . . . . . . . . . 5—3 Dropouts, horizontal streaks, stray dots . . . . . . . . . . . . . . . . . . . . . . . . . . . . . . . 5—4 Black or white vertical streaks . . . . . . . . . . . . . . . . . . . . . . . . . . . . . . . . . . . . . . . 5—4 Faint or blurred printing . . . . . . . . . . . . . . . . . . . . . . . . . . . . . . . . . . . . . . . . . . . 5—5 Grey background . . . . . . . . . . . . . . . . . . . . . . . . . . . . . . . . . . . . . . . . . . . . . . . . . 5—5 Dirt on the top edge or back of the paper. . . . . . . . . . . . . . . . . . . . . . . . . . . . . . 5—6 Characters out of position . . . . . . . . . . . . . . . . . . . . . . . . . . . . . . . . . . . . . . . . . . 5—6
5.5. Indicators and Messages . . . . . . . . . . . . . . . . . . . . . . . . . . . . . . 7
Indicators . . . . . . . . . . . . . . . . . . . . . . . . . . . . . . . . . . . . . . . . . . . . . . . . . . . . . . . 5—7
Maintenance Messages . . . . . . . . . . . . . . . . . . . . . . . . . . . . . . . . . . . . . . . . . . . . 5—8
Error Messages. . . . . . . . . . . . . . . . . . . . . . . . . . . . . . . . . . . . . . . . . . . . . . . . . . . 5—9
5.6. Correcting a Paper Jam . . . . . . . . . . . . . . . . . . . . . . . . . . . . . . 11
xv

Table of Contents
Chapter 6 Symbol Set Tables . . . . . . . . . . . . . . . . . . . . |
6—1 |
6.1. IBM Symbol Sets . . . . . . . . . . . . . . . . . . . . . . . . . . . . . . . . . . . . 2
6.2. Diablo 630 Symbol Sets . . . . . . . . . . . . . . . . . . . . . . . . . . . . . . . 8
6.3. LQ-850 Symbol Sets. . . . . . . . . . . . . . . . . . . . . . . . . . . . . . . . . 11
6.4. HP LaserJet 4 Plus Symbol Sets. . . . . . . . . . . . . . . . . . . . . . . . . 13
Appendix A Printer Specifications . . . . . . . . . . . . . . . . . A—1
Appendix B Paper Selection. . . . . . . . . . . . . . . . . . . . . . B—1
B.1. General Guidelines . . . . . . . . . . . . . . . . . . . . . . . . . . . . . . . . . . 1
Paper Availability . . . . . . . . . . . . . . . . . . . . . . . . . . . . . . . . . . . . . . . . . . . . . . . . . B—1
Paper Specifications . . . . . . . . . . . . . . . . . . . . . . . . . . . . . . . . . . . . . . . . . . . . . . . B—2
B.2. Selecting the Right Paper. . . . . . . . . . . . . . . . . . . . . . . . . . . . . . 2
B.3. Special Paper . . . . . . . . . . . . . . . . . . . . . . . . . . . . . . . . . . . . . . 5
Overhead Projection (OHP) Film. . . . . . . . . . . . . . . . . . . . . . . . . . . . . . . . . . . . . . B—5
Adhesive-Backed Labels . . . . . . . . . . . . . . . . . . . . . . . . . . . . . . . . . . . . . . . . . . . . B—6
Appendix C Host Computer Interface . . . . . . . . . . . . . . C—1
C.1. Parallel Interface . . . . . . . . . . . . . . . . . . . . . . . . . . . . . . . . . . . . 1
Parallel interface communication modes . . . . . . . . . . . . . . . . . . . . . . . . . . . . . . . C—1 Interface Signals. . . . . . . . . . . . . . . . . . . . . . . . . . . . . . . . . . . . . . . . . . . . . . . . . . C—2
C.2. RS-232C/RS-422A Interface . . . . . . . . . . . . . . . . . . . . . . . . . . . . |
5 |
RS-232C interface . . . . . . . . . . . . . . . . . . . . . . . . . . . . . . . . . . . . . . . . . . . . . . . . |
C—5 |
RS-422A interface . . . . . . . . . . . . . . . . . . . . . . . . . . . . . . . . . . . . . . . . . . . . . . . . |
C—6 |
C.3. RS-232C/RS-422A Protocol . . . . . . . . . . . . . . . . . . . . . . . . . . . . 10
PRESCRIBE II FRPO D0 command . . . . . . . . . . . . . . . . . . . . . . . . . . . . . . . . . . . . C—11
C.4. RS-232C Cable Connection . . . . . . . . . . . . . . . . . . . . . . . . . . . |
12 |
Preparing an RS-232C Cable . . . . . . . . . . . . . . . . . . . . . . . . . . . . . . . . . . . . . . . C—12 Connecting the Printer to the Computer . . . . . . . . . . . . . . . . . . . . . . . . . . . . . . C—12
Index . . . . . . . . . . . . . . . . . . . . . . . . . . . . . . . . . . . . Index—1
Mode Select Menu . . . . . . . . . . . . . . . . . . . . . . . . . Last page
xvi
1.1. Positioning the Printer
Chapter 1
Installing the Printer
This chapter explains how to unpack and install the printer. The topics covered are:
Positioning the printer
Unpacking and inspection
Names of parts
Setting up and interfacing
1.1. Positioning the Printer
Clearance
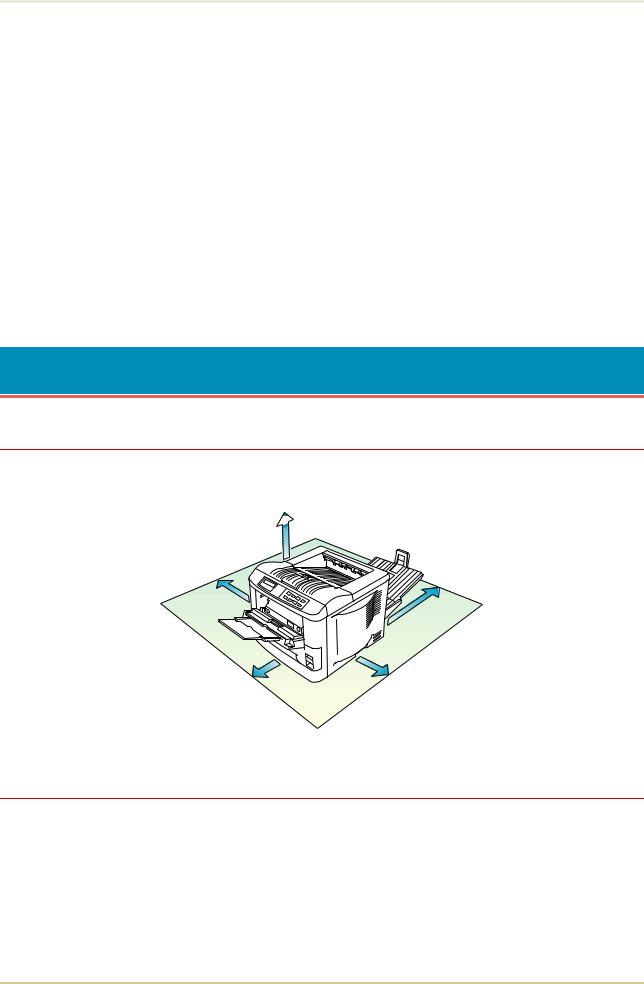
Allow at least the necessary minimum clearance around the printer (see below). A total space of 92 cm by 61 cm by 138 cm (36 by 24 by 54 inches) is needed.
 30 cm (12 inches)
30 cm (12 inches)
40 cm (16 inches)
[20 cm (8 inches) when the face-up output tray is not installed.]
60 cm (24 inches) |
25 cm (10 inches) |
Places to Avoid
Avoid installing the printer in locations subject to:
FDirect drafts of hot or cold air
FDirect drafts from outside (Avoid locations near doors leading outside.)
FSudden temperature or humidity changes
FSources of high temperature, for example, near stoves or radiators
FExcessive dust
1-1

1.1. Positioning the Printer
FVibration
FAmmonia or other harmful fumes. (If you are planning to fumigate the room, or make liberal use of insecticide, remove the printer first!)
FExcessive sunlight or humidity
FLack of ventilation
FLow air pressure, e.g., located more than 2000 meters (6500 feet) above sea level
Basic requirements
The printer will work best if it is installed in a location that is:
FNear the computer
If the parallel interface is used to connect the printer to the computer, the connecting cable should be shielded type and not be longer than 3 meters (10 feet).
FLevel and well supported
Place the printer on a sturdy table or desk. Do not place the printer on an unstable cart, stand, or table. The printer may fall, causing injury, or serious damage to the printer.
FNear an AC wall outlet, preferably one that can be used for the printer alone (see section Power Supply on next page).
Power requirements are:
Voltage |
120 V (U.S.A./Canada), 220 V to 240 V (European countries), ±10 % at each voltage |
||
Frequency |
60 Hz (120 |
V), ±2 % |
|
50 Hz (220 |
V to 240 V), ±2 % |
||
|
|||
Current |
FS-1700: Max. 5.8 A at 120 V, or Max 3 A at 220 V to 240 V |
||
capacity |
FS-3700: Max. 7.8 A at 120 V, or Max 4 A at 220 V to 240 V |
||
|
|
|
|
The outlet should be earthed, or an adapter should be used.
If an extension cord is used, the total length of the power cord plus extension should be 5 meters (17 feet) or less.
FWell ventilated, not too hot or cold, and not too damp or dry
Temperature |
10°C to 32.5°C, ideally about 20°C (50°F to 90.5°F, ideally about 68°F) |
Humidity |
20% to 80%, ideally 65% |
|
|
If you install the printer where the temperature or humidity is outside the above ranges, you may not get the best print quality, and there will be an increased chance of paper jams.
1-2

1.2. Unpacking and Inspection
Power Supply
The printer should not be on the same power circuit as an air conditioner, fluorescent light, copier, or shredder, because these devices generate electrical noise on the power line. If it must share a power circuit with equipment like this, a high-frequency noise filter or isolation transformer is advisable. (Filters and transformers are available commercially.)
Avoid using plug multipliers to connect a large number of devices on the same circuit as the printer.
If the power from the outlet itself appears to be unstable, a line stabilizer should be used. In places where the voltage tends to fluctuate, it may be necessary to install a voltage regulator.
As the disconnect device is not incorporated in the printer’s AC primary circuit, an easily accessible socket outlet must be provided near the equipment.
If the printer is used with the optional Sorter (SO-6) or Stacker (ST-20), in order to avoid short-circuiting, it should be ensured that these devices are plugged securely into their respective power outlets.
Da kein Trennschalter in den Wechselstrom-Primärkreis des Druckers eingebaut ist, muß eine leicht zugängliche Steckdose in der Nähe des Gerätes vorhanden sein.
Wenn der Drucker mit dem gesonderten Sorter (SO-6) oder Stapler (ST-20) verwendet wird, muß darauf geachtet werden, daß diese Geräte einwandfrei an separate Steckdosen angeschlossen sind, um Kurzschluß zu vermeiden.
1.2. Unpacking and Inspection
The printer is packed as shown below. Unpack the printer following diagrams 1 and 2 on the next page. While unpacking it, check that the listed parts are all accounted for.
Examine the package for any signs of damage that may have been caused during transportation. If the carton is found to be badly damaged, leave the carton unopened and immediately notify the dealer from whom you purchased the printer.
Save the box and other packing materials in case you have to repack the printer for transportation at a later date.
1-3
1.2. Unpacking and Inspection
List of shipped components
(A ) Toner kit, including a toner container, waste toner bottle, and a wiper cloth
(B ) Paper stopper
(C ) Container for the developer unit (including a plastic bag)
(D )Manuals : User’s Manual (Kyocera Digital Library CD-ROM, including the printer drivers), Installation Manual (this booklet)
(E ) Face-up output tray
(F ) Power cord
1 |
2 |
(A)
(B)
(D)
(C)
(E)
(F)
Printer
To remove the printer from the box, grasp the handholds on either side of the printer. Lift the printer from the carton as shown below.
K Always use these handholds whenever you lift or move the printer.
K The handhold on the right side of the printer doubles as the memory card slot. Be sure to remove the memory card first, if inserted, before lifting or moving the printer.
1-4

1.3. Names of Parts
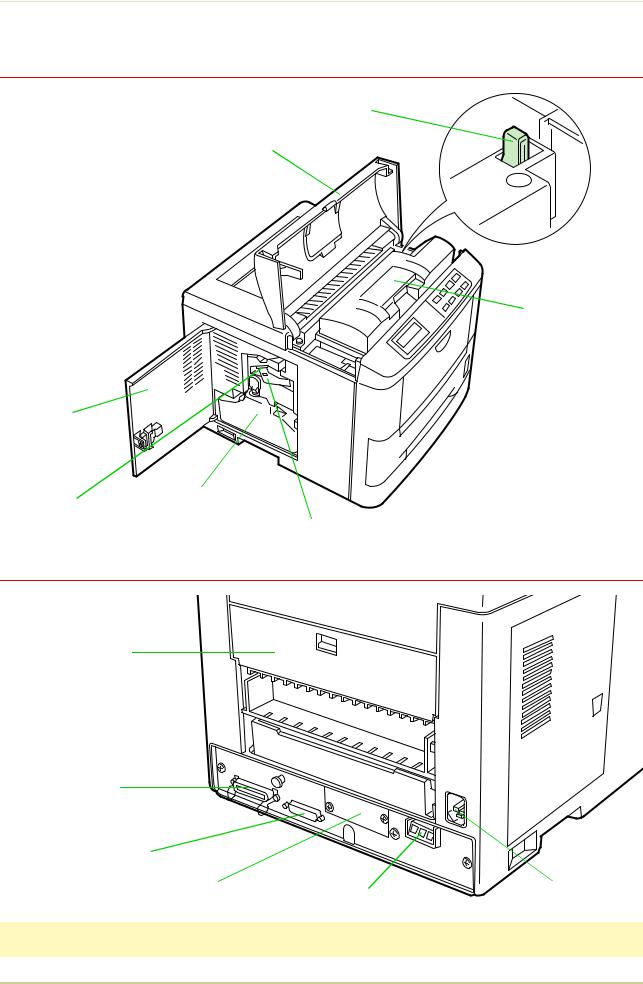
1.3. Names of Parts
This section takes you on a guided tour of the printer, pointing out its major parts. The part names introduced here will be used throughout this manual.
Front View
Paper Full Sensor |
Face-down |
(Model FS-3700 only) |
Output Tray |
Power Switch
Side Cover
Transfer Roller
Multi-Purpose
Tray
Paper Cassette
Paper Stopper |
Control Panel |
Multi-Purpose
Tray
Paper Feed Unit
Release Lever
Paper Cassette |
Memory Card Slot |
Registration Roller
Paper Feed Unit
1-5
1.3. Names of Parts
Interior View
Toner Container Release
Lever (Green)
Top Cover
Toner Container
Side Cover
Waste Toner Bottle
Cleaner Knob (Green)
Main Charger Unit
Rear View
Rear Cover
Parallel Interface
Connector*
Serial Interface
(RS-232C/RS-422A) Connector*
Option Interface Slot Cover |
Option Paper |
Power Cord |
|
Handler/Stacker Connector* |
Receptacle |
||
|
*: To protect the printer against static discharge, the connector must be covered with the supplied protective cap when not in use.
1-6

1.4. Setting Up and Interfacing
1.4. Setting Up and Interfacing
Before you can use the printer for the first time, you must set up the printer by installing the printer components and interfacing with the computer. The steps to be followed in setting up are:
1.Open the top cover.
2.Install the toner container.
3.Close the top cover.
4.Install the waste toner bottle.
5.Add paper.
6.Open the paper stopper on the face-down output tray.
7.Install the face-up output tray (if required).
8.Connect the printer to the computer.
9.Attach the power cord.
10.Print a status page.
11.Test the interface with the computer.
12.Set the emulation mode.
13.Install the printer driver.
1-7

1.4. Setting Up and Interfacing
1—Open the Top Cover
1.Remove the packing tape from the printer.
2.Open the printer top cover all the way.
2—Install the Toner Container
1.Take the toner container from the toner kit.
2.With the label side down, thoroughly shake the toner container (in the direction of the arrow) ten times or more to loosen and mix the toner inside.
3.The bottom of the toner container is sealed with a sealing strip. Peel off the seal on the toner container and carefully pull off and dispose of the sealing strip.
Be sure to peel the seal off the toner container before the toner container is fitted into the developer unit.
4.Install the toner container on the developer as show in the diagram.
Top Cover
Toner Container
Sealing strip
Developer Unit 

1-8

1.4. Setting Up and Interfacing
5. When the toner container is installed cor- |
Top Cover |
rectly on the developer, push the top of the |
|
container unit ("PUSH HERE") until it locks in. |
|
* Make sure that the toner container is properly locked in the printer.
3—Close the Top Cover
Close the top cover by pressing the arrowed part in this diagram.
Top Cover
4—Install the Waste Toner Bottle
The waste toner bottle is in the toner kit supplied with the printer. The waste toner bottle must be installed in the printer.
Install the waste toner bottle in the printer as follows.
1.Take the waste toner bottle from the toner kit supplied.
* Do not cap the waste toner bottle.
Cap
Waste Toner
Bottle
1-9

1.4. Setting Up and Interfacing
2. Open the side cover on the left side of the Side Cover printer. 
3.Insert the waste toner bottle with the bottle tilted slightly towards you as shown in the
figure.
Waste Toner Bottle
4. Ensuring that it is correctly inserted, close the side cover.
1-10

1.4. Setting Up and Interfacing
5—Add Paper
Before adding paper, remove the paper cassette all the way from the printer.
Read the paper manufacturer’s instructions concerning handling of the paper.
1.Push the bottom plate until it locks.
2.Set the paper in the cassette. The side of the paper that faces downward in the cassette is printed on. The paper size must match the cassette size. Tap the edges of the paper to align them neatly.
Don’t put in more paper than the limit indicated on the cassette. (The cassette should
hold approximately 250 sheets of paper with a 75 g/m2 [20 lb./ream] basis weight, 0.1 mm thickness.)
2.Set the clips at the two corners as shown right.
Bottom Plate
Paper Cassette
Clip
*Some types of paper (such as thick paper) may be hard to place in the cassette using this method. If this is
the case, the process is facilitated by inserting the paper from the back, as shown in the figure on the right.
3.Insert the paper cassette into the printer cassette slot. Push it straight as far as it will go.
1-11
1.4. Setting Up and Interfacing
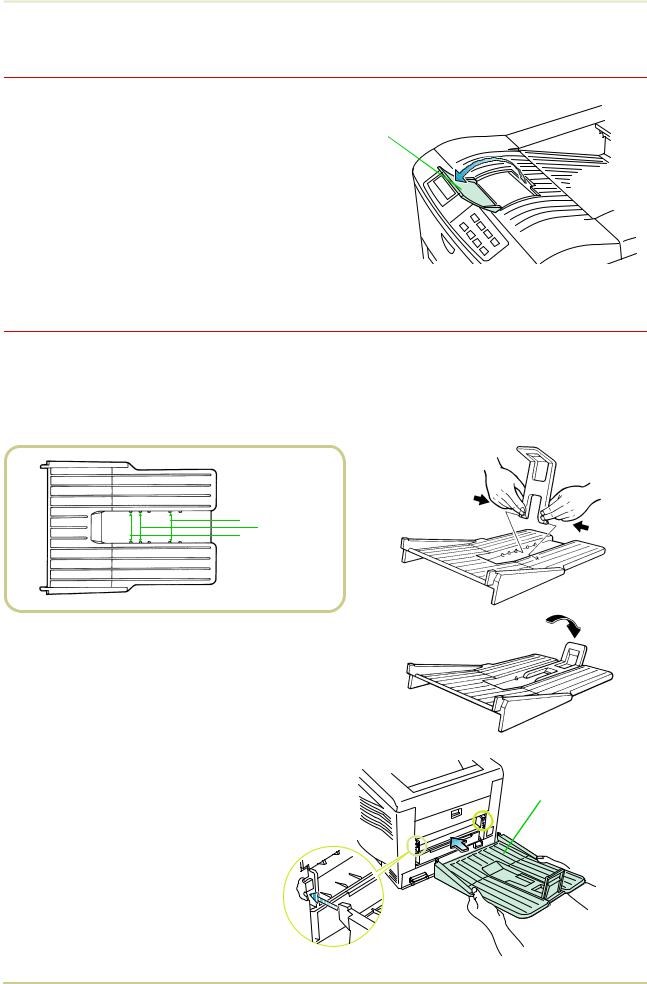
6—Open the Paper Stopper on the Face-down Output Tray
Open the paper stopper as shown right.
Paper Stopper
7—Install the Face-up Output Tray (if required)
If you want the printed pages stacked face-up (in reverse order), mount the face-up output tray as follows.
Depending on the size of the paper you use, mount the paper stopper on the face-up output tray as shown below.
 Paper Stopper
 Legal Size
A4 Size
 Letter Size
Face-up Output
Tray
1-12

1.4. Setting Up and Interfacing
8—Connect the Printer to the Computer
The printer has two computer cable connectors and a slot for installing an option interface. The one marked " " is for a parallel (Centronics standard) interface. The one marked "IšIšI " is for a serial (RS-232C/RS-422A) interface. You may use whichever is convenient for your computer, with the option interface, if you have already have one installed. All interface connectors can be used simultaneously with different computers.
Parallel Interface
Connector
Serial (RS-232C/RS-422A)
Interface Connector
Option Interface
Slot Cover
*Only connect or disconnect cables to the connectors while the printer and computer power are switched off.
Parallel interface |
|
|
Plug one end of the cable into the connector |
Clips |
|
marked Parallel on the printer. Close the clips |
||
|
||
on both sides to hold it in place. |
Printer Cable |
|
Plug the other end into a parallel (Centronics) |
|
|
interface connector on your computer. This |
|
|
connector is usually marked PRINTER . |
Rear Panel |
See Appendix C for more details about the parallel interface.
Serial interface
The serial interface of this printer is set to RS-232C mode before leaving the factory, but can also be set to RS-422A mode to suit your operating environment. Follow the instructions in
Appendix C.
9—Attach the Power Cord
1. Check that the power switch is off. |
Power Cord |
2.Plug one end of the power cord into the receptacle
at the back of the printer.
3.Plug the other end into the wall outlet.
Power Cord
Receptacle
1-13
 Loading...